Sony TDM-IP50 Bedienungsanleitung
- Kategorie
- Docking-Lautsprecher
- Typ
- Bedienungsanleitung

masterpage:Left
filename C:\00COV-TDMiP50CE7\010BCO.fm
model name [TDM-iP50]
[3-877-712-12(1)]
Sony Corporation Printed in Malaysia
* 3 8 7 7 7 1 2 1 2 *
(1)
filename C:\00COV-TDMiP50CE7\010COV.fm
masterpage:Right
©2008 Sony Corporation
GB
model name [TDM-iP50]
[3-877-712-12(1)]
FR
ES
DE
NL
IT
SE
PL
DK
PT
FI
3-877-712-12(1)
DIGITAL MEDIA PORT
Adapter
Operating Instructions ________
Mode d’emploi _______________
Manual de instrucciones ________
Bedienungsanleitung _________
Gebruiksaanwijzing ___________
Istruzioni per l’uso ____________
Bruksanvisning _______________
Instrukcja obsługi_____________
Brugsanvisning ______________
Käyttöohjeet _________________
Instruções de operação
________
TDM-iP50

2
GB
Do not install the appliance in a
confined space, such as a bookcase or
built-in cabinet.
The nameplate is located on the bottom
exterior.
Install this system so that the power
cord can be unplugged from the wall
socket immediately in the event of
trouble.
The unit is not disconnected from the
AC power source (mains) as long as the
connected AV system is connected to
the wall outlet.
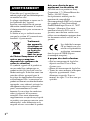
Disposal of Old
Electrical &
Electronic
Equipment
(Applicable in
the European
Union and
other European countries with
separate collection systems)
This symbol on the product or on its
packaging indicates that this product
shall not be treated as household waste.
Instead it shall be handed over to the
applicable collection point for the
recycling of electrical and electronic
equipment. By ensuring this product is
disposed of correctly, you will help
prevent potential negative
consequences for the environment and
human health, which could otherwise
be caused by inappropriate waste
handling of this product. The recycling
of materials will help to conserve
natural resources. For more detailed
information about recycling of this
product, please contact your local Civic
Office, your household waste disposal
service or the shop where you
purchased the product.
Notice for the customer in the
countries applying EU
Directives
The manufacturer of this product is
Sony Corporation, 1-7-1 Konan
Minato-ku Tokyo, 108-0075 Japan.
The Authorized Representative for
EMC and product safety is Sony
Deutschland GmbH, Hedelfinger
Strasse 61, 70327 Stuttgart, Germany.
For any service or guarantee matters
please refer to the addresses given in
separate service or guarantee
documents.
The validity of the CE
marking is restricted to
only those countries
where it is legally
enforced, mainly in the countries EEA
(European Economic Area).
On copyrights
• iPod is a trademark of Apple Inc.,
registered in the U.S. and other
countries.
• iPhone is a trademark of Apple Inc.
• All other trademarks and registered
trademarks are of their respective
holders. In this manual, ™ and ®
marks are not specified.
WARNING

3
GB
GB
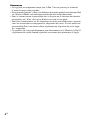
Notes
• This unit is designed for iPod only. You can not connect any other portable audio
players.
• In these Operating Instructions, “iPod” is used as a general reference for the iPod
functions on the iPod and iPhone, unless otherwise specified by the text or illustrations.
• Sony cannot accept responsibility in the event that data recorded to iPod is lost or
damaged when using an iPod connected to this unit.
• For details on supplied iPod Dock Adapters, refer to the instructions supplied with
the Dock Adapters. When you use other iPod models, a compatible Dock Adapter
from Apple Inc. will need to be purchased separately.
• This product has been designed specifically to work with iPhone and iPod and has
been certified to meet Apple performance standards.
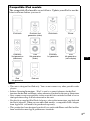
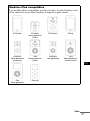
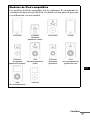
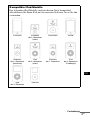
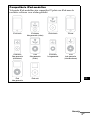
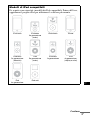
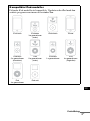
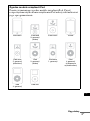
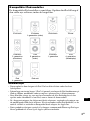
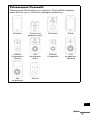
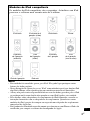
Compatible iPod models
The compatible iPod models are as follows. Update your iPod to use the
latest software before you use it.
iPod touch iPod nano 3rd
generation (video)
iPod classic iPhone
iPod nano
2nd generation
(aluminum)
iPod
5th generation
(video)
iPod nano
1st generation
iPod
4th generation
(color display)
iPod
4th generation
iPod mini

4
GB
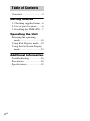
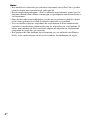
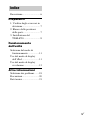
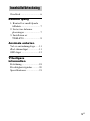
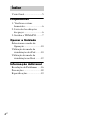
Overview...............................5
Getting Started
1: Checking supplied items...6
2: List of parts locations........6
3: Installing the TDM-iP50...7
Operating the Unit
Selecting the operating
mode.................................10
Using iPod Display mode....10
Using the On Screen Display
mode.................................12
Additional Information
Troubleshooting ..................16
Precautions ..........................18
Specifications......................19
Table of Contents

5
GB
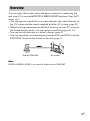
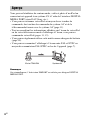
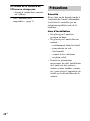
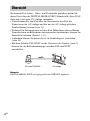
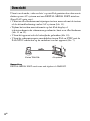
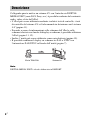
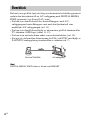
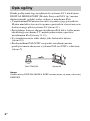
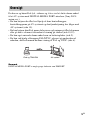
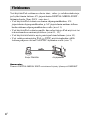
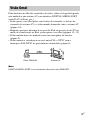
You can enjoy iPod audio, video and photo contents by connecting this
unit to an AV system with DIGITAL MEDIA PORT interface (Sony DAV
series, etc.).
• You can operate your iPod by its control buttons, the control buttons of
the AV system and the remote supplied with the AV system (page 10).
• While browsing information on the iPod screen or on your TV screen in
On Screen Display mode, you can operate your iPod (pages 10, 12).
• You can also use this unit as a battery charger (page 9).
• You can switch the on screen display between PAL and NTSC with the
PAL/NTSC switch on the bottom of the unit (page 6).
Note
DIGITAL MEDIA PORT is occasionally abbreviated as DMPORT.
Overview
iPod and TDM-iP50 AV system

6
GB
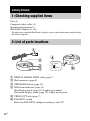
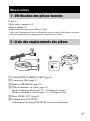
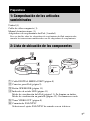
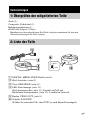
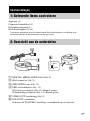
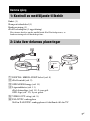
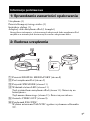
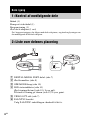
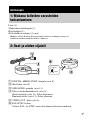
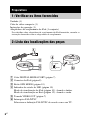
Unit (1)
Composite video cable (1)
Operating Instructions (1)
iPod Dock Adapters (1 set)
For details on supplied iPod Dock Adapters, refer to the instructions supplied with
the Dock Adapters.
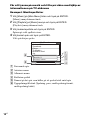
1 DIGITAL MEDIA PORT cable (page 7)
2 iPod connector (page 8)
3 OPR MODE button (page 10)
4 LED status indicator (page 10)
iPod Display mode (page 10): Lights up in amber.
On Screen Display mode (page 12): Lights up in green.
5 VIDEO OUT jack (page 7)
6 PAL/NTSC switch
Select the PAL/NTSC setting according to your TV.
Getting Started
1: Checking supplied items
2: List of parts locations
PA L
NTSC

7
GB
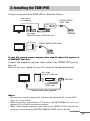
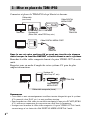
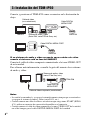
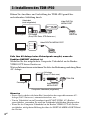
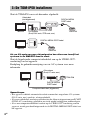
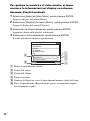
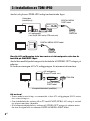
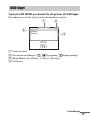
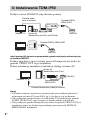
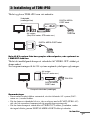
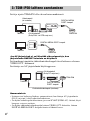
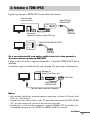
Connect and position the TDM-iP50 as illustrated below.
If your AV system cannot output video signals when the system is
in DMPORT function
Connect the supplied composite video cable to the VIDEO OUT jack of
this unit.
Refer to the user’s guide of your AV system for further information.
Notes
• This unit turns on/off automatically whenever the connected AV system (DAV
series, etc.) turns on/off.
• When connecting a video cable to a TV that has a SCART (EURO AV) jack, use a
commercially available conversion connector.
• When connecting the composite video cable to the VIDEO OUT jack of the unit,
no image is output from the DIGITAL MEDIA PORT cable of the unit.
3: Installing the TDM-iP50
DMPORT
Video cable
(not supplied)
DIGITAL MEDIA
PORT cable
TV AV system
(Sony DAV series, STR series, etc.)
TDM-iP50
DMPORT
DIGITAL MEDIA PORT cable
TV
TDM-iP50
Composite video cable (supplied)
DIGITAL MEDIA
PORT cable
AV system
(Sony HT series, etc.)
TV
TDM-iP50
continued

8
GB
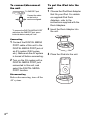
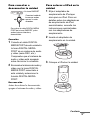
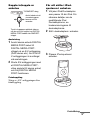
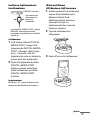
To connect/disconnect
the unit
Connecting
1 Connect the DIGITAL MEDIA
PORT cable of this unit to the
DIGITAL MEDIA PORT jack of
an AV system (DAV series,
etc.). Make sure the AV system
is turned off before connecting.
2 Turn on the AV system with a
DIGITAL MEDIA PORT jack
connected to this unit, and
select the DIGITAL MEDIA
PORT function.
Disconnecting
Before disconnecting, turn off the
AV system.
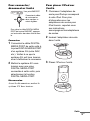
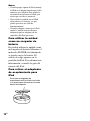
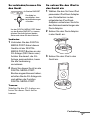
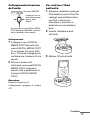
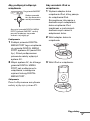
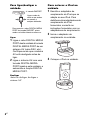
To put the iPod into the
unit
1 Choose the iPod Dock Adapter
that fits your iPod. For details
on supplied iPod Dock
Adapters, refer to the
instructions supplied with the
Dock Adapters.
2 Insert the Dock Adapter into
the unit.
3 Place the iPod into the unit.
DMPORT
To DMPORT jack
Connect the cable
so that both f
marks are aligned.
To remove the DIGITAL MEDIA PORT
cable from the DMPORT jack, press
both side buttons and pull it out.

9
GB
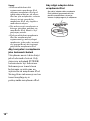
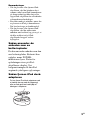
Notes
• When placing or removing the iPod,
handle the iPod in the same angle as
that of the iPod connector on this unit
and do not twist or sway the iPod to
prevent connector damage.
• Do not carry the unit with an iPod set
on the connector. Doing so may cause
a malfunction.
• When placing or removing the iPod,
brace the unit with one hand and take
care not to press the controls of the
iPod by mistake.
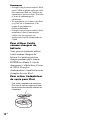
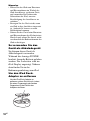
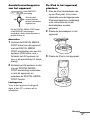
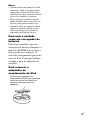
To use the unit as a
battery charger
You can use the unit as a battery
charger. While the POWER
indicator is lit, the battery can be
charged. The charging status
appears in the iPod display. For
details, see the user’s guide of your
iPod.
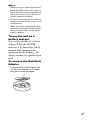
To remove the iPod Dock
Adapter
To remove the iPod Dock Adapter, pull
it up with your fingernail or a flat object
using the slot inside the adapter.

10
GB
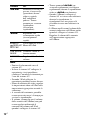
You can operate your iPod by the
AV system with DIGITAL
MEDIA PORT interface (Sony
DAV series, etc.).
Switch the operating mode
by pressing OPR MODE on
the unit.
x iPod Display mode
You can operate the unit by the
connected iPod’s buttons, the
connected AV system’s buttons or
its remote.
x On Screen Display mode
You can operate the unit by the
connected AV system’s buttons or
its remote while displaying the
iPod information menu screen on
the TV.
Note
The mode cannot be switched, except
for the DIGITAL MEDIA PORT
function.
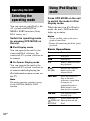
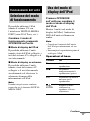
Press OPR MODE on the unit
to switch the mode to iPod
Display mode.
While the unit is in iPod Display
mode, the unit’s LED indicator
lights up in amber.
Notes
• To use an iPod, refer to the user’s
guide of your iPod.
• Before disconnecting the iPod, pause
playback.
Basic Operations
Operating the Unit
Selecting the
operating mode
Using iPod Display
mode
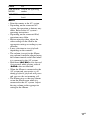
Press To
N Start play.
X/x Pause play.
X/x Select a menu or track
for playback.
c//
ENTER
Execute the selected
menu or play the
selected track.
./> Press and release to
skip to the next
(previous) song/video
or chapter of
audiobook/podcast.
Hold down to fast-
forward (fast-rewind).
m/M Fast-forward (fast-
rewind) play.
C/MENU/
DISPLAY/
RETURN
Works much like the
Menu button on the
iPod.

11
GB
Notes
• Point the remote at the AV system.
• Depending on the connected AV
system, the operation or buttons may
differ. Refer to the AV system’s
operating instructions.
• Depending on the connected iPod,
operations may differ.
• Before enjoying video, adjust the
video settings on the iPod to the
appropriate settings according to your
situation.
• It may take time to start playback
depending on the contents.
• The volume (except for the iPhone
ring volume) cannot be adjusted using
the volume control on the iPod when
it is connected to the AV system.
• Hold down ./> to fast-forward
(fast-rewind) while playing video if
m/M does not function.
• When the iPhone is connected to the
AV system and you receive a call
during playback, playback will pause
and you can take an incoming call.
• The iPhone rings as the ring volume
set on the iPhone even when it is
connected to the AV system. Adjust
the ring volume to the appropriate
setting on the iPhone.
OPR MODE/
MODE
Switch the operating
modes.
VOLUME
+/–
Adjust the volume
level.
Press To

12
GB
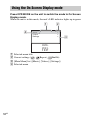
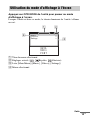
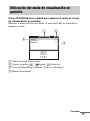
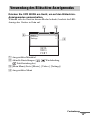
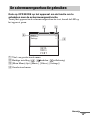
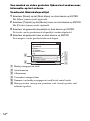
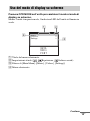
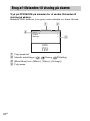
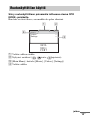
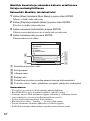
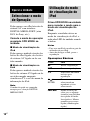
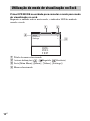
Press OPR MODE on the unit to switch the mode to On Screen
Display mode.
While the unit is in this mode, the unit’s LED indicator lights up in green.
1 Selected menu title
2 Current settings ( , Repeat, Shuffle)
3 [Main Menu] list ([Music], [Videos], [Settings])
4 Selected menu
Using the On Screen Display mode
Main Menu
Music
Videos
Settings
>
>
>
DIGITAL
MEDIA
P O R T
2
3
4
1

13
GB
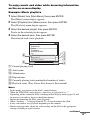
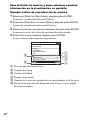
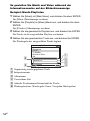
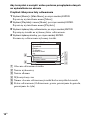
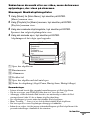
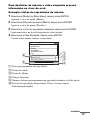
To enjoy music and video while browsing information
on the on screen display
Example: Music playlists
1 Select [Music] from [Main Menu], then press ENTER.
The [Music] menu display appears.
2 Select [Playlists] from [Music] menu, then press ENTER.
The [Playlists] menu display appears.
3 Select the desired playlist, then press ENTER.
Tracks in the selected playlist appear.
4 Select the desired track, then press ENTER.
The selected track starts playback.
1 Current playing track
2 Artist name
3 Album name
4 Elapsed time
5 Currently playing track number/total number of tracks
6 Playback status (Play, Pause, Fast-forward, Fast-rewind)
Notes
• In this mode, you cannot use the iPod’s control buttons.
• When the TDM-iP50 cannot display a character, it is displayed as “*”.
• Depending on the connected iPod, switching to iPod Display mode (page 10) will
be necessary in order to display video/photo images.
• Before disconnecting the iPod, pause playback.
• While “Loading…” is displayed on the TV, do not disconnect the iPod.
• It may take time to start playback depending on the contents.
• Before enjoying video, adjust the video settings on the iPod to the appropriate
settings according to your situation.
My Favorites
Jack and Paul
Somebody
Colors
To Marble
Woman in Red
Joy
Colors
Jennifer G
My Best Album
1/ 16 1: 30
2
3
4
5
6
1
continued

14
GB
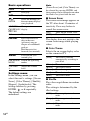
Basic operations
Settings menu
In the Settings menu, you can
select this unit’s settings: [Screen
Saver], [Color Theme], [Shuffle],
[Repeat], [Audiobooks]. The
setting switches by pressing
ENTER, , or c repeatedly.
The default settings are
underlined.
Note
[Screen Saver] and [Color Theme] can
be selected by pressing ENTER, and
their settings can be changed even when
the iPod is not placed into the unit.
x Screen Saver
The screen saver image appears on
the TV after about 15 minutes of
inactivity. Press any button to
cancel the screen saver.
The display does not switch to the
screen saver image while playing
video.
x Color Theme
Selects the on screen display color
on the connected TV.
x Shuffle
Plays the songs/albums in random
order.
The setting is determined by the
iPod settings.
Press To
N Start play.
X/x Pause play.
c//
ENTER
Select the menu/go to
the next menu display/
start playback.
C/MENU/
DISPLAY/
RETURN
Go to previous menu
display.
X/x Move cursor.
./> Press and release to
skip to the next
(previous) song or
chapter of audiobook/
podcast.
Hold down to fast-
forward (fast-rewind).
m/M Fast-forward (fast-
rewind) play.
OPR MODE/
MODE
Switch the operating
modes.
VOLUME
+/–
Adjust the volume
level.
[ON] Turns on the screen saver.
[OFF] Turns off the screen saver.
[Auto] The color is selected
automatically according to
your iPod.
[White] The color is white.
[Black] The color is black.
[Green] The color is green.
[Red] The color is red.
[Blue]
The color is blue.
[OFF] Does not play in random
order.
[Songs] Plays songs in random
order.
[Albums] Plays albums in random
order.

15
GB
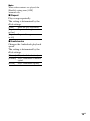
Note
When video contents are played, the
[Shuffle] setting turns [OFF]
automatically.
x Repeat
Plays songs repeatedly.
The setting is determined by the
iPod settings.
x Audiobooks
Changes the Audiobook playback
speed.
The setting is determined by the
iPod settings.
[OFF] Does not play repeatedly.
[Repeat
to One]
Repeat one song.
[Repeat
to All]
Repeat all songs.
[Slower] Plays Audiobook slowly.
[Normal] Plays Audiobook at normal
speed.
[Faster] Plays Audiobook rapidly.

16
GB
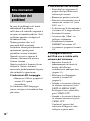
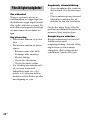
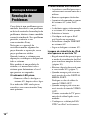
Should you encounter a problem
with your unit, find your problem
in the troubleshooting checklist
below and take the indicated
corrective action. If the problem
persists, contact your Sony dealer.
Note that if service personnel
changes some parts during repair,
these parts may be retained.
When bringing the system in for
repairs, be sure to bring in the
entire system.
This product is a system product,
and the entire system is needed to
determine the location requiring
repair.
The LED indicator flashes.
• Remove the iPod, and turn the
AV system off, then on again.
If the LED indicator still flashes,
consult your nearest Sony dealer.
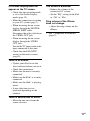
The remote does not function.
• Update your iPod to use the
latest software before you use it.
• Remove any obstacles.
• Point the remote at the AV
system (DAV series, etc.)’s
sensor.
• The distance between the
remote and the AV system is too
far.
• Replace the battery.
• Make sure the iPod* is securely
connected.
• Select the DMPORT function
on the AV system.
• Turn on and off the AV system.
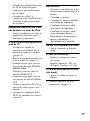
Video/photo image from the
iPod does not appear on the TV
screen.
• Set the operating mode to iPod
Display mode to display photo
images (page 10).
• Make the connection according
to your AV system (page 7).
• When browsing the on screen
display through the DIGITAL
MEDIA PORT cable:
Disconnect the video cable from
the VIDEO OUT jack.
• When browsing the on screen
display through the VIDEO
OUT jack:
Switch the TV input to the video
input connected to this unit.
• Check that the PAL/NTSC
setting on the iPod* is correct.
• Check that the TV output setting
on the iPod is on (Refer to the
user’s guide of your iPod).
• Check that the iPod* is
compatible with video output
(Refer to the user’s guide of
your iPod).
Video/photo image from the
iPod does not appear on the
iPod display.
• Adjust the video/photo image
output settings to the
appropriate settings.
Additional Information
Troubleshooting

17
GB
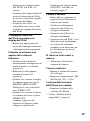
On screen display does not
appear on the TV screen.
• Check that the operating mode
is set to On Screen Display
mode (page 12).
• Make the connection according
to your AV system (page 7).
• When browsing the on screen
display through the DIGITAL
MEDIA PORT cable:
Disconnect the video cable from
the VIDEO OUT jack.
• When browsing the on screen
display through the VIDEO
OUT jack:
Switch the TV input to the video
input connected to this unit.
• Check that the PAL/NTSC
setting on the unit is correct
(page 6).
There is no sound.
• Update your iPod to use the
latest software before you use it.
• Check the connections.
• Make sure the unit is securely
connected.
• Make sure the iPod* is securely
connected.
• Make sure the iPod* is playing
music.
• It may take time to start
playback depending on the
contents.
There is severe hum or noise.
• Move the unit away from the
source of noise.
The sound is distorted.
• Reduce the volume of the
connected AV system.
• Set the “EQ” setting of the iPod
to “Off” or “Flat”.
Ring volume of the iPhone
does not change.
• Adjust the ring volume on the
iPhone.
* See “Compatible iPod models”
(page 3).

18
GB
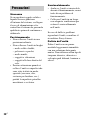
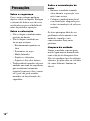
On safety
Should any solid object or liquid
fall into the system, unplug the
system and have it checked by
qualified personnel before
operating it any further.
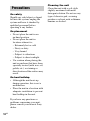
On placement
• Do not place the unit in an
inclined position.
• Do not place the unit in
locations where it is;
– Extremely hot or cold
– Dusty or dirty
– Very humid
– Subject to vibrations
– Subject to direct sunlight.
• Use caution when placing the
unit on surfaces that have been
specially treated (with wax, oil,
polish, etc.) as staining or
discoloration of the surface may
result.
On heat buildup
• Although the unit heats up
during operation, this is not a
malfunction.
• Place the unit in a location with
adequate ventilation to prevent
heat buildup in the unit.
If you have any questions or
problems concerning your unit,
please consult your nearest Sony
dealer.
Cleaning the unit
Clean the unit with a soft cloth
slightly moistened with mild
detergent solution. Do not use any
type of abrasive pad, scouring
powder or solvent such as thinner,
benzine or alcohol.
Precautions

19
GB
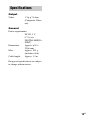
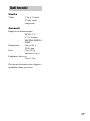
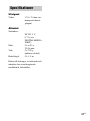
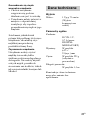
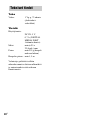
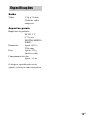
Output
Video: 1 Vp-p 75 ohm
(Composite Video
out)
General
Power requirements:
DC IN: 5 V,
0.7 A (via
DIGITAL MEDIA
PORT)
Dimensions: Approx. φ 95 ×
23(h) mm
Mass: Approx. 225 g
(includes cable)
Cable length: Approx. 1.5 m
Design and specifications are subject
to change without notice.
Specifications

2
FR
N’installez pas l’appareil dans un
endroit exigu tel qu’une bibliothèque ou
un meuble encastré.
La plaque signalétique se trouve sur la
face inférieure de l’appareil.
Installez cette chaîne afin de pouvoir
débrancher immédiatement le cordon
d’alimentation de la prise secteur en cas
de problème.
La chaîne n’est pas isolée du secteur
tant que le système AV connecté reste
branché à la prise murale.
Traitement
des appareils
électriques et
électroniques
en fin de vie
(Applicable
dans les pays
de l’Union Européenne et aux
autres pays européens
disposant de systèmes de
collecte sélective)
Ce symbole, apposé sur le produit ou
sur son emballage, indique que ce
produit ne doit pas être traité avec les
déchets ménagers. Il doit être remis à un
point de collecte approprié pour le
recyclage des équipements électriques
et électroniques. En s’assurant que ce
produit est bien mis au rebut de manière
appropriée, vous aiderez à prévenir les
conséquences négatives potentielles
pour l’environnement et la santé
humaine. Le recyclage des matériaux
aidera à préserver les ressources
naturelles. Pour toute information
supplémentaire au sujet du recyclage de
ce produit, vous pouvez contacter votre
municipalité, votre déchetterie ou le
magasin où vous avez acheté le produit.
Avis aux clients de pays
appliquant les directives UE
Le fabricant de ce produit est Sony
Corporation, 1-7-1 Konan Minato-ku
Tokyo, 108-0075 Japon.
Le représentant autorisé pour les
questions de compatibilité
électromagnétique (EMC) et la sécurité
des produits est Sony Deutschland
GmbH, Hedelfinger Strasse 61, 70327
Stuttgart, Allemagne. Pour toute
question relative au SAV ou à la
garantie, merci de bien vouloir vous
référer aux coordonnées contenues dans
les documents relatifs au SAV ou la
garantie.
La validité de la marque
CE est limitée aux pays
où elle est légalement en
application, notamment
dans les pays de l’EEE (Espace
économique européen).
A propos des droits d’auteur
• iPod est une marque de Apple Inc.,
déposée aux Etats-Unis et dans
d’autres pays.
• iPhone est une marque de Apple Inc.
• Toutes les autres marques et marques
déposées appartiennent à leurs
détenteurs respectifs. Dans ce
manuel, les sigles ™ et ® ne sont pas
spécifiés.
AVERTISSEMENT
Seite laden ...
Seite laden ...
Seite laden ...
Seite laden ...
Seite laden ...
Seite laden ...
Seite laden ...
Seite laden ...
Seite laden ...
Seite laden ...
Seite laden ...
Seite laden ...
Seite laden ...
Seite laden ...
Seite laden ...
Seite laden ...
Seite laden ...
Seite laden ...
Seite laden ...
Seite laden ...
Seite laden ...
Seite laden ...
Seite laden ...
Seite laden ...
Seite laden ...
Seite laden ...
Seite laden ...
Seite laden ...
Seite laden ...
Seite laden ...
Seite laden ...
Seite laden ...
Seite laden ...
Seite laden ...
Seite laden ...
Seite laden ...
Seite laden ...
Seite laden ...
Seite laden ...
Seite laden ...
Seite laden ...
Seite laden ...
Seite laden ...
Seite laden ...
Seite laden ...
Seite laden ...
Seite laden ...
Seite laden ...
Seite laden ...
Seite laden ...
Seite laden ...
Seite laden ...
Seite laden ...
Seite laden ...
Seite laden ...
Seite laden ...
Seite laden ...
Seite laden ...
Seite laden ...
Seite laden ...
Seite laden ...
Seite laden ...
Seite laden ...
Seite laden ...
Seite laden ...
Seite laden ...
Seite laden ...
Seite laden ...
Seite laden ...
Seite laden ...
Seite laden ...
Seite laden ...
Seite laden ...
Seite laden ...
Seite laden ...
Seite laden ...
Seite laden ...
Seite laden ...
Seite laden ...
Seite laden ...
Seite laden ...
Seite laden ...
Seite laden ...
Seite laden ...
Seite laden ...
Seite laden ...
Seite laden ...
Seite laden ...
Seite laden ...
Seite laden ...
Seite laden ...
Seite laden ...
Seite laden ...
Seite laden ...
Seite laden ...
Seite laden ...
Seite laden ...
Seite laden ...
Seite laden ...
Seite laden ...
Seite laden ...
Seite laden ...
Seite laden ...
Seite laden ...
Seite laden ...
Seite laden ...
Seite laden ...
Seite laden ...
Seite laden ...
Seite laden ...
Seite laden ...
Seite laden ...
Seite laden ...
Seite laden ...
Seite laden ...
Seite laden ...
Seite laden ...
Seite laden ...
Seite laden ...
Seite laden ...
Seite laden ...
Seite laden ...
Seite laden ...
Seite laden ...
Seite laden ...
Seite laden ...
Seite laden ...
Seite laden ...
Seite laden ...
Seite laden ...
Seite laden ...
Seite laden ...
Seite laden ...
Seite laden ...
Seite laden ...
Seite laden ...
Seite laden ...
Seite laden ...
Seite laden ...
Seite laden ...
Seite laden ...
Seite laden ...
Seite laden ...
Seite laden ...
Seite laden ...
Seite laden ...
Seite laden ...
Seite laden ...
Seite laden ...
Seite laden ...
Seite laden ...
Seite laden ...
Seite laden ...
Seite laden ...
Seite laden ...
Seite laden ...
Seite laden ...
Seite laden ...
Seite laden ...
Seite laden ...
Seite laden ...
Seite laden ...
Seite laden ...
Seite laden ...
Seite laden ...
Seite laden ...
Seite laden ...
Seite laden ...
Seite laden ...
Seite laden ...
Seite laden ...
Seite laden ...
Seite laden ...
Seite laden ...
Seite laden ...
Seite laden ...
Seite laden ...
Seite laden ...
Seite laden ...
Seite laden ...
Seite laden ...
Seite laden ...
Seite laden ...
Seite laden ...
Seite laden ...
Seite laden ...
Seite laden ...
Seite laden ...
Seite laden ...
Seite laden ...
Seite laden ...
Seite laden ...
Seite laden ...
Seite laden ...
Seite laden ...
-
 1
1
-
 2
2
-
 3
3
-
 4
4
-
 5
5
-
 6
6
-
 7
7
-
 8
8
-
 9
9
-
 10
10
-
 11
11
-
 12
12
-
 13
13
-
 14
14
-
 15
15
-
 16
16
-
 17
17
-
 18
18
-
 19
19
-
 20
20
-
 21
21
-
 22
22
-
 23
23
-
 24
24
-
 25
25
-
 26
26
-
 27
27
-
 28
28
-
 29
29
-
 30
30
-
 31
31
-
 32
32
-
 33
33
-
 34
34
-
 35
35
-
 36
36
-
 37
37
-
 38
38
-
 39
39
-
 40
40
-
 41
41
-
 42
42
-
 43
43
-
 44
44
-
 45
45
-
 46
46
-
 47
47
-
 48
48
-
 49
49
-
 50
50
-
 51
51
-
 52
52
-
 53
53
-
 54
54
-
 55
55
-
 56
56
-
 57
57
-
 58
58
-
 59
59
-
 60
60
-
 61
61
-
 62
62
-
 63
63
-
 64
64
-
 65
65
-
 66
66
-
 67
67
-
 68
68
-
 69
69
-
 70
70
-
 71
71
-
 72
72
-
 73
73
-
 74
74
-
 75
75
-
 76
76
-
 77
77
-
 78
78
-
 79
79
-
 80
80
-
 81
81
-
 82
82
-
 83
83
-
 84
84
-
 85
85
-
 86
86
-
 87
87
-
 88
88
-
 89
89
-
 90
90
-
 91
91
-
 92
92
-
 93
93
-
 94
94
-
 95
95
-
 96
96
-
 97
97
-
 98
98
-
 99
99
-
 100
100
-
 101
101
-
 102
102
-
 103
103
-
 104
104
-
 105
105
-
 106
106
-
 107
107
-
 108
108
-
 109
109
-
 110
110
-
 111
111
-
 112
112
-
 113
113
-
 114
114
-
 115
115
-
 116
116
-
 117
117
-
 118
118
-
 119
119
-
 120
120
-
 121
121
-
 122
122
-
 123
123
-
 124
124
-
 125
125
-
 126
126
-
 127
127
-
 128
128
-
 129
129
-
 130
130
-
 131
131
-
 132
132
-
 133
133
-
 134
134
-
 135
135
-
 136
136
-
 137
137
-
 138
138
-
 139
139
-
 140
140
-
 141
141
-
 142
142
-
 143
143
-
 144
144
-
 145
145
-
 146
146
-
 147
147
-
 148
148
-
 149
149
-
 150
150
-
 151
151
-
 152
152
-
 153
153
-
 154
154
-
 155
155
-
 156
156
-
 157
157
-
 158
158
-
 159
159
-
 160
160
-
 161
161
-
 162
162
-
 163
163
-
 164
164
-
 165
165
-
 166
166
-
 167
167
-
 168
168
-
 169
169
-
 170
170
-
 171
171
-
 172
172
-
 173
173
-
 174
174
-
 175
175
-
 176
176
-
 177
177
-
 178
178
-
 179
179
-
 180
180
-
 181
181
-
 182
182
-
 183
183
-
 184
184
-
 185
185
-
 186
186
-
 187
187
-
 188
188
-
 189
189
-
 190
190
-
 191
191
-
 192
192
-
 193
193
-
 194
194
-
 195
195
-
 196
196
-
 197
197
-
 198
198
-
 199
199
-
 200
200
-
 201
201
-
 202
202
-
 203
203
-
 204
204
-
 205
205
-
 206
206
-
 207
207
-
 208
208
-
 209
209
-
 210
210
-
 211
211
-
 212
212
-
 213
213
-
 214
214
-
 215
215


Sony TDM-IP50 Bedienungsanleitung
- Kategorie
- Docking-Lautsprecher
- Typ
- Bedienungsanleitung
in anderen Sprachen
- English: Sony TDM-IP50 Owner's manual
- français: Sony TDM-IP50 Le manuel du propriétaire
- español: Sony TDM-IP50 El manual del propietario
- italiano: Sony TDM-IP50 Manuale del proprietario
- Nederlands: Sony TDM-IP50 de handleiding
- português: Sony TDM-IP50 Manual do proprietário
- dansk: Sony TDM-IP50 Brugervejledning
- polski: Sony TDM-IP50 Instrukcja obsługi
- svenska: Sony TDM-IP50 Bruksanvisning
- suomi: Sony TDM-IP50 Omistajan opas
Verwandte Papiere
-
Sony TDM-iP10 Bedienungsanleitung
-
Sony RDP-X30iP Bedienungsanleitung
-
Sony TDM-iP1 Benutzerhandbuch
-
Sony SRS-GU10iP Bedienungsanleitung
-
Sony RDP-M5iP Bedienungsanleitung
-
Sony RDP-M7iPN Bedienungsanleitung
-
-
Sony RDP-M15IP Bedienungsanleitung
-
Sony STR-DA5400ES Bedienungsanleitung
-
Sonstige Unterlagen
-
Apple ZM034-4761-A Benutzerhandbuch
-
-
Alpine TDM-7554RB Bedienungsanleitung
-
-
MARBLE RACETRAX 869027 Benutzerhandbuch
-
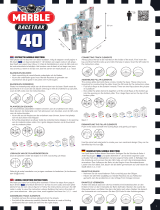 bol Marble Racetrax Circuit Set Knikkerbaan Benutzerhandbuch
-
-
MARBLE RACETRAX Grand Prix Ball Track Bedienungsanleitung
