Sanus VisionMount MF202 Benutzerhandbuch
- Kategorie
- Spielzeuge
- Typ
- Benutzerhandbuch
Dieses Handbuch eignet sich auch für

Sanus Systems
2221 Hwy 36 West
Saint Paul, MN 55113 USA
Customer Service
Americas: 800-359-5520 • 651-484-7988 • [email protected]
Europe, Middle East, and Africa: + 31 40 2324700 • europe.sanus@milestone.com
Asia Pacifi c: 86 755 8996 9226 • [email protected]om
sanus.com
©2010 Milestone AV Technologies, a Duchossois Group Company.
All rights reserved. Sanus is a division of Milestone.
All other brand names or marks are used for identifi cation purposes and are trademarks of their respective owners.
MF215
(6901-002090 <00>)
Wood Stud
Concrete
5.5mm
(7/32 in
.)
10mm
(3/8 in.
)
13mm
(1/2 in.)

6901-002090 <00>
2
?
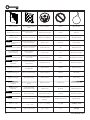
Wood stud walls
Concrete/Concrete Block
Walls
Choose an Option Do Not Alternate View
Structure de murs en bois
Murs en béton coulé ou en
blocs de béton
Sélectionnez une option Interdit Autre vue
Holzbalkenwände Beton-/Betonsteinwände Wählen Sie eine Option Tun Sie Folgendes nicht Alternative Ansicht
Paredes con montantes de
madera
Paredes de hormigón o de
bloques de hormigón
Elija una opción Prohibido Vista ampliada
Paredes de pino de madeira
Paredes de concreto/Paredes
de bloco de concreto
Escolha uma opção Não Exibição alternada
Muren met houten
balkenconstructie
Muren van beton/
betonblokken
Kies een optie Niet Alternatieve weergave
Pareti con montanti in legno
Pareti in calcestruzzo/blocchi
di calcestruzzo
Scegliere un'opzione Divieto Visualizzazione alternativa
Τοίχοι ε ξύλινου
ορθοστάτε
Τοίχοι από σκυρόδεα/
τσιεντόλιθου
Επιλέξτε ια επιλογή Μην Εναλλακτική προβολή
Vegger med trestendere
Betongvegger/vegger av
betongblokker
Velg et alternativ Forbudt Alternativ visning
Vægge med trædyveler Beton / betonblokvægge Vælg en mulighed Advarsel Skift visning
Väggar med träreglar Betong/Betongvägg Välj ett alternativ Gör inte Annan vinkel
/
Drewniane ściany
szkieletowe
Ściany z betonu lub
pustaków betonowych
Wybrać opcję Nie należy: Widok z innej strony
Zdi sdřevěnými výztuhami Zdi z betonu/panelů Vyberte jednu možnost Nedělat Alternativní zobrazení
Ahşap Pro lli Duvarlar Beton/Beton Blok Duvarlar
Seçeneklerden Birini
Belirleyin
Yapılmaması Gerekenler Diğer Görünüm
木製スタッド壁
コンクリート/コンクリー
トブロック壁
オプションの選択 禁止事項
木墙柱墙壁 混凝土/混凝土砌块墙 选择一个选项 请勿
交换视图
English
Français
Deutsch
Español
Português
Nederlands
Italiano
Ελληνικά
Norsk
Dansk
Svenska
Русский
polski
Česky
Türkçe
日本語
中文

6901-002090 <00>
3
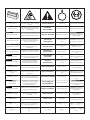
Tools required
WARNING: This product contains
small items that could be a choking
hazard.
CAUTION / WARNING This End Up Heavy! Assistance Required.
Outils nécessaires
Ce produit contient de petites pièces
qui peuvent représenter un risque
d’étou ement.
ATTENTION/
AVERTISSEMENT!
Ce côté vers le haut
TRÈS LOURD ! Cette étape
requiert deux personnes.
Benötigte Werkzeuge
Dieses Produkt enthält kleine Teile, die
zum Erstickungstod führen können.
VORSICHT / WARNUNG Dieses Ende nach oben
VORSICHT, SCHWER! Bei
diesem Schritt werden Sie
Hilfe benötigen.
Herramientas necesarias
Este producto contiene piezas
pequeñas que, si fuesen tragadas,
podrían producir as xia.
PRECAUCIÓN
/¡ADVERTENCIA!
Este extremo hacia
arriba
¡PESADO! Necesitará ayuda
para realizar esta operación.
Ferramentas necessárias
Este produto contém itens pequenos
que podem oferecer risco de
sufocamento.
ATENÇÃO / AVISO!
Esta extremidade para
cima
PESADO! Necessitará de
ajuda nesta etapa.
Benodigd gereedschap
Dit product bevat kleine onderdelen
die stikkingsgevaar kunnen opleveren.
VOORZICHTIG/
WAARSCHUWING
Deze zijde boven
ZWAAR! Voor het uitvoeren
van deze stap is assistentie
vereist.
Strumenti richiesti
Questo prodotto comprende elementi
di piccole dimensioni che potrebbero
causare il so ocamento.
PRECAUZIONE/
AVVERTENZA
Alto
PESANTE! Per questa
operazione, si avrà bisogno
di aiuto.
Απαιτούενα εργαλεία
Το προϊόν αυτό περιλαβάνει
ικρά αντικείενα που πορεί να
αποτελέσουν κίνδυνο πνιγού.
ΠΡΟΣΟΧΗ/
ΠΡΟΕΙΔΟΠΟΙΗΣΗ
Με αυτό το άκρο προ
τα επάνω
ΒΑΡΥ! Θα χρειαστείτε
βοήθεια σ’ αυτό το βήα.
Nødvendig verktøy
Dette produktet inneholder små
elementer som kan utgjøre kvelefare.
FORSIKTIG/ADVARSEL Denne siden opp
TUNGT! Du vil trenge hjelp til
denne operasjonen.
Redskaber, der skal
bruges
Dette produkt indeholder små dele,
som kan forårsage kvælning, hvis de
bliver slugt.
FORSIGTIG/ADVARSEL
Denne ende skal være
opad
TUNGT! Du skal bruge hjælp,
når du udfører dette trin.
Verktyg som behövs
Den här produkten innehåller små
delar som kan utgöra kvävningsrisk.
FÖRSIKTIGHET/VARNING Denna sida upp
TUNGT! Du kommer att
behöva hjälp under det här
steget.
,
.
ПРЕДУПРЕЖДЕНИЕ/
ПРЕДУПРЕЖДЕНИЕ
!
.
Wymagane narzędzia
Produkt zawiera małe elementy, które
mogą grozić zakrztuszeniem.
UWAGA / OSTRZEŻENIE Tym końcem do góry
CIĘŻKIE! W tej czynności
potrzebna będzie pomoc
drugiej osoby.
Požadované nástroje
Tento výrobek obsahuje malé
součástky, které hrozí rizikem
zadušení.
POZOR / VAROVÁNÍ Tímto koncem vzhůru
TĚŽKÉ! K tomuto kroku
budete potřebovat
pomocníka.
Gereken Aletler
Bu ürün, boğulma tehlikesine neden
olabilecek küçük parçalar içermektedir.
DİKKAT / UYARI Bu Uç Yukarı
AĞIR MALZEME! Bu aşamada
yardıma ihtiyacınız vardır.
必要なツール
本製品には小さい部品が付属して
おり、窒息の危険性があります。
注意 / 警告 この面を上にします
重量あり!この操作は2人
で行ってください。
需要的工具
此产品包含可能带来窒息危险的小
组件。
小心 / 警告 此端向上
支架臂很重! 该步骤需要
协助。
English
Français
Deutsch
Español
Português
Nederlands
Italiano
Ελληνικά
Norsk
Dansk
Svenska
Русский
polski
Česky
Türkçe
日本語
中文

6901-002090 <00>
4
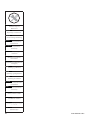
Troubleshooting and
Maintenance
Dépannage et maintenance
Fehlerbehebung und Wartung
Resolución de problemas y
mantenimiento
Solução de problemas e
manutenção
Probleemoplossing en
onderhoud
Risoluzione dei problemi e
manutenzione
Αντιετώπιση προβληάτων και
Συντήρηση
Feilsøking og vedlikehold
Fejl nding og Vedligeholdelse
Felsökning och underhåll
Rozwiązywanie problemów i
konserwacja
Řešení problémů a údržba
Sorun Giderme ve Bakım
トラブルシューティングとメ
ンテナンス
故障排除与维护
English
Français
Deutsch
Español
Português
Nederlands
Italiano
Ελληνικά
Norsk
Dansk
Svenska
Русский
polski
Česky
Türkçe
日本語
中文

6901-002090 <00>
5
English
IMPORTANT SAFETY INSTRUCTIONS – SAVE THESE INSTRUCTIONS – PLEASE
READ ENTIRE MANUAL BEFORE USING THIS PRODUCT
For best results, reference both the text and illustrations when using this
manual. Cut along the dashed lines to match your language with the
illustrations.
English Text Pages 6
Dansk
VIGTIGE SIKKERHEDSOPLYSNINGER – GEM DISSE OPLYSNINGER – LÆS
HELE DENNE VEJLEDNING IGENNEM FØR BRUG
For at opnå det bedste resultat, skal både tekst og illustrationer i denne
manual bruges. Klip langs den stiplede linje, så afsnittet med dit sprog
passer til illustrationerne.
Dansk tekst side
36
Français
INFORMATIONS IMPORTANTES CONCERNANT LA SÉCURITÉ – CONSERVEZ
CES INSTRUCTIONS – VEUILLEZ LIRE ATTENTIVEMENT LE MANUEL AVANT
D’UTILISER CE PRODUIT
Pour obtenir de meilleurs résultats, reportez-vous à la fois au texte et aux
illustrations lorsque vous consultez ce manuel. Couper le long de la ligne
pointillée pour faire correspondre les illustrations à votre langue de préférence.
Texte français page
20
Svenska
VIKTIGA SÄKERHETSANVISNINGAR SPARA DESSA ANVISNINGAR – LÄS
HELA HANDBOKEN INNAN DU ANVÄNDER DENNA PRODUKT
För bästa resultat, hänvisa till både text och bilder när du använder denna
bruksanvisning. Klipp längs de streckade linjerna för att matcha ditt språk
med bilderna.
Svensk text sida 38
Deutsch
WICHTIGE SICHERHEITSHINWEISE – BEWAHREN SIE DIESE HINWEISE
SORGFÄLTIG AUF – LESEN SIE VOR DEM GEBRAUCH DES PRODUKTS DAS
GESAMTE HANDBUCH
Die Montage ist am einfachsten, wenn Sie den Text und die Abbildungen
zusammen verwenden. Schneiden Sie daher den Text in Ihrer Sprache aus
(gestrichelte Linien), um ihn den Abbildungen gegenüberstellen zu können.
Deutscher Text Seiten
22
Русский
–
,
, .
, .
: .
40
Español
INSTRUCCIONES IMPORTANTES DE SEGURIDAD CONSERVE ESTAS
INSTRUCCIONES – LEA TODO EL MANUAL ANTES DE UTILIZAR ESTE
PRODUCTO
Para obtener mejores resultados, consulte el texto y las ilustraciones cuando
utilice este manual. Corte por las líneas punteadas para hacer coincidir su
idioma con las ilustraciones.
Español Páginas de texto
24
polski
WAŻNE INSTRUKCJE DOTYCZĄCE BEZPIECZEŃSTWA NIE WYRZUCAĆ –
PRZED UŻYTKIEM NALEŻY ZAPOZNAĆ SIĘ Z TREŚCIĄ CAŁEJ INSTRUKCJI
W celu uzyskania najlepszych rezultatów, korzystając z tej instrukcji,
należy zwrócić uwagę zarówno na tekst, jak i na ilustracje. Przeciąć wzdłuż
przerywanych linii w celu dopasowania języka do ilustracji.
Tekst w języku polskim na stronach
42
Português
INSTRUÇÕES DE SEGURANÇA IMPORTANTES GUARDE ESTAS
INSTRUÇÕES – LEIA O MANUAL INTEIRO ANTES DE USAR ESTE PRODUTO
Para obter melhores resultados, consulte o texto e as ilustrações ao usar
este manual. Recorte nas linhas tracejadas para combinar seu idioma com
as ilustrações.
Texto em português Páginas
26
Česky
WAŻNE INSTRUKCJE DOTYCZĄCE BEZPIECZEŃSTWA NIE WYRZUCAĆ.
PŘED POUŽITÍM TOHOTO VÝROBKU SI PROSÍM PŘEČTĚTE CELOU
PŘÍRUČKU – PŘED POUŽITÍM TOHOTO VÝROBKU SI PROSÍM PŘEČTĚTE
CELOU PŘÍRUČKU
Nejlepších výsledků dosáhnete, budete-li při používání této příručky
srovnávat text s ilustracemi. Odstřihněte podél čárkované čáry, aby bylo
možno české instrukce přiřadit k ilustracím.
Český text se nachází na straně
44
Nederlands
BELANGRIJKE VEILIGHEIDSINSTRUCTIES BEWAAR DEZE GOED – GAAT
GEBRUIKEN
Voor de beste resultaten moet u zowel de tekst als de illustraties raadplegen
wanneer u deze handleiding gebruikt. Gebruik de stippellijnen om uw taal
bij de illustraties te plaatsen.
Nederlandse tekst op pagina
28
Türkçe
ÖNEMLİ GÜVENLİK TALİMATLARI BU TALİMATLARI SAKLAYIN – LÜTFEN
BU ÜRÜNÜ KULLANMADAN ÖNCE KILAVUZUN TAMAMINI OKUYUN
En iyi sonucu almak için bu kılavuzdan yararlanırken hem metne hem
de resimlere bakın. Türkçe metinle resimleri eşleştirmek için kesik
çizgilerden kesin.
Türkçe Metin Sayfaları
46
Italiano
ISTRUZIONI DI SICUREZZA IMPORTANTI – CONSERVARE CON CURA
QUESTE ISTRUZIONI – LEGGERE TUTTE LE ISTRUZIONI PRIMA DI USARE
QUESTO PRODOTTO
Per risultati ottimali, fare riferimento sia al testo che alle illustrazioni di
questo manuale. Tagliare lungo le linee tratteggiate per abbinare il testo
nella propria lingua alle illustrazioni.
Testo in italiano alle pagine
30
日本語
48
Ελληνικά
ΣΗΜΑΝΤΙΚΕΣ ΟΗΓΙΕΣ ΑΣΦΑΛΕΙΑΣ ΦΥΛΑΞΤΕ ΑΥΤΕΣ ΤΙΣ ΟΗΓΙΕΣ –
ΙΑΒΑΣΤΕ ΟΛΟΚΛΗΡΟ ΤΟ ΕΓΧΕΙΡΙΙΟ ΠΡΙΝ ΧΡΗΣΙΜΟΠΟΙΗΣΕΤΕ ΑΥΤΟ ΤΟ
ΠΡΟΪΟΝ
Για βέλτιστα αποτελέσατα, ανατρέξτε στο κείενο και τι εικόνε κατά
τη χρήση αυτού του εγχειριδίου. Κόψτε κατά ήκο των διακεκοένων
γραών για να αντιστοιχίσετε τη γλώσσα σα ε τι εικόνε.
Ελληνικό κείενο, σελίδε
32
中文
重要安全说明 – 保存这些说明 – 请先完整阅读手册
使用本说明书时,请同时参考文本与插图,以达到最佳理解效果。沿着
虚线裁剪将您的语言与插图匹配起来。
中文文本页
50
Norsk
VIKTIGE SIKKERHETSINSTRUKSJONER TA VARE PÅ DISSE
INSTRUKSJONENE LES HELE HÅNDBOKEN FØR DU BRUKER DETTE
PRODUKTET
Se tekst og illustrasjoner i håndboken for beste resultater. Klipp langs de
stiplede linjene for å samsvare det aktuelle språket med illustrasjonene.
Norsk tekst side
34

6901-002090 <00>
6
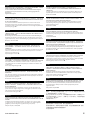
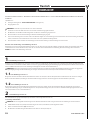
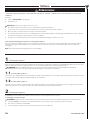
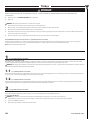
IMPORTANT SAFETY INSTRUCTIONS – SAVE THESE INSTRUCTIONS – PLEASE READ ENTIRE MANUAL BEFORE USING THIS PRODUCT
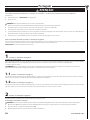
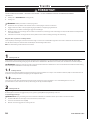
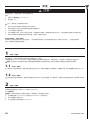
Speci cations
Weight capacity--DO NOT EXCEED: 27.22 kg (60 lbs) includes TV, mount, and any accessories
Tilt: ±15°
CAUTION: Avoid potential personal injuries and property damage!
Do not use this product for any purpose not explicitly speci ed by Sanus Systems.
The wall must be capable of supporting ve times the weight of the monitor and mount combined.
This product is not designed for use in metal stud walls!
If you do not understand these instructions, or have doubts about the safety of the installation, assembly or use of this product, contact manufacturer
Customer Service or call a quali ed contractor.
Sanus Systems is not responsible for damage or injury caused by incorrect assembly or use.
English
CAUTION:

6901-002090 <00>
7
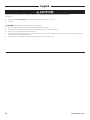
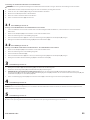
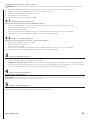
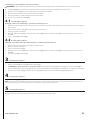
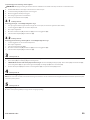
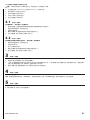
384.3 mm
(15.13 in.)
300.5 mm
(11.83 in.)
249.2 mm
(9.81 in.)
171.5 mm
(6.75 in.)
±15°
237.7 mm
(9.36 in.)
59.18 mm
(2.33 in.)
152.4 mm
(6.0 in.)
78.7 mm
(3.1 in.)
180°
360°
±15°
200 mm
(7.87 in.)
200 mm
(7.87 in.)
231.65 mm
(9.12 in.)
100 mm
(3.94 in.)
162.6 mm
(6.40 in.)
282.45 mm
(11.12 in.)
100 mm
(3.94 in.)
360°
75 mm
(2.95 in.)
75 mm
(2.95 in.)

6901-002090 <00>
8
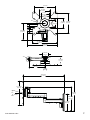
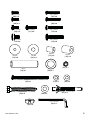
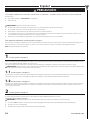
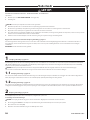
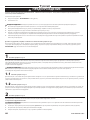
Supplied Parts and Hardware.
Before starting assembly, verify all parts are included and undamaged. If any parts are missing or damaged, do not return the damaged item to your dealer; contact Customer
Service. Never use damaged parts!
NOTE:
Not all hardware included will be used.
CAUTION:
[05] x 4
[03] x 2
8-32 x 0.5 in.
[04] x 4
[01] x 1
[02] x 1

6901-002090 <00>
9
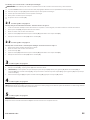
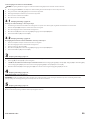
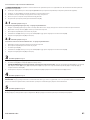
M4 x 12mm
[06] x 4
M5 x 12mm
[08] x 4
M6 x 12mm
[10] x 4
M8 x 12mm
[13] x 4
14mm
[19] x 1
M4 x 30mm
[07] x 4
M5 x 30mm
[09] x 4
M6 x 20mm
[11] x 4
M4/M5
[15] x 8
M6/M8
[16] x 4
M4/M5
[17] x 4
M6/M8
[18] x 4
M6 x 35mm
[12] x 4
M8 x 35mm
[14] x 4
5⁄16 in. x 2.5 in.
[25] x 2
[28] x 4
[20] x 1
[21] x 1
¼ -20 x 3.25 in.
[22] x 1
[23] x 1
[24] x 2
[26] x 2
[27] x 2
5⁄32 in. Hex Key
[29] x 1

6901-002090 <00>
10
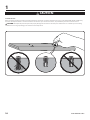
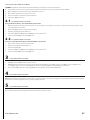
1
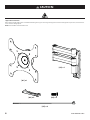
CAUTION:
Install TV Brackets
Before you begin, hand thread screws into the threaded inserts on the back of your TV to determine the correct screw diameter (M4, M5, M6, or M8). Verify
that there are adequate threads to secure the brackets to the monitor. If you encounter resistance, stop immediately and contact customer service.
CAUTION: Avoid potential personal injuries and property damage! Use the shortest screw and spacer combination to accomodate your needs. Using
hardware that is too long may damage your monitor’s internal components.

6901-002090 <00>
11
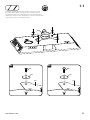
M5M4
For TVs with a at back. Ensure that the bracket is level on the back of
the TV. Standard con gurations are shown. If you need extra space to
accommodate cables, recesses, or protrusions, see the installation option
(1-2) that uses spacers. For special applications, or if you are uncertain about
your hardware selection, contact Customer Service.
1-1
?
[06] [08]
[15]
[15]
[01]
[01]
[01]

6901-002090 <00>
12
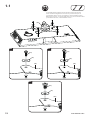
M6 M6
M8
For TVs with a at back. Ensure that the bracket is level on the back of
the TV. Standard con gurations are shown. If you need extra space to
accommodate cables, recesses, or protrusions, see the installation option
(1-2) that uses spacers. For special applications, or if you are uncertain about
your hardware selection, contact Customer Service.
?
1-1
[10]
[11]
[13]
[16]
[16]
[16]
[01]
[01]
[01]
[01]

6901-002090 <00>
13
M6
M5M4
M8
[01]
1-2
?
For TVs with an irregular/obstructed back. Ensure that the
bracket is level on the back of the TV. Standard con gurations
are shown. For special applications, or if you are uncertain about
your hardware selection, contact Customer Service.
[09]
[15]
[17]
[15]
[01]
[07]
[15]
[15]
[17]
[01]
[12]
[14]
[18]
[18]
[16] [16]
[01] [01]

6901-002090 <00>
14
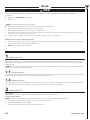
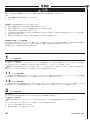
2
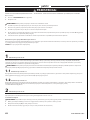
Wall Mounting
For assistance in determining wall plate location, see Height Finder at sanus.com.
2-1: Wood Stud Mounting
CAUTION:
Improper use could reduce the holding power of the lag bolt. To avoid potential injuries or property damage:
Pilot holes MUST be drilled to a depth of 63.5 mm (2.5 in.), using a 5.5 mm (7/32 in.) diameter drill bit.
Do not over-tighten the lag bolts [25].
Any material covering the wall must not exceed 16 mm (5/8 in.).
2-2: Solid Concrete and Concrete Block Mounting
CAUTION:
Improper use could reduce the holding power of the lag bolt. To avoid potential injuries or property damage:
Pilot holes MUST be drilled to a depth of 75 mm (3 in.), using a 10 mm (3/8 in.) diameter drill bit.
Be sure the anchors [27] seat ush with the concrete surface.
Mount wall plate directly onto the concrete surface.
Never drill into the mortar between blocks.
Do not over-tighten the lag bolts [25].
CAUTION:

6901-002090 <00>
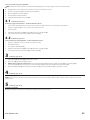
15
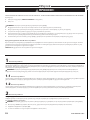
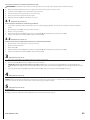
Wood Stud Wall Mounting – See Cautions in Step 2.
1. Locate stud. Verify the center of the stud with an awl or thin nail or use
an edge to edge stud nder.
2. Level the wall plate [02] and mark the hole locations.
3. Drill pilot holes as illustrated.
4. Place the wall plate against the wall. Tighten the lag bolts [25] only
until the washers [26] are pulled rmly against the wall plate [02].
5. Place lag bolt covers [28] over lag bolts [25].
2-1
1
13mm
(1/2 in.)
5.5mm
(7/32 in
.)
2
4
5
3
< 16 mm
(5/8 in.)
[02]
[02]
[26]
[25]
[28]
63.5 mm
2.5 in.

6901-002090 <00>
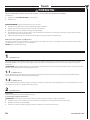
16
10mm
(3/8 in.
)
1
3
2-2
4
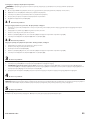
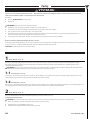
Solid Concrete and Concrete Block Mounting – See Cautions in Step 2.
1. Level wall plate and mark the hole locations.
2. Drill pilot holes as illustrated.
3. Insert lag bolt anchors [27].
4. Place the wall plate [02] against the wall. Tighten the lag bolts [25]
only until the washers [26] are pulled rmly against the wall plate [02].
5. Place lag bolt covers [28] over lag bolts [25].
2
13mm
(1/2 in.)
5
[02]
[02]
[28]
[26]
[25]
[27]
75 mm
3 in.

6901-002090 <00>
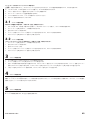
17
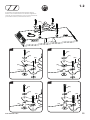
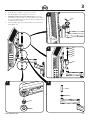
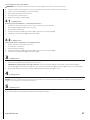
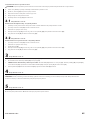
1. Fit nut [21] and cover [28] into underside of mount arm.
2. Place washer [20] and pivot pin [19] onto mount arm.
3. CAUTION: You will need assistance with this step! Fit mounting
bracket [01] onto pivot pin [19]. Slide washers [24] and spacer [23] onto
mounting bolt [22] and t bolt through mounting bracket [01] and pivot
pin [19] until it meets nut [21].
4. Use hex key [29] to tighten mounting bolt [22] and secure mounting
bracket [01] to arm.
3
4
3
21
[28]
[22]
[24]
[23]
[24]
[01]
[19]
[21]
[28]
[20]
[29]

6901-002090 <00>
18
4
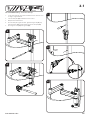
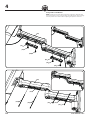
Arrange Cables and Add Plates
NOTE: Pull the arm to its full extension before routing the cables through
the channels, then loosely route the cables. This will give the cables enough
slack to prevent excess tension when adjusting the position of the arm.
?
[03]
[03]
[03]
[03]
[04]
[05]
[05]
[04]
[05]
[04]
[04]
[05]
[02]
[02]

6901-002090 <00>
19
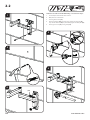
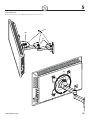
5
Tension Adjustment
A: Adjust arm extension tension. B: Adjust left/right/rotation swivel tension.
[B]
[B]
[A]
[29]

6901-002090 <00>
20
INFORMATIONS IMPORTANTES CONCERNANT LA SÉCURITÉ – CONSERVEZ CES INSTRUCTIONS – VEUILLEZ LIRE ATTENTIVEMENT LE MANUEL AVANT
D’UTILISER CE PRODUIT
Spéci cations
Capacité de charge – NE PAS DÉPASSER: 27.22 kg (60 lbs)
Inclinaison: ±15°
ATTENTION: Évitez les dommages matériels et les blessures!
Ne pas utiliser ce produit à d’autres ns que celles spéci ées par fabricant.
Le mur doit pouvoir supporter cinq fois le poids total du moniteur et du support.
Ce produit n’est pas conçu pour être utilisé sur des murs dont les montants sont en métal!
Si vous ne comprenez pas toutes ces instructions ou si vous avez des doutes sur la sécurité de l'installation, du montage ou de l’utilisation de ce produit,
veuillez contacter un installateur quali é ou le service à la clientèle de fabricant.
Fabricant n’est pas responsable des blessures ou des dommages causés par une mauvaise utilisation ou un montage incorrect.
Pièces et matériel fournis. Voir l’illustration de la page 8.
Avant de commencer l’assemblage, assurez-vous que toutes les pièces sont présentes et qu’elles ne sont pas endommagées. Si une pièce est manquante ou
endommagée, contactez le service Clientèle de. Ne retournez pas les pièces endommagées à votre revendeur. N’utilisez jamais de pièces endommagées !
REMARQUE:
Nem todas as ferramentas serão usadas.
ATTENTION:
Français
1Voir l’illustration de la page 10.
Installation des supports du téléviseur
Avant de commencer, serrez à la main les vis dans les ori ces letées au dos du téléviseur. Assurez-vous qu’il y a su samment de lets pour installer
solidement les supports de sur le moniteur. Si vous sentez une résistance, arrêtez immédiatement et contactez le Service à la clientèle.
ATTENTION : Évitez les dommages matériels et les blessures! Utilisez la combinaison la plus courte possible de vis et d’entretoise nécessaire. L’utilisation
de quincaillerie trop longue pourrait endommager les composantes internes de votre moniteur.
1-1Voir l’illustration de la page 11.
Pour les téléviseurs dont l’arrière est plat ou sans obstruction Assurez-vous que les supports sont à l’horizontale derrière le téléviseur. Si vous avez besoin de
plus d’espace à cause des câbles, de creux ou de protubérances, consultez les options d’installation (1-2) utilisant des entretoises.
1-2 Voir l’illustration de la page 13.
Pour les téléviseurs dont l’arrière est irrégulier ou obstrué. Assurez-vous que les supports sont à l’horizontale (à niveau) derrière le téléviseur. Les con gurations
standard sont illustrées. Consultez le Service à la clientèle pour toute application particulière ou si vous avez des doutes quant à la quincaillerie à utiliser.
2 Voir l’illustration de la page 14.
Montage mural
Pour obtenir de l’aide a n de déterminer l’emplacement de la plaque murale, consultez le site sanus.com sous la rubrique « Height Finder ».
2-1: Installation sur des murs avec montants de bois
ATTENTION :
Une utilisation inadéquate peut réduire la force de rétention du boulon tire-fond. A n d’éviter tout dommage matériel ou blessure :
Les avant-trous DOIVENT être percés à une profondeur de 63,5 mm (2,5 po) à l’aide d’un foret de 5,5 mm (7/32 po).
Ne pas trop serer les boulons tire-fond [25].
Tout matériau de revêtement de mur ne doit pas excéder 16 mm (5/8 in.).
Seite wird geladen ...
Seite wird geladen ...
Seite wird geladen ...
Seite wird geladen ...
Seite wird geladen ...
Seite wird geladen ...
Seite wird geladen ...
Seite wird geladen ...
Seite wird geladen ...
Seite wird geladen ...
Seite wird geladen ...
Seite wird geladen ...
Seite wird geladen ...
Seite wird geladen ...
Seite wird geladen ...
Seite wird geladen ...
Seite wird geladen ...
Seite wird geladen ...
Seite wird geladen ...
Seite wird geladen ...
Seite wird geladen ...
Seite wird geladen ...
Seite wird geladen ...
Seite wird geladen ...
Seite wird geladen ...
Seite wird geladen ...
Seite wird geladen ...
Seite wird geladen ...
Seite wird geladen ...
Seite wird geladen ...
Seite wird geladen ...
Seite wird geladen ...
-
 1
1
-
 2
2
-
 3
3
-
 4
4
-
 5
5
-
 6
6
-
 7
7
-
 8
8
-
 9
9
-
 10
10
-
 11
11
-
 12
12
-
 13
13
-
 14
14
-
 15
15
-
 16
16
-
 17
17
-
 18
18
-
 19
19
-
 20
20
-
 21
21
-
 22
22
-
 23
23
-
 24
24
-
 25
25
-
 26
26
-
 27
27
-
 28
28
-
 29
29
-
 30
30
-
 31
31
-
 32
32
-
 33
33
-
 34
34
-
 35
35
-
 36
36
-
 37
37
-
 38
38
-
 39
39
-
 40
40
-
 41
41
-
 42
42
-
 43
43
-
 44
44
-
 45
45
-
 46
46
-
 47
47
-
 48
48
-
 49
49
-
 50
50
-
 51
51
-
 52
52


Sanus VisionMount MF202 Benutzerhandbuch
- Kategorie
- Spielzeuge
- Typ
- Benutzerhandbuch
- Dieses Handbuch eignet sich auch für
in anderen Sprachen
- English: Sanus VisionMount MF202 User manual
- français: Sanus VisionMount MF202 Manuel utilisateur
- español: Sanus VisionMount MF202 Manual de usuario
- italiano: Sanus VisionMount MF202 Manuale utente
- русский: Sanus VisionMount MF202 Руководство пользователя
- Nederlands: Sanus VisionMount MF202 Handleiding
- português: Sanus VisionMount MF202 Manual do usuário
- dansk: Sanus VisionMount MF202 Brugermanual
- polski: Sanus VisionMount MF202 Instrukcja obsługi
- čeština: Sanus VisionMount MF202 Uživatelský manuál
- svenska: Sanus VisionMount MF202 Användarmanual
- 日本語: Sanus VisionMount MF202 ユーザーマニュアル
- Türkçe: Sanus VisionMount MF202 Kullanım kılavuzu
Verwandte Artikel
-
Sanus VisionMount VMPl50A Benutzerhandbuch
-
-
-
-
-
-
-
-
-