Dell Latitude 5179 2-in-1 Schnellstartanleitung
- Typ
- Schnellstartanleitung
Seite wird geladen ...

In the charms sidebar, tap Settings , tap the wireless icon , select your
network, and tap Connect.
Tik in de charmszijbalk op Instellingen , tik op het pictogram voor draadloos
netwerk , selecteer uw netwerk en tik op Verbinden.
Sur la barre d’action latérale, appuyez sur Paramètres , icône Sans fil ,
sélectionnez votre réseau et appuyez sur Connecter.
Tippen Sie in der Charms-Seitenleiste auf Einstellungen , dann auf das
Wireless-Symbol , wählen Sie Ihr Netzwerk aus, und tippen Sie auf Verbinden.
Nella barra laterale degli accessi, toccare Impostazioni , toccare l’icona della rete
senza fili , selezionare la rete e toccare Connetti.
Connecting to your network — optional
Verbinding maken met uw netwerk — optioneel
Vous connectez au réseau — en option
Verbinden mit Ihrem Netzwerk — optional
Connessione alla rete — opzionale
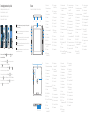
1. Power button
2. Power and battery-charge
status light
3. Camera-status light
4. Microphone
5. Front camera
6. Microphone
7. Headset port
8. Volume-control buttons (2)
9. Microphone
10. Micro-HDMI port
11. USB 3.0 port
12. USB 3.0 and power-adapter
port (USB-C)
13. Microphone
14. NFC-sensor area
(Latitude 5175 only)
15. Fingerprint reader
(Latitude 5179 only)
16. Smart-card reader
(Latitude 5179 only)
17. Docking connector
18. Docking pins (2)
19. Docking slots (2)
20. Service Tag label
21. NFC-sensor area
(Latitude 5179 only)
22. Rear camera
23. Security-cable slot
24. Micro-SIM card slot
25. MicroSD-card slot
26. Windows button
1. Bouton d’alimentation
2. Voyants d’état de l’alimentation et
de la batterie
3. Voyant d’état de la caméra
4. Microphone droit
5. Caméra avant
6. Microphone gauche
7. Port pour casque
8. Boutons de contrôle du volume (2)
9. Microphone
10. Port micro-HDMI
11. Port USB 3.0
12. Port d’alimentation et USB 3.0
(USB-C)
13. Microphone
14. Zone du capteur NFC (uniquement
sur le modèle Latitude 5175)
15. Lecteur d’empreintes digitales
(uniquement sur le modèle
Latitude 5179)
16. Lecteur de cartes à puce
(uniquement sur le modèle
Latitude 5179)
17. Connecteur d’amarrage
18. Broches de connexion (2)
19. Fentes de connexion (2)
20. Étiquette de numéro de série
21. Zone du capteur NFC
(réservé au modèle Latitude 5179)
22. Caméra arrière
23. Emplacement pour câble de sécurité
24. Emplacement de la carte micro-SIM
25. Logement de carte microSD
26. Bouton Windows
1. Accensione
2. Indicatore di stato alimentazione
e carica della batteria
3. Indicatore di stato della fotocamera
4. Microfono di destra
5. Fotocamera anteriore
6. Microfono di sinistra
7. Porta auricolare
8. Pulsanti del controllo volume (2)
9. Microfono
10. Porta Micro-HDMI
11. Porta USB 3.0
12. Porta USB 3.0 e dell’adattatore
dell’alimentazione (USB-C)
13. Microfono
14. Area sensore NFC
(solo Latitude 5175)
15. Lettore di impronte digitali
(solo Latitude 5179)
16. Lettore di smart card
(solo Latitude 5179)
17. Connettore dell’alloggiamento
18. Piedini dell’alloggiamento (2)
19. Slot di alloggiamento (2)
20. Etichetta Numero di servizio
21. Area sensore NFC
(solo Latitude 5179)
22. Fotocamera posteriore
23. Slot cavo di protezione
24. Alloggiamento per scheda
micro-SIM
25. Slot scheda MicroSD
26. Pulsante Windows
1. Aan-uitknop
2. Statuslampjes stroom en batterijlading
3. Statuslampje camera
4. Microfoon rechts
5. Camera aan voorzijde
6. Microfoon links
7. Headsetpoort
8. Bedieningsknoppen voor helderheid (2)
9. Microfoon
10. Micro-HDMI-poort
11. USB 3.0-poort
12. Poort voor USB 3.0 en netadapter
(USB-C)
13. Microfoon
14. NFC-sensorgebied
(alleen Latitude 5175)
15. Vingerafdruklezer
(alleen Latitude 5179)
16. Smartcardlezer
(alleen Latitude 5179)
17. Koppelingsconnector
18. Dockpennen (2)
19. Docksleuven (2)
20. Servicetag
21. NFC-sensorgebied
(alleen Latitude 5179)
22. Camera aan achterzijde
23. Sleuf voor beveiligingskabel
24. Sleuf voor microsimkaart
25. Sleuf voor MicroSD-kaart
26. Windows-knop
1. Betriebsschalter
2. Statusanzeige für Netz und
Batterieladezustand
3. Kamerastatusanzeige
4. Rechtes Mikrofon
5. Kamera an der Vorderseite
6. Linkes Mikrofon
7. Kopfhöreranschluss
8. Lautstärketasten (2)
9. Mikrofon
10. Micro-HDMI-Anschluss
11. USB 3.0-Anschluss
12. USB-3.0- und
Netzadapteranschluss (USB-C)
13. Mikrofon
14. NFC-Sensorbereich
(nur Latitude 5175)
15. Fingerabdruckleser
(nur Latitude 5179)
16. Smart-card-Leser
(nur Latitude 5179)
17. Docking-Anschluss
18. Docking-Stifte (2)
19. Docking-Steckplätze (2)
20. Service-Tag-Etikett
21. NFC-Sensorbereich
(nur Latitude 5179)
22. Kamera an der Rückseite
23. Sicherheitskabeleinschub
24. Micro-SIM-Kartensteckplatz
25. MicroSD-Kartensteckplatz
26. Windows-Taste
Features
Kenmerken | Caractéristiques | Funktionen | Funzioni
12
4 3
12
13
17 18 19 20
21
23
22
24
25
26
8
6
7
5
9
10
11
16
15
14
NOTE: For mobile broadband connection, you may need to activate your network
service before connecting.
N.B.: Voor een mobiele breedbandverbinding kan het zijn dat u uw netwerkservice
moet activeren voordat u verbinding maakt.
REMARQUE : pour les connexions à haut débit, il se peut que vous deviez d’abord
activer votre service réseau avant de tenter d’établir une connexion.
ANMERKUNG: Bei einer mobilen Breitbandverbindung müssen Sie vor dem Herstellen
einer Verbindung Ihren Netzwerkdienst aktivieren.
N.B.: per la connessione a banda larga mobile, è necessario attivare il servizio di
rete prima di effettuare la connessione.
-
 1
1
-
 2
2


Dell Latitude 5179 2-in-1 Schnellstartanleitung
- Typ
- Schnellstartanleitung
in anderen Sprachen
- English: Dell Latitude 5179 2-in-1 Quick start guide
- français: Dell Latitude 5179 2-in-1 Guide de démarrage rapide
- italiano: Dell Latitude 5179 2-in-1 Guida Rapida
- Nederlands: Dell Latitude 5179 2-in-1 Snelstartgids