
1
R. 12/21 838 860
SAMOA Industrial, S.A. · Pol. Ind. Porceyo, I-14 · Camino del Fontán, 831 · 33392 - Gijón - Spain · Tel.: +34 985 381 488 · www.samoaindustrial.com
2021_12_22-17:00
Part No. / Cód. / Réf. / Art. Nr.:
383 210
WIFI REPEATER 2
REPETIDOR WIFI 10
RÉPÉTITEUR WIFI 18
WIFI-REPEATER 26
EN
ES
FR
DE
Parts and technical service guide
Guía de servicio técnico y recambio
Guide d’instructions et pièces de rechange
Handbuch für Ersatzteile und technischen Service

2838 860 R. 12/21
SAMOA Industrial, S.A. · Pol. Ind. Porceyo, I-14 · Camino del Fontán, 831 · 33392 - Gijón - Spain · Tel.: +34 985 381 488 · www.samoaindustrial.com
EN
2021_12_22-17:00
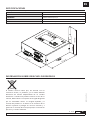
INTRODUCTION
WARNING!
This unit is intended for professional use.
Read all the instructions in this manual
prior to use.
!• The device is intended to be integrated into a
management system to allow the WIFI connection
between the components.
• Only use the device for its intended purpose.
• This device has not been approved for use in commercial
transactions. Do not alter or modify the device.
• Verify the correct setting of the monitoring system prior
to the first use.
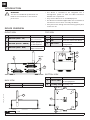
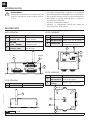
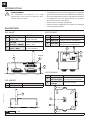
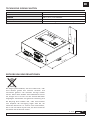
DEVICE OVERVIEW
FRONT VIEW
BACK VIEW
TOP VIEW
BOTTOM VIEW
Nº COMPONENT DESCRIPTION
1BUS CAN (main – IN) Allows CAN BUS
input connection
2BUS CAN (branch – GROUP) Provides power to
the WIFI Repeater
3BUS CAN (main - OUT) Allows CAN BUS
output connection
Nº COMPONENT DESCRIPTION
1 Keyboard Allows to configure the unit
2 LEDs Show the state of the device
3LCD screen Allows to view the unit
configuration
Nº COMPONENT DESCRIPTION
1Features label Main technical features
of the equipment
2Assembly holes Assembly holes
Nº COMPONENT DESCRIPTION
1WIFI antenna Allows WIFI connection
1
1
2
2
1
2
3
IN
12
GROUP
3
OUT

3
R. 12/21 838 860
SAMOA Industrial, S.A. · Pol. Ind. Porceyo, I-14 · Camino del Fontán, 831 · 33392 - Gijón - Spain · Tel.: +34 985 381 488 · www.samoaindustrial.com
EN
2021_12_22-17:00
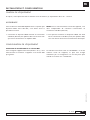
INSTALLATION AND CONFIGURATION
Optionally, the device can be fixed by using the assembly holes (2). Distance between holes: 154 mm.
To install the WFI Repeater module in any NEXU device
that has CAN BUS, the following procedure will be
followed:
1. Connect to the CAN BUS connector (branch) of the
WIFI Repeater, a NEXU device with power. This channel
is the one that provides power to the WIFI Repeater.
DEVICE ATTACHMENT
MOUNTING
NOTE: For the correct operation of the device, it is
therefore essential, to connect the power supply to the
CAN BUS connector (branch).
2. In the other two CAN BUS connectors (trunks) of the
WIFI repeater, NEXU devices can be connected, without
the need to include power for the supply.
WIFI Module connection with a Wifi network
In order to configure the device remotely (Mode 1 or 2) it
will be necessary to connect to it through the WIFI
network that it generates.
EQUIPMENT CONFIGURATION
The SSID of your local network is “UPOWER-X” where X
will be the local address of the device and it could be
changed locally through its configuration. The password
to access this network is “123456789”.

4838 860 R. 12/21
SAMOA Industrial, S.A. · Pol. Ind. Porceyo, I-14 · Camino del Fontán, 831 · 33392 - Gijón - Spain · Tel.: +34 985 381 488 · www.samoaindustrial.com
EN
2021_12_22-17:00
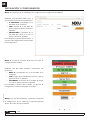
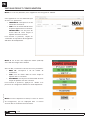
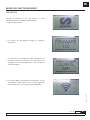
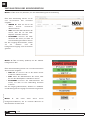
Mode 1. Through a PC (Windows) with the SAMOA configuration application
Mode 2. Through a Mobile (Android) with the SAMOA
configuration APP.
Mode 3. In the device itself through its configuration
section, which will be explained in the next section within
the operating mode.
Through this application you must only
and exclusively enter three parameters:
• SERVER IP: it will tally to the IP of
the UNET of our installation.
• SSID: name of the client’s WIFI
network where you want to
connect the WIFI repeater.
• PASSWORD: password of the
client’s WIFI network where you
want to connect it.
To complete the process, click on “Send”
and the configuration process will
start automatically.
Through this application you must only and exclusively
enter three parameters:
• UNET IP: it will tally to the IP of the UNET of our
installation.
• SSID: name of the client’s WIFI network where you
want to connect the WIFI repeater.
• PASSWORD: password of the client’s WIFI network
where you want to connect it.
To complete the process, press “SEND” and the
configuration process will start automatically.
INSTALLATION AND CONFIGURATION

5
R. 12/21 838 860
SAMOA Industrial, S.A. · Pol. Ind. Porceyo, I-14 · Camino del Fontán, 831 · 33392 - Gijón - Spain · Tel.: +34 985 381 488 · www.samoaindustrial.com
EN
2021_12_22-17:00
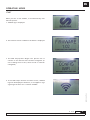
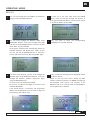
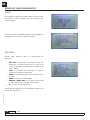
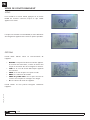
When you turn on the module, it will automatically start
the boot process:
1. SAMOA logo is displayed
OPERATING MODE
START
2. The firmware version loaded on the device is displayed
3. The WIFI setup process begins. This process tries to
connect to the network that has been configured. (In
case of being the first time, there will be no network
configured).
4. If the WIFI setup network has been correct, SAMOA
logo will be displayed. Otherwise, it will appear a logo
signaling that there isn’t a network available.

6838 860 R. 12/21
SAMOA Industrial, S.A. · Pol. Ind. Porceyo, I-14 · Camino del Fontán, 831 · 33392 - Gijón - Spain · Tel.: +34 985 381 488 · www.samoaindustrial.com
EN
2021_12_22-17:00
OPERATING MODE
SETUP
OPTIONS
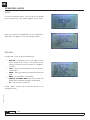
To access the SETUP section, you must press the ENTER
button continuously, until ‘SETUP’ appears on the screen.
LOCAL INFO: shows all device characteristic.
• DIR LOC: corresponds to the local address of the
device. Based on this value, it will create the local
network to which you must connect to configure it
remotely.
• SSID: is the name of the WIFI network the device is
connected to.
• PWD: is the password that has been entered for the
SSID.
• UNET: is the IP address of the UNET.
• PORT IN and PORT OUT: these are the input and
output ports where the messages are directed.
• IP: is the local IP of the device.
LOCAL SETUP: section that allows the device to be
configured locally
When you release the ENTER button, the configuration
drop-down will appear with all the available options.

7
R. 12/21 838 860
SAMOA Industrial, S.A. · Pol. Ind. Porceyo, I-14 · Camino del Fontán, 831 · 33392 - Gijón - Spain · Tel.: +34 985 381 488 · www.samoaindustrial.com
EN
2021_12_22-17:00
OPERATING MODE
PROCESS
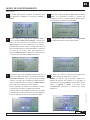
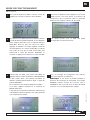
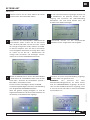
First, we can change the local address of the device
using the UP and DOWN buttons.
To move on to the next item, press the ENTER
button. Next you will go through the process of
setting up the WIFI connection. The first point will be
to set the IP address of the UNET.
You can scroll through the different digits using
RIGHT/LEFT buttons, and scroll through each digit
from 0-9 using UP/DOWN buttons. Once the correct
IP has been set, press ENTER.
At this point, the device will automatically search for
available networks and display their SSIDs, so that
you can use the UP/DOWN buttons to select the
correct SSID and confirm by pressing ENTER again.
The same to the UNET IP, you can scroll through the
different digits using RIGHT/LEFT buttons, and scroll
through the different symbols/ letters/ascii digits
using UP/DOWN buttons
To confirm the password press ENTER.
At this time, the device will begin to connect to the
selected NETWORK.
If the whole process is successful, the assigned IP
address will be displated in the first line, along with
the Gateway and subnet mask.
Then, you have to enter the corresponding
PASSWORD for the SSID selected.
Finally, a setup OK message will be displayed, before
the device reboots.
NOTE: In case any error occurs during the WIFI
network connection process, an ERROR message will
be displayed. From version 1.02 onwards, if the
ERROR is due to an incorrect SSID or PASSWORD it
will be specifically indicated.
1 2
4
6
3
5

8838 860 R. 12/21
SAMOA Industrial, S.A. · Pol. Ind. Porceyo, I-14 · Camino del Fontán, 831 · 33392 - Gijón - Spain · Tel.: +34 985 381 488 · www.samoaindustrial.com
EN
2021_12_22-17:00
PROBLEM DIAGNOSIS AND SOLUTION
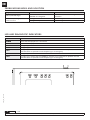
LED AND DIAGNOSTIC INDICATORS
Symptom Possible cause Solution
Offline (NO WIFI logo) WIFI network down or SSID/PAS-
SWORD misconfigured.
Check WIFI network and configuration
parameters.
Connected (WIFI logo) but no
communication
Wiring problem Check wiring
Configuration problem Check configuration
LED DESCRIPTION
POWER Shows that the equipment is connected
WIFI LINK Shows that the equipment has WIFI conection
E.O.L. If it lights up, it means that the end of line resistor is activated
CAN1 If it lights up, it means that the CANBUS 1 network is online.
BYP1 If it lights up, it means that the CANBUS 1 network has a comunication problem and the
solenoid valves are opened to allow dispensing in an emergency.
CAN2 If it lights up, it means that the CANBUS 2 network is online.
BYP2 If it lights up, it means that the CANBUS 2 network has a comunication problem and the
solenoid valves are opened to allow dispensing in an emergency.

9
R. 12/21 838 860
SAMOA Industrial, S.A. · Pol. Ind. Porceyo, I-14 · Camino del Fontán, 831 · 33392 - Gijón - Spain · Tel.: +34 985 381 488 · www.samoaindustrial.com
EN
2021_12_22-17:00
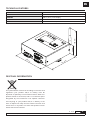
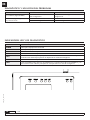
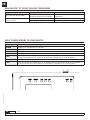
TECHNICAL FEATURES
DISPOSAL INFORMATION
POWER SUPPLY VOLTAGE 12-24 V DC
CURRENT INPUT 1 A
DISPLAY LCD 53,2x31,7 LCD display
STATUS LEDS 7
CONNECTIONS 1 x CAN BUS branch, 2 x CAN BUS trunk
The symbol above means that according to local laws and
regulations your product and/or its battery must be
disposed of separalety from household waste. When this
product reaches its end of life, take it to a collection point
designated by local authorities. The separate collection
and recycling of your product and/or its battery at hte
time of disposal will help conserve natural resources and
ensure that it is recycled in a manner that protects human
health and the environment.
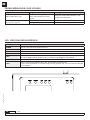
105 mm
35 mm
140 mm
135 mm

10 838 860 R. 12/21
SAMOA Industrial, S.A. · Pol. Ind. Porceyo, I-14 · Camino del Fontán, 831 · 33392 - Gijón - Spain · Tel.: +34 985 381 488 · www.samoaindustrial.com
2021_12_22-17:00
ES
INTRODUCCIÓN
ADVERTENCIA!
Este equipo está destinado a uso profesional. Lea
todas las instrucciones de este manual antes de
su uso.
!• Este equipo está destinado a integrarse en un sistema de
gestión para permitir la conexión WIFI entre los componentes.
• Use el equipo sólo para los fines a los que está destinado.
• Este equipo no ha sido aprobado para su empleo en
transacciones comerciales.
• No altere o modifique el equipo.
• Verifique la configuración correcta del sistema de
monitoreo antes del primer uso
DESCRIPCIÓN
VISTA FRONTAL
VISTA TRASERA
VISTA SUPERIOR
VISTA INFERIOR
Nº ELEMENTO DESCRIPCIÓN
1BUS CAN
(troncal - IN)
Permite la conexión CAN
BUS de entrada
2BUS CAN
(rama - GROUP)
Proporciona alimentación
al Repetidor WIFI
3BUS CAN
(troncal - OUT)
Permite la conexión CAN
BUS de salida
Nº ELEMENTO DESCRIPCIÓN
1 Teclado Permite configurar el equipo
2Leds de estado Indican el estado del equipo
3Pantalla LCD Permiten visualizar la
configuración del equipo
Nº ELEMENTO DESCRIPCIÓN
1Etiqueta de
características
Principales características
técnicas del equipo
2Agujeros de
montaje Agujeros para el montaje
Nº ELEMENTO DESCRIPCIÓN
1Antena WIFI Permite la conexión WIFI
IN
12
GROUP
3
OUT
1
2
3
1
1
2
2

11
R. 12/21 838 860
SAMOA Industrial, S.A. · Pol. Ind. Porceyo, I-14 · Camino del Fontán, 831 · 33392 - Gijón - Spain · Tel.: +34 985 381 488 · www.samoaindustrial.com
EN
2021_12_22-17:00
ES
INSTALACIÓN Y CONFIGURACIÓN
Opcionalmente, puede fijar el equipo mediante los agujeros de montaje (2). Distancia entre agujeros: 154 mm.
Para instalar el módulo Repetidor WIFI en cualquier
dispositivo NEXU que tenga BUS CAN debe seguir el
siguiente procedimiento:
1. Conecte al conector BUS CAN (rama) del Repetidor
WIFI, un dispositivo NEXU con potencia. Este canal es el
que proporciona alimentación al Repetidor WIFI.
FIJACIÓN DEL EQUIPO
MONTAJE
NOTA: Para el correcto funcionamiento del dispositivo, es
por tanto indispensable, conectar la alimentación en el
conector BUS CAN (rama).
2. En los otros dos conectores BUS CAN (troncales) del
repetidor WIFI puede conectar dispositivos NEXU, sin
necesidad de incluir potencia para la alimentación.
Cónexión Módulo Wifi con una red Wifi
Para poder configurar el dispositivo de forma remota
(Modo 1 ó 2) será necesario conectarse al mismo a través
de la red WIFI que este genera.
CONFIGURACIÓN DEL EQUIPO
El SSID de su red local es “UPOWER-X” donde X será la
dirección local del dispositivo, y puede modificarse
localmente a través de su configuración. La contraseña
para acceder a esta red es “123456789”.

12 838 860 R. 12/21
SAMOA Industrial, S.A. · Pol. Ind. Porceyo, I-14 · Camino del Fontán, 831 · 33392 - Gijón - Spain · Tel.: +34 985 381 488 · www.samoaindustrial.com
2021_12_22-17:00
ES
Modo 1. A través de un PC (Windows) con la aplicación de configuración de SAMOA.
INSTALACIÓN Y CONFIGURACIÓN
Modo 2. A través de un Móvil (Android) con la APP de
configuración de SAMOA.
Modo 3. En el propio dispositivo a través de su apartado
de configuración, que se explica en el siguiente apartado
dentro del modo de funcionamiento.
Mediante esta aplicación debe única y
exclusivamente introducir tres parámetros:
• IP SERVIDOR: corresponde a la IP
del UNET de la instalación.
• SSID: nombre de la red WIFI del
cliente a la que se quiere conectar el
repetidor.
• CONTRASEÑA: contraseña de la
red WIFI del cliente a la cual se
quiere conectar el repetidor.
Para completar el proceso pulse “Enviar” y
el proceso de configuración comenzará de
forma automática.
Mediante esta APP debe introducir nuevamente tres
parámetros:
• UNET IP: corresponde con la IP del UNET de la
instalación.
• SSID: nombre de la red WIFI del cliente a la que se
quiere conectar el repetidor.
• PASSWORD: contraseña de la red WIFI del cliente
a la cual se quiere conectar el repetidor.
Para completar el proceso pulse “SEND” y el proceso de
configuración comenzará de forma automática.

13
R. 12/21 838 860
SAMOA Industrial, S.A. · Pol. Ind. Porceyo, I-14 · Camino del Fontán, 831 · 33392 - Gijón - Spain · Tel.: +34 985 381 488 · www.samoaindustrial.com
EN
2021_12_22-17:00
ES
Al encender el módulo, automáticamente comenzará el
proceso de arranque:
1. Se muestra el logo de SAMOA
MODO DE FUNCIONAMIENTO
ARRANQUE
2. Se muestra la versión del firmware cargado en el
dispositivo.
3. Comienza el proceso de configuración WIFI. Este
proceso intenta conectarse a la red que se haya
configurado. (En caso de ser la primera vez, no habrá
ninguna red configurada).
4. Si la configuración de la red WIFI ha sido correcta se
mostrará el logo de conexión WIFI. En caso contrario,
aparecerá el logo indicando que no hay una red
disponible.

14 838 860 R. 12/21
SAMOA Industrial, S.A. · Pol. Ind. Porceyo, I-14 · Camino del Fontán, 831 · 33392 - Gijón - Spain · Tel.: +34 985 381 488 · www.samoaindustrial.com
2021_12_22-17:00
ES
MODO DE FUNCIONAMIENTO
SETUP
OPCIONES
Para acceder al apartado de SETUP, debe pulsar de forma
continuada el botón ENTER, hasta que aparezca por
pantalla SETUP.
LOCAL INFO: Muestra todas las características de
dispositivo.
• DIR LOC: corresponde a la dirección local del
dispositivo. En función de este valor, creará la red
local a la que debe conectarse para configurarlo de
forma remota.
• SSID: es el nombre de la red WIFI a la que se
encuentra conectado el dispositivo.
• PWD: es la contraseña que se ha introducido para
la SSID.
• UNET: es la dirección IP del UNET.
• PORT IN y PORT OUT: son los puertos de entrada
y salida hacia donde se dirigen los mensajes.
• IP: es la IP local del dispositivo.
LOCAL SETUP: apartado en el que puede configurar de
forma local el dispositivo.
Al soltar el botón de ENTER aparecerá el desplegable de
configuración con todas las opciones posibles.

15
R. 12/21 838 860
SAMOA Industrial, S.A. · Pol. Ind. Porceyo, I-14 · Camino del Fontán, 831 · 33392 - Gijón - Spain · Tel.: +34 985 381 488 · www.samoaindustrial.com
EN
2021_12_22-17:00
ES
MODO DE FUNCIONAMIENTO
PROCESO
En primer lugar puede modificar la dirección local
del dispositivo mediante los botones ARRIBA y
ABAJO.
Para pasar al siguiente punto debe pulsar el botón
ENTER. A continuación pasará al proceso de
configuración de la conexión WIFI. El primer punto
será establecer la dirección IP del UNET.
Puede moverse a lo largo de los diferentes dígitos
con los botones DERECHA/IZQUIERDA, y moverse en
cada uno de ellos del 0-9 mediante los botones
ARRIBA/ABAJO. Una vez establecida la IP correcta,
pulse ENTER. En este momento, el dispositivo buscará
de forma automática las redes disponibles y mostrará
los SSID de las mismas, para que mediante los
botones ARRIBA/ABAJO se seleccione la SSID correcta
y confirmemos pulsando ENTER nuevamente.
Al igual que para la IP del UNET, puede moverse a lo
largo de los diferentes dígitos utilizando los botones
IZQUIERDA/DERECHA y en cada uno de ellos puede
moverse a lo largo de los diferentes símbolos/letras/
números ASCII mediante los botones ARRIBA/ABAJO.
Para confirmar la contraseña pulse ENTER.
En este momento, el dispositivo comenzará a realizar
el proceso de conexión a la RED seleccionada.
Si todo el proceso, termina de forma correcta, se mostrará
en primer lugar, la dirección IP que se haya sido asignada,
junto con la puerta de enlace y la máscara de subred.
A continuación debe introducir la CONTRASEÑA
correspondiente para la SSID seleccionada.
Por último, se mostrará un mensaje de configuración
OK, antes de que el dispositivo se reinicie.
NOTA: En caso de que se produzca algún error
durante el proceso de conexión a la red WIFI, se
mostrará un mensaje de ERROR. A partir de la versión
1.02, si el ERROR es debido a un SSID o una
CONTRASEÑA incorrecta se indicará de forma
específica.
1 2
4
6
3
5

16 838 860 R. 12/21
SAMOA Industrial, S.A. · Pol. Ind. Porceyo, I-14 · Camino del Fontán, 831 · 33392 - Gijón - Spain · Tel.: +34 985 381 488 · www.samoaindustrial.com
2021_12_22-17:00
ES
DIAGNÓSTICO Y SOLUCIÓN DEL PROBLEMAS
Síntoma Posible causa Solución
Sin conexión (logo NO WIFI) RED WIFI caída o SSID/PASSWORD
mal configurados.
Comprobar red WIFI y parámetros de
configuración
Conectada (logo WIFI) pero no
hay comunicación
Problema cableado Verificar cableado
Problema configuración Verificar configuración
INDICADORES LED Y DE DIAGNÓSTICO
LED DESCRIPCIÓN
POWER Indica que el equipo está conectado
WIFI LINK Indica que el equipo tiene conexión WIFI
E.O.L. Si está encendido indica que está activa la resistencia de final de línea
CAN1 Si está encendido indica que la red CANBUS 1 está online
BYP1 Si está encendido indica que hay un problema en la comunicación de la red CANBUS 1 y las elec-
troválvulas están abiertas para permitir el dispensado en modo de emergencia
CAN2 Si está encendido indica que la red CANBUS 2 está online
BYP2 Si está encendido indica que hay un problema en la comunicación de la red CANBUS 2 y las
electroválvulas están abiertas para permitir el dispensado en modo de emergencia

17
R. 12/21 838 860
SAMOA Industrial, S.A. · Pol. Ind. Porceyo, I-14 · Camino del Fontán, 831 · 33392 - Gijón - Spain · Tel.: +34 985 381 488 · www.samoaindustrial.com
EN
2021_12_22-17:00
ES
ESPECIFICACIONES
INFORMACIÓN SOBRE DESECHOS DE RESIDUOS
TENSIÓN DE ALIMENTACIÓN 12-24 V DC
CORRIENTE DE ENTRADA 1 A
PANTALLA Pantalla LCD 53,2x31,7
LEDS DE ESTADO 7
CONEXIONES 1 x CAN BUS ramal, 2 x CAN BUS troncal
El símbolo anterior indica que, de acuerdo con las
normativas locales, su producto y/o su batería deberán
desecharse de manera independiente de los residuos
domésticos. Cuando este producto alcance el final de su
vida útil, deberá llevarlo a un punto de recogida designado
por las autoridades locales. La recogida separada y el
reciclaje del producto o su batería en el momento de su
desecho ayudarán a proteger los recursos naturales y a
garantizar su reciclaje de forma que proteja la salud de las
personas y el medio ambiente.
105 mm
35 mm
140 mm
135 mm

18 838 860 R. 12/21
SAMOA Industrial, S.A. · Pol. Ind. Porceyo, I-14 · Camino del Fontán, 831 · 33392 - Gijón - Spain · Tel.: +34 985 381 488 · www.samoaindustrial.com
2021_12_22-17:00
FR
INTRODUCTION
AVERTISSEMENT!
Cet équipement est destiné à un usage
professionnel. Lisez toutes les instructions de ce
manuel avant de l’utiliser.
!• Cet équipement est destiné à être intégré dans un système de
gestion pour permettre la connexion WIFI entre les composants.
• N’utilisez l’équipement que pour l’usage auquel il est destiné.
• Cet équipement n’est pas approuvé pour une utilisation
dans des transactions commerciales.
• Ne pas altérer ou modifier l’équipement.
• Vérifiez la bonne configuration du système de surveillance
avant la première utilisation.
DESCRIPTION
VUE AVANT
VUE ARRIÈRE
VUE DE HAUT
VUE D’EN BAS
Nº ÉLÉMENT DESCRIPTION
1BUS CAN
(tronc - IN)
Active la connexion de
l’entrée CAN BUS
2BUS CAN
(branche - GROUP)
Fournit l’alimentation au
répéteur WIFI
3BUS CAN
(tronc - OUT)
Permet la connexion de
la sortie CAN BUS
Nº ÉLÉMENT DESCRIPTION
1 Clavier Permet de configurer l’équipement
2LED d’état Indiquer l’état de l’équipement
3Écran LCD Ils permettent de visualiser la
configuration de l’équipement
Nº ÉLÉMENT DESCRIPTION
1Étiquette des
caractéristiques
Principales caractéristiques
techniques de l’équipement
2Trous de
montage Trous de montage
Nº ÉLÉMENT DESCRIPTION
1Antenne WIFI Permet la connexion WIFI
IN
12
GROUP
3
OUT
1
2
3
1
1
2
2

19
R. 12/21 838 860
SAMOA Industrial, S.A. · Pol. Ind. Porceyo, I-14 · Camino del Fontán, 831 · 33392 - Gijón - Spain · Tel.: +34 985 381 488 · www.samoaindustrial.com
EN
2021_12_22-17:00
FR
INSTALLATION ET CONFIGURATION
En option, l’unité peut être fixée à l’aide des trous de fixation (2). Espacement des trous : 154 mm.
Pour installer le module WIFI Repeater dans n’importe quel
dispositif NEXU avec CAN BUS, vous devez suivre la
procédure suivante:
1. Connectez un dispositif NEXU alimenté au connecteur
CAN BUS (branche) du répéteur WIFI. Ce canal est celui
qui fournit l’alimentation au répéteur WIFI.
FIXATION DE L’ÉQUIPEMENT
ASSEMBLAGE
NOTE: Pour un fonctionnement correct de l’appareil, il est
donc indispensable de connecter l’alimentation au
connecteur CAN BUS (branche).
2. Vous pouvez connecter les dispositifs NEXU aux deux
autres connecteurs CAN BUS (trunk) du répéteur WIFI,
sans avoir besoin d’inclure une alimentation électrique.
Connexion du module Wifi à un réseau Wifi
Pour configurer l’appareil à distance (Mode 1 ou 2), il sera
nécessaire de se connecter à l’appareil via le réseau WIFI
qu’il génère.
CONFIGURATION DE L’ÉQUIPEMENT
Le SSID de votre réseau local est “UPOWER-X” où X sera
l’adresse locale de l’appareil, et peut être changé
localement par sa configuration. Le mot de passe pour
accéder à ce réseau est “123456789”.

20 838 860 R. 12/21
SAMOA Industrial, S.A. · Pol. Ind. Porceyo, I-14 · Camino del Fontán, 831 · 33392 - Gijón - Spain · Tel.: +34 985 381 488 · www.samoaindustrial.com
2021_12_22-17:00
FR
Mode 1. Via un PC (Windows) avec l’application de configuration SAMOA.
INSTALLATION ET CONFIGURATION
Mode 2. Par le biais d’un téléphone mobile (Android)
avec l’APP de configuration SAMOA.
Mode 3. Dans le dispositif lui-même, à travers sa section
de configuration, qui est expliquée dans la section
suivante dans le mode de fonctionnement.
Cette application ne vous demande que
de saisir trois paramètres:
• SERVEUR IP: correspond à l’IP de
l’UNET de l’installation.
• SSID: nom du réseau WIFI du client
auquel le répéteur doit se connecter.
CONTRASEÑA: mot de passe du
réseau WIFI du client auquel le
répéteur doit être connecté.
Pour terminer le processus, cliquez sur
“Soumettre” et le processus de configuration
démarrera automatiquement.
Avec cet APP, vous devez à nouveau saisir trois paramètres:
• UNET IP: correspond à l’IP de l’UNET de
l’installation.
• SSID: nom du réseau WIFI du client auquel le
répéteur doit se connecter.
• PASSWORD: mot de passe du réseau WIFI du client
auquel le répéteur doit être connecté.
Pour terminer le processus, appuyez sur “SEND” et le
processus de configuration démarrera automatiquement.
Seite wird geladen ...
Seite wird geladen ...
Seite wird geladen ...
Seite wird geladen ...
Seite wird geladen ...
Seite wird geladen ...
Seite wird geladen ...
Seite wird geladen ...
Seite wird geladen ...
Seite wird geladen ...
Seite wird geladen ...
Seite wird geladen ...
Seite wird geladen ...
Seite wird geladen ...
Seite wird geladen ...
Seite wird geladen ...
-
 1
1
-
 2
2
-
 3
3
-
 4
4
-
 5
5
-
 6
6
-
 7
7
-
 8
8
-
 9
9
-
 10
10
-
 11
11
-
 12
12
-
 13
13
-
 14
14
-
 15
15
-
 16
16
-
 17
17
-
 18
18
-
 19
19
-
 20
20
-
 21
21
-
 22
22
-
 23
23
-
 24
24
-
 25
25
-
 26
26
-
 27
27
-
 28
28
-
 29
29
-
 30
30
-
 31
31
-
 32
32
-
 33
33
-
 34
34
-
 35
35
-
 36
36


in anderen Sprachen
- English: Samoa 383210
- français: Samoa 383210
- español: Samoa 383210
Verwandte Artikel
-
Samoa 383700 Instructions Manual
-
-
-
-
-
-
-
-
-