
Quick Start
Guide
Aranet PRO

SENSOR DATA
WIFI
LAN
12V
POWER FROM BATTERY
OFF ON LAN RESET
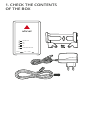
1. CHECK THE CONTENTS
OF THE BOX

PZ2
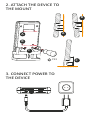
3. CONNECT POWER TO
THE DEVICE
2. ATTACH THE DEVICE TO
THE MOUNT
A
B
C
C
A
B

SENSOR DATA
WIFI
LAN
12V
POWER FROM BATTERY
OFF ON LAN RESET
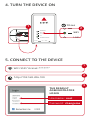
Username: root
Password: changeme
THE DEFAULT
ADMINISTRATOR
LOGIN
5. CONNECT TO THE DEVICE
4. TURN THE DEVICE ON
1
2
3
http://192.168.206.100
WiFi SSID “Aranet-******”
10 sec
SEN SOR DATA
WIFI
LAN
12V
POWER FROM BATTERY
OFF ON LAN RESET
2
ON
1

Change your password, modify and add users
in the Users setting section.
Set the device time in the System > Time setting
section.
Scan the availability of the radio channel in the
Sensors > Radio setting section.
Pair your sensors by pressing the Add sensor
button in the Sensors > Sensors setting section.
https://aranet.com/product/aranet-pro/
Enter the Notifications setting section, to
configure your e-mail notifications.
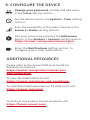
6. CONFIGURE THE DEVICE
Please refer to the Aranet PRO User Guide for
detailed instructions
https://aranet.com/product/aranet-pro/
#documentation
To view Terms&Conditions visit
https://aranet.com/terms-and-conditions/
To view Returns&Guarantees or fill RMA form visit
https://aranet.com/rma/
ADDITIONAL RESOURCES
To find out more about Aranet products visit
https://forum.aranet.com/

DEUTSCH
1 Überprüfen Sie den Lieferumfang
2 Montieren Sie das Gerät an der Halterung
3 Verbinden Sie das Gerät mit der Spannungsversorgung /
Optionales Zubehör PoE
4 Schalten Sie das Gerät ein
5 Stellen Sie eine Verbindung mit dem Gerät her
6
Ändern des Passworts und Ändern oder Hinzufügen von
Benutzer in den Benutzer.
Einstellen der Gerätezeit in System > Zeit.
Prüfen Sie die Kanalverfügbarkeit in Sensoren > Radio.
Um Sensoren anzubinden, drücken Sie die Sensor hinzugfügen
in Sensoren > Sensoren.
https://aranet.com/product/aranet-pro/
E-Mail-Benachrichtigungen verwalten in den Benachrichtigung.
Um das Aranet PRO Benutzerhandbuch einzusehen, besuchen Sie
https://aranet.com/product/aranet-pro/#documentation
Konfigurieren Sie das Gerät
ESPAÑOL
1
2 Adjunte el dispositivo al soporte
Verifique el contenido de la caja
3 Conecte el dispositivo a la energía / Accesorio opcional PoE
4 Encienda el dispositivo
5 Conéctese al dispositivo
6
Para ver la Guía del usuario de Aranet PRO, visite
https://aranet.com/product/aranet-pro/#documentation
Configura el dispositivo
Cambie su contraseña, modifique y agregue usuarios en la
sección Configuración de Usuarios
Configure la hora del dispositivo en la sección Configuración
del Sistema > Tiempo
Escanee la disponibilidad del canal de radio en la sección
Sensores > Configuración de Radio
Empareje sus sensores presionando el botón Añadir sensor
en la sección de configuración Sensores > Sensores
https://aranet.com/product/aranet-pro/
Ingrese a la sección Configuración de Notificaciones para
configurar sus notificaciones por correo electrónico.

FRANÇAIS
1
2 Attacher l’appareil à la monture
3 Connectez l’alimentation à l’appareil / Accessoire optionnel de PoE
4 Allumez l’appareil
5 Connectez à l’appareil
Configurer l’appareil
6
Changez votre mot de passe, modifiez et ajoutez des
utilisateurs dans la section Utilisateurs.
Définissez l’heure de l’appareil dans la section Système > Temps.
Parcourez la disponibilité du canal radio dans la section
Capteurs > Radio
.
Associez vos capteurs en appuyant sur le bouton Ajouter
un capteur dans la section Capteurs > Capteurs.
https://aranet.com/product/aranet-pro/
Entrez dans la section Notifications pour configurer vos
notifications par par e-mail.
Pour voir le guide de l’utilisateur Aranet PRO, veuillez visiter
https://aranet.com/product/aranet-pro/#documentation
Vérifiez le contenu de la box
ITALIANO
1
2Attaccare il dispositivo al supporto
Verificare il contenuto della scatola
3Collegare il dispositivo all’alimentazione / Accessorio opzionale PoE
4Accendere il dispositivo
5Connettersi al dispositivo
Configurare il dispositivo
6
Cambiare la password, modificare e aggiungere utenti nella
sezione Impostazioni Utenti.
Impostare l’orario nella sezione Sistema > Impostazione Ora.
Scansionare la disponibilità di canali radio nella sezione
Sensori > Impostazioni Radio.
Allineare i sensori premendo il pulsante Aggungi Sensore nella
sezione Sensori > Impostazioni Sensori.
https://aranet.com/product/aranet-pro/
Accedere alla sezione Impostazioni Notifiche per configurare
notifiche via email.
Per consultare la Guida d’Utente Aranet PRO visitare
https://aranet.com/product/aranet-pro/#documentation

LATVIEŠU
1 Pārbaudiet iepakojuma saturu
2 Pieskrūvējiet stiprinājumu pie ierīces
3 Pievienojiet ierīci pie elektrobarošanas / Papildus PoE aksesuārs
4 Ieslēdziet ierīci
5 Pieslēdzieties ierīcei
6 Iestatiet ierīci
Nomainiet paroli, modificējiet un pievienojiet lietotājus
Lietotāji sadaļā.
Iestatiet laiku un datumu Sistēma > Laiks sadaļā.
Pārbaudiet radio kanālu pieejamību Devēji > Radio sadaļā.
Pievienojiet devējus, nospiežot Pievienot devēju pogu
Devēji > Devēji sadaļā.
https://aranet.com/product/aranet-pro/
Apmeklējiet sadaļu Paziņojumi, lai mainītu e-pastu
paziņojumu iestatījumus.
Lai skatītu pilnu Aranet PRO rokasgrāmatu, apmeklējiet
https://aranet.com/product/aranet-pro/#documentation
NEDERLANDS
1 Controleer inhoud van de doos
2 Bevestig de standaard aan het apparaat
3 Sluit de stroombron aan / PoE optionele accessoire
4 Zet het apparaat aan
5 Verbind aan het apparaat
Configureer het apparaat
6
Verander password, voeg Gebruikers toe in Instellingen.
Stel tijd in Systeem > Tijd.
Scan beschikbaarheid radiokanalen in Sensoren > Radio.
Verbind sensor met apparaat door te drukken op Voeg
sensor toe in Sensoren > Sensoren instellingen.
https://aranet.com/product/aranet-pro/
Kies Meldingen om e-mail notificaties in te stellen.
Om Aranet PRO handleiding te bekijken bezoek
https://aranet.com/product/aranet-pro/#documentation

NORSK
1 Sjekk boksens innhold
2 Fest enheten til festeanordningen
3 Kobl strøm til enheten / Valgfritt tilbehør til PoE
4 Slå enheten på
5 Tilkobl enheten
Konfigurer enheten
6
Endr passordet, konfigurer og legg til brukere i avdeling Users.
Angi enhetens tid i avdeling av innstillinger System > Time.
Utfør skanning av tilgjengelige radiokanaler i avdeling av
innstillinger Sensor > Radio.
Utfør paring av dine sensorer ved å trykke på knappen
Add sensor i avdeling av innstillinger Sensors > Sensors.
https://aranet.com/product/aranet-pro/
Gå inn i avdeling av innstillinger Notifications for å
konfigurere dine e-post varslinger.
For å se på brukerveiledning til “Aranet PRO”, vennligst besøk
https://aranet.com/product/aranet-pro/#documentation
PORTUGUESES
1
2 Anexar o dispositivo ao suporte
Verifique o conteúdo da caixa
3 Conecte o dispositivo à energia elétrica / Acessório opcional PoE
4 Ligue o aparelho
5 Conecte-se ao dispositivo
Configurar o dispositivo
6
Utilizadores, modifique e adicione usuários na seção
Configuração do usuário.
Defina a hora do dispositivo na seção Sistema > Hora.
Analise a disponibilidade do canal de rádio na seção
Sensores > Rádio.
Emparelhe seus sensores pressionando o botão Adicionar
sensor na seção de configuração Sensores > Sensores.
https://aranet.com/product/aranet-pro/
Entre na seção de configuração de Notificações para
configurar suas notificações por e-mail.
Para ver o Guia do Usuário do Aranet PRO, visite
https://aranet.com/product/aranet-pro/#documentation

РУССКИЙ
1 Проверьте содержимое коробки
2 Присоедините устройство к креплению
3 Подключите питание к устройству / Дополнительный PoE
аксессуар
4 Включите устройство
5 Подключитесь к устройству
6 Произведите настройку устройства
Измените свой пароль, измените и добавьте
пользователей в разделе Пользователи.
Установите время устройства в Система > раздел Время.
Просканируйте доступность радиоканалов в Датчики >
раздел Радио.
Присоедините свои датчики, нажимая кнопку Добавить
датчик в Датчики > раздел Датчики.
https://aranet.com/product/aranet-pro/
В разделе Уведомления настройте свои уведомления
по электронной почте.
Для просмотра руководства пользователя Aranet PRO посетите
https://aranet.com/product/aranet-pro/#documentation
SUOMALAINEN
1 Tarkista laatikon sisältö
2 Liitä laite kiinnikkeeseen
3 Kytke virta laitteeseen / PoE valinnainen lisävaruste
4 Kytke laite päälle
5 Yhdistä laitteeseen
6 Määritä laitteen asetukset
Vaihda salasanasi, muuta ja lisää käyttäjät Users
asetusten osiossa.
Aseta laitteen aikaa System > Time asetusten osiossa.
Tarkista radiokanavien saatavuus Sensors > Radio
asetusten osiossa.
Muodosta laitepari painamalla Add sensor-painiketta
Sensors > Sensors asetusten osiossa.
https://aranet.com/product/aranet-pro/
Määritä sähköposti-ilmoitukset Notifications asetusten
osiossa.
Nähdäksesi Aranet PRO Käyttöohjee ole hyvä ja käy sivulla
https://aranet.com/product/aranet-pro/#documentation

SVENSKA
1 Kontrollera innehållet i boxen
2 Fäst enheten på fästet
3 Anslut ström till enheten / Tillvalstillbehör för PoE
4 Slå på enheten
5 Anslut enheten
Konfigurera enheten
6
Ändra ditt lösenord, konfigurera och lägg till användare i
inställningssektion Users.
Ställ in enhetstid i inställningssektion System > Time.
Utför skanning av tillgängliga radiokanaler i
inställningssektion Sensors > Radio.
Utför parning av dina sensorer genom att trycka på knappen
Add Sensor i inställningssektion Sensors > Sensors.
https://aranet.com/product/aranet-pro/
Gå in i inställningssektion Notifications för att konfigurera
dina e-post anmälningar.
För att läsa Användarmanual av “Aranet PRO”, besök vänligen
https://aranet.com/product/aranet-pro/#documentation
TÜRK
1 Kutunun içindekileri kontrol edin
2 Cihazı dayanağına monte edin
3 Cihaza güç kaynağını bağlayın / PoE opsiyonel aksesuar
4 Cihazı açın
5 Cihaza bağlayın
Cihazı konfigüre edin
6
Parolanızı değiştirin, Kullanıcılar ayarları bölümünde
kullanıcı ekleyin veya modifiye edin.
Sistem cihaz zaman ayarını set edin > Zaman ayarı bölümü.
Sensörler radyo kanalının kullanılabilirliğini tara > Radyo
ayarları bölümü.
Sensörler Sensör Ekle düğmesine basarak sensörlerinizi
eşleştirin > Sensörler ayarları bölümü.
https://aranet.com/product/aranet-pro/
E-posta bildirimlerinizi yapılandırmak için Bildirimler ayar
bölümüne girin.
Aranet PRO kullanım kılavuzunu görmek için lütfen ziyaret edin
https://aranet.com/product/aranet-pro/#documentation

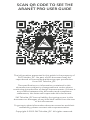
SCAN QR CODE TO SEE THE
ARANET PRO USER GUIDE
The information presented in this guide is the property of
SAF Tehnika, JSC. No part of this document may be
reproduced or transmitted without proper permission
from SAF Tehnika, JSC.
The specifications or information contained in this
document are subject to change without notice due to
continuing introduction of design improvements. If there is
any conflict between this document and compliance
statements, the latter will supersede this document.
SAF Tehnika, JSC has no liability for typing errors in this
document or damages of any kind that result from the use
of this document.
To get up to date information about accessories and their
availability, please contact sales representative.
Copyright © 2022 SAF Tehnika, JSC. All rights reserved.
v020322
-
 1
1
-
 2
2
-
 3
3
-
 4
4
-
 5
5
-
 6
6
-
 7
7
-
 8
8
-
 9
9
-
 10
10
-
 11
11
-
 12
12


