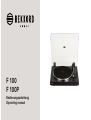
REKKORD AUDIO F 100 EasyLounge Hi-Fi Turntables Benutzerhandbuch
- Typ
- Benutzerhandbuch

Bedienungsanleitung
Operating manual
F 100
F 100P


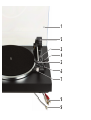
1
2
3
4
5
6
7
8
9

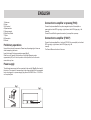
1Abdeckhaube
2Scharnier
3Lifthebel
4Drehzahleinstellung
5Tonarmstütze
6Start-Stop-Taste
7Abtastnadel
8Phonokabel
9Masseleitung
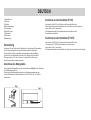
Vorbereitung
Entnehmen Sie das Gerät und alle Zubehörteile der Verpackung. Bitte bewahren
Sie alle Verpackunggsteile für einen eventuellen späteren Transport auf.
Scharniere 2in die dafür vorgesehenen Aussparungen einstecken (Fig. 1).
Schieben Sie die Abdeckhaube 1parallel zu der Stellung der Scharniere 2
(Öffnungswinkel ca. 60°) satt in diese ein. In dieser Stellung läßt sich die
Abdeckhaube jederzeit wieder abnehmen.
Anschluss des Netzgerätes
Das mitgelieferte Netzgerät wird an die Anschlussbuchse 6 (Fig. 2) auf der Rückseite
des Gerätes angeschlossen.
Primärseitig ist das Netzgerät entsprechend der Spannungsangabe auf dem
Typenschild entweder in die Netzsteckdose mit 230 V/50 Hz oder 115 V/60 Hz
einzustecken.
Fig. 1
Fig. 2
Anschluss an den Verstärker (F100)
Verbinden Sie die RCA-(Cinch)-Stecker des Phonokabels 8mit dem
Phono-Magnet-Eingang des Verstärkers oder Vorverstärkers (rot oder schwarz =
rechter Kanal, weiß = linker Kanal).
Den Masseanschluss 9an die Masseschraube des Verstärkers oder
Vorverstärkers anschließen.
Anschluss an den Verstärker (F100 P)
Verbinden Sie die RCA-(Cinch)-Stecker des Phonokabels 8mit dem
Line-Eingang (z.B. CD/AUX) des Verstärkers (rot oder schwarz =
rechter Kanal, weiß = linker Kanal).
Der Masseanschluss 9wird bei Modellen mit integriertem Vorverstärker nicht benötigt.
DEUTSCH

Automatischer Start, Drehzahlauswahl 33/45
Entsprechend der aufgelegten Schallplatte muß die Drehzahl gewählt werden.
Mit der Wahl der Plattentellerdrehzahl 33 oder 45 U/min 4wird automatisch auch
der Plattendurchmesser für den automatischen Start vorgewählt.
Nadelschutz für die Abtastnadel nach vorne abziehen und Taste 6auf Start
schieben. Der Tonarm setzt automatisch auf der Schallplatte auf.
Manueller Start, Stop
Entsprechend der aufgelegten Schallplatte muß die Drehzahl gewählt werden.
Wählen Sie mit dem Schalter 4die Drehzahl 33 oder 45 U/min.
Ziehen Sie den Nadelschutz nach vorne ab und bringen Sie den Lifthebel 3in
Stellung .
Nehmen Sie den Tonarm von der Tonarmstütze 5und schwenken Sie ihn über die
Einlaufrille der Schallplatte. Der Tonarm wird jetzt mit dem Lifthebel 3bedämpft
und plattenschonend abgesenkt .
Mit dem Lifthebel kann der Tonarm an jeder beliebigen Stelle - auch zur
kurzzeitigen Spielunterbrechung - abgehoben werden (Lifthebel in Stellung ).
Der Plattenteller dreht sich weiter.
Am Ende der Schallplatte wird der Tonarm automatisch zur Tonarmstütze
zurückgeführt und das Gerät abgeschaltet.
Sie können den Plattenspieler auch abschalten, indem Sie die Taste 6auf Stop
schalten, oder den Lifthebel 3in Stellung bringen und den Tonarm auf die
Tonarmstütze 5zurückführen.

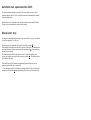
1Dustcover
2Hinge
3Cue control
4Speed selector
5Tonarm support
6Start-Stop-Switch
7Stylus
8Phonocable
9Ground
Preliminary operations
Unpack the unit and all accessories. Please keep the packaging for future use
when transporting the device.
Insert the hinges 2in the appropriate recesses (g. 1).
Slide the cover 1parallel to the position of the hinges 2(opening angle
approximately 60°) until it locks in position. In this position, the cover can be
removed at any time.
Power supply
The delivered power supply will be connected to the socket 6 (g. 2) at the back of
the device. The mains set, corresponding to the voltage indication on the nameplate
has to be plugged in to a power-supply plug either with 230V/50 Hz or 115 V/60 Hz
on the primary side.
Connection to amplier or preamp (F100)
Connect the phonocables 8to the phono-magnetic-inputs of the amplier or
preamp (red or black RCA-type plug = right channel, white RCA-type plug = left
channel).
Connect Ground 9to the ground connector of your amplier or preamp.
Connection to amplier (F100 P)
Connect the phonocables 8to a Line Input (CD/AUX) of your amplier (red or black
RCA-type plug = right channel, white RCA-type plug = left
channel).
The Ground 9has no function in this case.
ENGLISH
Fig. 1
Fig. 2

Automatic start, speed selection 33/45
The speed must be selected according to the record which is in place. If the
turntable speed is set to 33 or 45 rpm 4the record size is automatically selected
for the automatic start.
Remove stylus cover forwards for the pick-up stylus and move switch 6to Start.
The pick-up arm automatically lowers onto the record.
Manual start, stop
The speed must be selected according to the record which is in place. Use switch
6 to select a speed of 33 or 45 rpm.
Remove stylus cover forwards and move lift lever 3into position .
Now position the tonearm over the lead-in groove of the record. The tonearm can
now lowered slowly onto the record using the cueing lever 3, thus preventing
damage to your records.
The tonearm can be raised at any position, also for brief interruptions when
playing, by using the cue control lever (cueing in position ). The platter continu-
es to rotate in this case.
At the end of record, the tonearm is automatically repositioned back on the
tonearm post and the unit is switched off.
— You can also switch off the turntable by setting switch 6to Stop or setting the
cueing lever 3to position and repositioning the tonearm on the tonearm rest.

Sicherheitshinweise
Um Brandgefahr oder elektrischen Schäden vorzubeugen, darf das Gerät nicht Feuchtigkeit oder Regen ausgesetzt werden. Bitte öffnen Sie das Gerät nicht!
Halten Sie das Verpackungsmaterial, wie z.B. Folien von Kindern fern. Bei Missbrauch könnte Erstickungsgefahr bestehen.
ACHTUNG!
Entsorgung von Elektrogeräten durch Verbraucher in privaten Haushalten innerhalb der EU
Werfen Sie das Gerät am Ende seiner Lebenszeit nicht in den normalen Hausmüll. Erkundigen Sie sich nach Möglichkeiten einer umweltgerechten
Entsorgung bei den örtlichen Behörden, bei Wertstoffhöfen, oder dort, wo Sie das Gerät erworben haben.
Dieses Produkt entspricht den geltenden EU-Vorschriften
Safety precautions
To prevent the risk of re or electrical damage, do not expose the device to moisture or rain. Please do not open the device!
Keep the packaging material, such as plastic foils, away from children. Danger of asphyxiation by misuse.
CAUTION!
Disposal of electrical appliances by consumers in private households within the EU
At the end of its lifetime, do not throw the device away with the normal household waste. Ask about the options for environmentally sound disposal
at the local authorities, at recycling centers, or where you purchased the device.
This product complies with applicable EU regulations.

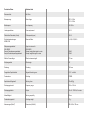
Technische Daten Technical data
Riemenantrieb Belt Drive
Netzspannung Main voltage 230 V / 50 Hz
115 V / 60 Hz
Netzfrequenz Line frequency 50 / 60 Hz
Leistungsaufnahme Power equirement 1,5 W
Plattenteller-Drehzahlen (U/min) Platter speeds (rpm) 33, 45
Gleichlaufschwankungen Wow and utter +/- 0,06 / 0,035 %
WRMS / DIN
Störspannungsabstand Signal-to-noise ratio
(DIN 45500) (DIN 45500)
Rumpel-Fremdspannungsabstand Rumpel unweighted signal-to-noise 40 dB
Rumpel-Geräuschspannungsabstand Rumpel weighted signal-to-noise 62 dB
Effektive Tonarmlänge Effective tonearm length 211 mm
Kröpfungswinkel Offset angle 26°
Überhang Overhang 19,5 mm
Tangentialer Spurfehlwinkel Tangential tracking error 0,15° / cm Rad.
Tonabnehmer Cartridge AT3600
Empfohlene Auagekraft Tracking force 20 mN (2g)
Übertragungsbreich Frequency range 20 Hz - 20 kHz
Übertragungsfaktor Output 3.5 mV / 1000 Hz, 5 cm/sec.
Abtastfähigkeit Tracking capability 60 um
Tonabnehmergewicht Cartridge weight 5,7 g
Abmessungen (BxHxT) Dimensions (WxHxD) 430 x 365 x 130 mm


Askus
Technicalquestions: support@rekkord-audio.com
General questions: info@rekkord-audio.com
Moreinfo
www.rekkord-audio.com
REKKORDAudio
a Divisionof AudioTuningVertriebs GmbH
Billingaddress:
Margaretenstrasse 98
A-1050Wien
AUSTRIA
Headquarter&Logistics:
Wirtschaftspark A5 Mistelbach/Wilfersdorf
Analogweg 1,2130Mistelbach
AUSTRIA
-
 1
1
-
 2
2
-
 3
3
-
 4
4
-
 5
5
-
 6
6
-
 7
7
-
 8
8
-
 9
9
-
 10
10
-
 11
11
-
 12
12


