Joie Bold R Booster Car Seat Benutzerhandbuch
- Kategorie
- Autositz
- Typ
- Benutzerhandbuch

1/2/3(9–36kg)
bold R
booster
Instruction Manual
Manual de Instruções
Manual de instrucciones
Manuel d’utilisateur
Bedienungsanleitung
Handleiding
Bebek arabasi Kullanma kilavuzu
GB
PT
ES
FR
TR
DE
NL
Használati utasítás
HU

2
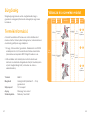
Welcome to Joie™
Congratulations on becoming part of the Joie family! We are so excited
to be part of your journey with your little one. While traveling with Joie
bold™ R booster you are using a high quality, fully certified safety Group
1/2/3 booster. This product is suitable for use with children weighing
9-36kg (approximately 1– 12 years). Please carefully read this manual and
follow each step to ensure a comfortable ride and best protection for your
child.
Please confirm
This booster is approved to UN ECE regulation No. 44, 04 series of
amendments. This booster can be installed using a 3 point retractable
adult seat belt approved to UN ECE regulation No. 16 or other equivalent
standards.
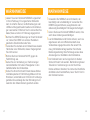
Booster
! IMPORTANT: KEEP FOR FUTURE REFERENCE. PLEASE READ
CAREFULLY.
Please keep the instruction manual in the storage compartment at the bot-
tom of the booster as right figure.
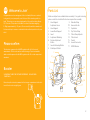
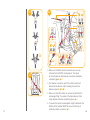
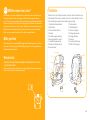
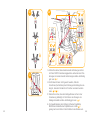
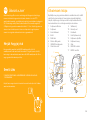
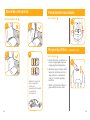
GB Parts List
Make sure all parts are available before assembly. If any part is missing,
please contact local retailer. No tools are required for assembly.
1 Head Support
Adjustment Lever
2 Head Support
3 Lower Back Support
4 Insert
5 Adjustment Webbing
6 Recline Adjustment
Button
7 Isosafe Releasing Button
8 Side Impact Shield
9 Shoulder Strap
10 Harness Buckle
11 Cupholder
12 Top Tether Strap
13 Tether Strap Adjuster
14 Tether Hook
15 Pocket
16 Isosafe Connector
17 ISOFIX Guides
11
12
13
14
15
16
2
3
4
10
5
9
1
7
8
6
17

3 4
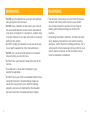
WARNING
! Do take care to locate and install the booster so
that it is not liable to become trapped by a move-
able seat or in a door of the vehicle.
! This booster is designed ONLY for child weighing
9-36kg (approximately 1 – 12 years or under).
! Make sure that the straps holding the restraint to
the vehicle should be tight and any straps restrain-
ing the child should be adjusted to the child’s
body. Check to make sure that the straps are not
twisted.
! After your child is placed in this booster, the safety
belt must be used correctly, and ensure that any
lap strap is worn low down, so that the pelvis is
firmly engaged.
! Replace the booster after an accident of any kind.
An accident can cause unseen damage to the
booster.
! NEVER use a booster if it has damaged or missing
parts. DO NOT use a cut, frayed or damaged
vehicle seat belt.
WARNING
! NEVER leave your child unattended with this
booster.
! Failure to properly use this booster increases the
risk of serious injury or death in a sharp turn,
sudden stop or crash.
! DO NOT use this booster without the soft goods.
! The soft goods should not be replaced with any
besides the ones recommended by the manufac-
turer, because the soft goods constitute an inte-
gral part of the booster performance.
! DO NOT use any load bearing contact points other
than those described in the instructions and
marked on the booster.
! NEVER leave luggage or other objects unsecured
in a vehicle, they are liable to cause injuries in the
event of a collision.
! DO NOT use in any configuration not shown in the
instructions.

5 6
WARNING
! NEVER give this booster to someone else without
also giving them this manual.
! NEVER leave a booster unsecured in your vehicle.
An unsecured booster can be thrown around and
may injure occupants in a sharp turn, sudden stop
or crash. Remove it or make sure that it is securely
belted in the vehicle.
! DO NOT modify your booster or use any accesso-
ries or parts supplied by other manufacturers.
! NEVER use a second-hand booster or a booster
whose history you do not know.
! DO NOT face your booster toward the rear of the
vehicle.
! To avoid burns, never put hot liquids in your
booster’s cupholder.
! DO NOT have your child in swaddled clothes when
using this booster in forward facing mode, be-
cause this may prevent your child from being
properly and securely fastened by the shoulder
harnesses and the harnesses between thighs.
WARNING
! The booster can become very hot if left in the sun.
Contact with these parts can burn your child’s
skin. Always touch the surface of any metal or
plastic parts before putting your child in the
booster.
! According to accident statistics, children are safer
when properly restrained in rear vehicle seating
positions, rather than front seating positions. For a
vehicle with a front passenger air bag, refer to your
vehicle owner’s manual as well as these instruc-
tions for a booster installation.

7 8
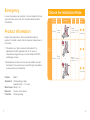
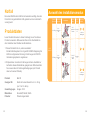
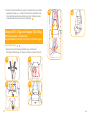
Installation
Mode InstallationReference
Age
Recline
Position
Position
1-3
harness
mode
9-25kg
Child's
Weight
ECE
R44.04
15-36kg
Reference
Images
2 3
+
23
+
+ Top Tether
Approx
1 year
to
7
years
Position
1-3
Approx
3 years
to
12
years
booster
mode or
23
+
+ Top Tether
Choose the Installation Mode
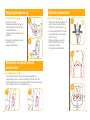
Emergency
In case of emergency or accidents, it is most important to have
your child taken care of with first aid and medical treatment
immediately.
Product Information
Read all the instructions in this manual before using this
product. If in doubt, consult either the booster manufacturer or
the retailer.
1. This booster is a ‘Semi-Universal’ child restraint. It is
approved to UN ECE regulation No. 44, 04 series of
amendments for general use in vehicles fitted with ISOFIX
anchorages systems.
2. Seat positions in other cars may also be suitable to accept
the booster. Please refer to our vehicle fitting list (on-product
as well as online at our website).
Product Bold R
Suitable for
Child weighing 9-36kg
(approximately 1 – 12 years)
Mass Group Group 1/2/3
Materials Plastics, metal, fabrics
Patent No. Patents pending

910
2
1
2
41
3
5
7
2
4
3
5
7
6
6
1
4
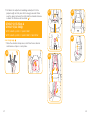
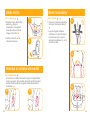
see images 1 - 4
1 2
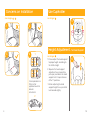
Concerns on Installation
3
see images 5
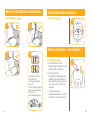
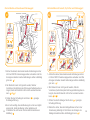
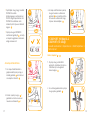
Height Adjustment – for Head Support
see images 6
1. Please adjust the head support
to proper height according to
the child's height.
2. Squeeze the head support
adjustment lever, meanwhile
pull up or push down the head
support until it snaps into one
of the 11 positions.
! Before adjusting the head
support height have your child
lean forward slightly.
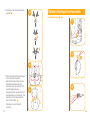
6
Use Cupholder
Check provided car
fitting list for
approved seats for
booster
attachment.
5

11 12
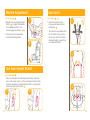
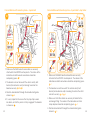
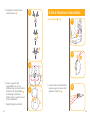
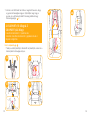
see images 7 - 8
1. Squeeze the recline adjustment
button 7, to adjust the booster
to the proper position. The
recline angles are shown as 8.
2. There are 3 recline positions
for forward facing mode.
see images 9 - 10
! Make sure to open the side impact protection shield for
more side impact safety. 9 The side impact shield will be
locked in permanently open position after it is opened for
maximum side impact safety. 10
Recline Adjustment
7
8
910
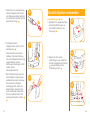
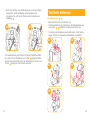
Use Side Impact Shield
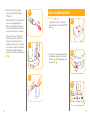
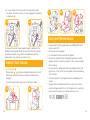
see images 11 - 16
1. Unlock the buckle of the
harnesses by pressing the
red button. 11
! To ensure the best protection
for the child, always use the
small insert when the child's
shoulder height is lower than
the headrest bottom.
Use Insert
12
11
13

13 14
15
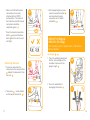
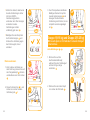
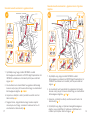
see images 17 - 22
1. To extend top tether for use,
press button on tether adjuster
and pull to lengthen. 19
12
Use Top Tether
17
18
19
14
16
2. Engage the buckle. Please
refer to 14 .
3. When the child's shoulders are
higher than the headrest
bottom without the support
from the small insert, remove
the lower body insert 16 , and
use upper body insert only until
the child does not fit
comfortably.
! This may vary depending on
regions.
1
2

15 16
see images 23 - 29
1. If required attach the plastic
guides onto the vehicle ISOFIX
bars. 23
2. Extend the Isosafe connectors
by depressing on the release
button 24 whilst pulling on the
connector. 25
Use Isosafe System
23
25
24
2. Connect the tether hook
securely to the anchorage
fitting. 20
! Use top tether for installation if
vehicle is equipped with a
tether anchorage fitting and
vehicle requirements are met
(see vehicle owner's manual).
! When not in use, top tether
must be properly stored. To
make sure the top tether is
properly stored away, remove
any slack in strap to avoid the
top tether swinging around
when the vehicle is in progress.
21 22
15
1
2
20
21
22

17 18
3. For transporting base, press
Isosafe connectors button 24
and move back Isosafe
connector so it is folded
completely. 29
! Make sure that both Isosafe
connectors are securely
attached to their ISOFIX
anchor points. The colors of
the indicators on both Isosafe
connectors should be
completely green. 26
! Press the Isosafe connectors
button 24 and push the base
back against the vehicle seat
until tight.
Removing the base
1. To remove base from the
vehicle press the release button
24 and pull the base back from
the seat. 27
2. Then press 28 -1 and pull back
on the Isosafe connector. 28 -2
26
27
28
1 2
29
see images 30 - 34
1. Press the webbing adjustment
button, while pulling out the
shoulder harnesses to the
proper length. 30
2. Press the red button to
disengage the buckle. 31
30
31
GROUP 1 (9-18kg) &
GROUP 2 (15-25kg)
With Isosafe system + 3-point-belt + top tether +
harness buckle

19 20
32
33
3. Make sure that both Isosafe connectors are securely
attached to their ISOFIX anchor points. The colors
of the indicators on both Isosafe connectors should be
completely green. 34 -1
4. The booster can not be used if the vehicle safety belt
buckle (female buckle end) is too long to anchor the
booster securely. 34 -2&34 -3
5. Make sure that tether hook are securely attached to the
anchorage fitting. The colors of the indicators on tether
strap adjuster should be completely green. 34 -4
6. To ensure the correct head support height is obtained, the
bottom of the headrest MUST be even with the top of
child’s shoulders as shown in 34 -5.
2
5
34
6
1
4
3

21 22
see images 35 - 44
! Store the shoulder strap cover, crotch belt cover, buckle
and harness straps in a safe place.
38
37
35 39
7. Pull down the adjustment webbing and adjust it to the
proper length so that your child is snugly secured. Make
sure the space between the child and the shoulder harness
is about the thickness of one hand. 34 -6
36
GROUP 2 (15-25kg) &
GROUP 3 (22-36kg)
With Isosafe system + 3-point-belt
With Isosafe system + 3-point-belt + top tether 40

23 24
1. Make sure that both Isosafe connectors are securely
attached to their ISOFIX anchor points. The colors of the
indicators on both Isosafe connectors should be
completely green. 41 -1
2. The booster can not be used if the vehicle safety belt
buckle (female buckle end) is too long to anchor the
booster securely. 41 -2&41 -3
3. Position shoulder belt through the shoulder belt guide
shown in 41 -4.
4. It is very important to ensure that any lap strap is worn
low down, so that the pelvis is firmly engaged. The booster
is shown as 41 .
2
4
41
1
3
For installation with Isosafe system + 3-point-belt + top tetherFor installation with Isosafe system + 3-point-belt
2
5
42
1
4
3
1. Make sure that both Isosafe connectors are securely
attached to their ISOFIX anchor points. The colors of the
indicators on both connectors should be completely green.
42 -1
2. The booster can not be used if the vehicle safety belt
buckle (female buckle end) is too long to anchor the child
restraint securely. 42 -2&42 -3
3. Make sure that tether hook are securely attached to the
anchorage fitting. The colors of the indicators on tether
strap adjuster should be completely green. 42 -4
4. Position shoulder belt through the shoulder belt guide
shown in 42 -5

25 26
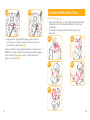
see images 45 - 49
! Please refer 35 - 40 to remove shoulder strap cover, crotch
belt cover, buckle and harness straps, and keep them
properly.
! To refit the seat pad simply reverse the steps above.
Detach Soft Goods
! Please wash the soft goods and inner padding with cold
water under 30°C.
! Do not iron the soft goods.
! Do not bleach or dry clean the soft goods.
! Do not use undiluted neutral detergent gasoline or other
organic solvent to wash the booster. It may cause damage
to the booster.
! Do not twist the soft goods and inner padding to dry with
great force. It may leave the soft goods and inner padding
with wrinkles.
! Please hang dry the soft goods and inner padding in the
shade.
! Please remove the booster from the vehicle seat if not in
use for a long period of time. Put the booster in a cool, dry
place and somewhere your child cannot access it.
Care and Maintenance
46
47 48
45
49
43 44
To ensure the correct head support height is obtained, the
bottom of the headrest MUST be even with the top of child’s
shoulders as shown in 43 and the shoulder belt must be
positioned in the red zone as shown in 44 .
5. It is very important to ensure that any lap strap is worn
low down, so that the pelvis is firmly engaged. The booster
is shown as 42 .

28
DE
11
12
13
14
15
16
2
3
4
10
5
9
1
7
8
6
17
Willkommen bei Joie™
Glückwunsch, dass Sie ein Mitglied der Joie-Familie werden! Wir freuen uns,
Ihr kleines Kind auf Reisen zu begleiten. Während Sie mit dem Kindersitz
boldTM R von Joie reisen, nutzen Sie ein hochwertiges, vollständig zertifiziertes
Produkt der Gruppe 1/2/3. Dieses Produkt eignet sich für Kinder mit einem Ge-
wicht von 9 bis 36 kg (ca. 1 bis 12 Jahre). Bitte lesen Sie diese Anleitung sorg-
fältig durch und beachten Sie jeden einzelnen Schritt, um eine komfortable
Fahrt und eine optimale Sicherheit für Ihr Kind zu gewährleisten.
Bitte prüfen
Dieser Kindersitz ist gemäß UN/ECE-Regelung No. 44/04 zugelassen. Er kann
mit einem 3-Punkt-Gurt gemäß UN/ECE-Regelung No. 16 oder vergleichbaren
Standards installiert werden.
Kindersitz
! WICHTIG: FÜR KÜNFTIGE BEZUGNAHME AUFBEWAHREN. BITTE SORG-
FÄLTIG DURCHLESEN.
Bitte bewahren Sie diese Anleitung wie rechts abgebildet im Aufbewahrungs-
fach an der Unterseite des Kindersitzes auf.
Teileliste
Stellen Sie vor der Montage sicher, dass alle Teile vorhanden sind.
Falls etwas fehlen sollte, wenden Sie sich an Ihren Händler vor Ort.
Für die Montage werden keine Werkzeuge benötigt.
1 Kopfstütze Einstellhebel
2 Kopfstütze
3 Untere Rückenstütze
4 Einsatz
5 Gurtführungseinstellung
6 Neigungseinstell- knopf
7 Isosafe-Freigabeknopf
8 Seitlicher Aufprallschutz
9 Schulterband
10 Gurtschnalle
11 Getränkehalter
12 Oberer Haltegurt
13 Haltegurteinsteller
14 Haltegurthaken
15 Tasche
16 Isosafe-Verbindung
17 ISOFIX-Führungen

29 30
WARNHINWEISE
! Lassen Sie Ihr Kind NIEMALS unbeaufsichtigt in
diesem Kindersitz zurück.
! Wird dieser Kindersitz nicht ordnungsgemäß verwen-
det, erhöht sich die Gefahr ernsthafter oder sogar
tödlicher Verletzungen bei scharfen Kurven, Notb-
remsungen oder Unfällen.
! Verwenden Sie diesen Kindersitz NICHT ohne die
Textilteile.
! Die Textilteile sollten ausschließlich durch die vom
Hersteller empfohlenen Teile ersetzt werden, da sie
ein integraler Bestandteil der Leistung des Kinder-
sitzes sind.
! Verwenden Sie NUR die in der Anleitung be-
schriebenen und am Kindersitz markierten belast-
baren Kontaktpunkte.
! Lassen Sie Gepäck und andere Objekte niemals
ungesichert in einem Fahrzeug, da sie bei einem
Unfall Verletzungen verursachen können.
! Verwenden Sie KEINE Konfiguration, die nicht in der
Anleitung gezeigt wird.
WARNHINWEISE
! Achten Sie darauf, den Kindersitz so zu platzieren
und zu installieren, dass er möglichst nicht von
einem beweglichen Sitz oder in einer Fahrzeugtür
eingeklemmt wird.
! Dieser Kindersitz wurde NUR für Kinder mit einem
Gewicht von 9 bis 36 kg (mit einem Alter von etwa 1
bis 12 Jahren) ausgelegt.
! Stellen Sie sicher, dass die Gurte, die das Rück-
haltesystem im Fahrzeug sichern, richtig befestigt
sind; die Gurte, die das Kind halten, müssen an den
Körper des Kindes angepasst sein. Vergewissern
Sie sich davon, dass die Gurte nicht verdreht sind.
! Nachdem Sie Ihr Kind in diesen Kindersitz gesetzt
haben, muss der Sicherheitsgurt für Ihr Kind sa-
chgemäß befestigt werden, und es muss
gewährleistet sein, dass der Beckengurt so tief wie
möglich angelegt wird, damit das Becken sicher
gehalten wird.
! Ersetzen Sie den Kindersitz nach einem Unfall gleich
welcher Art. Ein Unfall kann den Kindersitz beschädi-
gen, ohne sichtbare Spuren zu hinterlassen.

31 32
WARNHINWEISE
! Lassen Sie einen Kindersitz NIEMALS ungesichert
in Ihrem Fahrzeug. Ein ungesicherter Kindersitz
kann in scharfen Kurven, bei Notbremsungen oder
Unfällen umhergeschleudert werden und Verletzun-
gen verursachen. Entfernen Sie ihn oder achten Sie
darauf, dass er sicher im Fahrzeug angegurtet ist.
! Nehmen Sie KEINE Änderungen an Ihrem Kindersitz
vor; nutzen Sie KEINE von anderen Herstellern
gelieferten Zubehörartikel oder Teile.
! Verwenden Sie niemals einen Kindersitz aus zweiter
Hand oder einen Kindersitz, dessen Vergangenheit
Sie nicht kennen.
! Richten Sie Ihren Kindersitz NICHT gegen die
Fahrtrichtung aus.
! Geben Sie zur Vermeidung von Verbrennungen
niemals Behälter mit heißen Flüssigkeiten in den
Getränkehalter des Kindersitzes.
! Ziehen Sie Ihrem Kind beim Einsatz dieses Kinder-
rückhaltesystems im Fahrtrichtung-Modus nicht nur
Windel an; andernfalls kann Ihr Kind nicht ordnungs-
gemäß und zuverlässig über den Schultergurt und
zwischen den Oberschenkeln gesichert werden.
WARNHINWEISE
! Verwenden Sie NIEMALS einen Kindersitz, der
beschädigt oder unvollständig ist. Verwenden Sie
KEINEN eingeschnittenen, ausgefransten oder
anderweitig beschädigten Fahrzeugsicherheitsgurt.
! Geben Sie diesen Kindersitz NIEMALS weiter, ohne
auch diese Anleitung auszuhändigen.
! Laut Unfallstatistiken sind Kinder sicherer, wenn sie
angemessen auf einem Rücksitz anstatt eines
Vordersitzes angegurtet werden. Bei einem Fah-
rzeug mit Beifahrerairbag beachten Sie bitte die
Bedienungsanleitung Ihres Fahrzeugs sowie diese
Anweisungen zur Installation des Kindersitzes.
! Der Kindersitz kann nach einiger Zeit im direkten
Sonnenlicht sehr heiß werden. Bei Berührung dieser
Teile können Verbrennungen an der Haut Ihres
Kindes auftreten. Berühren Sie immer die Oberfläche
der Metall- oder Kunststoffteile, bevor Sie Ihr Kind in
den Kindersitz setzen.

33 34
9-25kg
ECE
R44.04
15-36kg
23
+
+ oberer
Haltegurt
23
+
Gewicht
des Kindes
Installation-
smodus Installation
Referen-
zalter
Neigungs-
position
Referenz-
bilder
Vor-
wärtsmo-
dus
Vor-
wärtsmo-
dus
Ca. 1
Jahrebis
7 Jahre
Circa 3
bis 12
Jahre
Position
1 -3
Position
1 -3
23
+
+ oberer
Haltegurt
or
Notfall
Bei einem Notfall oder Unfall ist es besonders wichtig, dass bei
Ihrem Kind umgehend Erste Hilfe geleistet und es medizinisch
versorgt wird.
Produktdaten
Lesen Sie alle Hinweise in dieser Anleitung, bevor Sie dieses
Produkt verwenden. Bitte wenden Sie sich im Zweifelsfall an
den Hersteller oder Händler des Kindersitzes.
1. Dieser Kindersitz ist ein „semiuniverselles“
Kinderrückhaltesystem. Es ist gemäß UN/ECE-Regelung No.
44/04 zur allgemeinen Nutzung in Fahrzeugen mit ISOFIX-
Verankerungssystemen zugelassen.
2. Sitzpositionen in anderen Fahrzeugen können ebenfalls zur
Aufnahme dieses Kindersitzes geeignet sein. Bitte beachten
Sie unsere Liste mit Fahrzeugbefestigungen (am Produkt
oder auf unserer Website).
Produkt Bold R
Geeignet für
Kinder mit einem Gewicht von 9 – 36 kg
(ca. 1 bis 12 Jahre)
Gewichtsgruppe Gruppe 1/2/3
Materialien Kunststoff, Metall, Stoffe
Patentnr Patente angemeldet
Auswahl des Installationsmodus

35 36
1
2
41
3
5
7
2
4
3
5
7
6
6
4
1 2
3
6
5
siehe Abbildungen 1 - 4
Bei der Installation zu beachten
siehe Abbildungen 5
siehe Abbildungen 6
1. Die Kopfstütze je nach
Körpergröße des Kindes in der
richtigen Höhe einstellen.
2. Drücken Sie den
Kopfstützeneinstellhebel und
schieben Sie die Kopfstütze
dann herauf oder herunter, bis
sie in einer der 11 Positionen
einrastet.
! Vor Anpassung der
Kopfstützenhöhe muss sich Ihr
Kind leicht nach vorne lehnen.
Getränkehalter benutzen
Informieren Sie sich
anhand der zur
Verfügung gestellten
Liste mit
Fahrzeugbefestigungen
über die zugelassenen
Sitze für die
Kindersitzbefestigung.
Höhe einstellen – Kopfstütze

37 38
siehe Abbildungen 7 - 8
1. Drücken Sie den
Neigungseinstellknopf 7, zur
Anpassung der Position des
Kindersitzes. Die
Neigungswinkel werden in 8
gezeigt.
2. Es gibt bei der Benutzung in
Fahrtrichtung 3
Neigungspositionen.
7
8
910
12
11
13
Neigungsanpassung
Seitlichen Aufprallschutz
verwenden
siehe Abbildungen 11 - 16
1. Öffnen Sie das Gurtschloss, in
dem Sie die rot eingefärbte
Taste nach unten drücken. 11
! Um den bestmöglichen Schutz
zu gewährleisten, verwenden
Sie immer die
Kleinkindeinlage, wenn die
Schulterhöhe des Kindes
niedriger ist als die
Unterseite der Kopfstütze.
Einsatz verwenden
siehe Abbildungen 9 - 10
!
Zum besseren Schutz muss der Seitenaufprallschutz
ausgeklappt werden.
9
Nach erstmaligem Öffnen wird der
Seitenaufprallschutz in dauerhaft geöffneter Position verriegelt,
um maximalen Schutz zu gewährleisten.
10
Seite wird geladen ...
Seite wird geladen ...
Seite wird geladen ...
Seite wird geladen ...
Seite wird geladen ...
Seite wird geladen ...
Seite wird geladen ...
Seite wird geladen ...
Seite wird geladen ...
Seite wird geladen ...
Seite wird geladen ...
Seite wird geladen ...
Seite wird geladen ...
Seite wird geladen ...
Seite wird geladen ...
Seite wird geladen ...
Seite wird geladen ...
Seite wird geladen ...
Seite wird geladen ...
Seite wird geladen ...
Seite wird geladen ...
Seite wird geladen ...
Seite wird geladen ...
-
 1
1
-
 2
2
-
 3
3
-
 4
4
-
 5
5
-
 6
6
-
 7
7
-
 8
8
-
 9
9
-
 10
10
-
 11
11
-
 12
12
-
 13
13
-
 14
14
-
 15
15
-
 16
16
-
 17
17
-
 18
18
-
 19
19
-
 20
20
-
 21
21
-
 22
22
-
 23
23
-
 24
24
-
 25
25
-
 26
26
-
 27
27
-
 28
28
-
 29
29
-
 30
30
-
 31
31
-
 32
32
-
 33
33
-
 34
34
-
 35
35
-
 36
36
-
 37
37
-
 38
38
-
 39
39
-
 40
40
-
 41
41
-
 42
42
-
 43
43


Joie Bold R Booster Car Seat Benutzerhandbuch
- Kategorie
- Autositz
- Typ
- Benutzerhandbuch
in anderen Sprachen
Verwandte Artikel
Andere Dokumente
-
 Babify 10040956 Bedienungsanleitung
-
 Thomashilfen Major Bedienungsanleitung
-
mothercare Heyner Multirelax Aero Fix_0713876 Benutzerhandbuch
-
Axkid Rekid Benutzerhandbuch
-
Peg-Perego Viaggio1 Duo-Fix ASIP Instructions For Use Manual
-
 Jole trillo™ Benutzerhandbuch
-
Baninni Arona Bedienungsanleitung
-
Moni Car Seat Bedienungsanleitung


