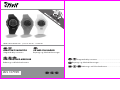
Crivit 1-LD3945 Usage And Safety Instructions
- Kategorie
- Sportuhren
- Typ
- Usage And Safety Instructions
Dieses Handbuch ist auch geeignet für

IAN
107990
HEART RATE MONITOR
·
1/201
5
· Art.
-
Nr.:
1
-
LD
3945
HEART RATE MONITOR
Usage and safety instructions
UR MED PULSMÅLER
Betjenings- og sikkerhedshenvisninger
HERZFREQUENZ-MESSUHR
Bedienungs
-
und Sicherheitshinweise
Usage and safety instructions ....................................................... - 1 -
Betjenings- og sikkerhedshenvisninger................................................. - 23 -
Bedienungs- und Sicherheitshinweise ............................ - 46 -

- 1 -
Usage and safety instructions
Table of contents
Table of contents......................................................................................................... - 1 -
Preliminary note .......................................................................................................... - 3 -
Intended use ................................................................................................................ - 3 -
Scope of delivery ....................................................................................................... - 3 -
Technical specifications ............................................................................................. - 3 -
Features ....................................................................................................................... - 4 -
Important safety information...................................................................... - 5 -
Batteries ................................................................................................................ - 5 -
User ....................................................................................................................... - 5 -
Chest belt ..................................................................................................................... - 6 -
Wearing the chest belt ........................................................................................ - 6 -
Coded transmission ............................................................................................. - 6 -
Bicycle holder ............................................................................................................. - 7 -
Setup of the heart rate monitor.................................................................................. - 8 -
Light .............................................................................................................................. - 9 -
Important notes on the operation of the heart rate monitor ................................... - 9 -
Speed setting ........................................................................................................ - 9 -
Time and basic settings .............................................................................................. - 9 -
Second time zone ............................................................................................. - 10 -
Alarm .................................................................................................................. - 10 -
Snooze feature .................................................................................................. - 11 -
Timer (max. 23:59:00) .................................................................................... - 11 -
Stop watch ............................................................................................................... - 12 -
Memory feature ................................................................................................ - 12 -
Heart rate measurement ......................................................................................... - 12 -
Warning light .................................................................................................... - 13 -
Timer ................................................................................................................... - 13 -
- 2 -
Memory feature ................................................................................................ - 14 -
Target heart rate ............................................................................................... - 15 -
Calories, fat burn and BMI .............................................................................. - 16 -
Notes on the BMI .............................................................................................. - 16 -
Fitness ................................................................................................................. - 17 -
Troubleshooting ....................................................................................................... - 17 -
The heart rate is not shown or is shown incorrectly ....................................... - 17 -
The display is unreadable / the light does not work .................................... - 17 -
Replacing the batteries ........................................................................................... - 18 -
Replacing the watch battery ............................................................................ - 18 -
Battery low indicator ........................................................................................ - 18 -
Replacing the chest belt battery ...................................................................... - 19 -
Reset .......................................................................................................................... - 19 -
Water resistance of the heart rate monitor ........................................................... - 19 -
Water resistance of the chest belt .......................................................................... - 19 -
Cleaning instructions ............................................................................................... - 19 -
Disposal of the electronic appliance ..................................................................... - 20 -
Disposal of the batteries.......................................................................................... - 20 -
digi-tech gmbh warranty ........................................................................................ - 20 -
Warranty conditions ............................................................................................... - 20 -
Warranty period and defects liability ................................................................... - 21 -
Scope of the warranty............................................................................................. - 21 -
Warranty claim procedure ..................................................................................... - 21 -
Service ...................................................................................................................... - 22 -
Supplier .................................................................................................................... - 22 -

- 3 -
HEART RATE MONITOR
Preliminary note
Please read the instruction manual before using the product for the first time- even
if you are experienced at using electronic equipment. Please take special care
when reading the chapter "Important safety information". Keep this instruction
manual so you may use it a reference material in the future. If you sell or give this
product to someone else it is very important to also include this manual.
Intended use
This electronic appliance is intended for time display and the described additional
features. Any other use or modification of the electronic appliance does not
comply with the intended uses. The manufacturer is not liable for damages caused
by improper use or misuse. The device is not intended for commercial use.
Scope of delivery
Please note: Check the scope of delivery after purchase. Please ensure that all
parts are included and undamaged.
• Heart rate monitor incl. battery (CR2032)
• Chest belt incl. battery (CR2032)
• Bicycle holder
• Instruction manual
Technical specifications
Heart rate monitor
Operating temperature
0
-
50°C
Dimensions
4,
3
x
4,6
cm
Display
2,5 x
2,6
cm
Weight
4
6
g
Battery
CR 2032/3V
- 4 -
Chest belt
Operating temperature
0
-
50°C
Dimensions
7 x 3,3 x 1,2 cm
Frequency
5
,3
kHz
Weight
51g
Battery
CR 2032/3V
Features
Heart rate measurement
• Alarm for maximum heart rate
• Target heart rate training with timer and alarm
(Health, Fitness, Peformance and user defined)
• Max. heart rate, min. heart rate and average heart rate
• Warning light for high heart rate
Calorie features
• Calories and fat burned during training
• BMI-calculation
• Fitness Level
Stop watch
• 1/100 seconds with 99 lap times
Countdown timer
Time features
• Time
• Calendar
• Alarm with snooze
• Hourly chime
• Second time zone

- 5 -
Other
• Back light
Important safety information
ATTENTION:
Consult your doctor before you begin any
training program. Your doctor can help you choose the
proper training intensity and heart rate guidelines for your
exercises.
This heart rate monitor is not a medical device and should
only be used as a guide for your training.
Batteries
Keep batteries out of reach of small children. If a battery is swallowed, you must
seek medical attention immediately. Batteries/rechargeable batteries must always
be inserted in the correct polarity. If necessary, clean the battery and device
contacts. Never attempt to recharge non-rechargeable batteries. Never short-
circuit or attempt to open batteries. Never throw batteries into fire as they may
explode. If the device will not be used for an extended time period, remove the
battery and store the device in a dry and dust-free area. Improper use of the
battery can lead to explosion or leakage. If the battery leaks, avoid contact with
skin, eyes and mucous membranes. Use gloves. If you are exposed to battery
acid, rinse the affected areas with plenty of clean water and immediately seek
medical attention. Remove discharged batteries from the device as they present an
increased risk of leakage.
User
This device may be used by persons (including children over 8 years of age) with
reduced physical, sensory or mental abilities or lack of experience and
knowledge, if they are supervised or instructed regarding the safe use of the
device and understand the dangers that may arise. Children may not play with the
device. Cleaning and user maintenance of the device may not be performed by
- 6 -
children without supervision. Keep packaging films out of the hands of children.
There is a danger of suffocation.
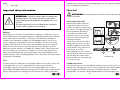
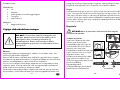
Chest belt
ATTENTION: Pacemaker patients should consult their physicians before
using the chest belt.
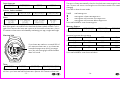
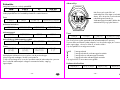
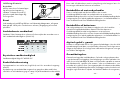
Wearing the chest belt
Adjust the chest belt so that it fits
snugly directly below the chest
muscles. Moisten the contact areas
with water or ECG gel (ECG gel can
be purchased at a pharmacy).
Ensure that the contact areas
constantly remain in skin contact.
Position the chest belt as per the
following illustration.
Please ensure that the chest belt is
seated properly. When you have
exhaled completely the chest belt
should still have very slight tension
pressing it to your chest.
High voltage power lines, Trains or
moving vehicular traffic may interfere
with the heart rate measurement.
Please consider this when planning
your exercise route.
Coded transmission
The chest belt's transmissions are digitally coded to prevent interference if you are
training with a training partner who is using an identical watch and chest belt.
When using the chest belt for the first time, a random channel is selected
automatically. The channel is briefly displayed at the top of the display upon
contact area

- 7 -
entering the heart rate display mode. The available channels are CH10, CH11,
CH12, CH13 and CH14.
The channel can be changed by briefly removing the battery from the chest best
and reinserting it. The chest belt will randomly select a channel and after approx. 1
minute the heart rate and the new channel will appear on the display of the watch.
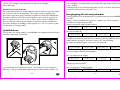
Bicycle holder
The included bicycle holder can be used to attach the heart rate monitor to the
handlebar of a bicycle.
Press the bicycle holder onto the top of the handlebar. Handlebars with an
especially large diameter may require the use of additional force to snap on the
bicycle holder. The heart rate monitor can now be attached to the bicycle holder
in the same way that you would attach it to your wrist.
The maximum range of 70cm between the heart rate monitor and the chest belt
should not be exceeded.
- 8 -
Setup of the heart rate monitor
Remove the protective film from the display and press MODE, SEL or SET.
Now select English, German, French or Spanish language by pressing SEL and
confirm your setting by pressing SET.
Select the unit KM-KG
METRIC KM - KG KM - KG KM - KG
or Miles/pounds
IMPERIAL M - LB M - LB M - LB
in the same way. The 12 or 24 hour selection will blink on the display.
Press SEL to select a setting and confirm your setting by pressing SET. Set the
seconds, minutes, hours, year, month and day in the same way.
Now the basic settings will follow. First the year of the birthday setting will appear
BIRTHDAY GEB-TAG DATNAISS CUMPL-AN
Press SEL to set the year and press SET to confirm your setting. Set the month and
day in the same way.
Now the weight will appear
WEIGHT GEWICHT POIDS PESO
Set the digits of your weight by pressing SEL and confirm each digit by pressing
SET.
Now the height display will appear
HEIGHT GROESSE TAILLE TAMANO
Set each digit of your height by pressing SEL and confirm each digit by pressing
SET.
Complete the setting procedure by pressing MODE.
Press SET and SEL simultaneously to totally reset the watch. This is the only way to
change language and the units of measurement.

- 9 -
Light
Briefly press LIGHT to temporarily activate the light.
Important notes on the operation of the heart rate
monitor
The watch has
3 different Modes of Operation.
Press MODE to select the mode of operation of the watch.
The order of the modes is as follows:
Stop watch
CHRONO ST-UHR CHRONO CRONO
Heart rate
HRM PULS FC PULSO
Time
TIME ZEIT TEMPS HORA
Each mode of operation may have several subfeatures.
The subfeatures can always be accessed by pressing SEL
SELSEL
SEL.
Speed setting
When setting numerical values, press and hold SEL to use the speed setting
feature.
Time and basic settings
Press MODE to select the feature before proceeding.
TIME
TIMETIME
TIME
ZEIT
ZEITZEIT
ZEIT
TEMPS
TEMPSTEMPS
TEMPS
HORA
HORAHORA
HORA
- 10 -
The subfeatures of the time mode can be accessed by pressing SEL.
Alarm
ALARM ALARM ALARM ALARMA
Timer
TIMER TIMER COMPTE TIMER
Time
TIME ZEIT TEMPS HORA
Press and hold SET for 3 seconds to access setting mode.
The display will show
HOLD
TO SET
HALTEN=
EINST.
MAINT=
REGLER
MANT=
AJUST
and the 12 or 24 hour selection will blink on the display.
Press SEL to select a setting and confirm your setting by pressing SET. Set the
seconds, minutes, hours, year, month and day in the same way.
Exit setting mode by pressing MODE.
Second time zone
Press and hold SEL for 3 seconds. The watch will switch to the second time zone
display and T2 will appear on the display. Setting the second time zone can be
accomplished in the same way as described in the previous paragraph.
Press and hold SEL for 3 seconds to return to normal time mode.
Alarm
ALARM ALARM ALARM ALARMA
Press and hold SET for 3 seconds to enter setting mode.
"AL" will appear on the display and the minutes of the alarm time will blink.
Press SEL to set the minutes and press SET to confirm your setting. Set the hours in
the same way.
You may optionally set the month and day as well.

- 11 -
If neither month nor day are set the alarm will sound daily. If the day is set, the
alarm will sound monthly. If both the month and the day are set the alarm will
sound only at the set date.
The hourly chime setting will now appear on the display
CHIME STDALARM SIGN HOR HORA AL
Press SEL to select a setting and confirm your setting by pressing SET
(ON/EIN/ACTIF/ENCENDID=on,
OFF/AUS/INACTIF/APAGADO=off).
If the chime is activated, the bell symbol will appear and the watch will chime at
the beginning of every hour.
Exit setting mode by pressing MODE. The alarm can be activated or deactivated
by pressing SET. If the alarm is activated the alarm symbol will appear.
When the alarm sounds, press SET, SEL or MODE to stop the alarm.
Snooze feature
If no button is pressed when the alarm sounds, the alarm will shut off after 30
seconds and the symbol will blink on the display. The alarm will stop and will
resume after sounding after 2 minutes. The process will repeat itself 5 times.
Timer (max. 23:59:00)
TIMER TIMER COMPTE TIMER
Press and hold SET for 3 seconds to enter setting mode.
The minutes of the timer time will blink on the display.
Press SEL to set minutes of the timer time and confirm your setting by pressing SET.
Set the hours in the same way.
Now the additional settings for the timer will follow. Press SEL to select the desired
mode:
Cd r After reaching 0:00 the timer will count the set time again
Cd U After reaching 0:00 the timer will count forward
Cd S After reaching 0:00 the timer will stop
Exit setting mode by pressing MODE.
- 12 -
The timer can be started or stopped by pressing SET.
Press and hold SET to reset the timer.
After the timer time is up an alarm will sound.
Stop watch
Press MODE to select the feature before proceeding.
CHRONO
CHRONOCHRONO
CHRONO
ST
STST
ST-
--
-UHR
UHRUHR
UHR
CHRONO
CHRONOCHRONO
CHRONO
CRONO
CRONOCRONO
CRONO
Press SET to start or stop the stop watch. Press SEL while the stop watch is running
to record a lap time. Up to 99 laps can be recorded.
Press and hold SET to reset the stop watch.
Memory feature
DATA
RECALL
ANSICHT
DATEN
APPEL
DONNEES
RECUP
DATOS
Press SEL while the stop watch is stopped to display the fastest lap on the display.
Press SET to display the other lap times.
Please note: The memory feature can only be used if at least one lap time was
recorded.
Heart rate measurement
Press MODE to select the feature before proceeding.
HRM
HRMHRM
HRM
PULS
PULSPULS
PULS
FC
FCFC
FC
PULSO
PULSOPULSO
PULSO
The subfeatures of the heart rate measurement can only be used when the chest
belt is connected.
Press SEL to access the subfeatures of the heart rate watch.
Timer
TIMER TIMER COMPTE TEMPORIZADOR
Memory feature
MEMORY SPEICHER MEMOIRE MEMORIA

- 13 -
Target heart rate
ZONE BEREICH ZONE ZONA
Calories, fat burn and BMI
CALORIE KALORIEN CALORIES CALORIAS
Fitness
FITNESS
LEVEL
FITNESS
LEVEL
NIV FORM
PHYSIQ
NIVEL
FIT
In the middle row of the display the heart rate is shown while wearing the chest
belt. If the signal is received from the chest belt the heart symbol will flash. To the
right of the heart rate the heart rate in percent of the maximum heart rate is shown.
The maximum heart rate is calculated by evaluating your age, weight and height.
Warning light
If your heart rate reaches or exceeds 99% of
your maximum heart rate, or your heart rate
exceeds the target zone values (see target
zone) the red warning light will blink and an
alarm will sound.
Timer
TIMER TIMER COMPTE TEMPORIZADOR
The bottom row of the display will show the elapsed training time. The middle row
will show your heart rate and the heart rate in percent of the maximum heart rate.
- 14 -
The timer will start automatically when the chest belt starts measuring the heart
rate. The timer will continue counting the time if the feature mode of the watch is
changed.
Press SET to select the timer mode:
TIMER total training time
training time in heart rate target zone
▲ training time with heart rate over target zone
▼ training time with heart rate below target zone
Press and hold SET to reset the training time.
Memory feature
MEMORY SPEICHER MEMOIRE MEMORIA
The stored values are shown in the bottom row of the display.
maximum heart rate during training
HI H FO AL
minimum heart rate during training
LO N FA BA
average heart rate during training
AV D MO PR
Press and hold SET to reset the stored values.

- 15 -
Target heart rate
ATTENTION: Consult your physician before selecting a
target zone. The target zone presets are approximate
guidelines and are not suitable for everyone.
ZONE BEREICH ZONE ZONA
The bottom row of the display will show the lower and upper limit value of the
target zone.
The selected training type is shown on the top row of the display.
L- U user defined
L-1 Health (50-65% of maximum heart rate)
L-2 Fitness (65-80% of maximum heart rate)
L-3 Performance (80-95% of maximum heart rate)
Press and hold SET for 3 seconds to enter setting mode.
Select the training type by pressing SEL. If "U" is selected (user defined) the lower
and upper limits can be set. Press SET. The display will show the lower limit.
Set the value by pressing SEL and confirm your setting by pressing SET. Set the
upper limit in the same way.
Exit setting mode by pressing MODE. Press and hold SEL to activate the heart rate
alarm. When the heart rate alarm is activated, the alarm symbol will appear
on and an alarm will sound when the measured heart rate is not within the set zone
"BEEP-BEEP...BEEP-BEEP...BEEP-BEEP".
If the measured heart rate is at or above 99% of the maximum heart rate the max.
heart rate alarm will sound. "BEEP-BEEP-BEEP-BEEP-BEEP-BEEP". The max. heart
alarm is independant of the training zone and the heart rate alarm of the training
zone.
- 16 -
Calories, fat burn and BMI
CALORIE KALORIEN CALORIES CALORIAS
The lower row will show the burned calories
CALORIE KALORIEN CALORIES CALORIAS
Press SET to switch to the display of fat burn in gram
FAT
BURN
FETT CONSGRAISSES
GRASA
or to the display of your BMI
BMI BMI IMC IMC
In the display for calorie burn or fat burn the values can be reset by pressing and
holding SET.
Note: To increase the accuracy of the calorie and fat burn displays your age and
weight must be set correctly.
Note: The counter for fat burn is only activated while your heart rate is above 120
beats per minute.
Notes on the BMI
The BMI is a statistical measurement that can be used to judge a persons weight.
For adults, a value between 18.5 and 25 is considered normal. Values below
18.5 are considered "underweight". Values above 25 are considered
"overweight". Values above 30 are considered "Obese".
The BMI is only a coarse guideline because it does not take a persons body type
and body composition into consideration.
The watch automatically calculates your BMI from the values entered during setup.

- 17 -
Fitness
FITNESS
LEVEL
FITNESS
LEVEL
NIV FORM
PHYSIQ
NIVEL
FIT
After your training, immediately press SET. A 5 minute countdown will start (cool
down phase).
The bar will show the remaining time. On the left side of the display the heart rate
at the beginning of cool down is shown. On the right side of the display the current
heart rate is shown. The countdown time is shown on the bottom row of the
display.
After 5 minutes your fitness level will appear.
Fitness level Heart rate
6 >130
5 130-120
4 120-110
3 110-105
2 105-100
1 <100
Troubleshooting
The heart rate is not shown or is shown incorrectly
Make sure the chest belt is positioned correctly and fits well.
Your skin should not be too dry or too cold.
The contact areas can be slightly moistened to improve function.
Electromagnetic interference may have an adverse effect on reception.
The distance between watch and chest belt must be under 70cm.
Other heart rate measuring devices within a 2m range may also cause
interference.
Wireless bicycle computers may cause interference.
The batteries may be low and require replacing.
The display is unreadable / the light does not work
Replace the batteries.
- 18 -
Replacing the batteries
Replacing the watch battery
The battery replacement can be performed by a watch maker in addition to a
water resistance test.
To replace the battery yourself, please read the following instructions first:
Remove the screws (1, 2, 3 and 4) from the back side of the watch with a small
Phillips screwdriver. Remove the caseback and the battery sticker.
Use a small, flat tool to open the latch (5) of the battery holder. Remove the
battery and insert a fresh 3V CR2032 battery with the (+) terminal facing upwards.
Ensure that the gasket (6) is seated correctly. Close the latch of the battery holder.
Replace the battery sticker and the caseback and replace the screws.
Battery low indicator
If the battery voltage on the chest belt battery drops below the voltage required for
normal operation,
TXBELT
LO BAT
TXGURT
BATT
SNGLTX
PILE
TXBCIN
BAT BA
will appear on the display. Replace the battery of the chest belt.

- 19 -
Replacing the chest belt battery
Use a coin to unscrew the battery
cover on the back side of the chest
belt and insert the 3V battery with the
(+) sign facing up. Screw the battery
compartment cover back into the
case.
Reset
Press SET and SEL simultaneously to totally reset the watch. All stored data will be
lost. Set up the watch as described in the chapter “Setup of the heart rate monitor”.
Water resistance of the heart rate monitor
Water resistant up to 3 bar. The bar value specifies the atmospheric overpressure
which is applied during testing (DIN 8310).
Water resistance of the chest belt
Water resistance according to IEC 60529 IPx7.
Cleaning instructions
Clean the heart rate monitor with a soft, dry and lint-free cloth. A glasses cleaning
cloth is ideal.
After each use, clean the chest belt and the watch strap using lukewarm water,
mild soap solution and a sponge. Please take care not to get the watch wet.
battery CR2032
- 20 -
Dry all parts with a towel and hang the chest belt to dry. Sweat and contaminants
are detrimental to the function of the sensor.
Disposal of the electronic appliance
This electronic appliance may not be disposed of with normal household
waste. Dispose of the unit at an approved disposal facility or at your
local recycling centre. Please observe the current rules and regulations when
disposing of the appliance. Contact the disposal system if in doubt.
Disposal of the batteries
Please dispose of your batteries properly in containers especially set up
at retailers. Batteries do not belong in household waste. Dispose of the batteries at
an approved disposal facility or at your local recycling centre. Contact the
disposal system if in doubt.
digi-tech gmbh warranty
This watch includes a 3 year warranty starting on the day of purchase. In case of
defects of this heart rate monitor you have, by law, certain rights regarding the
vendor of the heart rate monitor. These rights are not changed by the warranty
which is described in the following paragraphs.
Warranty conditions
The warranty duration starts on the date of purchase. Please keep the original
receipt in a safe place. The receipt is needed as a proof of purchase. If a defect
occurs in the heart rate monitor within 3 years, the heart rate monitor will be
repaired or replaced (according to our choice) free of charge. This warranty
requires that, within the 3 year warranty period, the watch and the receipt can be
made available to us along with a short written description of the defect and when
it occured. If the defect is covered by the warranty, you will receive the repaired
heart rate monitor or a new heart rate monitor. Repair or replacement does not
cause the warranty period to restart.

- 21 -
Warranty period and defects liability
The warranty period is not increased by the defect liability. This also applies to
repaired or replaced parts. If defects are noticed at the time of purchase they must
be reported immediately upon unpacking the item. Paid repair may be available
after the end of the warranty period.
Scope of the warranty
The heart rate monitor was manufactured according to strict quality guidelines and
was carefully inspected before delivery. The warranty does not include parts that
experience normal wear and tear and can thus be seen as wear parts or fragile
parts that are damaged. Examples include Switches, Batteries or parts made of
glass. This warranty becomes void if the heart rate monitor is damaged, is not used
in the recommended way or is improperly repaired. For proper use of the heart
rate monitor all instructions in this manual must be adhered to exactly. Use of the
heart rate monitor in a way that is discouraged in the manual must be avoided.
The heart rate monitor not intended for commercial use. Abusive or improper use,
excessive force and changes that are made by non-authorized repair centers will
void the warranty.
Warranty claim procedure
To ensure that your call is processed in a fast and efficient manner please note the
following directions:
• Have your receipt (as proof of purchase) and the article number (107990)
handy.
• The article number can be found on the type label, an engraving, the front
page of the manual (bottom left) or a sticker on the back side or bottom side of
the case.
• In case defects occur, please first contact the service center (see below) by
phone or email.
Visit www.lidl-service.com to download this and many other manuals,
product videos and software.
- 22 -
Service
Name: Inter-Quartz GmbH
Street: Valterweg 27A
Town: Eppstein 65817
Country: Germany
Email: support@inter-quartz.de
Telephone: +49 (0)6198 571825
00800 5515 6616
00800 5515 6616
800 5515 6616
IAN
107990
Supplier
Please note that the following address is not a service address.
Please first contact the service address (see above).
Name: digi-tech gmbh
Street: Valterweg 27A
Town: Eppstein 65817
Country: Germany

-
23
-
Betjenings- og sikkerhedshenvisninger
Indhold
Indhold ..................................................................................................................... - 23 -
Indledning ................................................................................................................ - 25 -
Brug i henhold til bestemmelsen ............................................................................. - 25 -
Leveringens omfang ................................................................................................ - 25 -
Tekniske data ........................................................................................................... - 26 -
Funktioner ................................................................................................................. - 26 -
Vigtige sikkerhedshenvisninger ............................................................ - 27 -
Batterier .............................................................................................................. - 27 -
Bruger ................................................................................................................ - 28 -
Brystsele .................................................................................................................... - 28 -
At bære brystselen ............................................................................................ - 28 -
Kodet transmission af pulsen ........................................................................... - 29 -
Cykelholderen ......................................................................................................... - 29 -
Ibrugtagning af uret med pulsmåler ...................................................................... - 30 -
Lys ............................................................................................................................. - 31 -
Vigtige informationer til betjening af uret med pulsmåler .................................... - 31 -
Hurtigindstilling ................................................................................................. - 31 -
Klokkeslæt og grundindstillinger ............................................................................ - 32 -
Anden tidszone ................................................................................................. - 32 -
Vækningsalarm ................................................................................................. - 33 -
Slummerfunktion ................................................................................................ - 33 -
Timer (max. 23:59:00) .................................................................................... - 33 -
Stopur ....................................................................................................................... - 34 -
Hukommelsesfunktion ....................................................................................... - 34 -
Pulsmåler .................................................................................................................. - 35 -
Advarselslys ....................................................................................................... - 36 -
Timer ................................................................................................................... - 36 -
-
24
-
Hukommelsesfunktion ....................................................................................... - 36 -
Målsætningspulsområde.................................................................................. - 37 -
Kalorier, fedtforbrænding og BMI .................................................................. - 38 -
Henvisninger til BMI ......................................................................................... - 39 -
Fitness ................................................................................................................. - 39 -
Fejlafhjælpning ........................................................................................................ - 39 -
Pulsen vises ikke eller ikke korrekt ................................................................... - 39 -
Displayet er dårlig læsbar / Belysningen fungerer ikke ............................... - 40 -
Udskiftning af batteri ............................................................................................... - 40 -
Udskiftning af batteriet i armbåndsuret ........................................................... - 40 -
Batteritilstandsadvarsel..................................................................................... - 40 -
Udskiftning af batteriet i brystselens ................................................................ - 41 -
Reset .......................................................................................................................... - 41 -
Armbåndsurets vandtæthed ................................................................................... - 41 -
Brystselens vandbestandighed ............................................................................... - 41 -
Renholdelseshenvisning .......................................................................................... - 41 -
Bortskaffelse af uret med pulsmåler ....................................................................... - 42 -
Bortskaffelse af batterierne ..................................................................................... - 42 -
digi-tech gmbh’s garanti........................................................................................ - 42 -
Garantibetingelser .................................................................................................. - 42 -
Garantitid og lovlige mangelkrav .......................................................................... - 43 -
Garantiomfang ........................................................................................................ - 43 -
Afvikling i tilfælde af garanti .................................................................................. - 44 -
Service ...................................................................................................................... - 45 -
Leverandør ............................................................................................................... - 45 -

-
25
-
UR MED PULSMÅLER
Indledning
Hjertelig til lykke med købet af Deres nye ur med pulsmåler. De har dermed
bestemt Dem til et apparat af høj kvalitet. Betjeningsvejledningen er bestanddel af
dette ur med pulsmåler. Denne indeholder vigtige henvisninger til sikkerhed, brug
og bortskaffelse.
Før De tager uret med pulsmåler i brug, bør De gøre Dem bekendt med alle
betjenings- og sikkerhedshenvisninger. Benyt kun uret med pulsmåler som
beskrevet og kun i de angivne indsats områder.
Hvis De giver uret med pulsmåler videre til andre, udlever også alle papirer.
Brug i henhold til bestemmelsen
Uret med pulsmåler er egnet til brug som tidsangivelse og til de beskrevne
ekstrafunktioner. Enhver anden brug eller forandring af uret med pulsmåler gælder
ikke som brug i henhold til bestemmelsen. Producenten er ikke ansvarlig for
skader, der hidrører fra brug uden for bestemmelsesområdet eller fra forkert
betjening. Uret med pulsmåler er ikke beregnet til erhvervsmæssig brug.
Leveringens omfang
Henvisning: Kontroller venligst leveringens omfang efter købet. Vær sikker på,
at alle dele er forhånden og at de ikke er defekt.
• Ur med pulsmåler inkl. batteri (CR2032)
• Brystsele inkl. batteri (CR2032)
• Cykelstrop
• Brugermanual
-
26
-
Tekniske data
Ur med pulsmåler
Arbejdstemperaturområde
0
-
50°C
Mål (ekskl. bånd)
4,3 x 4,6
cm
Displaymål
2,5 x 2,6
cm
Vægt
4
6
g
Batteri
CR2032/3V
Brystsele
Arbejdstemperaturområde
0
-
50°C
Mål
(ekskl. bånd)
7 x 3,3 x 1,2 cm
Transmissionsfrekvens
5
,3
kHz
Vægt
51 g
Batteri
CR2032/3V
Funktioner
Pulsmåling
• Maksimalpuls alarm
• Målsætningspuls træning med timer og alarm
(sundhed, fitness, præstation og brugerdefineret)
• Højeste puls, laveste puls, gennemsnitlig puls
• Advarselslys (når målsætningspulsen overskrides)
Kaloriefunktioner
• Kalorieforbrug og fedtforbrænding under træningen
• BMI-beregning
• Fitness level
Stopur
• 1/100 sekund med 99 rundetider

-
27
-
Countdown timer
Tidsfunktioner
• Tid
• Kalender
• Vækningsalarm med vækningsgentagelse
• Timesignal
• Anden tidszone
Yderligere
• Baggrundsbelysning
Vigtige sikkerhedshenvisninger
GIV AGT!:
Tal med Deres læge før De begynder med
træningen. Han kan oplyse Dem om den træning, der er
bedst egnet for Dem, om trænings intensiteten og
målsætningspulsen. Dette ur med pulsmåler er ikke et
medicinsk apparat og tjener kun som understyttelse af Deres
træningsform.
Batterier
Batterier bør opbevares utilgængeligt for småbørn. Hvis et batteri sluges, skal
medicinsk hjælp tilkaldes omgående.
Batterier/akkumulatorer skal altid isættes med polen rigtig. Efter behov rengøres
først batteriets og apparatets kontakter. Forsøg ikke at oplade, kortslutte eller åbne
batterier. Kast aldrig batterier i åben ild, da de kan eksplodere.
Hvis De over en længere tid ikke bruger apparatet, bør De tage batteriet ud og
opbevare det på et tørt og støvfrit sted. Ved uhensigtsmæssig brug af batteriet
består eksplosionsfare og fare for at batteriet udløber.
Skulle batteriet dog engang udløbe, undgå kontakt med hud, øjne og slimhinder.
Benyt handsker. Ved kontakt med batterisyre skylles de pågældende steder med
-
28
-
rigelig klart vand og en læge opsøges omgående. Opbrugte batterier tages
omgående ud af apparatet, der er forhøjet fare for at batteriet udløber.
Bruger
Dette apparat kan bruges af personer (inklusive børn fra 8 år) med formindskede
fysiske, sensoriske eller mentale evner eller mangel på erfaring og viden, når de er
under opsyn eller blev undervist i sikker brug af apparatet og forstår farerne der
resulterer deraf. Børn må ikke spille med apparatet. Rengøring og brugerpleje
må ikke udføres af børn uden opsyn. Hold også indpaknigsfolie borte fra børn.
Der er fare for kvælning.
Brystsele
GIV AGT: Bærer af pacemakers skulle tale med deres læge før
benyttelse af brystbæltet.
At bære brystselen
Tilpas selen således at den sidder
snævert under brystmuskelen.
Kontaktfladerne på selen fugtes let
med vand eller EKG-lotion (fås på
apoteket). Vær sikker på at
kontaktfladerne altid har kontakt med
huden. Positioner selen som vist på
følgende illustration. Vær
opmærksom på at brystselen sidder
rigtig. Når De har åndet helt ud,
skulle selen ligge på brystkassen med
ganske let spænding.
Højspændingsmaster,
jernbaneluftledninger eller flydende
biltrafik kan have indflydelse på
Kontaktflade

-
29
-
eller forstyrre målingen. Vær opmærksom herpå når De udvælger
løbestrækningen.
Kodet transmission af pulsen
Brystselens datatransmission koderes digital for at forhindre at forstyrrelser opstår,
når De træner med en træningspartner, der bruger et identisk apparat. Når
brystselen bruges første gang, udvælges automatisk en kanal efter tilfældigheds
princippet. Kanalen vises kort foroven i displayet, når De skifter til angivelse af
pulsen. Kanalerne CH10, CH11, CH12, CH13 og CH14 står til rådighed. De
kan skifte kanalen ved kort at fjerne batteriet i brystselen og igen indsætte det.
Brystselen udvælger en tilfældig ny kanal og efter ca. 1 min. vises pulsen og den
nye kanal på uret med pulsmåler.
Cykelholderen
De kan bære uret med pulsmåler om håndleddet eller fastgøre det på cykelstyret
med den medleverede cykelholder.
Tryk cykelholderen på cykelstyret ovenfra. Hvis cykelstyret har en særlig stor
diameter, er det i givet fald nødvendigt at bruge forstærket kraftanvendelse. De
-
30
-
kan nu fastgøre uret med pulsmåler på cykelholderen på samme måde som på
Deres håndled.
Ved benyttelsen af uret med pulsmåler bedes De ikke overskride den maksimale
transmissionsafstand til brystselen på 70 cm.
Ibrugtagning af uret med pulsmåler
Træk beskyttelsesfolien af displayet på uret med pulsmåler og tryk på MODE, SEL
eller SET.
Vælg nu ved tryk på SEL mellem sprogene: Engelsk, tysk, fransk og spansk.
Bekræft Deres valg med tryk på SET.
Vælg nu på samme måde enheden KM-KG
METRIC KM - KG KM - KG KM - KG
eller mil/pund (M-LB)
IMPERIAL M - LB M - LB M - LB
Angivelsen af 12 eller 24-timers modus blinker.
Tryk SEL for at indstille og bekræft Deres indstilling ved tryk på SET. På samme
måde indstilles sekunderne, minutterne, timerne, år, måned og dag.
Nu følger grundindstillingerne. Først vises Deres fødselsår.
BIRTHDAY GEB-TAG DATNAISS CUMPL-AN
Tryk SEL for at indstille og bekræft Deres indstilling ved tryk på SET.
På samme måde indstilles måned og dag.
Nu vises angivelsen af vægten.
WEIGHT GEWICHT POIDS PESO
Indstil Deres vægts enkelte cifre ved tryk på SEL og bekræft efter hvert ciffer Deres
indlæsning ved tryk på SET.
Nu vises angivelsen af legemshøjden.
HEIGHT GROESSE TAILLE TAMANO

-
31
-
Indstil Deres højdes enkelte cifre ved tryk på SEL og bekræft efter hvert ciffer Deres
indlæsning ved tryk på SET.
fslut ibrugtagningen ved tryk på MODE.
Ved samtidigt tryk på SET og SEL kan uret fuldstændig tilbagesættes.
Først efter reset kan De igen ændre sprog og måleenhed.
Lys
Tryk kort på LIGHT for forbigående at aktivere baggrundsbelysningen.
Vigtige informationer til betjening af uret med
pulsmåler
Uret med pulsmåler råder over
3 funktionsmodi.
Ved tryk på MODE kan De skifte urets funktionsmodus.
Funktionernes rækkefølge er:
Stopur
CHRONO ST-UHR CHRONO CRONO
Pulsmåler
HRM PULS FC PULSO
Klokkeslæt
TIME ZEIT TEMPS HORA
Derforuden findes der forskellige underfunktioner i de 3 funktionsmodi.
Ved tryk på SEL kommer De altid til underfunktionerne.
Hurtigindstilling
Når De indstiller numeriske værdier, kan De bruge hurtigindstillingen ved at
trykke og holde SEL.
-
32
-
Klokkeslæt og grundindstillinger
Vælg først funktionen ved tryk på MODE.
TIME
TIMETIME
TIME
ZEIT
ZEITZEIT
ZEIT
TEMPS
TEMPSTEMPS
TEMPS
HORA
HORAHORA
HORA
Ved tryk på SEL kan De fremkalde underfunktionerne i tidsmodus.
Vækningsalarm
ALARM ALARM ALARM ALARMA
Timer
TIMER TIMER COMPTE TIMER
Klokkeslæt
TIME ZEIT TEMPS HORA
Tryk og hold SET i 3 sekunder for at skifte til indstillingsmodus.
På displayet vises
HOLD
TO SET
HALTEN=
EINST.
MAINT=
REGLER
MANT=
AJUST
og angivelsen af 12 eller 24-timers modus blinker.
Tryk SEL for at indstille og bekræft Deres indstilling ved tryk på SET. På samme
måde indstilles sekunderne, minutterne, timerne, år, måned og dag.
Afslut indstillingsmodus ved tryk på MODE.
Anden tidszone
Tryk og hold SEL i 3 sekunder. Uret skifter til angivelse af den anden tidszone og
T2 vises på displayet. Indstillingen af den anden tidszone følger som beskrevet i
forudgående afsnit.
Tryk og hold SEL i 3 sekunder for at skifte tilbage til den normale tidsangivelse.

-
33
-
Vækningsalarm
ALARM ALARM ALARM ALARMA
Hold SET i 3 sekunder for at komme til indstillingsmodus.
På displayet vises "AL" og vækningstidens minutter blinker.
Tryk på SEL for at indstille og bekræft Deres indstilling ved tryk på SET.
På samme måde indstiller De timerne.
Hvis det ønskes, indstiller De nu måned og dag.
Hvis hverken måned eller dag indstilles, lyder alarmen daglig. Hvis kun dagen
indstilles, lyder alarmen månedlig. Hvis både måned og dag indstilles, lyder
alarmen kun på den indstillede dato.
På displayet vises nu timeslagets indstilling.
CHIME STDALARM SIGN HOR HORA AL
For at indstille trykker De SEL og bekræft Deres indstilling ved tryk på SET
(ON/EIN/ACTIF/ENCENDID=tændt,
OFF/AUS/INACTIF/APAGADO=slukket).
Når timeslaget er aktiveret, vises klokkesymbolet og hver fulde time lyder en
signaltone.
Afslut indstillingsmodus ved tryk på MODE.
De kan aktivere eller deaktivere alarmen ved tryk på SET.
Når alarmen er aktiveret vises alarmsymbolet .
Når alarmen lyder, trykker De SET, SEL eller MODE for at stoppe alarmen.
Slummerfunktion
Hvis De ikke trykker på en tast når vækningsalarmen lyder, aktiveres
slummerfunktionen automatisk efter 30 sekunder og symbolet blinker på
displayet. Alarmen forstummer nu og lyder igen efter 2 minutters forløb. Denne
proces gentager sig 5 gange.
Timer (max. 23:59:00)
TIMER TIMER COMPTE TIMER
-
34
-
Tryk og hold SET i 3 sekunder for at indstille timeren.
På displayet blinker timertidens minutter.
For at indstille trykker De SEL og bekræft Deres indstilling ved tryk på SET. På
samme måde indstiller De timerne.
Nu følger timerens ekstraindstilling. Ved tryk på SEL vælger De den ønskede
modus:
Cd r Efter opnåelse af 0:00 tæller timeren den indstillede tid
på ny tilbage.
Cd U Efter opnåelse af 0:00 tæller timeren fremad.
Cd S Efter opnåelse af 0:00 stopper timeren.
Afslut indstillingsmodus ved tryk på MODE.
Ved tryk på SET kan De starte eller stoppe timeren.
Tryk og hold SET for at resætte timeren.
Når timertiden er udløbet, lyder en signaltone.
Stopur
Vælg først funktionen ved tryk på MODE.
CHRONO
CHRONOCHRONO
CHRONO
ST
STST
ST-
--
-UHR
UHRUHR
UHR
CHRONO
CHRONOCHRONO
CHRONO
CRONO
CRONOCRONO
CRONO
For at starte eller stoppe stopuret trykker de SET. For at stoppe en rundetid trykker
De ved løbende stopur SEL. Op til 99 rundetider kan stoppes.
Tryk og hold SET for at resætte stopuret.
Hukommelsesfunktion
DATA
RECALL
ANSICHT
DATEN
APPEL
DONNEES
RECUP
DATOS
Når stopuret er standset, trykker De på SEL og på displayet vises den hurtigste
runde. Tryk på SET for at vise de andere rundetider.
Henvisning: Hukommelsesfunktionen kan kun fremkaldes, når mindst en rundetid
blev optegnet.

-
35
-
Pulsmåler
Vælg først funktionen ved tryk på MODE.
HRM
HRMHRM
HRM
PULS
PULSPULS
PULS
FC
FCFC
FC
PULSO
PULSOPULSO
PULSO
Pulsmåleren fungerer kun, når brystselen bruges.
Ved tryk på SEL kan De fremkalde pulsmålerens underfunktioner.
Timer
TIMER TIMER COMPTE TEMPORIZADOR
Hukommelsesfunktion
MEMORY SPEICHER MEMOIRE MEMORIA
Målsætningspuls
ZONE BEREICH ZONE ZONA
Kalorieforbrug, fedtforbrænding og BMI
CALORIE KALORIEN CALORIES CALORIAS
Fitness
FITNESS
LEVEL
FITNESS
LEVEL
NIV FORM
PHYSIQ
NIVEL
FIT
På displayets mellemste linie vises pulsen, når brystselen bruges.
Når pulssignalet modtages, blinker hjertesymbolet.
Til højre for pulsangivelsen vises den opnåede andel af maksimalpulsen i procent.
Den vurderede maksimalpuls udregnes automatisk af alder, vægt og
legemshøjde..
-
36
-
Advarselslys
Når Deres puls opnår 99% af
maksimalpulsen eller sågar overskrider
denne, eller når pulsen overskrider den
indstillede grænseværdi (se
"Målsætningspulsområde") blinker det
røde advarselslys og lyder alarmen.
Timer
TIMER TIMER COMPTE TEMPORIZADOR
På displayets nederste linie vises den hidtil forløbne træningstid. På den mellemste
linie vises pulsen og den opnåede andel af maksimalpulsen i procent.
Timeren tæller automatisk fra det tidspunkt, hvor brystselen tages på. Timeren
tæller også videre, selvom De skifter til en anden modus.
Tryk kort på SET for at vælge timermodus:
TIMER Træningstid total
Træningstid indenfor målsætningspulsområdet
▲ Træningstid over målsætningspulsområdet
▼ Træningstid under målsætningspulsområdet
Tryk og hold SET for at resætte træningstiden.
Hukommelsesfunktion
MEMORY SPEICHER MEMOIRE MEMORIA

-
37
-
De gemte værdier vises i den nederste linie.
opnået maksimalpuls
HI H FO AL
opnået minimalpuls
LO N FA BA
gennemsnitlig puls
AV D MO PR
Tryk og hold SET for at resætte de gemte værdier.
Målsætningspulsområde
GIV AGT: Tal med Deres læge før De begynder med
træningen for at få afklaret hvilket målsætningspuls- område
der er egnet for Dem. De forud indstillede værdier er kun
grove standardværdier og ikke egnet for enhver person.
ZONE BEREICH ZONE ZONA
I den nederste linie vises øverste og nederste grænseværdi i
målsætningspulsområdet.
Den udvalgte træningsmåde vises i den øverste linie.
L- U Brugerdefineret
L-1 Helbred (50-65% af maksimalpulsen)
L-2 Fitness (65-80% af maksimalpulsen)
L-3 Præstation (80-95% af maksimalpulsen)
Tryk og hold SET i 3 sekunder for at skifte til indstillingsmodus.
Vælg træningsarten ved tryk på SEL. Hvis De vælger "U" (brugerdefineret) kan De
indstille grænseværdierne manuelt.
-
38
-
Tryk på SET. På displayet blinker den nederste grænseværdi. Indstil værdien ved
tryk på SEL og bekræft indstillingen ved tryk på SET.
Indstil på samme måde den øverste grænseværdi.
Afslut indstillingsmodus ved tryk på MODE.
Tryk og hold SEL for at aktivere pulsalarmen. Når pulsalarmen er aktiveret, vises
alarmsymbolet i displayet, og når målsætningspulsområdet forlades , lyder en
signaltone"PIEP-PIEP... PIEP-PIEP...PIEP-PIEP". Hvis Deres puls opnår 99% af
maksimalpulsen eller sågar overskrider denne værdi, lyder alarmtonen for
maksimalpulsen "PIEP-PIEP-PIEP-PIEP-PIEP...". Denne tone er uafhængig af
træningszonen og træningszonens pulsalarm.
Kalorier, fedtforbrænding og BMI
CALORIE KALORIEN CALORIES CALORIAS
I den nederste linie vises de opbrugte kalorier
CALORIE KALORIEN CALORIES CALORIAS
Tryk på SET for at skifte til angivelsen af fedtforbrændingen i gram
FAT
BURN
FETT CONSGRAISSES
GRASA
eller til angivelsen af Deres BMI.
BMI BMI IMC IMC
I angivelsen af kalorieforbruget eller fedtforbrændingen kan De resætte de gemte
værdier ved at trykke og holde SET.
Henvisning: For at forbedre nøjagtigheden af kalorie- og fedtforbrændings-
angivelsen, er det nødvendigt, at alder og vægt er korrekt indstillet.
Henvisning: Fedtforbrændingsmåleren bliver kun aktiv ved en puls på over 120
slag i minuttet.
Seite laden ...
Seite laden ...
Seite laden ...
Seite laden ...
Seite laden ...
Seite laden ...
Seite laden ...
Seite laden ...
Seite laden ...
Seite laden ...
Seite laden ...
Seite laden ...
Seite laden ...
Seite laden ...
Seite laden ...
Seite laden ...
-
 1
1
-
 2
2
-
 3
3
-
 4
4
-
 5
5
-
 6
6
-
 7
7
-
 8
8
-
 9
9
-
 10
10
-
 11
11
-
 12
12
-
 13
13
-
 14
14
-
 15
15
-
 16
16
-
 17
17
-
 18
18
-
 19
19
-
 20
20
-
 21
21
-
 22
22
-
 23
23
-
 24
24
-
 25
25
-
 26
26
-
 27
27
-
 28
28
-
 29
29
-
 30
30
-
 31
31
-
 32
32
-
 33
33
-
 34
34
-
 35
35
-
 36
36


Crivit 1-LD3945 Usage And Safety Instructions
- Kategorie
- Sportuhren
- Typ
- Usage And Safety Instructions
- Dieses Handbuch ist auch geeignet für
in anderen Sprachen
- English: Crivit 1-LD3945
- dansk: Crivit 1-LD3945
Verwandte Papiere
-
Crivit 1-LD3945 Usage And Safety Instructions
-
-
-
-
-
Crivit 1/2013 Usage And Safety Instructions
-
Crivit 1-LD3604-2 Usage And Safety Instructions
-
-
Crivit 1-LD4086 Bedienungsanleitung
