Alape WT.RS450H Installationsanleitung
- Kategorie
- Flachbildschirm-Wandhalterungen
- Typ
- Installationsanleitung

Montageanleitung Waschtische
Installation instructions washstands
WT.RS450H WT.RS400H WT.RS325 WT.QS325X
WT.RS450 WT.RS400
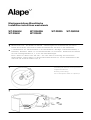
1. Ablaufventil und – bei Modell WT.RS450H – Überlaufgarnitur am Waschtisch montieren.
Please mount drain valve and for model WT.RS450H the overflow on the washstand.
2. 4 x Dübellöcher für Stockschrauben in die Wand bohren. Montage- und Anschlussmaße, s.
Rückseite, beachten. Dübel (1) und Stockschrauben (2) einsetzen. Waschtisch mit Muttern
(6) und Unterlegscheiben (3, 4, 5) an der Wand befestigen.
Bore 4 holes for dowels into the wall – see rear side for mounting and connection
measurements. Insert dowels (1) and wood-to-metal dowels (2). Secure washstand to wall
with nuts (6) and flat washers (3,4,5).
3
2
1
1.
2.
6
Armaturenmontage auf Becken:
Verwendung der Hahnloch-Unterlegscheibe ist
zwingend erforderlich!
Mounting of the fitting:
Use of the tap hole washer is compulsory!
951393/060717

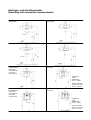
Montage- und Anschlussmaße
Mounting and connection measurements
WT.RS450H
WT.RS400
WT.RS400H
*
* OKFF = Oberkante fertiger Fußboden/ Finished floor level (FFL)
*
*
*
WT.RS325 – mit sichtbarem Ablauf bei standardisierten
Montagemaßen /
visible drain
with traditional
Connection
measurements
WT.RS450
*
WT.RS325 – mit verdecktem Ablauf / without visible
drain pipe
Empfehlung:
Viega
Ablaufbogen,
Art.-Nr. 103781
Recommendation:
Siphon from Viega,
item no. 103781
951393/060717
WT.QS325X – mit sichtbarem Ablauf bei standardisierten
Montagemaßen /
visible drain
with traditional
Connection
measurements
WT.QS325X – mit verdecktem Ablauf / without visible
drain pipe
Empfehlung:
Viega
Ablaufbogen,
Art.-Nr. 103781
Recommendation:
Siphon from Viega,
item no. 103781
*
* *
-
 1
1
-
 2
2


Alape WT.RS450H Installationsanleitung
- Kategorie
- Flachbildschirm-Wandhalterungen
- Typ
- Installationsanleitung
in anderen Sprachen
- English: Alape WT.RS450H Installation guide
Verwandte Papiere


Sonstige Unterlagen
-
Respekta NEWYORK Produktinformation
-
-
-
-
-
-
-
-
-
STIEBEL ELTRON HDB-E 12-24 Si Operation Instruction