
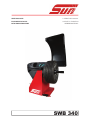
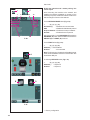
Manual do Operador Manual do Operador
SWB 340
WHEEL BALANCER
EQUILIBREUSE DE ROUES
RADAUSWUCHTMASCHINE
• OPERATOR’S MANUAL
• NOTICE D’ UTILISATION
• BETRIEBSANLEITUNG

ii
Snap-on Equipment Srl a unico socio
Via Provinciale per Carpi, 33
42015 CORREGGIO (RE) ITALY
Tel.: +39-(0)522-733480
Fax: +39-(0)522-733479
E-mail: [email protected]
Internet: https://www.snapon-totalshopsolutions.com
Correggio (RE) - ITALYFrancesco Frezza
date:
ENG - complies with all the relevant regulations in the following directives:
FRA - est conforme à toutes les dispositions pertinentes des directives suivantes :
DEU - Allen zu folgenden Richtlinien gehörenden Bestimmungen entspricht:
ITA - è conforme a tutte le disposizioni pertinenti delle seguenti direttive:
POR - satisfaz todas as disposições relevantes das seguintes directivas:
SPA - es conforme con todas las disposiciones pertinentes a las siguientes directivas:
ALB - është konform me të gjitha dispozitat që kanë të bëjnë me direktivat e mëposhtme:
BUL - ••••••••••! "! ••#$%# &!'(•&•)*#, ••)•&+!.# •• • •/•)•!.#•• )#&•%•#•#:
CES - vyhovuje všem požadavk0m, které se vztahují na následující sm1rnice:
HRV - udovoljava svim relevantnim odredbama slijede2ih smjernica:
DAN - er i overensstemmelse med bestemmelserne i følgende direktiver:
EST - vastab järgmiste direktiivide kõikidele asjassepuutuvatele sätetele:
FIN - on seuraavien direktiivien asiaankuuluvien säännösten mukainen:
ELL - 34567 89;<=5> ;3 ?@3J K7J MQ>W@XY37J 8Z3K7[XJ ;3 K7J 6[?@>\]3J >^_`43J:
ISL - er í samræmi við allar viðeigandi tilskipanir eftirfarandi reglugerða:
LAV - atbilst visiem attiecxgajiem noteikumiem š{d{s direktxv{s:
LIT - atitinka visus toliau nurodyt| direktyv| reikalavimus:
}~D - • •• ••€/!•"••• •• •#•• "•&‚# •) •/•)"#•• )#&•%•#•#:
}ON - je u skladu sa svim relevantnim odredbama slede2ih direktiva:
NLD - overeenstemt met alle toepasselijke voorschriften van de volgende richtlijnen:
POL - jest zgodna ƒjest zgodny„ ze wszystkimi zarz…dzeniami zawartymi w nast†puj…cych dyrektywach:
RU} - este fabricat în conformitate cu toate prevederile în materie din urmãtoarele directive:
SLO - vyhovuje všetkým požiadavkám, vz‡ahujúcim sa na nasledujúce smernice:
SLV - v skladu z vsemi predpisi, ki se nanašajo na naslednje direktive:
SˆE - överensstämmer med alla bestämmelser tillhörande följande direktiv:
TUR - a‰aŠ‹da belirtilen yönetmeliklere ili‰kin tüm hükümlere uygundur:
HUN - megfelel a következŒ irányelvekbe foglalt, valamennyi rendelkezésnek:
RUS - ••••••••••Ž•• •••‚ (&#‚•"‘•‚’‚ "•&‚!‚ •/•)Ž“.#” )#&•%•#•:
ENG-The }anager of the Technical Of• ce is authorised to compile a technical lea– et in compliance with appendi— VII, letter A, of the ˜™™›œŸ˜œCE directive
FRA-Le Responsable du Bureau Technique est autorisé à constituer le fascicule technique visé sous l¡anne—e VII lettre A de la directive ˜™™›œŸ˜œCE
DEU-Der Leiter der technischen Abteilung ist bevollmächtigt, die technischen Unterlagen zu erstellen ƒsiehe Anhang VII, Buchstabe A der Richtlinie ˜™™›œŸ˜œCE
ITA-Il Responsabile dell¡Uf• cio Tecnico è autorizzato a costituire il fascicolo tecnico di cui all¡allegato VII lettera A della direttiva ˜™™›œŸ˜œCE
POR-O Responsável do Gabinete Técnico está autorizado a compilar o processo técnico, referido no ane—o VII alínea A da directiva ˜™™›œŸ˜œCE
SPA-El Responsable del Departamento Técnico está autorizado a constituir el fascículo técnico indicado en el ane—o VII letra A de la directiva ˜™™›œŸ˜œCE
ALB-Përgjegjësi i ¢yrës Teknike është i autorizuar të realizojë fashikullin teknik sipas dokumentit bashkëngjitur VII germa A e direktivës ˜™™›œŸ˜œ~E
BUL-£•€•••&"#%•• "! ¤•”"#$••%#‘ ••)•/ • Ž(•/"•‚•.•" )! ••••!•# ••”"#$••%!•! *&•¥Ž&! • ••••••••••#• • ¦&#/•+•"#• VII, §A¨, ©#&•%•#•! ˜™™›œŸ˜œEª
CES-¢odpov1dný pracovník technického odd1lení je oprávn1ný vypracovat technickou dokumentaci podle p«ílohy VII ¬ásti A Sm1rnice ˜™™›œŸ˜œES
HRV-Odgovorna osoba Tehni¬kog ureda je ovlaštena ustrojiti tehni¬ki svezak kako se vidi u dodatku VII slovo A smjernice ˜™™›œŸ˜œCE
DAN-Chefen i den tekniske afdeling har tilladelse til udarbejdelse af den tekniske dokumentation jf bilag VII litra A i direktivet ˜™™›œŸ˜œEF
EST-Tehnoosakonna vastutav töötaja on volitatud koostama tehnilise toimiku vastava lt direktiivi ˜™™›œŸ˜œEÜ VII lisa osale A
FIN-Teknisen toimiston vastuuhenkilö on valtuutettu kokoamaan tekninen eritelmä direktiivin ˜™™›œŸ˜œE- liitteen VII kohdan A mukaisesti
ELL-® ¯M39]\5>J K>\ °3Z57[>9 ±Q6<34>\ 34567 3²>\87>^>K_;X5>J 56 M6Q³²37 K>5 K3Z57[? <³[3@> 89;<=56 ;3 K> 8\5_;;X5> VII `Q³;;6 A K_J >^_`46J ˜™™›œŸ˜œ´µ
ISL-Á byrgðar manni tæknis krifsto funnar er heimilt að gera tækniskjalið samkvæmt A-lið VI I viðauka í regluger𠘙™› œŸ˜œEB
LAV-Tehnisk{s noda¶as vadxt{js ir pilnvarots sast{dxt tehnisko dokument{ciju atbilstoši ES direktxvas ˜™™›œŸ˜œE~ VII pielikuma A ieda¶ai
LIT-už technin· skyri| atsakingas asmuo yra ·galiotas sudaryti technin† byl…, kurios sudarymo tvarka nurodyta Direktyvos ˜™™›œŸ˜œEB VII priedo A dalyje
}~D-£)€•••&"#•• "! ••”"#$%#•• •))•/ • ••/!•••" )! €• ••••!•# ••”"#$%#•• (&#&!$"#% )!)•" •• (&#/•€ VII (#•‚• A •) )#&•%•#•!•! ˜™™›œŸ˜œCE
}ON-Odgovorno lice Tehni¬kog ureda je ovlašteno da sastavi tehni¬ku fasciklu kako se vidi u dodatku VII slovo A direktive ˜™™›œŸ˜œCE
NLD-Het Hoofd van de Technische Afdeling is gemachtigd om het technisch dossier samen te stellen waarover in Bijlage VII, afdeling A, van de richtlijn ˜™™›œŸ˜œEG
POL-~ierownik Biura Projektowego jest upowa¸niony do za¹o¸enia skoroszytu technicznego, o którym mowa w ¢a¹…czniku VII litera A dyrektywy ˜™™›œŸ˜œUE
RU}-Responsabilul Biroului Tehnic este autorizat sã întocmeascã dosarul tehnic prevãzut în ane—a VII litera A directiva ˜™™›œŸ˜œCE privind echipamentele tehnice
SLO-¢odpovedný pracovník technického oddelenia je oprávnený vypracova‡ technickú dokumentáciu podºa prílohy VII ¬asti A Smernice ˜™™›œŸ˜œES
SLV-Vodja tehniènega urada je pooblašèena za sestavo tehniène mape, kot navedeno v prilogi VII, èrka A direktive ˜™™›œŸ˜œES
SˆE-Ansvarig på det tekniska kontoret har behörighet att sammanställa medföljande teknisk dokumentation i enlighet med avsnitt A i bilaga VII i direktiv ˜™™›œŸ˜œEG
TUR-Teknik Ofis Sorumlusu ˜™™›œŸ˜œEC -önetmeliŠi¡nin VII ekinin A harfinde belirtilen teknik dosyay‹ haz‹rlamaya yetkilidir
HUN-A }»szaki Iroda IrodavezetŒje feljogosított a ˜™™›œŸ˜œE~ irányelv A részének VII }ellékletében meghatározott, m»szaki dokumentáció összeállítására
RUS-¼Ž%•••)#••/½ ••”"#$••%•€• ••)•/! Ž(•/"•‚•$•" ••••!•#•½ ••”"#$••%#¾ /#•• • ••••••••••## • (&#/•+•"#•‚ VII, /#••& A )#&•%•#•’ ˜™™›œŸ˜œCE
ITA-Direttore Operativo SPA-Director Operativo POR-Director Operacional ENG-Operations }anager FRA-Directeur Opérationnel
DEU-Betriebsleiter ALB-Drejtori Operativ BUL-£(•&!•#••" )#&•%••& CES-Výkonný «editel HRV-Operativni direktor DAN-Driftsleder
EST-Tegevdirektor FIN-Operatiivinen johtaja ELL-´M7Z37Q_876[?J ¿73\]\5KÀJ ISL-Starfandi framkvæmdarstjóri LAV-Operatxvais direktors
LIT-Operacij| vadovas }~D-£(•&!•#••" )#&•%••& }ON-Operativni direktor NLD-Operationeel directeur POL-Dyrektor Operatywny
RU}-Director Operator SLO-Výkonný riaditeº SLV-Operativni vodja SˆE-Driftledare TUR-‰letme }üdürü HUN-Operatív Igazgató
RUS - Ã(&!•/‘“.#¾ (&•#'••)••••‚
(8
2014//(8
2006/42/CE
ENG - DECLARATION OF CE CONFORMITY
FRA - DECLARATION CE DE CONFORMITE
DEU - KONFORMITÄTSERKLÄRUNG
FIN - EY-VAATIMUSTENMUKAISUUSVAKUUTUS
NLD - VERKLARING VAN OVEREENSTEMMING
SWE - EG-FÖRSÄKRAN OM ÖVERENSSTÄMMELSE
DAN - EF-OVERENSSTEMMELSESERKLÆRING
ISL - EB-SAMRÆMISYFIRLÝSING
POL - DEKLARACJA ZGODNO•CI “CE”
RUM - DECLARA•IE DE CONFORMITATE CU NORMELE CE
SLO - ES VYHLÁSENIE O ZHODE
SLV - IZJAVA O SKLADNOSTI CE
ALB - DEKLARATË KONFORMITETI KE
HUN - EK MEGFELEL•SÉGI NYILATKOZAT
DICHIARAZIONE CE DI CONFORMITA’ - ITA
DECLARAÇÃO CE DE CONFORMIDADE - POR
DECLARACIÓN CE DE CONFORMIDAD - SPA
•••!"#"$%& '" ()*+,•+(+,%• - BUL
ES PROHLÁŠENÍ O SHOD. - CES
DEKLARACIJA CE O PODOBNOSTI - HRV
EÜ VASTAVUSDEKLARATSIOON - EST
/01230 CE 34556782303 - ELL
ES ATBILST9BAS DEKLAR:CIJA - LAV
ATITIKTIES DEKLARACIJA - LIT
“EC” •••!"#"$%;" '" (**<#"'=*(+ - MKD
DEKLARACIJA CE O USKLA>ENOSTI - MON
EC UYGUNLUK BEYANNAMES? - TUR
•••!"#"$%& (**+,•+(+,%& (+"=•"#+"@ •( -
RUS
Snap-on Equipment Srl - Via Provinciale per Carpi, 33 - 42015 Correggio (RE) Italy
ENG - takes full responsibility for declaring that the machineQ
FRA - déclare sous sa propre responsabilité que la machine Q
DEU - erklärt auf eigene VerantwortungX dass die MaschineQ
ITA - dichiara sotto la propria responsabilità che la macchinaQ
POR - declara sob a própria responsabilidade que a máquinaQ
SPA - declara bajo su propia responsabilidad que la máquinaQ
ALB - deklaron nën përgjegjësinë e tij se makineriaQ
BUL - [\]^_`v`_ xz[ z{|z}z`~z€{X ‚\ ƒ_„v~_{_Q
CES - prohlašuje na …lastní †odpo…‡dnostX že strojní †aˆí†eníQ
HRV - i†ja…ljuje pod …lastitom odgo…ornoš‰u da strojQ
DAN - erklærer på eget ans…arX at maskinenQ
EST - kinnitab omal …astutuselX et aparaatQ
FIN - …akuuttaa omalla …astuullaanX että koneQ
ELL - ‹ŒŽ‘•–— ˜™–›œ˜•Ÿ ¡— Œ ¢Œ£Ÿ•¤Q
ISL - lýsir þ…í y¥ r á eigin ábyrgð að bíllinnQ
LAV - ap†in¦damies sa…u atbild§bu apliecinaX ka maš§na¨iek¦rtaQ
LIT - prisiimdama atsakomyb© skelbiaX kad mašinaQ
MKD - vª«_}¬}_ xz[ €}z«_ z[|z}z`~z€{ [\]_ ƒ_„v~_{_Q
MON - i†ja…ljuje pod …lastitom odgo…oroš‰u da mašinaQ
NLD - …erklaart …oor eigen …erantwoordelijkheid dat de machineQ
POL - o-wiadc†a na w®asn¯ odpowied†ialno-‰X °e mas†ynaQ
RUM - declarã pe propria rãspundere cã ma±inaQ
SLO - …yhlasuje na …lastnú †odpo…ednos²X že strojo…é †ariadenieQ
SLV - pod lastno odgo…ornostjo i†ja…ljamoX da je strojQ
SWE - försäkrar under eget ans…ar att maskinenQ
TUR - kendi sorumlulu³u alt´nda makinenin a±a³´da belirtilen yönetmeliklere uygun oldu³unu beyan etmektedirQ
HUN - a saját felelµssége tudatában kijelentiX hogy a gépQ
RUS - € xz^~z¶ z{}\{€{}\~~z€{·¸ ª_¹}^¹\{ ‚{z ƒ_„v~_
WHEEL BALANCER
EQUILIBREUSE
RADAUSWUCHTGERÄT
EQUILIBRATRICE
MÁQUINA DE EQUILIBRAR RODAS
EQUILIBRADORA
EKUILIBRUESE
!"#$%" &" '"("%)$*"%+ %" ,.!$
VYVAŽOVA/KA
BALANSER
HJULAFBALANCERINGSMASKINE
TASAKAALUSTUSSEADE
TASAPAINOTUSKONE
0123455467873
JAFNVÆGISSTILLINGARVÉL
BALANSÇÐANA
BALANSAVIMAS
$&+9%":.;":
BALANSERKA
BALANCEERMACHINE
WYWA<ARKA
ECHILIBROR
VYVAŽOVA/KA
STROJ ZA URAVNOTEŽEVANJE
BALANSMASKIN
DENGELEY=C=
KERÉKKIEGYENSÚLYOZÓ
'"("%)$*>;>:%?@ )X+%9
EC DECLARATION (Original document contained in Spare Parts Booklet)
DÉCLARATION CE (Le document original fi gurant dans le Liste des pièces détachées)
CE KONFORMITÄTSERKLÄRUNG (Originaldokument in der Ersatzteilliste enthaltenen)
ДЕКЛАРАЦИЯ EC (Оригинал документа прилагается к ведомости запчастей)
DICHIARAZIONE CE (Originale contenuta nel Libretto Ricambi)
DECLARACIÓN CE (El original se encuentra en tabla de repuestos)
DECLARAÇÃO CE (O original está contida em Lista de peças)
All Information in this manual has been supplied by the producer of the equipment:
Toutes les informations fi gurant dans le présent manuel ont été fournies par le fabricant de l’équipement :
Alle in diesem Handbuch enthaltenen Informationen wurden vom Hersteller der Ausrüstung geliefert:
Вся информация, содержащаяся в данном руководстве, предоставлена производителем оборудования
Tutte le informazioni contenute nel presente manuale sono fornite dal produttore dell’apparecchiatura:
Toda la información contenida en este manual ha sido suministrada por el productor del equipo:
Todas as informações contidas neste manual foram fornecidas pelo produtor do equipamento:
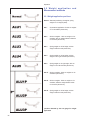
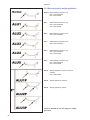
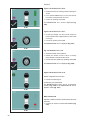
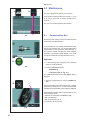
FAMILY NAME DESCRIPTION
SWB 340L Laser pointer and Sonar sonic transducer
SWB 340
SWB 340P Laser pointer, Sonar sonic transducer and Power Clamp system
SWB 340 P
- ФАКСИМИЛЕ
-

iii
Product aid publication:
WHEEL BALANCER
Zum Produkt gehörendes Dokument:
AUSWUCHTMASCHINEN
Publication de support au produit:
EQUILIBREUSE
Pubblicazione di supporto al prodotto:
EQUILIBRATRICE
Publicación de soporte al producto:
EQUILIBRADORA
Documentação de apoio ao produto:
MÁQUINA DE EQUILIBRAR RODAS
Публикация для поддержки изделия:
БАЛАНСИРОВОЧНЫЙ СТАНОК
date of fi rst publication:
date de la première édition:
Datum der Erstveröffentlichung:
data di prima pubblicazione:
fecha de la primera publicación:
data da primeira publicação:
дата первой публикации:
Original language edition in: ITALIAN
Langue d’origine de la publication: ITALIEN
Originalausgabe in: ITALIENISCH
Edizione di lingua originale in: ITALIANO
Edición original en idioma: ITALIANO
Edição original em: ITALIANO
язык оригинального издания: АНГЛИЙСКИЙ
DOCUMENTAZIONE DISPONIBILE
DOCUMENTAÇÃO DISPONÍVEL
DOCUMENTACIÓN DISPONIBLE
DOCUMENTATION AVAILABLE
DOCUMENTATION DISPONIBLE
VERFÜGBARE DOKUMENTATION
ДОСТУПНАЯ ДОКУМЕНТАЦИЯ
DICHIARAZIONE CE
EC DECLARACIÓN CE
DECLARAÇÃO CE
Schema Elettrico
WD Esquema Eléctrico
Esquema Elétrico
Contenuto in SP
Integradas en SP
Conteúdos em SP
Contained in SP
Teil der SP
Contenu dans SP
Содержится в каталоге запчастей
EC DECLARATION
EC EG-KONFORMITÄTSERKLÄRUNG
DECLARATION CE
ДЕКЛАРАЦИЯ ЕС
Wiring Diagram
WD Schaltplan
Schéma électrique
Схема электрических соединений
NOTE SULLA DOCUMENTAZIONE - ITA
NOTAS SOBRE LA DOCUMENTACIÓN - ESP
NOTAS SOBRE A DOCUMENTAÇÃO - POR
ENG - NOTES REGARDING DOCUMENTATION
DEU -
ANMERKUNGEN ZUR DOKUMENTATION
FRA - NOTES SUR LA DOCUMENTATION
RU - ПРИМЕЧАНИЯ ПО ДОКУМЕНТАЦИИ
ABB. DESCRIPTION CODE LANGUAGE
SIGLE DESCRIPTION CODE LANGUE
KENN. BESCHREIBUNG CODE SPRACHE
SIGLA
DESCRIZIONE CODICE LINGUA
SIGLA DESCRIPCIÓN CÓDIGO IDIOMA
SIGLA DESCRIÇÃO CÓDIGO IDIOMA
Operator’s Manual
Manuel de l’Opérateur ZEEWB120A03
ENG-FRA-DEU
OM Betriebsanleitung
Руководство по эксплуатации
ZEEWB120A08
RU
Spare Parts Booklet ENG-FRA-DEU
SP Liste des pièces détachées
TEEWB120A3
ITA-SPA-POR
Ersatzteilliste RU
Safety Booklet (Quick Start) EAZ0103G25A
ENG-FRA-DEU
OM Manuel de Securité EAZ0103G26A ITA-POR-SPA
Sicherheitsvorkehrungen
EAZ0103G27A RU
Manuale Operatore
OM Manual de Operador ZEEWB120A05 ITA-SPA-POR
Manual do Operador
Libretto Ricambi ENG-FRA-DEU
SP tabla de repuestos
TEEWB120A3 ITA-SPA-POR
Lista de peças RU
Libretto di Sicurezza EAZ0103G25A
ENG-FRA-DEU
OM Manual de Seguridad EAZ0103G26A ITA-POR-SPA
Manual de Segurança
EAZ0103G27A RU
05 / 2017

iv
UPDATES REPORT
Release B -__________________- August 2016
Updates;
Notes on Wi! , pages; 20, 106
Updates;
Chapter 5 reviewing
WARRANTY TERMS AND LIABILITY
LIMITATIONS
While the authors have taken care in the preparation
of this manual, nothing contained herein:
- modifies or alters in any way the standard
terms and conditions of the purchase, lease or
rental agreement under the terms of which the
equipment to which this manual relates was
acquired
- increases in any way the liability to the customer
or to third parties.
TO THE READER
While every effort has been made to ensure that
the information contained in this manual is correct,
complete and up-to-date, the right to change any part
of this document at any time without prior notice is
reserved.
Before installing, maintaining or
operating this unit, please read
this manual carefully, paying extra
attention to the safety warnings
and precautions.
Table of Contents
Warranty Terms iv
1.0
Safety 6
2.0 Speci! cations 8
3.0 Introduction 10
4.0 Layout 14
5.0 Operation 40
6.0 Maintenance 104
7.0 Troubleshooting 114
8.0 Disposal 140
9.0 Appendix 140
Appendix: Installation instructions 143
Revision A of May 2017
First Release
New model machine - PCN: 17G0039
Release B -___________________- March 2018

v
GEWÄHRLEISTUNGS- UND
HAFTUNGSAUSSCHLUSS
Die Informationen in dieser Bedienungsanleitung wurden
gewissenhaft und sorgfältig zusammengestellt.
Der
Inhalt oder Teile des Inhalts dieser Bedienungsanleitung:
- haben keinen Einfluss auf die Allgemeinen
Geschäftsbedingungen des Kaufvertrages,
Leasingvertrages oder Mietvertrages auf dessen
Grundlage das in dieser Bedienungsanleitung
beschriebene Maschine bezogen wurde,
- erweitern in keiner Weise den Haftungsanspruch
des Kunden oder Dritter.
AN DEN LESER
Bei der Zus ammenstellung der in dieser
Bedienungsanleitung enthaltenen Informationen wurde
größten Wert auf deren Richtigkeit, Vollständigkeit und
Aktualität gelegt. Wir behalten uns jedoch ausdrücklich
das Recht vor, diese Informationen jederzeit und ohne
vorherige Ankündigung zu ändern.
Lesen Sie diese
Bedienungsanleitung sorgfältig
durch, bevor Sie die Maschine
installieren, warten oder betreiben.
Beachten Sie insbesondere die
Sicherheitsvorschriften und
Warnungen.
Inhaltsverzeichnis
Gewährleistungsbedingungen v
1.0
Sicherheit 7
2.0 Spezi! kationen 9
3.0 Einführung 11
4.0 Layout 15
5.0 Betrieb 41
6.0 Wartung 105
7.0 Fehlerbeseitigung 115
8.0 Entsorgung 141
9.0 Anhang 141
Anhang: Installationsanweisungen 143
APPLICATION DE LA GARANTIE ET
LIMITATIONS DE RESPONSABILITÉ
Bien que les auteurs aient accordé la plus grande
attention à la rédaction du présent manuel, aucun
élément ! gurant dans ce dernier :
- ne modi! e d’aucune façon les termes et les
conditions générales des contrats d’achat, de
crédit-bail ou de location, aux termes desquels
les appareils mentionnés dans ce manuel ont
été achetés
- n’augmente d’aucune façon la responsabilité de
la société envers le client ou les tiers.
NOTE POUR LE LECTEUR
Bien que tout effort ait été fait pour assurer l’exactitude
des informations ! gurant dans le présent manuel,
comme complément ou mise à jour de ce dernier, le
droit d’y apporter des modi! cations à tout moment sans
préavis est réservé.
Avant d’installer, d’entretenir
ou d’utiliser la machine, lire
attentivement le présent manuel,
en faisant particulièrement
attention aux avertissements et
précautions de sécurité.
Sommaire
Application de la garantie v
1.0
Sécurité 7
2.0 Spéci! cations 9
3.0 Introduction 11
4.0 Disposition 15
5.0 Utilisation 41
6.0 Maintenance 105
7.0 Dépannage 115
8.0 Élimination 141
9.0 Annexes 141
Annexes : Instructions d’Installation 143

6
1-1
WICHTIG!!
DIESE ANLEITUNG IST AUFZUBEWAHREN
IMPORTANT !!
CONSERVER CES INSTRUCTIONS
Safety
IMPORTANT!!
KEEP THESE INSTRUCTIONS
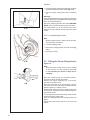
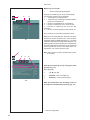
1.0 Safety
The safety precautions must be completely understood
and observed by every operator. The Operator’s
Manual will contain speci! c warnings and cautions
when dangerous situations may be encountered during
the procedures described.
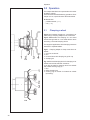
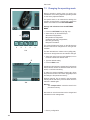
Important safety precautions relevant to the unit are
described in the Safety Booklet, refer to Figure 1-1.
We suggest you store a copy of the Safety Booklet near
the unit, within easy reach of the operator.
1.1 Typographic style
This manual contains text styles intended to recall the
reader's attention:
Note: Suggestion or explanation.
C
AUTION: INDICATES THAT THE FOLLOWING
ACTION MAY RESULT IN DAMAGE TO THE UNIT
OR OBJECTS ATTACHED TO IT.
WARNING: INDICATES THAT THE FOLLOWING
ACTION MAY RESULT IN (SERIOUS) INJURY TO
THE OPERATOR OR OTHERS.
• Bulleted list:
• Indicates that the action must be executed by the
operator before proceeding with the next step in
the sequence.
TOPIC (F n°) = see the Chapter number.
The topic indicated is explained in full in the chapter
speci! ed.
1.2
Manuals supplied with the unit
The unit includes the following documentation:
- Safety manual and Installation guide (standard
supplement Fig. 1-1).
Installation instructions:
Further installation instructions are in the Appendix
of the Operator Manual.
- Operator Manual (available on the web).
The operator must learn in detail the instructions
contained in it and meticulously observe the notes,
HAZARD and CAUTION WARNINGS.
- Spare Parts Booklet
Document for use by Service personnel.
EC Declaration of Conformity
The EC Declaration is included in the Spare Parts
Booklet.
P/N: EAZ0103G25A

7
Sicherheit
1.0 Sicherheit
Die Sicherheitsmaßnahmen müssen von allen
Bedienern vollständig verstanden und eingehalten
werden. Das Bedienungshandbuch enthält spezi! sche
Warnungen und Hinweise, wenn bei den beschriebenen
Maßnahmen gefährliche Situationen auftreten können.
Wichtige Sicherheitsmaßnahmen für dieses Gerät sind im
Sicherheitshandbuch beschrieben; siehe Abbildung 1-1.
Wir empfehlen, eine Kopie des Sicherheitshefts in
der Nähe des Geräts gut sichtbar für den Bediener
aufzubewahren.
1.1 Typographie
Dieses Handbuch enthält Schriftweisen, die zu
besonderer V
orsicht auffordern:
Hinweis: Vorschlag oder Erklärung.
VORSICHT: WEIST DARAUF HIN, DASS DIE
FOLGENDE MASSNAHME ZU SCHÄDEN AM
GERÄT ODER DARAN BEFESTIGTEN TEILEN
FÜHREN KANN.
WARNUNG: WEIST DARAUF HIN, DASS DIE
FOLGENDE MASSNAHME ZU (SCHWEREN)
VERLETZUNGEN DES BEDIENERS ODER
ANDERER PERSONEN FÜHREN KANN.
• Aufzählungspunkte:
• Zeigen an, dass der Bediener Maßnahmen
durchführen muss, bevor er zum nächsten Schritt
des Vorgangs übergehen kann.
THEMA (F Nr. (= siehe Kapitel Nummer).
Das angegebene Thema wird in dem bezeichneten
Kapitel ausführlich behandelt.
1.2 Handbücher des Geräts
Das Gerät ist mit folgender Dokumentation ausgestatt
et:
- Booklet für Sicherheit und Installationshandbuch
(Standardbeilage Abb. 1-1).
Installationsanweisungen:
Weitere Installationsanweisungen ! nden Sie in der
Anlage der Betriebsanleitung.
- Betriebsanleitung (im Internet verfügbar).
Der Benutzer muss die darin enthaltenen
Anweisungen im Detail erfassen und die Hinweise,
die WARNUNGEN vor Gefahren und die Angaben mit
der Bezeichnung ACHTUNG genauestens befolgen.
- Ersatzteilhandbuch
Dieses Dokument ist dem Wartungspersonal vorbehalten.
CE-Konformitätserklärung
Die CE-Konformitätserklärung befindet sich im
Ersatzteilhandbuch.
Sécurité
1.0 Sécurité
Tout opérateur doit avoir une parfaite connaissance des
consignes de sécurité et il est tenu de les respecter. Quand
les opérations décrites peuvent créer des situations
dangereuses, le manuel pour l’opérateur contient des
avertissements et des indications spéci! ques.
Les mesures de sécurité importantes relatives à la
machine sont décrites dans le Livret de sécurité,
reportez-vous à la Fig.1-1.
Nous suggérons de conserver une copie du Livret de
Sécurité près de la machine à la portée de l’opérateur.
1.1 Composition typographique
Ce manuel contient des styles de texte qui vous
demandent de prêter une attention particulière :
Remarque : Suggestion ou explication.
A
TTENTION : INDIQUE QUE L’ACTION SUIVANTE
RISQUE D’ENDOMMAGER LA MACHINE ET LES
OBJETS ATTACHÉS À LA MACHINE.
AVERTISSEMENT : INDIQUE QUE L'ACTION
SU IVAN TE RISQU E D E C AU SER D ES
BLESSURES (SÉRIEUSES) À L’OPÉRATEUR
OU AUX AUTRES.
• Liste à puces :
•
Indique l’action que l’opérateur doit effectuer avant
de pouvoir passer à l’étape suivante de la procédure.
ARGUMENT (F n°) = se reporter au Chapitre numéro.
L’argument indiqué est complètement traité dans le
chapitre indiqué.
1.2 Manuels fournis
La machine est fournie avec les manuels suivants :
- Livret de sécurité et Guide d’installation (supplément
standard Fig. 1-1).
Instructions pour l’installation :
D’autres instructions d’installation se trouvent dans
l’annexe du Manuel d’utilisation.
- Manuel d’utilisation (disponible sur le web).
L’utilisateur doit apprendre dans le détail les instructions
que ce manuel contient et observer scrupuleusement
les remarques, les AVERTISSEMENT de danger et
d’ATTENTION.
- Notice des Pièces détachées.
Document à usage exclusif du personnel
d’assistance.
Déclaration de Conformité CE
La Déclaration CE ! gure dans la Notice des Pièces
détachées.

8
Speci• cations
ĂƵŐĞĂƌŵ
! "#$%&'(!)(&(*
! "#%&'(!)(&(*
+
,
%ĂƵŐĞĂƌŵ*
,
-.
-.,
,
-.,%,*
-.,,
/,
--0%1,*
2,
/--0
,
3
%,*
,
4!+4
/
2,
2,
5#35
6"
3
#+
#+
#4%*
3
7
2.0 Speci• cations
!
" #
$$#
%$#
& $&'"#
"
$(&(
(&(
(&(
$(&%(
(&(
)*
+,&-#
".
"/
/&/$
&%
".
&&0%1&2
$3$$3%
''$.
%.
)*45##
6-
6-
)*
)*
67
-#
-#
)*
8
)*
6-
6-
6-
6-
6-
6-
SWB 340

9
Spezi• kationen
ĂƵŐĞĂƌŵ##
$%$&&'()*+%,+")+-
#
.
.
.#
/##( ĂƵŐĞĂƌŵ-
.
.#
!0
"#
10&"#
23"#
23"'
."#
23"'(&-
23"'
$4
#2.2/("-
5
#62.2/
.
.
$&&6
$&&'$0( -
#
$&($-
%7&
5
5
8'8
5&
"#
6#
"&
"
9
2.0 Spezi• kationen
Speci• cations
ĂƵŐĞĂƌŵ
!"#$
$
%
%
$ "&'ĂƵŐĞĂƌŵ(
%
%
"&
)
*&
+,-
,-
,-'(
,-
,,.'+(
,,.
/
!
0
$&0'(
"%
'$1#(
#2
3
134/3
+5
/
/
2.0 Spéci• cations

10
3-1
3-2
min.
500 mm
min.
500 mm
min. 2200 mm
min. 2000 mm
Introduction
3.0 Introduction
This wheel balancer combines advanced, high-
performance technology, robustness and reliability with
very simple, user-friendly operation.
The slow rotation speed of the wheel ensures a
completely safe use.
The colour monitor displays set data, operating modes,
values measured, symbols and text of the operator
guide. The touch screen monitor also contains all the
Operating Controls.
Always work in a clean area and with clean wheels;
preventively remove debris and old counterweights
from tyres and rims. That way proper mounting of the
wheel and an optimal balancing result can be achieved.
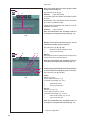
WARNING:
THIS MACHINE HAS ONLY ONE OPERATING
STATION (A, Figure 3-1). THE OPERATOR
IS RESPONSIBLE FOR WORKING AREA
LIMITATIONS AND FOR ANY CONSEQUENCE
CONNECTED WITH THE USE OF THE
EQUIPMENT.
THE OPERATOR MUST REMAIN NEAR THE
MACHINE, IN THE CORRECT WORK POSITION;
AT THE CONTROL UNIT SIDE (A, Figure 3-1).
CAUTION:
ONLY THE OPERATOR IS ALLOWED TO ACCESS
THE WORKING
AREA.
Do not allow unauthorised people to approach the
working area (Fig. 3-2).
Application
The off-the-vehicle wheel balancer is designed for
dynamic and static balancing of cars and light-duty
trucks wheels, that fall within the limits stated in the
technical speci! cations (F 2).
This is a high accuracy measuring device. Handle
with care.
3.1 Conditions
During use or long term storage, the following values
should never be exceeded.
T
emperature range 0-50 °C
Humidity range 10-90% without condensation

11
Einführung
3.0 Einführung
Dieses Auswuchtgerät verbindet hochmoderne
Hochleistungstechnik, Robustheit und Zuverlässigkeit
mit einfachem, benutzerfreundlichem Betrieb.
Durch die niedrige Rotationsgeschwindigkeit des
Rades ist das Auswuchtgerät extrem sicher in der
Benutzung.
Auf dem Farbmonitor werden eingegebene Daten,
Betriebsarten, die jeweils ermittelten Messwerte sowie
bedienerführende Symbole und Hinweise angezeigt.
Außerdem enthält der Touchscreen-Monitor sämtliche
Steuerungselemente für den Betrieb.
Arbeiten Sie immer in einer sauberen Umgebung und
mit sauberen Rädern; entfernen Sie Rückstände und
alte Gewichte von Reifen und Felgen. Dadurch ist
sichergestellt, dass das Rad richtig aufgespannt wird
und eine optimale Auswuchtung erzielt wird.
ACHTUNG:
DIESE MASCHINE HAT NUR EINEN EINZIGEN
B E D I E N E R P L AT Z ( A , A b b . 3 - 1 ) . D E R
BEDIENER IST FÜR DIE BEGRENZUNGEN
DES ARBEITSBEREICHS UND FÜR ALLE
KONSEQUENZEN VERANTWORTLICH, DIE
DURCH DIE VERWENDUNG DES GERÄTS
ENTSTEHEN.
DER BETREIBER MUSS IN DER NÄHE VON
MASCHINEN BLEIBEN, IN GUTE POSITION DER
ARBEIT, IM COMMAND UNIT SEITE (A, Abb.3-1).
ACHTUNG:
N U R D E R B E D I E N E R D A R F S I C H I M
ARBEITSBEREICH
BEFINDEN.
Sorgen Sie dafür, dass Unbefugten der Zutritt verboten
ist (Abb. 3-2).
Einsatzbereich
Das Auswuchtgerät für demontierte Räder wurde zur
statischen und dynamischen Auswuchtung von Rädern
von Personenkraftwagen und leichten Lkws entwickelt,
die in den Bereich der angegebenen technischen
Spezi! kationen fallen (F 2).
Dies ist ein hochgenaues Messgerät. Behandeln Sie
es p" eglich.
3.1 Bedingungen
Während der Benutzung bzw. einer Langzeitlagerung
d
ürfen die folgenden Werte nicht überschritten werden.
Temperaturbereich 0-50 °C
Luftfeuchtigkeitsbereich 10-90% nicht kondensierend
Introduction
3.0 Introduction
Cette équilibreuse vous offre une technologie avancée
de haute performance, solidité et fiabilité et son
fonctionnement est très simple et convivial.
La faible vitesse de rotation de la roue assure que
cette équilibreuse peut être utilisée en toute sécurité.
Sur le moniteur couleur sont af! chées les données
entrées, les modes de fonctionnement, les valeurs
mesurées respectives et le guide pour l’opérateur.
L’écran tactile contient aussi toutes les commandes
de fonctionnement.
Travaillez toujours dans un endroit propre avec des
roues propres ; débarrassez les pneus et les jantes
de la saleté et des masses qui ne servent plus. Ainsi
vous obtiendrez une installation correcte de la roue et
un excellent résultat d’équilibrage.
ATTENTION :
C ETT E M AC HINE A UN SEUL POS TE
OPÉRATIONNEL (A, Fig. 3-1). L'OPÉRATEUR
A LA RESPONSABILITÉ DE LIMITER L’ACCÈS
À LA ZONE DE TRAVAIL ET DE TOUTES LES
CONSÉQUENCES LIÉES À L’UTILISATION DE
L’ÉQUIPEMENT.
L’OPÉRATEUR DOIT RESTER À PROXIMITÉ DE
LA MACHINE, DANS LA BONNE POSITION DE
TRAVAIL, CÔTÉ UNITÉ DE COMMANDE (A, Fig.
3-1).
ATTENTION :
SEUL L'OPÉRATEUR PEUT OCCUPER LA ZONE DE
TRAVAIL.
Interdire l’accès à toute personne étrangère au service
(Fig. 3-2).
Application
L’équilibreuse a été conçue pour l’équilibrage statique
et dynamique des roues de voitures et de véhicules uti-
lisés pour le transport léger, se trouvant dans les limites
mentionnées par les spéci! cations techniques (F 2).
Ceci est un appareil de mesure de haute précision.
Manipuler avec soin.
3.1 Conditions
Lors d’une utilisation ou un stockage prolongé les
conditions ne doivent jamais dépasser :
Gamme de température
0-50 °C
Gamme d’humidité 10-90 % sans condensation

12
3-3
EAA0263G66A
EAM0086G86A
EAM0058D69A
EAC0058D15A
EAC0058D07A
EAC0058D08A
EAM0005D25A
EAM0005D24A
EAM0005D23A
EAM0005D40A
8-04250A
EAA0247G21A
Power Clamp
Quick Clamp
Accessories
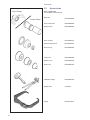
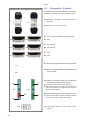
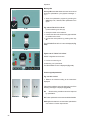
3.2 Accessories
Refer to Figure 3-3.
The standard accessories are:
Quick Nut
Power Clamp Nut
Plastic sleeve
Drum Cushion
Wheel pressing Drum
Pressure ring
Large cone
Medium cone
Small cone
Calibration weight
W
eight pliers
Gauge

13
EAA0263G66A
EAM0086G86A
EAM0058D69A
EAC0058D15A
EAC0058D07A
EAC0058D08A
EAM0005D25A
EAM0005D24A
EAM0005D23A
EAM0005D40A
8-04250A
EAA0247G21A
EAA0263G66A
EAM0086G86A
EAM0058D69A
EAC0058D15A
EAC0058D07A
EAC0058D08A
EAM0005D25A
EAM0005D24A
EAM0005D23A
EAM0005D40A
8-04250A
EAA0247G21A
Zubehör
3.2 Zubehör
Siehe Abbildung 3-3.
Das folgende Standardzubehör steht zur V
erfügung:
Schnellspannmutter
Power Clamp Spannmutter
Druckmuffe aus Kunststoff
Schützring für Andrückhaube
Andrückhaube
Druckring
Großer Konus
Mittlerer Konus
Kleiner Konus
Benutzerkalibriergewicht
Gewichtzange
Meßlehre
Accessoires
3.2 Accessoires
Se reporter à la Fig. 3-3.
Les accessoires standard sont :
Écrou à serrage rapide
Embout de blocage Power Clamp
Manchon en plastique
Protection Tête de serrage
Tête de serrage
Bague de serrage
Grand cône
Cône moyen
Petit cône
Masse de calibrage
Pince à masses
Calibre

14
4-1
4-1a
1
3
2
4-2
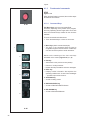
Layout
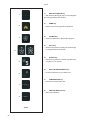
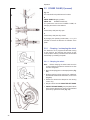
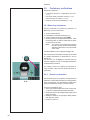
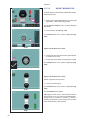
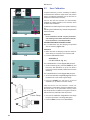
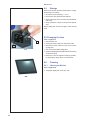
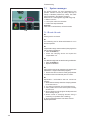
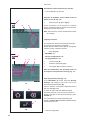
4.0 Layout
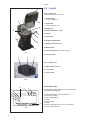
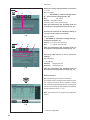
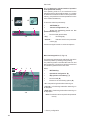
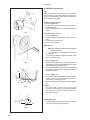
Refer to Figure 4-1.
Functional description of the unit:
1.
Touch screen
Refer to Chapter 4.1.
2. Input panel
Refer to Chapter 4.1.2
3a Gauge arm
3b. External Detector - Sonar
4. Flange
5. Stub shaft
6. Weight compartments
7. Storage areas for cones
7a. Storage areas for nut
8. Wheel guard
9. Control pedal (Brake / Power Clamp)
10. Laser Pointer
Identi! cation data
An identi! cation plate attached to the machine shows
the following data Fig. 4-2:
a- Name and address of the manufacturer
b- Conformity marking
c- Year of manufacture
d- Model
e- Serial number
f- Weight
g- Electric speci! cations (volt, ph, Hz, kW and A)
h- Acoustic pressure level
Refer to Figure 4-1a
1. Mains switch (ON/OFF)
2. Fuse holder
3. Power outlet
1
2
3a
4
6
7
9
5
8
3b
10
8. Wheel guard
9. Control pedal (Brake / Power Clamp)
10. Laser Pointer
a
b c
d
e
f
g
h

15
Layout
4.0 Layout
Siehe Abbildung 4-1.
Funktionsbeschreibung des Geräts:
1.
Berührungseingabe Bildschirm
Siehe Kapitel 4.1.
2. Eingabefeld
Siehe Kapitel 4.1.2
3a Innerer Messarm
3b. Messgerät für das Außen - Sonar
4. Flansch
5. Flanschwelle
6. Gewichtefächer
7. Aufbewahrungsbereiche für Konen
7a. Aufbewahrungsbereiche für Spannteile
8. Radschutz
9. Steuerpedal (Bremse / Power Clamp)
10. Laserzeiger
Markierungsdaten
An der Maschine ist ein Markierungsschild angebracht,
das folgende Daten enthält Abb. 4-2:
a- Name und Adresse des Herstellers
b- Konformitätsmarkierung
c- Baujahr
d- Modell
e- Seriennummer
f- Nettogewicht
g- Elektrische Daten (Volt, ph, Hz, kW und A)
h- Schalldruckpegel
Siehe Abbildung 4-1a
1. Netzschalter (AN/AUS)
2. Sicherungshalter
3. Netzanschluss
Disposition
4.0 Disposition
Se reporter à la Fig. 4-1.
Description fonctionnelle de la machine :
1.
Af! cheur tactile
Se reporter au Chapitre 4.1
2. Panneau des commandes
Se reporter au Chapitre 4.1.2
3a Jauge de mesure
3b. Capteur externe - Sonar
4. Plateau
5. Embout d’arbre
6. Bacs porte-masses
7. Zones de stockage pour cônes
7a. Zone de stockage pour embout de blocage
8. Carter de roue
9. Pédale commande (Frein / Power Clamp)
10. Pointeur laser
Données de marquage
Sur la machine, vous trouverez une plaque avec les
données suivantes Fig. 4-2 :
a- Nom et adresse du constructeur
b- Marquage de conformité
c- Année de construction
d- Modèle
e- Numéro de série
f- Poids net
g- Caractéristiques électriques (volt, ph, Hz, kW et A)
h- Niveau de pression sonore
Se reporter à la Fig. 4-1a
1. Interrupteur secteur (ALLUMÉ / ÉTEINT)
2. Porte-fusibles
3. Branchement électrique
8. Carter de roue
9. Pédale commande (Frein / Power Clamp)
10. Pointeur laser
8. Radschutz
9. Steuerpedal (Bremse/ Power Clamp)
10. Laser-Pointer

16
4-3
4-4
3
21
Layout
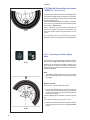
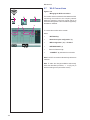
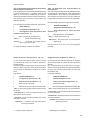
4.1 The screen
Fig. 4-3 Screen with display ! elds.
1 Display ! eld.
2 Information ! eld.
3 Commands Field (Key pad).
The screen shows the set data, helpful information, all
measured data and possible Error codes.
Description of display ! elds
Each ! eld of the screen has a speci! c function.
1 Display ! eld
- Rim dimensions (editable).
- Balancing modes (editable).
- Unbalance value.
- List of Counters.
- C codes (User Codes).
- Help information.
2 Information ! eld
- Number of the installed program version.
- Measurements of the wheel being processed.
- Operating conditions icons.
- Error codes.
3 Commands Field
The pictographs illustrating basic and special functions
are located here.
Each key has an icon showing the speci! c function it
is used to retrieve.
Touch Screen
In the Touch Screen interface, in order to have a touch
response, you need to tap and release the area on the
screen with your ! nger (Fig. 4-4).
The operator can hear a con! rmation tone, whenever
their own touch performs an action connected with
icons, buttons, text or images on the screen.
Note: For a regular operation keep the monitor
clean as indicated in the maintenance
chapter (F 6.0).

17
Layout
4.1 Bildschirm
Abb. 4-3 Bildschirm mit
Anzeigezonen.
1 Anzeigefeld.
2 Informationsfeld.
3 Steuerungsfeld (Tastenfeld).
Auf dem Bildschirm werden die jeweiligen Eingabedaten,
bedienerunterstützende Informationen, alle ermittelten
Messwerte sowie Fehlermeldungen angezeigt.
Beschreibung der Anzeigezonen
Jedes Feld am Bildschirm hat eine besondere Funktion.
1 Anzeigefeld
- Felgenabmessungen (kann bearbeitet werden).
- Auswuchtarten (kann bearbeitet werden).
- Unwuchtgröße.
- Liste der Zähler.
- C-Codes (Benutzercodes).
- Hilfetexte.
2 Informationsfeld
- Versionsnummer des installierten Programms.
- Abmessungen des Rads, das gerade bearbeitet
wird.
- Symbol des Betriebszustands.
- Fehlercode.
3 Steuerungsfeld
Hier be! nden sich Bildzeichen, die Grundfunktionen
und Sonderfunktionen darstellen.
Auf jeder Taste ist die jeweilige Funktion, die mit der
Taste abgerufen wird, durch ein Symbol dargestellt.
Touch-Screen
Bei der Touchscreen-Schnittstelle muss man den
jeweiligen Bereich des Bildschirms mit dem Finger
berühren und dann loslassen, damit eine Reaktion auf
die Berührung erfolgt (Abb 4-4).
Der Bediener kann ein akustisches Signal zur
Bestätigung erhalten, sobald er mit seiner Berührung
eine Aktion ausführt, die mit Symbolen, Tasten, Text
oder Bildern auf dem Bildschirm verbunden ist.
Hinweis: Für eine korrekte Funktionsweise
den Bildschirm entsprechend den
Anweisungen im Kapitel Wartung (F
6.0) sauber halten.
Disposition
4.1 Écran
Fig. 4-3 Écran avec zones d’af!
chage.
1 Zone d’af! chage.
2 Zone d’informations.
3 Zone de commandes (Clavier).
Sur l’écran sont af! chés les paramètres, les textes
d’aide, toutes les valeurs mesurées et les messages
d’erreur éventuels.
Description des zones d’a chage
Les zones de l’écran ont chacune un rôle spéci! que.
1 Zone d’af! chage
- Dimensions de la jante (éditables).
- Modes d’équilibrage (éditables).
- Grandeur du balourd.
- Liste des compteurs.
- Codes C (Codes Utilisateur).
- Textes d’aide.
2 Zone Informations
- Numéro de version du programme installé.
- Mesures de la roue en usinage.
- Icônes des conditions opérationnelles.
- Codes d’erreur.
3 Zones Commandes
Les pictogrammes illustrant les fonctions de base et
les fonctions spéciales sont représentés ici.
Chaque touche possède une icône qui représente sa
fonction spéci! que.
Écran tactile
Dans l’interface d’écran tactile, il faut toucher et retirer
le doigt de la zone intéressée sur l’écran pour avoir
une réponse au toucher (Fig. 4-4).
Un signal acoustique de con! rmation peut être émis à
chaque toucher activant une action liée à des icônes,
boutons, textes ou images à l’écran.
Remarque : Pour un bon fonctionnement,
maintenir le moniteur propre
comme indiqué dans le chapitre
entretien (F 6.0).

18
4-8
4-7
4-5
4-6
1
1
1
Layout
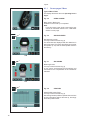
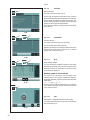
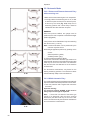
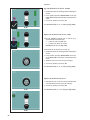
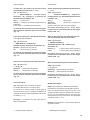
4.1.1 Screen pages / Menu
Types of Menu Fields
The
Display ! eld shows the main Operating Screen
Pages:
Fig. 4-5 INTRO SCREEN
Basic screen / Main menu.
Available once the start-up is completed.
Note:
From this screen page, simply removing the arm
causes an automatic switch to the “RIM DATA
ENTRY” screen page.
Fig. 4-6 RIM DATA ENTRY
Rim data entry screen.
You may access it with the Key (1)
The wheel data are displayed after the detections in
this screen page. The screen also allows you to select
the operator (1 & 2) and the wheel pro! les saved in
the memory.
Fig. 4-7 BALANCING
Balancing Screen.
You may access it with the Key (1)
In this screen are displayed all informations and
commands for the compensation of the unbalances
indicated.
Fig. 4-8 PROFILES
Wheel Pro! le Screen Page.
You may access it with the Key (1)
After having saved a pro! le the operator does not have
to enter information again at the start up, but simply
select the pro! le from list.

19
Layout
4.1.1 Die Display-Seiten / Menü
Arten Menüfelder
I
m Anzeigefeld sind die wichtigsten Betriebsseiten
dargestellt:
Abb. 4-5 INTRO SCREEN
Basisbildschirm / Hauptmenü.
Sofort nach dem beendeten Startvorgang verfügbar.
Hinweis:
Auf dieser Bildschirmseite bewirkt das Ausfahren
des Messgeräts allein schon den automatischen
Übergang zum Bildschirm “RIM DATA ENTRY”.
Abb. 4-6 RIM DATA ENTRY
Der Seite zur Eingabe der Daten.
Sie können mit dem Schlüssel zugreifen (1).
In dieser Bildschirmansicht werden nach den
Vermessungen die Raddaten angezeigt. Darüber
hinaus können von hier aus die Bediener (1 & 2) und
die eventuell im Speicher vorhandenen Rad-Pro! le
ausgewählt werden.
Abb. 4-7 BALANCING
Bildschirm Auswuchten.
Sie können mit dem Schlüssel zugreifen (1).
Diese Bildschirmansicht enthält sämtliche Informationen
und die Befehle für Kompensation der angezeigten
Unwuchten.
Abb. 4- PROFILES
Bildschirmseite Rad-Pro! le.
Sie können mit dem Schlüssel zugreifen (1).
Nachdem ein Profil gespeichert wurde, kann der
Bediener sämtliche Einstellungen vor dem Start
vermeiden, indem schnell eines der gelisteten Pro! le
aufgerufen wird.
Disposition
4.1.1 Les pages-écrans / Menu
Types de Zones Menu
La zone Af! chage donne accès aux principales Pages-
écrans opérationnelles :
Fig. 4-5 INTRO SCREEN
Page-écran de base / Menu principal.
Immédiatement disponible au démarrage.
Remarque :
La simple extraction de l’outil de mesure à partir de
cette page-écran provoque le passage automatique
à la page-écran “RIM DATA ENTRY”.
Fig. 4-6 RIM DATA ENTRY
Page-écran de Saisie des données de la jante.
Il est possible d’accéder avec la touche (1) .
Après les relevés, les données relatives à la roue
s’af! chent dans cette page-écran. Depuis celle-ci, il
est en outre possible de sélectionner l’opérateur (1 &
2) ainsi que les pro! ls roue éventuellement présents
dans la mémoire.
Fig. Fig. 4-7 BALANCING
Page-écran Équilibrage.
Il est possible d’accéder avec la touche (1) .
Dans cette page-écran, ! gurent toutes les informations
et les commandes pour la compensation des balourds
indiqués.
Fig. 4-8 PROFILES
Page-écran Pro! ls Roue.
Il est possible d’accéder avec la touche (1) .
Après avoir mémorisé un profil l’opérateur peut
éviter tout réglage préventif à la lancée, en rappelant
rapidement l’un des pro! ls dans la liste.

20
4-10
4-9
4-11
4-12
2
2
1
1
1
1
Layout
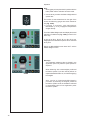
Fig. 4-9 SETTING
Settings Screen.
You may access it with the Key (1)
Even though the machine presents the most common
functions already selected, the operator can customise
various display speci! cations and process modes. This
screen lets the operator customise all the operating
settings to his/her speci! c requirements.
Once saved the balancer will present the settings at
each start-up.
Fig. 4-10 COUNTERS
Counters Screen.
You may access it with the Keys (1 and 2)
The information is primarily useful for
statistical purposes, for example to obtain evidence of
load intervals of parts when defective, or of monthly
(yearly) use of the machine, etc.
Fig. 4-11 Wi-Fi
Wi-Fi settings screen.
You may access the available networks screen page
with the keys (1 and 2). In this screen the operator can
associate, connect or disconnect the machine to the
list of networks displayed.
MACHINE NAME ON THE NETWORK
The name of the machine to be connected to the
network via Wi-Fi can contain numbers and letters of
the English alphabet, as well as the special characters
listed below;
! ? * : ; < > $ % / ( ) [ ] , - + _
All the remaining special characters are not allowed.
The network connection will not work if they are used
in the machine name.
Fig. 4-12 OP.1
Optimisation / weight Minimisation screen page.
You may access it with the Key (1) when on the Screen
after a measuring run.
Seite wird geladen ...
Seite wird geladen ...
Seite wird geladen ...
Seite wird geladen ...
Seite wird geladen ...
Seite wird geladen ...
Seite wird geladen ...
Seite wird geladen ...
Seite wird geladen ...
Seite wird geladen ...
Seite wird geladen ...
Seite wird geladen ...
Seite wird geladen ...
Seite wird geladen ...
Seite wird geladen ...
Seite wird geladen ...
Seite wird geladen ...
Seite wird geladen ...
Seite wird geladen ...
Seite wird geladen ...
Seite wird geladen ...
Seite wird geladen ...
Seite wird geladen ...
Seite wird geladen ...
Seite wird geladen ...
Seite wird geladen ...
Seite wird geladen ...
Seite wird geladen ...
Seite wird geladen ...
Seite wird geladen ...
Seite wird geladen ...
Seite wird geladen ...
Seite wird geladen ...
Seite wird geladen ...
Seite wird geladen ...
Seite wird geladen ...
Seite wird geladen ...
Seite wird geladen ...
Seite wird geladen ...
Seite wird geladen ...
Seite wird geladen ...
Seite wird geladen ...
Seite wird geladen ...
Seite wird geladen ...
Seite wird geladen ...
Seite wird geladen ...
Seite wird geladen ...
Seite wird geladen ...
Seite wird geladen ...
Seite wird geladen ...
Seite wird geladen ...
Seite wird geladen ...
Seite wird geladen ...
Seite wird geladen ...
Seite wird geladen ...
Seite wird geladen ...
Seite wird geladen ...
Seite wird geladen ...
Seite wird geladen ...
Seite wird geladen ...
Seite wird geladen ...
Seite wird geladen ...
Seite wird geladen ...
Seite wird geladen ...
Seite wird geladen ...
Seite wird geladen ...
Seite wird geladen ...
Seite wird geladen ...
Seite wird geladen ...
Seite wird geladen ...
Seite wird geladen ...
Seite wird geladen ...
Seite wird geladen ...
Seite wird geladen ...
Seite wird geladen ...
Seite wird geladen ...
Seite wird geladen ...
Seite wird geladen ...
Seite wird geladen ...
Seite wird geladen ...
Seite wird geladen ...
Seite wird geladen ...
Seite wird geladen ...
Seite wird geladen ...
Seite wird geladen ...
Seite wird geladen ...
Seite wird geladen ...
Seite wird geladen ...
Seite wird geladen ...
Seite wird geladen ...
Seite wird geladen ...
Seite wird geladen ...
Seite wird geladen ...
Seite wird geladen ...
Seite wird geladen ...
Seite wird geladen ...
Seite wird geladen ...
Seite wird geladen ...
Seite wird geladen ...
Seite wird geladen ...
Seite wird geladen ...
Seite wird geladen ...
Seite wird geladen ...
Seite wird geladen ...
Seite wird geladen ...
Seite wird geladen ...
Seite wird geladen ...
Seite wird geladen ...
Seite wird geladen ...
Seite wird geladen ...
Seite wird geladen ...
Seite wird geladen ...
Seite wird geladen ...
Seite wird geladen ...
Seite wird geladen ...
Seite wird geladen ...
Seite wird geladen ...
Seite wird geladen ...
Seite wird geladen ...
Seite wird geladen ...
Seite wird geladen ...
Seite wird geladen ...
Seite wird geladen ...
Seite wird geladen ...
Seite wird geladen ...
Seite wird geladen ...
Seite wird geladen ...
Seite wird geladen ...
Seite wird geladen ...
Seite wird geladen ...
Seite wird geladen ...
Seite wird geladen ...
-
 1
1
-
 2
2
-
 3
3
-
 4
4
-
 5
5
-
 6
6
-
 7
7
-
 8
8
-
 9
9
-
 10
10
-
 11
11
-
 12
12
-
 13
13
-
 14
14
-
 15
15
-
 16
16
-
 17
17
-
 18
18
-
 19
19
-
 20
20
-
 21
21
-
 22
22
-
 23
23
-
 24
24
-
 25
25
-
 26
26
-
 27
27
-
 28
28
-
 29
29
-
 30
30
-
 31
31
-
 32
32
-
 33
33
-
 34
34
-
 35
35
-
 36
36
-
 37
37
-
 38
38
-
 39
39
-
 40
40
-
 41
41
-
 42
42
-
 43
43
-
 44
44
-
 45
45
-
 46
46
-
 47
47
-
 48
48
-
 49
49
-
 50
50
-
 51
51
-
 52
52
-
 53
53
-
 54
54
-
 55
55
-
 56
56
-
 57
57
-
 58
58
-
 59
59
-
 60
60
-
 61
61
-
 62
62
-
 63
63
-
 64
64
-
 65
65
-
 66
66
-
 67
67
-
 68
68
-
 69
69
-
 70
70
-
 71
71
-
 72
72
-
 73
73
-
 74
74
-
 75
75
-
 76
76
-
 77
77
-
 78
78
-
 79
79
-
 80
80
-
 81
81
-
 82
82
-
 83
83
-
 84
84
-
 85
85
-
 86
86
-
 87
87
-
 88
88
-
 89
89
-
 90
90
-
 91
91
-
 92
92
-
 93
93
-
 94
94
-
 95
95
-
 96
96
-
 97
97
-
 98
98
-
 99
99
-
 100
100
-
 101
101
-
 102
102
-
 103
103
-
 104
104
-
 105
105
-
 106
106
-
 107
107
-
 108
108
-
 109
109
-
 110
110
-
 111
111
-
 112
112
-
 113
113
-
 114
114
-
 115
115
-
 116
116
-
 117
117
-
 118
118
-
 119
119
-
 120
120
-
 121
121
-
 122
122
-
 123
123
-
 124
124
-
 125
125
-
 126
126
-
 127
127
-
 128
128
-
 129
129
-
 130
130
-
 131
131
-
 132
132
-
 133
133
-
 134
134
-
 135
135
-
 136
136
-
 137
137
-
 138
138
-
 139
139
-
 140
140
-
 141
141
-
 142
142
-
 143
143
-
 144
144
-
 145
145
-
 146
146
-
 147
147
-
 148
148
-
 149
149
-
 150
150
-
 151
151
-
 152
152


in anderen Sprachen
- English: Snap-On Sun SWB 340 User manual
- français: Snap-On Sun SWB 340 Manuel utilisateur
Verwandte Artikel
Andere Dokumente
-
 Snap-on Equipment JohnBean B2000P Series Benutzerhandbuch
-
Zipper Mowers ZI-RWM99 Bedienungsanleitung
-
Hofmann monty 3650 Bedienungsanleitung
-
 M&B Engineering WB 277-N Original Instructions Manual
-
ABB D2 Benutzerhandbuch
-
 Anthogyr Implanteo Benutzerhandbuch
-
McAfee WebShield e500 Installationsanleitung
-
GYS GYSMETER Bedienungsanleitung
-
-
Canon i-SENSYS LBP7680Cx Bedienungsanleitung


