eezigo Designed for mobility Laptop Stand | The Eco-Friendly, Portable, Compact, Adjustable, Ergonomic Ultra Lightweight Laptop Stand Installationsanleitung
- Typ
- Installationsanleitung

Deutsche (DE) Français (FR) Español (ES) Italiano (IT)
• Ensure that there are no raised
protrusions of higher than 3mm on the
surface area of laptop, where stand
will be attached.
• Stand must be attached to flat surface
as close to edge as possible.
• The stand may be placed over
ventilation holes but ensure that hook
and loop adhesive pads do not cover
laptop ventilation holes or panel joints.
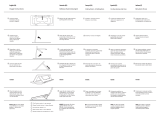
Installing the Stand
Hook
Loop
Backing tape
Product contents:
• Laptop stand
• 4 x Self-adhesive hook and loop pads
• 2 x Non-slip rubber pads
• Instruction pamphlet
• Ensure the laptop surface is clean.
• Peel the backing tape from the ‘Loop’
(fluffy side, which is still attached to the
Hook pad).
• Attach the Stand to the previously
located position on the Laptop. Press
down firmly on the 4 corners of the
stand to ensure adhesive is securely
attached.
Attach the Non-slip Rubber
Pads.
2
3
4
5
6
Attach Hook and Loop Adhesive
Pads to Stand
Attach Stand to Laptop
• DO NOT separate the hook and loop
adhesive pads.
• From point 3, locate the 4 best
corresponding positions to attach the
adhesive pads to the underside of the
stand.
• NB: Remember to ensure that
adhesive pads do not cover laptop
ventilation holes.
• Peel off the backing tape from the
‘hook’ adhesive pads and attach to
stand.
• Peel off the backing tape from the
rubber pads and stick as close to the
front edge of the laptop as possible.
Note: The pads must be in contact
with the desk surface when the
Stand is open.
• Leave the adhesive to dry for 12 hours
before use.
Locate Best Position for Stand
IDEAL
POSITION
a
IDEAL POSITIONS FOR
ADHESIVE PADS
PRESS FIRMLY
Video Instructions:
www.valfyproducts.com
Please contact us should you have
any problems.
Remove the contents from packaging.
1
a
IDEAL
POSITION
Place closed laptop, upside down
on a flat, secure surface.
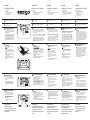
• Stellen Sie sicher, dass sich auf der Oberfläche
des Laptops, an der der Ständer befestigt
wird,sich keine erhöhten Vorsprünge von mehr
als 3 mm befinden.
• Der Ständer muss so nahe wie möglich an der
Kante auf einer ebenen Fläche befestigt werden.
• Der Ständer kann über den Lüftungslöchern
platziert werden. Stellen Sie jedoch sicher, dass
die Klettverschlusspads nicht die Lüftungslöcher
des Laptops oder die Paneelverbindungen
verdecken
Montieren des Ständers
Wareninhalt:
• Laptopständer
• 4 x Selbsthaftende Klettverschlussklebepads
• 2 x Rutschfeste Gummipads
•
Gebrauchsanweisung
• Hinweis: Stellen Sie sicher, dass die
Laptopoberfläche sauber ist.
• Ziehen Sie das Schutzband von der
"flauschigen" Seite des
Klettverschlussklebepads ab ( die noch immer
an dem “Häkchen” Pad befestigt ist).
• Befestigen Sie den Ständer am Laptop an der
zuvor ausgewählten Position. Drücken Sie fest
auf die 4 Ecken des Ständers, um
sicherzustellen, dass der Klebstoff ausreichend
hält.
Die rutschfesten Gummipads
befestigen
2
3
4
5
6
Klettverschlussklebepads am Ständer
befestigen.
Ständers am Laptop befestigen
• TRENNEN SIE NICHT die
Klettverschlussklebepads
• Ab Punkt 3, finden Sie die 4 am besten
geeignetsten Positionen, um die Klebepads an
der Unterseite des Ständers zu befestigen.
• Hinweis: Versichern Sie sich, dass die
Klebepads nicht die Lüftungsöffnungen des
Laptops verdecken.
• Ziehen Sie das Schutzband von der
"Häkchen"
Seite des Klettverschlussklebepads ab und
befestigen Sie es am Ständer.
• Ziehen Sie das Schutzband von den
Gummipads ab und kleben Sie es so nahe
wie möglich an der Vorderkante des Laptops
• Hinweis: Die Pads müssen mit der
Tischoberfläche in Berührung sein, wenn der
Ständer geöffnet ist.
• Lassen Sie dem Klebstoff 12 Stunden
Trockenzeit, bevor der ersten Verwendung.
Optimale platzierung des Ständers
a
Videoanleitung:
https://www.valfyproducts.com
Bitte setzen Sie sich mit und in
Verbindung falls Sie Probleme haben
sollten.
1
Legen Sie den geschlossenen Laptop
umgekehrt auf eine flache und feste Fläche.
• Assurez-vous qu'il n'y ait pas de saillies
surélevées de plus de 3 mm sur la surface
de l'ordinateur portable, où le support sera
fixé.
• Le support doit être fixé sur une surface
plane aussi près que possible du bord.
• Le support peut être placé au-dessus des
trous de ventilation, mais assurez-vous que
les tampons et rubans adhésifs
n’obstruent ni la ventilation ni les joints des
panneaux de l’ordinateur portable.
Installation du support
Contendu du colis:
• Support
• Tampons et rubans auto-adhesifs double face x4
• Rubans anti- dérapant x2
• Brochure d’installation
• NB: Assurez-vous que la surface du portable
soit propre.
• Decollez la partie du ruban adhésif du
tampon (côté duveteux, toujours attaché au
tampon ).
• Collez le support dans la position
sélectionnée auparavant.
• Pressez sur les 4 coins du support pour
s’assurer que le ruban adhésif soit
fermement collé.
Collez le ruban anti-dérapant.
2
3
4
5
6
Appliquez les tampons et rubans
auto-adhesifs double face sur le
support.
Fixez le support au portable.
• Ne pas detacher le ruban adhesive
du tampon.
• Repérez la meilleure position pour
fixer les 4 tampons adhésifs à
l’envers du support. Comme indiqué
au point 3.
• NB: Assurez- vous que les supports
adhésifs ne couvrent pas les orifices
de ventilation.
• Enlevez le ruban adhésif des tampons
et fixez-les au support.
• Détachez la bande protectrice des tampons en
caoutchouc et collez les le plus près possible
du bord avant de l'ordinateur portable.
NB: Les tampons doivent être en contact
avec le plan de travail lorsque le support est
ouvert.
• Laissez sécher l’adhésif durant 12h avant
utilisation.
Positionnez le support:
a
Vidéo d’instructions :
https://www.valfyproducts.com
www.valfyproducts.com
En cas de problèmes, veuillez nous
contacter.
Retirez les éléments du colis.
1
Posez votre portable fermé et à l’envers
sur une surface plane.
• Asegúrese de que no existen protuberancias
elevadas de más de 3mm en la superficie del
portátil, donde el soporte será colocado.
• El soporte debe ser fijado a una superficie
plana, lo más cerca posible del borde.
• El soporte puede ser colocado sobre los
orificios de ventilación, pero asegúrese de que
las cintas adhesivas de gancho y bucle no
tapan los orificios de ventilación o las juntas de
los paneles.
Instalando el Producto
Contenidos del Producto:
• Soporte para el Portátil
• 4 x Cintas de gancho y bucle autoadhesivas
• 2 x Almohadillas de goma antideslizantes
• Folleto de Instruccione
• NB: Asegúrese de que la superficie del portátil
está limpia.
• Despegue la parte que tapa el adhesivo de la
cinta tipo “Bucle” (la cinta tipo Bucle es la parte
afelpada, que todavía se encuentra fija a la cinta
tipo Gancho).
• Coloque el Soporte en la posición seleccionada
anteriormente en el portátil. Presione firmemente
sobre las 4 esquinas del soporte para asegurarse
de que la cinta adhesiva ha sido fijada
firmemente.
Coloque las almohadillas de
goma antideslizantes.
2
3
4
5
6
Aplique las Cintas Adhesivas de
Gancho y Bucle al Soporte
Fije el Soporte al Portátil
• NO separe la cinta de gancho de la
cinta de bucle.
• Como en el punto 3, localice la mejor
posición para fijar cada una de las 4
cintas adhesivas a la parte inferior del
soporte.
• NB: Asegúrese de que las cintas
adhesivas no tapan los orificios de
ventilación.
• Aplique la parte adhesiva de la cinta
tipo “Gancho” al soporte.
• Despegue la parte que tapa el adhesivo de las
almohadillas de goma y pegue lo más cerca
posible al borde frontal del portátil.
Nota: Las almohadillas deberán de estar en
contacto con la superficie de la mesa cuando
el Soporte se encuentre abierto.
• Deje secar el adhesivo durante 12 horas antes de
usar.
Identifique la Mejor Posición para el
Soporte
a
Video de Instrucciones:
https://www.valfyproducts.com
www.valfyproducts.com
Por favor contacte con nosotros si
tiene algún problema.
Retire el contenido del embalaje.
1
Coloque el portátil cerrado, boca abajo,
en una superficie plana y firme.
• Assicurarsi che non ci siano sporgenze
superiori a 3 mm sulla suerficie del computer
portatile, dove lo Stand verra’ attaccato.
• Lo Stand deve essere attaccato alla superficie
piana il piu’ vicino possibile al margine.
• Lo Stand puo’ essere posizionato sopra i
buchi di ventilazione ma ci si deve assicurare
che le chiusure a strappo adesive non
coprano i buchi di ventilazione o i giunti a
pannello.
Installazione dello Stand
Contenuto del prodotto:
• Stand per computer portatile
• 4x strisce di chiusura a strappo
auto-adesive
• 2x cuscinetti in gomma anti-scivolo
• Opuscolo informativo
• NB: Assicurarsi che la superficie del computer
portatile sia pulita.
• Rimuovere la protezione adesiva dalla striscia
morbida (che e’ ancora attaccata alla striscia
ruvida)
• Attacca lo Stand nella posizione precedentemente
localizzata sul computer portatile. Premere con
fermezza sui 4 angoli dello Stand e assicurarsi
che gli adesivi siano attaccare in modo sicuro.
Attaccare i cuscinetti in gomma
anti-scivolo
2
3
4
5
6
Attaccare le chiusure a strappo
adesive allo Stand
Attaccare lo Stand al Computer
Portatile
• NON separare le chiusure a strappo adesive
• Dal punto 3, localizzare le 4 posizioni migliori
corrispondenti per attaccare le chiusure a
strappo alla parte inferiore dello Stand.
• NB: Assicurarsi che le chiusure a strappo
adesive non coprano i buchi di ventilazione
del computer portatile.
• Rimuovere la protezione adesiva della
chiusura a strappo dalla striscia ruvida e
attaccarla allo Stand.
• Staccare la protezione adesiva dai cuscinetti e
attaccarli il piu’ vicino possibile al bordo
anteriore del computer portatile.
Nota: I cuscinetti devono essere in contatto
con la superficie di lavoro quando lo Stand
e’ aperto.
• Lasciare gli adesivi ad asciugare per 12 ore
prima dell’uso.
Localizzare la miglior posizione per
lo Stand
a
Istruzioni Video:
https://www.valfyproducts.com
costumerservice@valfyproduct
s.com Contattarci in caso di
problemi.
Rimuovere il contenuto dalla confezione.
1
Posizionare il computer portatile chiuso
sottosopra su una superficie piana e sicura.
Nehmen Sie den gesamten Inhalt aus der
Verpackung heraus
Designed for mobility
English (UK)
-
 1
1

eezigo Designed for mobility Laptop Stand | The Eco-Friendly, Portable, Compact, Adjustable, Ergonomic Ultra Lightweight Laptop Stand Installationsanleitung
- Typ
- Installationsanleitung
in anderen Sprachen
- English: eezigo Designed for mobility Laptop Stand | The Eco-Friendly, Portable, Compact, Adjustable, Ergonomic Ultra Lightweight Laptop Stand Installation guide
- français: eezigo Designed for mobility Laptop Stand | The Eco-Friendly, Portable, Compact, Adjustable, Ergonomic Ultra Lightweight Laptop Stand Guide d'installation
- español: eezigo Designed for mobility Laptop Stand | The Eco-Friendly, Portable, Compact, Adjustable, Ergonomic Ultra Lightweight Laptop Stand Guía de instalación
- italiano: eezigo Designed for mobility Laptop Stand | The Eco-Friendly, Portable, Compact, Adjustable, Ergonomic Ultra Lightweight Laptop Stand Guida d'installazione