
- 2 -
From the charcoal stoves of long ago to modern-day digital cooking, Scholtès has preserved that
particular "hand-made" spirit which has been its star asset and strength for over 80 years.
Every Scholtès appliance is a successful blend of highly stylish aesthetic appeal and unquestionable
technological contents, offering high performance levels and the utmost innovation.
This document was written in conjunction with our very own culinary expert, the professional chef
Philippe Rogé, who works as part of the company's Research and Development Department.
As you read through this manual, you will come across some practical advice, which we invite you to
follow, in order to benefir fully from his experience and to get perfect results, every time.
The two documents, the User's Guide, and the Technical Handbook, go hand in hand:
• the User's Guide simply illustrates the various features of the new appliance in detail. It also
contains some cooking advice, which should help you use your oven to its full potential.
• the Technical Handbook provides all the information necessary for the smooth installation,
electrical connection and maintenance of the appliance, along with any recommendations.
Enjoy cooking with SCHOLTES

- 3-
Table of Contents
The control panel ................................................................................................................... 4
Setting the time ...................................................................................................................... 4
The timer................................................................................................................................. 4
Cooking .................................................................................................................................. 5
Presentation ...................................................................................................................................... 5
Cooking modes ................................................................................................................................. 5
Operation ................................................................................................................................ 6
How to start cooking ......................................................................................................................... 6
Adjusting the temperature ................................................................................................................. 6
Turning the oven off........................................................................................................................... 6
Exiting "Demo mode" ........................................................................................................................ 6
Programming ......................................................................................................................7-8
Programming a cooking time with an immediate start ...................................................................... 7
Programming a cooking time with a delayed start ............................................................................ 8
The accessories ................................................................................................................9-10
Restoring after a blackout ................................................................................................... 10
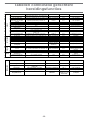
Cooking mode/dish combination tables .......................................................................11-12
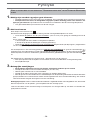
Pyrolysis ............................................................................................................................... 13
Useful tips before pyrolysis ............................................................................................................. 13
Operation ........................................................................................................................................ 13
Important information ...................................................................................................................... 13
TROUBLESHOOTING........................................................................................................... 14
Technical Specifications .....................................................................................................14

- 4 -
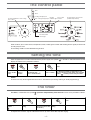
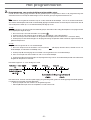
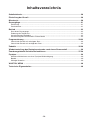
The control panel
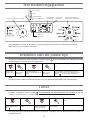
Knob A allows you to set the time, temperature, timer, cooking time and/or end cooking time or pyrolysis time and/
or end pyrolysis time.
The cooking modes can be selected using knob B.
Setting the time
The timer, marked with the symbol , operates independently from the oven and to set it, proceed as follows:
After the appliance has been connected to the power supply, the symbol
is turned on and 0:00 flashes on the
display. To set the time, proceed as follows:
Note
Turn to light the timer
symbol
Press to access the
setting
Turn to set the duration
(from 0 to 23 hours and
59 minutes)
Press to confirm the
setting
Notes
Turn to set the
hours
Press to
confirm
The minutes flash ?
Turn to set the minutes
Press to confirm
To switch from summer to winter time or vice
versa or following a power failure: Turn A to light
symbol and carry out the same procedure
Note
The time can only be changed when the oven is switched off (not during cooking or while programming).
The timer
A sequence of acoustic signals indicate the time is up. Press knob A to stop the ringing.
Cooking temperature and cooking
time control
Time
Timer
Cooking time/pyrolysis
End cooking time/pyrolysis
Heating
indicator light
Door locked
indicator
Cooking mode selector knob
(default temperatures)
Recommended
rack height
STOP

- 5-
Cooking
Presentation
For each dish you cook, the oven only manages the essential parameters for the success of all recipes, from the
simplest to the most sophisticated culinary delights: i.e. the temperature, heat source, degree of humidity and fan
assisted operation are all controlled automatically.
This chapter was written with the precious help of our very own culinary expert. We invite you to follow his
advice to benefit from his experience and for successful cooking, always.
The recommended cooking modes, temperatures and oven rack heights reflect our expert's own experience
in the kitchen and will allow you to achieve the very best results.
For each cooking mode, the table below specifies whether it is best to preheat your oven or not. Please observe
these suggestions, as they will guarantee you perfect results.
During the pre-heating stage, indicator light
flashes. When the desired cooking temperature has been reached,
will remain on without flashing.
The temperature is recommended according to the type of cooking selected; however, you may adjust it to suit your
recipe (see on the next page).
You can also set a cooking time with an immediate or delayed start (see on the next page).
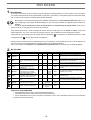
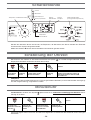
Cooking modes
Notes on defrosting
• Defrosted food must be eaten promptly.
• Never re-freeze food that has thawed.
• Remove the food from the oven once defrosting is complete and store it inside the refrigerator until it is eaten
or cooked.
1.
2.
Cooking mode Cooking recommended for …
Oven
tray on
rack
Grid 1 on
rack
Grid 2 on
rack
Oven at start
Note
Defrosting*
1 2
The recommended defrosting method remains the slow
defrosting process inside a refrigerator. You can save up
to 50% in time using the oven.
Suitable for all raw or cooked food.
Leavening
Leavening process of dough made with
yeast or baking powder (brioches,
bread, sugar pie, croissants, etc.)
2 Cold Temperature (40°C) cannot be modified.
Brioches
Bakery items (containing yeast or
baking powder)
2 Pre-heated
If you wish to bake a pizza, we recommend you raise the
temperature to 220°C.
Tarts
Sweet or savoury pastries (shortcrust or
flaky)
2 Pre-heated
Perfect baking of the bottom and golden browning of the
surface.
Multi-level
Simultaneous cooking of several dishes
on 2 or 3 racks without the respective
flavours or aromas mingling
Cakes other than Tarts and Brioches
(choux pastries, pound cake, sponge,
etc.)
1 3
5 (if
cooking
on 3
racks)
Pre-heated
If you use this function for one dish only, use the oven tray
on rack 2.
Convection
mode
Simmered dishes (hotpots, beef
bourguignon, casseroles, etc.) or Bain-
Marie cooking (terrines, crème caramel,
etc.)
2 Pre-heated
For the Bain-Marie, you can pour the water directly into the
oven tray.
Roasting
Roasts (white or red meat) and au gratin
dishes
1 2 Cold
The recommended temperature guarantees perfect
cooking and sealing of the roast and avoids the formation
of smoke. If your meat is in a dish, use the oven tray on
rack 2.
Turnspit*
Cooking red or white roasts 1 3 (turnspit) Cold
Grill
Beef ribs, fish, grilled food and au gratin
dishes, etc.
1
The rack height
depends on the size
of the food to be
g
rilled
Pre-heated

- 6 -
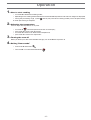
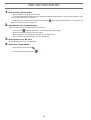
Operation
1.How to start cooking
• turn knob B to the desired cooking mode;
• depending on the cooking mode selected, the recommended temperature and oven rack height are displayed;
• During the pre-heating stage, symbol
flashes (only with certain cooking modes) and is left permanently
on when pre-heating is complete.
Adjusting the temperature
You can adjust the temperature at any time.
• turn knob A
until the temperature flashes on the display;
• press knob A to access the adjustment;
• turn knob A to increase or decrease the temperature;
• press knob A to confirm the adjustment.
Turning the oven off
When you deem your dish to be cooked thoroughly, turn knob B back to position 0.
Exiting "Demo mode"
• Press knob A three times
• Turn knob A in an anticlockwise direction
3.
2.
4.

- 7-
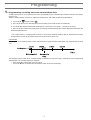
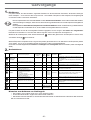
Programming
1.
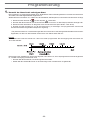
Prog ramming a cooking time with an immediate start
A cooking time can be set so that the oven starts immediately and is automatically turned off when the set amount
of time is up.
Select a cooking mode, if necessary adjust the temperature, and make the following adjustments:
1. Turn knob A
to light symbol ;
2. press knob A to access the adjustment of the cooking time: 2:00 flashes on the display;
3. turn knob A to display the desired cooking time (a minimum of 2 minutes - a maximum of 9h59);
4. press knob A to confirm the programming. The programmed cooking time will be displayed alternately with
the desired temperature.
(1)
For safety reasons, a cooking time of 2 hours is set for each cooking mode by default. Should this time fail to
be adjusted, the oven will be automatically turned off once this time is up.
For example
It is 9:00 a.m. and a cooking time of 1 hour and 15 minutes is programmed. Cooking will stop automatically at 10:15
a.m..
The displaying of the word "end", accompanied by a sequence of acoustic signals, indicates that the programmed
cooking time is up and the cooking is stopped.
• Press knob A to silence the acoustic signals.
• Turn knob B back to position 0 to remove the word "end" from the display.

- 8 -
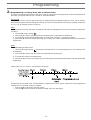
Programming
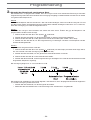
Programming a cooking time with a delayed start
The oven can be programmed so that the dish is ready at a given time: the programmer automatically determines
the cooking start time and the oven is turned off at the desired time.
For example
It is 9:00 a.m. and you want the dish to be ready at 12:30 knowing that cooking should last 1 hour and 15 minutes:
then the cooking time and end cooking time are set. The oven will automatically calculate that cooking should start
at 11:15 a.m. for cooking to end at 12:30 p.m..
Step 1
Place your dish in the oven and select a cooking mode. Adjust the temperature if necessary and set a cooking time,
as follows:
1. Turn knob A to light symbol
;
2. press knob A to access the adjustment of the cooking time: 2:00 flashes on the display;
3. turn knob A to set the desired cooking time (a minimum of 2 minutes - a maximum of 9h59);
4. press knob A to confirm the programming. The cooking time will be displayed alternately with the desired
temperature.
Step 2
Set the desired end cooking time:
1. Turn knob A to light symbol
STOP
(the display indicates 10h15, i.e. the end cooking time, if the cooking starts
immediately);
2. press knob A to access the adjustment of the desired end cooking time;
3. turn knob A to set the end cooking time.
4. press knob A to confirm the programming. The end cooking time will be displayed alternately with the desired
temperature.
Cooking will start at 11:15 a.m. and will stop at 12:30 p.m..
The displaying of the word "end", accompanied by a sequence of acoustic signals, indicates that the programmed
cooking time is up and the cooking is stopped.
• Press knob A to silence the acoustic signals.
• Turn knob B back to position 0 to remove the word "end" from the display.
2.

- 9-
The accessories
Your oven is fitted with 5 different oven rack heights (from 1 to 5, from the bottom up) depending on the dish and
cooking mode selected.
For perfect results every time, the display indicates the recommended oven rack.
The oven tray
It is used:
• as a dish support for all dishes when cooking on one rack only and in Bain-Marie cooking on rack 2;
• as a baking tray (for cakes, tarts, choux pastry, etc.) on rack 2;
• as a dripping pan to catch juices and fat dripping from food situated on the grid (meat, fish, etc.); in this
case, always place it on rack 1;
• as a dish support for multi-level cooking; in this case, place it on rack 1.
We advise against using the oven tray on rack heights 4 and 5.
The grids
They are used:
• as a dish support for multi-level cooking (rack 3 when cooking on 2 racks and rack 3 and 5 when cooking on
3 racks);
• as a support for the meat or fish and the oven tray to catch any dripping fat or juices; in this case, the grid
should be placed on rack 2;
• as a support for the food to be defrosted and the oven tray to catch any melting liquids; in this case, the grid
should be placed on rack 2.
NOTE
If you wish to cook food of considerable dimensions (weighing more than 8 kg), we recommend you use the oven
tray. However, if using the grid is unavoidable, turn it upside down (
).
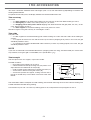
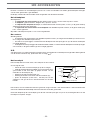
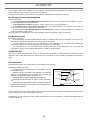
The turnspit
The turnspit consists of a support, a spit and a handle.
Proceed as follows:
• Place the turnspit support (A) on rack 3;
• Centre the meat on the spit, making sure you place it at an
equal distance from both ends of the spit (B);
• make sure the meat is kept firmly in place by the forks (C);
• set the forks in the meat using the screws (D);
• secure the spit onto the support, making sure the rear of
the spit is seated firmly in the hollow at the back of the oven
interior.
The removable handle is heatproof to avoid scalding yourself when removing the roast at the end of cooking. The
handle should be removed during cooking.
Use the oven tray on rack 1 to catch any cooking juices or fat, and place the turnspit support on rack 3.
Screw
(D)
Spit
(B)
Spit handle (D)
Rotisserie
support (A)
Fork
(C)
Screw
(D)
back

- 10 -
If the temperature inside the oven has not dropped below a value that is too low, the appliance comes with a
system that allows you to resume cooking/pyrolysis from the point in which it was interrupted at the time of the
black-out. Remember that this function will be disabled if the knobs "A" and "B" are turned during the power failure.
Once the cooking/pyrolysis has been completed, remember to update the time if you want to.
NOTE
Please bear in mind that, for safety reasons, cooking/pyrolysis programmes waiting to start are not restored when
the power comes back on.
Restoring after a blackout
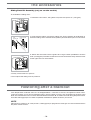
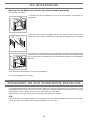
Sliding Rack Kit Assembly (only on certain models)
To assemble the sliding racks:
1. Remove the two frames, lifting them away from the spacers “A” (
see figure
).
2. Choose which shelf to use with the sliding rack. Paying attention to the direction in
which the sliding rack is to be extracted, position joint B and then joint C on the frame.
3. Secure the two frames with the guide rails using the holes provided on the oven
walls (
see diagram
). The holes for the left frame are situated at the top, while the holes
for the right frame are at the bottom.
4. Finally, fit the frames on spacer A.
5. Do not place the sliding racks in position 5.
A
D
B
C
Left
guide rail
Right guide
rail
Direction
of extraction
The accessories

- 11-
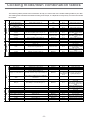
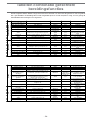
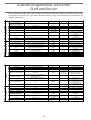
Cooking mode/dish combination tables
The following tables provide useful information to help you choose the most suitable cooking mode for your dish.
The cooking time should be calculated according to the recipe, as it depends on the quantity and size of the food to
be cooked.
DISHES EXAMPLES COOKING MODE TEMPERATURE SUPPORTS
Savoury tarts and pies
(shortcrust or flaky pastry)
quiche lorraine, leek tart, etc. Tarts 220 °C cake tin on the oven tray
Deep pan pizzas made with
bread dough (or frozen ready-
made pizzas)
pizzas, focaccia Brioches 220 °C on the oven tray
Pizzas (other doughs) Tarts 220 °C cake tin on the oven tray
Savoury bread olive loaf, tuna loaf, etc. Cakes (or multi-level) 160 °C cake tin on the oven tray
Country pies filo cheese pastries, salmon pithiviers, … Cakes (or multi-level) 200 °C on the oven tray
Terrines fish, meat, vegetable terrines, foie gras, etc. Convection mode 160 °C
terrine dish on the oven tray
(Bain-Marie starting with hot
water)
Ramekins
poultry liver pies, salmon mousse, eggs cocotte,
etc.
Convection mode 160 °C
ramekins on the oven tray
(Bain-Marie starting with hot
water)
Soufflés cheese, vegetable or fish soufflés, etc. Multi-level 200 °C cake tin on the oven tray
STARTERS
Food requiring browning stuffed oysters, cheese on toast, etc. Grill 270 °C
directly on the grid or dish on
the grid
Au gratin dauphinois, shepherd's pie, lasagna, etc. Gratin (or roasting) 210 °C dish on the oven tray
Stuffed vegetables
potatoes, tomatoes, courgettes, aubergines,
peppers, etc.
Multi-level 200 °C
on the oven tray or in a dish on
the oven tray
Vegetable casseroles cabbage, carrots and saffron, leeks, etc. Convection mode 200 °C casserole dish on the oven tray
Flans mushroom flan, vegetable flan, etc. Convection mode 160 °C
ramekins or flan dish on the
oven tray (Bain-Marie starting
with hot water)
Terrines vegetable terrines Convection mode 160 °C
terrine dish on the oven tray
(Bain-Marie starting with hot
water)
Soufflés asparagus or tomato soufflés, etc. Multi-level 200 °C soufflé dish on the oven tray
Pies vegetable pie, etc. Multi-level 200 °C on the oven tray
Foil parcels truffles, etc. Multi-level 200 °C foil parcels on the oven tray
VEGETABLES
Rice Pilaf Convection mode 180 °C dish on the oven tray
DISHES EXAMPLES COOKING MODE TEMPERATURE SUPPORTS
Roast poultry chicken, duck, cockerel, capon. Roasting 210 °C poultry on the grid
Poultry on the spit chicken, cockerel Turnspit 270 °C turnspit support
Roasts
roast pork, veal, turkey, beef, leg of lamb, haunch of
venison, stuffed veal breast, etc.
Roasting 210 °C meat directly on the grid
large pieces of braised meat whole ham on the bone, large capon or turkey, etc. Multi-level
180 °C (one third
into cooking, lower
the temperature to
160°C)
meat on the oven tray baste
regularly with the juice
Meat casseroles and traditional
dishes
beef bourguignon, rabbit chasseur, veal Marengo,
lamb stew, Basquaise chicken, etc. hotpots,
cassoulet, etc.
Convection mode 190 °C casserole dish on the oven tray
Grilled meat ribs, cutlets, sausages, kebabs, chicken thighs, etc. Grill 300 °C
on the grid (the rack depends
on the size)
Meat pies Beef Wellington, steak and kidney pie, etc. Multi-level 200 °C
on the tray (for large pieces of
meat, lower the temperature to
160°C when the pastry crust is
baked)
MEAT
Salt-baking salt-baked poultry, etc. Multi-level 240 °C
meat on the oven tray or in a
dish on the oven tray
Grilled fish and fish kebabs bass, mackerel, sardines, mullet, tuna, etc. Grill 270 °C
on the grid (the rack depends
on the size)
Whole fish (stuffed) sea bream, carp, etc. Multi-level 200 °C on the oven tray
Fish fillets (with basting) salmon, scorpion fish, cod, bass, etc. Convection mode 200 °C on the oven tray
Foil parcels sole, dab, scallops, etc. Multi-level 200 °C on the oven tray
Fish pies (flaky or shortcrust
pastry)
salmon, pike, etc. Multi-level 200 °C on the oven tray
Fish au gratin brandade gratin, etc.
gratin (or roasting)
(grill for browning)
210 °C 270 °C
dish on the oven tray (or grid
for browning under the grill)
Soufflés scallop soufflé, etc. Multi-level 200 °C soufflé dish on the oven tray
FISH
Salt-baked fish bass, carp, etc. Multi-level 240 °C
fish on the oven tray or in a
dish on the oven tray

- 12 -
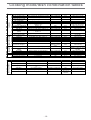
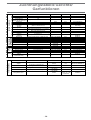
Cooking mode/dish combination tables
DISHES EXAMPLES COOKING MODE TEMPERATURE SUPPORTS
Biscuits (no baking powder) sponge, savoy biscuits, rolled biscuits, brownies, cakes (or multi-level) 200 °C cake tin on the oven tray
Fruitcake and pound cake
(containing baking powder)
fruitcake, marble cake, pound cake, etc. cakes (or multi-level) 160 °C cake tin on the oven tray
Fruit tart (shortcrust or flaky,
with or without flan)
apple, plum or pear tarts, etc. Tarts 220 °C cake tin on the oven tray
Cheesecake Tarts 200 °C cake tin on the oven tray
Raised dough sugar pies, brioche fruit tart Brioches 180 °C cake tin on the oven tray
Blind baking pastry bases (puff
pastry)
tarts garnished with fresh fruit (strawberries,
raspberries, etc.)
Tarts 180 °C
cake tin on the oven tray (dry
beans on the pastry base)
Pies (shortcrust or flaky pastry) pear pies, etc. Tarts 220 °C cake tin on the oven tray
Choux pastry
profiteroles, choux balls, eclairs, praline filled
paris brest, saint honoré, etc.
cakes (or multi-level) 190 °C on the oven tray
Flaky pastry apple turnovers, flaky pastries, pithiviers, etc. cakes (or multi-level) 200 °C on the oven tray
Buns and small pastries
(containing yeast or baking
powder)
croissants, sugar pies, individual brioches, small
savarins, etc.
Brioches 180 °C on the oven tray
PASTRIES
Large pastries (containing
yeast or baking powder)
Kugelhopf, brioche, panettone, currant cramique,... Brioches 160 °C
on the oven tray or in a dish on
the oven tray
Biscuit dough mini cup cakes, finger biscuits, etc. cakes (or multi-level) 180 °C on the oven tray
Puff pastry shortbread biscuits, spritz, cookies, etc. cakes (or multi-level) 200 °C on the oven tray
Flaky pastry palmier biscuits, etc. cakes (or multi-level) 200 °C on the oven tray
Macaroons, coconut rocks coconut or almond macaroons cakes (or multi-level) 180 °C on the oven tray
Raised dough mini-brioches, mini-croissants, etc. Brioches 180 °C on the oven tray
White meringues
white meringues (or
multi-level)
70 °C on the oven tray
MINI CUP CAKES
Golden brown meringues
golden brown
meringues (or multi-
level)
110 °C on the oven tray
Puddings bread or brioche based pudding, rice pudding cakes (or multi-level) 190 °C cake tin on the oven tray
Custards and flans Semolina
pudding
crème caramel, crème brûlée, chocolate flan, etc. cakes (or multi-level) 160 °C
Ramekins or flan dishes on the
oven tray (Bain-Marie in the
oven tray)
Rice pudding milky rice pudding, rich riz à l’impératrice cakes (or multi-level) 180 °C cake tin on the oven tray
DESSERTS
Soufflés liqueur soufflé, fruit soufflé, etc. cakes (or multi-level) 200 °C cake tin on the oven tray
Stuffed fruit or fruit foil parcels oven-baked applies, etc. Multi-level 200 °C
dish or foil parcel on the oven
tray
FRUIT
Fruit gratins (with sabayon) fresh fruit gratin Grill 270 °C dish on the grid
DISHES EXAMPLES COOKING MODE TEMPERATURE SUPPORTS
Yoghurts Convection mode 50 °C ramekins on the oven tray
Dry food
mushrooms, herbs, dried fruit or vegetables,
etc.
Multi-level 60 °C on the grid
Sterilisation jars of fruit in syrup, etc. Sterilisation (or multi-level) 130 °C jars on the oven tray
Reheating dishes
cooked dishes (home-made or ready-made
packets)
Reheating dishes
(or multi-level)
140 °C dish on the oven tray
MISCELLANEOUS
Home-made bread Multi-level
260 °C for 10
minutes 210 °C
afterwards
on the oven tray

- 13-
Pyrolysis
Useful tips before pyrolysis
• Remove the toughest grease and food spots and especially all substantial overflows in order to avoid the
creation of flames or smoke.
• Remove all oven accessories, the frames and the sliding racks (if present) before running a pyrolysis
cycle. Extremely high temperatures may cause these accessories to become warped or discoloured.
• Do not leave any tea towels on the oven handle.
Operation
Turn knob B towards the right to position .
The automatic cleaning cycle is carried out for a default time of 1h30.
• However, the
cycle time can be modified (from 1h00 to 2h00) depending on how dirty your oven is. (to do so,
Proceed as follows:
1. turn knob A to set the desired cooking time;
2. press knob A to confirm the programming.
• You can also set a pyrolysis time with a delayed start (see "programming a cooking time with a delayed start"
paragraph).
When the temperature inside the oven is high enough, the oven door is locked and indicator light
is automatically
turned on. From this point on, no cooking time, end cooking time or timer modifications can be made.
The door unlocks automatically and indicator light
is turned off when the temperature inside the oven drops
sufficiently.
An acoustic signal, accompanied by the displaying of the word "end" indicates the cycle is complete.
• Press knob A to make the word "end" disappear and to silence the acoustic signals;
• set knob B back to position 0.
1.
2.
FOR ALL OVENS, PLEASE REFER TO THE "OVEN MAINTENANCE" CHAPTER IN THE TECHNICAL HANDBOOK.
3.
Important information:
• The oven surfaces may get very hot; keep children well away.
• Avoid scraping the enamel coating with sharp objects (such as knives)
• Do not use abrasive detergents or products.
• When cleaning your oven, try to prevent any liquids from leaking into the door slots.
• When looking through the oven door, you may notice some particles that light up when they are destroyed by
pyrolysis upon contact with the heating elements: this is simply spontaneous combustion. It is perfectly normal
and hazard-free.
After pyrolysis, wait for the oven to have cooled down completely and then, using a damp sponge, remove the dust
deposits which formed as the food residue burned.
To cut down on pre-heating times and therefore save on energy, we recommend you run a pyrolysis cycle straight
after cooking;

- 14 -
TROUBLESHOOTING
... your oven releases a lot of smoke:
• check whether you selected the correct cooking mode for the cooking required;
• check whether the temperature displayed (if you have adjusted it) is too high;
• check the degree of soil of the oven, and whether it needs to be cleaned: food residue encrusted onto the
enamel coating inside the oven becomes charred and creates both smoke and pungent smells.
... the oven fan stays on when cooking is complete:
• the fan stops automatically when the temperature inside the oven drops sufficiently.
... the display indicates an error type ERxx
The oven is fitted with an autotest system: if it detects an operating anomaly, the display indicates a two-digit code
in the form of: -4NN.
Contact your local retailer or an authorised after-sales service centre (see Technical handbook) and specify:
• your appliance's commercial code and serial number (featured on the guarantee certificate);
• the error code displayed.
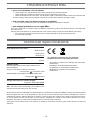
Inner dimensions of the oven:
Width 43.5 cm
Depth 40 cm
Height 32 cm
Inner Volume of the Oven:
56 litres
ENERGY LABEL
Directive 2002/40/EC on the label of electric ovens
Norm EN 50304
Energy consumption for Natural convection
heating mode:
Convection mode
Declared energy consumption for Forced convection Class
heating mode:
Multi-level
Voltage and Frequency of Power Supply:
220-240V~ 50Hz 2560-3050W
N.B. : The inner volume and energy consumption of the
oven do not take the sliding racks into account.
Technical Specifications
%
This appliance conforms with the following
European Economic Community directives:
- 73/23/EEC of 19/02/73 (Low Voltage) and subsequent
modifications;
- 89/336/EEC of 03/05/89 (Electromagnetic
Compatibility) and subsequent modifications;
- 93/68/EEC of 22/07/93 and subsequent
modifications.
The European Directive 2002/96/EC on Waste Electrical and Electronic Equipment (WEEE), requires that old household
electrical appliances must not be disposed of in the normal unsorted municipal waste stream. Old appliances must be
collected separately in order to optimise the recovery and recycling of the materials they contain and reduce the impact
on human health and the environment. The crossed out “wheeled bin” symbol on the product reminds you of your
obligation, that when you dispose of the appliance it must be separately collected.
Consumers should contact their local authority or retailer for information concerning the correct disposal of their old
appliance.

- 15-
Vanaf de kolenkachel uit het verleden tot aan het digitaal koken van onze tijd heeft Scholtès gedurende
80 jaren geschiedenis het idee van "met de hand gemaakt" weten te behouden dat nog steeds zijn
kenmerk en sterke punt is gebleven.
Leder product van Scholtès is het resultaat van de geslaagde combinatie van elegante vormgeving
met onbetwistbare technologie, die bestaat uit prestatie en vernieuwing.
Deze handleiding is tot stand gekomen met de hoogst gewaardeerde medewerking van onze eigen
eersteklas culinaire expert, Philippe Rogé, die deel uitmaakt van het team voor Research en
Ontwikkeling van ons bedrijf.
U kunt in deze handleiding vele raadgevingen vinden, die wij u aanraden op te volgen, en die het
mogelijk maken van de ervaring van onze chef te profiteren en zodoende met de bereiding altijd een
perfect resultaat te bereiken.
De twee documenten, de Gebruiksaanwijzing en deTechnische Handleiding, vullen elkaar aan:
• de Gebruiksaanwijzing beschrijft op eenvoudige maar gedetailleerde wijze de functies waarvan
het apparaat is voorzien. U vindt er bovendien nuttige tips voor het koken, die u helpen op de
beste wijze van de mogelijkheden van de oven te genieten.
• de Technische handleiding bevat alle noodzakelijke informatie voor het installeren, de aansluiting,
het onderhoud van het apparaat… en de aanbevelingen.
Eet smakelijk met SCHOLTES

- 16 -
Inhoud
Het bedieningspaneel.......................................................................................................... 17
Instellen van de juiste tijd ...................................................................................................17
Timer ..................................................................................................................................... 17
Het koken.............................................................................................................................. 18
Presentatie ...................................................................................................................................... 18
De functies ...................................................................................................................................... 18
Het functioneren .................................................................................................................. 19
Het starten van een bereiding ......................................................................................................... 19
Veranderen van de temperatuur...................................................................................................... 19
Uitschakelen van de oven ............................................................................................................... 19
Uitzetten "Demo Mode" ..................................................................................................................................19
Het programmeren..........................................................................................................20-21
Programmeren kooktijd met onmiddelijke start ............................................................................... 20
Programmeren van een kooktijd met uitgestelde start.................................................................... 21
De accessoires................................................................................................................22-23
Herstellen na een elektrische black-out............................................................................. 23
Tabellen combinatie gerechten/bereidingsfuncties.....................................................24-25
Pyrolyse ................................................................................................................................ 26
Nuttige tips voordat u pyrolyse gaat uitvoeren ................................................................................ 26
Het functioneren .............................................................................................................................. 26
Belangrijke aanwijzingen ................................................................................................................. 26
WAT TE DOEN ALS … .......................................................................................................... 27
Technische gegevens .......................................................................................................... 27

- 17-
Het bedieningspaneel
Knop A regelt de juiste tijd, de temperatuur, de timer, de tijdsduur en/of einde van de kooktijd of pyrolyse.
Met knop "B" kunt u de kookfuncties kiezen.
Instellen van de juiste tijd
De timer, aangegeven met het symbool , is onafhankelijk van het functioneren van de oven en voor het
instellen van de timer gaat u als volgt te werk:
Als het apparaat elektrisch wordt aangesloten gaat het symbool
aan en op de display gaat 0:00 knipperen. Voor
het gelijk zetten van de klok gaat u als volgt te werk:
N.B.
Draai voor het verlichten
van het symbool van de
timer
Druk voor toegang tot het
instellen.
Draai voor instellen
tijdsduur (van 0 tot 23
uren en 59 minuten)
Druk voor het bevestigen
van de instelling.
N.B.
Draai voor het
instellen van de
tijd
Druk voor het
bevestigen
De minuten knipperen?
Draai voor het instellen van de
minuten
Druk voor het
bevestigen
Voor het instellen van winter/zomer of na een
stroomuitval: Draai A voor het verlichten van het
symbool en volg dezelfde handelswijze
N.B.
De tijd kan alleen worden veranderd als de oven uit is (niet gedurende de kooktijd of het programmeren).
Timer
Een opeenvolging van geluidssignalen geeft aan dat de timer is afgelopen. Druk op de toets A voor het afzetten van
het geluidssignaal.
Regelen temperatuur en kooktijd
De juiste tijd
Timer
Kooktijd/pyrolyse
Einde kooktijd/pyrolyse
Controlelampje
verwarming
Indicatie deur
geblokkeerd
Keuzeknop kookfuncties
(vastgestelde temperatuur)
Aanbevolen
ovenstand
STOP

- 18 -
Het koken
Presentatie
Voor iedere soort koken bestuurt de oven eigenhandig de essentiële gegevens voor het slagen van alle recepten,
van de eenvoudigste tot de meest ingewikkelde,: temperatuur, warmtebron, vochtigheidsgraad en heteluchtcirculatie
zijn waarden die automatisch onder controle worden gehouden.
Dit hoofdstuk is verzorgd met de zeer gewaardeerde medewerking van onze culinaire expert. Wij raden u aan
zijn raadgevingen op te volgen teneinde volledig van zijn ervaring te profiteren en altijd een perfect resultaat te
bereiken.
De keuze van de bereidingsfuncties, de temperaturen en de plaatsing van de gerechten in de oven is
precies zoals hij ze zelf gebruikt voor de beste resultaten.
Voor iedere functie vindt u in de hiervolgende tabel informatie of het gerecht in de koude of warme oven moet
worden geplaatst. Als u zich aan deze aanwijzingen houdt is een uitstekend resultaat altijd gegarandeerd.
Gedurende de voorverwarmingsfase knippert het controlelampje
. Het bereiken van de kooktemperatuur wordt
aangegeven door
, dat aan blijft zonder te knipperen.
De temperatuur wordt automatisch bepaald op basis van het gekozen soort bereiding; toch kunt u dit veranderen ter
aanpassing aan het speciale recept dat u gaat bereiden (zie volgende bladzijde).
Het is ook mogelijk een kooktijd met onmiddelijke of uitgestelde start in te stellen (zie volgende bladzijde).
De functies
Tips voor het ontdooien
• Een ontdooid product moet in korte tijd worden opgegeten .
• Ontdooide etenswaren mogen nooit weer worden ingevroren.
• Als het ontdooien klaar is haalt u het product uit de oven en zet u het in de koelkast totdat u het gaat bereiden
of opeten binnen een korte tijd.
1.
2.
Functie Aanbevolen bereiding voor …
Niveau
bakplaat
Niveau
rooster 1
Niveau
rooster 2
Inladen
N.B.
Ontdooien*
1 2
Langzaam ontdooien in de koelkast blijft de beste
methode. Met gebruik van de oven bespaart u 50% van de
tijd
Functie geschikt voor alle rauwe of gekookte etenswaren.
Rijzen
Rijzen van deeg met bakkersgist
(brioches, brood, suikertaart, croissants,
enz.)
2 Koud Temperatuur (40°C) niet veranderbaar.
Gistdeeg
Gebak (op basis van bakkersgist) 2 Warm
Voor het bereiden van pizza raden wij aan de temperatuur
op 220°C te zetten.
Krokant
Zoet of zout gebak (bladerdeeg of
zandtaartdeeg)
2 Warm
Bodem perfect gaar en voldoende afwerking van de
bovenkant.
Multiniveau
Gelijktijdig bereiden van meerdere
gerechten op 2 of 3 niveaus zonder
overdragen van geuren of smaak
Ander gebak dan krokant en gistdeeg
(beignets, pan di spagna, enz.)
1 3
5
(bij
bereidin
g op 3
niveaus)
Warm
Als u deze functie gebruikt voor een enkele bereiding zet u
de bakplaat op het 2° niveau.
Traditie
Langzame bereiding (backenhof, boeuf
bourguignon, goulash, enz.) of au-bain-
marie (terrine, crème caramel enz.)
2 Warm
Voor au-bain-marie bereiding kunt u het water rechtstreeks
in de bakplaat gieten.
Braden
Braadstukken (wit of rood vlees) en au
gratin
1 2 Koud
De aanbevolen temperatuur garandeert een perfecte
bereiding en vermijd het ontstaan van rook. Als het vlees
op een schaal ligt plaatst u de bakplaat op het 2° niveau.
Braadspit*
Het braden van wit of rood vlees 1 3 (braadspit) Koud
Grill
Biefstuk, vis, grilleren, gratineren enz. 1
Het niveau hangt af
van de dikte van het
stuk vlees
Warm

- 19-
Het functioneren
1.Het starten van het koken
• draai knop B tot aan de gewenste functie;
• naar gelang de gekozen bereidingswijze worden de aanbevolen temperatuur en het niveau in de oven waar
u het gerecht moet plaatsen getoond;
• Gedurende het voorverwarmen knippert het symbool
(alleen bij enkele functies) en aan het einde van
deze fase houdt het op met knipperen.
Veranderen van de temperatuur
U kunt wanneer u maar wilt de temperatuur veranderen.
• Draai knop A
totdat de temperatuur op de display niet meer knippert.
• Druk op knop A voor toegang tot het instellen.
• draai knop A voor het verhogen of verlagen van de temperatuur;
• duk op knop A voor het bevestigen van de verandering.
Uitschakelen van de oven
Als het gerecht klaar is zet u knop B op 0.
Uitzetten "Demo Mode"
• Druk drie keer op de knop A
• Draai de knop A tegen de klok in
3.
2.
4.

- 20 -
Het programmeren
Programmeren van een kooktijd met onmiddelijke start
U kunt een kooktijd zodanig instellen dat de oven onmiddelijk in werking treedt en automatisch wordt uitgeschakeld
als de geprogrammeerde tijd is verlopen.
Kies een bereidingswijze, verander indien nodig de temperatuur, en ga als volgt te werk:
1. Draai knop A
voor het verlichten van symbool .
2. druk op knop A voor toegang tot het instellen van de kooktijd: op de display knippert 2:00;
3. draai aan knop A voor het verschijnen van de gewenste kooktijd (minimum 20 minuten - maximum 9h59);
4. druk op knop A voor het bevestigen van de programmering. De geprogrammeerde tijdsduur wordt vertoond,
afgewisseld met de gekozen temperatuur.
(1)
Voor iedere kookfunctie is voor de veiligheid een tijdsduur ingesteld van 2 uren. Als deze niet wordt veranderd
gaat de oven automatisch uit als deze tijd is afgelopen
Als u het woord "end" ziet verschijnen, tesamen met een opeenvolging van geluidssignalen, is de geprogrammeerde
tijdsduur afgelopen en wordt het koken onderbroken.
• Druk op knop A voor het afzetten van de geluidssignalen.
• Zet knop B op 0 voor het verwijderen van het woord "end".
1.

- 21-
Het programmeren
Programmeren van een kooktijd met uitgestelde start
U kunt de oven zodanig programmeren dat het gerecht op een vastgesteld uur klaar is: de programmering stelt
automatisch het uur waarop het koken begint vast en de oven gaat op het gewenste moment uit.
B.v.:
Het is 9:00 uur en het gerecht moet klaar zijn om 12:30, wetende dat de kooktijd 1 uur en 15 minuten moet duren:
dus moeten de kooktijd en het einde van de kooktijd geprogrammeerd worden. De oven bepaalt automatisch dat de
start moet plaats vinden op 11:15 zodat de kooktijd eindigt op 12:30.
1° stap
Plaats het gerecht in de oven en kies een bereidingswijze. Verander indien nodig de temperatuur en programmeer
de kooktijd op de volgende wijze:
1. Draai aan knop A voor het verlichten van symbool
.
2. druk op knop A voor toegang tot het instellen van de kooktijd: u ziet 2:00 knipperen;
3. draai aan knop A voor het instellen van de gewenste kooktijd (minimum 20 minuten - maximum 9h59);
4. druk op knop A voor het bevestigen van de programmering. De tijdsduur wordt vertoond, afgewisseld met de
gekozen temperatuur.
2° stap
Programmeer het gewenste uur van einde kooktijd:
1. Draai aan knop A voor het verlichten van het symbool
STOP
(de display vertoont 10h15, oftewel het uur van
einde kooktijd, als het koken onmiddelijk start);
2. druk op knop A voor toegang tot het instellen van het gewenste uur van einde kooktijd;
3. draai aan knop A voor het instellen van het uur van einde kooktijd.
4. druk op knop A voor het bevestigen van de programmering. Het uur van einde kooktijd wordt afwisselend met
de gekozen temperatuur vertoond.
Het koken begint om 11:15 en eindigt om 12:30.
Het woord "end", tesamen met een opeenvolging van geluidssignalen, geeft aan dat de geprogrammeerde tijdsduur
is afgelopen en het koken wordt onderbroken.
• Druk op knop A voor het afzetten van de geluidssignalen.
• Zet knop B weer op 0 voor het verwijderen van het woord "end".
2.
Seite wird geladen ...
Seite wird geladen ...
Seite wird geladen ...
Seite wird geladen ...
Seite wird geladen ...
Seite wird geladen ...
Seite wird geladen ...
Seite wird geladen ...
Seite wird geladen ...
Seite wird geladen ...
Seite wird geladen ...
Seite wird geladen ...
Seite wird geladen ...
Seite wird geladen ...
Seite wird geladen ...
Seite wird geladen ...
Seite wird geladen ...
Seite wird geladen ...
Seite wird geladen ...
Seite wird geladen ...
Seite wird geladen ...
Seite wird geladen ...
-
 1
1
-
 2
2
-
 3
3
-
 4
4
-
 5
5
-
 6
6
-
 7
7
-
 8
8
-
 9
9
-
 10
10
-
 11
11
-
 12
12
-
 13
13
-
 14
14
-
 15
15
-
 16
16
-
 17
17
-
 18
18
-
 19
19
-
 20
20
-
 21
21
-
 22
22
-
 23
23
-
 24
24
-
 25
25
-
 26
26
-
 27
27
-
 28
28
-
 29
29
-
 30
30
-
 31
31
-
 32
32
-
 33
33
-
 34
34
-
 35
35
-
 36
36
-
 37
37
-
 38
38
-
 39
39
-
 40
40
-
 41
41
-
 42
42


Whirlpool FMN 36.1 WH Benutzerhandbuch
- Typ
- Benutzerhandbuch
- Dieses Handbuch eignet sich auch für
in anderen Sprachen
- English: Whirlpool FMN 36.1 WH User guide
- Nederlands: Whirlpool FMN 36.1 WH Gebruikershandleiding
Verwandte Artikel
-
Whirlpool FX 35.2 WH Bedienungsanleitung
-
-
-
-
Whirlpool FG66 Bedienungsanleitung
-
-
-