Bresser 7007401 Bedienungsanleitung
- Kategorie
- Wetterstationen
- Typ
- Bedienungsanleitung
Dieses Handbuch eignet sich auch für

GB
INSTRUCTION MANUAL
DE
BEDIENUNGSANLEITUNG
RC Hygrometer
with outdoor sensor
Funk-Hygrometer
Mit Außensensor
Art. No. 7007401
Manual_7007401_RC-Hygrometer_en-de_BRESSER_v082019a.indd 1 26.08.2019 08:12:22

2
GB
INSTRUCTION MANUAL .....................................5
DE
BEDIENUNGSANLEITUNG .................................16
Fig. 1
A B
FR
Vous souhaitez un mode d’emploi détaillé pour ce produit dans une langue spécifique ? Alors
consultez notre site Internet à l’aide du lien suivant (code QR) pour voir les versions disponibles.
NL
U wenst een uitvoerige gebruikshandleiding voor dit product in een specifieke taal? Bezoek dan onze
website via deze link (QR Code) voor alle beschikbare versies.
IT
Desidera ricevere informazioni esaustive su questo prodotto in una lingua specifica? Venga a visitare il
nostro sito Web al seguente link (codice QR Code) per conoscere le versioni disponibili.
PT
Deseja um manual detalhado deste produto numa determinada língua? Visite a nossa Website
através da seguinte ligação (QR Code) das versões disponíveis.
ES
¿Desearía recibir unas instrucciones de uso completas sobre este producto en un idioma determinado?
Entonces visite nuestra página web utilizando el siguiente enlace (código QR) para ver las versiones
disponibles.
www.bresser.de/P7007401
Manual_7007401_RC-Hygrometer_en-de_BRESSER_v082019a.indd 2 26.08.2019 08:12:23

3
Fig. 2
D
a
b
c
Batterien nicht enthalten.
Batteries not included.
Manual_7007401_RC-Hygrometer_en-de_BRESSER_v082019a.indd 3 26.08.2019 08:12:24

4
Fig. 3
Batterien nicht enthalten.
Batteries not included.
Manual_7007401_RC-Hygrometer_en-de_BRESSER_v082019a.indd 4 26.08.2019 08:12:24

5
GB
ABOUT THIS INSTRUCTION MANUAL
These operating instructions are to be considered a component of the
device. Please read the safety instructions and the operating instructions
carefully before use. Keep these instructions for renewed use at a later date.
When the device is sold or given to someone else, the instruction manual
must be provided to the new owner/user of the product.
This product is intended only for private use. It was developed as an electronic
medium for the use of multimedia services.
GENERAL WARNINGS
RISK OF CHOKING!
Keep packaging material, like plastic bags and rubber bands, out of the reach
of children, as these materials pose a choking hazard.
RISK of ELECTRIC SHOCK!
This device contains electronic components that operate via a power source
(batteries). Children should only use the device under adult supervision. Only
use the device as described in the manual; otherwise, you run the risk of an
electric shock.
RISK OF CHEMICAL BURN!
Leaking battery acid can lead to chemical burns. Avoid contact of battery acid
with skin, eyes and mucous membranes. In the event of contact, rinse the
affected region immediately with a plenty of water and seek medical attention.
RISK of FIRE/EXPLOSION!
Use only the recommended batteries. Do not short-circuit the device or
batteries, or throw them into a fire. Excessive heat or improper handling could
trigger a short-circuit, a fire or an explosion.
NOTE!
Do not disassemble the device. In the event of a defect, please contact your
dealer. The dealer will contact the Service Centre and can send the device in
to be repaired, if necessary.
Do not immerse the unit in water.
Manual_7007401_RC-Hygrometer_en-de_BRESSER_v082019a.indd 5 26.08.2019 08:12:24

6
Do not subject the unit to excessive force, shock, dust, extreme temperature
or high humidity, which may result in malfunction, shorter electronic life span,
damaged batteries and distorted parts.
Use only the recommended batteries. Always replace weak or empty batteries
with a new, complete set of batteries at full capacity. Do not use batteries
from different brands or with different capacities. Remove the batteries from
the unit if it has not been used for a long time.
The manufacturer is not liable for damage related to improperly installed
batteries!
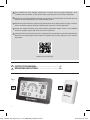
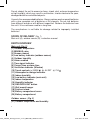
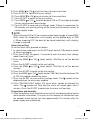
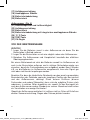
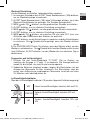
SCOPE OF DELIVERY (Fig. 1)
Main unit (A), outdoor sensor (B), instruction manual
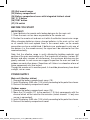
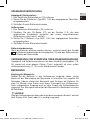
PARTS OVERVIEW
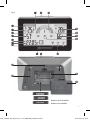
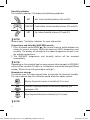
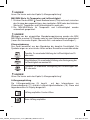
Main unit (Fig. 2)
(1) Outdoor temperature
(2) MIN/MAX value
(3) Sensor channel
(4) Low battery indicator (outdoor sensor)
(5) Outdoor humidity
(6) Alarm enabled
(7) Time signal indicator
(8) Current time or alarm time
(9) Ventilation indicator (Window)
(10) Touch controls (a) MEM/ (b) AL/SET (c) CH/
(11)
Atmospheric change indicator
(12) Indoor humidity
(13) Low battery indicator (main unit)
(14) Indoor temperature
(15) Humidity indicator
(16) SNOOZE/LIGHT button
(17) Wall mount hanger
(18) Fold-out stand
(19) Battery compartment cover
(20) Battery compartment
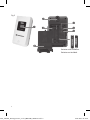
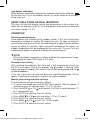
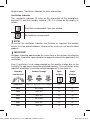
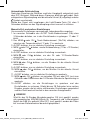
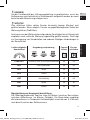
Outdoor sensor (Fig. 3)
(21) Outdoor temperature and humidity
Manual_7007401_RC-Hygrometer_en-de_BRESSER_v082019a.indd 6 26.08.2019 08:12:24

7
(22) Wall mount hanger
(23) Battery compartment
(24) Battery compartment cover with integrated fold-out stand
(25) °C/°F button
(26) TEST button
(27) CH switch
BEFORE YOU START
IMPORTANT!
1. Insert batteries for remote units before doing so for the main unit.
2. Place the main unit as close as possible to the remote unit.
3.
Position the remote unit and main unit within the effective transmission range.
When changing batteries always change batteries in the main unit as well
as all remote units and replace them in the correct order, so the remote
connection can be re-established. If batteries are exchanged in only one of
the devices (i.e. the remote sensor) the signal can’t be received or can’t be
received correctly.
Note, that the effective range is vastly affected by building materials and
position of the main and remote units. Due to external influences (various RC
devices and other sources of interference), the maximum distance can be
greatly reduced. In such cases we suggest to position the main unit and the
outdoor sensorat other places. Sometimes all it takes is a relocation of one of
these components of a few inches!
Though the remote unit is weather proof, it should be placed away from direct
sunlight, rain or snow.
POWER SUPPLY
Main unit (Weather station)
1. Remove the battery compartment cover (19).
2. Install 3 batteries (AAA size 1.5V) strictly according to the polarities shown.
3. Reinsert the battery compartment cover.
Outdoor sensor
1. Remove the battery compartment cover (24).
2. Move the CH switch (27) to the position (1-3) that corresponds with the
channel which will be used for transmission (select channel 1 if only one
sensor is connected).
3. Install 2 batteries (AAA size 1.5V) strictly according to the polarities shown.
4. Reinsert the battery compartment cover.
Manual_7007401_RC-Hygrometer_en-de_BRESSER_v082019a.indd 7 26.08.2019 08:12:24

8
Low battery indication
When batteries need to be replaced the respective low battery indicator
for the main unit (13) or the outdoor sensor (4) will be shown on the display
of the main unit.
USING TABLE STAND OR WALL MOUNTING
The main unit and the outdoor sensor can be placed on a flat surface (e.g.
table) with the fold-out stand (18, 24) or mounted on walls using the recessed
wall mount hanger (17, 22).
OPERATION
Receiving measurements
Once batteries are installed to the outdoor sensor, it will start transmitting
temperature readings at roughly 60 second intervals. As soon as batteries
are installed in the main unit it will start searching for a signal from the outdoor
sensor for about 3-4 minutes. Upon successful reception of the signal, the
outdoor temperature will be displayed on the main unit. The main unit will
automatically update its readings at about 60 second intervals.
NOTE!
When the outdoor temperature is above or below the measurement range,
the display will show HHH (high) or LLL (low).
Automatic time setting
After installing the batteries, the main unit it will automatically search for
the DCF time signal. During this process, the symbol is flashing. After
successful signal reception, the current time (8) will be displayed and the
symbol disappears.
If the time signal was not received, press the Light/Snooze button (16) for
approx. 3 seconds to manually re-initialize the signal reception.
Manual time setting and other settings
To make manual settings, proceed as follows:
1. In normal time mode press the AL/SET touch control (10b) for approx. 3
seconds to enter the settings mode. °C or °F will flash.
2. Press the MEM/
or CH/ touch control (10a/10c) to switch between °C
or °F temperature unit.
3. Press AL/SET to switch to the next setting.
4. Press MEM/
or CH/ to set hour offset (-12 to +12 hours).
5. Press AL/SET to switch to the next setting.
6. Press MEM/ or CH/ to set 24 or 12 hour mode.
7. Press AL/SET to switch to the next setting.
Manual_7007401_RC-Hygrometer_en-de_BRESSER_v082019a.indd 8 26.08.2019 08:12:24

9
8. Press MEM/ or CH/ to set the hours for the current time.
9. Press AL/SET to switch to the next setting.
10. Press MEM/ or CH/ to set minutes for the current time.
11. Press AL/SET to switch to the next setting.
12. Press MEM/ or CH/ to switch between ON or OF to enable or disable
24 hour measurement data storage.
13. Press AL/SET to save and exit settings mode. If there is no operation for
20 seconds, the existing setting will be saved and the device returns to
normal display mode.
NOTE!
When choosing ON for 24 hour measurement data storage all stored MIN/
MAX values for temperature and humidity will be deleted daily at 0:00
h! When choosing OFF the data will be stored indefinitely until a battery
change is required.
Alarm time setting
To set the alarm time, proceed as follows:
1. In normal time mode press the AL/SET touch control (10b) once to switch
to alarm time display.
2. Press the AL/SET for approx. 3 seconds to enter the alarm time settings
mode. Hours will flash.
2. Press the MEM/ or CH/ touch control (10a/10c) to set the desired
hours.
3. Press the AL/SET to switch to the next setting.
4. Press the MEM/ or CH/ touch control (10a/10c) to set the desired
minutes.
5. Press the AL/SET to switch to the next setting.
6. Press the MEM/ or CH/ touch control (10a/10c) to switch between ON
or OFF to enable or disable the alarm.
7. Press the AL/SET to save and exit settings mode. The symbol will be
displayed when the alarm was enabled.
8. Press SNOOZE/LIGHT button (16) when alarm sounds to interrupt the
alarm. The symbol will flash and the alarm will sound again after 5
minutes. Press the AL/SET to deactivate the alarm until next day.
Temperature and humidity
2. Once the batteries are installed the main unit will start displaying the interior
measurement information. The main unit will display the information from
the outdoor sensor for the first time approximately 3-4 minutes after the
power supply was established.
Manual_7007401_RC-Hygrometer_en-de_BRESSER_v082019a.indd 9 26.08.2019 08:12:25

10
Humidity indicator
The humidity indicator (15) displays the following conditions:
WET Wet. Indoor humidity between 66% and 95%
COMFORT Comfortable. Indoor humidity between 45% and 65%
DRY Dry. Indoor humidity between 20% and 40%
NOTE!
Read chapter "Ventilation indicator" for more information.
Temperature and humidity MAX/MIN records
1. Press the touch control MEM/ (10a) several times to switch between the
values for current, minimum (MIN) and maximum (MAX) temperature and
humidity. The display will change for the indoor temperature as well as for
the outdoor temperature.
2. The MIN/MAX temperature and humidity values will be recorded
automatically.
NOTE!
Depending on the selected type for measurement data storage the MIN/MAX
values will be saved for 24 hours or until batteries need to be changed (Read
chapter "Manual time setting and other settings").
Atmospheric change
The device uses the measurement data to calculate the absolute humidity.
The icons indicate how the ventilation would affect the indoor climate:
Moister. Expected increase in humidity by 5% or more.
Constant. Expected increase or decrease in humidity by a
maximum of 4%.
Dryer. Expected decrease in humidity by 5% or more.
NOTE!
Manual_7007401_RC-Hygrometer_en-de_BRESSER_v082019a.indd 10 26.08.2019 08:12:25

11
Read chapter "Ventilation indicator" for more information.
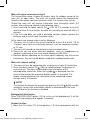
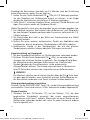
Ventilation indicator
The ventilation indicator (9) relies on the information of the atmospheric
change (11) and the humidity indicator (15). It is shown on the display as
follows:
Ventilation recommended. Open your window.
No ventilation recommended.
NOTE!
To ensure the ventilation indicator can function as required, the outdoor
sensor must be placed outdoors, otherwise the result can not be calculated
properly.
IMPORTANT!
Windows should be opened wide for a short time (a few minutes) for effective
ventilation. If possible, open windows on opposite sides of the apartment (full
ventilation).
Even if ventilation is not recommended by the weather station due to the
humidity, the apartment should be ventilated regularly. This contributes to the
reduction of pollutants and other volatile compounds in the room air.
Humidity
comfort level
Ambient change Open
window
Close
window
COMFORT
MORE DRY, MORE WET OR NO CHANGE off off
DRY
NO CHANGE off off
DRY
MORE WET on off
DRY
MORE DRY off on
WET
NO CHANGE off off
WET
MORE WET off on
WET
MORE DRY on off
Manual_7007401_RC-Hygrometer_en-de_BRESSER_v082019a.indd 11 26.08.2019 08:12:26

12
Main unit signal receivement check
The transmission range is about 50 meters from the outdoor sensor to the
main unit (in open area). The main unit should receive the temperature/
humidity information from the transmitter within 3-4 minutes after set-up.
Should the main unit not receive information from transmitter within 3-4
minutes after setting up, please check following steps:
1. Press and hold the touch control CH/ (10c) for 2-3 seconds to re-start
receiving from the transmitter; the data will normally be received within 3
minutes.
2. If the first step does not yield a desirable solution, please remove the
batteries and re-install them (hardware reset).
At the same time, please make sure the following:
1. The main unit as well as the sensor should be at least 5 to 6 feet (1.5 to
2 meters) away from any interfering sources, such as computer monitors
or TV sets.
2. The main unit should not stand close to metal window frames.
3. Please do not use other electrical products, such as headphones or
speakers, operating on the same signal frequency (433 MHz).
4. Electrical devices operating on the same signal frequency may also cause
interference. This can include devices used in the neighborhood as well.
Main unit channel setting
1. The main unit can be connected with a maximum of up to 3 transmitters.
2. Press the touch control CH/
(10c) to switch between the displays of
each channel. The main unit will display the information of the
corresponding transmitter. When the symbol is displayed near the
channel information the automatic display rotation is activated. The
display changes between the information of the connected remote
sensors every 10 seconds.
NOTE!
The function to change the channels by pressing the CH/ button can be
used only if more than one outdoor sensor is connected with the main
unit. Otherwise this function is disabled.
Background illumination
Press SNOOZE/LIGHT button (16) to to turn on the background. It will be
turned off automatically after approx. 5 seconds.
Sensor function
1. Move the CH switch (27) to the position (1-3) that corresponds with the
Manual_7007401_RC-Hygrometer_en-de_BRESSER_v082019a.indd 12 26.08.2019 08:12:26

13
channel which will be used for transmission (select channel 1 if only one
outdoor sensor is connected). If you would like to connect more than one
outdoor sensor with the main unit, different channels need to be selected
for each sensor.
2. Press °C/°F button (25) to change the temperature display of the transmitter
3. Once the weather station receives radio signals from the sensors, the
alternating temperature values of the different channels will be updated on
the weather station every 1-2 minutes.
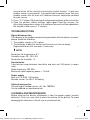
TROUBLESHOOTING
Signal disconnection
If the display of the outdoor temperature goes blank without obvious reasons,
please check the following:
1. The outdoor sensor is still in place.
2. The batteries of both the sensor and the main unit are not empty.
Replace batteries with new ones if necessary.
NOTE!
Resolution for temperature: 0.1°
Humidity range: 20 – 95% RH
Resolution for humidity: 1%
Transmission
Transmission range between transmitter and main unit: 50 meters (in open
area)
Radio frequency: 433 MHz
Maximum radio frequency power: < 10 mW
Power supply
Main unit: 3x AAA 1.5V battery
Remote sensor: 2x AAA 1.5V battery
Optional accessories
Thermo/Hygro Outdoor sensor· Art. No. 7009994
Can be ordered on www.bresser.de
CLEANING AND MAINTENANCE
Before cleaning the device, disconnect it from the power supply (remove
batteries)! Only use a dry cloth to clean the exterior of the device. To avoid
damaging the electronics, do not use any cleaning fluid.
Manual_7007401_RC-Hygrometer_en-de_BRESSER_v082019a.indd 13 26.08.2019 08:12:26

14
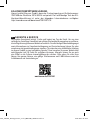
DISPOSAL
Dispose of the packaging materials properly, according to their type,
such as paper or cardboard. Contact your local waste-disposal service
or environmental authority for information on the proper disposal.
Do not dispose of electronic devices in the household garbage!
As per Directive 2002/96/EC of the European Parliament on waste
electrical and electronic equipment and its adaptation into German law,
used electronic devices must be collected separately and recycled in an
environmentally friendly manner.
In accordance with the regulations concerning batteries and
rechargeable batteries, disposing of them in the normal household
waste is explicitly forbidden. Please make sure to dispose of your used
batteries as required by law — at a local collection point or in the retail market.
Disposal in domestic waste violates the Battery Directive.
Batteries that contain toxins are marked with a sign and a chemical symbol.
"Cd" = cadmium, "Hg" = mercury, "Pb" = lead.
EC DECLARATION OF CONFORMITY
Hereby, Bresser GmbH declares that the equipment type with part number:
7007400 is in compliance with Directive: 2014/30/EU. The full text of the
EU declaration of conformity is available at the following internet address:
http://www.bresser.de/download/7007401/CE
Manual_7007401_RC-Hygrometer_en-de_BRESSER_v082019a.indd 14 26.08.2019 08:12:26

15
GB
WARRANTY & SERVICE
The regular guarantee period is 2 years and begins on the day of purchase. To
benefit from an extended voluntary guarantee period as stated on the gift box,
registration on our website is required. You can consult the full guarantee terms as
well as information on extending the guarantee period and details of our services at
www.bresser.de/warranty_terms. Would you like detailed instructions for this product in
a particular language? Then visit our website via the link below (QR code) for available
versions. Alternatively you can also send an email to manuals@bresser.de. Please always
state your name, precise address, a valid phone number and email address, as well as the
article number and name.
www.bresser.de/P7007401
Manual_7007401_RC-Hygrometer_en-de_BRESSER_v082019a.indd 15 26.08.2019 08:12:26

16
DE
Zu dieser Anleitung
Diese Bedienungsanleitung ist als Teil des Gerätes zu betrachten.
Lesen Sie vor der Benutzung des Geräts aufmerksam die
Sicherheitshinweise und die Bedienungsanleitung. Bewahren Sie diese
Bedienungsanleitung für die erneute Verwendung zu einem späteren
Zeitpunkt auf. Bei Verkauf oder Weitergabe des Gerätes ist die
Bedienungsanleitung an jeden nachfolgenden Besitzer/Benutzer des
Produkts weiterzugeben.
Dieses Produkt dient ausschließlich der privaten Nutzung. Es wurde
entwickelt als elektronisches Medium zur Nutzung multimedialer Dienste.
Allgemeine Sicherheitshinweise
ERSTICKUNGSGEFAHR!
Verpackungsmaterialien (Plastiktüten, Gummibänder, etc.) von Kindern
fernhalten! Es besteht ERSTICKUNGSGEFAHR!
GEFAHR EINES STROMSCHLAGS!
Dieses Gerät beinhaltet Elektronikteile, die über eine Stromquelle (Batterien)
betrieben werden. Lassen Sie Kinder beim Umgang mit dem Gerät nie
unbeaufsichtigt! Die Nutzung darf nur, wie in der Anleitung beschrieben,
erfolgen, andernfalls besteht GEFAHR eines STROMSCHLAGS!
VERÄTZUNGSGEFAHR!
Ausgelaufene Batteriesäure kann zu Verätzungen führen! Vermeiden Sie den
Kontakt von Batteriesäure mit Haut, Augen und Schleimhäuten. Spülen Sie
bei Kontakt mit der Säure die betroffenen Stellen sofort mit reichlich klarem
Wasser und suchen Sie einen Arzt auf.
BRAND-/EXPLOSIONSGEFAHR!
Benutzen Sie nur die empfohlenen Batterien. Gerät und Batterien nicht
kurzschließen oder ins Feuer werfen! Durch übermäßige Hitze und
unsachgemäße Handhabung können Kurzschlüsse, Brände und sogar
Explosionen ausgelöst werden!
HINWEIS!
Bauen Sie das Gerät nicht auseinander! Wenden Sie sich im Falle eines
Manual_7007401_RC-Hygrometer_en-de_BRESSER_v082019a.indd 16 26.08.2019 08:12:26

17
Defekts an Ihren Fachhändler. Er nimmt mit dem Service-Center Kontakt auf
und kann das Gerät ggf. zwecks Reparatur einschicken.
Tauchen Sie das Gerät nicht in Wasser!
Setzen Sie das Gerät keinen Stößen, Erschütterungen, Staub, dauerhaft
hohen Temperaturen oder extremer Feuchtigkeit aus. Dies kann zu
Fehlfunktionen, Kurzschlüssen sowie zu Beschädigungen an Batterien und
Bauteilen führen.
Benutzen Sie nur die empfohlenen Batterien. Ersetzen Sie schwache oder
verbrauchte Batterien immer durch einen komplett neuen Satz Batterien mit
voller Kapazität. Verwenden Sie keine Batterien unterschiedlicher Marken,
Typen oder unterschiedlich hoher Kapazität. Entfernen Sie Batterien aus
dem Gerät, wenn es längere Zeit nicht benutzt wird!
Für Spannungsschäden in Folge falsch eingelegter Batterien übernimmt der
Hersteller keine Haftung!
LIEFERUMFANG (Fig. 1)
Hauptgerät (A), Außensensor (B), Bedienungsanleitung
TEILEÜBERSICHT
Hauptgerät (Fig. 2)
(1) Außentemperatur
(2) MIN/MAX-Wert
(3) Sensor-Kanal
(4) Batteriestandsanzeige (Außensensor)
(5) Luftfeuchtigkeit außen
(6) Wecker aktiv
(7) Zeitsignal
(8) Aktuelle Uhrzeit oder Weckzeit
(9) Lüftungsanzeige (Fenster)
(10) Touch-Bedienelemente (a) MEM/ (b) AL/SET (c) CH/
(11)
Klimaveränderungsanzeige
(12) Luftfeuchtigkeit innen
(13) Batteriestandsanzeige (Hauptgerät)
(14) Innentemperatur
(15) Luftfeuchtigkeitsanzeige
(16) SNOOZE/LIGHT-Taste
Manual_7007401_RC-Hygrometer_en-de_BRESSER_v082019a.indd 17 26.08.2019 08:12:26

18
(17) Aufhängevorrichtung
(18) Ausklappbarer Ständer
(19) Batteriefachabdeckung
(20) Batteriefach
Außensensor (Fig. 3)
(21) Außentemperatur und Luftfeuchtigkeit
(22) Aufhängevorrichtung
(23) Batteriefach
(24) Batteriefachabdeckung mit integriertem ausklappbarem Ständer
(25) °C/°F-Taste
(26) TEST-Taste
(27) CH-Regler
VOR DER INBETRIEBNAHME
WICHTIG!
1. Legen Sie die Batterien zuerst in den Außensensor ein bevor Sie die
Basisstation in Betrieb nehmen.
2. Legen Sie die Basisstation so nah wie möglich neben den Außensensor.
3. Betreiben Sie Außensensor und Haupteinheit innerhalb des effektiven
Übertragungsbereichs.
Bei einem Batteriewechsel stets die Batterien sowohl im Außensensor als
auch in der Basisstation entfernen und in richtiger Reihenfolge wieder neu
einsetzen, damit die Funkverbindung neu aufgebaut werden kann! Werden
z.B. nur die Batterien im Außensensor ausgetauscht, kann das Signal gar
nicht oder nicht korrekt empfangen werden.
Beachten Sie, dass die tatsächliche Reichweite von den jeweils verwendeten
Baumaterialien der Gebäude sowie der jeweiligen Position der Basiseinheit
und des Außensensors abhängt. Durch externe Einflüsse (diverse
Funksender und andere Störquellen) kann sich die mögliche Distanz stark
reduzieren. In solchen Fällen empfehlen wir, sowohl für das Basisgerät als
auch den Außensensor andere Standorte zu suchen. Manchmal reicht schon
ein Verschieben um wenige Zentimeter!
Obwohl der Außensensor wetterfest ist, sollte er nicht an Orten mit Einfall von
direkter Sonneneinstrahlung, Regen oder Schnee platziert werden.
Manual_7007401_RC-Hygrometer_en-de_BRESSER_v082019a.indd 18 26.08.2019 08:12:26

19
SPANNUNGSVERSORGUNG
Hauptgerät (Wetterstation)
1. Den Deckel des Batteriefaches (19) entfernen.
2. Setzen Sie die 3 Batterien (Typ AAA, 1.5V) den angegebenen Polaritäten
entsprechend ein.
3. Schließen Sie das Batteriefach wieder.
Außensensor
1. Den Deckel des Batteriefachs (24) entfernen.
2. Schieben Sie den CH-Regler (27) auf die Position (1-3), die dem
gewünschten Sendekanal entspricht (bei einem angeschlossenen
Außensensor stets Kanal 1 wählen).
3. Setzen Sie 2 Batterien (Typ AAA, 1.5V) den angegebenen Polaritäten
entsprechend ein.
4. Schließen Sie das Batteriefach wieder.
Batteriestandsanzeige
Wenn die Batterien ersetzen werden müssen, erscheint jeweils das Symbol
für Batteriestandsanzeige des Hauptgeräts (13) oder des Außensensors
(4) im Display der Basisstation.
VERWENDUNG VON STANDFUSS ODER WANDAUFHÄNGUNG
Hauptgerät und Außensensor können mit dem Standfuß (ausklappbar) (18,
24) sowohl auf einer ebenen Fläche (Tisch) aufgestellt als auch mittels
Aufhängevorrichtung (17, 22) an der Wand montiert werden.
BEDIENUNG
Empfang der Messwerte
Sobald Sie die Batterien in den Außensensor eingelegt haben, startet
dieser mit der Übertragung der Messwerte in Intervallen von ungefähr 60
Sekunden. Ebenso startet das Basisgerät nach Einlegen der Batterien für
etwa 3-4 Minuten eine Suche nach einem Funksignal vom Außensensor.
Nach erfolgreichem Empfang wird auf dem Display die Außentemperatur
angezeigt. Das Basisgerät aktualisiert die Messwerte in Abständen von etwa
60 Sekunden.
HINWEIS!
Liegt die Außentemperatur über oder unter dem messbaren Bereich, wird auf
dem Display HHH (hoch) oder LLL (niedrig) angezeigt.
DE
GB
Garantie / Warranty
Manual_7007401_RC-Hygrometer_en-de_BRESSER_v082019a.indd 19 26.08.2019 08:12:26

20
Automatische Zeiteinstellung
Nach dem Einsetzen der Batterien sucht das Hauptgerät automatisch nach
dem DCF-Zeitsignal. Während dieses Prozesses blinkt das Symbol. Nach
erfolgreichem Signalempfang wird die aktuelle Uhrzeit (8) angezeigt und das
Symbol verschwindet.
Wurde das Signal nicht empfangen, die Light/Snooze-Taste (16) etwa 3
Sekunden drücken um den Signalempfang erneut manuell zu initiieren.
Manuelle Zeit- und weitere Einstellungen
Um manuelle Einstellungen vorzunehmen, folgendermaßen vorgehen:
1. Im normalen Zeitmodus das AL/SET Touch-Bedienelement (10b) etwa
3 Sekunden drücken, um in den Einstellmodus zu gelangen. °C oder °F
blinkt.
2. Das MEM/
oder CH/ Touch-Bedienelement (10a/10c) drücken, um
zwischen der Temperatureinheit °C oder °F zu wechseln.
3. AL/SET drücken, um zur nächsten Einstellung zu wechseln.
4. MEM/
oder CH/ drücken, um die Zeitabweichung (-12 bis +12 Stunden)
einzustellen.
5. AL/SET drücken, um zur nächsten Einstellung zu wechseln.
6. MEM/ oder CH/ drücken, um den 24- oder 12-Stunden-Modus
einzustellen.
7. AL/SET drücken, um zur nächsten Einstellung zu wechseln.
8. MEM/
oder CH/ drücken, um die Stunden für die aktuelle Uhrzeit
einzustellen.
9. AL/SET drücken, um zur nächsten Einstellung zu wechseln.
10. MEM/
oder CH/ drücken, um die Minuten für die aktuelle Uhrzeit
einzustellen.
11. AL/SET drücken, um zur nächsten Einstellung zu wechseln.
12. MEM/
oder CH/ drücken, um zwischen ON (ein) oder OFF (aus) zum
Aktivieren oder Deaktivieren der 24-Stunden-Messwerte-Speicherung zu
wechseln.
13. AL/SET drücken, um die Einstellungen zu speichern und den
Einstellmodus zu verlassen. Erfolgt binnen 20 Sekunden keine weitere
Eingabe, wreden die bis dahin existierenden Einstellungen gespeichert
und das Gerät wechselt zurück in den normalen Anzeigemodus.
HINWEIS!
Wird für den 24-Stunden-Messdatenspeicher ON (ein) gewählt, werden
alle gespeicherten MIN/MAX-Werte für Temperatur und Luftfeuchtigkeit
täglich um 0:00 Uhr gelöscht! Wird OFF (aus) gewählt, werden die Daten
bis zu einem Batteriewechsel dauerhaft gespeichert.
Manual_7007401_RC-Hygrometer_en-de_BRESSER_v082019a.indd 20 26.08.2019 08:12:26
Seite wird geladen ...
Seite wird geladen ...
Seite wird geladen ...
Seite wird geladen ...
Seite wird geladen ...
Seite wird geladen ...
Seite wird geladen ...
Seite wird geladen ...
-
 1
1
-
 2
2
-
 3
3
-
 4
4
-
 5
5
-
 6
6
-
 7
7
-
 8
8
-
 9
9
-
 10
10
-
 11
11
-
 12
12
-
 13
13
-
 14
14
-
 15
15
-
 16
16
-
 17
17
-
 18
18
-
 19
19
-
 20
20
-
 21
21
-
 22
22
-
 23
23
-
 24
24
-
 25
25
-
 26
26
-
 27
27
-
 28
28


Bresser 7007401 Bedienungsanleitung
- Kategorie
- Wetterstationen
- Typ
- Bedienungsanleitung
- Dieses Handbuch eignet sich auch für
in anderen Sprachen
- English: Bresser 7007401 Owner's manual
Verwandte Artikel
-
Bresser Temeo io Temperature Station Bedienungsanleitung
-
Bresser RC Thermo- / Hygrometer Bedienungsanleitung
-
-
Bresser 7000001 Bedienungsanleitung
-
Bresser 7000003 Bedienungsanleitung
-
-
-
Bresser 7007402 Bedienungsanleitung
-
-
Andere Dokumente
-
 Dmax 3320012 Bedienungsanleitung
-
National Geographic 9066000 Bedienungsanleitung
-
Renkforce TF0073 - 1380336 Bedienungsanleitung
-
Eurochron EFWS-Color Bedienungsanleitung
-
-
National Geographic 9070710 Bedienungsanleitung
-
