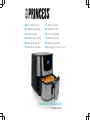
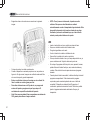
Princess 01.182060.01.001 Benutzerhandbuch
- Typ
- Benutzerhandbuch

EN Instruction manual
NL Gebruiksaanwijzing
FR Mode d’emploi
DE Bedienungsanleitung
ES Manual de usuario
PT Manual de utilizador
IT Manuale utente
SV Bruksanvisning
CS Návod na použití
PL Instrukcja obsługi
SK Návod na použitie
Digital Aerofryer Deluxe XXL
01.182060.01.001
RU Руководство по эксплуатации

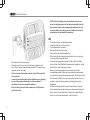
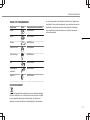
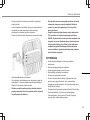
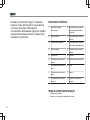
PARTS DESCRIPTION / ONDERDELENBESCHRIJVING / DESCRIPTION DES PIÈCES
/ TEILEBESCHREIBUNG / DESCRIPCIÓN DE LAS PIEZAS / DESCRIÇÃO DOS
COMPONENTES / DESCRIZIONE DELLE PARTI / BESKRIVNING AV DELAR /
OPIS CZĘŚCI / POPIS SOUČÁSTÍ / POPIS SÚČASTÍ / ОПИСАНИЕ ЗАПЧАСТИ
ZĘŚCI / POPIS SOUČÁSTÍ / POPIS SÚČASTÍ / ОПИСАНИЕ ЗАПЧ
1
10
14
17
11 12 13
15
16
4
5
2
6
18
789
3

Instruction manual
3
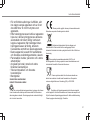
SAFETY
• By ignoring the safety instructions the
manufacturer cannot be held responsible for
the damage.
• If the supply cord is damaged, it must be
replaced by the manufacturer, its service
agent or similarly qualified persons in order
to avoid a hazard.
• Never move the appliance by pulling the
cord and make sure the cord cannot
become entangled.
• The appliance must be placed on a stable,
level surface.
• This appliance is only to be used for
household purposes and only for the
purpose it is made for. In worst case the
food can catch fire. (i.e. do not use more
than one tea spoon of oil, no meat that will
release to much grease or water intended
for boiling foods.
• This appliance shall not be used by children
aged less than 8 years. This appliance can
be used by children aged from 8 years and
above and persons with reduced physical,
sensory or mental capabilities or lack of
experience and knowledge if they have been
given supervision or instruction concerning
use of the appliance in a safe way and
understand the hazards involved. Children
shall not play with the appliance. Keep the
appliance and its cord out of reach of
children aged less than 8 years. Cleaning
and user maintenance shall not be made by
children unless older than 8 and supervised.
• To protect yourself against an electric shock,
do not immerse the cord, plug or appliance
in the water or any other liquid.
• The appliance is to be connected to a
socket-outlet having an earthed contact (for
class I appliances).
• WARNING: If the surface is cracked, switch
off the appliance to avoid the possibility of
an electric shock.
• Keep the appliance and its cord out of reach
of children less than 8 years.
• The temperature of accessible surfaces may
be high when the appliance is operating.
• The appliance is not intended to be operated
by means of an external timer or a separate
remote-control system.
EN

Instruction manual
4
• Surfaces indicated with this logo are
liable to get hot during use.
• In order to prevent disruptions of the airflow do
not put anything on top of the appliance and
make sure there is always 10 centimeter of free
space around the appliance.
• After the baking process the appliance needs to
cooldown, this cooling process will activate
automatically when the timer is done. Avoid to
unplug the appliance from the net socket before
the cooling process is finished because the
remaining hot air can damage the appliance.
• This appliance is intended to be used in
household and similar applications such as:
• Staff kitchen areas in shops, offices and other
working environments.
• By clients in hotels, motels and other residential
type environments.
• Bed and breakfast type environments.
• Farm houses.
SAVE THESE INSTRUCTIONS
HOUSEHOLD USE ONLY
The universal recycling symbol, logo, or icon is an internationally
recognized symbol used to designate recyclable materials. The recycling
symbol is in the public domain and is not a trademark.
This product complies with conformity requirements of the
applicable European regulations or directives.
Waste electrical products should not be disposed of with
household waste. Please recycle where facilities exist. Check with your
local Authority or local store for recycling advice.
The Eurasian Conformity mark (ЕАС) is a certification mark to
indicate products that conform to all technical regulations of the Eurasian
Customs Union.
This symbol is used for marking materials intended to come
into contact with food in the European Union as defined in regulation (EC)
No 1935/2004.

Instruction manual
5
The product and packaging materials are recyclable,
subject to extended manufacturer responsibility. Dispose it
separately, following the illustrated packaging symbols, for better
waste treatment. The Triman logo is valid in France only.
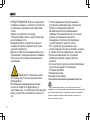
Cleaning and maintenance
• Before cleaning, unplug the appliance and
wait for the appliance to cool down.
• Never immerse the device in water or any
other liquid. The device is not dishwasher-
proof.
• The pan and basket are dishwasher-proof,
they can also be cleaned with some
washing-up liquid, and a non-abrasive
sponge.
• If dirt is stuck to the basket or the bottom of
the pan, fill the pan with hot water with some
washing-up liquid. Put the basket in the pan
and let the pan and the basket soak for
about 10 minutes.
• Clean the appliance with a damp cloth.
Never use harsh and abrasive cleaners,
scouring pad or steel wool, which damages
the appliance.
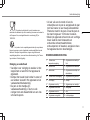
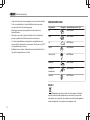
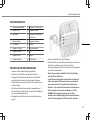
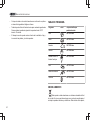
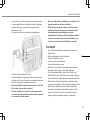
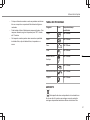
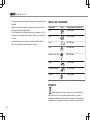
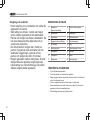
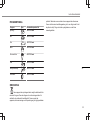
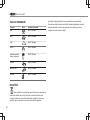
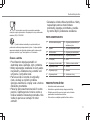
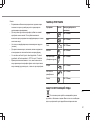
PARTS DESCRIPTION
1 Temperature control buttons 10 Aerofryer fries program
2 Power button 11 Roast program
3 Mode button 12 Shellfish/Crustaceans
program
4 Timer control buttons 13 Vegetables program
5 LCD display 14 Basket
6 Chicken program 15 Basket release button
7 Meat program 16 Handle
8 Fish program 17 Pan
9 Bake program 18 Air openings
BEFORE THE FIRST USE
• Remove all packaging material.
• Remove any stickers or labels from the appliance.
• Thoroughly clean the basket and the pan with hot water, some
washing-up liquid and a non-abrasive sponge.
• Wipe the inside and outside of the appliance with a moist cloth.
• Place the appliance on a stable, horizontal and level surface, do
not place the appliance on non-heat-resistant surfaces.
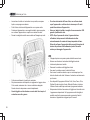
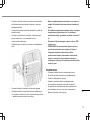
• Attach the handle to the basket as shown in the image below:
EN

Instruction manual
6
• Place the basket in the pan properly
• When the device is turned on for the first time, a slight odour will
occur. This is normal, ensure adequate ventilation. This smell is only
temporary and will soon fade.
•This is an air fryer that works on hot air. Do not fill the pan with
oil or frying fat.
•In order to prevent disruptions of the airflow do not put anything
on top of the appliance and make sure there is always 10
centimeter of free space around the appliance.
•Note: for baking chips we advise a maximum of 1500 grams to
get the best result.
•NOTE: After the baking process the appliance needs to cool
down, this cooling process will activate automatically when the
timer is done. Please avoid unplugging the appliance from the
net-socket before the cooling process is finished because the
remaining hot air can damage the appliance.
USE
• Put the mains plug in an earthed wall socket.
• Carefully pull the pan out of the air fryer.
• Put the ingredients in the basket.
• Slide the pan back into the air fryer.
• Never use the pan without the basket in it.
• Do not touch the pan during and some time after use, as it gets very
hot. Only hold the pan by the handle.
• There are 8 frying programs included: Chicken, Meat, Fish, Bake,
Aerofryer fries, Roast, Shellfish/Crustaceans and Vegetables. Use the
mode button to select the desired program.
• When you press the power button, the aerofryer will start the
corresponding program. When you have chosen the wrong program,
you can abort by pressing the power button again. The device will stop
after 20 seconds. After this you can select another function. It is also
possible to adjust the chosen program by changing the time and
temperature.
• The time can be adjusted with the timer control buttons. Press the
timer control buttons one time to increase or decrease the frying time
by one minute. Press and hold one of the buttons to adjust the time
faster. You can set the timer between 1 and 60 minutes.

Instruction manual
7
• The temperature can be adjusted with the temperature control
buttons. Press the temperature control buttons one time to
increase or decrease the temperature by 5 degrees. Press and
hold one of the buttons to adjust the temperature faster. You can
set the temperature between 80 and 200 degrees.
• It is also possible to start the device without selecting a function.
Set the time and temperature with the timer and temperature
control buttons, then press the power button.
• When you pull out the pan during the frying process, the device
will shut off automatically. When you reinsert the device, the
program will resume.
• To cancel any program, press the power button. The device will
shut off after 20 seconds.
• During the hot air frying process, the heating-up light will blink
during heating, when the set temperature is reached the heating-
up light will stay on continuously. When the temperature drops
below the set temperature the heating-up light will start blinking
again to maintain the set temperature.
• Excess oil from the ingredients is collected on the bottom of the
pan.
• Some ingredients require shaking halfway through the
preparation time. To shake the ingredients, pull the pan out of the
appliance by the handle and shake it. Then slide the pan back
into the air fryer. Do not press the basket release button during
shaking
• When you hear the timer beep, the set preparation time has
elapsed. The device will shut off after 20 seconds. Pull the pan
out of the appliance and place it on a heat-resistant surface.
• Check if the ingredients are ready. If the ingredients are not
ready yet, simply slide the pan back into the appliance and set
the timer to a few extra minutes.
• To remove small ingredients (e.g. fries), press the basket release
button and lift the basket out of the pan. Do not turn the basket
upside down with the pan still attached to it, as any excess oil
that has collected on the bottom of the pan will leak onto the
ingredients.
• Empty the basket into a bowl or onto a plate. When a batch of
ingredients is ready, the air fryer is instantly ready for preparing
another batch.
Tips
• Shaking smaller ingredients halfway during the preparation time
optimizes the end result and can help prevent unevenly fried
ingredients.
• Add some oil to fresh potatoes for a crispy result. Fry your
ingredients in the air fryer within a few minutes after you've added
the oil.
• Do not prepare extremely greasy ingredients such as sausages
in the air fryer.
• Place the baking tin in the basket if you want to bake a cake or
quiche or if you want to fry fragile ingredients or filled ingredients.
• You can also use the air fryer to reheat ingredients. To reheat
ingredients, set the temperature to 150°C for up to 10 minutes.
• Baking times may vary based on amount of fries, type of fries,
temperature and brand.
EN

Instruction manual
8
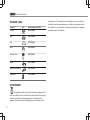
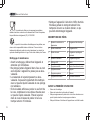
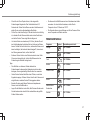
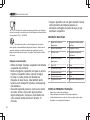
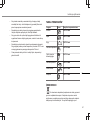
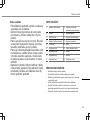
PROGRAM TABLE
Program Icon Default temperature/time
Chicken 180°C/25 min
Meat 180°C/15 min
Fish 180°C/20 min
Bake 160°C/40 min
Aerofryer Fries 200°C/20 min
Roast 180°C/15 min
Shellfish/Crustaceans 180°C/12 min
Vegetables 160°C/15 min
ENVIRONMENT
This appliance should not be put into the domestic garbage at the
end of its durability, but must be offered at a central point for the recycling
of electric and electronic domestic appliances. This symbol on the
appliance, instruction manual and packaging puts your attention to this
important issue. The materials used in this appliance can be recycled. By
recycling of used domestic appliances you contribute an important push to
the protection of our environment. Ask your local authorities for information
regarding the point of recollection.

Gebruiksaanwijzing
9
VEILIGHEID
• Als u de veiligheidsinstructies negeert, kan
de fabrikant niet verantwoordelijk worden
gehouden voor de mogelijke schade.
• Als het netsnoer beschadigd is, moet het
worden vervangen door de fabrikant, de
onderhoudsmonteur van de fabrikant of door
personen met een soortgelijke kwalificatie
om gevaar te voorkomen.
• Verplaats het apparaat nooit door aan het
snoer te trekken en zorg dat het snoer niet
in de war kan raken.
• Het apparaat moet op een stabiele, vlakke
ondergrond worden geplaatst.
• Dit apparaat is uitsluitend voor huishoudelijk
gebruik en voor het doel waar het voor
bestemd is. In het ergste geval kan het
voedsel vlam vatten. (Gebruik niet meer dan
één theelepel olie, geen vlees dat te veel vet
vrijgeeft of water dat bedoeld is om voedsel
te koken.)
• Dit apparaat mag niet worden gebruikt door
kinderen jonger dan 8 jaar. Dit apparaat kan
worden gebruikt door kinderen vanaf 8 jaar
en door personen met verminderde
lichamelijke, zintuiglijke of geestelijke
vermogens of gebrek aan de benodigde
ervaring en kennis indien ze onder toezicht
staan of instructies krijgen over hoe het
apparaat op een veilige manier kan worden
gebruikt alsook de gevaren begrijpen die
met het gebruik samenhangen. Kinderen
mogen niet met het apparaat spelen. Houd
het apparaat en het netsnoer buiten bereik
van kinderen jonger dan 8 jaar. Laat
reiniging en onderhoud niet door kinderen
uitvoeren, tenzij ze ouder zijn dan 8 jaar en
onder toezicht staan.
• Dompel het snoer, de stekker of het
apparaat niet onder in water of andere
vloeistoffen om elektrische schokken te
voorkomen.
• Het apparaat moet worden aangesloten op
een geaard stopcontact (voor klasse I-
apparaten).
• WAARSCHUWING: Indien het oppervlak is
gebarsten, schakel dan het apparaat uit om
elektrische schokken te voorkomen.
• Houd het apparaat en het netsnoer buiten
bereik van kinderen jonger dan 8 jaar.
• De temperatuur van de toegankelijke
oppervlakken kan hoog zijn wanneer het
apparaat in gebruik is.
NL

Gebruiksaanwijzing
10
• Het apparaat is niet bedoeld om bediend te
worden met behulp van een externe timer of
een afzonderlijk afstandbedieningssysteem.
• Oppervlakken gemarkeerd met dit
logo kunnen heet worden tijdens gebruik.
• Plaats niets boven op het apparaat en zorg
ervoor dat er altijd 10cm vrije ruimte rondom
het apparaat is om verstoring van de
luchtstroom te voorkomen.
• Na het bakken moet het apparaat afkoelen. Dit
koelproces wordt automatisch geactiveerd na
afloop van de timer. Verwijder de stekker pas
na voltooiing van het koelproces uit het
stopcontact, omdat de resterende hete lucht het
apparaat kan beschadigen.
• Dit apparaat is bedoeld voor huishoudelijk en
soortgelijk gebruik, zoals:
• Personeelskeukens in winkels, kantoren en
andere werkomgevingen.
• Door gasten in hotels, motels en andere
residentiële omgevingen.
• Bed&Breakfast-type omgevingen.
• Boerderijen.
BEWAAR DEZE INSTRUCTIES
ALLEEN VOOR HUISHOUDELIJK GEBRUIK
Het universele recyclingsymbool, -logo of -pictogram is een
internationaal erkend symbool dat wordt gebruikt om recyclebare
materialen aan te duiden. Het recyclingsymbool behoort tot het publieke
domein en is geen handelsmerk.
Dit product voldoet aan de conformiteitseisen van de
toepasselijke Europese verordeningen of richtlijnen.
Afgedankte elektrische producten mogen niet samen met
huishoudelijk vuil worden weggegooid. Gelieve te laten recyclen bij de
daartoe aangewezen faciliteiten. Neem contact op met uw gemeente of
plaatselijke winkel voor advies over recycling.
Het Euraziatische conformiteitsmerk (ЕАС) is een certificeringsmerk
om producten aan te duiden die voldoen aan alle technische voorschriften
van de Euraziatische douane-unie.

Gebruiksaanwijzing
11
Dit symbool wordt gebruikt voor het markeren van
materialen die bestemd zijn om in aanraking te komen met voedsel in
de Europese Unie, zoals gedefinieerd in verordening (EC) nr.
1935/2004.
Het product en de verpakkingsmaterialen zijn recyclebaar,
binnen de grenzen van de uitgebreide verantwoordelijkheid van de
fabrikant. Verwijder het gescheiden, volgens de geïllustreerde
verpakkingssymbolen, voor een betere afvalverwerking. Het Triman-
logo is alleen in Frankrijk geldig.
Reiniging en onderhoud
• Verwijder voor reiniging de stekker uit het
stopcontact en wacht tot het apparaat is
afgekoeld.
• Dompel het toestel nooit onder in water of
een andere vloeistof. Het apparaat is niet
vaatwasmachinebestendig.
• De pan en het mandje zijn
vaatwasserbestendig. U kunt ze ook
reinigen met wat afwasmiddel en een niet-
schurende spons.
• Vul als vuil aan de mand of aan de
onderzijde van de pan is aangekoekt de pan
met heet water en een beetje afwasmiddel.
Plaats de mand in de pan en laat de pan en
de mand ongeveer 10 minuten inweken.
• Maak het apparaat schoon met een vochtige
doek. Gebruik nooit krassende en
schurende schoonmaakmiddelen,
schuursponzen of staalwol, aangezien deze
het apparaat kunnen beschadigen.
ONDERDELENBESCHRIJVING
1 Toetsen voor
temperatuurregeling
10 Programma voor aerofryer-
friet
2 Aan/uit-toets 11 Programma voor braadstuk
3 Modustoets 12 Programma voor schelp- en
schaaldieren
4 Toetsen voor timerregeling 13 Programma voor groenten
5 Lcd-display 14 Mandje
6 Programma voor kip 15 Vrijgaveknop voor mandje
7 Programma voor vlees 16 Handgreep
8 Programma voor vis 17 Pan
9 Programma voor gebak 18 Luchtopeningen
NL

Gebruiksaanwijzing
12
VOOR HET EERSTE GEBRUIK
• Verwijder alle verpakkingsmateriaal.
• Verwijder eventuele stickers of etiketten van het apparaat.
• Reinig de mand en de pan grondig met heet water, wat afwasmiddel
en een niet-schurende spons.
• Reinig de binnenkant en de buitenkant van het apparaat met een
vochtige doek.
• Plaats het apparaat op een stabiele, horizontale en vlakke
ondergrond. Plaats het apparaat niet op een niet-hittebestendige
ondergrond.
• Bevestig het handvat aan de mand zoals op de onderstaande
afbeelding:
• Plaats de mand op de juiste wijze in de pan.
• Als het apparaat voor de eerste keer wordt aangezet, ontstaat een
lichte geur. Dit is normaal, zorg voor voldoende ventilatie. Deze geur is
maar tijdelijk en zal spoedig vervliegen.
•Dit is een heteluchtfriteuse die werkt op hete lucht. Vul de pan
niet met olie of frituurvet.
•Plaats niets boven op het apparaat en zorg ervoor dat er altijd 10
centimeter vrije ruimte rondom het apparaat is om verstoring van
de luchtstroom te voorkomen.
•Opmerking: voor een optimaal resultaat bij het bakken van friet
raden we aan maximaal 1500gram te gebruiken.
•LET OP: Na het bakken moet het apparaat afkoelen. Dit
koelproces wordt automatisch na afloop van de timer
ingeschakeld. Trek de stekker van het apparaat pas na voltooiing
van het koelproces uit het stopcontact. Dit omdat de resterende
hete lucht het apparaat kan beschadigen.
GEBRUIK
• Plaats de netstekker in een geaard stopcontact.
• Trek de pan voorzichtig uit de heteluchtfriteuse.
• Doe de ingrediënten in de mand.
• Schuif de pan terug in de heteluchtfriteuse.
• Gebruik de pan nooit zonder dat de mand erin is geplaatst.
• Raak de pan tijdens en enige tijd na gebruik niet aan. De pan wordt
zeer heet. Houd de pan uitsluitend bij de handgreep vast.
• Er zijn 8 bakprogramma's beschikbaar: Kip, Vlees, Vis, Gebak,
Aerofryer-friet, Braadstuk, Schelp- en schaaldieren en Groenten.
Gebruik de modustoets om het gewenste programma te selecteren.

Gebruiksaanwijzing
13
• Als u op de aan/uit-knop drukt, start de aerofryer het
bijbehorende programma. Als u het verkeerde programma hebt
gekozen, kunt u het programma afbreken door opnieuw op de
aan/uit-knop te drukken. Het apparaat wordt na 20 seconden
gestopt. Vervolgens kunt u een andere functie selecteren. U kunt
het gekozen programma ook wijzigen door de tijd en temperatuur
aan te passen.
• De tijd kan worden gewijzigd met de timerregelknoppen. Druk
eenmaal op de timerregelknoppen om de frituurtijd met één
minuut te verlengen of te verkorten. Houd een van de knoppen
ingedrukt om de tijd sneller te wijzigen. U kunt de timer tussen 1
en 60 minuten instellen.
• De temperatuur kan worden gewijzigd met de
temperatuurregelknoppen. Druk eenmaal op de
temperatuurregelknoppen om de temperatuur met 5 graden te
verhogen of te verlagen. Houd een van de knoppen ingedrukt om
de temperatuur sneller te wijzigen. U kunt de temperatuur
instellen tussen 80 en 200 graden.
• Het is ook mogelijk het apparaat te starten zonder een functie te
selecteren. Stel de tijd en de temperatuur in met de timer- en
temperatuurregelknoppen. Druk vervolgens op de aan/uitknop.
• Als u de pan tijdens het frituren verwijdert, schakelt het apparaat
automatisch uit. Als u het apparaat terugplaatst, zal het
programma hervatten.
• Druk om een programma te annuleren op de aan/uitknop. Het
apparaat schakelt na 20 seconden uit.
• Tijdens het heteluchtfrituren gaat de opwarmindicator tijdens het
opwarmen knipperen. Als de ingestelde temperatuur is bereikt,
gaat de opwarmindicator constant branden. Als de temperatuur
onder de ingestelde temperatuur daalt, gaat de opwarmindicator
weer knipperen om de ingestelde temperatuur in stand te
houden.
• Overtollige olie van de ingrediënten wordt verzameld op de
bodem van de pan.
• Sommige ingrediënten moeten halverwege de bereidingstijd
worden geschud. Trek de pan met de handgreep uit het apparaat
en schud de pan om de ingrediënten te schudden. Schuif
vervolgens de pan terug in de heteluchtfriteuse. Druk tijdens het
schudden niet op de mandontgrendelingsknop.
• Als de timer een piep laat horen, is de ingestelde bereidingstijd
verstreken. Het apparaat schakelt na 20 seconden uit. Trek de
pan uit het apparaat en plaats de pan op een hittebestendige
ondergrond.
• Controleer of de ingrediënten klaar zijn. Indien de ingrediënten
nog niet klaar zijn, schuif dan de pan terug in het apparaat en stel
met de timer nog een paar extra minuten in.
• Druk op de mandontgrendelingsknop en til de mand uit de pan
om kleine ingrediënten (bijv. friet) te verwijderen. Draai de mand
niet ondersteboven met de pan er nog aan vast. Eventuele
overtollige olie die zich heeft verzameld op de bodem van de pan
zal op de ingrediënten lekken.
• Leeg de mand in een kom of op een bord. Als een hoeveelheid
ingrediënten klaar is, is de heteluchtfriteuse direct klaar voor het
bereiden van een andere hoeveelheid.
Tips
• Het halverwege de bereidingstijd schudden van kleinere
ingrediënten verbetert het eindresultaat en kan ongelijkmatig
gefrituurde ingrediënten helpen voorkomen.
NL

Gebruiksaanwijzing
14
• Voeg wat olie toe aan verse aardappelen voor een krokant resultaat.
Frituur uw ingrediënten in de heteluchtfriteuse binnen een paar
minuten nadat u de olie heeft toegevoegd.
• Bereid geen extreem vette ingrediënten zoals worsten in de
heteluchtfriteuse.
• Plaats als u een cake of quiche wilt bakken of als u kwetsbare of
gevulde ingrediënten wilt frituren de bakvorm in de mand.
• U kunt de heteluchtfriteuse ook gebruiken om ingrediënten op te
warmen. Stel de temperatuur voor maximaal 10 minuten in op 150°C
om ingrediënten op te warmen.
• Baktijden kunnen variëren, afhankelijk van de hoeveelheid friet, het
type friet, de temperatuur en het merk.
PROGRAMMATABEL
Programma Pictogram Standaardtemperatuur/-tijd
Kip 180°C/25 min
Vlees 180°C/15 min
Vis 180°C/20 min
Gebak 160°C/40 min
Aerofryer-friet 200°C/20 min
Braadstuk 180°C/15 min
Schelp- en
schaaldieren
180°C/12 min
Groenten 160°C/15 min
MILIEU
Dit apparaat mag aan het einde van de levensduur niet bij het
normale huisafval worden gedeponeerd, maar moet bij een speciaal
inzamelpunt voor hergebruik van elektrische en elektronische apparaten
worden aangeboden. Het symbool op het apparaat, in de

Gebruiksaanwijzing
15
gebruiksaanwijzing en op de verpakking attendeert u hierop. De in
het apparaat gebruikte materialen kunnen worden gerecycled. Met
het recyclen van gebruikte huishoudelijke apparaten levert u een
belangrijke bijdrage aan de bescherming van ons milieu. Informeer bij
uw lokale overheid naar het inzamelpunt. NL

Manuel d'instructions
16
SÉCURITÉ
• Si vous ignorez les consignes de sécurité, le
fabricant ne peut être tenu pour responsable
des dommages.
• Si le cordon d'alimentation est endommagé, il
doit être remplacé par le fabricant, son
réparateur ou des personnes qualifiées afin
d'éviter tout risque.
• Ne déplacez jamais l'appareil en tirant sur le
cordon et veillez à ce que celui-ci ne s'enroule
pas.
• L'appareil doit être posé sur une surface stable
et nivelée.
• Cet appareil est uniquement destiné à des
utilisations domestiques et seulement dans le
but pour lequel il est fabriqué. Dans le pire des
cas, les aliments peuvent prendre feu.
(N'utilisez pas plus d'une cuillère à café d'huile,
aucune viande pouvant diffuser trop de graisse
ou d'eau pour l'ébullition des aliments.)
• Cet appareil ne doit pas être utilisé par des
enfants de moins de 8 ans. Cet appareil peut
être utilisé par des enfants de 8 ans ou plus et
des personnes présentant un handicap
physique, sensoriel ou mental voire ne
disposant pas des connaissances et de
l'expérience nécessaires en cas de surveillance
ou d'instructions sur l'usage de cet appareil en
toute sécurité et de compréhension des risques
impliqués. Les enfants ne doivent pas jouer
avec l'appareil. Maintenez l'appareil et son
cordon d'alimentation hors de portée des
enfants de moins de 8 ans. Le nettoyage et la
maintenance utilisateur ne doivent pas être
confiés à des enfants sauf s'ils ont 8 ans ou
plus et sont sous surveillance.
• Afin de vous éviter un choc électrique,
n'immergez pas le cordon, la prise ou l'appareil
dans de l'eau ou autre liquide.
• Branchez l'appareil sur une prise électrique
munie d'une connexion à la terre (pour les
appareils de catégorie I).
• AVERTISSEMENT: Si la surface est fissurée,
arrêtez l'appareil pour éviter tout risque de choc
électrique.
• Maintenez l'appareil et son cordon
d'alimentation hors de portée des enfants de
moins de 8 ans.
• La température des surfaces accessibles peut
devenir élevée quand l'appareil est en fonction.
• L'appareil n'est pas destiné à fonctionner avec
un dispositif de programmation externe ou un
système de télécommande indépendant.

Manuel d'instructions
17
• Les surfaces indiquées par ce
logo risquent de devenir chaudes à l'usage.
• Pour éviter les perturbations du flux d'air, ne
placez rien sur l'appareil et assurez-vous de
préserver systématiquement un
dégagement de 10 cm autour de l'appareil.
• Après le processus de cuisson, l'appareil
doit refroidir. Ce processus de
refroidissement s'active automatiquement
une fois la minuterie terminée. Évitez de
débrancher l'appareil du secteur avant la fin
du processus de refroidissement. L'air
chaud résiduel risquerait d'endommager
l'appareil.
• Cet appareil est destiné à une utilisation
domestique et aux applications similaires,
notamment:
• Coin cuisine des commerces, bureaux et
autres environnements de travail.
• Hôtels, motels et autres environnements de
type résidentiel.
• Environnements de type chambre d’hôtes.
• Fermes.
CONSERVEZ CES INSTRUCTIONS
USAGE DOMESTIQUE UNIQUEMENT
Le symbole, le logo ou l'icône universel de recyclage est un
symbole internationalement reconnu utilisé pour désigner les
matériaux recyclables. Le symbole du recyclage relève du domaine
public et n'est pas une marque déposée.
Ce produit est conforme aux exigences de conformité
des règlements ou directives européens en vigueur.
Les produits électriques usagés ne doivent pas être
jetés avec les ordures ménagères. Veuillez recycler là où les
installations sont disponibles. Vérifiez auprès des autorités locales ou
du magasin le plus proche pour obtenir des conseils sur le recyclage.
La marque de conformité eurasienne (ЕАС) est une marque de
certification destinée à indiquer les produits conformes à toutes les
réglementations techniques de l'Union douanière eurasienne.
FR

Manuel d'instructions
18
Ce symbole est utilisé pour le marquage des matériaux
destinés à entrer en contact avec les aliments dans l'Union Européenne,
tel que défini dans le règlement (CE) n° 1935/2004.
Le produit et les matériaux d'emballage sont recyclables, sous
réserve de la responsabilité étendue du fabricant. Par souci de bon
traitement des déchets, mettez-le au rebut séparément, en suivant les
symboles d'emballage illustrés. Le logo Triman n'est valable qu'en France.
Nettoyage et maintenance
• Avant le nettoyage, débranchez l'appareil et
attendez qu'il refroidisse.
• Ne plongez jamais l'appareil dans l'eau ou tout
autre liquide. L'appareil ne passe pas au lave-
vaisselle.
• La casserole et le panier passent au lave-
vaisselle. Ils peuvent également être nettoyés
avec un peu de liquide vaisselle et une éponge
non abrasive.
• Si de la saleté adhère au panier ou au fond de
la cuve, remplissez la cuve d'eau chaude avec
un peu de liquide vaisselle. Placez le panier
dans la cuve et laissez le panier et la cuve
tremper environ 10 minutes.
• Nettoyez l'appareil à l'aide d'un chiffon humide.
N'utilisez jamais de nettoyant abrasif ni de
tampon à récurer ou de laine d'acier, ce qui
pourrait endommager l'appareil.
DESCRIPTION DES PIÈCES
1 Boutons de contrôle de la
température
10 Programme frites Aerofryer
2 Bouton marche/arrêt 11 Programme Rôti
3 Bouton de mode 12 Programme coquillages et
crustacés
4 Boutons de minuterie 13 Programme légumes
5 Affichage LCD 14 Panier
6 Programme volaille 15 Bouton d'ouverture du panier
7 Programme viande 16 Poignée
8 Programme poisson 17 Friteuse
9 Programme de cuisson 18 Ouvertures d'aération
AVANT LA PREMIÈRE UTILISATION
• Retirez tout l'emballage.
• Retirez tout autocollant ou étiquette de l'appareil.
• Nettoyez soigneusement le panier et la cuve à l'eau chaude avec un
peu de liquide vaisselle et une éponge non abrasive.
• Nettoyez l'intérieur et l'extérieur de l'appareil avec un chiffon humide.

Manuel d'instructions
19
• Placez l'appareil sur une surface stable, horizontale et de niveau
et évitez les surfaces non thermorésistantes.
• Fixez l'anse au panier comme indiqué sur l'image ci-dessous :
• Placez le panier correctement dans la cuve.
• Lorsque l'appareil est allumé pour la première fois, une légère
odeur se dégage. Ceci est normal et gage d'une ventilation
adéquate. Cette odeur est temporaire et disparaîtra vite.
•Cette friteuse à air chaud fonctionne à l'air chaud. Ne
remplissez pas la cuve avec de l'huile ou de la graisse de
friture.
•Pour éviter les perturbations du flux d'air, ne placez rien sur
l'appareil et assurez-vous de préserver systématiquement un
dégagement de 10 cm autour de l'appareil.
•Remarque: pour les chips, nous conseillons un maximum
de 1500 grammes pour obtenir le meilleur résultat.
•NOTE: Après le processus de cuisson, l'appareil doit
refroidir. Ce processus de refroidissement s'active
automatiquement une fois la minuterie terminée. Évitez de
débrancher l'appareil du secteur avant la fin du processus
de refroidissement. L'air chaud résiduel risquerait
d'endommager l'appareil.
UTILISATION
• Branchez la fiche secteur dans une prise murale mise à la terre.
• Retirez prudemment la cuve de la friteuse à air chaud.
• Placez les ingrédients dans le panier.
• Glissez à nouveau la cuve dans la friteuse à air chaud.
• N'utilisez jamais la cuve sans le panier dedans.
• Ne touchez pas la cuve durant l'usage et ensuite pendant un
certain temps. Elle devient très chaude. Tenez la cuve
uniquement par la poignée.
• Il y a 8 programmes de cuisson inclus: Volaille, Viande, Poisson,
Cuisson au four, Frites Aerofryer, Rôti, Coquillages et crustacés
et Légumes. Utilisez le bouton de mode pour choisir le
programme souhaité.
• Lorsque vous appuyez sur le bouton Marche/Arrêt, l'aerofryer
démarre le programme correspondant. Si vous avez choisi le
mauvais programme, vous pouvez annuler en appuyant à
nouveau sur le bouton. L'appareil s'éteint après 20secondes.
Vous pourrez ensuite choisir une autre fonction. Il est également
possible de modifier le programme choisi en adaptant la durée et
la température.
FR

Manuel d'instructions
20
• La durée est réglable avec les boutons de minuterie. Appuyez sur les
boutons de minuterie une fois pour augmenter /réduire le temps de
friture d'une minute. Appuyez sur l'un des boutons sans le relâcher
pour accélérer le réglage de la durée. La minuterie est réglable entre 1
et 60 minutes.
• La température est réglable avec les boutons de thermostat. Appuyez
sur les boutons de température une fois pour augmenter /réduire la
température de 5 degrés. Appuyez sur l'un des boutons sans le
relâcher pour accélérer le réglage de température. La température est
réglable entre 80 et 200 degrés.
• Vous pouvez aussi démarrer l'appareil sans sélectionner une fonction.
Réglez la durée et la température avec les boutons de minuterie et de
thermostat puis appuyez sur le bouton d'alimentation.
• Si vous retirez la cuve durant le processus de friture, l'appareil s'éteint
automatiquement. Lorsque vous remettez l'appareil, le programme
reprend.
• Pour annuler un programme, appuyez sur le bouton d'alimentation.
L'appareil s'éteint après 20 secondes.
• Durant le processus de friture à air chaud, le témoin de chauffage
clignote durant le chauffage. Une fois la température réglée atteinte, le
témoin de chauffage reste allumé en continu. Lorsque la température
chute sous le niveau réglé, le témoin de chauffage recommence à
clignoter pour entretenir la température réglée.
• L'excès d'huile des ingrédients est recueilli au fond de la cuve.
• Certains ingrédients ont besoin d'être secoués à mi-temps de la
préparation Pour secouer les ingrédients, sortez la cuve de l'appareil
par la poignée et secouez-la. Puis glissez à nouveau la cuve dans la
friteuse à air chaud. N'appuyez pas sur le bouton de libération de
panier durant la secousse.
• Dès que le minuteur sonne, le temps de préparation réglé s'est
écoulé. L'appareil s'éteint après 20 secondes. Sortez la cuve de
l'appareil et placez-la sur une surface thermorésistante.
• Vérifiez si les ingrédients sont prêts. Si les ingrédients ne sont pas
encore prêts, glissez simplement à nouveau la cuve dans l'appareil et
ajoutez quelques minutes au minuteur.
• Pour retirer les petits ingrédients (ex. frites), appuyez sur le bouton de
libération de panier et sortez le panier de la cuve. Ne retournez pas le
panier avec la cuve encore fixée dessus. En effet, tout l'excès d'huile
recueilli au fond de la cuve risque de couler sur les ingrédients.
• Videz le panier sur un plat ou dans un bol. Dès qu'un lot d'ingrédients
est prêt, la friteuse à air chaud est prête instantanément pour la
préparation du lot suivant.
Conseils
• Secouer les petits ingrédients à mi-temps durant la préparation
optimise le résultat final et contribue à éviter la friture irrégulière des
ingrédients.
• Ajoutez de l'huile aux pommes de terre fraîches pour un résultat
croustillant. Faites frire vos ingrédients dans la friteuse à air chaud en
quelques minutes après avoir ajouté de l'huile.
• Évitez de préparer des ingrédients très graisseux comme les
saucisses dans la friteuse à air chaud.
• Placez le moule de cuisson dans le panier afin de cuire un gâteau ou
une quiche, voire pour frire des ingrédients fragiles ou farcis.
• Vous pouvez aussi utiliser la friteuse à air chaud pour réchauffer des
ingrédients. Pour réchauffer les ingrédients, réglez la température sur
150°C pendant un maximum de 10 minutes.
• Les durées de cuisson indiquées peuvent varier selon la quantité de
frites, le type de frites, la température et la marque.
Seite wird geladen ...
Seite wird geladen ...
Seite wird geladen ...
Seite wird geladen ...
Seite wird geladen ...
Seite wird geladen ...
Seite wird geladen ...
Seite wird geladen ...
Seite wird geladen ...
Seite wird geladen ...
Seite wird geladen ...
Seite wird geladen ...
Seite wird geladen ...
Seite wird geladen ...
Seite wird geladen ...
Seite wird geladen ...
Seite wird geladen ...
Seite wird geladen ...
Seite wird geladen ...
Seite wird geladen ...
Seite wird geladen ...
Seite wird geladen ...
Seite wird geladen ...
Seite wird geladen ...
Seite wird geladen ...
Seite wird geladen ...
Seite wird geladen ...
Seite wird geladen ...
Seite wird geladen ...
Seite wird geladen ...
Seite wird geladen ...
Seite wird geladen ...
Seite wird geladen ...
Seite wird geladen ...
Seite wird geladen ...
Seite wird geladen ...
Seite wird geladen ...
Seite wird geladen ...
Seite wird geladen ...
Seite wird geladen ...
Seite wird geladen ...
Seite wird geladen ...
Seite wird geladen ...
Seite wird geladen ...
Seite wird geladen ...
Seite wird geladen ...
Seite wird geladen ...
Seite wird geladen ...
Seite wird geladen ...
Seite wird geladen ...
Seite wird geladen ...
Seite wird geladen ...
Seite wird geladen ...
Seite wird geladen ...
Seite wird geladen ...
Seite wird geladen ...
Seite wird geladen ...
Seite wird geladen ...
Seite wird geladen ...
Seite wird geladen ...
Seite wird geladen ...
Seite wird geladen ...
Seite wird geladen ...
Seite wird geladen ...
-
 1
1
-
 2
2
-
 3
3
-
 4
4
-
 5
5
-
 6
6
-
 7
7
-
 8
8
-
 9
9
-
 10
10
-
 11
11
-
 12
12
-
 13
13
-
 14
14
-
 15
15
-
 16
16
-
 17
17
-
 18
18
-
 19
19
-
 20
20
-
 21
21
-
 22
22
-
 23
23
-
 24
24
-
 25
25
-
 26
26
-
 27
27
-
 28
28
-
 29
29
-
 30
30
-
 31
31
-
 32
32
-
 33
33
-
 34
34
-
 35
35
-
 36
36
-
 37
37
-
 38
38
-
 39
39
-
 40
40
-
 41
41
-
 42
42
-
 43
43
-
 44
44
-
 45
45
-
 46
46
-
 47
47
-
 48
48
-
 49
49
-
 50
50
-
 51
51
-
 52
52
-
 53
53
-
 54
54
-
 55
55
-
 56
56
-
 57
57
-
 58
58
-
 59
59
-
 60
60
-
 61
61
-
 62
62
-
 63
63
-
 64
64
-
 65
65
-
 66
66
-
 67
67
-
 68
68
-
 69
69
-
 70
70
-
 71
71
-
 72
72
-
 73
73
-
 74
74
-
 75
75
-
 76
76
-
 77
77
-
 78
78
-
 79
79
-
 80
80
-
 81
81
-
 82
82
-
 83
83
-
 84
84


Princess 01.182060.01.001 Benutzerhandbuch
- Typ
- Benutzerhandbuch
in anderen Sprachen
- français: Princess 01.182060.01.001 Manuel utilisateur
- español: Princess 01.182060.01.001 Manual de usuario
- italiano: Princess 01.182060.01.001 Manuale utente
- slovenčina: Princess 01.182060.01.001 Používateľská príručka
- português: Princess 01.182060.01.001 Manual do usuário
- polski: Princess 01.182060.01.001 Instrukcja obsługi
Verwandte Artikel
-
Princess 01.182050.01.001 Benutzerhandbuch
-
-
-
Princess Digital Aero Oil Free Fryers Benutzerhandbuch
-
-
Princess 182020 Benutzerhandbuch
-
-
-
-