Audio System R200-FL Benutzerhandbuch

Typ
Benutzerhandbuch
R200 FL FREAAIR / R200 FREEAIR
ANLEITUNG / USER MANUAL
Abb.: AX 08 FLAT EVO
2x AS200 bei / at R200 FREAIR EVO2
2x AX08 FLAT bei / at R200 FL FREEAIR EVO2
2x HS24 PA
8x SCREW3.5X20
2x FWR EVO2
Vielen Dank
Thank You
Wir beglückwünschen Sie zum Erwerb eines hochwertigen
AUDIO SYSTEM Produktes inkl. GERMAN SOUND.
Wichtig: Lesen Sie diese Bedienungsanleitung vor der
Installation und Inbetriebnahme des Gerätes vollständig
durch.
Achtung: Beachten Sie die Vorschriften und Hinweise
Ihres Automobilherstellers und achten Sie beim
Anschließen auf die richtige Polarität.
Wichtig: Ihr Kaufbeleg dient als Garantienachweis für
etwaige Reparaturen oder Austausch. Heben Sie Ihren
Kaufbeleg, diese Bedienungsanleitung und die
Originalverpackung sorgfältig auf.
Achtung: Der Gebrauch von Musikanlagen kann das
Hören von wichtigen Verkehrsgeräuschen behindern.
AUDIO SYSTEM GERMANY übernimmt keine
Verantwortung für Gehörschäden, körperliche Schäden
oder Sachschäden, die aus dem Gebrauch oder
Missbrauch seiner Produkte entstehen. Wir empfehlen
Ihnen, die Installation von einer Fachwerkstatt /
Einbauspezialist vornehmen zu lassen, da ein
fachgerechter Einbau und Anschluss die Voraussetzung
für ein klanglich perfektes Ergebnis ist.
Congratulations on purchasing a high-quality
AUDIO SYSTEM product incl. GERMAN SOUND.
Important: Completely read this operating instruction
before installation and use of the device.
Attention: Pay attention to advice and instructions of the
car manufacturer. Check the polarity when connecting the
speakers.
Important: You will need your purchase receipt as proof of
purchase for all warranty repairs and for insurance
purposes. Keep your receipt, owner´s manual and packing
materials in a safe location for possible future use.
Attention: Use of sound components can impair your
ability to hear necessary traffic sounds and may constitute
a hazard while driving your automobile. AUDIO
SYSTEM GERMANY accepts no liability for hearing
loss, bodily injury or property damage as a result of use or
misuse of our products.
We recommend installing the equipment by an authorized
service center or dealer. A professional fitting and
connection is the requirement for further warranty and
perfect sound.
Frequenzweiche FWR EVO2
Crossover FWR EVO2
Wichtig: Das Lautsprechersystem lässt sich an die
jeweilige Akustik des Fahrzeuges, Musikrichtung und an
den persönlichen Geschmack über die Frequenzweiche
anpassen. Je nach Lage der Lautsprecher kann die
Weiche so eingestellt werden, dass der Frequenzgang mit
diesen geometrischen Gegebenheiten optimiert wird. Je
nach Installationsort des Hochtöners ist es nötig, den
Frequenzgang tonal sowie den Lautstärkepegel
anzupassen, z.B. bei einer Montage des Hochtöners in der
A-Säule, im Spiegeldreieck oder in der Türverkleidung.
Important: The speaker system can be adapted to the
acoustics of the vehicle, the genre of music and to the
personal taste via the crossover. Depending on the
position of the speakers, the switch can be adjusted so
that the frequency response is optimized with these
geometric conditions. Depending on the installation
location of the tweeter, it is necessary to adjust the
frequency response tonal and volume technology, e.g.,
when mounting the tweeter in the A-pillar, in the mirror
triangle or in the door trim.
R-Series ANLEITUNG / USER MANUAL
Achtung: Die Weiche wird in einer Grundeinstellung
ausgeliefert. Sollte ein Lautsprecher einmal nicht
funktionieren, viel zu leise spielen oder sich klanglich
verfärbt anhören, muss die Weiche wieder in diese
Grundeinstellung gestellt werden, um sicher zu gehen,
dass nicht die Weicheneinstellung für die Probleme
verantwortlich ist und Ihr Fachhändler nicht unnötig nach
einem Fehler an einem Lautsprecher sucht.
Attention: The crossover is supplied with a default setting.
If some speakers do not work or work too much softly as
bad sounding, the crossover must be adjusted again to the
basic settings in order to clarify if mistakes on crossover
setting is the real defect reason or not. Thus, you can
avoid that you or the dealer must check the speaker
unnecessarily.
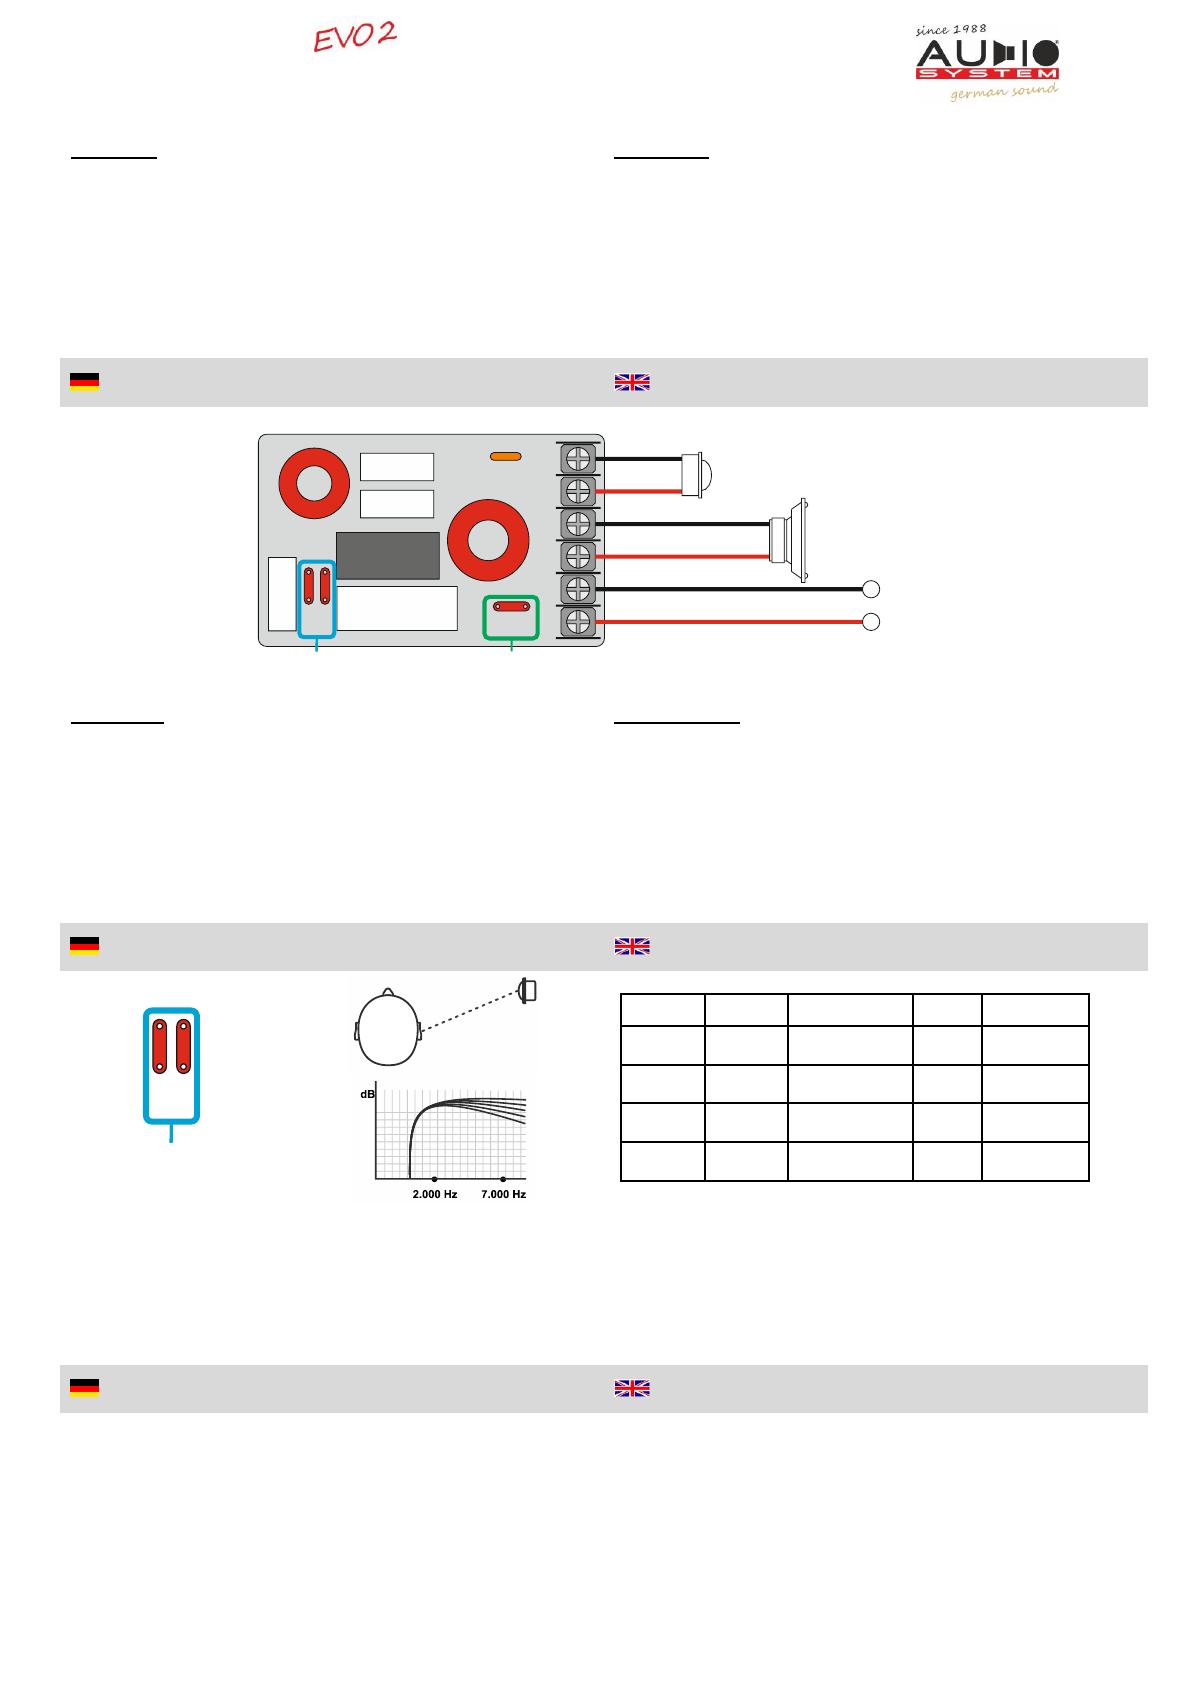
Grundeinstellung Frequenzweiche FWR EVO2
Default Setting Crossover FWR EVO2
WICHTIG: Die Weiche wird in einer Grundeinstellung
ausgeliefert. Sollte ein Lautsprecher einmal nicht
funktionieren, viel zu leise spielen oder sich klanglich
verfärbt anhören, muss die Weiche wieder in diese
Grundeinstellung gestellt werden, um sicher zu gehen,
dass nicht die Weicheneinstellung für die Probleme
verantwortlich ist und Ihr Fachhändler nicht unnötig nach
einem Fehler an einem Lautsprecher sucht.
IMPORTANT: The crossover is supplied with a default
setting. If some speakers do not work or work too much
softly as bad sounding, the crossover must be adjusted
again to the basic settings in order to clarify if mistakes on
crossover setting is the real defect reason or not. Thus,
you can avoid that you or the dealer have to check the
speaker unnecessarily.
Anpassung des Hochtonpegels (SECTION A)
HIGH FREQUENCY LEVEL (SECTION A)
-6dB
-3dB
SECTION A
-3dB
-6dB
Resultat
dB
RESULT
-
-
etwas lauter
0 dB
slightly
higher
JUMPER
-
Grundeinstellu
ng
-3,0 dB
basic setting
-
JUMPER
etwas leiser
- 6,0
dB
a little softer
JUMPER
JUMPER
noch leiser
- 9,0
dB
more soft
Je nach Installationsort des Hochtöners ist es nötig, den
Pegel anzupassen, z.B. bei einer Montage des
Mitteltöners im Fußraum und des Hochtöners auf dem
Armaturenbrett. Ohne Pegelabsenkung wären die
Hochtöner zu laut. Natürlich kann die Weiche auch auf die
persönliche Vorstellung der Hochtonlautstärke oder
Musikrichtung eingestellt werden.
Depending on the installation position of the tweeter, you
have to adapt the level, example: if the woofer is installed
in the feet area while the tweeter is installed on the
dashboard. Without level decrease, the tweeter could be
too loud. The crossover is adjustable exactly to your
personal idea for tweeter volume or music trend.
Flankensteilheit im Mitteltonbereich (SECTION B)
Woofer Cut Slope (SECTION B)
Je nach Einbauposition und Größe des Mitteltöners ist es
sinnvoll, ihn nach oben zu begrenzen (6 oder 12 dB).
Kleinere Lautsprecher oder weiter oben installierte sollten
mit 12 dB begrenzt werden. Aber auch ein 165mm
Lautsprecher kann durch eine 12 dB Schaltung eine
Pegelanhebung vor seiner Übernahmefrequenz
bekommen, wodurch im Auto übliche Senken bei der
Übernahmefrequenz angeglichen werden können.
Ausprobieren und hören bzw. messen (MICRO AS) ist
hier sinnvoll!
It is useful, depending on installation position and speaker
size, to limit the higher frequencies up to 6 dB or 12 dB.
Especially smaller speakers, or those installed more above
should be limited. In contrast, a 165 mm speaker can also
be affected to get a level increase with the 12 dB circuit
around his cutting frequency. Result can be a better
efficiency under the cutting frequency. The best is to
listen or measure it with MICRO AS.
R-Series ANLEITUNG / USER MANUAL
ON=12dB
OFF=6dB
SECTION B
Montage Tips
Mechanical Installation Tip
WARNUNG: Trennen Sie vor der Montage den Masse-Pol
(-) von der Fahrzeugbatterie. Kontrollieren Sie alle
Anschlüsse auf richtige Polung, dies kann sonst zu
Kurzschlüssen an der Fahrzeugelektrik führen. Die besten
Einbaupositionen sind die Originalplätze zwecks
Originalität und einfacher Montage. Beachten Sie, dass die
Lautsprecher plan und stabil eingebaut werden. Die
Qualität des Einbaues entscheidet sehr stark das
Klangbild, daher sollte auf Dämmung und Sorgfalt bei der
Installation geachtet werden. Beachten Sie, dass die
Lautsprecher vor Hitze, Sonneneinstrahlung,
mechanischen Einflüssen, Feuchtigkeit und Nässe durch
Zubehör von AUDIO SYSTEM geschützt sind.
ACHTUNG: Verlegen Sie Ihre Kabel so, dass diese nicht
gequetscht werden oder über scharfe Kanten verlaufen.
Dies kann zu Kurzschlüssen mit Beschädigungen führen.
Vorsicht: Beim Entfernen von Innenverkleidungen können
Befestigungsteile beschädigt werden, diese müssen Sie
ersetzen.
Wichtig: Die richtige Polarität der Lautsprecher
zueinander beeinflusst das Klangbild entscheidend. Dies
können z.B. durch gemeinsames Verpolen der Hochtöner
verbessert werden.
Ausprobieren und hören bzw. messen ist hier sinnvoll!
Warning: First disconnect negative pole of your car
battery. Check-polarity, changing polarity may cause
serious damage to your car electric. Best speaker
positions are the original build in positions. Easy
installation and original look are the reasons.
Please note that the speakers are installed flat and stable.
The quality of the installation decides the sound very
much, therefore, attention should be paid to insulation and
care during installation. Please note that the speakers are
protected from heat, sunlight, mechanical influences,
moisture and wetness by accessories from AUDIO
SYSTEM.
Attention: Install all cables as straight as possible without
squashing or laying them over sharp edges. Otherwise,
this can cause short circuit or damages to your whole
installation.
Attention: Be careful removing original plastic parts of
your car. The fitting parts could be damaged and must be
replaced.
Important: The right polarity of all speakers is extremely
important for the sound of your car audio system. We
recommend changing polarity of the tweeter finding out the
best possible sound.
The best is to listen and/or to measure it.
Optionales Einbauzubehör
Optional Mounting Accessories
- ALUBUTYL 1500, 2000 EVO, 3000 EVO und ALU 250 EVO
selbstklebende Dämmmatten
- Dämmung: DOORKIT 1.0 und DOORKIT 2.0
- Z-(T)SC 0.75, 1.5, 2.5, 4.0 Lautsprecherkabel
- Zu empfehlende Verstärker: CARBON-130.2, CO-100.2,
X-150.2 D oder M-100.2 MD
- ALUBUTYL 1500, 2000 EVO, 3000 EVO und 4000,
ALU 200 EVO Self Adhesive Damping Material
- Damping: DOORKIT 1.0 and DOORKIT 2.0
- Z-(T)SC 0.75, 1.5, 2.5, 4.0 Oxygen-Free Speaker Cable
- Recommended amplifiers: CARBON-130.2, CO-100.2,
X-150.2 D or M-100.2 MD
www.audio-system .de
audio system germany - falltorstrasse 6 - 76707 hambrückeN
SECtion B
Result
Jumper
12 dB(Basic)
-
6 dB
  • Page 1 1
  • Page 2 2
  • Page 3 3
  • Page 4 4

Audio System R200-FL Benutzerhandbuch

Typ
Benutzerhandbuch

in anderen Sprachen