Ingo Maurer Eclipse Ellipse Bedienungsanleitung
- Typ
- Bedienungsanleitung

Eclipse Ellipse Instructions
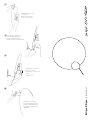
Gewindemutter kontern
Lock the nut
Bloquer l’écrou leté
Fissare il controdado
Lichtelement anbringen
Place the lighting element
Placer l’élément lumineux
Applicare l’elemento illuminante
Kabelstecker einstecken
Plug in the cable
Brancher le connecteur de
câble
Inserire il cavo
Lichtelement verstellen
Adjust the lighting element
Ajuster l’élément lumineux
Regolazione dell’elemento
illuminante
⑦
⑧
⑨
⑩

Elektroanschluss / Electrical connection / Raccordement élec-
trique /
Collegamento elettrico
Scheibe positionieren / Positioning the disc / Positionner le
disque / Posizionare il disco
MONTAGE / ASSEMBLY / MONTAGE / MONTAGGIO
1
Abdeckplatte anschrauben / Fixing the cover plate / Visser la
plaque de recouvrement / Avvitare la piastra di copertura
3
Kugelgelenk positionieren / Inserting the ball joint /
Positionner l’articulation à rotule / Posizionare il giunto a sfera
2
3
Scheibe im Uhrzeigersinn eindrehen / Screw the disc in clock-
wise / Tourner le disque dans le sens des aiguilles d’une montre /
Avvitare il disco in senso orario
①
②
③
④
⑤
⑥

Bitte vor Inbetriebnahme aufmerksam lesen und aufbewahren.
Bitte nehmen Sie die Leuchte vorsichtig aus der Verpackung.
Entfernen Sie die Kabelbinder und wickeln Sie die Kabel vollständig ab.
Montage und Elektroanschluss müssen von einer Elektrofachkraft
ausgeführt werden.
Wichtig: Schalten Sie die Sicherung des Wandauslasses vor der
Montage aus. Achten Sie unbedingt auf den Verlauf von Elektroleitungen
in der Wand damit auf keinen Fall ein Kabel angebohrt wird.
Montieren Sie nicht auf feuchtem und leitendem Untergrund!
Montage
① 4 Bohrlöcher bohren und –je nach Beschaffenheit der Wand–
4 geeignete Dübel einsetzen. Wanddose (1) festschrauben.
② Leiter und Null-Leiter des Wandauslasses in der Lüster-
klemme anschließen, dabei die Markierungen N, L beachten.
Der Schutzleiter liegt in der Mitte!
③ Die Gewindebuchse des Kugelgelenks (2) in die Öffnung der
Abdeckplatte (3) stecken ...
④ ... und die Abdeckplatte am Baldachin befestigen. Die drei
Schrauben nur von Hand anziehen, gerade so fest, dass sich
die Gewindebuchse nicht mehr bewegen lässt. Keinen Akku-
schrauber verwenden!
⑤ Die Scheibe aufsetzen und im Uhrzeigersinn eindrehen.
Prüfen, ob die Reibung des Kugelgelenks ausreichend ist:
Falls notwendig, die 3 Schrauben noch einmal nachziehen
(bzw. lockern).
⑥ Die Scheibe bis zum Anschlag in die Gewindebuchse ein-
drehen.
⑦ Die Gewindemutter kontern, d.h. mit beiliegendem Schrau-
benschlüssel nach unten festziehen, dabei die Scheibe fest-
halten.
⑧ Den Magneten des Lichtelements an gewünschter Position
auf die Rückseite der Scheibe setzen.
⑨ Das Kabel des Lichtelements in der Buchse an der Wanddose
einstecken.
⑩ Das Lichtelement kann um ca. 30° geneigt werden.
P ege
Reinigen Sie die Leuchte mit einem trockenen Mikrofasertuch.
Verwenden Sie keine lösungsmittel- oder chlorhaltigen Reinigungsmittel.
Technische Daten
200-240/100-125 V, 50/60 Hz. Sekundär 35V DC.
12 ,5W LED, 0,98 cosᵩ, Nennstrom 350 mA, 1120 lm, 2700 K,
CRI 97 Ra, dimmbar.
Aktuelle Empfehlungen zu kompatiblen Dimmern entnehmen Sie
bitte unserer Internetseite:
https://www.ingo-maurer.com/de/produkte/eclipse-ellipse
Enthält eingebaute LED Lichtquellen der Energieklasse F (A-G).
Die Lichtquelle und das Betriebsgerät können nicht vom Nutzer
ausgetauscht werden, aber von Fachleuten. Die LED hat eine
Lebensdauer von ca. 25 000 Stunden (Herstellerangabe).
Ein defektes Vorschaltgerät / Kabel / LED muss als
Elektroschrott entsorgt werden und darf nicht in den
Hausmüll gelangen.
Eventuell notwendige Reparaturen dürfen nur von einer
Elektrofachkraft durchgeführt werden. Bei Schäden, die durch
Nichtbeachten dieser Bedienungsanleitung, unsachgemäßer
Inbetriebnahme und/oder baulicher Veränderung z. B. durch
Fremdbauteile, Handhabung oder Fremdeingriff verursacht werden,
erlischt der Garantieanspruch.
Ingo Maurer GmbH Kaiserstrasse 47 80801 München Germany T. +49. 89. 381606-0 F. +49. 89. 381606-20 info@ingo-maurer.com www.ingo-maurer.com
Deutsch English
Please read these instructions carefully and keep them in a safe
place for future reference.
Please take the lamp carefully out of the packaging. Remove the
cable ties and unwind the cables completely.
The lamp assembly and all electrical work must be carried out by a
qualified electrician.
Important: Switch off or remove the fuse for the wall outlet
before beginning the assembly.
Take care to ascertain the exact position of all electrical wiring in
the wall so as to avoid accidentally drilling into a cable.
Do not attach the lamp to a damp and/or conductive surface!
Assembly
① Drill 4 holes and insert 4 plugs according to the material and
stability of the wall. Firmly x the box (1) to the wall.
② Attach the phase and neutral wires to the contacts marked N
and L in the terminal. The earth lead is in the middle!
③ Insert the threaded bushing (2) of the ball joint into the open-
ing of the cover plate (3) ...
④ ... and x the cover plate at the box. Tighten the 3 screws
only by hand, just so that the threaded bushing cannot be
moved anymore. Do not use a cordless screwdriver!
⑤ Fit the disc and turn it clockwise. Check if the friction of the ball
joint is suf cient: If necessary, tighten the 3 screws again (or relax).
⑥
Screw the disc into the threaded bush until it stops.
⑦
Locking the nut: Hold the disc while tightening the nut clock-
wise with the provided wrench.
⑧
Place the magnet of the light element at the desired position
on the back of the disc.
⑨ Plug the cable of the light element into the socket on the wall box.
⑩ The light element can be tilted by about 30°.
Cleaning
The lamp can be cleaned with a dry micro ber cloth. Do not use
cleaning agents containing solvents or chlorine.
Technical specification
220-240/100-125 V, 50/60 Hz. Secondary 35V DC.
12,5 W LED, 0.98 cosᵩ, rated current 350 mA, 1120 lm, 2700 K,
CRI 97 Ra, dimmable.
For current recommendations on compatible dimmers, please visit
our website:
https://www.ingo-maurer.com/en/products/eclipse-ellipse
This luminaire contains LED lightsources of the energy class F
(A-G). The light source and the powersupply cannot be replaced by
the user, but by experts. According to the manufacturer, the LED
has an average life of 25 000 hours.
A defective Ballast, cable or LED must be disposed as
electronic scrap, it must not get into domestic waste.
Any repairs that may become necessary must be carried out by a
quali ed electrician.
The legal and contractual warranty for defects and product
liability will be void, Should the installation instructions not be duly
followed or non-original components be employed.

Design: Ingo Maurer 2017
Français Italiano
À lire attentivement avant l‘utilisation et à conserver.
Veuillez sortir la lampe soigneusement de son emballage. Retirer les
attaches de câble et déroulez complètement les câbles. Le monta-
ge et le branchement électrique sont à effectuer par un électricien.
Important: Déconnecter le fusible contrôlant l‘arrivée du courant
mural avant le montage!
Il est indispensable de respecter le positionnement des conduites
électriques dans le mur pour éviter de percer un câble électrique!
Ne pas installer sur une surface humide et/ou conductrice!
Montage
① Percer 4 trous de perçage et –selon la nature du mur– installer
4 chevilles appropriées. Visser fermement le boîtier mural. (1).
②
Brancher le conducteur et le conducteur neutre contrôlant
l’arrivée du courant au mur dans le domino, bien respecter le
marquage N, L.
Le conducteur de protection est placé au milieu!
③
Enfoncer la douille letée de l’articulation à rotule (2) dans
l’ori ce de la plaque de recouvrement (3) ...
④ ... et xer la plaque de recouvrement au baldaquin. Serrer les
trois vis uniquement manuellement, le plus fermement possible,
de façon à ce que la douille letée ne bouge plus. Ne pas
utiliser de tournevis électrique!
⑤
Placer le disque et tourner le dans le sens des aiguilles d’une
montre. Véri er que la friction de l’articulation à rotule soit
suf sante: Si nécessaire, resserrer (ou desserrer) de nouveau
les 3 vis.
⑥
Tourner le disque jusqu’à la butée dans la douille letée.
⑦
Bloquer l’écrou leté, càd serrer avec la clé de serrage jointe
vers le bas, en tenant fermement le disque.
⑧ Poser l‘aimant de l’élément lumineux à la position souhaitée
sur la face arrière du disque.
⑨ Branchez le câble de l'élément lumineux dans la prise du
boîtier mural.
⑩ L‘élément lumineux peut être basculé à env. 30°.
Entretien
Nettoyer la lampe avec un chiffon à micro bre sec. Ne pas utiliser
de solvants ou de détergents à base de chlore!
Données techniques
220-240/100-125 V, 50/60 Hz. Secondaire 35V DC
12,5 W LED, 0,98 cosᵩ, courant nominal 350 mA, 1120 lm, 2700 K,
CRI 97 Ra, dimmable.
Veuillez s‘il vous plaît consulter sur notre site Internet nos
recommandations actuelles sur les variateurs compatibles:
https://www.ingo-maurer.com/fr/produits/eclipse-ellipse
Le luminaire contient des sources lumineuses de la classe énergétique
F (A-G). La source lumineuse et l‘appareillage ne peuvent pas être
remplacés par l‘utilisateur, mais par des professionnels. La LED à une
durée de vie d‘env. 25 000 heures (données du fabricant).
Un LED, ballast ou cables défectueux devra être jeté avec
des déchets électroniques, ne pas les jeter avec vos ordures
ménagères.
Des réparations éventuellement nécessaires ne doivent être
effectuées que par un spécialiste.La garantie légale et contractuelle
pour les défauts et la responsabilité pour les dommages causés
par des produits défectueux, expireront en cas de dommages
ou de ré- clamations résultant du non-respect des instructions
d‘installation et/ou des modifications Structurelles, en particulier si
des composants non originaux sont utilisés.
Prima della messa in funzione leggere attentamente le presenti
istruzioni e conservarle per futuro riferimento.
Con entrambe le mani estrarre cautamente la lampada
dall’imballaggio. Rimuovere le fascette per cavi e svolgere
completamente i cavi. Il montaggio e il collegamento alla rete
devono essere effettuati da un elettricista.
Importante: Prima del montaggio staccare la corrente dell’uscita
della corrente sul muro! Fare attenzione al percorso delle linee di
alimentazione, per evitare di danneggiare un cavo.
Non montare su super ci umide e/o conduttrici di corrente!
Montaggio
① Effettuare quattro fori e inserire –a seconda del tipo di parete–
4 tasselli adatti. Avvitare il scatola a muro (1).
② Collegare fase e neutro dell’uscita della corrente alla parete
nella morsettiare, facendo attenzione alle marcature N, L.
La terra deve essere collegata al centro!
③
Inserire la boccola lettata del giunto a sfera (2) nell’apertura
della piastra di copertura (3) ...
④ ... e ssare la piastra di copertura al rosone. Serrare le tre
viti esclusivamente a mano, solo al punto, in cui la boccola
lettata non si lascia più muovere, non oltre. Non impiegare
un avvitatore a batterie!
⑤
Applicare il disco e avvitarlo girando in senso orario.
Controllare, se l’attrito del giunto a sfera è suf ciente.
Se necessario, serrare ulteriormente (o allentare) le 3 viti.
⑥
Avvitare il disco no all’arresto nella boccola lettata.
⑦ issare il controdado, cioè stringerlo verso il basso con
l’inclusa chiave per dadi, e allo stesso tempo tenere fermo
il disco.
⑧
Applicare la calamita dell’elemento luminoso sul retro del
disco nella posizione desiderata.
⑨ Collegare il cavo dell'elemento luminoso alla presa sulla
scatola a muro.
⑩ L’elemento illuminante è basculante di circa 30°.
Cura
Pulire la lampada con un panno asciutto in micro bra. Non usare
solventi o prodotti contenenti cloro.
Dati tecnici
220-240/100-125 V, 50/60 Hz. Secondario 35V DC.
12,5 W LED, 0,98 cosᵩ, corrente 350 mA, 1120 lm, 2700 K,
CRI 97 Ra, dimmerabile.
Per raccomandazioni relative a dimmer compatibili consultare il
nostro sito:
https://www.ingo-maurer.com/it/prodotti/eclipse-ellipse
L‘apparecchio contiene sorgenti luminose della classe energetica F
(A-G). La sorgente luminosa e l‘alimentatore non possono essere
sostituiti dall‘utente, ma da esperti. I LED hanno una durata di vita
di ca. 25 000 ore (Dichiarazione del produttore).
Un LED, trasformatore o cavo difettoso è da considerarsi un rifi-
uto elettrici e non deve essere smaltito con i rifi uti domestici.
Eventuali riparazioni possono essere effettuate esclusivamente
da un elettricista. In caso di danni causati dall‘inosservanza delle
presenti istruzioni d‘uso, da una messa in servizio e/o da una modi-
fica costruttiva non corretta, ad es. a causa di componenti estranei,
manipolazione o interferenze esterne, Il diritto alla garanzia decade.
Stand November 2021
Made in Germany
-
 1
1
-
 2
2
-
 3
3
-
 4
4


Ingo Maurer Eclipse Ellipse Bedienungsanleitung
- Typ
- Bedienungsanleitung
in anderen Sprachen
Verwandte Artikel
-
Ingo Maurer Max. Kugler Bedienungsanleitung
-
-
-
-
-
-
-
-
-