Alphacool ACTIVE BACKPLATE 3090 FTW Eisblock Aurora GPX-N Acrylic Active Backplate Benutzerhandbuch
- Typ
- Benutzerhandbuch

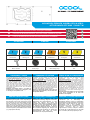
COMPATIBILITY CHECK KOMPATIBILITÄT PRÜFEN VÉRIFICATION DE COMPATIBILITÉ
Before starting the cooler assembly, compare your
card with the pictures in our congurator. To do so,
visit https://www.hwcong.com and search for your
graphics card or cooler model. For a denitive
identication, you can also compare the PCB number.
The cooler was designed for a special PCB layout.
Occasionally, graphics card manufacturers may
revise the design of their card slightly, causing the
cooler not to t on later models. During assembly,
please make sure taller parts have enough space
around them and that the cooler does not damage
your graphics card.
Alphacool International GmbH is not liable for
assembly errors occurring due to negligence, such
as selecting an incompatible cooler.
Bevor Sie mit der Montage des Kühlers beginnen,
vergleichen Sie Ihre Platine mit den Fotos in
unserem Kongurator. Besuchen Sie dafür
https://www.hwcong.com und suchen Sie nach
Ihrem Grakkarten- oder Kühlermodell. Zur
eindeutigen Zuordnung kann dort auch die PCB
Nummer verglichen werden. Der Kühler wurde für
ein spezielles PCB Layout konstruiert. Es kommt
vor, dass Grakkartenhersteller über Revisionen den
Aufbau leicht abändern und der Kühler auf spätere
Modelle nicht mehr passt. Achten Sie auch bei der
Montage darauf, dass hohe Bauteile frei liegen und
der Kühler die Grakkarte nicht beschädigt.
Alphacool International GmbH haftet nicht bei
fahrlässigen Montagefehlern, wie die Wahl eines
inkompatiblen Kühlers.
Avant de commencer l'assemblage du refroidisseur,
comparez votre carte avec les images de notre
congurateur. Pour ce faire, visitez
https://www.hwcong.com et cherchez votre carte
graphique ou votre modèle de refroidisseur. Pour une
identication précise, vous pouvez également
comparer le numéro de la PCB. La refroidisseur a été
conçu pour une disposition spéciale du PCB. Il est
possible que le fabricant change des détails dans la
disposition de ses composants lors d’une révision et
que le bloc de refroidissement ne soit plus
compatible. Veillez lors de l’installation au fait que les
composants hauts ne touchent pas le bloc de
refroidissement et que le bloc n’endommage pas la
carte graphique.
Alphacool International GmbH n’est pas responsable
ni des erreurs d’installation ni du choix d’un
refroidisseur incompatible.
ACCESSORIES ZUBEHÖR ACCESSOIRES
Lisez les instructions de sécurité avant de commencer l‘installation.
FR
!
DE Lesen Sie die Sicherheitshinweise, bevor Sie mit der Installation beginnen.
!
EN Read the safety instructions before starting the installation.
!
ALPHACOOL EISBLOCK AURORA GPX-N ACRYL
ACTIVE BACKPLATE 3080 / 3090 FTW
PREPARE GRAPHICS CARD GRAFIKKARTE VORBEREITEN PRÉPARER LA CARTE GRAPHIQUE
Put the hardware on an antistatic mat. Begin
dismantling the original cooler. Depending on
the structure of the cooler, remove the screws
at the back of the card and carefully unhook
the fan connector rst. If the original cooler
uses thermal glue, extreme care should be
taken as you can easily damage parts. Pick up
all the items carefully. Next, clean the hardware
of thermal paste or pad residues with a solvent
(e.g. isopropanol alcohol).
Legen Sie die Hardware auf eine
antistatische Unterlage. Beginnen Sie mit der
Demontage des Original-Kühlers. Je nach
Aufbau des Kühlers sind zuerst die
Schrauben des Lüfters zu entfernen und die
Blenden zu lösen. Bei aufgeklebten Kühlern
ist äußerste Sorgfalt geboten. Es können
leicht Bauteile abgerissen werden. Heben Sie
alle Einzelteile sorgfältig auf. Reinigen Sie
anschließend die Hardware von Resten der
Wärmeleitpaste oder Pads mit einem
Lösemittel (z.B. Isopropanol-Alkohol).
Posez le matériel sur un tapis antistatique.
Commencez par le démontage du
refroidisseur d’origine. Selon la conguration
du radiateur les vis du ventilateur et les caches
doivent être enlevés d’abord. S’il s’agit d’un
refroidisseur collé il faut travailler très
doucement. Sinon des composants peuvent
s’arracher. Conservez tous les pièces
soigneusement. Ensuite, nettoyer le matériel
de résidus de la pâte thermique ou de pads
avec un solvant (alcool isopropanol par ex.).
11x
M2x11 Screws
2x
Screw plugs
2x
MCX Fitting plugs
1x
Tool
1x
15x15x1mm
2x
15x51x1mm
1x
15x38x1mm
1x
30x30x2mm
1x
8x74x3mm
1x
8x100x3mm
1 2 3 4 5 6

EN DE FR
Close the 3mm barbed ttings with the
enclosed cap. Screw in the G1/4 screw plugs
with the enclosed tool.
Verschließen Sie die 3mm Schlauchtüllen mit
den beiliegenden Kappen. Drehen Sie die
G1/4 Verschlussschrauben mit dem
beiliegenden Werkzeug ein.
Fermez les buses du tuyau de 3 mm avec les
bouchons fournis. Vissez les bouchons à vis
G1/4 à l'aide de l'outil fourni.
4.
EN DE FR
To control the digital RGB lighting, connect the
3-pin female connector to the 3-pin male
connector of the graphics card LED. You can
connect additional digital RGB LEDs to the
remaining 3-pin male connector. As shown,
you have two installation options.
Um die Digital - RGB Beleuchtung zu steuern,
schließen Sie den 3-Pin female Stecker an
den 3-Pin male Stecker der Grakkarten LED.
An den übrigen 3-Pin male Stecker können
Sie zusätzliche Digital - RGB LEDs
anschließen. Sie haben wie dargestellt, zwei
Verlegungsmöglickeiten.
Pour contrôler l'éclairage numérique RVB,
connectez le connecteur femelle à 3 broches
au connecteur mâle à 3 broches de la DEL de
la carte graphique. Vous pouvez connecter
des LED RGB numériques supplémentaires au
connecteur mâle à 3 broches restant. Comme
indiqué, vous avez deux options d'installation.
3.
EN DE FR
Two options are available to connect the unit
to the water circuit. Use either the two G1/4"
threads or the 5/3mm connections in
conjunction with the optionally available MCX
distributor with article number 13041.
Zur Anbindung in den Wasserkreislauf stehen
zwei Optionen zur Verfügung. Verwenden sie
entweder die beiden G1/4" Gewinde oder die
5/3mm Anschlüsse in Verbindung mit dem
optional erhältlichem MCX Verteiler mit der
Artikelnummer 13041.
Deux options sont disponibles pour le
raccordement au circuit d'eau. Utilisez soit les
deux letages G1/4", soit les raccords 5/3mm
en association avec le distributeur MCX
disponible en option sous la numèro d’article
13041.
5.
EN DE FR
Put the active backplate on and screw it
together with the 11 M2x11 screws as shown. Legen Sie nun die aktive Backplate auf und
verschrauben Sie diese mit den 11 M2x11
Schrauben wie dargestellt.
Placez maintenant la plaque arrière active et
vissez-la en place avec les 11 vis M2x11
comme indiqué.
2.
EN DE FR
Clean the contact surfaces on the bottom side
of the cooler with Isopropanol alcohol or
similar. The surface must be free of
contaminants.
Remove the protective foils from the thermal
pads and place the pads on the backplate as
shown.
Reinigen Sie die Kontaktächen auf der
Bodenseite des Kühlers mit
Isopropanolalkohol oder ähnlichen Mitteln.
Die Fläche muss frei von Verunreinigungen
sein. Entfernen Sie die Schutzfolien der
Wärmeleitpads und platzieren Sie die Pads
wie dargestellt auf der Backplate.
Nettoyez les surfaces de contact (la face
inférieure du bloc de refroidissement) avec de
Alcool isopropanol. La surface doit être propre
sans aucune pollution.
Retirez les feuilles de protection des pads
thermiques et placez les pads sur le Plaque
arrière comme indiqué.
1.
1
3
45
6
2 2 Graphic cards LED
Add more Digital RGB LEDs

V.1.00-09.2021
Alphacool International GmbH
Marienberger Str. 1
D-38122 Braunschweig
Germany
Support: +49 (0) 531 28874 - 0
Fax: +49 (0) 531 28874 - 22
E-Mail: [email protected]
https://www.alphacool.com
General Managers: Andreas Rudnicki, Nathanael Draht, Fabian Noelte
WEEE-Reg.-Nr.: DE 54464644
Trade Register: Amtsgericht Braunschweig HRB 202390
VAT.ID.Nr.: DE270458421
Tax number: 13/207/02047
-
 1
1
-
 2
2
-
 3
3


Alphacool ACTIVE BACKPLATE 3090 FTW Eisblock Aurora GPX-N Acrylic Active Backplate Benutzerhandbuch
- Typ
- Benutzerhandbuch
in anderen Sprachen
Verwandte Artikel
-
Alphacool Eisblock ES Acetal GPX-N RTX 3080/3090 Turbo Benutzerhandbuch
-
Alphacool CORE Benutzerhandbuch
-
Alphacool 13475 Benutzerhandbuch
-
Alphacool EISBLOCK AURORA ACRYL GPX-N RTX 4080 Bedienungsanleitung
-
-
Alphacool RX 7900XTX Merc 310 Benutzerhandbuch
-
Alphacool Eisblock Aurora Acryl RTX 4080 Suprim Bedienungsanleitung
-
-
Alphacool Eisblock Aurora Acryl RX 7900XTX-XT Toxic Benutzerhandbuch
-
Alphacool Eisblock Aurora Acryl RTX 4070TI Reference Benutzerhandbuch