
FOUR-IN-ONE MUSIC SYSTEM
OMNI PLAY
QUICKSTART GUIDE
ENGLISH ( 1 – 3 )
MANUAL DE INICIO RÁPIDO
ESPAÑOL ( 4 – 6 )
GUIDE D’UTILISATION RAPIDE
FRANÇAIS ( 7 – 9 )
KURZANLEITUNG
DEUTSCH ( 10 – 12 )
MANUALE RAPIDO DI UTILIZZAZIONE
ITALIANO ( 13 – 15 )
SNELSTARTGIDS
NEDERLANDS ( 16 – 18 )

1
QUICKSTART GUIDE
o Make sure that the items listed below are included in the box:
OMNI PLAY Turntable 45 RPM Adapter
Quickstart Guide Safety Instructions & Warranty Information
o READ SAFETY INSTRUCTION BOOKLET BEFORE USING THE PRODUCT
o Go to http://www.ionaudio.com
for product registration.
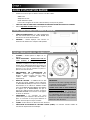
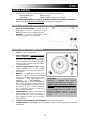
REAR PANEL FEATURES
1. POWER CABLE – Plug this cable into a power
source.
2. ANTENNA – Fully extend this antenna to enhance
radio reception.
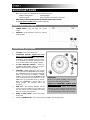
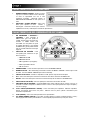
TURNTABLE FEATURES
1. PLATTER – Place your record here.
2. TRANSPORT SCREW – Tighten this screw
before using the turntable! When loosened,
this screw secures the platter and tonearm
assembly to prevent damage during transport.
If you transport the turntable, loosen the screw
to re-secure the platter and tonearm assembly.
3. 45 RPM ADAPTER HOLDER – Holds the
included 45 RPM adapter. When not using the
adapter, please place it in this holder.
4. TONEARM – OMNI PLAY comes with a ready
to use pre-balanced TONEARM and cartridge.
The TONEARM can be raised and lowered by
hand, or by pressing the RAISE / LOWER
LEVER. Please note that the TONEARM needs
to be moved away from resting position (on the
ARM CLIP) for the turntable motor to activate.
When the TONEARM is placed back in its
resting position, the turntable motor will
deactivate.
5. ARM CLIP – This specially designed arm clip
secures the tone arm while at rest or when not in
use. The arm clip has been designed to remain
in the up position while unlocked.
6. RAISE / LOWER LEVER – Raises and lowers
the tonearm.
7. 33 / 45 / 78 RPM SWITCH – This switch controls the RPM of the turntable platter.
IMPORTANT
Remove the plastic cartridge cover (needle
cover) before operating the turntable.
Tighten the TRANSPORT SCREW before
using the turntable. When loosened, this
screw secures the platter and tonearm
assembly to prevent damage during transport.
If you transport the turntable, loosen the screw
to re-secure the platter and tonearm assembly.

2
TAPE PLAYER FEATURES
1. CASSETTE TAPE SLOT – Insert your cassette
tape here (with the open end to the right). The
tape will play once it is fully inserted.
Remember to set the FUNCTION SELECTOR to
"TA" to hear the tape.
2. EJECT / FF – Press this button fully to eject the
tape. Press and hold it halfway down to fast
forward the tape and release it to resume
playback.
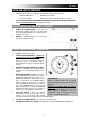
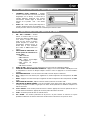
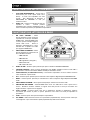
CD PLAYER & RADIO FEATURES
1. ON / OFF / VOLUME – Turn this knob
clockwise until it clicks to turn OMNI
PLAY on. While OMNI PLAY is on,
this knob adjusts the speaker volume.
Turn the knob all the way
counterclockwise until it clicks to turn
OMNI PLAY off.
2. FUNCTION SELECTOR – Turn this
knob to select what you want to listen
to:
• AM: AM radio
• FM: FM radio
• PO: the turntable ("phonograph")
• CD: the CD player
• TA: the cassette tape player
3. OPEN / CLOSE – Press this button to open or close the CD TRAY.
4. CD TRAY – Open the tray by pressing the OPEN / CLOSE button and insert an audio CD here. Press
OPEN / CLOSE to close the tray.
5. TRACK DISPLAY – When playing a CD, the track number will be displayed here.
6. ALT – Press this button to boost the high frequencies of OMNI PLAY's speakers.
7. BASS – Press this button to boost the bass frequencies of OMNI PLAY's speakers.
8. STATION SELECTOR – Turn this knob to select the radio station.
9. FM STEREO INDICATOR – When OMNI PLAY is receiving FM radio in stereo, this light will be on.
When reception is weaker, the signal will be "summed" to mono to allow for better reception, and this
light will turn off.
10. PLAY / PAUSE – Press this button to play. While playing, press again to pause. While paused, press
again to resume playback.
11. STOP – Press this button to stop playback.
12. UP / DOWN – Skips to the next track or previous track (respectively). Press and hold the button down
to rewind or fast forward (respectively) through the current track.

3
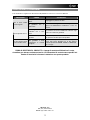
TROUBLESHOOTING
Refer to the following troubleshooting scenarios if you experience difficulty playing your vinyl.
PROBLEM CAUSE SOLUTION
Needle is not on the
record.
Place the needle on the record.
I am not hearing any
audio.
Turntable not powered.
Make sure that the turntable is connected to a live
power outlet and that it is powered on.
Cartridge connection is
not secure.
Cartridge must be securely connected to the
tonearm whenever you are using the turntable.
I am experiencing
poor sound quality.
Vinyl record is dirty or
scratched.
Try dusting off and gently wiping the surface of the
record before playing it.
My music is playing at
a strange pitch.
Incorrect speed selected
on the turntable.
Make sure that you are playing your records at the
speed they were intended to be played. Select
between the three different speeds by pressing 33,
45, or 78 RPM.
BEFORE RETURNING THE PRODUCT, please contact ION Audio or your retailer for
technical support. Contact information can be found in the Safety Instruction Booklet
included with this product.
ION Audio, LLC
Tel: (U.S.) 401.658.3743
E-mail: [email protected]om

4
GUÍA DE INICIO RÁPIDO
o Asegúrese de que todos los elementos abajo indicados estén incluidos en la caja.
Giradiscos OMNI PLAY Adaptador para 45 RPM
Guía de inicio rápido Folleto de información sobre la seguridad y la garantía
o LEA EL FOLLETO DE INSTRUCCIONES DE SEGURIDAD ANTES DE UTILIZAR EL PRODUCTO.
o Visite http://www.ionaudio.com
para registrar el producto.
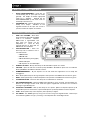
CARACTERÍSTICAS DEL PANEL TRASERO
1. CABLE DE ALIMENTACION – Este cable de
alimentación se debe enchufar a un tomacorriente
en la pared DESPUÉS de que se hagan todas las
conexiones de audio.
2. ANTENA – Extienda totalmente esta antena para
mejorar la recepción de radio.
CARACTERÍSTICAS DEL GIRADISCOS
1. PLATO – Coloque aquí el disco.
2. TORNILLO DE TRANSPORTE – ¡Apriete este
tornillo antes de usar el giradiscos! Cuando
está flojo, este tornillo sujeta el conjunto de
plato y brazo para evitar daños durante el
transporte. Si va a transportarlo, afloje el
tornillo para volver a sujetar el conjunto de plato
y brazo.
3. SOPORTE DEL ADAPTADOR DE 45 RPM –
Sostiene el adaptador de 45 RPM incluido.
Cuando no use el adaptador, póngalo en este
soporte.
4. BRAZO DE LECTURA – El OMNI PLAY viene
con un BRAZO DE LECTURA y una cápsula
previamente balanceados listos para usar. El
BRAZO DE LECTURA se puede subir y bajar a
mano o presionando LA PALANCE SUBIR /
BAJAR. Tenga en cuenta que es necesario
sacar el BRAZO DE LECTURA de la posición de
reposo (CLIP DEL BRAZO) para que se active el
motor del giradiscos. Cuando el BRAZO DE
LECTURA se coloca de nuevo en su posición de
reposo, el motor del giradiscos se desactiva.
5. CLIP DEL BRAZO – Este clip diseñado
especialmente fija el brazo mientras está en
reposo o no se usa. El clip ha sido diseñado
para que permanezca hacia arriba mientras está desbloqueado.
6. PALANCA DE SUBIR / BAJAR – Levanta y baja el brazo de lectura.
7. INTERRUPTOR DE 33 / 45 / 78 RPM – Este interruptor controla las RPM del plato del giradiscos.
IMPORTANTE :
Retire la cubierta plástica de la cápsula
(cubierta de la púa) antes de hacer funcionar el
giradiscos.
¡Apriete este tornillo antes de usar el
giradiscos! Cuando está flojo, este tornillo
sujeta el conjunto de plato y brazo para evitar
daños durante el transporte. Si va a
transportarlo, afloje el tornillo para volver a
sujetar el conjunto de plato y brazo.

5
CARACTERÍSTICAS DE LA CASETERA
1. RANURA PARA EL CASETE - Inserte el casete
aquí (con el extremo abierto hacia la derecha).
La cinta se reproducirá una vez si está
totalmente insertada. Recuerde colocar el
SELECTOR DE FUNCIÓN en "TA" para oír la
cinta.
2. EXPULSAR / AVANCE RÁPIDO – Pulse este
botón para expulsar la cinta. Púlselo y
manténgalo a mitad de camino para avanzar
rápidamente la cinta y suéltelo para reanudar la reproducción.
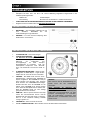
CARACTERÍSTICAS DEL REPRODUCTOR CD Y RADIO
1. ON ENCENDIDO / APAGADO /
VOLUMEN – Para encender el
OMNI PLAY, gire esta perilla en
sentido horario hasta que haga clic.
Cuando el OMNI PLAY está
encendido, con esta perilla se ajusta
el volumen del altavoz. Para apagar
el OMNI PLAY, gire la perilla hasta el
tope en sentido antihorario hasta que
haga clic.
2. SELECTOR DE FUNCIÓN – Gire
esta perilla para seleccionar lo que
desea escuchar:
• AM: Radio de AM
• FM: Radio de FM
• PO: el giradiscos (“fonógrafo”)
• CD: el reproductor de CD
• TA: la casetera
3. ABRIR/CERRAR – Pulse este botón para abrir o cerrar la BANDEJA DE CD.
4. BANDEJA DE CD – Abra la bandeja presionando el botón de ABRIR / CERRAR e inserte aquí un CD
de audio. Presione ABRIR / CERRAR para cerrar la bandeja.
5. PANTALLA DE PISTA – Cuando se reproduce un CD, aparece aquí el número de pista.
6. ALT – Pulse este botón para reforzar las frecuencias altas de los altavoces de OMNI PLAY.
7. BAJOS – Pulse este botón para reforzar las frecuencias bajas de los altavoces de OMNI PLAY.
8. SELECTOR DE ESTACIÓN – Gire esta perilla para seleccionar la estación de radio.
9. INDICADOR DE FM ESTÉREO – Cuando OMNI PLAY recibe radio de FM en estéreo, esta luz se
enciende. Cuando la recepción es débil la señal se “suma” a mono para permitir una mejor recepción y
esta luz se apaga.
10. PLAY / PAUSE (REPRODUCIR / PAUSA) – Pulse este botón para reproducir. Mientras reproduce,
púlselo nuevamente para hacer una pausa. Mientras está en pausa, púlselo nuevamente para
reanudar la reproducción.
11. STOP (PARAR) – Pulse este botón para detener la reproducción.
12. UP / DOWN (ARRIBA / ABAJO) – Para saltar a la pista siguiente o anterior (respectivamente). Pulse y
mantenga pulsado el botón para rebobinar o avance rápido (respectivamente) en la pista actual.

6
SOLUCIÓN DE PROBLEMAS
Si experimenta dificultades al reproducir sus vinilos, consulte los siguientes escenarios de solución de
problemas.
PROBLEMA CAUSA SOLUCIÓN
La púa no está
sobre el disco.
Coloque la púa sobre el disco.
No oigo ningún audio.
El giradiscos no
está encendido.
Asegúrese de que el giradiscos esté conectado a un
tomacorriente alimentado y que esté encendido.
La conexión de la
cápsula no es
firme.
La cápsula debe estar conectada firmemente al brazo
toda vez que use el giradiscos.
Experimento un
sonido de baja
calidad.
El disco de vinilo
está sucio o
rayado.
Pruebe desempolvando y limpiando suavemente la
superficie del disco antes de reproducir.
La música se
reproduce con un
pitch extraño.
Velocidad
incorrecta
seleccionada en el
giradiscos.
Asegúrese de que esté reproduciendo sus discos a la
velocidad a la que están previstos. Seleccione entre las
dos velocidades diferentes pulsando 33, 45, o 78 RPM.
ANTES DE DEVOLVER EL PRODUCTO, comuníquese con ION Audio o con su
vendedor minorista para solicitar soporte técnico. La información de contacto se
encuentra en el folleto de instrucciones de seguridad incluido con este producto.
ION Audio, LLC
Tel: (U.S.) 401.658.3743
E-mail: [email protected]om

7
GUIDE D’UTILISATION RAPIDE
o Veuillez vous assurer que les articles suivants sont dans la boîte.
OMNI PLAY
Adaptateur 45 t/min
Guide d’utilisation rapide
Le livret des consignes de sécurité et des informations concernant la garantie
o VEUILLEZ LIRE LE LIVRET DES CONSIGNES DE SÉCURITÉ AVANT D'UTILISER LE PRODUIT.
o Allez à http://www.ionaudio.com
pour enregistrer le produit.
CARACTÉRISTIQUES DU PANNEAU ARRIÈRE
1. CÂBLE D’ALIMENTATION – Ce câble d’alimentation
doit être branché dans la prise murale APRÈS avoir
effectué tous les autres branchements.
2. ANTENNE – Veuillez déployer cette antenne au
maximum afin d’obtenir une réception radio optimale.
CARACTÉRISTIQUES DU TOURNE-DISQUE
1. PLATEAU – Veuillez placer le disque sur ce
plateau.
2. VIS DE TRANSPORT – Veuillez serrer cette vis
avant d’utiliser la platine tourne-disque!
Lorsque la vis est desserrée, elle permet de
verrouiller le plateau et le bras de lecture afin
d’éviter de les endommager durant le transport. Si
vous transportez la platine tourne-disque, veuillez
desserrer la vis afin de verrouiller en place le
plateau et le bras de lecture.
3. EMPLACEMENT DE L’ADAPTATEUR 45
TR/MIN – Permet de ranger l’adaptateur pour
disques 45 tr/min. Lorsqu’il n’est pas utilisé,
veuillez mettre l'adaptateur dans cet
emplacement.
4. BRAS DE LECTURE – Le OMNI PLAY est doté
d’un bras de lecture équilibré et d’une cartouche.
Le BRAS DE LECTURE peut être levé ou abaisser
manuellement ou en utilisant le LEVIER. Veuillez
noter que le BRAS DE LECTURE doit être déplacé
du support (sur le SERRE-BRAS) afin que le
moteur de la table tournante soit activé. Lorsque le
BRAS DE LECTURE est à nouveau sur le support,
le moteur se désactive.
5. SERRE-BRAS – Le serre-bras est conçu
spécialement pour maintenir le bras de lecture en
place. Le serre-bras est conçu pour demeurer en
position élevée lorsqu’il n’est pas verrouillé.
6. LEVIER – Permet de lever ou abaisser le bras de lecture.
7. SÉLECTEUR DE VITESSES DE LECTURE 33/45/78 (T/MIN) – Ce sélecteur contrôle nombre de
tours/minute du plateau du tourne-disque.
IMPORTANT
Assurez-vous de retirer le protège-cartouche
en plastique (protège-aiguille) avant de faire
fonctionner le tourne-disque.
Veuillez serrer cette vis avant d’utiliser la
platine tourne-disque! Lorsque la vis est
desserrée, elle permet de verrouiller le
plateau et le bras de lecture afin d’éviter de
les endommager durant le transport. Si vous
transportez la platine tourne-disque, veuillez
desserrer la vis afin de verrouiller en place le
p
lateau et le bras de lecture.

8
CARACTÉRISTIQUES DU LECTEUR CASSETTES
1. LOGEMENT POUR CASSETTE – Veuillez
insérer la cassette dans cette fente (côté bande
magnétique vers la droite). La lecture de la
cassette débutera lorsqu'elle sera insérée
correctement. Veuillez régler le sélecteur de
fonction sur la position « TA » afin d'entre
l'audio.
2. EJECT / FF – Cette touche permet d’éjecter la
cassette. Veuillez l'enfoncer et la maintenir à mi-
chemin pour faire avancer la cassette, puis la relâcher pour résumer la lectu.
CARACTÉRISTIQUES DU LECTEUR CD ET RADIO
1. ON / OFF / VOLUME – Veuillez
tourner ce bouton dans le sens
horaire pour mettre le OMNI PLAY
sous tension. Lorsque le OMNI
PLAY est sous tension, ce bouton
permet d’ajuster le volume des
haut-parleurs. Veuillez tourner ce
bouton dans le sens antihoraire
pour mettre le OMNI PLAY hors
tension.
2. SÉLECTEUR DE FONCTION – Ce
bouton permet de sélectionner la
source audio :
• AM : Radio AM
• FM : Radio FM
• PO : platine tourne-disque
(« phonographe »)
• CD: lecteur de disques
compacts
• TA: lecteur cassettes
3. OPEN / CLOSE – Appuyez sur cette touche pour ouvrir ou fermer le compartiment disque.
4. TIROIR DU LECTEUR DE DISQUES COMPACTS – Appuyez sur la touche OPEN / CLOSE pour ouvrir
le compartiment et insérez un disque compact. Fermer le tiroir en appuyant sur la touche OPEN /
CLOSE.
5. AFFICHEUR DE PISTE – Lors de la lecture d’un CD, le numéro de piste s’affiche ici.
6. ALT – Appuyez sur cette touche pour augmenter les hautes fréquences des haut-parleurs du OMNI
PLAY.
7. BASS – Appuyez sur cette touche pour augmenter les basses fréquences des haut-parleurs du OMNI
PLAY.
8. SÉLECTEUR DE STATION – Utilisez ce bouton afin de syntoniser une station radio.
9. INDICATEUR DU MODE STÉRÉO – Lors de la réception stéréo d’une station FM, ce témoin s'allume.
Lorsque la réception est faible, le signal passe en mono afin de permettre une meilleure réception et le
témoin sera éteint.
10. PLAY / PAUSE – Cette touche permet de lancer la lecture. Appuyer de nouveau permet de faire un
arrêt de lecture momentanée. Appuyer de nouveau permet de relancer la lecture.
11. STOP – Ce bouton permet de faire un arrêt de lecture.
12. UP / DOWN – Ces touches permettent de de passer à la piste suivante ou retourner à la piste
précédente. Maintenez les touches enfoncées afin de reculer ou d’avancer sur la piste en cours.

9
DÉPANNAGE
Veuillez consulter les scénarios suivants si vous avez des problèmes.
PROBLÈME CAUSE SOLUTION
L’aiguille n’est pas
déposée sur le vinyle.
Déposez l’aiguille sur le vinyle.
Je n’entends pas de
signal audio.
La table tournante n’est
pas branchée.
Assurez-vous que le tourne-disque est branché à
prise d’alimentation et qu’il est sous tension.
La cartouche n’est pas
fixée correctement.
La cartouche doit être fixée correctement au bras
de lecture.
Le son est de
mauvaise qualité.
Le vinyle est peut-être
sale ou égratigné.
Essayez de retirer toute poussière ou marque de
doigts en l’essuyant avant de le remettre sur la
table tournante.
La musique joue à
une vitesse étrange.
La vitesse sélectionnée
sur le tourne-disque est
incorrecte.
Assurez-vous de faire jouer les disques à la vitesse
appropriée. Sélectionnez la vitesse appropriée, soit
33, 45, ou 78 RPM.
AVANT DE RETOURNER CE PRODUIT, veuillez contacter ION Audio ou votre
détaillant pour du soutien technique. Toutes les coordonnées se trouvent dans
le livret des consignes de sécurité inclus avec de produit.
ION Audio, LLC
Tél: (U.S.) 401.658.3743
E-mail: [email protected]om

10
GUIDA RAPIDA
o Assicurarsi che gli elementi elencati di seguito siano contenuti nella confezione.
Giradischi OMNI PLAY Adattatore 45 giri
Guida rapida Libretto di istruzioni di sicurezza e garanzia
o LEGGERE ATTENTAMENTE IL LIBRETTO DI ISTRUZIONI PRIMA DI UTILIZZARE IL PRODOTTO
o Recarsi alla pagina http://www.ionaudio.com
per la registrazione del prodotto.
CARATTERISTICHE PANNELLO POSTERIORE
1. CAVO DI ALIMENTAZIONE – questo cavo di
alimentazione va inserito in una presa a muro
DOPO aver effettuato tutti i collegamenti audio.
2. ANTENNA – Estendere completamente questa
antenna per migliorare la ricezione radio.
CARATTERISTICHE GIRADISCHI
1. PIATTO – Il disco va collocato qui.
2. VITE DI TRASPORTO – Stringere questa vite
prima di utilizzare il giradischi! Quando è
allentata, questa vite fissa il piatto e il gruppo
del braccio per evitare che si danneggino
durante il trasporto. Se si trasporta il giradischi,
allentare la vite per fissare nuovamente il piatto
e il gruppo del braccio.
3. SUPPORTO ADATTATORE 45 GIRI – Regge
l’incluso adattatore per 45 giri. Quando
l'adattatore non è in uso, può essere collocato a
questo livello.
4. BRACCIO – Il OMNI PLAY è dotato di un
BRACCIO e di una cartuccia pre-bilanciati
pronti per l’uso. Il BRACCIO può essere alzato
e abbassato a mano, oppure premendo la
LEVETTA di SOLLEVAMENTO /
ABBASSAMENTO. Va notato che il BRACCIO
deve essere allontanato dalla posizione di
riposo (sul FERMABRACCIO) affinché il motore
del giradischi si attivi. Quando il BRACCIO
viene nuovamente collocato in posizione di
riposo, il motore si disattiva.
5. FERMA BRACCIO – questo ferma braccio dal
design speciale fissa il braccio quando è a
riposo o quando non è in uso. Il ferma braccio è
stato progettato in modo che resti sollevato
quando sbloccato.
6. LEVETTA DI SOLLEVAMENTO / ABASSAMENTO – Alza e abbassa il braccio.
7. INTERRUTTORE 33 / 45 / 78 GIRI – Questo interruttore controlla il numero di giri al minuto del piatto
del giradischi.
IMPORTANTE
Rimuovere il cappuccio della cartuccia
(copripuntina) prima di utilizzare il giradischi.
Stringere questa vite prima di utilizzare il
giradischi! Quando è allentata, questa vite
fissa il piatto e il gruppo del braccio per evitare
che si danneggino durante il trasporto. Se si
trasporta il giradischi, allentare la vite per
fissare nuovamente il piatto e il gruppo del
braccio.

11
CARATTERISTICHE DEL LETTORE NASTRO
1. SLOT PER MUSICASSETTE - Inserire qui la
musicassetta (con il lato aperto rivolto verso
destra). Il nastro verrà riprodotto una volta
inserito. Non dimenticare di impostare il
SELETTORE DI FUNZIONI su "TA" per
ascoltare il nastro.
2. EJECT / FF – Premere a fondo questo tasto per
espellere il nastro. Tenerlo premuto
parzialmente per avanzare rapidamente lungo il
nastro e lasciare la pressione per riprendere la riproduzione.
CARATTERISTICHE LETTORE CD E RADIO
1. ON / OFF / VOLUME – Girare
questa manopola in senso orario fino
a quando non scatta per accendere
l’OMNI PLAY. Quando OMNI PLAY
è acceso, questa manopola regola il
volume della cassa. Girare la
manopola completamente in senso
antiorario fino a quando non scatta
per spegnere l’OMNI PLAY.
2. SELETTORE DI FUNZIONI – Girare
questa manopola per selezionare ciò
che si desidera ascoltare:
• AM: radio AM
• FM: radio FM
• PO: il giradischi (“fonografo”)
• CD: il lettore CD
• TA: il lettore di nastri
3. OPEN / CLOSE – Premere questo pulsante per aprire o chiudere il VASSOIO PORTACD.
4. VASSOIO PORTACD – Aprire il vassoio premendo il tasto OPEN / CLOSE e inserire un CD audio a
questo livello. Premere nuovamente OPEN / CLOSE per chiudere il vassoio.
5. TRACK DISPLAY (visualizzazione tracce) – Al momento di riprodurre un CD, il numero di traccia
verrà visualizzato a questo livello.
6. ALT – Premere questo pulsante per incrementare le alte frequenze degli altoparlanti dell’OMNI PLAY.
7. BASS – Premere questo pulsante per incrementare le basse frequenze degli altoparlanti dell’OMNI
PLAY.
8. SELETTORE DI STAZIONI – Girare questa manopola per selezionare la stazione radio.
9. INDICATORE FM STEREO – Quando OMNI PLAY riceve una radio FM in stereo, questa luce è
accesa. Quando la ricezione è debole, il segnale verrà fatto passare a mono per consentire una
migliore ricezione e questa luce si spegnerà.
10. PLAY / PAUSE – Premere questo tasto per la riproduzione. Durante la riproduzione, premere
nuovamente per mettere in pausa. In pausa, premere il tasto ancora una volta per riprendere la
riproduzione.
11. STOP – Premere questo tasto per interrompere la riproduzione.
12. UP / DOWN – Salta alla traccia successiva o precedente (rispettivamente). Tenere premuto il tasto per
il riavvolgimento o per l’avanzamento rapido (rispettivamente) della traccia corrente.

12
RISOLUZIONE DI PROBLEMI
Fare riferimento ai seguenti casi di risoluzione di problemi nel caso in cui si avessero difficoltà.
PROBLEMA CAUSA SOLUZIONE
La puntina non è sul
disco.
Appoggiare la puntina sul disco.
Non si sente l’audio
mentre registro.
Il giradischi non è
alimentato.
Assicurarsi che il giradischi sia collegato ad una
presa di alimentazione funzionante e che sia
acceso.
Il collegamento della
cartuccia non è ben
fisso.
La cartuccia va fissata saldamente al braccio ogni
volta che si utilizza il giradischi.
Scarsa qualità sonora.
Il vinile è sporco o
graffiato.
Provare a spolverare delicatamente con un panno
la superficie del disco prima di riprodurlo.
La mia musica suona
in una tonalità strana.
Sul giradischi è stata
selezionata la velocità
sbagliata.
Assicurarsi di riprodurre i dischi alla velocità per cui
sono stati creati. Scegliere tra le due diverse
velocità premendo 33RPM, 45RPM o 78RPM (33,
45 o 78 giri).
PRIMA DI RESTITUIRE IL PRODOTTO, si prega di contattare ION Audio o il vostro
rivenditore per ottenere assistenza tecnica. Le informazioni di contatto sono reperibili nel
libretto di istruzioni di sicurezza in dotazione con questo prodotto.
ION Audio, LLC
Tel: (U.S.) 401.658.3743
E-mail: [email protected]om

13
KURZANLEITUNG
o Überprüfen SIe bitte, dass sich die in der unteren Abbildung aufgeführten Gegenstände in der
Produktverpackung befinden.
OMNI PLAY 45 RPM Adapter
Kurzanleitung Broschüre mit den Sicherheits- und Garantierichtlinien
o LESEN SIE BITTE DIE SICHERHEITSHINWEISE, BEVOR SIE DAS PRODUKT VERWENDEN
o Registrieren Sie Ihr Produkt online auf http://www.ionaudio.com
.
ÜBERSICHT ÜBER DIE ZURÜCK
1. NETZKABEL – Das Netzkabel verbinden Sie mit
einer Steckdose, NACHDEM Sie alle
Audioverbindungen hergestellt haben.
2. ANTENNE – Für einen besseren Empfang, diese
Radioantenne voll ausziehen.
ÜBERSICHT ÜBER DIE PLATTENSPIELER
1. PLATTENTELLER – Hier Platte auflegen.
2. TRANSPORTSCHRAUBE – Diese Schraube
vor Gebrauch des Plattenspielers anziehen!
Ist diese Schraube gelöst, dient dies zur
Sicherung von Plattenteller und
Tonarmgestänge, um beim Transport
Beschädigungen zu vermeiden. Falls der
Plattenspieler transportiert wird, Schraube
lösen, um Plattenteller und Tonarm wieder zu
sich.
3. 45 RPM ADAPTER ABLAGE – Ablage für den
beiliegenden 45 RPM Adapter. Lagen Sie den
Adapter hier ab, wenn Sie ihn nicht verwenden.
4. TONARM – Der OMNI PLAY wird mit einem
betriebsfertigen, ausbalanciertem TONARM mit
System ausgeliefert. Der TONARM lässt sich per
Hand anheben und absenken oder alternativ
durch Drücken des TONARMLIFTS betätigen.
Beachten Sie bitte, dass der TONARM von der
Ablage (siehe TONARM CLIP) bewegt werden
muss, damit der Schallplattenmotor aktiviert wird.
Wird der TONARM zurück auf seine Ablage
gelegt, deaktiviert sich der Motor.
5. ARM CLIP – Dieser speziell entworfene Arm-Clip
sichert den Tonarmwährend Pausen und bei
Nichtgebrauch. Der Arm-Clip wurde so entworfen,
dass er in der aufrechten Stellung verbleibt
solang er geöffnet ist.
6. TONARMLIFT – Hebt und senkt den tonarm.
7. 33 / 45 / 78 RPM SCHALTER – Diese Schalter steuert die Drehzahl des Plattentellers.
WICHTIG
Bitte entfernen Sie die Nadelabdeckung aus
Plastik, bevor Sie den Plattenspieler
verwenden.
Diese Schraube vor Gebrauch des
Plattenspielers anziehen! Ist diese
Schraube gelöst, dient dies zur Sicherung von
Plattenteller und Tonarmgestänge, um beim
Transport Beschädigungen zu vermeiden.
Falls der Plattenspieler transportiert wird,
Schraube lösen, um Plattenteller und Tonarm
wieder zu sich.

14
BEDIENELEMENTE BANDGERÄT
1. KASSETTENFACH – Hier Kassette einlegen
(offene Seite nach rechts). Die Ksssette wird
abgespielt, sobald diese richtig eingelegt ist.
Nicht vergessen, den FUNCTION SELECTOR
auf "TA" zustellen, um die Kassette anzuhören.
2. EJECT / FF – Diese Taste drücken, um die
Kassette herauszunehmen. Drücken und halb
heruntergedrückt halten, um das Band
vorzuspulen und die Taste loslassen, um mit
dem Abspielen fortzufahren.
ÜBERSICHT ÜBER DIE CD-SPIELER UND RADIO
1. ON / OFF / VOLUME – Diesen
Regler im Uhrzeigersinn bis ein
Klicken ertönt drehen, um OMNI
PLAY einzuschalten. Während
OMNI PLAY eingeschaltet ist, dient
dieser Regler zur
Lautstärkeregelung. Wird der
Regler ganz gegen den
Uhrzeigersinn bis zum Klicken
gedreht, schaltet dies die Funktion
OMNI PLAY aus.
2. FUNCTION SELECTOR – Diesen
Knopf drehen, um die gewünschte
Funktion zu wählen:
• AM: Langwellenradio
• FM: Kurzwellenradio
• PO: Plattenspieler ("Fonograf")
• CD: der CD-Spieler
• TA: das Bandgerät
3. OPEN / CLOSE – Mit dieser Taste kann das CD-Fach (CD TRAY) geöffnet und geschlossen werden.
4. CD TRAY – Fach durch Drücken der Taste OPEN / CLOSE öffnen und eine Audio-CD einlegen. Durch
Drücken der Taste OPEN / CLOSE das Fach wieder schließen.
5. TRACK DISPLAY – Beim Abspielen einer CD wird hier die Nummer des Musikstücks angezeigt.
6. ALT – Mit dieser Taste können die Höhen der OMNI PLAY-Lautsprecher verstärkt werden.
7. BASS – Mit dieser Taste können die Bässe der OMNI PLAY-Lautsprecher verstärkt werden.
8. STATION SELECTOR – Mit diesem Regler kann die Radiostation ausgewählt werden.
9. FM STEREO INDICATOR – Diese Lampe leuchtet auf, wenn OMNI PLAY eine Kurzwellenstation in
Stereoqualität empfängt. Ist der Empfang schwächer, wird das Signal in Mono "gebündelt", um einen
besseren Empfang zu ermöglichen und die Lampe leuchtet nicht auf.
10. PLAY / PAUSE – Drücken Sie die Taste zur Wiedergabe. Drücken Sie diese Taste beim Abspielen, um
die Musik zu unterbrechen. Während der Pause führen Sie durch nochmaliges Drücken der Taste die
Wiedergabe fort.
11. STOP – Drücken Sie diese taste, um die Wiedergabe oder die Aufnahme zu beenden.
12. UP / DOWN – Lässt Sie jeweils zum nächsten oder zum vorherigen Track springen. Halten Sie den
Button gedrückt, um im aktuellen Track entweder zurückzuspulen oder den Schnellvorlauf zu betätigen.

15
FEHLERHILFE
Sollten Sie bei der Verwendung Ihres Plattenspielers auf Probleme stoßen, können Sie die folgende
Fehlersuchtabelle verwenden, um eine Lösung zu finden.
PROBLEM URSACHE LÖSUNG
Nadel liegt nicht auf der
Schallplatte.
Legen Sie die Nadel auf die Schallplatte auf.
Ich höre bei der
Aufnahme kein
Audiosignal.
Plattenspieler hat kein
Strom.
Vergewissern Sie sich, dass der Schallplattenspieler
mit einer funktionierenden Stromquelle verbunden und
eingeschaltet ist.
Das System sitzt nicht
richtig.
Das Tonabnehmersystem muss fest am Tonarm
sitzen, wenn Sie den Plattenspieler verwenden.
Der Klang, den ich
höre, ist sehr schlecht.
Die Schallplatte ist
schmutzig oder verkratzt.
Wischen Sie die Oberfläche der Schallplatte mit einem
antistatischen Tuch vorsichtig ab.
Meine Musik wird in
der falschen Tonhöhe
abgespielt.
Falsche Geschwindigkeit
am Plattenspieler
ausgewählt.
Achten Sie darauf, dass die Schallplatten in der
vorgesehenen Geschwindigkeit abgespielt werden. Sie
können mit den Tasten 33RPM, 45RPM oder 78RPM
zwischen zwei Geschwindigkeiten wählen.
BEVOR SIE DIESES PROKT ZURÜCK SENDEN nehmen Sie bitte Kontakt mit ION Audio
oder Ihrem Fachhändler zur Behebung eines Problems auf. Die Kontaktinformationen
finden Sie in der Broschüre mit den Sicherheitshinweisen, die diesem Produkt beiliegt.
ION Audio, LLC
Tel: (U.S.) 401.658.3743
E-Mail: [email protected]om

16
SNELSTARTGIDS
o Controleer of onderstaande onderdelen in de doos zitten.
OMNI PLAY draaita fel 45 TPM adapter
Snelstartgids Veiligheids- en garantie-informatie
o LEES DE VEILIGHEIDSINSTRUCTIES VOOR HET PRODUCT GEBRUIKT WORDT
o Bezoek http://www.ionaudio.com
voor productregistratie.
OVERZICHT ACHTERPANEEL
1. NETSNOER – Deze kabel dient in een stopcontact
te worden gestoken NADAT alle audio-aansluitingen
zijn gemaakt.
2. ANTENNE – Trek de antenne volledig uit om de
radio-ontvangst te verbeteren.
OVERZICHT DRAAITAFEL
1. PLATEAU – Plaats uw plaat hier.
2. TRANSPORTSCHROEF – Draai deze schroef
aan voordat de draaitafel gebruikt wordt!
Wanneer de schroef is losgedraaid, houdt deze
het plateau en de arm-montage bij elkaar om
zo schade tijdens transport te voorkomen. Bij
transport van de draaitafel dient de schroef te
worden losgedraaid om plateau en arm-
montage opnieuw vast te zetten.
3. 45 TPM ADAPTERHOUDER – Voor de
meegeleverde 45 TPM-adapter. Wanneer de
adapter niet gebruikt wordt, kan deze in de
houder worden geplaatst.
4. TOONARM – De OMNI PLAY wordt geleverd
met een direct bruikbare, voorgebalanceerde
TOONARM met patroon. Deze TOONARM kan
met de hand of door indrukken van HENDEL
VOOR OPTILLEN/NEERLATEN worden
opgetild en neergelaten. Vergeet niet dat de
TOONARM uit de rustpositie (op de ARMKLEM)
genomen dient te worden voordat de motor van
de draaitafel geactiveerd wordt. Wanneer de
TOONARM teruggeplaatst wordt in rustpositie,
wordt de motor van de draaitafel gedeactiveerd.
5. ARMKLEM – Deze speciaal ontworpen armklem
zorgt ervoor dat de toonarm in positie blijft
wanneer deze niet wordt gebruikt. De klem is
ontworpen om in opwaartse positie te blijven
staan wanneer ontgrendeld.
6. HENDEL VOOR OPTILLEN / NEERLATEN – Tilt de toonarm op en laat deze neer.
7. 33 / 45 / 78 RPM knoppen – Deze knop regelt het toerental (RPM) van het plateau van de draaitafel.
BELANGRIJK
Verwijder het plastic elementkapje
(naaldbescherming) voor gebruik van de
draaitafel.
Draai deze schroef aan voordat de
draaitafel gebruikt wordt! Wanneer de
schroef is losgedraaid, houdt deze het plateau
en de arm-montage bij elkaar om zo schade
tijdens transport te voorkomen. Bij transport
van de draaitafel dient de schroef te worden
losgedraaid om plateau en arm-montage
opnieuw vast te zetten.

17
FUNCTIES CASSETTESPELER
1. GLEUF CASSETTEBANDJE – Plaats hier uw
cassettebandje (met de open zijde naar rechts
gekeerd). Het bandje zal worden afgespeeld
nadat het is geplaatst. Onthoud dat de
FUNCTIESELECTOR op "TA" moet staan om
het bandje te kunnen horen.
2. UITWERPEN / FF – Druk op deze knop om het
bandje uit te werpen. Indrukken en half
ingedrukt houden om de tape snel vooruit te
spoelen; loslaten om afspelen te hervatten.
OVERZICHT BOVENPANEEL
1. AAN / UIT / VOLUME – Draai deze
knop rechtsom tot deze klikt om OMNI
PLAY in te schakelen. Wanneer
OMNI PLAY is ingeschakeld, stelt
deze knop het volume van de
luidsprekers in. Draai de knop
helemaal linksom tot deze klikt om
OMNI PLAY uit te schakelen.
2. FUNCTIESELECTOR – Draai aan
deze knop om te selecteren waar u
naar wilt luisteren:
• AM: AM radio
• FM: FM radio
• PO: de draaitafel ("phonograph")
• CD: de CD-speler
• TA: afspelen van cassettebandjes
3. OPENEN / SLUITEN – Druk op deze knop om de CD-LADE te openen of te sluiten.
4. CD-LADE – Open de lade met een druk op knop OPENEN / SLUITEN en plaats hier uw audio-CD.
Druk op OPENEN / SLUITEN om de lade te sluiten.
5. NUMMERWEERGAVE – Bij het afspelen van een CD wordt het volgnummer van het liedje hier
weergegeven.
6. ALT – Druk op deze knop om de hoge frequenties in de speakers van OMNI PLAY een boost te geven.
7. BASS – Druk op deze knop om de basfrequenties in de speakers van OMNI PLAY een boost te geven.
8. STATIONSELECTOR – Draai aan deze knop om een radiostation te selecteren.
9. FM STEREO-INDICATOR – Wanneer OMNI PLAY FM-radio in stereo ontvangt, gaat dit lampje aan.
Wanneer de ontvangst slechter wordt, wordt het signaal "omgebouwd" naar mono voor een betere
ontvangst en gaat dit lampje uit.
10. AFSPELEN / PAUZEREN – Druk op deze knop om af te spelen. Tijdens het afspelen opnieuw op de
knop drukken pauzeert het nummer; in pauzestand opnieuw op de knop drukken hervat het afspelen.
11. STOP – Druk op deze knop om het afspelen (of de opname) te stoppen.
12. UP / DOWN – UP / DOWN gaat resp. terug naar vooruit of vorig naar volgend nummer. Druk knop in
en houd deze ingedrukt voor (rep.) snel terug- of vooruitspoelen door het huidige nummer.

18
PROBLEEMOPLOSSING
Raadpleeg de volgende probleemoplossingen wanneer u moeilijkheden ondervindt.
PROBLEEM OORZAAK OPLOSSING
Naald staat niet op de
plaat.
Plaats de naald op de plaat.
Ik hoor geen geluid
wanneer de plaat
afgespeeld wordt.
Draaitafel heeft geen
stroom.
Zorg ervoor dat de draaitafel aangesloten is op een
actief stopcontact en dat deze is ingeschakeld.
Aansluiting van het
element is niet in orde.
Element dient stevig bevestigd te zijn aan de
toonarm wanneer de draaitafel in gebruik is.
De geluidskwaliteit is
slecht.
Vinyl plaat is vuil of
beschadigd.
Stof de plaat af en veeg het oppervlak voorzichtig
schoon voordat de plaat afgespeeld wordt.
Mijn muziek speelt af
op een vreemde
toonhoogte
Onjuiste snelheid
geselecteerd op de
draaitafel.
Zorg ervoor dat u uw platen op dezelfde snelheid
afspeelt als die waarvoor deze bedoeld zijn.
Selecteer één van de twee snelheden door te
drukken op 33RPM, 45PM of 78RPM.
Voor technische ondersteuning wordt u verzocht VÓÓR RETOURNERING VAN HET
PRODUCT contact te zoeken met ION Audio of uw verkooppunt. Contactinformatie vindt
u in de Veiligheidsinstructies die bij het product geleverd worden.
ION Audio, LLC
Tel: (U.S.) 401.658.3743
E-mail: [email protected]om

www.ionaudio.com
MANUAL VERSION 1.0
-
 1
1
-
 2
2
-
 3
3
-
 4
4
-
 5
5
-
 6
6
-
 7
7
-
 8
8
-
 9
9
-
 10
10
-
 11
11
-
 12
12
-
 13
13
-
 14
14
-
 15
15
-
 16
16
-
 17
17
-
 18
18
-
 19
19
-
 20
20


in anderen Sprachen
- English: iON OMNI PLAY Owner's manual
- français: iON OMNI PLAY Le manuel du propriétaire
- español: iON OMNI PLAY El manual del propietario
- italiano: iON OMNI PLAY Manuale del proprietario
- Nederlands: iON OMNI PLAY de handleiding
