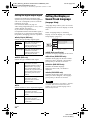
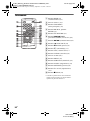
Sony DVP-FX875 Bedienungsanleitung
- Kategorie
- DVD Spieler
- Typ
- Bedienungsanleitung
Dieses Handbuch ist auch geeignet für

D:\NU_Working_NU\New Folder\Foxconn080828_DVP-
FX875_GB\01US01COV-CEK.fm
master page=right
DVP-FX875
4-116-131-22(1)
4-116-131-22(1)
© 2008 Sony Corporation
DVP-FX875
Operating Instructions
Mode d'emploi
Bedienungsanleitung
Manual de instrucciones
Istruzioni per l'uso
Gebruiksaanwijzing
GB
FR
DE
ES
IT
NL
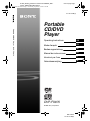
DVP-FX875Portable CD/DVD Player
Portable
CD/DVD
Player
01US01COV-CEK.fm Page 1 Wednesday, September 10, 2008 5:41 PM

D:\NU_Working_NU\New Folder\Foxconn080828_DVP-
FX875_GB\01US02WAR-CEK.fm
master page=left
2
GB
DVP-FX875
4-116-131-22(1)
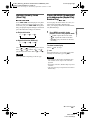
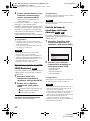
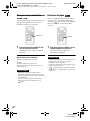
WARNING
To reduce the risk of fire or
electric shock, do not expose
this apparatus to rain or
moisture.
To avoid electrical shock, do
not open the cabinet. Refer
servicing to qualified
personnel only.
The mains lead must be
changed only at a qualified
service shop.
Batteries or batteries
installed apparatus shall not
be exposed to excessive heat
such as sunshine, fire or the
like.
This label is located on the bottom
of the unit.
This appliance is classified as a
CLASS 1 LASER product. The
CLASS 1 LASER PRODUCT
MARKING is located on the
bottom of the unit.
CAUTION
• The use of optical instruments
with this product will increase
eye hazard. As the laser beam
used in this CD/DVD player is
harmful to eyes, do not attempt
to disassemble the cabinet.
Refer servicing to qualified
personnel only.
• Danger of explosion if battery is
incorrectly replaced. Replace
only with the same or equivalent
type.
Disposal of Old Electrical &
Electronic Equipment (Applicable
in the European Union and other
European countries with separate
collection systems)
This symbol on the product or on
its packaging indicates that this
product shall not be treated as
household waste. Instead it shall be
handed over to the applicable
collection point for the recycling of
electrical and electronic
equipment. By ensuring this
product is disposed of correctly,
you will help prevent potential
negative consequences for the
environment and human health,
which could otherwise be caused
by inappropriate waste handling of
this product. The recycling of
materials will help to conserve
natural resources. For more
detailed information about
recycling of this product, please
contact your local Civic Office,
your household waste disposal
service or the shop where you
purchased the product.
Disposal of waste batteries
(applicable in the European Union
and other European countries with
separate collection systems)
This symbol on the battery or on
the packaging indicates that the
battery provided with this product
shall not be treated as household
waste.
By ensuring these batteries are
disposed of correctly, you will help
prevent potentially negative
consequences for the environment
and human health which could
otherwise be caused by
inappropriate waste handling of the
battery. The recycling of the
materials will help to conserve
natural resources.
In case of products that for safety,
performance or data integrity
reasons require a permanent
connection with an incorporated
battery, this battery should be
replaced by qualified service staff
only.
To ensure that the battery will be
treated properly, hand over the
product at end-of-life to the
applicable collection point for the
recycling of electrical and
electronic equipment.
For all other batteries, please view
the section on how to remove the
battery from the product safely.
Hand the battery over to the
applicable collection point for the
recycling of waste batteries.
For more detailed information
about recycling of this product or
battery, please contact your local
Civic Office, your household
waste disposal service or the shop
where you purchased the product.
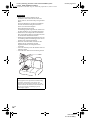
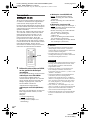
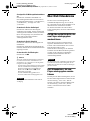
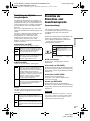
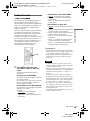
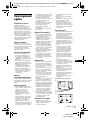
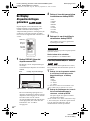
Precautions
• Install this system so that the
mains lead can be unplugged
from the wall socket
immediately in the event of
trouble.
• The player is not disconnected
from the AC power source
(mains) as long as it is connected
to the wall outlet, even if the
player itself has been turned off.
• To prevent fire or shock hazard,
do not place objects filled with
liquids, such as vases, on the
apparatus.
The manufacturer of this product
is Sony Corporation, 1-7-1
Konan Minato-ku Tokyo, 108-
0075 Japan. The Authorized
Representative for EMC and
product safety is Sony
Deutschland GmbH,
Hedelfinger Strasse 61, 70327
Stuttgart, Germany. For any
service or guarantee matters
please refer to the addresses
given in separate service or
guarantee documents.
4116131111.book Page 2 Wednesday, September 10, 2008 5:33 PM

D:\NU_Working_NU\New Folder\Foxconn080828_DVP-
FX875_GB\01US02WAR-CEK.fm
master page=right
3
GB
DVP-FX875
4-116-131-22(1)
GB
Precautions
Road safety
Do not use the monitor unit and
headphones while driving, cycling,
or operating any motorized
vehicle. Doing so may create a
traffic hazard and is illegal in some
areas. It can also be potentially
dangerous to play your headsets at
high volume while walking,
especially at pedestrian crossings.
You should exercise extreme
caution or discontinue use in
potentially hazardous situations.
On safety
Should any solid object or liquid
fall into the cabinet, unplug the
player and have it checked by
qualified personnel before
operating it any further.
On power sources
• The power requirements of this
unit are indicated on the AC
adaptor. Check that the unit’s
operating voltage is identical
with your local power supply.
• If you are not going to use the
player for a long time, be sure to
disconnect the player from the
wall outlet. To disconnect the
AC power cord (mains lead),
grasp the plug itself; never pull
the cord.
• Do not touch the mains lead or
the AC adaptor with wet hands.
Doing so may cause shock
hazard.
On temperature increases
Heat may build up inside the player
during charging or if it is being
used for a long time. This is not a
malfunction.
On placement
• Place the player in a location
with adequate ventilation to
prevent heat build-up in the
player.
• Do not place the player in a
confined space such as a
bookshelf or similar unit.
• Do not cover the ventilation of
the player with newspapers,
tablecloths, curtains, etc. And do
not place the player on a soft
surface, such as a rug.
• Do not place the player in a
location near heat sources, or in a
place subject to direct sunlight,
excessive dust, sand, moisture,
rain, or mechanical shock, or in a
car with its windows closed.
• Do not place the player in an
inclined position. It is designed
to be operated in a horizontal
position only.
• Keep the player and discs away
from equipment with strong
magnet, such as microwave
ovens, or large loudspeakers.
• Do not place heavy objects on
the player.
On operation
• If the player is brought directly
from a cold to a warm location,
or is placed in a very damp room,
moisture may condense on the
lenses inside the player. Should
this occur, the player may not
operate properly. In this case,
remove the disc and leave the
player turned on for about half an
hour until the moisture
evaporates.
• Keep the lens on the player clean
and do not touch it. Touching the
lens may damage the lens and
cause the player to malfunction.
Leave the disc lid closed except
when you insert or remove discs.
On Liquid Crystal Display
• Although manufactured with
high precision technology, the
LCD may occasionally display
dots of various colours. That is
not a malfunction.
• Do not wipe the LCD surface
with wet cloth. If water enters, a
malfunction may result.
• Do not place or drop any object
onto the LCD surface. Also, do
not apply pressure from hands or
elbows.
• Do not damage the LCD surface
with a sharp edged tool.
• Do not close the LCD panel with
a pen, etc., on the disc lid.
• If the player is brought directly
from a cold to a warm location,
moisture may condense over the
LCD surface. In which case,
wipe out the moisture with tissue
paper, etc., before use.
However, moisture condensation
will continue if the LCD surface
is cold. Wait until the surface
warms to room temperature.
On AC adaptor
•Use the supplied AC adaptor for
this player, as other adaptors
may cause a malfunction.
• Do not disassemble or
reverseengineer.
• Do not drop or apply shock.
• Do not confine the AC adaptor in
a closed place such as a
bookshelf or an AV cabinet.
• Do not connect the AC adaptor
to a traveler’s electric
transformer, which may generate
heat and cause a malfunction.
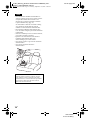
On battery pack
• Certain countries may regulate
disposal of the battery used to
power this product. Please
consult with your local authority.
• Because of the battery’s limited
life, its capacity gradually
deteriorates over time and
repeated use. Purchase a new one
when the battery holds about
only half the normal period.
• The battery may not be charged
to its fullest capacity when
charged for the first time, or
when it has not been used for a
long time. The capacity recovers
after being charged and
discharged several times.
• Do not leave the battery pack in
a car or direct sunlight, where
temperature goes up above
60 ºC.
• Do not expose to water.
• Avoid short-circuiting the
battery connecting jacks (A)
located on the bottom of the
player and the connecting jacks
(C) on the battery pack with
metal objects such as a necklace.
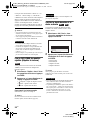
• Make sure dust or sand does not
enter the battery connecting
jacks (A) and the guide holes (B)
located on the bottom of the
player, and the connecting jacks
(C) and the guide holes (D) on
the battery pack.
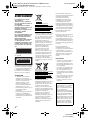
B
A
Bottom of the player
D
C
Battery pack
,continued
4116131111.book Page 3 Wednesday, September 10, 2008 5:33 PM

D:\NU_Working_NU\New Folder\Foxconn080828_DVP-
FX875_GB\01US02WAR-CEK.fm
master page=left
4
GB
DVP-FX875
4-116-131-22(1)
On car adaptor
• Use the supplied car adaptor for
this player, as other adaptors
may cause a malfunction.
• Do not dissemble or reverse-
engineer.
• Do not drop or apply shock.
• Do not touch the metal parts, as
it may cause a short and damage
the car adaptor, especially if
touched by other metal objects.
• Do not place the car adaptor in a
location near heat sources, or in a
place subject to direct sunlight or
mechanical shock, or in a car
with its windows closed.
On adjusting volume
Do not turn up the volume while
listening to a section with very low
level inputs or no audio signals. If
you do, the speakers may be
damaged when a peak level section
is played.
On headphones
• Preventing hearing damage
Avoid using headphones at high
volumes. Hearing experts advice
against continuous, loud, and
extended play. If you experience a
ringing in your ears, reduce the
volume or discontinue use.
• Showing consideration for
others
Keep the volume at a moderate
level. This will allow you to hear
outside sounds and still be
considerate to the people around
you.
On cleaning
Clean the cabinet, panel, and
controls with a soft cloth slightly
moistened with a mild detergent
solution. Do not use any type of
abrasive pad, scouring powder or
solvent such as alcohol or benzine.
On cleaning discs, disc/
lens cleaners
Do not use cleaning discs or disc/
lens cleaners (including wet or
spray types). These may cause
the apparatus to malfunction.
If you have any questions or
problems concerning your player,
please consult your nearest Sony
dealer.
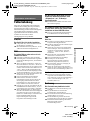
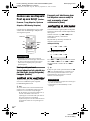
IMPORTANT NOTICE
Caution: This player is capable
of holding a still video image or
on-screen display image on your
television screen indefinitely. If
you leave the still video image or
on-screen display image
displayed on your TV for an
extended period of time you risk
permanent damage to your
television screen. Plasma
display panel televisions and
projection televisions are
susceptible to this.
4116131111.book Page 4 Wednesday, September 10, 2008 5:33 PM

D:\NU_Working_NU\New Folder\Foxconn080828_DVP-
FX875_GB\01US01COV-CEKTOC.fm
master page=right
DVP-FX875
4-116-131-22(1)
5
GB
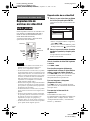
Table of Contents
WARNING . . . . . . . . . . . . . . . . . . . . . . . . . . . . . . . . . . . . . . . . . . . . . . . . . . . .2
Precautions . . . . . . . . . . . . . . . . . . . . . . . . . . . . . . . . . . . . . . . . . . . . . . . . . . . 3
About This Manual . . . . . . . . . . . . . . . . . . . . . . . . . . . . . . . . . . . . . . . . . . . . . 6
This Player Can Play the Following Discs. . . . . . . . . . . . . . . . . . . . . . . . . . . . 7
Preparations . . . . . . . . . . . . . . . . . . . . . . . . . . . . . . . . . . . . . . . . 9
Checking the Accessories . . . . . . . . . . . . . . . . . . . . . . . . . . . . . . . . . . . . . . . .9
Using the Remote . . . . . . . . . . . . . . . . . . . . . . . . . . . . . . . . . . . . . . . . . . . . . . 9
Using the LCD Panel . . . . . . . . . . . . . . . . . . . . . . . . . . . . . . . . . . . . . . . . . . .10
Connecting the AC Adaptor . . . . . . . . . . . . . . . . . . . . . . . . . . . . . . . . . . . . . .11
Using with the Battery Pack . . . . . . . . . . . . . . . . . . . . . . . . . . . . . . . . . . . . . .12
Using in a Car (for Rear Seat Passenger) . . . . . . . . . . . . . . . . . . . . . . . . . . .14
Playing Discs . . . . . . . . . . . . . . . . . . . . . . . . . . . . . . . . . . . . . . 16
Playing Discs. . . . . . . . . . . . . . . . . . . . . . . . . . . . . . . . . . . . . . . . . . . . . . . . . 16
Using the Playback Settings Display . . . . . . . . . . . . . . . . . . . . . . . . . . . . . . 22
Searching for a Particular Point on a Disc (Search, Scan, Slow Play, Repeat
Play, Random Play) . . . . . . . . . . . . . . . . . . . . . . . . . . . . . . . . . . . . . . . . 24
Playing MP3 Audio Tracks or JPEG Image Files . . . . . . . . . . . . . . . . . . . . 26
Adjusting the Picture Size and Quality
. . . . . . . . . . . . . . . . . . . . . . . . . . . . . 29
Enjoying DivX
®
Videos . . . . . . . . . . . . . . . . . . . . . . . . . . . . . . . . 30
Playing DivX Video Files . . . . . . . . . . . . . . . . . . . . . . . . . . . . . . . . . . . . . . . 30
About DivX Video Files . . . . . . . . . . . . . . . . . . . . . . . . . . . . . . . . . . . . . . . . . 31
Settings and Adjustments . . . . . . . . . . . . . . . . . . . . . . . . . . . . . . 33
Using the Setup Display . . . . . . . . . . . . . . . . . . . . . . . . . . . . . . . . . . . . . . . . 33
Settings for the Display (General Setup). . . . . . . . . . . . . . . . . . . . . . . . . . . . 34
Settings for the Sound (Audio Setup) . . . . . . . . . . . . . . . . . . . . . . . . . . . . . . 35
Setting the Display or Sound Track Language (Language Setup) . . . . . . . . 36
Parental Control Settings (Parental Control). . . . . . . . . . . . . . . . . . . . . . . . . 37
Hookups . . . . . . . . . . . . . . . . . . . . . . . . . . . . . . . . . . . . . . . . . . 39
Connecting to another device . . . . . . . . . . . . . . . . . . . . . . . . . . . . . . . . . . . .39
Additional Information . . . . . . . . . . . . . . . . . . . . . . . . . . . . . . . . 42
Troubleshooting . . . . . . . . . . . . . . . . . . . . . . . . . . . . . . . . . . . . . . . . . . . . . . 42
About MP3 Audio Tracks and JPEG Image Files . . . . . . . . . . . . . . . . . . . . . 44
Notes About the Discs. . . . . . . . . . . . . . . . . . . . . . . . . . . . . . . . . . . . . . . . . . 45
Specifications . . . . . . . . . . . . . . . . . . . . . . . . . . . . . . . . . . . . . . . . . . . . . . . . .46
Index to Parts and Controls . . . . . . . . . . . . . . . . . . . . . . . . . . . . . . . . . . . . . .47
Index . . . . . . . . . . . . . . . . . . . . . . . . . . . . . . . . . . . . . . . . . . . . . . . . . . . . . . .50
4116131111.book Page 5 Wednesday, September 10, 2008 5:33 PM

D:\NU_Working_NU\New Folder\Foxconn080828_DVP-
FX875_GB\01US01COV-CEKTOC.fm
master page=left
DVP-FX875
4-116-131-22(1)
6
GB
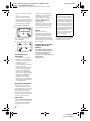
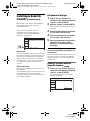
About This Manual
• Instructions in this manual describe the controls on the remote. You can also use the
controls on the player if they have the same or similar names as those on the remote.
• “DVD” may be used as a general term for DVD VIDEOs, DVD+RWs/DVD+Rs (+VR
mode) and DVD-RWs/DVD-Rs (VR mode, video mode).
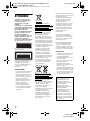
• The meaning of the icons used in this manual is described below:
Icons Meaning
Functions available for DVD VIDEOs and DVD+RWs/DVD+Rs in +VR
mode or DVD-RWs/DVD-Rs in video mode
Functions available for DVD-RWs/DVD-Rs in VR (Video Recording) mode
Functions available for VIDEO CDs (including Super VCDs or CD-Rs/CD-
RWs in video CD format or Super VCD format)
Functions available for music CDs or CD-Rs/CD-RWs in music CD format
Functions available for DATA CDs (CD-ROMs/CD-Rs/CD-RWs
containing MP3
*1
audio tracks, JPEG image files, and DivX
*2*3
video files)
Functions available for DATA DVDs (DVD-ROMs/DVD+RWs/DVD+Rs/
DVD-RWs/DVD-Rs containing MP3
*1
audio tracks,
JPEG image files, and
DivX
*2*3
video files
)
*1 MP3 (MPEG-1 Audio Layer III) is a standard format defined by ISO (International Organization for
Standardization)/IEC (International Electrotechnical Commission) MPEG which compresses audio
data.
*2 DivX
®
is a video file compression technology, developed by DivX, Inc.
*3 DivX, DivX Certified, and associated logos are trademarks of DivX, Inc. and are used under licence.
4116131111.book Page 6 Wednesday, September 10, 2008 5:33 PM

D:\NU_Working_NU\New Folder\Foxconn080828_DVP-
FX875_GB\01US03PRE1-CEK.fm
master page=right
DVP-FX875
4-116-131-22(1)
7
GB
This Player Can Play the
Following Discs
“DVD+RW,” “DVD-RW,” “DVD+R,”
“DVD-R,” “DVD VIDEO,” and “CD” logos
are trademarks.
Note about CDs/DVDs
The player can play CD-ROMs/CD-Rs/CD-
RWs recorded in the following formats:
– music CD format
– video CD format
– MP3 audio tracks, JPEG image files, and
DivX video files of format conforming to
ISO 9660* Level 1, or its extended format,
Joliet
– KODAK Picture CD format
* A logical format of files and folders on CD-
ROMs, defined by ISO (International
Organization for Standardization).
The player can play DVD-ROMs/
DVD+RWs/DVD-RWs/DVD+Rs/DVD-Rs
recorded in the following format:
– MP3 audio tracks, JPEG image files, and
DivX video files of format conforming to
UDF (Universal Disk Format).
Example of discs that the player
cannot play
The player cannot play the following discs:
• Blu-ray discs.
• Discs recorded in AVCHD format.
• HD DVDs.
•DVD-RAMs.
• CD-ROMs/CD-Rs/CD-RWs other than
those recorded in the formats listed on this
page.
• CD-ROMs recorded in PHOTO CD format.
• Data part of CD-Extras.
• DVD Audio discs.
• DATA DVDs that do not contain MP3
audio tracks, JPEG image files, or DivX
video files.
• HD layer on Super Audio CDs.
Also, the player cannot play the following
discs:
• A DVD VIDEO with a different region
code.
• A disc that has a non-standard shape (e.g.,
card, heart).
• A disc with paper or stickers on it.
• A disc that has the adhesive of cellophane
tape or a sticker still left on it.
Notes
• Notes about DVD+RWs/DVD+Rs, DVD-RWs/
DVD-Rs or CD-Rs/CD-RWs
Some DVD+RWs/DVD+Rs, DVD-RWs/DVD-
Rs, or CD-Rs/CD-RWs cannot be played on this
player due to the recording quality or physical
condition of the disc, or the characteristics of the
recording device and authoring software.
The disc will not play if it has not been
correctly finalized. For more information, refer
to the operating instructions for the recording
device. Note that some playback functions may
not work with some DVD+RWs/DVD+Rs, even
if they have been correctly finalized. In this case,
view the disc by normal playback. Also some
DATA CDs/DATA DVDs created in Packet
Write format or multiple sessions cannot be
played.
• Notes about DVD+R DLs/DVD-R DLs
DVD-R DL discs recorded in VR mode may not
be playable.
MP3 and JPEG files recorded on the second layer
of a DVD+R DL/-R DL (double layered) may not
be playable.
Format of discs
DVD VIDEO
DVD-RW/-R
(finalized disc)
DVD+RW/+R
(finalized disc)
VIDEO CD/
Music CD
CD-RW/-R
,continued
4116131111.book Page 7 Wednesday, September 10, 2008 5:33 PM

D:\NU_Working_NU\New Folder\Foxconn080828_DVP-
FX875_GB\01US03PRE1-CEK.fm
master page=left
DVP-FX875
4-116-131-22(1)
8
GB
• Music discs encoded with copyright protection
technologies
This product is designed to playback discs that
conform to the Compact Disc (CD) standard.
Recently, various music discs encoded with
copyright protection technologies are marketed
by some record companies. Please be aware that
among those discs, there are some that do not
conform to the CD standard and may not be
playable by this product.
• Note on DualDiscs
A DualDisc is a two sided disc product which
mates DVD recorded material on one side with
digital audio material on the other side.
However, since the audio material side does not
conform to the Compact Disc (CD) standard,
playback on this product is not guaranteed.
Region code
It is the system that is used to protect
copyrights. The region code is shown on the
DVD VIDEO packages according to the
region of sale. DVD VIDEOs labelled “ALL”
or “2” will play on this player.
Note on playback operations of
DVDs and VIDEO CDs
Some playback operations of DVDs and
VIDEO CDs may be intentionally set by
software producers. Since this player plays
DVDs and VIDEO CDs according to the disc
contents the software producers designed,
some playback features may not be available.
Also, refer to the instructions supplied with
the DVDs or VIDEO CDs.
Copyrights
This product incorporates copyright
protection technology that is protected by
U.S. patents and other intellectual property
rights. Use of this copyright protection
technology must be authorized by
Macrovision, and is intended for home and
other limited viewing uses only unless
otherwise authorized by Macrovision.
Reverse engineering or disassembly is
prohibited.
Trademarks
• Manufactured under license from Dolby
Laboratories.
Dolby and the double-D symbol are
trademarks of Dolby Laboratories.
• Manufactured under license under U.S.
Patent #: 5,451,942 & other U.S. and
worldwide patents issued & pending. DTS
and DTS Digital Out are registered
trademarks and the DTS logos and Symbol
are trademarks of DTS, Inc. ©1996-2007
DTS, Inc. All Rights Reserved.
ALL
4116131111.book Page 8 Wednesday, September 10, 2008 5:33 PM

D:\NU_Working_NU\New Folder\Foxconn080828_DVP-
FX875_GB\01US04GET-CEK.fm
master page=right
Preparations
DVP-FX875
4-116-131-22(1)
9
GB
Preparations
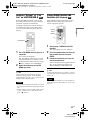
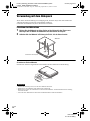
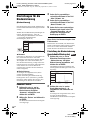
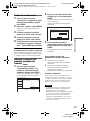
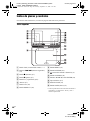
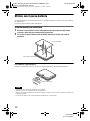
Checking the Accessories
Check that you have the following items:
• Audio/video cord (mini plug × 2 y phono
plug × 3) (1)
• Mains lead (1)
• AC adaptor (1)
• Car battery adaptor (1)
• Battery pack (NP-FX110) (1)
• Remote (with battery) (1)
• Headrest mounting bracket (1)
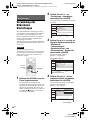
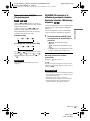
Using the Remote
When operating, point it at the remote sensor on the player.
To replace the remote control battery
Insert a lithium battery CR2025 matching the 3 and # ends of the battery.
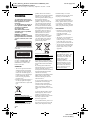
1 Pull out the battery holder (2) while
pressing the lock lever (1).
2 Remove the old battery.
3 Insert the new battery in the battery
holder with the 3 side up and then push
the holder fully.
Notes
• Do not expose the remote sensor to direct sunlight or a lighting apparatus. Doing so may cause a
malfunction.
• No button operation can be made, when the battery drains. If the remote does not work at all, change the
battery and check the status.
4116131111.book Page 9 Wednesday, September 10, 2008 5:33 PM

D:\NU_Working_NU\New Folder\Foxconn080828_DVP-
FX875_GB\01US04GET-CEK.fm
master page=left
DVP-FX875
4-116-131-22(1)
10
GB
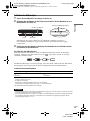
Using the LCD Panel
The LCD panel of the player can rotate a maximum of 180 degrees clockwise and still be used.
After rotation of the LCD panel, it can be folded down on the main body of the player and still
function.
Rotating the LCD panel
1 Place the player on a table or other flat stable surface.
2 Push the LCD panel up with your thumbs until it is open to the vertical position.
3 Slowly rotate the LCD panel 180 degrees in the direction indicated by the arrow
(clockwise).
Rotating and folding down the LCD panel
After rotating the LCD panel 180 degrees clockwise push the LCD panel down onto the main
body of the player. In this position the panel is facing up.
To return the LCD panel to its original position
Open the LCD panel to the vertical position and rotate the LCD panel counter-clockwise slowly.
Notes
• Do not rotate the LCD panel over 180 degrees. In addition, do not rotate in the opposite direction. Doing
so will break the LCD panel.
• If the LCD panel does not fully open, do not further rotate it. The LCD panel may become damaged.
• Return the LCD panel to its original positions after use. The LCD screen can be damaged by sudden shocks
or similar treatment.
4116131111.book Page 10 Wednesday, September 10, 2008 5:33 PM

D:\NU_Working_NU\New Folder\Foxconn080828_DVP-
FX875_GB\01US04GET-CEK.fm
master page=right
Preparations
DVP-FX875
4-116-131-22(1)
11
GB
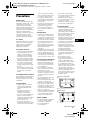
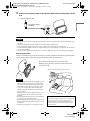
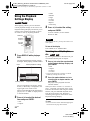
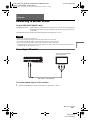
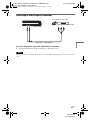
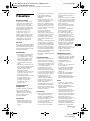
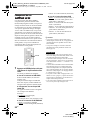
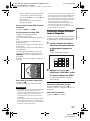
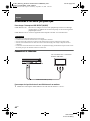
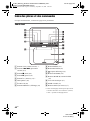
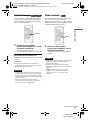
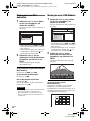
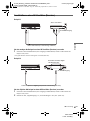
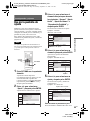
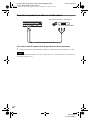
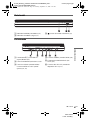
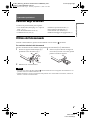
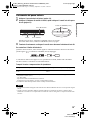
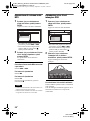
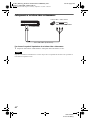
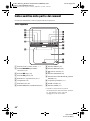
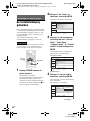
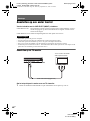
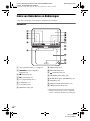
Connecting the AC Adaptor
Connect the AC adaptor (supplied) in the order of 1 to 3 below.
To disconnect, follow the steps in reverse order.
NoteNote
Stop playback before disconnecting the mains lead. Failure to do so may cause a malfunction.
DC IN
9.5V
AUDIO VIDEO
PHONES
OPTICAL
OUT
AB
LINE SELECT
IN OUT
DC plug
2
To DC IN 9.5 V jack
AC Adaptor
(supplied)
1
Mains lead (supplied)
To mains
3
4116131111.book Page 11 Wednesday, September 10, 2008 5:33 PM

D:\NU_Working_NU\New Folder\Foxconn080828_DVP-
FX875_GB\01US04GET-CEK.fm
master page=left
DVP-FX875
4-116-131-22(1)
12
GB
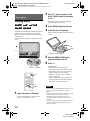
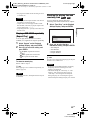
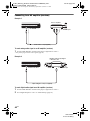
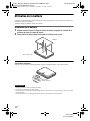
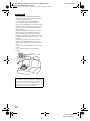
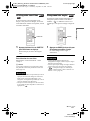
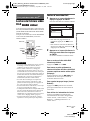
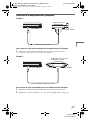
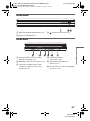
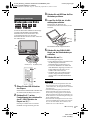
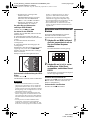
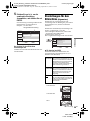
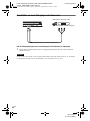
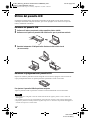
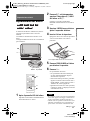
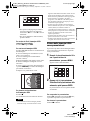
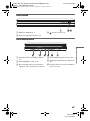
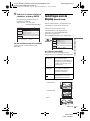
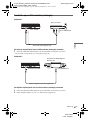
Using with the Battery Pack
When a mains connection is not available, the player can be enjoyed with the battery pack
(supplied) installed.
Please charge the battery pack before using it.
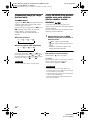
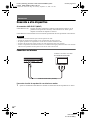
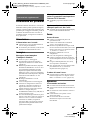
Installing the battery pack
1 Aligning the battery pack with the lines on the player’s bottom, engage the hooks of
the battery pack in the holes on the bottom of the player.
2 Slide the battery pack in the direction of the arrow until it clicks into place.
To remove the battery pack
Push the release knob and slide the battery pack in the direction of the arrow.
Notes
• Turn the player off before installing the battery pack.
• Do not remove the battery pack during playback.
• Do not touch the connecting points of the player and the battery pack. Doing so may cause a malfunction.
• Be careful not to drop the battery pack when installing and removing it.
Bottom of the player
Battery pack
Release knob
4116131111.book Page 12 Wednesday, September 10, 2008 5:33 PM

D:\NU_Working_NU\New Folder\Foxconn080828_DVP-
FX875_GB\01US04GET-CEK.fm
master page=right
Preparations
DVP-FX875
4-116-131-22(1)
13
GB
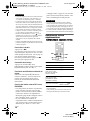
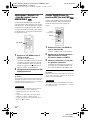
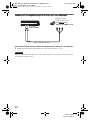
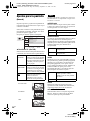
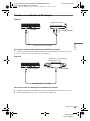
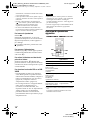
Charging the battery pack
1 Attach the battery pack to the player (page 12).
2 Connect the AC adaptor to the player, and then connect the mains lead into a mains
(page 11).
When charging begins, the CHARGE indicator turns on.
When charging ends, the CHARGE indicator turns off.
3 After charging is finished, disconnect the mains lead from the mains and remove the
AC adaptor.
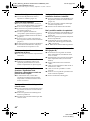
To check the battery level
When the player is stopped, a battery indicator is displayed on the screen. Recharge the battery,
when is displayed or the CHARGE indicator flashes.
The battery indicator is not displayed when a DVD, VIDEO CD or JPEG file are being played.
Stop the player and check the battery level.
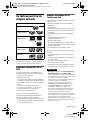
Charging time and maximum playing time
* This is the indication of the longest continuous playback on the following conditions.
– normal temperature (20°C)
– Headphone Use
– Set Backlight Adjustment to the Minimum
– Set “Digital Output” to “Off” in “Audio Setup.”
Battery condition may reduce operating time.
Notes
• The battery indicator does not appear on the screen when the AC adaptor is used or when inputting from
external sources.
• Charging times may differ from that indicated above due to conditions of use, environment, and other
factors. The recommended charge up surrounding temperature is in the 10-30°C range.
Charging time (with the player turned off) Playing time (with the display turned on)
Approx.
6 hours
Approx.
6 hours*
DC IN
9.5V
AUDIO VIDEO
PHONES
OPTICAL
OUT
AB
LINE SELECT
IN OUT
HOLD
POWER CHARGE
CHARGE indicator
DC IN 9.5 V jack
Player Battery pack
Full Exhausted
4116131111.book Page 13 Wednesday, September 10, 2008 5:33 PM

D:\NU_Working_NU\New Folder\Foxconn080828_DVP-
FX875_GB\01US04GET-CEK.fm
master page=left
DVP-FX875
4-116-131-22(1)
14
GB
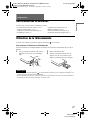
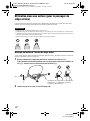
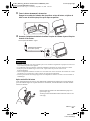
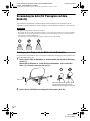
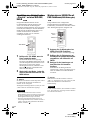
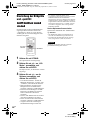
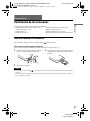
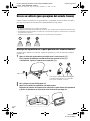
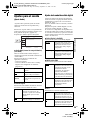
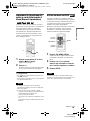
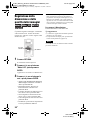
Using in a Car (for Rear Seat Passenger)
Use the headrest mounting bracket and car battery adaptor (both supplied) for rear seat
passengers to enjoy the player.
Notes
• Do not perform installation while the car is being driven.
• The adaptor is for a 12V car battery. Do not use it with a 24V car battery.
• The adaptor is only for use with negatively grounded cars. Do not use it with cars grounded positively.
• Depending on the seat type, it may not be possible to mount the player.
Mounting the player at the back of the front seat
You should not use the battery pack in the car. Turn off the player and remove the battery pack
in advance (page 12).
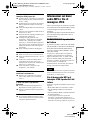
1 Adjust the height of the headrest to allow approx. 3 cm of space (1).
Attach the bracket by buckling up firmly until you hear click (2), then securely tighten
the belt (3).
2 Rotate and fold down the LCD panel (page 10).
3 Securely hold the player with both hands.
Engage the hooks of the bracket in the holes on the player’s bottom, and slide the
player in the direction of the arrow until it clicks into place.
Approx. 3 cm
If the space is too wide, the belt may loosen,
which could cause an accident or injury.
4116131111.book Page 14 Wednesday, September 10, 2008 5:33 PM

D:\NU_Working_NU\New Folder\Foxconn080828_DVP-
FX875_GB\01US04GET-CEK.fm
master page=right
Preparations
DVP-FX875
4-116-131-22(1)
15
GB
4 Connect the car battery adaptor to the cigarette lighter socket and the player’s DC IN
jack.
Notes
• Arrange the cord so as not to interfere with the driver. Also, do not place the LCD panel where the driver
can watch.
• The driver should not attach or detach the car battery adaptor while driving.
• Clean the cigarette lighter socket. If it is dirty, it may cause contact failure or malfunction.
• Use the car battery adaptor with the car engine running. If it is used with the car engine off, the car battery
may become unusable.
• Do not use the headrest mounting bracket or car battery adaptor if they have been dropped or damaged.
After using the player
Firstly turn off the player, then disconnect the car battery adaptor from both the cigarette lighter
socket and the player’s DC IN jack, then detach the player as shown below.
Notes
• Do not disconnect the car battery adaptor or turn
off the car engine before you turn off the player.
Doing so may cause damage to the player. Also
Resume Play (page 18) is not possible if you do
so. If your car is equipped with an idling stop
system, deactivate the function before using the
player in the car.
• Disconnect the car battery adaptor after use. If it
is left connected, the car battery may become
unusable.
• Detach the bracket after use. If it is left attached,
it could cause an accident or injury.
• When listening to the car radio, disconnect the car
battery adaptor from the cigarette lighter socket to
avoid noise.
• Do not leave the player or accessories in the car.
• Do not leave the battery pack in the car.
To cigarette lighter socket
Car battery adaptor
(supplied)
SPECIAL NOTE
Any warranty, stated or implied, shall not be applied
in case of your failure to follow the instruction
mentioned above, and you should be liable for all
troubles or damages arising from failure to follow
such instruction.
Press down the release knob until it clicks (1).
Hold the player securely with both hands and pull out
towards you (2).
4116131111.book Page 15 Wednesday, September 10, 2008 5:33 PM

D:\NU_Working_NU\New Folder\Foxconn080828_DVP-
FX875_GB\01US05PLY1-CEK.fm
master page=left
DVP-FX875
4-116-131-22(1)
16
GB
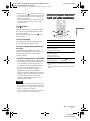
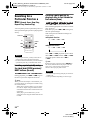
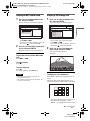
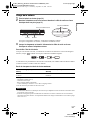
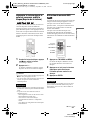
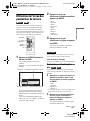
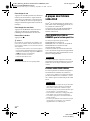
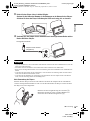
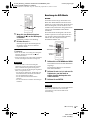
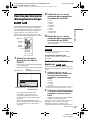
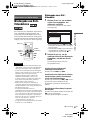
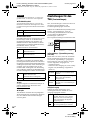
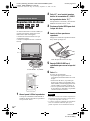
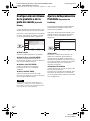
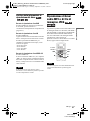
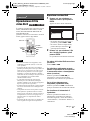
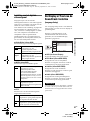
Playing Discs
Playing Discs
Depending on the DVD or VIDEO CD, some
operations may be different or restricted.
Refer to the operating instructions supplied
with the disc.
Connect the AC adaptor or install the battery
pack.
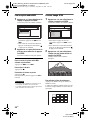
1 Open the player’s LCD panel.
Set the LINE SELECT switch on the
player’s right side to “OUT”.
2 Press [/1 on the remote or slide
the [/1/HOLD switch of the player
to “[/1.”
The player turns on and the POWER
indicator lights up in green.
3 Press OPEN to open the disc lid.
4 Insert the disc to be played.
Push with the playback side down until it
clicks.
5 Push the PUSH CLOSE on the
player to shut the disc lid.
6 Press H.
Playback starts.
• Some discs may start playing
automatically after the disc lid is shut.
• Depending on the disc, a menu may
appear on the screen. For DVD
VIDEOs, see page 18. For VIDEO
CDs, see page 21.
• After all titles have been played, the
player will stop itself and the display
will return to the menu screen.
Notes
• If the disc is inserted with playback side up, a “No
Disc” or “Cannot play this disc.” message
appears.
• Discs created on DVD recorders must be correctly
finalized to play on this player. For more
information about finalizing, refer to the
operating instructions supplied with the DVD
recorder.
• The disc may be still spinning when the disc lid is
opened. Wait until the spinning stops before
removing the disc.
VOL
DISPLAY MENU RETURN OPTIONS
CHARGEPOWER
H
O
L
D
O
P
EN
CHARGE
POWER
x
H
OPEN \/1/HOLD
123
456
78
0
9
\/1
H
x
Playback side facing down
4116131111.book Page 16 Wednesday, September 10, 2008 5:33 PM

D:\NU_Working_NU\New Folder\Foxconn080828_DVP-
FX875_GB\01US05PLY1-CEK.fm
master page=right
Playing Discs
DVP-FX875
4-116-131-22(1)
17
GB
• During operation, “ ” may appear on the screen.
This symbol indicates that a function explained in
this operating instruction is not available on the
current DVD VIDEO.
• Some DVD-RWs/DVD-Rs (VR mode) may take
time before starting playback because of the
recorded content.
To stop playback
Press x.
Pressing H again will start playback from
the point you stopped (Resume Play). See
page 18 for details.
To play from the beginning, press x twice,
then press H.
To turn off the power
Press the remote’s \/1 button or slide the
player’s \/1/HOLD switch to “\/1.”
To avoid accidental button operation on
the player
Set the player’s \/1/HOLD switch to
“HOLD.” All the buttons on the player are
locked, while the button on the remote
remains operable.
To play DTS sound tracks on a DVD VIDEO
• The player’s speaker does not output DTS
sound. When you play DTS sound tracks on
a DVD VIDEO, connect the player to an
AV amplifier (receiver) (page 40) and set
up “DTS” in “Audio Setup” (page 36).
• If you connect the player to audio
equipment such as an AV amplifier
(receiver) without a DTS decoder, do not set
“DTS” to “On” in “Audio Setup” (page 36).
A loud noise may come out from the
speakers, which may affect your ears or
cause speaker damage.
Notes
• A screen saver image appears when you leave the
player in pause or stop without operation for more
than 15 minutes. The image disappears when you
press H. See page 35 for details.
• The player turns off, 15 minutes after starting the
screen saver function (Auto Power Off).
Additional playback operations
* DVD VIDEOs, DVD-RWs/DVD-Rs (VR mode)
only.
The above functions may not be used for some
scenes.
To Operation
Stop Press x
Pause Press X
Go to the next chapter,
track, or scene in
continuous play mode
Press >
Go back to the
previous chapter,
track, or scene in
continuous play mode
Press .
Briefly fast forward
the current scene*
Press during
playback.
123
456
78
0
9
.
>
X
x
,continued
4116131111.book Page 17 Wednesday, September 10, 2008 5:33 PM

D:\NU_Working_NU\New Folder\Foxconn080828_DVP-
FX875_GB\01US05PLY1-CEK.fm
master page=left
DVP-FX875
4-116-131-22(1)
18
GB
Resuming playback from the
point where you stopped the disc
(Resume Play)
When you stop playback, the player
remembers the stop point and displays a
message on the screen. You can resume from
the same point by pressing H again. Resume
Play works even after the player is turned off,
as long as the disc lid is kept closed.
1 While playing a disc, press x to stop
playback.
A message appears.
2 Press H.
The player starts playback from the point
you stopped in step 1.
z Hints
• To play from the beginning of the disc, press x
twice, then press H.
• When turning power on again after power off,
resume play starts automatically.
Notes
• Depending on the stop point, Resume play may
not start from exactly the same point.
• The point where you stopped playing is cleared
when:
– you turn off the player while playing a DVD-
RW/DVD-R (VR mode).
– you open the disc lid.
– you disconnect the battery pack and the AC
adaptor.
– you change the LINE SELECT switch setting.
Using the DVD’s menu
A DVD is divided into long sections of a
picture or a music feature called “titles.”
When you play a DVD containing several
titles, you can select the title you want using
the TOP MENU button.
When you play DVDs that allow you to select
items such as language for the sound and
subtitles, select these items using the MENU
button.
1 Press TOP MENU or MENU.
The disc’s menu appears on the screen.
The contents of the menu vary from disc
to disc.
2 Press C/X/x/c or the number buttons
to select the item you want to play or
change.
3 Press ENTER.
Note
Depending on the disc, you may not be able to use
C/c of the player for the disc menu. In this case, use
C/c on the remote.
123
456
78
0
9
H
x
123
456
78
0
9
TOP MENU
C/X/x/c
ENTER
MENU
Number
buttons
4116131111.book Page 18 Wednesday, September 10, 2008 5:33 PM

D:\NU_Working_NU\New Folder\Foxconn080828_DVP-
FX875_GB\01US05PLY1-CEK.fm
master page=right
Playing Discs
DVP-FX875
4-116-131-22(1)
19
GB
Changing the sound
When playing a DVD VIDEO recorded in
multiple audio formats (PCM, Dolby Digital,
or DTS), you can change the audio format. If
the DVD VIDEO is recorded with
multilingual tracks, you can also change the
language.
With CDs or VIDEO CDs, you can select the
sound from either the right or left channel and
listen to the sound of the selected channel
through both the right and left speakers. For
example, when playing a disc containing a
song with the vocals on the right channel and
the instruments on the left channel, you can
hear the instruments from both speakers by
selecting the left channel.
1 Press AUDIO repeatedly to select the
desired audio signal.
The default setting is underlined.
◆ When playing a DVD VIDEO
Depending on the DVD VIDEO, the
choice of language varies.
When the same language is displayed two
or more times, the DVD VIDEO is
recorded in multiple audio formats.
◆ When playing a DVD (VR mode) disc
The types of sound tracks recorded on a
disc are displayed.
Example:
•1.Main
(main sound)
• 1.Sub (sub sound)
• 1.Main+Sub (main and sub sound)
◆ When playing a CD/VIDEO CD
•Stereo
: the standard stereo sound
• Left: the sound of the left channel
(monaural)
• Right: the sound of the right channel
(monaural)
◆ When playing a Super VCD
•Stereo
: the stereo sound of the audio
track 1
• Left: the sound of the left channel of the
audio track 1 (monaural)
• Right: the sound of the right channel of
the audio track 1 (monaural)
• Stereo 1: the stereo sound of the audio
track 2
• Left 1: the sound of the left channel of
the audio track 2 (monaural)
• Right 1: the sound of the right channel
of the audio track 2 (monaural)
z Hints
• You can check of the current audio format (Dolby
Digital, DTS, PCM, etc.) by pressing AUDIO
repeatedly while playing a DVD VIDEO.
• You can switch the sound in the Playback Settings
Display while playing a DVD (page 22).
Notes
• Depending on the disc, you may not be able to
change the audio format, even if it is recorded in
multiple audio formats.
• When playing a Super VCD that does not contain
audio track 2, no sound will come out if you select
“Stereo 1,” “Left 1,” or “Right 1.”
• When playing soundtracks on DVD-RW/DVD-R
(VR mode) with audio equipment such as an AV
amplifier (receiver) connected via the OPTICAL
OUT jack, set “Dolby Digital” in “Audio Setup”
to “Downmix PCM” (page 36).
• If “DTS” in “Audio Setup” is set to “Off”
(page 36), the DTS track selection option will not
appear on the screen even if the disc contains DTS
tracks.
• When playing DTS sound tracks on a CD, you
cannot change the sound.
123
456
78
0
9
AUDIO
,continued
4116131111.book Page 19 Wednesday, September 10, 2008 5:33 PM

D:\NU_Working_NU\New Folder\Foxconn080828_DVP-
FX875_GB\01US05PLY1-CEK.fm
master page=left
DVP-FX875
4-116-131-22(1)
20
GB
Displaying the subtitles
If subtitles are recorded on the disc, you can
change the subtitles or turn them on and off
whenever you want while playing a DVD.
1 Press SUBTITLE repeatedly to select a
setting.
Depending on the disc, the choice of
language varies.
To turn off the subtitles
Select “Subtitle Off” in step 1.
z Hint
You can switch the subtitles in the Playback
Settings Display while playing a DVD (page 22).
Notes
• Depending on the DVD VIDEO, you may not be
able to change the subtitles even if multilingual
subtitles are recorded on it. You also may not be
able to turn them off.
• While you play a disc with subtitles, the subtitle
may disappear when you press .
Changing the angles
If various angles (multi-angles) for a scene
are recorded on the DVD VIDEO, “ ”
appears on the screen. This means that you
can change the viewing angle.
1 Press ANGLE repeatedly to select an
angle number.
The scene changes to the selected angle.
Notes
• Some DVD VIDEOs prohibit changing angles
even when multi-angles are recorded.
• You cannot change angles during Slow Play or
Scan Play.
• “ ” (angle mark) does not appear when
“Angle Mark” in “General Setup” is set to “Off”
(page 35).
123
456
78
0
9
SUBTITLE
123
456
78
0
9
ANGLE
4116131111.book Page 20 Wednesday, September 10, 2008 5:33 PM
Seite laden ...
Seite laden ...
Seite laden ...
Seite laden ...
Seite laden ...
Seite laden ...
Seite laden ...
Seite laden ...
Seite laden ...
Seite laden ...
Seite laden ...
Seite laden ...
Seite laden ...
Seite laden ...
Seite laden ...
Seite laden ...
Seite laden ...
Seite laden ...
Seite laden ...
Seite laden ...
Seite laden ...
Seite laden ...
Seite laden ...
Seite laden ...
Seite laden ...
Seite laden ...
Seite laden ...
Seite laden ...
Seite laden ...
Seite laden ...
Seite laden ...
Seite laden ...
Seite laden ...
Seite laden ...
Seite laden ...
Seite laden ...
Seite laden ...
Seite laden ...
Seite laden ...
Seite laden ...
Seite laden ...
Seite laden ...
Seite laden ...
Seite laden ...
Seite laden ...
Seite laden ...
Seite laden ...
Seite laden ...
Seite laden ...
Seite laden ...
Seite laden ...
Seite laden ...
Seite laden ...
Seite laden ...
Seite laden ...
Seite laden ...
Seite laden ...
Seite laden ...
Seite laden ...
Seite laden ...
Seite laden ...
Seite laden ...
Seite laden ...
Seite laden ...
Seite laden ...
Seite laden ...
Seite laden ...
Seite laden ...
Seite laden ...
Seite laden ...
Seite laden ...
Seite laden ...
Seite laden ...
Seite laden ...
Seite laden ...
Seite laden ...
Seite laden ...
Seite laden ...
Seite laden ...
Seite laden ...
Seite laden ...
Seite laden ...
Seite laden ...
Seite laden ...
Seite laden ...
Seite laden ...
Seite laden ...
Seite laden ...
Seite laden ...
Seite laden ...
Seite laden ...
Seite laden ...
Seite laden ...
Seite laden ...
Seite laden ...
Seite laden ...
Seite laden ...
Seite laden ...
Seite laden ...
Seite laden ...
Seite laden ...
Seite laden ...
Seite laden ...
Seite laden ...
Seite laden ...
Seite laden ...
Seite laden ...
Seite laden ...
Seite laden ...
Seite laden ...
Seite laden ...
Seite laden ...
Seite laden ...
Seite laden ...
Seite laden ...
Seite laden ...
Seite laden ...
Seite laden ...
Seite laden ...
Seite laden ...
Seite laden ...
Seite laden ...
Seite laden ...
Seite laden ...
Seite laden ...
Seite laden ...
Seite laden ...
Seite laden ...
Seite laden ...
Seite laden ...
Seite laden ...
Seite laden ...
Seite laden ...
Seite laden ...
Seite laden ...
Seite laden ...
Seite laden ...
Seite laden ...
Seite laden ...
Seite laden ...
Seite laden ...
Seite laden ...
Seite laden ...
Seite laden ...
Seite laden ...
Seite laden ...
Seite laden ...
Seite laden ...
Seite laden ...
Seite laden ...
Seite laden ...
Seite laden ...
Seite laden ...
Seite laden ...
Seite laden ...
Seite laden ...
Seite laden ...
Seite laden ...
Seite laden ...
Seite laden ...
Seite laden ...
Seite laden ...
Seite laden ...
Seite laden ...
Seite laden ...
Seite laden ...
Seite laden ...
Seite laden ...
Seite laden ...
Seite laden ...
Seite laden ...
Seite laden ...
Seite laden ...
Seite laden ...
Seite laden ...
Seite laden ...
Seite laden ...
Seite laden ...
Seite laden ...
Seite laden ...
Seite laden ...
Seite laden ...
Seite laden ...
Seite laden ...
Seite laden ...
Seite laden ...
Seite laden ...
Seite laden ...
Seite laden ...
Seite laden ...
Seite laden ...
Seite laden ...
Seite laden ...
Seite laden ...
Seite laden ...
Seite laden ...
Seite laden ...
Seite laden ...
Seite laden ...
Seite laden ...
Seite laden ...
Seite laden ...
Seite laden ...
Seite laden ...
Seite laden ...
Seite laden ...
Seite laden ...
Seite laden ...
Seite laden ...
Seite laden ...
Seite laden ...
Seite laden ...
Seite laden ...
Seite laden ...
Seite laden ...
Seite laden ...
Seite laden ...
Seite laden ...
Seite laden ...
Seite laden ...
Seite laden ...
Seite laden ...
Seite laden ...
Seite laden ...
Seite laden ...
Seite laden ...
Seite laden ...
Seite laden ...
Seite laden ...
Seite laden ...
Seite laden ...
Seite laden ...
Seite laden ...
Seite laden ...
Seite laden ...
Seite laden ...
Seite laden ...
Seite laden ...
Seite laden ...
Seite laden ...
Seite laden ...
Seite laden ...
Seite laden ...
Seite laden ...
Seite laden ...
Seite laden ...
Seite laden ...
Seite laden ...
Seite laden ...
Seite laden ...
Seite laden ...
Seite laden ...
Seite laden ...
Seite laden ...
Seite laden ...
Seite laden ...
Seite laden ...
Seite laden ...
Seite laden ...
Seite laden ...
Seite laden ...
Seite laden ...
Seite laden ...
Seite laden ...
Seite laden ...
Seite laden ...
Seite laden ...
Seite laden ...
Seite laden ...
Seite laden ...
Seite laden ...
Seite laden ...
Seite laden ...
Seite laden ...
Seite laden ...
Seite laden ...
Seite laden ...
Seite laden ...
Seite laden ...
Seite laden ...
Seite laden ...
Seite laden ...
Seite laden ...
Seite laden ...
-
 1
1
-
 2
2
-
 3
3
-
 4
4
-
 5
5
-
 6
6
-
 7
7
-
 8
8
-
 9
9
-
 10
10
-
 11
11
-
 12
12
-
 13
13
-
 14
14
-
 15
15
-
 16
16
-
 17
17
-
 18
18
-
 19
19
-
 20
20
-
 21
21
-
 22
22
-
 23
23
-
 24
24
-
 25
25
-
 26
26
-
 27
27
-
 28
28
-
 29
29
-
 30
30
-
 31
31
-
 32
32
-
 33
33
-
 34
34
-
 35
35
-
 36
36
-
 37
37
-
 38
38
-
 39
39
-
 40
40
-
 41
41
-
 42
42
-
 43
43
-
 44
44
-
 45
45
-
 46
46
-
 47
47
-
 48
48
-
 49
49
-
 50
50
-
 51
51
-
 52
52
-
 53
53
-
 54
54
-
 55
55
-
 56
56
-
 57
57
-
 58
58
-
 59
59
-
 60
60
-
 61
61
-
 62
62
-
 63
63
-
 64
64
-
 65
65
-
 66
66
-
 67
67
-
 68
68
-
 69
69
-
 70
70
-
 71
71
-
 72
72
-
 73
73
-
 74
74
-
 75
75
-
 76
76
-
 77
77
-
 78
78
-
 79
79
-
 80
80
-
 81
81
-
 82
82
-
 83
83
-
 84
84
-
 85
85
-
 86
86
-
 87
87
-
 88
88
-
 89
89
-
 90
90
-
 91
91
-
 92
92
-
 93
93
-
 94
94
-
 95
95
-
 96
96
-
 97
97
-
 98
98
-
 99
99
-
 100
100
-
 101
101
-
 102
102
-
 103
103
-
 104
104
-
 105
105
-
 106
106
-
 107
107
-
 108
108
-
 109
109
-
 110
110
-
 111
111
-
 112
112
-
 113
113
-
 114
114
-
 115
115
-
 116
116
-
 117
117
-
 118
118
-
 119
119
-
 120
120
-
 121
121
-
 122
122
-
 123
123
-
 124
124
-
 125
125
-
 126
126
-
 127
127
-
 128
128
-
 129
129
-
 130
130
-
 131
131
-
 132
132
-
 133
133
-
 134
134
-
 135
135
-
 136
136
-
 137
137
-
 138
138
-
 139
139
-
 140
140
-
 141
141
-
 142
142
-
 143
143
-
 144
144
-
 145
145
-
 146
146
-
 147
147
-
 148
148
-
 149
149
-
 150
150
-
 151
151
-
 152
152
-
 153
153
-
 154
154
-
 155
155
-
 156
156
-
 157
157
-
 158
158
-
 159
159
-
 160
160
-
 161
161
-
 162
162
-
 163
163
-
 164
164
-
 165
165
-
 166
166
-
 167
167
-
 168
168
-
 169
169
-
 170
170
-
 171
171
-
 172
172
-
 173
173
-
 174
174
-
 175
175
-
 176
176
-
 177
177
-
 178
178
-
 179
179
-
 180
180
-
 181
181
-
 182
182
-
 183
183
-
 184
184
-
 185
185
-
 186
186
-
 187
187
-
 188
188
-
 189
189
-
 190
190
-
 191
191
-
 192
192
-
 193
193
-
 194
194
-
 195
195
-
 196
196
-
 197
197
-
 198
198
-
 199
199
-
 200
200
-
 201
201
-
 202
202
-
 203
203
-
 204
204
-
 205
205
-
 206
206
-
 207
207
-
 208
208
-
 209
209
-
 210
210
-
 211
211
-
 212
212
-
 213
213
-
 214
214
-
 215
215
-
 216
216
-
 217
217
-
 218
218
-
 219
219
-
 220
220
-
 221
221
-
 222
222
-
 223
223
-
 224
224
-
 225
225
-
 226
226
-
 227
227
-
 228
228
-
 229
229
-
 230
230
-
 231
231
-
 232
232
-
 233
233
-
 234
234
-
 235
235
-
 236
236
-
 237
237
-
 238
238
-
 239
239
-
 240
240
-
 241
241
-
 242
242
-
 243
243
-
 244
244
-
 245
245
-
 246
246
-
 247
247
-
 248
248
-
 249
249
-
 250
250
-
 251
251
-
 252
252
-
 253
253
-
 254
254
-
 255
255
-
 256
256
-
 257
257
-
 258
258
-
 259
259
-
 260
260
-
 261
261
-
 262
262
-
 263
263
-
 264
264
-
 265
265
-
 266
266
-
 267
267
-
 268
268
-
 269
269
-
 270
270
-
 271
271
-
 272
272
-
 273
273
-
 274
274
-
 275
275
-
 276
276
-
 277
277
-
 278
278
-
 279
279
-
 280
280
-
 281
281
-
 282
282
-
 283
283
-
 284
284
-
 285
285
-
 286
286
-
 287
287
-
 288
288
-
 289
289
-
 290
290
-
 291
291
-
 292
292
-
 293
293
-
 294
294
-
 295
295
-
 296
296
-
 297
297
-
 298
298
-
 299
299
-
 300
300
-
 301
301
-
 302
302
-
 303
303
-
 304
304


Sony DVP-FX875 Bedienungsanleitung
- Kategorie
- DVD Spieler
- Typ
- Bedienungsanleitung
- Dieses Handbuch ist auch geeignet für
in anderen Sprachen
- English: Sony DVP-FX875 Owner's manual
- français: Sony DVP-FX875 Le manuel du propriétaire
- español: Sony DVP-FX875 El manual del propietario
- italiano: Sony DVP-FX875 Manuale del proprietario
- Nederlands: Sony DVP-FX875 de handleiding
Verwandte Papiere
-
Sony DVP FX750 Benutzerhandbuch
-
Sony DVP-FX875 Bedienungsanleitung
-
Sony MV-650STR Bedienungsanleitung
-
Sony DVP-FX870 Bedienungsanleitung
-
Sony DVP-FX740DTB Bedienungsanleitung
-
-
Sony DVP-FX730 Bedienungsanleitung
-
-
Sony DVP-FX850 Bedienungsanleitung
-
Sony DVP-FX740DT Bedienungsanleitung