
1
KV-CM20
UNIVERSAL REAR VIEW CAMERA: INSTRUCTIONS
UNIVERSAL RÜCKFAHRKAMERA: BEDIENUNGSANLEITUNG
CAMÉRA DE RECUL UNIVERSELLE: MANUEL D’INSTRUCTIONS
CÁMARA DE VISTA TRASERA UNIVERSAL: MANUAL DE INSTRUCCIONES
LVT2349-001C
[K]
1211NSHCREFUJI
EN, GE, FR, SP
©2012 JVC KENWOOD Corporation
WARNINGS
• This unit is designed to operate on 12 V DC,
NEGATIVE ground electrical systems. If
your vehicle does not have this system, a voltage
inverter is required, which can be purchased at a
JVC car audio dealers.
• DO NOT install any unit and wire any cable in
locations where;
–it may obstruct the steering wheel and gearshift
lever operations, as this may result in a traffic
accident.
WARNHINWEISE
• Dieses Gerät ist für einen Betrieb in elektrischen
Anlagen mit 12 V Gleichstrom und (–)
Erdung ausgelegt. Wenn Ihr Fahrzeug mit
einer anderen elektrischen Spannung arbeitet, ist
ein Spannungsinverter erforderlich, der bei einem
Fachhändler für JVC Autostereo erhältlich ist.
• Installieren Sie Gerät over verdrahten Sie Kabel
NICHT an Orten;
–an denen sie die Bewegungen des Lenkrads und
des Ganghebels behindern könnten. Anderenfalls
führt diese Behinderung möglicherweise zu
ernsten Verkehrsunfällen.
AVERTISSEMENTS
• Cetappareilestconçupourfonctionnersur
dessourcesdecourant continu de 12 V à
masse NEGATIVE.Sivotrevéhiculen’utilise
pascesystème,vousdevezutiliseruninverseur
detensionquipeutêtreachetéchezvotre
revendeurd’autoradioJVC.
• N’INSTALLEZaucunappareilniaucuncâble
dansunendroitoù:
–oùilpeutgênerl’accèsauvolantouaulevier
devitessecarcelapeutentraînerunaccident
delacirculation.
ADVERTENCIAS
• Estaunidadestádiseñadaparafuncionarcon
12 V de CC, con sistemas eléctricos de masa
NEGATIVA.Sisuvehículonoestáequipado
conestesistema,seránecesariounconversorde
tensión,quepuedeadquirirenundistribuidorJVC
deequiposdeaudioparaautomóviles.
• NOinstaleningunaunidadnitiendacablesenlos
lugaresdonde;
–dondepuedaobstruirlamaniobradelvolante
dedirecciónydelcambiodeengranajes,conel
consiguienteriesgodeaccidentesdetráfico.
ENGLISH DEUTSCH FRANÇAIS ESPAÑOL
THIS DEVICE COMPLIES WITH PART 15 OF THE FCC RULES. OPERATION IS SUBJECT TO
THE FOLLOWING TWO CONDITIONS:
(1) THIS DEVICE MAY NOT CAUSE HARMFUL INTERFERENCE, AND (2) THIS DEVICE MUST
ACCEPT ANY INTERFERENCE RECEIVED, INCLUDING INTERFERENCE THAT MAY CAUSE
UNDESIRED OPERATION.
FCC WARNING
This equipment may generate or use radio frequency energy. Changes or modifications to this
equipment may cause harmful interference unless the modifications are expressly approved in the
instruction manual. The user could lose the authority to operate this equipment if an unauthorized
change or modification is made.
FCC NOTE
This equipment has been tested and found to comply with the limits for a Class B digital device,
pursuant to Part 15 of the FCC Rules. These limits are designed to provide reasonable protection against
harmful interference in a residential installation. This equipment may cause harmful interference to
radio communications, if it is not installed and used in accordance with the instructions.
However, there is no guarantee that interference will not occur in a particular installation. If this
equipment does cause harmful interference to radio or television reception, which can be determined
by turning the equipment off and on, the user is encouraged to try to correct the interference by one or
more of the following measures:
•Reorient or relocate the receiving antenna.
•Increase the separation between the equipment and receiver.
•Connect the equipment into an outlet on a circuit different from that to which the receiver is
connected.
•Consult the dealer or an experienced radio/TV technician for help.
Thank you for purchasing a JVC product.
Wir danken lhnen für den Kauf eines JVC Produkts.
Mercid’avoirachetéunproduitJVC.
MuchasgraciasporadquirirunproductoJVC.
Information for Users on Disposal of Old
Equipment and Batteries
[European Union only]
These symbols indicate that the
product and the battery with this
symbol should not be disposed as
general household waste at its end-
of-life.
If you wish to dispose of this product
and the battery, please do so in
accordance with applicable national
legislation or other rules in your
country and municipality.
By disposing of this product correctly,
you will help to conserve natural
resources and will help prevent potential negative
effects on the environment and human health.
Notice:
The sign Pb below the symbol for batteries
indicates that this battery contains lead.
Products
Battery
Bu ürün 26891sayılı Resm Gazete’de yayımlanan
Elektrkl ve Elektronk Eşyalarda Bazı Zararlı
Maddelern Kullanımının Sınırlandırılmasına
Dar Yönetmelğe uygun olarak üretlmştr.
Benutzerinformationen zur Entsorgung
alter Geräte und Batterien
[Nur Europäische Union]
Diese Symbole zeigen an, dass das
damit gekennzeichnete Produkt
bzw. die Batterie nicht als normaler
Haushaltsabfall entsorgt werden
sollen.
Wenn Sie dieses Produkt und die
Batterie entsorgen möchten, halten Sie
sich dabei bitte an die entsprechenden
Landesgesetze und andere Regelungen
in Ihrem Land bzw. Ihrer Gemeinde.
Die korrekte Entsorgung dieses
Produkts dient dem Umweltschutz und
verhindert mögliche Schäden für die Umwelt und
die menschliche Gesundheit.
Hinweis:
Das Zeichen Pb unterhalb des Batteriesymbols gibt
an, dass diese Batterie Blei enthält.
Produkte
Batterie
Informations relatives à l’élimination des appareils
et des piles usagés, à l’intention des utilisateurs
[Union européenne seulement]
Cessymbolessignifientquele
produitetlespilesnedoiventpas
êtreéliminésentantquedéchet
ménageràlafindesoncycledevie.
Sivoussouhaitezéliminerceproduit
etlespiles,faites-leconformément
àlalégislationnationaleouautres
règlesenvigueurdansvotrepayset
votremunicipalité.
Enéliminantcorrectementceproduit,
vouscontribuezàlaconservation
desressourcesnaturellesetàla
préventiondeséventuelseffetsnégatifssur
l’environnementetlasantéhumaine.
Notification:
LamarquePbendessousdusymboledespiles
indiquequecettepilecontientduplomb.
Produits
Pile
Información para los usuarios sobre la
eliminación de equipos y baterías/pilas usados
[Sólo Unión Europea]
Estossímbolosindicanqueel
productoylabateríaquellevaneste
símbolonodebendesecharsejunto
conlabasuradomésticaalfinaldesu
vidaútil.
Sideseadesecharesteproductoyla
batería,hágalodeconformidadcon
lalegislaciónnacionalvigenteuotras
normativasdesupaísymunicipio.
Sidesechaelproductocorrectamente,
estarácontribuyendoaconservarlos
recursosnaturalesyaprevenirlos
posiblesefectosnegativosenelmedioambientey
enlasaluddelaspersonas.
Atención:
LaindicaciónPbdebajodelsímbolodebatería/
pilaindicaqueéstacontieneplomo.
Productos
Baterías/pilas
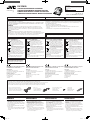
Parts list / Teileliste / Liste de pièces / Lista de componentes
The following parts are provided for this unit. After checking them, please set them correctly.
Die folgenden Teile werden zusammen mit diesem Gerät geliefert. Nach ihrer Überprüfung, die Teile richtig einsetzen.
Lespiècessuivantessontfourniesaveccetappareil.Aprèsvérification,veuillezlesplacercorrectement.
Conestaunidadsesuministranlassiguientespiezas.Despuésdeinspeccionarlas,colóquelascorrectamente.
Rear view camera (with camera bracket)
Rückfahrkamera (mit Kamerahalterung)
Caméraderecul(avecsupportdemontage)
Cámaraderetrovisión(conabrazadera)
Power cord
Stromversorgungskabel
Cordond’alimentation
Cabledealimentación
Screw (M3 x 8mm)(3/8 inch)
Schraube (M3 x 8mm)
Vis(M3x8mm)
Tornillos(M3x8mm)
Cable packing
Kabelpackung
Emballageducâble
Guíaparaelcable
For Customer Use:
Enter below the Model No. and Serial No. which are
located on the rear of the cabinet. Retain this information
for future reference.
Model No.
Serial No.
NOTICE: This Class B digital apparatus complies with Canadian ICES-003.
REMARQUE: Cet appareil numérique de la classe B est conforme à la norme NMB-003 du Canada.
Declaration of Conformity with regard to
the EMC Directive 2004/108/EC
Manufacturer:
JVC KENWOOD Corporation
3-12 Moriya-cho, Kanagawa-ku, Yokohama-shi,
Kanagawa, 221-0022, Japan
EU Representative’s:
JVC Technical Services Europe GmbH
Postfach 10 05 04
61145 Friedberg
Germany
Konformitätserklärung in Bezug auf die
EMC-Vorschrift 2004/108/EG
Hersteller:
JVC KENWOOD Corporation
3-12 Moriya-cho, Kanagawa-ku, Yokohama-shi,
Kanagawa, 221-0022, Japan
EU-Vertreter:
JVC Technical Services Europe GmbH
Postfach 10 05 04
61145 Friedberg
Germany
Déclaration de conformité se rapportant à
la directive EMC 2004/108/EC
Fabricant:
JVCKENWOODCorporation
3-12Moriya-cho,Kanagawa-ku,Yokohama-shi,
Kanagawa,221-0022,Japan
Représentants dans l’UE :
JVCTechnicalServicesEuropeGmbH
Postfach100504
61145Friedberg
Germany
Declaración de conformidad con respecto
a la Directiva EMC 2004/108/CE
Fabricante:
JVCKENWOODCorporation
3-12Moriya-cho,Kanagawa-ku,Yokohama-shi,
Kanagawa,221-0022,Japan
Representante en la UE:
JVCTechnicalServicesEuropeGmbH
Postfach100504
61145Friedberg
Germany
KV-CM20[K].indb 1 2012/02/03 15:29:12

2
INSTALLATION
• The following illustration shows a typical
installation. However, you should make
adjustments corresponding to your specific car.
If you have any questions or require information
regarding installation kits, consult your JVC car
audio dealer or a company supplying kits.
Before installing the unit:
• When mounting the unit, be sure to use the
screws provided, as instructed. If other screws are
used, parts could become loose or damaged.
• When tightening screws or bolts, be careful not to
pinch any connection cord.
• Be sure to attach the unit onto the surface which
is flat and dry.
• When the humidity is high, dry the installation
position before installing the unit so that the
adhesive strength of the double-faced tape is not
weakened.
• When the temperature is low, warm the
installation position before installing the unit so
that the adhesive strength of the double-faced
tape is not weakened.
• Clean the installation position before attaching
the double-faced tape.
• Do not install the unit onto a position where the
double-faced tape is not attached firmly.
• Do not place FM/AM antennas, cellular phones,
etc. near the unit.
• Do not perform the following before 24 hours
have passed since installing.
–Apply water to the unit.
–Expose the unit to rain.
–Apply unnecessary force to the unit.
EINBAU
• Die folgende Abbildung zeigt die typische
Installation. Sie müssen aber Justierungen
entsprechend des vorliegenden Fahrzeugs
vornehmen. Wenn Sie Fragen haben oder weitere
Informationen zu Einbausätzen benötigen, wenden
Sie sich an Ihren Fachhändler für JVC Autostereo
oder einen Fachhändler für die Einbausätze.
–Wenn bezüglich des richtigen Einbaus dieses
Geräts Zweifel bestehen, immer einen qualifizierten
Techniker um Rat fragen.
Vor dem Einbau des Geräts:
• Bei der Montage dieses Gerätssollen immer
die mitgelieferten Schrauben wie beschrieben
verwendet werden. Wenn andere Schrauben
verwendet werden, besteht die Gefahr, dass sich
Teile lockern oder beschädigt werden könnten.
• Beim Festziehen von Schrauben oder
Steckschrauben immer darauf achten, keine Kabel
einzuklemmen.
• Bringen Sie das Gerät immer an einer Oberfläche
an, die flach und trocken ist.
• Bei hoher Luftfeuchtigkeit trocknen Sie die
Einbauposition vor dem Einbau des Geräts, so dass
die Klebekraft des doppelseitigen Klebebands nicht
geschwächt wird.
• Bei niedriger Temperatur wärmen Sie die
Einbauposition vor dem Einbau des Geräts, so dass
die Klebekraft des doppelseitigen Klebebands nicht
geschwächt wird.
• Säubern Sie die Einbauposition vor dem
Anbringen des doppelseitigen Klebebands.
• Bringen Sie das Gerät nicht in einer Position
an, wo das doppelseitige Klebeband nicht fest
angebracht ist.
• Platzieren Sie keine UKW/MW-Antennen,
Mobiltelefone usw. in der Nähe des Geräts.
• Führen Sie Folgendes nicht aus, bevor 24 Stunden
nach dem Einbau vergangen sind.
–Das Gerät Wasser aussetzen.
–Das Gerät Regen aussetzen.
–Das Gerät unnötiger Gewaltanwendung
aussetzen.
INSTALLATION
• L’illustrationsuivanteestunexemple
d’installationtypique.Cependant,vous
devezfairelesajustementscorrespondantà
votrevoiture.Sivousavezdesquestionsou
avezbesoind’informationssupplémentaires
concernantleskitsd’installation,consultez
votrerevendeurd’autoradioouunecompagnie
fournissantdetelskits.
–Sivousn’êtespassûrdepouvoirinstaller
l’appareilcorrectement,faite-leinstallerpar
untechnicienqualifié.
Avant d’installer l’appareil:
• Lorsdumontagedel’appareil,assurez-vous
d’utiliserlesvisfournies,delafaçonindiquée.
Sivousutilisezd’autresvis,certainespièces
peuventêtreperduesouendommagées.
• Lorsquevousserrezdesvisoudesboulons,
faitesattentiondenepaspinceruncordonde
connexion.
• Assurez-vousdefixerl’appareilsurunesurface
plateetsèche.
• Siilyatropd’humidité,essuyezlaposition
d’installationavantd’installerl’appareildefaçon
quel’adhérencedurubanadhésifdouble-face
nesoitpasaffaiblie.
• Silatempératureesttropbasse,chauffezla
positiond’installationavantd’installerl’appareil
defaçonquel’adhérencedurubanadhésif
double-facenesoitpasaffaiblie.
• Nettoyezlapositiond’installationavantdefixez
lerubanadhésifdouble-face.
• N’installezpasl’appareildansunendroitoù
lerubanadhésifdouble-facenepeutêtrefixé
solidement.
• NeplacezpasuneantenneFM/AM,un
téléphoneportable,etc.,prèsdel’appareil.
• Nefaitespasleschosessuivantesavant24
heuresaprèsl’installation.
–Appliquerdel’eausurl’appareil.
–Exposerl’appareilàlapluie.
–Appliquezuneforcetropimportantesur
l’appareil.
INSTALACIÓN
• Lasiguienteilustraciónmuestraunainstalación
típica.Sinembargousteddeberáefectuarlos
ajustescorrespondientesasuautomóvil.Sitiene
algunaconsultaonecesitainformaciónadicional
acercadeloskitsdeinstalación,consultea
sudistribuidorJVCdeequiposdeaudiopara
automóvilesoalaempresaproveedoradeloskits.
–Sinoestásegurodepoderinstalarlaunidad
correctamente,déjelaenmanosdeuntécnico
cualificado.
Antes de instalar la unidad:
• Alinstalarlaunidad,asegúresedeusarlos
tornillossuministrados,deacuerdoconlas
instrucciones.Elusodeotrostornillospodrá
provocarflojedaddeodañosalaspiezas.
• Alapretarlostornillosolospernos,asegúresede
queningúncabledeconexiónquedepillado.
• Asegúresedefijarlaunidadaunasuperficieplana
yseca.
• Encondicionesdehumedadelevada,sequeel
lugardeinstalaciónantesdeinstalarlaunidad
paraquenosedebilitelacapacidadadhesivade
lacintadedoblefaz.
• Encondicionesdetemperaturabaja,calienteel
lugardeinstalaciónantesdeinstalarlaunidad
paraquenosedebilitelacapacidadadhesivade
lacintadedoblefaz.
• Limpieellugardeinstalaciónantesdefijarlacinta
dedoblefaz.
• Noinstalelaunidadenunaubicacióndondela
cintadedoblefaznosefijeconfirmeza.
• NocoloqueantenasdeFM/AM,teléfonos
celulares,etc.cercadelaunidad.
• Norealicelosiguientedentrodelasprimeras24
horasluegodelainstalación.
–Aplicaraguaalaunidad.
–Exponerlaalalluvia.
–Aplicarfuerzainnecesariasobrelaunidad.
–it may obstruct the operation of safety devices
such as air bags, as this may result in a fatal
accident.
–it may obstruct visibility.
• DO NOT operate any unit while manipulating
the steering wheel, as this may result in a traffic
accident.
• If you need to operate the unit while driving,
be sure to look around carefully or you may be
involved in a traffic accident.
• This unit helps the driver to check behind.
However, the unit cannot show all dangers and
obstacles. Be sure to look behind also for yourself
before travelling in reverse.
• The rear view is wider in near sight and narrower
in far sight than the actual view because of the
wide-angle lens. This sight distortion may cause
the distance recognition to be different. Be sure to
look behind also for yourself.
• DO NOT wash your car with high-pressure
sprayers as it may cause water to penetrate the
unit or cause the unit to fall off, resulting in
damage or malfunction.
• If you use this unit in a location lit by fluorescent
light, the display may flicker. (This is not an
indication of trouble.)
Notes on electrical connections:
Replace the fuse with one of the specified rating.
If the fuse blows frequently, consult your JVC car
audio dealer.
Notes:
• The view through the unit is a left-right reversal
as with the view in the rear or side mirrors.
• When the lens is exposed to the direct sunlight or
the strong light, the reflection of the light may be
looked like noises on the monitor, but this is not a
malfunction.
• Before driving, be sure to check the unit is
installed securely. Incorrect installation may
cause an accident.
–an denen sie den Betrieb von Sicherheit
seinrichtungen, z.B. Airbags, behindern
könnten. Anderenfalls führt diese Behinderung
möglicherweise zu ernsten Verkehrsunfällen.
–an denen sie die Sicht behindern.
• Betätigen Sie beim Fahren KEINE Geräte.
Anderenfalls führt dies möglicherweise zu einem
ernste Verkehrsunfall.
• Wenn Sie das Gerät beim Fahren bedienen
müssen, dürfen Sie nicht den Blick von der Straße
nehmen, da sonst die Gefahr von Verkehrsunfällen
besteht.
• Dieses Gerät hilft dem Fahrer, zu prüfen was sich
hinter dem Fahrzeug befindet. Das Gerät kann
aber nicht alle Gefahren und Hindernisse zeigen.
Vergewissern Sie sich beim Rückwärtsfahren
immer mit eigenen Augen.
• Die Rückfahrsicht ist wegen den Eigenschaften
des Weitwinkelobjektivs breiter bei Nahsicht und
schmaler bei Fernsicht. Diese Sichtverzerrung
kann die Entfernungseinschätzung verfälschen.
Vergewissern Sie sich immer mit eigenen Augen.
• Reinigen Sie Ihr Auto NICHT mit einem
Hochdruckreiniger, da hierdurch Wasser in das
Gerät eindringen oder das Gerät herunterfallen
kann, was zu Schäden oder Störungen führen
kann.
• Wenn Sie dieses Gerät an einem durch
Leuchtstoffröhren beleuchteten Ort verwenden,
kann der Anzeigebildschirm flackern. (Dies ist kein
Anzeichen für eine Störung.)
Hinweise zu elektrischen Anschlüssen:
Die Sicherung durch eine mit vorgeschriebener
Stärke ersetzen. Wenn die Sicherung häufig
durchbrennt, lassen Sie sich von Ihrem Fachhändler
für JVC Autostereo beraten.
Hinweise:
•
Die Sicht durch das Gerät ist spiegelverkehrt, genau
wie beim Blick in den Seiten- oder Rückspiegel.
• Wenn das Objektiv direktem Sonnenlicht oder
starkem Licht ausgesetzt wird, können die
Reflexionen des Lichts wie Störungen im Monitor
erscheinen, aber das ist keine Fehlfunktion.
• Vor dem Losfahren prüfen Sie immer, ob das Gerät
sicher installiert ist. Falsche Installation kann
Unfälle verursachen.
–oùilpeutgênerlamanipulationdedispositifs
desécuritételsquelesairbagscarcelapeut
entraînerunaccidentfatal.
–oùilpeutgênerlavisibilité.
• NECOMMANDEZpasl’appareillorsdela
manipulationduvolantcarcelapeutentraîner
unaccidentdelacirculation.
• Sivoussouhaitezopérerl’appareilpendant
quevousconduisez,assurez-vousdebien
regarderautourdevousafindenepascauser
unaccidentdelacirculation.
•
Cetappareilaideleconducteuràvérifiercequise
trouvederrièrelavoiture.Cependant,l’appareilne
peutpasmontrertouslesdangersetlesobstacles.
Assurez-vousderegarderaussidirectement
derrièrevousavantd’effectuerunemarchearrière.
•
Lavuearrièreestpluslargepourleschoses
prochesetplusétroitepourleschoseséloignées
parrapportàlavueactuelleàcausedel’effet
del’objectifgrandangle.Ladéformation
delavuepeutentraîneruneerreurdansla
reconnaissancedeladistance.Assurezvousde
regarderdirectementderrièrevous.
• NELAVEZPASvotrevéhiculeàl’aided’un
équipementhautepression.Celarisquerait
eneffetdeprovoquerunepénétrationd’eau
dansl’appareiloulachutedecedernier,ce
quientraîneraitunendommagementouun
dysfonctionnementdel’appareil.
• Sivousutilisezcetappareildansunlieuéclairé
pardeslampesfluorescentes,l’afficheurrisque
declignoter.(Cecin’estenrienlesigned’un
dysfonctionnement.)
Remarques sur les connexions électriques:
Remplacezlefusibleparunautredelavaleur
indiquée.Silefusiblegrillefréquemment,
consultezvotrerevendeurautoradioJVC.
Remarques:
•
L’imageaffichéeparl’appareilcorrespondàune
vueinverséegauche-droitecommecellequevous
voyezdansvotrerétroviseurprincipaloulatéral.
• Quandl’objectifestexposéàlalumièredirecte
dusoleilouàunelumièreimportante,la
réflexiondelalumièrepeutapparaîtresousla
formedebruitsurlemoniteur,maiscen’estpas
unmauvaisfonctionnement.
•
Avantdeconduirelavoiture,assurez-vousque
l’appareilestinstallésolidement.Uneinstallation
incorrectepeutentraînerunaccident.
–dondepuedaobstruirelfuncionamientode
dispositivosdeseguridadtalescomobolsasde
aire,puespodríaresultarenunaccidentefatal.
–dondepuedaobstruirlavisibilidad.
• NOOPERElaunidadmientrasestámaniobrando
elvolantededirección,puespodríaproducirseun
accidentedetráfico.
• Sinecesitaoperarlaunidadmientrasconduce,
asegúresedemiraratentamenteasualrededor
puesdelocontrario,sepodríaproducirun
accidentedetráfico.
• Estaunidadleayudaalconductoraverificarlo
queocurredetrásdesuvehículo.Sinembargo,
estaunidadnopuedemostrartodoslospeligros
uobstáculos.Asegúresetambiéndemirarhacia
atrásantesdeponerelvehículoenmovimientoen
marchaatrás.
• Lavistatraseraesmásanchaquelavistareala
cortadistanciaymásangostaalargadistancia
debidoalobjetivogranangular.Estadistorsión
delavisiónpuedeprovocarquelaapreciaciónde
ladistanciaseadiferente.Asegúresetambiénde
mirarhaciaatrásporustedmismo.
• NOlaveelcocheconmanguerasdealtapresión,
yaquepuedeprovocarqueelaguapenetre
enlaunidadoquelaunidadsecaigay,en
consecuencia,queseproduzcandañosoaverías.
• Siutilizaestaunidadenunaubicacióniluminada
porunaluzfluorescente,puedequelapantalla
parpadee(estonoindicaqueexistaunproblema).
Notas sobre las conexiones eléctricas:
Reemplaceelfusibleporunodelaclasificación
especificada.Sielfusiblesequemara
frecuentemente,consulteasudistribuidorJVCde
equiposdeaudioparaautomóviles.
Notas:
•
Laimagenqueseobtieneatravésdelaunidades
unainversiónhorizontal,lamismaqueseobtiene
atravésdelespejoretrovisorolosespejoslaterales.
• Cuandoseexponeelobjetivoalaluzdirectadel
soloaunaluzpotente,lareflexióndedichaluz
puedeversecomoruidoenelmonitor,peroesto
noesseñaldemalfuncionamiento.
•
Antesdeconducir,asegúresedecontrolarquela
unidadseencuentreinstaladaenformasegura.La
instalaciónincorrectapuedeprovocarunaccidente.
ENGLISH DEUTSCH FRANÇAIS ESPAÑOL
KV-CM20[K].indb 2 2012/02/03 15:29:12

3
ENGLISH DEUTSCH FRANÇAIS ESPAÑOL
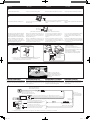
Adequate view of the rear view camera
ELECTRICAL CONNECTIONS
To prevent short circuits, we recommend that you
disconnect the battery’s negative terminal and make
all electrical connections before installing the unit.
ELEKTRISCHE ANSCHLÜSSE
Zur Vermeidung von Kurzschlüssen empfehlen wir,
daß Sie den negativen Batterieanschluß abtrennen
und alle elektrischen Anschlüsse herstellen, bevor das
Gerät eingebaut wird.
RACCORDEMENTS ELECTRIQUES
Pourévitertoutcourt-circuit,nousvous
recommandonsdedébrancherlabornenégative
delabatterieetd’effectuertouslesraccordements
électriquesavantd’installerl’appareil.
CONEXIONES ELECTRICAS
Paraevitarcortocircuitos,recomendamosque
desconecteelterminalnegativodelabateríayque
efectúetodaslasconexioneseléctricasantesde
instalarlaunidad.
Bumper or rear edge of the car /
Sichtbereich der Rückfahrkamera /
Plagedevuedelacaméraderecul/
Rangodevisióndelacámarade
retrovisión
3
If required, separate the camera bracket from
the camera and adjust the shape according to
the surface on which it will be attached, and
then mount the camera on the camera bracket.
Be sure to install the rear view camera with
the “JVC” logo up. If the rear view camera is
installed upside down, the picture displayed on
the monitor will also be upside down.
Bend / Biegen /
Plier / Doblar
Bend / Biegen /
Plier / Doblar
Caméra bracket / Kamerahalterung / Supportdelacaméra / Abrazaderadelacámara
1
2A
2A
1
1
To a video input jack of the receiver/monitor *
1
/ Zu einer Eingangsbuchse von Receiver/Monitor *
1
/
Àuneprised’entréevidéod’unautoradio/moniteur*
1
/
Aljackdeentradadevídeodelreceptor/monitor*
1
Video output cord / Video-Ausgangskabel / Cordondesortievidéo/Cabledesalidadevídeo
To metallic body or chassis of the car
Zur metallenen Karosserie oder zum Fahrwerk des Autos
Verscorpsmétalliqueouchâssisdelavoiture
Auncuerpometálicoochasisdelautomóvil
From the rear view camera
Von der Rückfahrkamera
Àpartirdelacaméraderecul
Desdelacámaraderetrovisión
Power cord
Stromversorgungskabel
Cordond’alimentation
Cabledealimentación
Rear view camera cord: 1.5 m (59 inch)
Kabel der Rückfahrkamera: 1.5 m
Cordondelacaméraderecul:1.5m
Cabledelacámaraderetrovisión:1.5m
To an accessory terminal in the fuse block
Zur einer Zubehöranschlußklemme im Sicherungsblock
Versborneaccessoireduporte-fusible
Aunterminalaccesoriodelbloquedefusibles
Red / Rot /
Rouge/Rojo
Fuse (2 A) / Sicherung (2 A) /
Fusible(2A)/Fusible(2A)
Black / Schwarz / Noir / Negro
*
1
Not included for this unit. / Für diesen Receiver nicht mitgeliefert. / Nonfourniaveccetappareil. / Nosuministradoconestaunidad.
1
Cleanthecamerainstallsurface.
Reinigen Sie die Kamera-Montagefläche.
Nettoyezlasurfaced’installationdelacaméra. Limpielasuperficiedeinstalacióndelacámara.
2
Loosen the camera bracket retaining screws.
Rear view camera / Rückfahrkamera /
Caméraderecul/Cámaraderetrovisión
Camera bracket / Kamerahalterung / Supportdelacaméra / Abrazaderadelacámara
Lösen Sie die Befestigungsschrauben der
Kamerahalterung.
Deserrezlesvisdefixationdusupportdela
caméra.
Aflojelostornillosdefijacióndelaabrazaderadela
cámara.
Entfernen Sie bei Bedarf die Kamerahalterung von
der Kamera und passen Sie die Form der Halterung
der Montagefläche an; bringen Sie die Kamera an
der Kamerahalterung an.
Bauen Sie die Rückfahrkamera mit dem “JVC”-Logo
nach oben weisend ein. Wenn die Rückfahrkamera
in umgekehrter Stellung eingebaut wird, erscheint
das Bild im Monitor ebenfalls umgekehrt.
Sicelaestnécessaire,détachezlesupportde
lacaméraetadaptezsaformeàlasurfacede
montageetpuismontezlacamérasurson
support.
Assurez-vousd’installerlacaméradereculavec
lelogo“JVC”dirigéverslehaut.Silacamérade
reculestinstalléeàl’envers,l’imageaffichéesurle
moniteurseraaussiàl’envers.
Siesnecesario,separelaabrazaderadelacámara
yajustesuformasegúnlasuperficiedondese
acoplará,yentoncesmontelacámarasobrela
abrazadera.
Asegúresedeinstalarlacámaraderetrovisióncon
ellogo“JVC”haciaarriba.Siinstalaralacámarade
retrovisiónalrevés,laimagenvisualizadatambién
seencontraráalrevés.
Geeignete Sicht der Rückfahrkamera Vue correcte de la caméra de recul Vista correcta de la cámara de retrovisión
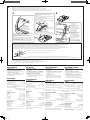
4
*1
Adjust the angle
Stellen Sie den Winkel ein
Ajustezl’angle
Ajusteelángulo
After adjusting the camera angle, tighten the
retaining screws firmly.
Ziehen Sie nach dem Einstellen des
Kamerawinkels die Befestigungsschrauben fest
an.
Aprèsavoirréglél’angledelacaméra,serrez
fermementlesvisdefixation.
Despuésdeajustarelángulodelacámara
aprietefirmementelostornillosdefijación.
Fix the camera in position. / Bringen Sie die Kamera in ihrer Position an. /
Fixezlacaméraenplace./Fijelacámaraensuposición.
*
1
If required, secure the bracket on the vehicle body. / Befestigen Sie die Halterung bei Bedarf
an der Fahrzeugkarosserie. / Sibesoinest,fixezlesupportsurlecorpsduvéhicule. /
Siesnecesario,fijelaabrazaderaalacarroceríadelvehículo.
KV-CM20[K].indb 3 2012/02/03 15:29:13

2
Cable packing/
Kabelpackung/
Emballageducâble/
Guíaparaelcable
4
TROUBLESHOOTING
• Thefuseblows.
* Are the red and black leads connected correctly?
• Nopictureappearsonthemonitor.
* Is the video output cord connected correctly?
• Thepictureisupsidedown.
* The rear view camera is installed upside down.
Install the rear view camera correctly as in
“INSTALLATION.”
SPECIFICATIONS
GENERAL:
Power Requirement: 12.0 V (11 V to 16 V allowable)
Max. current consumption: 60 mA
Grounding System: Negative ground
Allowable Storage Temperature:
–30˚C ~ +80˚C (–22˚F ~ +176˚F)
Allowable Operating Temperature:
–20˚C ~ +60˚C (–4˚F ~ +140˚F)
Dimensions (W × H × D):
24 mm × 24 mm × 24.9 mm
(1 inch × 1 inch × 1 inch)
Mass (approx.): 34 g (0.075 lbs)
CAMERA SECTION:
Camera: 1/4 inch C-MOS
Pixels (approx.): 310 000 px
Lens: Wide view angle
Focus length: 1.41 mm (
1
/16 inch)
F value: 2.3
View Angle: Horizontal: 130 degree
Vertical: 101 degree
Illumination Range (approx.): 0.9 to 100 000 lux
VIDEO OUTPUT:
Color System: NTSC
Scanning System: Interlace
Output level: 1.0 V(p-p) / 75
Aspect ratio: 4:3
Output Picture: Reverse (mirror image)
Design and specifications are subject to change
without notice.
FEHLERSUCHE
• Sicherungbrenntdurch.
* Sind die roten und schwarzen Leitungen richtig
angeschlossen?
• KeinWiedergabebilderscheintimMonitor.
* Ist das Videoausgangskabel richtig angeschlossen?
• DasBilderscheintverkehrtherum.
* Die Rückfahrkamera wurde verkehrt herum
eingebaut. Die Rückfahrkamera richtig einbauen,
wie in “EINBAU” beschrieben.
TECHNISCHE DATEN
ALLGEMEINES:
Betriebsstromanforderu ngen:
12,0 V (11 V bis 16 V Toleranz)
Max. Stromverbrauch: 60 mA
Erdungssystem: Negative Masse
Zulässige Lagertemperatur: –30˚C ~ +80˚C
Zulässige Betriebstemperatur: –20˚C ~ +60˚C
Abmessungen (B × H × T):
24 mm × 24 mm × 24.9 mm
Gewicht (ca.): 34 g
KAMERATEIL:
Kamera: 1/4 Zoll C-MOS
Pixel (ca.): 310 000 px
Objektiv: Weitwinkel
Brennweite: 1.41 mm
F-Wert: 2,3
Sichtwinkel: Horizontal: 130 Grad
Vertikal: 101 Grad
Beleuchtungsbereich (ca.): 0,9 bis 100 000 Lux
VIDEOAUSGANG:
Farbsystem: NTSC
Abtastsystem: Zeilensprung
Ausgangspegel: 1,0 V(s-s) / 75 Ω
Seitenverhältnis: 4:3
Ausgabebild: Umgekehrt (spiegelverkehrt)
Änderungen bei Design und technischen Daten
bleiben vorbehalten.
EN CAS DE DIFFICULTES
• Lefusiblegrille.
* Lesfilsrougeetnoirsont-ilsconnectés
correctement?
• Aucuneimagen’apparaîtsurlemoniteur.
* Lecordondesortievidéoest-ilconnecté
correctement?
• L’imageestàl’envers.
* Lacaméradereculestinstalléeàl’envers.
Installezlacaméradereculcorrectement
commeexpliquédans“INSTALLATION”.
SPÉCIFICATIONS
GÉNÉRALITÉS:
Alimentation: 12,0V(11Và16Vadmissibles)
Consommationdecourantmax.: 60mA
Systèmedemiseàlamasse: Massenégative
Températuredestockageadmissible:
–30˚C~+80˚C
Températuresdefonctionnementadmissibles:
–20˚C~+60˚C
Dimensions(L×H×P):
24mm×24mm×24,9mm
Masse(approx.): 34g
SECTION DE LA CAMÉRA:
Caméra: C-MOS1/4pouce
Pixels(approx.): 310000px
Objectif: Grandangle
Longueurfocale: 1,41mm
ValeurF: 2,3
Angledevue: Horizontal:130degrés
Vertical:101degrés
Plaged’éclairement(approx.): 0,9à100000lux
SORTIE VIDÉO:
Standarddecouleur: NTSC
Systèmedebalayage: Entrelacé
Niveaudesortie: 1,0V(p-p)/75Ω
Rapportd’aspect: 4:3
Imagesortie: Inversée(imagemiroir)
Lemodèleetlescaractéristiquespeuventêtre
sujetsàmodificationssansavispréalable.
LOCALIZACIÓN DE AVERIAS
• Elfusiblesequema.
* ¿Seencuentrancorrectamenteconectadoslos
cablesrojoynegro?
• Noaparecelaimagenenelmonitor.
* ¿Seencuentraconectadocorrectamenteelcable
desalidadevídeo?
• Laimagenestáinvertidaverticalmente.
*
Lacámaraderetrovisiónseencuentrainstalada
alrevés.Instalelacámaraderetrovisión
correctamente,comosemuestraen“INSTALACIÓN”.
ESPECIFICACIONES
GENERAL:
Requisitosdepotencia:
12,0V(toleranciade11Va16V)
Consumomáximodecorriente: 60mA
Sistemadepuestaatierra: Negativoamasa
Temperaturadealmacenamientoadmisible:
–30˚C~+80˚C
Temperaturadefuncionamientoadmisible:
–20˚C~+60˚C
Dimensiones(An×Al×Pr):
24mm×24mm×24,9mm
Peso(aprox.): 34g
SECCIÓN DE LA CÁMARA:
Cámara: 1/4pulgadaC-MOS
Píxeles
(aprox.)
: 310000píxeles
Objetivo: granangular
Distanciafocal: 1,41mm
Fvalor: 2,3
Ángulodevisión: horizontal:130grados
Vertical:101grados
Rangodeiluminación(aprox.): 0,9a100000lux
SALIDA DE VÍDEO:
Sistemadecolor: NTSC
Sistemadebarrido: entrelazado
Niveldesalida: 1,0V(p-p)/75Ω
Relacióndeaspecto: 4:3
Imagenproducida: invertida(imagenenespejo)
Eldiseñoylasespecificacionesseencuentransujetos
acambiossinprevioaviso.
Wiringthecord/VerlegungdesKabels/Acheminementducordon/Colocacióndelcableado
Illustration A is example for a hatchback car, and illustration B is for a sedan car.
Abbildung A ist ein Beispiel für ein Schrägheck-Fahrzeug und Abbildung B ist für eine Limousine.
L’illustrationAestunexempledevoiturebicorpsetl’illustrationBestpourunevoitureberline.
LailustraciónAesunejemploparaunautomóvil3/5puertas;lailustraciónBcorrespondeaunautomóvilsedán.
Cable packing / Kabelpackung / Emballageducâble/Guíaparaelcable
Installation position / Einbauposition / Positiond’installation / Posicióndeinstalación
Attaching the cable packing / Anbringen der Kabelpackung / Fixation du emballage du câble / Fijación de la guía para el cable
Attach the cable packing at the position where the cord is pulled inside the car as the rain water does not penetrate inside the car.
Bringen Sie die Kabelpackung in der Position an, wo das Kabel in das Fahrzeug geführt wird, damit kein Regenwasser in das Fahrzeug eindringen kann.
Fixezleemballageducâbledansunepositionoùlecordonesttiréàl’intérieurdelavoituredefaçonquel’eaudepluienepénètrepardanslavoiture.
Fijelaguíaparaelcableenellugardondeelcableentraenelautomóvilparaqueelaguadelluvianopenetredentrodelautomóvil.
B
Cord of the rear view camera (Insert the cord into the cable packing) / Kabel der Rückfahrkamera (Kabel in Kabelpackung einsetzen) /
Cordondelacaméraderecul(insérezlecordondansleemballageducâble)/Cabledelacámaraderetrovisión(inserteelcableenlaguíaparaelcable)
After wiring the cord, be sure to check if the hatch door does not rubs the cord. /
Nach Verdrahtung des Kabels immer prüfen, ob die Heckklappe nicht das Kabel reibt. /
Aprèsavoiracheminélecordon,assurez-vousdevérifierlaportearrièrenetouchepaslecordon./
Luegodecolocarelcable,asegúresequelapuertatraseranoroceelcable.
A
Pull the cord from outside of the hinge and
harness cover./
Ziehen Sie das Kabel von außen von dem Scharnier
und der Kabelbaumabdeckung./
Tirezlecâbleparl’extérieurdelacharnièreetdu
couvercleduharnais./
Paseelcabledesdelaparteexteriordelabisagray
lacubiertadelmazodecables.
Hinge / Scharnier /
Charnière/Bisagra
Harness cover / Kabelbaumabdeckung /
Couvercleduharnais/Cubiertadelmazodecables
Cable packing/
Kabelpackung/
Emballageducâble/
Guíaparaelcable
Attach the cable packing so that it is touching underneath the
rubber seal and pull the cord inside the car./
Die Kabelpackung so anbringen, dass sie unterhalb der
Gummiabdichtung anliegt; danach das Kabel ins Fahrzeuginnere
ziehen./
Fixezl’emballageducâbledefaçonàcequ’iltouchele
dessousdujointd’étanchéitéencaoutchoucettirezle
cordonàl’intérieurduvéhicule./
Fijelaguíaparaelcabledeformaquetoquelaparteinferiordel
sellodecauchoytiredelcablehaciaelinteriordelautomóvil.
Attach the cable packing so
that when the trunk is closed it
closes on a level area./
Die Kabelpackung so
anbringen, dass beim
Schließen des Kofferraums der
Kofferraumdeckel auf einer
flachen Stelle aufliegt./
Fixezl’emballageducâble
defaçonàcequelorsquele
coffreàbagagesestfermé,
ilserefermesurunezone
égale./
Fijelaguíadelcabledeforma
quealcerrarelportaequipajes
secierresobreunáreanivelada.
KV-CM20[K].indb 4 2012/02/03 15:29:13
-
 1
1
-
 2
2
-
 3
3
-
 4
4


in anderen Sprachen
- English: JVC KV-CM20 Owner's manual
- français: JVC KV-CM20 Le manuel du propriétaire
- español: JVC KV-CM20 El manual del propietario