
Lue Turvallisuus ja tärkeitä tietoja (lisähuomautus)
ensin.
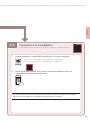
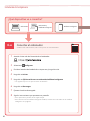
Aloitusopas
Læs Sikkerhedsoplysninger og vigtige
oplysninger (tillæg) først.
Før du begynder
Les Sikkerhetsinformasjon og viktig informasjon
(tillegg) først.
Komme i gang
Läs Information om säkerhet och annan viktig
information (bilaga) först.
Uppstartsguide
Διαβάστε πρώτα τις Πληροφορίες για την ασφάλεια
και σημαντικές πληροφορίες (συμπλήρωμα).
Ξεκινώντας
Lea primero Información de seguridad
e información importante (apéndice).
Guía de inicio
Leia Informações Importantes e Sobre Segurança
(adendo) primeiro.
Para Começar
Leggere innanzitutto Informazioni importanti
e sulla sicurezza (addendum).
Guida Rapida
Lees eerst Veiligheidsinformatie en belangrijke
informatie (addendum).
Aan de Slag-gids
Lesen Sie Sicherheitsinformationen und wichtige
Hinweise (Anhang) zuerst.
Inbetriebnahme
Commencez par lire Sécurité et informations
importantes (addendum).
Démarrage
Getting Started
Read Safety and Important Information
(addendum) rst.

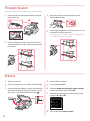
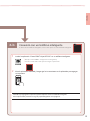
Tulostimen piteleminen
Yhdistäminen tietokoneeseen, älypuhelimeen tai tablet-tietokoneeseen .... sivu 4
Tulostimen asennus ...................................................................................................................... sivu 1
Tilslutning til en computer, smartphone eller tablet ...............................................side 4
Installation af printeren ...............................................................................................................side 1
Holde printeren
Holde skriveren
Koble til en datamaskin, en smarttelefon eller et nettbrett .................................side 4
Installere skriveren .........................................................................................................................side 1
Bära skrivaren
Ansluta till en dator, smarttelefon eller surfplatta ......................................................sida 4
Installera skrivaren..........................................................................................................................sida 1
Πώς να κρατήσετε τον εκτυπωτή
Σύνδεση σε υπολογιστή, smartphone ή tablet .....................................................σελίδα 4
Εγκατάσταση του εκτυπωτή ..............................................................................................σελίδα 1
Cómo sujetar la impresora
Conexión con un ordenador, teléfono inteligente o tableta ....................... página 4
Instalación de la impresora ...............................................................................................página 1
Segurando a impressora
Conectando a um computador, smartphone ou tablet .................................página 4
Instalando a impressora ...................................................................................................... página 1
Come tenere la stampante
Connessione a un computer, uno smartphone o un tablet .........................pagina 4
Installazione della stampante .......................................................................................... pagina 1
De printer vasthouden
Verbinden met een computer, smartphone of tablet ......................................pagina 4
De printer installeren.............................................................................................................pagina 1
Halten des Druckers
Herstellen einer Verbindung mit einem Computer, Smartphone oder Tablet ....Seite 4
Installation des Druckers .......................................................................................................... Seite 1
Manipulation de l'imprimante
Connexion à un ordinateur, un smartphone ou une tablette .........................page 4
Installation de l'imprimante ..................................................................................................page 1
Installing the Printer ...................................................................................................................page 1
Connecting to a Computer, Smartphone or Tablet ............................................... page 4
Holding the Printer

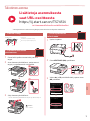
1
ENGLISH
Setting Up the Printer
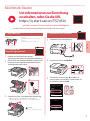
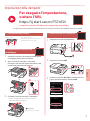
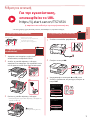
1. Box Contents
•
FINE Cartridges
Color Black
•
Power Cord
•
Safety and Important Information
•
Getting Started (this manual)
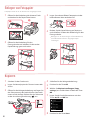
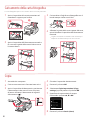
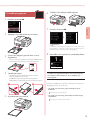
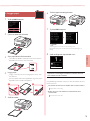
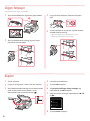
2. Removing Packing Materials
1 Remove and dispose of any packing materials
and orange tape.
2 Open the scanning unit / cover, remove and
dispose of the orange tape and protective
material inside.
b
a
3 Close the scanning unit / cover.
• Open the scanning unit / cover fully and then close it.
Caution
Watch your ngers.
a
b
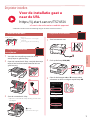
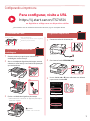
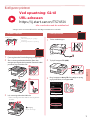
3. Turning on the Printer
1 Connect the power cord.
Back
2 Press the ON button.
3 Use the { and } buttons to select a language,
and then press the OK button.
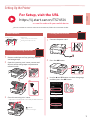
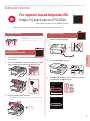
For Setup, visit the URL
https://ij.start.canon/TS7450i
or scan the code with your mobile device
•
For users without an Internet-connected environment, follow the instructions below.

2
Setting Up the Printer
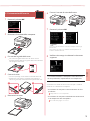
4.
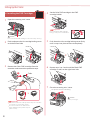
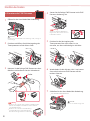
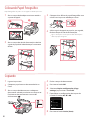
Installing the FINE Cartridges
1 Open the scanning unit / cover.
Caution
Do not touch the FINE cartridge holder until it stops moving.
2 Pinch and open the ink cartridge locking cover
on the left-hand side.
3 Remove the Color FINE cartridge from the
container and remove the protective tape.
aColor
b
Important
• Do not touch the ink on the protective tape. It could stain
your hands or surrounding objects.
• Do not touch the areas shown in the
gure. Otherwise, the printer may not
print correctly.
4 Set the Color FINE cartridge in the FINE
cartridge holder.
Important
Do not bump the FINE cartridge.
Doing so may cause a malfunction.
5 Push down the ink cartridge locking cover rmly
until it snaps into place to close it completely.
6 Repeat steps 2 to 5 and install the Black FINE
cartridge as well, on the right-hand side.
7 Close the scanning unit / cover.
• The printer will start initializing.
Caution
Watch your ngers.
a
b

3
ENGLISH
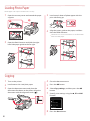
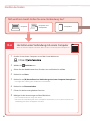
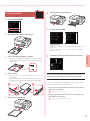
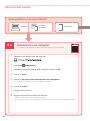
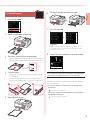
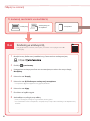
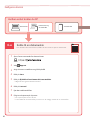
5. Loading Paper
1 Press the OK button.
2 Remove the cassette from the printer.
3 Slide apart the paper guides.
• Slide the right paper guide to the right edge. Align
the front paper guide with the Letter or A4 mark.
4 Load paper.
• Load 2 or more sheets of Letter or A4 sized plain
paper.
• Place the paper against the front paper guide, and
align the right paper guide to the width of the paper.
a b
5 Replace the cassette.
6 Pull out the paper output tray.
7 Press the OK button.
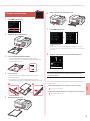
Note
The alignment process prints out two double sided sheets.
Do not pull out the paper or use the printer until alignment is
complete.
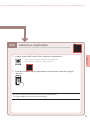
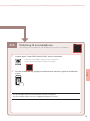
8 Check that the following screen appears.
If you will use the printer without connecting any other
devices, setup is now complete.
Select the connection method that best matches how you
will use the printer.
• To use the printer without connecting to any other
devices
Setup is now complete.
• To use the printer connecting to a computer or
smartphone
Proceed to the next page.

6-a
4
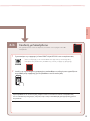
Setting Up the Printer
Computer Smartphone
Computer and
smartphone
Connecting to a Computer
If you are using multiple computers, perform these steps on each computer.
1 Access the Canon website from your computer.
2 Select Set Up.
3 Enter your printer's model name and click Go.
4 Click Start.
5 Click (B) Connecting to a Computer/Smartphone.
• The following steps are for Windows users.
6 Click Download.
7 Run the downloaded le.
8 Follow the on-screen instructions.
• These operations may take some time.
• To connect to a smartphone as well, see "6-b. Connecting to a Smartphone" on page 5.
What device are you connecting?
6-a. Connecting to a Computer

6-b
5
ENGLISH
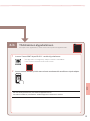
6-b. Connecting to a Smartphone
1 Install the "Canon PRINT Inkjet/SELPHY" app on your smartphone.
• Search for "Canon PRINT" in App Store, or Google Play.
• Access the Canon website to download the app.
2 Open the installed app, and follow the on-screen instructions in the app to add your
printer.
Once you have added your printer, you can print from your smartphone.
To print photos, see "Loading Photo Paper" on page 6.
Connecting to a Smartphone
If you are using multiple smartphones, perform these steps on each smartphone.

6
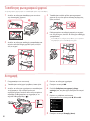
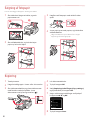
Loading Photo Paper
1 Open the rear tray cover and extend the paper
support.
b
a
2 Open the feed slot cover and slide the right-
hand side paper guide to the far right.
3 Load several sheets of photo paper with the
print side facing up.
4 Align the paper guide to the paper, and then
close the feed slot cover.
• Follow the on-screen instructions to set information
for the loaded paper.
Copying
Photo paper can only be loaded in the rear tray.
1 Turn on the printer.
2 Load Letter or A4 sized plain paper.
3 Open the document cover and place the
document face down on the platen. Align the
document with the alignment mark ( ).
4 Close the document cover.
5 Press the OK button.
6 Select Copy settings, and then press the OK
button.
7 Specify print settings using the {, } and OK
buttons.
8 Press the Start button.

1
FRANÇAIS
Conguration de l'imprimante
1. Contenu de la boîte
•
Cartouches FINE
Couleur Noire
•
Cordon d'alimentation
•
Sécurité et informations importantes
•
Démarrage (ce manuel)
2. Retrait du matériel
d'emballage
1 Enlevez et jetez tout matériel d'emballage et
bande orange.
2 Ouvrez l'unité de numérisation / capot, retirez et
jetez tout bande orange et matériau protecteur
se trouvant à l'intérieur.
b
a
3 Fermez l'unité de numérisation / capot.
• Ouvrez complètement l'unité de numérisation /
capot, puis fermez-la.
Attention
Faites attention à vos doigts.
a
b
3. Mise sous tension de
l'imprimante
1 Branchez le cordon d'alimentation.
Arrière
2 Appuyez sur le bouton MARCHE (ON).
3 Utilisez les boutons { et } pour sélectionner
une langue, puis appuyez sur le bouton OK.
Pour la configuration,
rendez-vous sur l'URL
https://ij.start.canon/TS7450i
ou numérisez le code avec votre appareil mobile
• Pour les utilisateurs ne disposant pas d'un environnement connecté à Internet, suivez les instructions ci-
dessous.

2
Conguration de l'imprimante
4.
Installation des cartouches
FINE
1 Ouvrez l'unité de numérisation / capot.
Attention
Ne touchez pas le porte-cartoucheFINE avant son arrêt.
2 Pincez et ouvrez le couvercle de verrouillage de
cartouche d'encre sur la gauche.
3 Retirez la cartouche FINE couleur du conteneur
et retirez le ruban protecteur.
aCouleur
b
Important
• Ne touchez pas l'encre se trouvant sur le ruban protecteur.
Cela pourrait salir vos mains ou les objets environnants.
• Ne touchez pas les zones présentées
dans la gure. Sinon, l'imprimante
pourrait ne pas imprimer correctement.
4 Installez la cartouche FINE couleur dans le
porte-cartouche FINE.
Important
Ne cognez pas la cartouche FINE.
Cela risquerait d'entraîner un
dysfonctionnement.
5 Poussez fermement vers le bas le couvercle
de verrouillage de cartouche d'encre jusqu'au
déclic pour le fermer complètement.
6 Répétez les étapes2 à5 et installez également
la cartouche FINE noire sur la droite.
7 Fermez l'unité de numérisation / capot.
• L'imprimante commence à s'initialiser.
Attention
Faites attention à vos doigts.
a
b

3
FRANÇAIS
5. Chargement du papier
1 Appuyez sur le bouton OK.
2 Retirez la cassette de l'imprimante.
3 Faites glisser séparément les guides papier.
• Faites glisser le guide papier droit vers le bord droit.
Alignez le guide papier avant sur la marque Lettre ou A4.
4 Chargez du papier.
• Chargez au moins 2 feuilles de papier ordinaire au
format Lettre ou A4.
• Placez le papier contre le guide papier avant et
alignez le guide papier droit sur la largeur du papier.
a b
5 Remettez la cassette en place.
6 Retirez le bac de sortie papier.
7 Appuyez sur le bouton OK.
Remarque
Le processus d'alignement imprimer deux feuilles recto verso.
Ne tirez pas sur le papier ou n'utilisez pas l'imprimante tant que
l'alignement n'est pas terminé.
8 Assurez-vous que l'écran suivant s'ache.
Pour utiliser l'imprimante sans connecter aucun autre
périphérique, la conguration est terminée.
Sélectionnez la méthode de connexion correspondant le
mieux à la manière dont vous utiliserez l'imprimante.
• Pour utiliser l'imprimante sans connexion à aucun autre
périphérique
La conguration est terminée.
• Pour utiliser l'imprimante en la connectant à un
ordinateur ou à un smartphone
Passez à la page suivante.

6-a
4
Conguration de l'imprimante
Ordinateur Smartphone
Ordinateur et
smartphone
Connexion à un ordinateur
Si vous utilisez plusieurs ordinateurs, eectuez ces étapes sur chaque ordinateur.
1 Accès au site Web Canon à partir de votre ordinateur.
2 Sélectionnez Conguration.
3 Entrez le nom de modèle de votre imprimante et cliquez sur Accéder.
4 Cliquez sur Démarrer.
5 Cliquez sur (B) Connexion à un ordinateur/smartphone.
• Les étapes suivantes concernent les utilisateurs Windows.
6 Cliquez sur Télécharger.
7 Exécutez le chier téléchargé.
8 Suivez les instructions à l'écran.
• Ces opérations peuvent prendre du temps.
• Pour vous connecter aussi à un smartphone, voir «6-b. Connexion à un smartphone» à la page
5.
Quel périphérique connectez-vous ?
6-a. Connexion à un ordinateur

6-b
5
FRANÇAIS
6-b. Connexion à un smartphone
1 Installez l'application «Canon PRINT Inkjet/SELPHY» sur votre smartphone.
• Recherchez «Canon PRINT» dans App Store ou Google Play.
• Accédez au site Web Canon pour télécharger l'application.
2 Ouvrez l'application installée, puis suivez les instructions achées à l'écran par
l'application pour ajouter votre imprimante.
Une fois que vous avez ajouté votre imprimante, vous pouvez imprimer depuis votre smartphone.
Pour imprimer des photos, voir «Chargement de papier photo» à la page 6.
Connexion à un smartphone
Si vous utilisez plusieurs smartphones, eectuez ces étapes sur chaque smartphone.

6
Chargement de papier photo
1 Ouvrez le couvercle du réceptacle arrière et
déployez le support papier.
b
a
2 Ouvrez le couvercle de la fente d'alimentation et
faites glisser le guide papier droit vers l'extrême
droite.
3 Chargez plusieurs feuilles de papier photo face à
imprimer vers le haut.
4 Alignez le guide papier avec le papier, puis
fermez le couvercle de la fente d'alimentation.
• Suivez les instructions à l'écran pour dénir les
informations sur le papier chargé.
Copie
Le papier photo peut être chargé uniquement dans le réceptacle arrière.
1 Mettez l'imprimante sous tension.
2 Chargez du papier ordinaire au format Lettre ou
A4.
3 Ouvrez le capot du scanner et placez le
document face vers le bas sur la vitre
d'exposition. Alignez le document avec le repère
d'alignement ( ).
4 Fermez le capot du scanner.
5 Appuyez sur le bouton OK.
6 Sélectionnez Paramètres de copie, puis
appuyez sur le bouton OK.
7 Spéciez les paramètres d'impression à l'aide
des boutons {, } et OK.
8 Appuyez sur le bouton Démarrage (Start).

1
DEUTSCH
Einrichten des Druckers
1. Inhalt der Box
•
FINE-Patronen
Farbe Schwarz
•
Netzkabel
•
Sicherheitsinformationen und wichtige
Hinweise
•
Inbetriebnahme (dieses Handbuch)
2. Entfernen des
Verpackungsmaterials
1 Entfernen und entsorgen Sie das gesamte
Verpackungsmaterial sowie das orangefarbene Klebeband.
2 Önen Sie das Scan-Modul/die Abdeckung, entfernen und
entsorgen Sie das orangefarbene Klebeband sowie das
Schutzmaterial aus dem Inneren.
b
a
3 Schließen Sie das Scan-Modul/die Abdeckung.
• Önen Sie das Scan-Modul/die Abdeckung
vollständig und schließen Sie es/sie dann wieder.
Vorsicht
Passen Sie auf Ihre Finger auf.
a
b
3. Einschalten des Druckers
1 Schließen Sie das Netzkabel an.
Rückseite
2 Drücken Sie die Taste EIN (ON).
3 Verwenden Sie die Tasten { und }, um
eine Sprache auszuwählen, und drücken Sie
anschließend die Taste OK.
Um Informationen zur Einrichtung
zu erhalten, rufen Sie die URL
https://ij.start.canon/TS7450i
auf oder scannen Sie den Code mit Ihrem Mobilgerät
•
Benutzer ohne Internetverbindung befolgen bitte die folgenden Anweisungen.

2
Einrichten des Druckers
4.
Einsetzen der FINE-Patronen
1 Önen Sie das Scan-Modul/die Abdeckung.
Vorsicht
Berühren Sie die FINE-Patronen-Halterung nicht, solange sie
sich bewegt.
2 Drücken und önen Sie die Verriegelung der
Tintenpatronen auf der linken Seite.
3 Nehmen Sie die farbige FINE-Patrone aus dem
Behälter und entfernen Sie das Schutzband.
aFarbe
b
Wichtig
• Berühren Sie nicht die Tinte auf dem Schutzband. Ihre
Hände oder Objekte in der Nähe könnten dadurch
verschmutzt werden.
• Berühren Sie nicht die in der Abbildung
gezeigten Bereiche. Andernfalls druckt
der Drucker möglicherweise nicht richtig.
4 Setzen Sie die farbige FINE-Patrone in die FINE-
Patronen-Halterung ein.
Wichtig
Stoßen Sie mit der FINE-Patrone
nirgends an. Dies könnte zu einer
Fehlfunktion führen.
5 Drücken Sie die Verriegelung der
Tintenpatronen fest nach unten, bis sie
einrastet, um diese vollständig zu schließen.
6 Wiederholen Sie die Schritte 2 bis 5 und setzen
Sie auch die schwarze FINE-Patrone auf der
rechten Seite ein.
7 Schließen Sie das Scan-Modul/die Abdeckung.
• Der Drucker wird initialisiert.
Vorsicht
Passen Sie auf Ihre Finger auf.
a
b

3
DEUTSCH
5. Einlegen von Papier
1 Drücken Sie die Taste OK.
2 Entfernen Sie die Kassette aus dem Drucker.
3 Schieben Sie die Papierführungen auseinander.
• Schieben Sie die rechte Papierführung an die rechte
Kante. Richten Sie die vordere Papierführung an der
Markierung für Letter oder A4 aus.
4 Legen Sie Papier ein.
• Legen Sie 2 oder mehr Blatt Normalpapier des Formats Letter
oder A4 ein.
• Schieben Sie das Papier gegen die vordere Papierführung und
richten Sie die rechte Papierführung an der Breite des Papiers aus.
a b
5 Setzen Sie die Kassette wieder ein.
6 Ziehen Sie das Papierausgabefach heraus.
7 Drücken Sie die Taste OK.
Hinweis
Während der Ausrichtung werden zwei doppelseitig
bedruckte Blätter ausgegeben.
Ziehen Sie das Papier nicht heraus und verwenden Sie den
Drucker nicht, bis die Ausrichtung abgeschlossen wurde.
8 Überprüfen Sie, ob der folgende Bildschirm
angezeigt wird.
Wenn Sie den Drucker ohne Anschluss weiterer Geräte
verwenden, ist die Einrichtung nun abgeschlossen.
Wählen Sie die Verbindungsmethode aus, die der späteren
Verwendung des Druckers am besten entspricht.
• Verwenden des Druckers ohne Anschluss weiterer
Geräte
Die Einrichtung ist jetzt abgeschlossen.
• Verwenden des Druckers, indem eine Verbindung mit
einem Computer oder Smartphone hergestellt wird
Fahren Sie auf der nächsten Seite fort.

6-a
4
Einrichten des Druckers
Computer Smartphone
Computer und
Smartphone
Herstellen einer Verbindung mit einem Computer
Wenn Sie mehrere Computer verwenden, führen Sie diese Schritte auf jedem Computer aus.
1 Greifen Sie von Ihrem Computer aus auf die Canon-Website zu.
2 Wählen Sie Einrichten aus.
3 Geben Sie den Modellnamen Ihres Druckers ein und klicken Sie auf Los.
4 Klicken Sie auf Start.
5 Klicken Sie auf (B) Herstellen einer Verbindung mit einem Computer/Smartphone.
• Die folgenden Schritte gelten für Benutzer von Windows.
6 Klicken Sie auf Herunterladen.
7 Führen Sie die heruntergeladene Datei aus.
8 Befolgen Sie die Anweisungen auf dem Bildschirm.
• Diese Verfahren können einige Zeit dauern.
• Um auch eine Verbindung mit einem Smartphone herzustellen, lesen Sie „6-b. Herstellen einer
Verbindung mit einem Smartphone” auf Seite 5.
Mit welchem Gerät stellen Sie eine Verbindung her?
6-a. Herstellen einer Verbindung mit einem
Computer

6-b
5
DEUTSCH
6-b. Herstellen einer Verbindung mit einem
Smartphone
1 Installieren Sie die App „Canon PRINT Inkjet/SELPHY” auf Ihrem Smartphone.
• Suchen Sie „Canon PRINT” im App Store oder in Google Play.
• Rufen Sie die Canon-Website auf, um die App herunterzuladen.
2 Önen Sie die installierte App und befolgen Sie die Anweisungen in der App, um Ihren
Drucker hinzuzufügen.
Sobald Sie Ihren Drucker hinzugefügt haben, können Sie über Ihr Smartphone drucken.
Informationen zum Drucken von Fotos nden Sie unter „Einlegen von Fotopapier” auf Seite 6.
Herstellen einer Verbindung mit einem Smartphone
Wenn Sie mehrere Smartphones verwenden, führen Sie diese Schritte auf jedem
Smartphone aus.

6
Einlegen von Fotopapier
1 Önen Sie die Abdeckung des hinteren Fachs
und ziehen Sie die Papierstütze heraus.
b
a
2 Önen Sie die Abdeckung für den
Einzugsschacht und schieben Sie die rechte
Papierführung ganz nach rechts.
3 Legen Sie mehrere Blätter Fotopapier mit der
bedruckbaren Seite nach oben ein.
4 Richten Sie die Papierführung am Papier aus
und schließen Sie dann die Abdeckung für den
Einzugsschacht.
• Befolgen Sie die Anweisungen auf dem Bildschirm,
um Informationen für das eingelegte Papier
festzulegen.
Kopieren
Fotopapier kann nur in das hintere Fach eingelegt werden.
1 Schalten Sie den Drucker ein.
2 Legen Sie Normalpapier des Formats Letter oder
A4 ein.
3 Önen Sie die Vorlagenabdeckung und legen Sie
das Dokument mit der bedruckbaren Seite nach
unten auf die Auage. Richten Sie das Dokument
an der Ausrichtungsmarkierung ( ) aus.
4 Schließen Sie die Vorlagenabdeckung.
5 Drücken Sie die Taste OK.
6 Wählen Sie Kopiereinstellungen (Copy
settings) aus und drücken Sie dann die Taste
OK.
7 Legen Sie die Druckinformationen mit den
Tasten {, } und OK fest.
8 Drücken Sie die Taste Start.
Seite wird geladen ...
Seite wird geladen ...
Seite wird geladen ...
Seite wird geladen ...
Seite wird geladen ...
Seite wird geladen ...
Seite wird geladen ...
Seite wird geladen ...
Seite wird geladen ...
Seite wird geladen ...
Seite wird geladen ...
Seite wird geladen ...
Seite wird geladen ...
Seite wird geladen ...
Seite wird geladen ...
Seite wird geladen ...
Seite wird geladen ...
Seite wird geladen ...
Seite wird geladen ...
Seite wird geladen ...
Seite wird geladen ...
Seite wird geladen ...
Seite wird geladen ...
Seite wird geladen ...
Seite wird geladen ...
Seite wird geladen ...
Seite wird geladen ...
Seite wird geladen ...
Seite wird geladen ...
Seite wird geladen ...
Seite wird geladen ...
Seite wird geladen ...
Seite wird geladen ...
Seite wird geladen ...
Seite wird geladen ...
Seite wird geladen ...
Seite wird geladen ...
Seite wird geladen ...
Seite wird geladen ...
Seite wird geladen ...
Seite wird geladen ...
Seite wird geladen ...
Seite wird geladen ...
Seite wird geladen ...
Seite wird geladen ...
Seite wird geladen ...
Seite wird geladen ...
Seite wird geladen ...
Seite wird geladen ...
Seite wird geladen ...
Seite wird geladen ...
Seite wird geladen ...
Seite wird geladen ...
Seite wird geladen ...
Seite wird geladen ...
Seite wird geladen ...
-
 1
1
-
 2
2
-
 3
3
-
 4
4
-
 5
5
-
 6
6
-
 7
7
-
 8
8
-
 9
9
-
 10
10
-
 11
11
-
 12
12
-
 13
13
-
 14
14
-
 15
15
-
 16
16
-
 17
17
-
 18
18
-
 19
19
-
 20
20
-
 21
21
-
 22
22
-
 23
23
-
 24
24
-
 25
25
-
 26
26
-
 27
27
-
 28
28
-
 29
29
-
 30
30
-
 31
31
-
 32
32
-
 33
33
-
 34
34
-
 35
35
-
 36
36
-
 37
37
-
 38
38
-
 39
39
-
 40
40
-
 41
41
-
 42
42
-
 43
43
-
 44
44
-
 45
45
-
 46
46
-
 47
47
-
 48
48
-
 49
49
-
 50
50
-
 51
51
-
 52
52
-
 53
53
-
 54
54
-
 55
55
-
 56
56
-
 57
57
-
 58
58
-
 59
59
-
 60
60
-
 61
61
-
 62
62
-
 63
63
-
 64
64
-
 65
65
-
 66
66
-
 67
67
-
 68
68
-
 69
69
-
 70
70
-
 71
71
-
 72
72
-
 73
73
-
 74
74
-
 75
75
-
 76
76


in anderen Sprachen
- français: Canon TS7450i Mode d'emploi
- italiano: Canon TS7450i Guida utente
- português: Canon TS7450i Guia de usuario
- dansk: Canon TS7450i Brugervejledning
Verwandte Artikel
-
Canon TS7400 Benutzerhandbuch
-
Canon PIXMA TS5150 Bedienungsanleitung
-
Canon Pixma TS8240 - Mac Bedienungsanleitung
-
Mode d'Emploi pdf PIXMA TS6240 Benutzerhandbuch
-
Mode d'Emploi pdf PIXMA TS9551C Benutzerhandbuch
-
Canon Pixma TS9140 - Mac Benutzerhandbuch
-
Canon Pixma TS6150 - Mac Benutzerhandbuch
-
Canon Pixma TR7540 - Mac Benutzerhandbuch
-
Canon Pixma TR8540 - Mac Benutzerhandbuch
-
Canon Pixma TS305 - Mac Bedienungsanleitung