merten Uniq Pro Operating Instructions Manual
- Typ
- Operating Instructions Manual

fr
de
en
es
pt
it
nl
sv
no
fi
da
hu
ro
pl
el
ru
S1B20591-00 02/12
Gebrauchsanleitung
Operating instructions
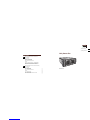
Uniq Server Pro
MEG6910-0019
Merten GmbH
de Merten GmbH, Fritz-Kotz-Str. 8, D-51674 Wiehl
www.merten.de
Service Center:
Telefon: +49 2261 702-204
Telefax: +49 2261 702-136
E-Mail: [email protected]
InfoLine:
Telefon: +49 2261 702-235 oder +49 800 63783640
Telefax: +49 2261 702-680 oder +49 800 63783630
E-Mail: [email protected]
es
en Merten GmbH, Fritz-Kotz-Str. 8, 51674 Wiehl, Germany
www.merten.com
Service Center:
Tel.: +49 2261 702-204
Fax: +49 2261 702-136
email: [email protected]
InfoLine:
Tel.: +49 2261 702-235
Fax: +49 2261 702-680
email: [email protected]
it

fr
de
en
es
pt
it
nl
sv
no
fi
da
hu
ro
pl
el
ru
Uniq Server Pro
Uniq Touch
>48,26 cm (19”)
EJECT
READY/STAND BY
MMC
PRO
Uniq Client
Welcome to Uniq Admin.
Please log in:
Help with the Uniq Admin site
Learn about Uniq at www.uniq
Version: x.x.x.xx
UNIQ
****
Login
Configuration
Welcome to Uniq Admin.
Please log in:
Help with the Uniq Admin site
Learn about Uniq at www.uniq
Version: x.x.x.xx
UNIQ
****
Login
Configuration
!
"

Lieferumfang
1
fr
de
en
es
pt
it
nl
sv
no
fi
da
hu
ro
pl
el
ru
de | Gebrauchsanleitung
Uniq Server Pro
Gebrauchsanleitung
MEG6910-0019
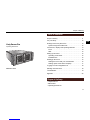
Lieferumfang . . . . . . . . . . . . . . . . . . . . . . . . . . . . . . . . . . . . . 1
Zu Ihrer Sicherheit. . . . . . . . . . . . . . . . . . . . . . . . . . . . . . . . . 2
Uniq Server Pro kennenlernen. . . . . . . . . . . . . . . . . . . . . . . 2
Systemaufbau und Architektur . . . . . . . . . . . . . . . . . . . . . 2
Anschlüsse, Anzeigen und Bedienelemente . . . . . . . . . . . 3
Vorderseite. . . . . . . . . . . . . . . . . . . . . . . . . . . . . . . . . . . . . 3
Rückseite . . . . . . . . . . . . . . . . . . . . . . . . . . . . . . . . . . . . . . 4
Server aufstellen . . . . . . . . . . . . . . . . . . . . . . . . . . . . . . . . . . 5
Betriebsumgebung . . . . . . . . . . . . . . . . . . . . . . . . . . . . . . 5
Montageort. . . . . . . . . . . . . . . . . . . . . . . . . . . . . . . . . . . . . 5
Server in Betrieb nehmen. . . . . . . . . . . . . . . . . . . . . . . . . . . 5
Server mit eigener Hardware in Betrieb nehmen . . . . . . 5
Server mit PC/Notebook in Betrieb nehmen . . . . . . . . . . 7
Im Konfigurationstool anmelden . . . . . . . . . . . . . . . . . . . . . 8
Server herunterfahren. . . . . . . . . . . . . . . . . . . . . . . . . . . . . . 8
Technische Daten . . . . . . . . . . . . . . . . . . . . . . . . . . . . . . . . . 9
Anhang. . . . . . . . . . . . . . . . . . . . . . . . . . . . . . . . . . . . . . . . . 10
– Uniq Server Pro
– Netzkabel
– Gebrauchsanleitung
Inhaltsverzeichnis
Lieferumfang

Zu Ihrer Sicherheit
2
fr
de
en
es
pt
it
nl
sv
no
fi
da
hu
ro
pl
el
ru
¼GEFAHR!
Lebensgefahr durch elektrischen Schlag.
Alle Tätigkeiten am Gerät dürfen nur durch ausgebildete
Elektrofachkräfte erfolgen. Beachten Sie die länderspe-
zifischen Vorschriften.
½VORSICHT!
Es können Störungen im System auftreten.
Die Montage, Inbetriebnahme und Konfiguration von
Uniq kann nur durch geschulte Elektrofachkräfte erfol-
gen. Die nächsten Schulungstermine finden Sie im Inter-
net unter:
http://www.schneider-electric.com/sites/corporate/en/
products-services/training/training.page
Der Uniq Server Pro (im Folgenden Server genannt) ist Be-
standteil des Uniq-Systems und steuert und visualisiert Ge-
bäudefunktionen, Mediageräte und multimediale Inhalte.
Der Server agiert als ein Master und stellt Uniq-Geräten mit der
Benutzeroberfläche Uniq Interface (Uniq Touch, Fernseher,
PC, Notebook, Smartphone ...) alle Daten und Funktionen zur
Verfügung. Hierzu gehört:
– die Licht-, Jalousie- und Klimasteuerung eines KNX-Sys-
tems
– die Verwaltung von Musik, Videos, Bildern und Dokumenten
– die Kommunikation inner- oder außerhalb eines Gebäudes
(Telefon, Internet oder von Tür zu Tür)
– die Überwachung eines Gebäudes mit Sensoren und Kame-
ras
– die Integration der Systeme und deren Funktionen wie Funk-
system Connect, Bluetooth, WLAN.
Der Server erfasst „plug-and-play“ Hardwarekomponenten
wie VoIP-Telefone, Kameras oder auch Netzwerk-Audioplayer
und bindet sie so in die Gebäudesteuerung ein.
Systemaufbau und Architektur
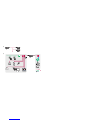
Maximal kann ein einzelner Server 100 Uniq-Geräte steuern,
wobei 1 Uniq-Gerät entweder
– 1 Uniq Touch ist oder
– 1 Uniq Client ist oder
– 2 Computer (mit Uniq Interface) sind.
Mehr als 100 Uniq-Geräte erfordern den Aufbau eines Uniq-
Systems mit Master/Slave-Struktur (Bild !, Umschlag).
Der Server ist ideal geeignet für Gebäude mit 100 Räumen
und mehr, z. B. Hotels oder große Bürogebäude. Zudem las-
sen sich zentral alle Multimedia-Inhalte steuern (Bild ", Um-
schlag).
Zu Ihrer Sicherheit
Uniq Server Pro kennenlernen

Anschlüsse, Anzeigen und Bedienelemente
3
fr
de
en
es
pt
it
nl
sv
no
fi
da
hu
ro
pl
el
ru
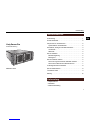
Vorderseite
Anschlüsse, Anzeigen und Bedienelemente
Verriegeln Sie die Abdeckung, damit nicht unbe-
absichtigt ein Schalter betätigt wird.
Die rote LED leuchtet, bei Zugriff auf die Festplat-
te.
Die grüne Betriebs-LED leuchtet, wenn der Server
eingeschaltet ist.
2x USB 2.0-Schnittstelle
Hinter der Abdeckung:
Ein/Aus-Taster kurz drücken: Das Betriebssystem
wird ordnungsgemäß gestartet oder beendet.
DVD-Laufwerk
½VORSICHT!
Datenverlust durch Neustart.
Bei einem Neustart über die Reset-Taste,
wird das Betriebssystem nicht ordnungsge-
mäß beendet. Dies kann zu einem Datenver-
lust führen.
Speichern Sie vorher immer Ihre Daten.

Anschlüsse, Anzeigen und Bedienelemente
4
fr
de
en
es
pt
it
nl
sv
no
fi
da
hu
ro
pl
el
ru
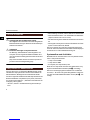
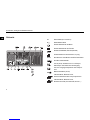
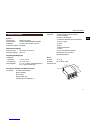
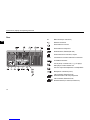
Rückseite
O/I Netzschalter (AC 100-240 V)
Netzkabelanschluss
PS/2-Schnittstelle für die Maus
PS/2-Schnittstelle für die Tastatur
Serielle Schnittstelle, EIA-232 (RS-232)
VGA-Anschluss für einen Monitor, 15-polig
DVI-D Anschluss für einen Monitor mit DVI-D-Anschluss
8x USB 2.0-Schnittstelle
Line-in (AUX). Anschluss für z. B. CD-Player,
DVD-Player oder Radios mit Line-Ausgang.
Line-out. Ausgang für Kopfhörer oder Lautspre-
cher.
Mikrofonanschluss (mono)
LAN-Anschluss, Ethernet RJ-45,
Internes Netzwerk für alle Uniq-Komponenten
LAN-Anschluss, Ethernet RJ-45,
Externes Netzwerk (PC-Netzwerk, Internet ...)

Server aufstellen
5
fr
de
en
es
pt
it
nl
sv
no
fi
da
hu
ro
pl
el
ru
Betriebsumgebung
Die Umgebungstemperaturen für den Betrieb liegen zwischen
-5 °C bis +40 °C.
½VORSICHT
Der Server kann durch übermäßige Erhitzung be-
schädigt werden.
• Stellen Sie den Server in einen gut belüfteten und kli-
matisierten Raum auf.
• Halten Sie die Lüfter und die Lüftungsschlitze immer
frei, damit die Luft zirkulieren kann.
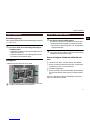
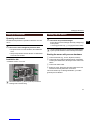
Montageort
– Montieren Sie den Server in ein 19“-Rack.
|Der Geräteboden A (fest oder ausziehbar) muss eine
Traglast von mindestens 20 kg aufweisen.
½VORSICHT
Der Server kann beschädigt werden.
Schützen Sie den Server vor Schäden, die durch Über-
spannung und Spannungsspitzen verursacht werden.
• Verwenden Sie einen Feinschutz (z. B. ein Überspan-
nungsschutzmodul).
|Verwenden Sie eine unterbrechungsfreie Stromversor-
gung (USV), die auch während eines kurzzeitigen Strom-
ausfalls den Betrieb aufrecht erhält.
Server mit eigener Hardware in Betrieb neh-
men
1Hardware (z. B. Maus, Tastatur, Monitor) anschließen.
2Server mit externem Netzwerk verbinden. Je nach Syste-
marchitektur ist das z. B. ein DSL-Router.
3Netzkabel anschließen.
4Server einschalten: Erst den Netzschalter auf der Rücksei-
ten, dann den Ein/Aus-Taster auf der Vorderseite betäti-
gen.
Der Server fährt hoch. Nach der Initialisierung werden Sie
durch den „A/V-Wizard“ geführt.
Server aufstellen Server in Betrieb nehmen

Server in Betrieb nehmen
6
fr
de
en
es
pt
it
nl
sv
no
fi
da
hu
ro
pl
el
ru
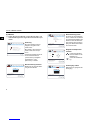
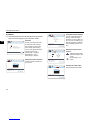
A/V-Wizard
5Folgen Sie dem A/V-Wizard, mit dem Sie die Audio- und
Videoeinstellungen Ihres angeschlossenen Monitors opti-
mieren.
Bedienung
Mit <OK> bestätigen Sie Ihre
Eingaben und gehen einen
Schritt weiter.
Mit <Zurück> gehen Sie einen
Schritt zurück, ohne zu spei-
chern.
Sie können den Wizard auch nur
mit der Tastatur bedienen:
[Cursor-Tasten] = Navigation
[Enter/Return] = <OK>
[ESC-Taste] = <Zurück>
Monitorauflösung einstellen
Wählen Sie die geeignete Auflö-
sung für Ihren Monitor.
Welcome to AV Wizard
Step 1 FinalStep 5Step 4Step 3Step 2
Continue
From here you can set up the audio & video settings.
For selections use „Up/Down/Left/Right“ arrows.
For validation use „OK“.
If you want to go back one step use „Back“.
AV Setup
FinalStep 5Step 4Step 3Step 2
Select the appropiate resolution that you
consider is best for your machine. After you
choose one press „OK“.
Screensize / Resolution
720p (1280 x 720)
1280 x 1024
1080p (1920 x 1080)
OKBack
Step 1
AV Setup
Monitorauflösung prüfen
Sie sehen die neue Einstellung
für ca. 15 Sekunden und können
sie in dieser Zeit bestätigen oder
ablehnen. Wenn Sie keine Ein-
gabe in dieser Zeit vornehmen,
springt der Wizard automatisch
einen Schritt zurück.
Bildgröße und Bildposition
einstellen
Passen Sie das Bild in
Höhe und Breite an den
Bildschirm an.
Setzen Sie das Bild mit-
tig.
Audioausgang wählen
Wählen Sie den geeigneten Au-
dioausgang.
FinalStep 5Step 4Step 3Step 1 Step 2
5
OKBack
Select the appropiate resolution that you
consider is best for your machine. After you
choose one press „OK“.
If you want to keep it, choose „OK“.
If you want to choose another resolution, press „Back“.
Screensize / Resolution
720p (1280 x 720)
Your settings:
AV Setup
Zoom In
Zoom Out
Up
Down
Left Right
FinalStep 5Step 4Step 2Step 1
Adjust your screen position using the
following options: Use Plus/Minus to Zoom
In/Out the screen. Use arrow keys to center
the image to the desired position.
Adjust Image Size
OKBack
Step 3
AV Setup
FinalStep 5Step 3Step 2Step 1
Wich connector did you use?
Audio output connector
OKBack
Analog stereo
SPDIF coaxial
SPDIF optical
No sound
Step 4
AV Setup

Server in Betrieb nehmen
7
fr
de
en
es
pt
it
nl
sv
no
fi
da
hu
ro
pl
el
ru
Der A/V-Wizard ist abgeschlossen, das System wird neu ge-
startet. Dieser Vorgang kann bis zu 15 Minuten dauern.
Nach dem Systemstart wird automatisch die Benutzeroberflä-
che Uniq Interface aufgerufen.
6Server mit internem Uniq-Netzwerk verbinden. Je nach
Systemarchitektur ist das z. B. ein Netzwerk-Switch.
Konfigurationstool aufrufen
7Wählen Sie auf der Startseite von Uniq Interface:
<Internet> <SYSTEM ADMIN>
Server mit PC/Notebook in Betrieb nehmen
1Server mit externem Netzwerk verbinden. Je nach Syste-
marchitektur ist das z. B. ein DSL-Router.
2Server-Netzkabel anschließen.
3Server einschalten: Erst den Netzschalter auf der Rücksei-
ten, dann den Ein/Aus-Taster auf der Vorderseite betäti-
gen.
Das System wird gestartet. Dieser Vorgang kann bis zu 15 Mi-
nuten dauern.
4Server mit internem Uniq-Netzwerk verbinden: Je nach
Systemarchitektur ist das z. B. ein Netzwerk-Switch.
5PC/Notebook mit internem Netzwerk verbinden und ein-
schalten.
|Damit Uniq Interface und das Konfigurationstool korrekt
angezeigt werden, müssen Sie an Ihrem PC/Notebook
eine Mindestauflösung von 1024x768 einstellen.
|Stellen Sie sicher, dass sich Ihr PC/Notebook im IP-Ad-
ressbereich 192.168.80.x befindet.
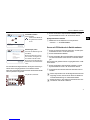
Lautstärke einstellen
Sie hören Musik.
Stellen Sie die Musik auf
die gewünschte Lautstär-
ke ein.
Einstellungen prüfen
Sie sehen alle Einstellungen auf
einen Blick.
Wenn Sie Änderungen vorneh-
men möchten, dann gehen Sie
mit <Zurück> Schritte zurück.
Wenn Sie mit Ihren Einstellungen
zufrieden sind, dann drücken Sie
<OK>.
Uniq Interface, Startseite
FinalStep 4Step 3Step 2Step 1
Music is playing, press enter when you
confirm that you can hear it and the volume
is adjusted at a comfortable level.
Audio volume
OKBack
80%
Step 5
AV Setup
Step 5Step 4Step 3Step 2Step 1
OKBack
If you‘re satisfied with these settings, press
„OK“. The system will reboot. This process can
take up to 15 minutes, please be patient.
Ready !
1. Resolution: 720p (1280 x 720)
2. Audio output: Analog stereo
3. Audio volume: 80%
Your settings:
Final
AV Setup

Im Konfigurationstool anmelden
8
fr
de
en
es
pt
it
nl
sv
no
fi
da
hu
ro
pl
el
ru
Uniq Interface aufrufen
6Browser starten:
http://192.168.80.1/uniq-admin/weborbiter.php
Konfigurationstool aufrufen
7Browser starten: http://192.168.80.1
1Melden Sie sich an:
Login: UNIQ
Passwort: UNIQ
Sie können nun mit der Konfiguration des Systems beginnen.
|Ändern Sie sofort im Konfigurationstool das Passwort für
Ihr System, damit nur autorisierte Personen darauf Zu-
griff haben.
¼WARNUNG
Verletzungsgefahr!
Um Verletzungen durch elektrische Schläge oder Be-
schädigung des Servers zu vermeiden, müssen Sie den
Server vollständig von der Stromversorgung trennen.
Betätigen Sie daher immer den Netzschalter an der
Rückseite und entfernen Sie das Netzkabel.
Wenn Sie nur den Ein/Aus-Schalter auf der Vorderseite
betätigen, bleiben einige interne Komponenten aktiv.
|Bei der Installation von „Hot-Plug-Geräten“ muss der Ser-
ver nicht heruntergefahren werden.
1Betriebssystem herunterfahren:
Wählen Sie: <Settings> <System> <ShutDown>
2Netzschalter an der Rückseite betätigen.
3Netzkabel entfernen.
Der Server ist vollständig von der Stromversorgung getrennt.
Im Konfigurationstool anmelden
Konfigurationstool, Startseite
Welcome to Uniq Admin.
Please log in:
Help with the Uniq Admin site
Learn about Uniq at www.uniq
Version: x.x.x.xx
UNIQ
****
Login
Server herunterfahren

Technische Daten
9
fr
de
en
es
pt
it
nl
sv
no
fi
da
hu
ro
pl
el
ru
Technische Daten
System
Prozessortyp: Intel® Core 2 DUO
Hauptspeicher: 2 GB SO-DIMM DDR2 800 SDRAM
Festplatten: 2x HDD 1 TB mit RAID 1-System
Optisches Laufwerk: DVD Multi
Netzstromversorgung
Nennspannung: AC 100-240 V; 50-60 Hz
Energieverwaltung: ACPI 2.0
Umgebungsbedingungen
Temperatur
bei Betrieb: -5 °C bis +40 °C
bei Lagerung: -20 °C bis +60 °C
Luftfeuchtigkeit: 5 % - 90 % relative Luftfeuchtigkeit bei
50 °C; nicht kondensierend
Anschlüsse, Anzeigen und Bedienelemente
Vorderseite: 2x USB 2.0-Schnittstelle
Ein/Aus-Schalter
Reset-Taster
Betriebs-LED, grün
LED-Anzeige für Festplatte, rot
Rückseite: 2x LAN-Anschluss, Ethernet RJ-45,
10/100/1000 Mbit/s
8x USB 2.0-Schnittstelle
1x Serielle Schnittstelle, EIA-232 (RS-232)
1x VGA, 15-polig
1x DVI-D
2x PS/2
1x Mikrofonanschluss
1x Line-in
1x Line-out/Kopfhöreranschluss
Netzschalter (AC 100-240 V)
Netzkabelanschluss
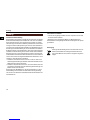
Gerät
Gewicht: ca. 17 kg
Gehäuse: für 19“-Rack, 4 HE
Abmessungen:
42,7 cm
17,78 cm
48 cm
48,26 cm
53 cm

Anhang
10
fr
de
en
es
pt
it
nl
sv
no
fi
da
hu
ro
pl
el
ru
FCC-Konformitätserklärung
Dieses Gerät wurde getestet und erfüllt die Grenzwerte für ein digitales
Gerät der Klasse B entsprechend Abschnitt 15 der FCC-Vorschriften.
Diese Grenzwerte sollen einen angemessenen Schutz vor schädli-
chen Störungen in bewohnten Gebieten gewährleisten. Dieses Gerät
erzeugt und nutzt Funkfrequenzenergie und kann diese ausstrahlen,
und es kann bei unsachgemäßer Installation und Nichtbefolgung der
Anweisungen schädliche Störungen des Funkverkehrs verursachen.
Es lässt sich jedoch nicht gewährleisten, dass es bei einer bestimmten
Installation zu keiner Störung kommt. Wenn dieses Gerät schädliche
Störungen im Funk- oder Fernsehempfang verursacht, die durch Aus-
und Einschalten des Geräts ermittelt werden können, kann der Benut-
zer eine oder mehrere der folgenden Maßnahmen durchführen, um zu
versuchen, diese Störungen zu beheben:
• Installieren und bedienen Sie den Server so, dass er nicht so viel
elektromagnetische Energie abstrahlt, dass diese bei Geräten in der
Nähe Störungen hervorrufen würde.
• Installieren und prüfen Sie den Server, um sicherzustellen, dass die
von Geräten in der Nähe erzeugte elektromagnetische Energie den
Betrieb des Servers nicht stört.
Änderungen oder Modifikationen, die nicht ausdrücklich von der für
die Einhaltung der Vorschriften verantwortlichen Partei genehmigt
sind, können zum Erlöschen der Betriebserlaubnis des Benutzers für
das Gerät führen.
Informationen zu Marken
• Intel ist eine eingetragene Marke der Intel Corporation in den USA
und/oder anderen Ländern.
• Bluetooth ist eine eingetragene Marke von Bluetooth SIG Inc.
Andere Marken und eingetragenen Marken sind Eigentum der jeweili-
gen Besitzer.
Entsorgung
Anhang
Entsorgen Sie das Gerät getrennt vom Hausmüll in einer of-
fiziellen Sammelstelle. Eine fachgerechte Wiederverwer-
tung schützt Mensch und Umwelt vor möglichen negativen
Folgen.

Scope of delivery
11
fr
de
en
es
pt
it
nl
sv
no
fi
da
hu
ro
pl
el
ru
en | Operating instructions
Uniq Server Pro
Operating instructions
MEG6910-0019
Scope of delivery. . . . . . . . . . . . . . . . . . . . . . . . . . . . . . . . . 11
For your safety. . . . . . . . . . . . . . . . . . . . . . . . . . . . . . . . . . . 12
Getting to know Uniq Server Pro . . . . . . . . . . . . . . . . . . . . 12
System design and architecture. . . . . . . . . . . . . . . . . . . 12
Connections, displays and operating elements . . . . . . . . 13
Front . . . . . . . . . . . . . . . . . . . . . . . . . . . . . . . . . . . . . . . . . 13
Rear . . . . . . . . . . . . . . . . . . . . . . . . . . . . . . . . . . . . . . . . . 14
Setting up the server. . . . . . . . . . . . . . . . . . . . . . . . . . . . . . 15
Operating environment . . . . . . . . . . . . . . . . . . . . . . . . . . 15
Installation site . . . . . . . . . . . . . . . . . . . . . . . . . . . . . . . . . 15
Starting up the server . . . . . . . . . . . . . . . . . . . . . . . . . . . . . 15
Starting the server with your own hardware . . . . . . . . . 15
Starting up the server with a PC/laptop . . . . . . . . . . . . . 17
Logging on in the configuration tool. . . . . . . . . . . . . . . . . . 18
Shutting down the server . . . . . . . . . . . . . . . . . . . . . . . . . . 18
Technical data. . . . . . . . . . . . . . . . . . . . . . . . . . . . . . . . . . . 19
Appendix . . . . . . . . . . . . . . . . . . . . . . . . . . . . . . . . . . . . . . . 20
– Uniq Server Pro
– Mains cable
– Operating instructions
Table of contents
Scope of delivery

For your safety
12
fr
de
en
es
pt
it
nl
sv
no
fi
da
hu
ro
pl
el
ru
¼DANGER
Risk of fatal injury from electric shock.
All work on the device should only be carried out by
trained and highly-skilled electricians. Observe the coun-
try-specific regulations.
½CAUTION
Faults may occur with the system.
Installation, commissioning and configuration of Uniq
may only be carried out by trained, skilled electricians.
The next dates for training courses can be found on the
Internet at:
http://www.schneider-electric.com/sites/corporate/en/
products-services/training/training.page
The Uniq Server Pro (hereafter referred to as server) is an in-
tegral part of the Uniq system and controls and visualises
building functions, media devices and multimedia content.
The server acts as a master and makes all data and functions
available to Uniq devices with the Uniq Interface (Uniq Touch,
television, PC, laptops, smartphones... ). This includes:
– control of lighting, blinds, and air conditioning of a KNX sys-
tem
– management of music, videos, pictures and documents
– communication inside or outside of a building (telephone, In-
ternet or from door to door)
– monitoring of the building with sensors and cameras
– integration of the systems and their functions, such as Con-
nect radio system, Bluetooth, WLAN.
The server detects plug-and-play hardware components such
as VoIP phones, cameras and network audio players, thereby
integrating them in the building control.
System design and architecture
A single server can control 100 Uniq devices at maximum, one
of which must be either
– 1 Uniq Touch or
– 1 Uniq Client or
– 2 computers (with Uniq Interface).
In the event that there are more than 100 Uniq devices, a Uniq
system with master/slave structure must be configured (Figure
!, cover).
The server is ideally suited for buildings with 100 rooms or
more, e.g. hotels or large office buildings. In addition, all mul-
timedia contents can be centrally controlled (Figure ", cov-
er).
For your safety
Getting to know Uniq Server Pro

Connections, displays and operating elements
13
fr
de
en
es
pt
it
nl
sv
no
fi
da
hu
ro
pl
el
ru
Front
Connections, displays and operating elements
Lock the cover so that no switch is unintentionally
actuated.
The red LED lights up when the hard drive is ac-
cessed.
The green operational LED lights up when the
server is switched on.
2 x USB 2.0 interfaces
Behind the cover:
Press the on/off push-button briefly: the operating
system is started up or exited in the proper man-
ner.
DVD drive
½CAUTION
Loss of data on restart.
If a restart is carried out using the reset key,
the operating system will not be shut down
properly. This can result in loss of data.
Always save data beforehand.

Connections, displays and operating elements
14
fr
de
en
es
pt
it
nl
sv
no
fi
da
hu
ro
pl
el
ru
Rear
O/I Mains switch (AC 100-240 V)
Network connection
PS/2 interface for mouse
PS/2 interface for keyboard
Serial interface, EIA-232 (RS-232)
VGA connection for a monitor, 15-pole
DVI-D Connection for a monitor with DVI-D connection
8 x USB 2.0 interfaces
Line-in (AUX). Connection for, e.g., CD player,
DVD player or radios with line out.
Line-out. Output for headphones or loudspeakers.
Microphone connection (mono)
LAN connection, Ethernet RJ-45,
Internal network for all Uniq components
LAN connection, Ethernet RJ-45,
External network (PC network, Internet etc.)

Setting up the server
15
fr
de
en
es
pt
it
nl
sv
no
fi
da
hu
ro
pl
el
ru
Operating environment
The ambient temperature for operation is between -5°C and
+40°C.
½CAUTION
The server can be damaged by excessive heat.
• Set up the server in a well-ventilated, air-conditioned
room.
• Always keep the fans and fan slits free of obstructions
so that air can circulate.
Installation site
– Install the server in a 19" rack.
|The device shelves A (fixed or pull out) must have a
bearing load of at least 20 kg.
½CAUTION
The server may become damaged.
Protect the server from damage caused by voltage surg-
es and peaks.
• Use surge protection (e. g., a surge protective module).
|Use an uninterrupted power supply (UPS) that keeps the
system operational in the event of a brief power failure.
Starting the server with your own hardware
1Connect hardware (e.g., mouse, keyboard, monitor).
2Connect the server with an external network. Depending
on this system architecture, this may be a DSL router for in-
stance.
3Connect the mains cable.
4Switch on server: First press the mains switch at the rear
and then the On/Off push-button on the front.
The server will boot up. Following initialization, you will be
guided by the A/V Wizard.
Setting up the server Starting up the server

Starting up the server
16
fr
de
en
es
pt
it
nl
sv
no
fi
da
hu
ro
pl
el
ru
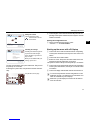
A/V Wizard
5Follow the instructions from the A/V Wizard to optimise the
audio and video settings of your connected monitor.
Operation
Confirm your entries with <OK>
and continue to the next step.
Use <Zurück> to return to the
previous step without saving.
You can also operate the wizard
with the keyboard only:
[Cursor keys] = navigation
[Enter/Return] = <OK>
[ESC button] = <Zurück>
Setting the monitor resolution
Choose a suitable resolution for
your monitor.
Welcome to AV Wizard
Step 1 FinalStep 5Step 4Step 3Step 2
Continue
From here you can set up the audio & video settings.
For selections use „Up/Down/Left/Right“ arrows.
For validation use „OK“.
If you want to go back one step use „Back“.
AV Setup
FinalStep 5Step 4Step 3Step 2
Select the appropiate resolution that you
consider is best for your machine. After you
choose one press „OK“.
Screensize / Resolution
720p (1280 x 720)
1280 x 1024
1080p (1920 x 1080)
OKBack
Step 1
AV Setup
Testing the monitor resolution
The new setting will appear for
approx. 15 seconds during
which time you can confirm or re-
ject it. If you do not make any en-
tries during this time, the Wizard
will automatically go back one
step.
Setting the image size and
position
Adjust the height and the
width of the image to the
screen.
Set the image so it is
central.
Selecting the audio output
Select a suitable audio output.
FinalStep 5Step 4Step 3Step 1 Step 2
5
OKBack
Select the appropiate resolution that you
consider is best for your machine. After you
choose one press „OK“.
If you want to keep it, choose „OK“.
If you want to choose another resolution, press „Back“.
Screensize / Resolution
720p (1280 x 720)
Your settings:
AV Setup
Zoom In
Zoom Out
Up
Down
Left Right
FinalStep 5Step 4Step 2Step 1
Adjust your screen position using the
following options: Use Plus/Minus to Zoom
In/Out the screen. Use arrow keys to center
the image to the desired position.
Adjust Image Size
OKBack
Step 3
AV Setup
FinalStep 5Step 3Step 2Step 1
Wich connector did you use?
Audio output connector
OKBack
Analog stereo
SPDIF coaxial
SPDIF optical
No sound
Step 4
AV Setup

Starting up the server
17
fr
de
en
es
pt
it
nl
sv
no
fi
da
hu
ro
pl
el
ru
The A/V wizard finishes, the system will restart. This process
may take up to 15 minutes.
Following the system start, Uniq Interface will start automati-
cally.
6Connecting the server with an internal Uniq network. De-
pending on the system architecture, this may be a network
switch for instance.
Starting the configuration tool
7On the Uniq Interface homepage, select:
<Internet> <SYSTEM ADMIN>
Starting up the server with a PC/laptop
1Connect the server with an external network. Depending
on the system architecture, this may be a DSL router for in-
stance.
2Connect the server mains cable.
3Switch on server: First press the mains switch at the rear
and then the On/Off push-button on the front.
The system is started. This process may take up to 15 minutes.
4Connect the server with internal Uniq network: Depending
on the system architecture, this may be a network switch
for instance.
5Connect PC/laptop with internal network and switch it on.
|To ensure Uniq Interface and the configuration tool are
displayed correctly, you will need to set a minimum reso-
lution of 1024x768 on your PC/laptop.
|Make sure your PC/laptop is located in the IP address
area 192.168.80.x.
Setting the volume
You are listening to music.
Set the music to the de-
sired volume.
Checking the settings
All settings are visible at a glance
If you wish to make changes,
press <Zurück> to go back one
step at a time.
When you are satisfied with your
settings, press <OK>.
Uniq Interface, home page
FinalStep 4Step 3Step 2Step 1
Music is playing, press enter when you
confirm that you can hear it and the volume
is adjusted at a comfortable level.
Audio volume
OKBack
80%
Step 5
AV Setup
Step 5Step 4Step 3Step 2Step 1
OKBack
If you‘re satisfied with these settings, press
„OK“. The system will reboot. This process can
take up to 15 minutes, please be patient.
Ready !
1. Resolution: 720p (1280 x 720)
2. Audio output: Analog stereo
3. Audio volume: 80%
Your settings:
Final
AV Setup

Logging on in the configuration tool
18
fr
de
en
es
pt
it
nl
sv
no
fi
da
hu
ro
pl
el
ru
Calling up the Uniq Interface
6Start the browser:
http://192.168.80.1/uniq-admin/weborbiter.php
Starting the configuration tool
7Start the browser: http://192.168.80.1
1Log on:
Login: UNIQ
Password: UNIQ
You can now start configuring the system.
|Change the password for your system immediately in the
configuration tool to prevent access by unauthorised per-
sons.
¼WARNING
Risk of injury!
To prevent injuries from electric shocks or damage to the
server, you have to disconnect the server fully from the
power supply. For this reason, always actuate the mains
switch on the back and remove the mains cable.
If you only press the On/Off switch on the front, some in-
ternal components will remain active.
|There is not need to shut down the server for installation
of “hot plug” devices.
1Shut down the operating system:
Select: <Settings> <System> <ShutDown>
2Actuate the mains switch on the rear.
3Remove the mains cable.
The server is now fully disconnected from the power supply.
Logging on in the configuration tool
Configuration tool, home page
Welcome to Uniq Admin.
Please log in:
Help with the Uniq Admin site
Learn about Uniq at www.uniq
Version: x.x.x.xx
UNIQ
****
Login
Shutting down the server
Seite wird geladen ...
Seite wird geladen ...
-
 1
1
-
 2
2
-
 3
3
-
 4
4
-
 5
5
-
 6
6
-
 7
7
-
 8
8
-
 9
9
-
 10
10
-
 11
11
-
 12
12
-
 13
13
-
 14
14
-
 15
15
-
 16
16
-
 17
17
-
 18
18
-
 19
19
-
 20
20
-
 21
21
-
 22
22


merten Uniq Pro Operating Instructions Manual
- Typ
- Operating Instructions Manual
in anderen Sprachen
- English: merten Uniq Pro


