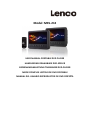
Lenco MES-212 Bedienungsanleitung
- Kategorie
- Tragbare DVD / Blu-Ray-Player
- Typ
- Bedienungsanleitung

Model: MES-212
USER MANUAL PORTABLE DVD PLAYER
HANDLEIDING DRAAGBARE DVD-SPELER
BEDIENUNGSANLEITUNG TRAGBARER DVD-PLAYER
MODE D’EMPLOI LECTEUR DE DVD PORTABLE
MANUAL DEL USUARIO REPRODUCTOR DE DVD PORTÁTIL

2
Index
English ................................................................................................................................ 3
Nederlands ....................................................................................................................... 15
Deutsch ............................................................................................................................ 28
Français ............................................................................................................................ 41
Español ............................................................................................................................. 54
Version : 2.0

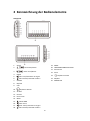
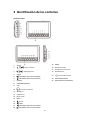
3
English
1 Safety Instrucons
- Before using this product, read and follow all warnings and instrucons.
- This device is not intended for use by people (including children) with physical, sensory or
mental disabilies, or a lack of experience and knowledge, unless they’re under supervision
or have received instrucons about the correct use of the device by the person who is
responsible for their safety;
- This product is intended for household use o
nly and not for commercial or industrial use.
- Do not expose to dripping or splashing.
- No naked flame sources, such as lighted candles, should be placed on or near the product.
- Venlaon should not be impeded by covering venlaon openings with items such as
newspapers, table cloths, curtains and the like.
- Make sure the unit is adjusted to a stable posion. Damage caused by using this product in
an unstable posion or by failure to follow any other warning or
precauon contained
within this user manual will not be covered by warranty.
- Do not place objects filled with liquids, such as vases on or near the product.
- Do not use or store this product in a place where it is subject to direct sunlight, heat,
excessive dust or vibraon.
- Do not keep or store this product in wet condions for a long period.
- Do not clean this product with water or other liquids.
- Do not block or cover the slots and holes in the product.
- Do not pu
sh foreign objects into the slots or holes in the product.
- Do not aempt to open this product yourself. There are no user serviceable parts inside.
- Do not allow children access to plasc bags.
Warning
- Never remove the casing of this device.
-
Never place this device on other electrical equipment.
Noce
• If at any me in the future you should need to dispose of this product please note that: All
baeries and accumulators need to be removed from this product (Removal of Waste
Baeries and Accumulators).
• Always bring your product to a professional to remove the built-in baery.
WARNING
Do not ingest the baery, Chemical Burn Hazard
(The remote control supplied with) This product contains a coin/buon cell baery. If the coin/buon cell
baery is swallowed, it can cause severe internal burns in just 2 hours and can lead to death.
Keep new and used baeries away from children.
If the baery compartment does not close securely, stop using the product and keep it away from
children.
If you think baeries might have been swallowed or placed inside any part of the body, seek immediate
medical aenon.
To prevent possible hearing damage, do not listen at high volume levels for long periods.

4
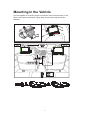
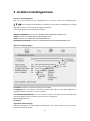
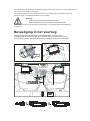
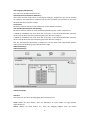
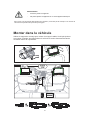
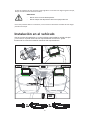
Mounting in the Vehicle
Use the supplied car mounting straps to install the main unit and monitor on the
back of the vehicle's headrests. Tightly wrap the mounting strap around the
headrest.

5
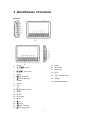
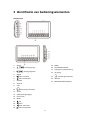
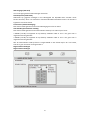
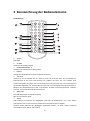
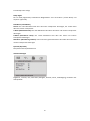
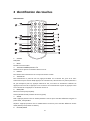
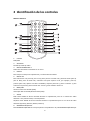
19.
MODE
20.
BACK LIGHT
21.
DC IN 9-12V
22.
AV IN
23.
Earphone Socket
24.
ON/OFF
25.
POWER INDICATOR
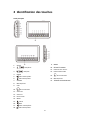
2 Identification of Controls
Main Unit
1. SETUP
2. Up/Prev
3. Down/Next
4. ENTER
5. /VOL- Left/VOL-
6. /VOL+ Right/VOL+
7. SOURCE
8. ON/OFF
9. USB
10. Earphone Socket
11. AV OUT
12. DC OUT
13. DC IN 9-12V
14. MUTE
15. UP
16. Down
17. /VOL- Left/VOL-
18. /VOL+ Right/VOL+

6
2 Identification of Controls
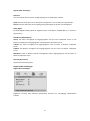
Remote control unit
1. SOURCE
DVD/USB.
2. MUTE
Disable Audio output.
3. 0-9 NUMBER BUTTON
Selects numbered items in a menu.
4. DISPLAY
To display the playtime and status information.
5. 10+ BUTTON
In order to select a track 10, for CD, press 10+ button first, then press 0; for DVD, press 10+
button; select track greater than 10, for example, track 12; first press 10+, a highlighted bar
appears and further press 10+ and press number 2; select track 23, press 10+ button 3 times and
press number 3 button.
6. MENU/PBC
Return to DVD root menu(DVD).
PBC on/off switch (VCD).
7. AUDIO
DVD: Press AUDIO repeatedly during playback to hear a different audio language or audio track, if
available.
CD/VCD: Press AUDIO repeatedly during playback to hear a different audio channel (Left, Right,
Mix, Stereo).
8. PLAY/PAUSE
Press PLAY/PAUSE once to pause playback, pressing PLAY/PAUSE a second time will resume the
1 2
3
4
5
6
7
8
9 0
10+
REPEAT
TITLE
ENTER
MODE
SUBTITLE
AUDIO
MUTE
SOURCE
STEP
DISPLAY
MENU
/PBC
VOL+VOL-
SLOW
ZOOM
16
17
2
1
3
4
5
6
7
8
9
10
11
12
13
14
15
27
26
25
24
23
22
21
20
18
19

7
playback.
9. STOP
When this button is pressed once, the unit records the stopped point, from where playback will
resume if PLAY ( )is pressed after wards. But if STOP button is pressed again instead of PLAY
( ) button, there will be no resume function.
10. MODE
Set LCD parameter (adjust brightness, contrast, and saturation).
11. VOL+
Adjust volume
12. Forward Skip
Go to next chapter/track.
13. Reverse Skip
Go to previous chapter/track to the beginning.
14. BUTTON
Press BUTTON allow skipping ahead at 5-level speed (X2->X4->X8->X16->X32->PLAY),
press PLAY button return to normal playback
15. BUTTON
Press BUTTON allows skipping back at 5-level speed(X2->X4->X8->X16->X32->PLAY), press
PLAY button return to normal playback.
16. STEP
Step the motion in DVD mode.
17. SEARCH
Go to time point, title or chapter you want in DVD Mode.
18. SUBTITLE
Press SUBTITLE repeatedly during playback to hear a different subtitle languages.
19. ANGLE
DVD: Press ANGLE will change the view angle, on DVDs that support this feature.
20. TITLE
Return to DVD title menu
21. ENTER
Confirms menu selection..
22. SETUP
Accesses or removes setup menu.
23. VOL-
Adjust volume
24. REPEAT
Press REPEAT during playback to select a desired repeat mode.
DVD: you can play select repeat chapter/title/off.
CD/VCD: you can select repeat single/all/off.
Mp3: you can select shuffle/random/single/repeat one/repeat folder/folder
25. SLOW
Press Slow button repeatedly to enter slow playback, and cycle between different speeds. The

8
speeds are 1/2, 1/4, 1/8, 1/16, and normal.
26. PROGRAM
DVD/VCD: The program function enables you to store your favorite tracks from the disc. Press the
PROGRAM button, then the PROGRAM MENU will appear on screen, now you can use the
number key to direct input the titles, chapters or tracks number and select PLAY option. to
resume normal playback, press PROGRAM and select clear program option on the program menu,
press PROGRAM again to exit the program menu.
27. ZOOM
DVD/VCD: Use ZOOM to enlarge or shrink the video image.
1. Press ZOOM during playback or still playback to activate the Zoom function. The square
frame appears briefly in the right bottom of the picture.
2. Each press of the ZOOM button changes the TV screen in the following sequence:
2X size 3X size 4X size 1/2X size 1/3X size 1/4X size normal size
JPEG: Use ZOOM to enlarge or shrink the picture.
Press 'ZOOM'.
1. Use " " to enlarge, or " " to shorten the picture.
2. Use the button to move through the zoomed picture.

9
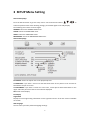
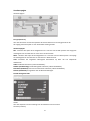
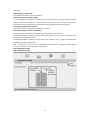
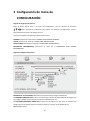
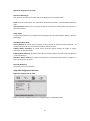
3 SETUP Menu Setting
General Setup Page
Press the SETUP button to get the setup menu. Use the direction buttons to
select the preferred item. After finishing settings, press SETUP again to normally display.
The following menu items can be changed:
GENERAL: selects the GENERAL PAGE menu.
AUDIO: selects the AUDIO PAGE menu.
VIDEO: selects the VIDEO PAGE menu.
PREFERENCE: selects the PREFERENCE PAGE menu.
General Setup Page
TV DISPLAY: selects the aspect ratio of the playback picture.
4:3 PANSCAN: if you have a normal TV and want both sides of the picture to be trimmed or
formatted to fit your TV screen.
4:3 LETTERBOX: if you have a normal TV. In this case, a wide picture with black bands on the
upper and lower portions of the TV screen will be displayed.
16:9: wide screen display.
TFT Display
Angle Mark
Displays current angle setting information on the right hand corner of the TFT screen if available
on the disc.
OSD Language
You can select your own preferred language settings.

10
Closed Captions
Closed captions are data that are hidden in the video signal of some discs. Before you select this
function, please ensure that the disc contains closed captions information and your TV set also
has this function.
Screen Saver
This function is used to turn the screen saver On or Off
Auto Standby
This function is used to select auto standby settings after 3 or 4 hours.
3 HOURS: the unit will turn to standby mode after 3 hours if there is no interaction from the user
within this period of time.
4 HOURS: the unit will turn to standby mode after 4 hours if there is no interaction from the user
within this period of time.
OFF: the auto standby function is disabled, and the unit will stay in the “on” mode even if there is
no interaction from user..
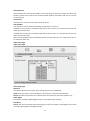
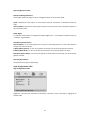
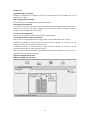
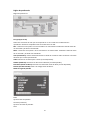
Audio Setup Page
Audio Setup Page
Video Setup Page
Downmix
This options allows you to set the stereo analog output of your DVD Player.
LT/RT: Select this option if your DVD Player is connected to a Dolby Pro Logic decoder.
Stereo: Select this option when the output delivers sound from the two front speakers only.
Dolby digital
The options included in Dolby Digital Setup are: 'Dual Mono' and 'Dynamic'.
Dual Mono
Stereo: Left mono sound will send output signals to the Left speaker and the Right mono sound
will send output signals to the Right speaker.

11
L-Mono: Left mono sound will send output signals to Left speaker and the Right speaker.
R-Mono: Right mono sound will send output signals to the Left speaker and the Right speaker.
Mix-Mono: Left and Right mixed mono sound will send output signals to the Left and Right
speakers.
Dynamic
Dynamic range compression.
Video Setup Page
VIDEO SETUP PAGE
Brightness, Contrast, Hue, Saturation: setting the video quality.
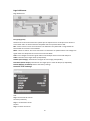
Preference Page
Preference Page
TV Type
Selecting the colour system that corresponds to your TV when AV outputs. This DVD Player is
compatible with both NTSC and PAL.
Preference Page
PAL - Select this if the connected TV is a PAL system. It will change the video signal of a NTSC disc
and output in PAL format.
NTSC-Select this if the connected TV is NTSC system. It will change the video signal of a PAL disc
and output in NTSC format.
Auto: Changes the video signal output automatically according to the playing disk format.
Audio: Selects a language for audio (if available).
Subtitle: Selects a language for subtitle (if available).
Disc Menu: Selects a language for disc menu (if available).

12
Default: Back to the factory settings.
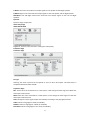
Second display mode
Bright
Adjust screen Bright Setting.
Contrast
Adjust screen Contrast Setting.
Colour
Adjust screen Color Setting.
LANG
Adjust Menu OSD Language
ZOOM
Adjust screen 16:9 or 4:3
RESET
Reset to default setting.

13
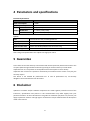
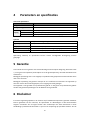
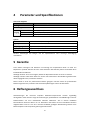
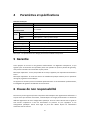
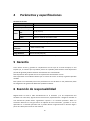
4 Parameters and specifications
Electronical parameters
Item
Standard requirement
Power consumption
: <10W
Operating humidity
: 5% to 90%
Output
VIDEO OUT
:1 Vp-p (75 Ω)
AUDIO OUT
: 1.2 Vrms (1 KHz, 0 dB)
Audio
:Speaker: 1WX2, Headphones output
System
Laser
:Semiconductor laser, wavelength 650 nm
Signal system
:NTSC/PAL
Frequency response
: 20Hz to 20 kHz(1 dB)
Signal-to-noise ratio
:More than 80 dB (ANALOG OUT connectors only)
Dynamic range
:More than 85 dB (DVD/CD)
Note: Design and specifications are subject to change prior notice.
5 Guarantee
Lenco offers service and warranty in accordance with the European law, which means that in case
of repairs (both during and after the warranty period) you should contact your local dealer.
Important note: It is not possible to send products that need repairs to Lenco directly.
Important note: If this unit is opened or accessed by a non-official service center in any way, the
warranty expires.
This device is not suitable for professional use. In case of professional use, all warranty
obligations of the manufacturer will be voided.
6 Disclaimer
Updates to Firmware and/or hardware components are made regularly. Therefore some of the
instruction, specifications and pictures in this documentation may differ slightly from your
particular situation. All items described in this guide for illustration purposes only and may not
apply to particular situation. No legal right or entitlements may be obtained from the description
made in this manual.

Products with the CE marking comply with the EMC Directive (2014/30/EU) and
the Low Voltage Directive (2014/35/EU) issued by the Commission of the
14
7 Disposal of the Old Device
This symbol indicates that the relevant electrical product or battery should not be
disposed of as general household waste in Europe. To ensure the correct waste
treatment of the product and battery, please dispose them in accordance to any
applicable local laws of requirement for disposal of electrical equipment or batteries.
In so doing, you will help to conserve natural resources and improve standards of
environmental protection in treatment and disposal of electrical waste (Waste
Electrical and Electronic Equipment Directive).
8 CE Marking
European Community.
Hereby, Lenco Benelux BV, Thermiekstraat 1a, 6361 HB Nuth, The Netherlands, declares that this
product is in compliance with the essential requirements and other relevant provisions of
Directive 1999/5/EC.
The declaration of conformity may be consulted via techdo[email protected]om
9 Service
For more information and helpdesk support, please visit www.lenco.com
Lenco Benelux BV, Thermiekstraat 1a, 6361 HB, The Netherlands.

15
Nederlands
1 Veiligheidsinstruces
- Lees voor het gebruik van dit product alle waarschuwingen en instruces en volg ze op.
- Dit apparaat is niet bedoeld voor gebruik door personen (inclusief kinderen) met een
lichamelijke, zintuiglijke of verstandelijke beperking of met een gebrek aan kennis en
ervaring, tenzij zij onder toezicht staanof instruces over het juiste gebruik van het apparaat
hebben gekregen van de persoon die verantwoordelijk is voor hun veiligheid;
- Dit p
roduct is alleen voor huishoudelijk gebruik bedoeld en niet voor commercieel of
industrieel gebruik.
- Stel het niet bloot aan druppels of spatwater.
- Er mogen geen bronnen van open vuur, zoals brandende kaarsen, op of in de buurt van het
toestel worden geplaatst.
- De venlae mag niet worden belemmerd door het bedekken van de venlaeopeningen
door bijvoorbeeld kranten, tafelkleden, gordijnen en dergelijke.
- Verzeker u ervan dat het apparaat in een stabiele posie staat opge
steld. Schade,
veroorzaakt door het gebruik van dit product in een onstabiele posie, of door het niet
naleven van waarschuwingen of voorzorgsmaatregelen genoemd in deze handleiding, valt
niet onder de garane.
- Plaats geen voorwerpen gevuld met vloeistoffen, zoals vazen, op of bij het product.
- Dit product niet gebruiken of opslaan op plaatsen waar het wordt blootgesteld aan direct
zonlicht, hie, buitensporig veel stof of trillingen.
- Hou
d of bewaar dit product niet gedurende langere jd onder vochge omstandigheden.
- Reinig dit product niet met water of andere vloeistoffen.
- Bedek of blokkeer de gleuven en de gaten in het product niet.
- Stop geen vreemde voorwerpen in de gleuven of gaten van het product.
- Probeer dit product niet zelf te openen. Er zien geen door de gebruiker te onderhouden
onderdelen in.
- Geef kinderen geen gelegenheid in aanraking met plasc zakken te komen.
Let op
• Als het in de toekomst
nodig is om dit product af te voeren, let dan op het volgende: Alle
baerijen en accu's dienen uit het product te worden verwijderd (verwijdering van afval
baerijen en accu's).
• Breng het apparaat aljd naar een vakman om de geïntegreerde baerij te laten
verwijderen.
ACHTUNG
Nehmen Sie niemals die Baerie ein, Verätzungen wären die Folge
(mitgelieferte Fernbedienung) Dieses Produkt enthält eine Knopfzelle. Wenn die Knopfzellenbaerie
verschluckt wird, kann dies innerhalb von 2 Stunden zu schweren inneren Verätzungen und Tod führen.
Neue und gebrauchte Baerien von Kindern fernhalten.
Wenn das Baeriefach nicht sicher schließt, dieses Produkt nicht weiter verwenden und von Kindern
fernhalten.

16
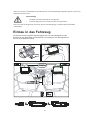
Einbau in das Fahrzeug
Verwenden Sie die mitgelieferten Montageriemen, um das Hauptgerät und die
Monitore an den Rückseiten der Kopfstützen zu befestigen. Den Montageriemen
fest um die Kopfstütze wickeln.
SETU
P
ENTER
SOURCE
\
\
VOL
+
\
U
T
E
S P R
E
T
N
E
E
C
R
UO
S
\
\
L
O
V
+
\
VOL+\
Waarschuwing
- Verwijder nooit de behuizing van dit apparaat.
- Plaats dit apparaat nooit op andere elektrische apparatuur.
Wenn Sie vermuten, dass Baerien verschluckt oder eine Körperöffnung eingeführt wurden, suchen Sie
umgehend ärztliche Hilfe.
Hören Sie nicht für längere Zeit mit einem hohen Lautstärkepegel, um dauerhaen Hörschäden
vorzubeugen.

17
19.
MODE
20.
ACHTERVERLICHTING
21.
Ingang 9-12 V gelijkspanning
22.
AV-ingang
23.
Aansluiting oortelefoon
24.
AAN/UIT
25.
INDICATIELAMPJE AAN/UIT
2 Identificatie van bedieningselementen
Hoofdeenheid
1. SETUP
2. Omhoog/Vorige
3. Omlaag/Volgende
4. ENTER
5. /VOL- Links/VOL-
6. /VOL+ Rechts/VOL+
7. SOURCE
8. AAN/UIT
9. USB
10. Aansluiting oortelefoon
11. AV UIT
12. Gelijkspanningsuitgang
13. DC IN 9-12V
14. MUTE
15. Op
16. Neer
17. /VOL- Links/VOL-
18. /VOL+ Rechts/VOL+

18
2 Identificatie van bedieningselementen
Afstandsbediening
1. BRON
DVD/USB.
2. DEMPEN
Uitschakelen audio-uitgang.
3. NUMERIEKE TOETSEN 0-9
Voor het selecteren van genummerde onderdelen in een menu.
4. DISPLAY
Voor het weergeven van de speelduur en de statusinformatie.
5. 10+ TOETS
Voor CD, om track 10 te selecteren, druk eerst op toets 10+ en vervolgens op 0; voor DVD, druk
op de toets 10+; selecteer een track hoger dan 10, bijvoorbeeld track 12; druk eerst op 10+, een
gemarkeerde balk verschijnt, druk nogmaals op 10+ en vervolgens op cijfer 2; selecteer track 23,
druk 3 keer op de toets 10+ en vervolgens op cijfertoets 3.
6. MENU/PBC
Terugkeren naar het DVD-hoofdmenu (DVD).
PBC aan/uitschakelaar (VCD).
7. AUDIO
DVD: Druk tijdens het afspelen herhaaldelijk op AUDIO om, indien beschikbaar, de verschillende
talen voor de audio te laten horen.
CD/VCD: Druk in afspeelmodus meerdere keren op “AUDIO” om van audiokanaal te wisselen
(Links, Rechts, Mix, Stereo).
8. AFSPELEN/PAUZE
Druk eenmaal op AFSPELEN/PAUZE om het afspelen te pauzeren; als u voor de tweede keer op
1 2
3
4
5
6
7
8
9 0
10+
REPEAT
TITLE
ENTER
MODE
SUBTITLE
AUDIO
MUTE
SOURCE
STEP
DISPLAY
MENU
/PBC
VOL+VOL-
SLOW
ZOOM
16
17
2
1
3
4
5
6
7
8
9
10
11
12
13
14
15
27
26
25
24
23
22
21
20
18
19

19
AFSPELEN/PAUZE drukt, wordt het afspelen hervat.
9. STOP
Wanneer u eenmaal op deze toets drukt, zal het apparaat het gestopte punt opslaan en het
afspelen vanaf dit punt hervatten wanneer u op “AFSPELEN ( )” drukt. Als u echter nogmaals
op de “STOP”-toets i.p.v. de “AFSPELEN ( )”-toets drukt, dan is deze hervatfunctie niet
beschikbaar.
10. MODE
LCD-parameters instellen (helderheid, contrast en verzadiging aanpassen).
11. VOL+
Aanpassen volume
12. Volgende
Naar het volgende hoofdstuk of de volgende track gaan.
13. Achteruit overslaan
Naar het vorige hoofdstuk of het begin van de huidige track gaan.
14. TOETS
Druk op de -TOETS om op 5 verschillende snelheden vooruit te spoelen (X2 -> X4- > X8- >
X16- > X32- > AFSPELEN), druk op de “AFSPELEN”-toets om de normale afspeelmodus te
hervatten.
15. TOETS
Druk op de -TOETS om op 5 verschillende snelheden terug te spoelen (X2 -> X4- > X8- >
X16- > X32- > AFSPELEN), druk op de “AFSPELEN”-toets om de normale afspeelmodus te
hervatten.
16. STEP
Stapsgewijs afspelen in DVD-modus.
17. SEARCH
Ga naar het gewenste tijdpunt of een titel of hoofdstuk in DVD-modus.
18. SUBTITLE
Druk tijdens het afspelen meerdere keren op "SUBTITLE" om van ondertitelingstaal te wisselen.
19. ANGLE
DVD: Door op ANGLE te drukken wijzigt de kijkhoek voor DVD's die deze functie ondersteunen.
20. TITLE
Om terug te keren naar het titelmenu van de DVD.
21. ENTER
Bevestigt de menukeuze.
22. SETUP
Voor toegang tot of verlaten van het instellingenmenu.
23. VOL-
Aanpassen volume
24. REPEAT
Druk tijdens het afspelen meerdere keren op "REPEAT" om de gewenste herhaalmodus te
selecteren.
DVD: selecteer hoofdstuk/titel herhalen of uit.

20
CD/VCD: selecteer enkele/alles herhalen of uit.
MP3: u kunt de functies shuffle/willekeurig/enkel/herhaal één/herhaal folder/folder gebruiken
25. SLOW
Druk herhaaldelijk op de SLOW-toets voor vertraagde weergave en om uit verschillende
snelheden te kiezen. De snelheden zijn 1/2, 1/4, 1/8, 1/16 en normaal.
26. PROGRAM
DVD/VCD: Met de programmafunctie kunt u uw favoriete tracks van de disc opslaan. Druk op de
“PROGRAM”-toets (programmeren), waarna het programmamenu op het scherm zal verschijnen.
Nu kunt u de cijfertoetsen gebruiken om direct de titel-, hoofdstuk- of tracknummers in te voeren
en de afspeeloptie te selecteren. Om de de normale afspeelmodus te hervatten, druk op
PROGRAM en selecteer de optie ‘programmering wissen’ in het programmeermenu, druk
nogmaals op PROGRAM om het programmeermenu te verlaten.
27. ZOOM
DVD/VCD: Gebruik “ZOOM” om het videobeeld te vergroten of verkleinen.
1. Druk in afspeel- of pauzemodus op ZOOM om de Zoomfunctie te activeren. Het
rechthoekframe zal kort rechtsonder in het beeld verschijnen.
2. Ieder keer drukken op de toets ZOOM wijzigt het TV-scherm volgens de volgende volgorde:
2X grootte 3X grootte 4X grootte 1/2X grootte 1/3X grootte 1/4X
grootte normale grootte
JPEG: Gebruik “ZOOM” om de foto te vergroten of te verkleinen.
1. Druk op 'ZOOM'.
2. Gebruik “ ” om het beeld te vergroten of “ ” om het te verkleinen.
Gebruik om door de ingezoomde afbeelding te gaan.
Seite wird geladen ...
Seite wird geladen ...
Seite wird geladen ...
Seite wird geladen ...
Seite wird geladen ...
Seite wird geladen ...
Seite wird geladen ...
Seite wird geladen ...
Seite wird geladen ...
Seite wird geladen ...
Seite wird geladen ...
Seite wird geladen ...
Seite wird geladen ...
Seite wird geladen ...
Seite wird geladen ...
Seite wird geladen ...
Seite wird geladen ...
Seite wird geladen ...
Seite wird geladen ...
Seite wird geladen ...
Seite wird geladen ...
Seite wird geladen ...
Seite wird geladen ...
Seite wird geladen ...
Seite wird geladen ...
Seite wird geladen ...
Seite wird geladen ...
Seite wird geladen ...
Seite wird geladen ...
Seite wird geladen ...
Seite wird geladen ...
Seite wird geladen ...
Seite wird geladen ...
Seite wird geladen ...
Seite wird geladen ...
Seite wird geladen ...
Seite wird geladen ...
Seite wird geladen ...
Seite wird geladen ...
Seite wird geladen ...
Seite wird geladen ...
Seite wird geladen ...
Seite wird geladen ...
Seite wird geladen ...
Seite wird geladen ...
Seite wird geladen ...
-
 1
1
-
 2
2
-
 3
3
-
 4
4
-
 5
5
-
 6
6
-
 7
7
-
 8
8
-
 9
9
-
 10
10
-
 11
11
-
 12
12
-
 13
13
-
 14
14
-
 15
15
-
 16
16
-
 17
17
-
 18
18
-
 19
19
-
 20
20
-
 21
21
-
 22
22
-
 23
23
-
 24
24
-
 25
25
-
 26
26
-
 27
27
-
 28
28
-
 29
29
-
 30
30
-
 31
31
-
 32
32
-
 33
33
-
 34
34
-
 35
35
-
 36
36
-
 37
37
-
 38
38
-
 39
39
-
 40
40
-
 41
41
-
 42
42
-
 43
43
-
 44
44
-
 45
45
-
 46
46
-
 47
47
-
 48
48
-
 49
49
-
 50
50
-
 51
51
-
 52
52
-
 53
53
-
 54
54
-
 55
55
-
 56
56
-
 57
57
-
 58
58
-
 59
59
-
 60
60
-
 61
61
-
 62
62
-
 63
63
-
 64
64
-
 65
65
-
 66
66


Lenco MES-212 Bedienungsanleitung
- Kategorie
- Tragbare DVD / Blu-Ray-Player
- Typ
- Bedienungsanleitung
in anderen Sprachen
- English: Lenco MES-212 Owner's manual
- français: Lenco MES-212 Le manuel du propriétaire
- español: Lenco MES-212 El manual del propietario
- Nederlands: Lenco MES-212 de handleiding