Lenco TT-13 Benutzerhandbuch
- Kategorie
- Audio-Plattenspieler
- Typ
- Benutzerhandbuch

1
Modellnr.: TT-13
USER MANUAL – Turntable with Bluetooth and USB Play/recording
BEDIENUNGSANLEITUNG – Plattenspieler mit Bluetooth und USB-
Wiedergabe/Aufnahme
MANUEL de l’UTILISATEUR - Tourne-disque avec Bluetooth et
enregistrement/ lecture USB
GEBRUIKERSHANDLEIDING - platenspeler met bluetooth en USB-
afspelen/-opnemen
NÁVOD K OBSLUZE – gramofon s funkcí Bluetooth
a přehráváním/nahráváním USB
Giradischi con Bluetooth e funzione di riproduzione/registrazione USB:
manuale dell'utente

2
Inhaltsverzeichnis:
English....................................................................................................................................3
Deutsch ................................................................................................................................ 15
Français ................................................................................................................................ 27
Nederlands ........................................................................................................................... 38
Česky .................................................................................................................................... 49
Italiano ................................................................................................................................. 60
Version: 1.0

3
English
CAUTION:
Usage of controls or adjustments or performance of procedures other than those specified herein may result
in hazardous radiation exposure.
PRECAUTIONS BEFORE USE
KEEP THESE INSTRUCTIONS IN MIND:
1. Do not cover or block any ventilation openings. When placing the device on a shelf, leave 5 cm (2”) free
space around the whole device.
2. Install in accordance with the supplied user manual.
3. Keep the device away from heat sources such as radiators, heaters, stoves, candles and other heat-
generating products or naked flame. The device can only be used in moderate climates. Extremely cold
or warm environments should be avoided. Working temperature between 0° and 35°C.
4. Avoid using the device near strong magnetic fields.
5. Electrostatic discharge can disturb normal usage of this device. If so, simply reset and restart the device
following the instruction manual. During file transmission, please handle with care and operate in a
static-free environment.
6. Warning! Never insert an object into the product through the vents or openings. High voltage flows
through the product and inserting an object can cause electric shock and/or short circuit internal parts.
For the same reason, do not spill water or liquid on the product.
7. Do not use in wet or moist areas such as bathrooms, steamy kitchens or near swimming pools.
8. The device shall not be exposed to dripping or splashing and make sure that no objects filled with
liquids, such as vases, are placed on or near the apparatus.
9. Do not use this device when condensation may occur. When the unit is used in a warm wet room with
damp, water droplets or condensation may occur inside the unit and the unit may not function
properly; let the unit stand in power OFF for 1 or 2 hours before turning on the power: the unit should
be dry before getting any power.
10. Although this device is manufactured with the utmost care and checked several times before leaving
the factory, it is still possible that problems may occur, as with all electrical appliances. If you notice
smoke, an excessive build-up of heat or any other unexpected phenomena, you should disconnect the
plug from the main power socket immediately.
11. This device must operate on a power source as specified on the specification label. If you are not sure
of the type of power supply used in your home, consult your dealer or local power company.
12. Keep away from animals. Some animals enjoy biting on power cords.
13. To clean the device, use a soft dry cloth. Do not use solvents or petrol based fluids. To remove severe
stains, you may use a damp cloth with dilute detergent.
14. The supplier is not responsible for damage or lost data caused by malfunction, misuse, modification of
the device or battery replacement.
15. Do not interrupt the connection when the device is formatting or transferring files. Otherwise, data
may be corrupted or lost.
16. If the unit has USB playback function, the USB memory stick should be plugged into the unit directly.
Don’t use an USB extension cable because it can cause interference resulting in failing of data.
17. The rating label has been marked on the bottom or back panel of the device.
18. This device is not intended for use by people (including children) with physical, sensory or mental
disabilities, or a lack of experience and knowledge, unless they’re under supervision or have received
instructions about the correct use of the device by the person who is responsible for their safety.
19. This product is intended for non professional use only and not for commercial or industrial use.
20. Make sure the unit is adjusted to a stable position. Damage caused by using this product in an unstable
position vibrations or shocks or by failure to follow any other warning or precaution contained within
this user manual will not be covered by warranty.
21. Never remove the casing of this device.
22. Never place this device on other electrical equipment.
23. Do not allow children access to plastic bags.
24. Only use attachments/accessories specified by the manufacturer.

4
25. Refer all servicing to qualified service personnel. Servicing is required when the device has been
damaged in any way, such as the power supply cord or the plug, when liquid has been spilled or objects
have fallen into the device, when the device has been exposed to rain or moisture, does not operate
normally, or has been dropped.
26. Long exposure to loud sounds from personal music players may lead to temporary or permanent
hearing loss.
27. If the product is delivered with power cable or AC power adaptor:
If any trouble occur, disconnect the AC power cord and refer servicing to qualified personnel.
Don’t step on or pinch the power adaptor. Be very careful, particularly near the plugs and the
cable’s exit point. Do not place heavy items on the power adaptor, which may damage it. Keep
the entire device out of children’s reach! When playing with the power cable, they can seriously
injure themselves.
Unplug this device during lightning storms or when unused for a long period.
The socket outlet must be installed near the equipment and must be easily accessible.
Do not overload ac outlets or extension cords. Overloading can cause fire or electric shock.
Devices with class 1 construction should be connected to a main socket outlet with a protective
earthed connection.
Devices with class 2 construction do not require a earthed connection.
Always hold the plug when pulling it out of the main supply socket. Do not pull the power cord.
This can cause a short circuit.
Do not use a damaged power cord or plug or a loose outlet. Doing so may result in fire or electric
shock.
28. If the product contains or is delivered with a remote control containing coin/cell batteries:
Warning:
“Do not ingest battery, Chemical Burn Hazard” or equivalent working.
[The remote control supplied with] This product contains a coin/button cell battery. If the battery
is swallowed, it can cause severe internal burns in just 2 hours and can lead to death.
Keep new and used batteries away from children.
If the battery compartment does not close securely, stop using the product and keep it away from
children.
If you think batteries might have been swallowed or placed inside any part of the body, seek
immediate medical attention.
29. Caution about the use of Batteries:
Danger of explosion if battery is incorrectly replaced. Replace only with the same or equivalent
type.
Battery cannot be subjected to high or low extreme temperatures, low air pressure at high altitude
during use, storage or transportation.
Replacement of a battery with an incorrect type that can result in an explosion or the leakage of
flammable liquid or gas.
Disposal of a battery into fire or a hot oven, or mechanically crushing or cutting of a battery, that
can result in an explosion.
Leaving a battery in an extremely high temperature surrounding environment that can result in an
explosion or that leakage of flammable liquid or gas.
A battery subjected to extremely low air pressure that may result in an explosion or the leakage of
flammable liquid or gas.
Attention should be drawn to the environmental aspects of battery disposal.
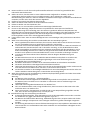
INSTALLATION
• Unpack all parts and remove protective material.
• Do not connect the unit to the mains before checking the mains voltage and before all other connections
have been made.

5
Accessories included:
User manual
Power adaptor

6
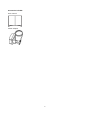
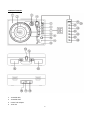
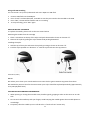
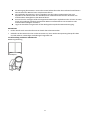
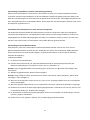
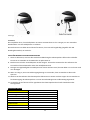
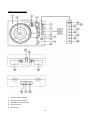
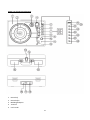
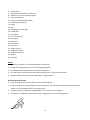
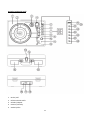
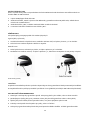
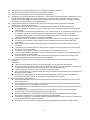
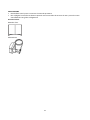
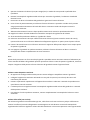
Location of Controls
1. Turntable deck
2. Turntable shaft
3. Center hole adaptor
4. Tone arm

7
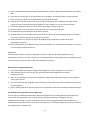
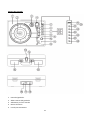
5. Cueing lever
6. Tone arm clip
7. Turntable speed selector
8. Auto stop control switch
9. LED status indicator
10. Power switch/Volume control
11. Headphone jack
12. Stylus
13. Lock catch
14. Carrying handle
15. Speaker
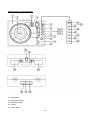
16. Aux in jack
17. Line out channel R/L
18. DC in jack
19. USB slot
20. Function LED
21. Recording
22. Previous track
23. Next track
24. Play/pause
25. Mode
26. Pair
Mode
1. Short press “Mode” to select the playing mode.
2. Blue LED will be flashed when Bluetooth is pairing.
3. Blue LED will be illuminated when Bluetooth is connected
4. Red LED will be illuminated when it is turntable mode/Aux in mode.
5. Green LED will be illuminated when it is USB mode.
Using the turntable
1. Place the turntable case on a flat level surface.
2. Insert the adaptor cord into the Dc jack at the rear of the case and plug the adaptor into the mains supply
socket.
3. On first use, ensure that the cable tie is removed from the player arm.
4. Remove the stylus cover and keep in a safe place for future use

8
5. Move the speed selector to the speed (33,45 or 78rpm) corresponding to the record to the played
6. Turn the Volume knob to turn the turntable on and the mode indicator will illuminate red
7. Place a record onto the turntable spindle and unclip the tone arm
8. Use the cuing lever to lift the tone arm and move the arm so that the stylus is positioned just inside the
edge of the record or aligned with the start of the track to be played.
9. Slowly lower the arm and after a short interval the record will start to play
10. Adjust the volume to the desired level by rotating the volume control knob
11. When the end of the record has been reached the turntable will stop
12. Use the lever again to lift the tone arm (the deck will start to rotate again), move it back to the clip and
lower into the cradle. The deck will stop
13. Secure the tine arm using the clip and refit the stylus cover after use and always before moving the
turntable
14. To turn off the turntable at any time, lift the tone arm on the record and turn the volume knob fully
anticlockwise.
Note
Some records have larger center hole and it may be necessary to fit the center hole adaptor to the turntable
shaft before placing the record on the turntable. Always refit the stylus cover and secure the turntable arm
using the clip before moving the turntable.
Using with auxiliary device
1. Auxiliary analogue audio equipment can be connected and amplified via the turntable.
2. Connect the auxiliary equipment using a 3.5mm jack cable (cable not included) into the Aux in jack.
3. Press the play button on the auxiliary equipment and use the track controls as usual on the auxiliary
device.
4. The volume can be adjusted using the volume knob on the turntable or the controls on the connected
auxiliary device.
5. To turn off the unit at the any time turn the volume knob fully anticlockwise.
Using headphones (not included)
A stereo headphone jack has been provided so that the turntable can be used without disturbing others.

9
Plug in the headphones at the point marked headphone near the volume knob and adjust the listening
volume to your chosen level. Excessive sound pressure from earphones and headphones can cause hearing
loss. The turntable speakers will not operate when earphones are fitted.

10
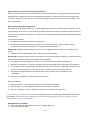
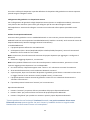
Connecting the turntable to external speaker
In connecting the turntable to external speakers (via a suitable amplifier), use a twin phono to twin phono
lead (not included) to connect the RCA output jacks to the Audio in of the amplifier. Ensure red plugs are
inserted into the red sockets and white into white.
Using with Bluetooth device
Check that your turntable is in Bluetooth mode. If you are not already in Bluetooth mode, short press the
Mode button until you are in Bluetooth mode (Blue LED will be illuminated). It will begin to search for
Bluetooth devices (Blue LED flashed during pairing).
In Bluetooth Mode:
1. Your device will search for Bluetooth.
2. On the device (e.g. iPhone/iPad/Android/other phone/Tablet/Computer), turn on Bluetooth connectivity
and ensure that it is ‘discoverable’.
Note: If necessary, refer to the instructions for your device to add or set up Bluetooth.
3. Select to ‘Add new device’, if necessary.
Note: Some products will automatically search for a new device and so the ‘Add new device’ option is not
available.
4. When found, your device will be displayed as ‘Lenco TT-13’. Select and begin pairing.
5. When pairing is complete ‘Bluetooth Connected’ will be displayed.
6. Now that you have paired your device with the turntable, it will connect to it when it is within range, which
is about 10 meter or less (33 feet or less), line of sight.
7. Your device will remain paired with the turntable unless you decide to disconnect or ‘unpair’ it.
8. You can short press “Pair” to reconnect.
Playing Bluetooth
1. Press “Previous” for previous track of your Bluetooth device.
2. Press “Next” for next track of your Bluetooth device.
3. Press “Play/pause” for play or pause of your Bluetooth device.
“This product has a bluetooth reception function, you can not transmit any bluetooth sound with it:
this means that you can receive wirelessly a bluetooth sound signal from an external source like a
smartphone.”
Using with USB playback
1. Connect USB flash or MP3 player into the USB port.
2. It will play automatically

11
Using with USB encoding
You can record a vinyl record, Bluetooth and Aux in Mp3 to a USB flash.
1. Connect USB flash into the USB port.
2. Press “mode” to select Bluetooth, turntable or Aux that you intend to be recorded to the USB.
3. Press “REC”, the LED will be flashed. And it is recording.
4. To stop recording, press “REC” again.
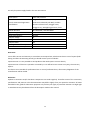
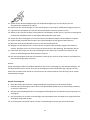
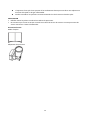
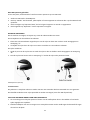
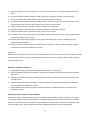
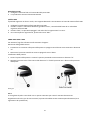
HOW TO REPLACE THE NEEDLE
To replace the needle, please refer to the instructions below.
Removing the needle from the cartridge
1. Place a screwdriver at the tip of the stylus and push downward as shown in direction “A”.
2. Remove the stylus by pulling the stylus forward and pushing downward.
Installing the Stylus
1. Hold the tip of the stylus and insert the stylus by pressing as shown in direction “B”.
2. Push the stylus upward as in direction “C” until the stylus locks into the tip position.
Guide Pins (inside)
NOTES
We advise you to clean your records with an anti-static cloth to gain maximum enjoyment from them.
We would also point out that for the same reason your stylus should be replaced periodically (approximately
every 250 playback hours)
TIPS FOR BETTER TURNTABLE PERFORMANCE
1. When opening or closing the turntable cover, handle it gently, gripping it either at the centre or at each
side.
2. Do not touch the needle tip with your fingers; avoid bumping the needle against the turntable platter or
record edge.
3. Frequently clean the needle tip-use a soft brush in a “back-to-front” motion only.

12
4. If you must use a needle cleaning fluid, use very sparingly.
5. Gently wipe the turntable player housing with a soft cloth. Use only a small amount of mild detergent to
clean the turntable player.
6. Never apply harsh chemicals or solvents to any part of the turntable system.
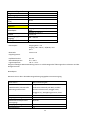
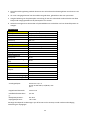
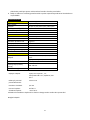
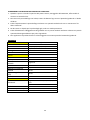
SPECIFICATIONS
Type
Belt drive
drive motor
DC motor
speed
33 1/3 rpm, 45 rpm, 78 rpm
wow and flutter
<0.35%
turntable platter
200mm
cartridge
Type
ceramic cartridge
Stylus
0.7 mil
optimum tracking force
6 gram
output
300-500mv
frequency response
,+/-20dB
crosstalk
10db
signal to noise ration (S/N)
18db
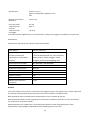
General
Adaptor
Input AC 100-240V, 50/60Hz, 0.3A max.
Output DC5V 1A
product
DC5V 1A
audio output (line out)
300-500mv
power consumption
5W
Power adaptor.
Output DC 5V 1A
Input AC 100-240V, 50/60Hz, 0.3A max.
Bluetooth Pairing name:
Lenco TT-13
Headphone socket:
3.5mm
Operating Temperature:
0°C‐40°C
Storage Temperature:
-20°C‐70°C
Due to continuing improvement, the features and the design are subject to change without notice
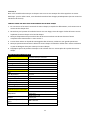
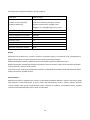
Power supply adaptor

13
Use only the power supply listed in the user instructions
Information
Value and precision
Manufacturers name or trade
mark, commercial registration
and address
DongGuan Obelieve Electronic Co., Ltd
Huazhaoxin Industrial park B-4/F, Golden
phoenix industrial zone, Fenggan town,
Dongguan city, Guangdong province, China
Model Identifier
0BL-0501000E / 0BL-0501000B
Input voltage
100-240V
Input AC frequency
50/60Hz
Output voltage
5V
Output current
1A
Output Power
5W
Average active efficiency
73.62
No load Power consumption
≤ 0.10
Guarantee
Lenco offers service and warranty in accordance to European law, which means that in case of repairs (both
during and after the warranty period) you should contact your local dealer.
Important note: It is not possible to send products that need repairs to Lenco directly.
Important note: If this unit is opened or accessed by a non-official service center in any way, the warranty
expires.
This device is not suitable for professional use. In case of professional use, all warranty obligations of the
manufacturer will be voided.
Disclaimer
Updates to Firmware and/or hardware components are made regularly. Therefore some of the instruction,
specifications and pictures in this documentation may differ slightly from your particular situation. All items
described in this guide for illustration purposes only and may not apply to particular situation. No legal right
or entitlements may be obtained from the description made in this manual.

14
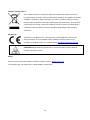
Disposal of the Old Device
This symbol indicates that the relevant electrical product or battery should not be
disposed of as general household waste in Europe. To ensure the correct waste
treatment of the product and battery, please dispose them in accordance to any
applicable local laws of requirement for disposal of electrical equipment or
batteries. In so doing, you will help to conserve natural resources and improve
standards of environmental protection in treatment and disposal of electrical waste
(Waste Electrical and Electronic Equipment Directive).
CE Marking
Hereby, Lenco Benelux B.V., Thermiekstraat 1a, 6361 HB Nuth, The Netherlands,
declares that this product is in compliance with the essential EU directive
requirements.
The declaration of conformity may be consulted via [email protected]om
WARNING: To prevent possible hearing damage, do not listen at high volume levels
for long periods.
Service
For more information and helpdesk support, please visit support.lenco.com
Lenco Benelux BV, Thermiekstraat 1a, 6361 HB Nuth, The Netherlands.

15
Deutsch
ACHTUNG:
Eine andere als die hier beschriebene Benutzung der Bedienelemente oder Einstellung oder Durchführung
von Abläufen kann zu einem gefährlicher Strahlung ausgesetzt werden führen.
VORSICHTSMASSNAHMEN VOR DER BENUTZUNG
BEFOLGEN SIE IMMER FOLGENDE ANWEISUNGEN:
1. Blockieren oder bedecken Sie keine Lüftungsöffnungen. Wenn Sie das Gerät auf ein Regal stellen,
lassen Sie um das gesamte Gerät 5 cm (2”) freien Platz.
2. Stellen Sie das Gerät entsprechend den Anweisungen der mitgelieferten Bedienungsanleitung auf.
3. Halten Sie das Gerät von Hitzequellen wie Radiatoren, Heizern, Ö fen, Kerzen oder anderen
hitzeerzeugenden Produkten oder offenen Flammen fern. Das Gerät darf nur bei gemäßigtem Klima
verwendet werden. Sehr kalte oder heiße Umgebungen sind zu vermeiden. Die Betriebstemperatur
liegt zwischen 0 °C und 35 °C.
4. Meiden Sie bei der Benutzung des Produkts die Nähe starker Magnetfelder.
5. Elektrostatische Entladungen können die normale Benutzung dieses Geräts stören. Sollte dies
geschehen, führen Sie einfach einen Reset aus und starten Sie dann das Gerät entsprechend den
Anweisungen dieser Bedienungsanleitung neu. Gehen Sie besonders bei Datenübertragungen mit dem
Gerät vorsichtig um und führen Sie diese nur in einer antielektrostatischen Umgebung aus.
6. Warnung! Niemals Gegenstände durch die Lüftungsschlitze oder Ö ffnungen in das Gerät stecken. In
diesem Gerät fließt Hochspannung und das Hineinstecken von Gegenständen kann zu elektrischem
Schock und/oder Kurzschluss interner elektrischer Bauteile führen. Spritzen/Gießen Sie aus dem
gleichen Grund kein Wasser oder Flüssigkeiten auf das Gerät.
7. Benutzen Sie das Gerät nicht in nasser oder feuchter Umgebung wie Bad, Dampfküche oder in der Nähe
von Schwimmbecken.
8. Das Gerät darf weder Tropf- noch Spritzwasser ausgesetzt werden und es dürfen keine mit Flüssigkeit
gefüllten Behälter wie z. B. Vasen auf das Gerät oder in der Nähe des Gerätes gestellt werden.
9. Benutzen Sie das Gerät nicht, wenn Kondensation entstehen kann. Wenn Sie das Gerät in einem
warmen feuchten Raum mit Dampf benutzen, dann können Wassertropfen oder Kondensation in das
Gerät eindringen und u. U. zu Fehlfunktionen des Geräts führen. Schalten Sie in diesem Fall das Gerät
für 1 – 2 Stunden aus, bevor Sie es erneut einschalten, wobei Sie darauf achten sollten, dass das Gerät
vollständig getrocknet ist, bevor Sie es wieder einschalten.
10. Obwohl dieses Gerät unter größter Sorgfalt hergestellt und vor Auslieferung mehrmals überprüft
wurde, können trotzdem wie bei jedem anderen elektrischen Gerät auch Probleme auftauchen.
Trennen Sie das Gerät bei Rauchentwicklung, starker Hitzeentwicklung oder jeder anderen
unnatürlichen Erscheinung sofort vom Stromnetz.
11. Dieses Gerät ist durch eine Stromquelle wie auf dem Typenschild angegeben zu betreiben. Halten Sie
bei Unsicherheiten über die Art Ihrer Stromversorgung in Ihrer Wohnung Rücksprache mit Ihrem
Händler oder Ihrer Stromzuliefererfirma.
12. Halten Sie das Gerät von Haustieren fern. Einige Nagetiere lieben es, an Netzkabeln zu nagen.
13. Benutzen Sie für die Reinigung ein weiches und trockenes Tuch. Benutzen Sie niemals Lösungsmittel
oder Flüssigkeiten auf Ö lbasis. Benutzen Sie zum Entfernen hartnäckiger Flecken ein feuchtes Tuch mit
mildem Reinigungsmittel.
14. Der Hersteller haftet nicht für Beschädigungen oder Datenverluste durch Fehlfunktion,
Zweckentfremdung oder Modifikation des Geräts oder durch das Wechseln der Batterie.
15. Unterbrechen Sie die Verbindung nicht während einer Formatierung oder einer Datenübertragung. Bei
Unterbrechung drohen Datenverlust und Datenbeschädigung.
16. Wenn das Gerät eine USB-Wiedergabefunktion besitzt, dann stecken Sie den USB-Stick direkt in das
Gerät. Verwenden Sie kein USB-Verlängerungskabel, weil die erhöhte Störungsanfälligkeit zu
Datenverlust führen kann.
17. Das Typenschild befindet sich an der Unter- oder Rückseite des Gerätes.
18. Dieses Gerät ist nicht zur Benutzung durch Personen (einschließlich Kinder) mit physischen,
sensorischen oder mentalen Beeinträchtigungen oder ohne ausreichender Erfahrung vorgesehen, es sei
denn, sie werden durch eine verantwortliche Person beaufsichtigt oder wurden in die ordnungsgemäße
Bedienung des Gerätes durch eine für ihre Sicherheit verantwortlichen Person eingewiesen.

16
19. Dieses Produkt ist nur für den nicht-professionellen Gebrauch und nicht für gewerbliche oder
industrielle Zwecke bestimmt.
20. Stellen Sie sicher, dass das Gerät in einer stabilen Position aufgestellt ist. Schäden, die durch
Verwendung dieses Produkts in einer instabilen Position, durch Vibrationen, Stöße oder
Nichtbeachtung der anderen in diesem Handbuch enthaltenen Warnungen und Sicherheitsmaßnahmen
entstehen, werden nicht durch die Garantie abgedeckt.
21. Entfernen Sie niemals das Gehäuse dieses Geräts.
22. Stellen Sie dieses Gerät niemals auf andere elektrische Geräte.
23. Halten Sie Kinder von den Plastiktüten fern.
24. Benutzen Sie nur vom Hersteller spezifizierte Erweiterungen/Zubehörteile.
25. Lassen Sie alle Wartungs-/Reparaturarbeiten von qualifiziertem Servicepersonal ausführen.
Reparatur/Wartung wird notwendig, wenn das Gerät in irgendeiner Weise wie beispielsweise am
Netzkabel oder am Netzstecker beschädigt wurde oder wenn Flüssigkeit in das Gerät gelangt ist bzw.
Gegenstände in das Gerät gefallen sind, das Gerät Regen oder Feuchtigkeit ausgesetzt war, es
heruntergefallen ist oder nicht ordnungsgemäß funktioniert.
26. Langes Hören lauter Töne aus einem Musikgerät kann zum zeitweiligen oder permanenten Hörverlust
führen.
27. Wenn zum Lieferumfang des Produkts ein Netzkabel oder ein Netzadapter gehört:
Wenn irgendwelche Probleme auftreten, dann trennen Sie das Gerät vom Stromnetz und setzen
Sie sich anschließend mit einer qualifizierten Fachkraft in Verbindung.
Treten Sie nicht auf den Netzadapter und klemmen Sie ihn auch nicht ein. Seien Sie besonders im
näheren Bereich des Netzsteckers und an der Stelle vorsichtig, an der das Netzkabel aus dem
Gerät herausgeführt wird. Stellen Sie keine schweren Gegenstände auf den Netzadapter, weil er
dadurch beschädigt werden kann. Halten Sie das gesamte Gerät außerhalb der Reichweite von
Kindern! Durch Spielen mit dem Netzkabel können sie sich ernsthafte Verletzungen zuziehen.
Trennen Sie das Gerät während eines Gewitters oder bei längerer Nichtbenutzung vom
Stromnetz.
Die Netzsteckdose muss sich in der Nähe des Geräts befinden und einfach zu erreichen sein.
Ü berlasten Sie Steckdosen und Verlängerungsleitungen nicht. Eine Überlastung kann zu
Brandgefahr bzw. Stromschlag führen.
Geräte der Schutzklasse 1 müssen Sie an eine Netzsteckdose mit Schutzleiter anschließen.
Geräte der Schutzklasse 2 benötigen keinen Schutzleiteranschluss.
Halten Sie den Netzstecker in der Hand, wenn Sie ihn aus der Netzsteckdose ziehen. Ziehen Sie ihn
nicht durch Zerren am Kabel heraus. Das kann zu einem Kurzschluss führen.
Verwenden Sie weder ein beschädigtes Netzkabel noch einen beschädigten Netzstecker oder eine
lockere Steckdose. Missachtung kann zu Brand oder Stromschlag führen.
28. Wenn das Produkt mit einer Fernbedienung mit Batterien/Knopfzellen geliefert wird oder das Produkt
eine derartige Fernbedienung umfasst:
Warnung:
Die Batterie nicht einnehmen – Verätzungsgefahr!
Die mit diesem Produkt mitgelieferte Fernbedienung enthält eine Knopfzelle. Das Verschlucken
der Batterie kann innerhalb von nur 2 Stunden zu schwersten inneren Verbrennungen mit
Todesfolge führen.
Halten Sie neue und gebrauchte Batterien von Kindern fern.
Falls sich das Batteriefach nicht richtig schließen lässt, dann benutzen Sie das Gerät nicht mehr
und halten Sie es von Kindern fern.
Wenn Sie vermuten, dass Batterien verschluckt oder in eine Körperöffnung eingeführt worden
sind, dann suchen Sie umgehend eine/-n Ärztin/Arzt auf.
29. Warnhinweise bzgl. der Verwendung von Batterien:
Es besteht Explosionsgefahr, wenn die Batterien nicht ordnungsgemäß ersetzt werden. Tauschen
Sie die Batterie nur gegen eine Batterie des gleichen Typs aus.
Die Batterie darf während der Benutzung, Aufbewahrung oder des Transports weder sehr hohen
oder sehr niedrigen Temperaturen noch niedrigem Luftdruck in großen Höhenlagen ausgesetzt
werden.
Die Ersetzung der Batterie mit einem falschen Batterietyp kann zum Explodieren der Batterie oder
zum Entweichen von entflammbarem Gas oder Auslaufen von entflammbarer Flüssigkeit aus der
Batterie führen.

17
Die Entsorgung der Batterie in Feuer oder einem heißen Ofen oder das mechanische Zerkleinern
oder Zerteilen der Batterie kann zu Explosionen führen.
Das Verbleiben der Batterie in einer Umgebung mit sehr hohen Temperaturen kann zum
Explodieren der Batterie oder zum Entweichen von entflammbarem Gas oder Auslaufen von
entflammbarer Flüssigkeit aus der Batterie führen.
Eine einem sehr niedrigen Luftdruck ausgesetzte Batterie kann explodieren oder es kann aus einer
einem sehr niedrigen Luftdruck ausgesetzten Batterie entflammbares Gas entweichen oder
entflammbare Flüssigkeit auslaufen.
Legen Sie besonderes Augenmerk auf den ökologischen Aspekt der Batterieentsorgung.
AUFSTELLEN
• Packen Sie alle Teile aus und entfernen Sie danach die Schutzmaterialien.
• Schließen Sie das Gerät nicht eher an das Stromnetz an, bevor Sie die Netzspannung überprüft haben
und alle anderen notwendigen Verbindungen hergestellt sind.
Im Lieferumfang enthaltene Zubehörteile:
Bedienungsanleitung
Netzadapter

18
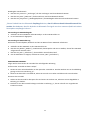
Bedienelemente und Komponenten
27. Plattenteller
28. Plattenspielerschaft
29. Mittellochadapter
30. Tonarm
31. Cueing-Hebel

19
32. Tonarmclip
33. Wahlschalter für die Plattenspielergeschwindigkeit
34. Auto-Stopp-Kontrollschalter
35. LED-Statusanzeige
36. Netzschalter/Lautstärkeregler
37. Kopfhöreranschluss
38. Tonnadel
39. Arretierlasche
40. Tragegriff
41. Lautsprecher
42. Aux-in-Buchse
43. Line-Out-Kanal R/L
44. DC-Eingangsbuchse
45. USB-Anschluss
46. Funktions-LED
47. Aufnahme
48. Vorheriger Titel
49. Nächster Titel
50. Wiedergabe/Pause
51. Modus
52. Koppeln
Modus
6. Drücken Sie kurz „Mode“ („Modus)“, um den Wiedergabemodus zu wählen.
7. Die blaue LED blinkt, wenn Bluetooth gekoppelt wird.
8. Die blaue LED leuchtet, wenn eine Bluetooth-Verbindung besteht.
9. Die rote LED leuchtet, wenn der Plattenspieler-Modus/Aux-in-Modus aktiviert ist.
10. Die grüne LED leuchtet, wenn der USB-Modus aktiviert ist.
Den Plattenspieler verwenden
15. Stellen Sie den Plattenspielerkoffer auf eine flache, ebene Oberfläche.
16. Stecken Sie das Adapterkabel in die Gleichstrombuchse an der Rückseite des Gehäuses und stecken Sie
den Adapter in die Netzsteckdose.
17. Achten Sie bei der ersten Inbetriebnahme darauf, dass der Kabelbinder vom Plattenspielerarm entfernt
wird.
18. Entfernen Sie den Schutz der Tonnadel und bewahren Sie ihn für die spätere Verwendung an einem
sicheren Ort auf.

20
19. Stellen Sie den Geschwindigkeitsregler auf die Geschwindigkeit (33, 45 oder 78 rpm), die der
abzuspielenden Schallplatte entspricht.
20. Drehen Sie den Lautstärkeregler, um den Plattenspieler einzuschalten; die Betriebsanzeige leuchtet rot.
21. Legen Sie eine Schallplatte auf den Stift des Plattenspielers und lösen Sie den Tonarm.
22. Heben Sie den Tonarm mit dem Cueing-Hebel an und bewegen Sie den Arm so, dass die Tonnadel genau
am Rand der Schallplatte oder am Anfang des abzuspielenden Titels steht.
23. Senken Sie den Arm langsam ab und nach einem kurzen Moment beginnt die Schallplatte zu spielen.
24. Stellen Sie die Lautstärke durch Drehen des Lautstärkereglers auf den gewünschten Wert ein.
25. Wenn das Ende der Schallplatte erreicht ist, hält der Plattenspieler an.
26. Betätigen Sie den Hebel erneut, um den Tonarm anzuheben (der Drehteller beginnt sich wieder zu
drehen), bewegen Sie ihn zurück zum Clip und senken Sie ihn in die Halterung. Der Drehteller hält an.
27. Sichern Sie den Tonarm mit dem Clip und bringen Sie den Schutz der Tonnadel nach Gebrauch und
immer vor dem Bewegen des Plattenspielers wieder an.
28. Um den Plattenspieler jederzeit auszuschalten, heben Sie den Tonarm auf der Platte an und drehen Sie
den Lautstärkeregler ganz nach links.
Hinweis
Einige Schallplatten haben ein größeres Mittelloch und es kann notwendig sein, den Mittellochadapter auf
den Plattentellerschaft zu setzen, bevor Sie die Schallplatte auf den Plattenteller legen. Bringen Sie den
Schutz der Tonnadel immer wieder an und sichern Sie den Plattenspielerarm mit dem Clip, bevor Sie den
Plattenspieler bewegen.
Betrieb mit Zusatzgerät
6. Ü ber den Plattenspieler können analoge Audiogeräte angeschlossen und verstärkt werden.
7. Schließen Sie das Zusatzgerät mit einem 3,5-mm-Klinkenkabel (Kabel nicht im Lieferumfang enthalten)
an die Aux-in-Buchse an.
8. Drücken Sie die Wiedergabetaste am Zusatzgerät und bedienen Sie die Titelsteuerung wie gewohnt am
Zusatzgerät.
9. Die Lautstärke kann mit dem Lautstärkeregler am Plattenspieler oder den Reglern am angeschlossenen
Zusatzgerät eingestellt werden.
10. Zum Ausschalten des Geräts können Sie den Lautstärkeregler jederzeit ganz nach links drehen.
Seite wird geladen ...
Seite wird geladen ...
Seite wird geladen ...
Seite wird geladen ...
Seite wird geladen ...
Seite wird geladen ...
Seite wird geladen ...
Seite wird geladen ...
Seite wird geladen ...
Seite wird geladen ...
Seite wird geladen ...
Seite wird geladen ...
Seite wird geladen ...
Seite wird geladen ...
Seite wird geladen ...
Seite wird geladen ...
Seite wird geladen ...
Seite wird geladen ...
Seite wird geladen ...
Seite wird geladen ...
Seite wird geladen ...
Seite wird geladen ...
Seite wird geladen ...
Seite wird geladen ...
Seite wird geladen ...
Seite wird geladen ...
Seite wird geladen ...
Seite wird geladen ...
Seite wird geladen ...
Seite wird geladen ...
Seite wird geladen ...
Seite wird geladen ...
Seite wird geladen ...
Seite wird geladen ...
Seite wird geladen ...
Seite wird geladen ...
Seite wird geladen ...
Seite wird geladen ...
Seite wird geladen ...
Seite wird geladen ...
Seite wird geladen ...
Seite wird geladen ...
Seite wird geladen ...
Seite wird geladen ...
Seite wird geladen ...
Seite wird geladen ...
Seite wird geladen ...
Seite wird geladen ...
Seite wird geladen ...
Seite wird geladen ...
-
 1
1
-
 2
2
-
 3
3
-
 4
4
-
 5
5
-
 6
6
-
 7
7
-
 8
8
-
 9
9
-
 10
10
-
 11
11
-
 12
12
-
 13
13
-
 14
14
-
 15
15
-
 16
16
-
 17
17
-
 18
18
-
 19
19
-
 20
20
-
 21
21
-
 22
22
-
 23
23
-
 24
24
-
 25
25
-
 26
26
-
 27
27
-
 28
28
-
 29
29
-
 30
30
-
 31
31
-
 32
32
-
 33
33
-
 34
34
-
 35
35
-
 36
36
-
 37
37
-
 38
38
-
 39
39
-
 40
40
-
 41
41
-
 42
42
-
 43
43
-
 44
44
-
 45
45
-
 46
46
-
 47
47
-
 48
48
-
 49
49
-
 50
50
-
 51
51
-
 52
52
-
 53
53
-
 54
54
-
 55
55
-
 56
56
-
 57
57
-
 58
58
-
 59
59
-
 60
60
-
 61
61
-
 62
62
-
 63
63
-
 64
64
-
 65
65
-
 66
66
-
 67
67
-
 68
68
-
 69
69
-
 70
70


Lenco TT-13 Benutzerhandbuch
- Kategorie
- Audio-Plattenspieler
- Typ
- Benutzerhandbuch
in anderen Sprachen
- français: Lenco TT-13 Manuel utilisateur
- italiano: Lenco TT-13 Manuale utente
- Nederlands: Lenco TT-13 Handleiding
- slovenčina: Lenco TT-13 Používateľská príručka
Verwandte Artikel
-
Lenco Classic Phono TT-120BNWH Bedienungsanleitung
-
-
Lenco TT-10 Benutzerhandbuch
-
-
Lenco TT-116 Benutzerhandbuch
-
Lenco LS-101 Benutzerhandbuch
-
Lenco TT-110 Benutzerhandbuch
-
Lenco TT-120 Benutzerhandbuch
-
-
Lenco LS-55 Benutzerhandbuch