

2
Precautions
●
Do not expose the plug-in board to direct sunlight,
excessive humidity, high temperatures, excessive dust
or strong vibrations.
●
Before handling the plug-in board, be sure to touch a
metal surface to discharge any static electricity which
may be in your body.
●
When holding the plug-in board, do not touch the inside
area of the circuit board or apply excessive pressure to
the board, and be sure to protect the board from contact
with water or other liquids.
●
Before installing the plug-in board onto a tone genera-
tor/sound card, unplug the power connector of your
computer.
●
Before connecting the computer to other devices, turn
off the power switches of all devices.
●
Yamaha is not responsible for loss of data through com-
puter malfunctions or operator actions.
●
The plug-in board contains no user-serviceable parts, so
never touch the inside area of the circuit board or
tamper with the electronic circuitry in any way. Doing
so may result in electrical shock or damage to the plug-
in board.
YAMAHA CANNOT BE HELD RESPONSIBLE
FOR DAMAGE CAUSED BY IMPROPER CARE
AND USE OF THE PLUG-IN BOARD.
* The company names and product names in this Owner’s Manual are the trademarks or registered
trademarks of their respective companies.
* The screens as illustrated in this owner’s manual are for instructional purposes only, and may
appear somewhat different from the ones of your instrument.
* This applies only to products distributed by YAMAHA CORPORATION OF AMERICA.
• This applies only to products distributed by Yamaha Canada Music Ltd.
• Ceci ne s’applique qu’aux produits distribués par Yamaha Canada Musique Ltée.
FCC INFORMATION (U.S.A.)
1. IMPORTANT NOTICE: DO NOT MODIFY THIS UNIT!
This product, when installed as indicated in the instructions contained in this manual, meets FCC requirements. Modifications
not expressly approved by Yamaha may void your authority, granted by the FCC, to use the product.
2. IMPORTANT:
When connecting this product to accessories and/or another product use only high quality shielded cables.
Cable/s supplied with this product MUST be used. Follow all installation instructions. Failure to follow instructions could void
your FCC authorization to use this product in the USA.
3. NOTE:
This product has been tested and found to comply with the requirements listed in FCC Regulations, Part 15 for Class
”B” digital devices. Compliance with these requirements provides a reasonable level of assurance that your use of this product
in a residential environment will not result in harmful interference with other electronic devices. This equipment generates/uses
radio frequencies and, if not installed and used according to the instructions found in the users manual, may cause interfer-
ence harmful to the operation of other electronic devices. Compliance with FCC regulations does not guarantee that interfer-
ence will not occur in all installations. If this product is found to be the source of interference, which can be determined by
turning the unit ”OFF” and ”ON”, please try to eliminate the problem by using one of the following measures:
Relocate either this product or the device that is being affected by the interference.
Utilize power outlets that are on different branch (circuit breaker or fuse) circuits or install AC line filter/s.
In the case of radio or TV interference, relocate/reorient the antenna. If the antenna lead-in is 300 ohm ribbon lead, change
the lead-in to co-axial type cable.
If these corrective measures do not produce satisfactory results, please contact the local retailer authorized to distribute this
type of product. If you can not locate the appropriate, please contact Yamaha Corporation of America, Electronic Service Divi-
sion, 6600 Orangethorpe Ave, Buena Park, CA 90620
CANADA
This Class B digital apparatus complies with Canadian ICES-003.
Cet appareil numérique de la classe B est conforme à la norme NMB-003 du Canada.

3
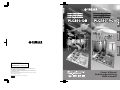
Congratulations and thank you for purchasing the Yamaha PLG150-DR Drums Plug-in Board/
PLG150-PC Percussion Plug-in Board!
The PLG150-DR/PLG150-PC is a custom tone generator designed for use with a variety of
Yamaha electronic musical instruments. Foremost, the PLG150-DR/PLG150-PC can be
installed to and integrated with instruments of the Modular Synthesis Plug-in System (such as
the MOTIF, S80, etc.) It can also be used seamlessly with the MU128 Tone Generator (as well
as other MU-series instruments and the SW1000XG PCI Audio/MIDI Board).
To install your PLG150-DR/PLG150-PC correctly and to ensure full enjoyment of its sophisti-
cated functions, be sure to read this manual very carefully. When finished, keep the manual in a
secure and convenient place for future reference.
SPECIAL NOTICE
• The product and this owner's manual are exclusive copyrights of Yamaha Corporation.
• Use of the software and this manual is governed by the SOFTWARE LICENCING AGREEMENT which the purchaser fully agrees to
upon breaking the seal of software packing. (Please read carefully the AGREEMENT at the end of this manual before installing the appli-
cation.)
• Copying of the software or reproduction of this manual in whole or in part by any means is expressly forbidden without the written con-
sent of the manufacturer.
• Yamaha makes no representations or warranties with regard to the use of the software and documentation and cannot be held responsible
for the results of the use of this manual and software.
• This product incorporates and bundles computer programs and contents in which Yamaha owns copyrights or with respect to which it has
license to use others' copyrights. Such copyrighted materials include, without limitation, all computer software, styles files, MIDI files,
WAVE data and sound recordings. Any unauthorized use of such programs and contents outside of personal use is not permitted under
relevant laws. Any violation of copyright has legal consequences. DON'T MAKE, DISTRIBUTE OR USE ILLEGAL COPIES.
• Copying of the commercially available music sequence data and/or digital audio files is strictly prohibited except for your personal use.
• Future upgrades of application and system software and any changes in specifications and functions will be announced separately.
About the Modular Synthesis Plug-in System
The Yamaha Modular Synthesis Plug-in System offers powerful expansion and upgrade capa-
bilities for Modular Synthesis-Plug-in-compatible synthesizers, tone generators and sound
cards. This enables you to easily and effectively take advantage of the latest and most sophisti-
cated synthesizer and effects technology, allowing you to keep pace with the rapid and multi-
faceted advances in modern music production.
About the XG Plug-in System
The Yamaha XG Plug-in System offers powerful expansion and upgrade capabilities for XG-
Plug-in-compatible tone generators and sound cards. This enables you to easily and effectively
take advantage of the latest and most sophisticated synthesizer and effects technology, allowing
you to keep pace with the rapid and multi-faceted advances in modern music production.

4
Overview of the PLG150-DR/PLG150-PC
........................................................... 5
Main Features of the PLG150-DR/PLG150-PC................................................ 5
Included Items .................................................................................................. 5
Required and Recommended Items................................................................. 6
Installing the PLG150-DR/PLG150-PC ............................................................ 6
Specifications ................................................................................................... 6
Parameter Structure
.......................................................................................... 7
For Modular Synthesis Plug-in System Users
................................................ 8
Selecting DR/PC Voices................................................................................... 8
Editing the DR/PC Native Part Parameters ...................................................... 9
For XG Plug-in System Users
............................................................................ 10
Editing the DR/PC Native Part Parameters .................................................... 12
Parameters
.......................................................................................................... 13
Native Part Parameters .................................................................................. 13
Native System Parameter............................................................................... 15
Voice Edit Parameters.................................................................................... 15
About the Included CD-ROM
............................................................................... 18
For Windows Users ........................................................................................ 18
For Macintosh Users ...................................................................................... 24
Demonstration Songs ..................................................................................... 25
Appendix
................................................................................................................ 26
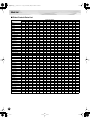
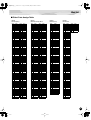
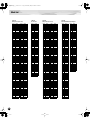
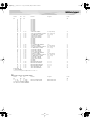
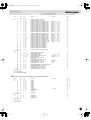
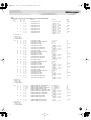
Voice List
............................................................................................................ 26
DR/PC Plug-in Voice List
.................................................................................. 52
Effect List
........................................................................................................... 53
Parameter List
(XG/Modular Synthesis Plug-in System)
...................................... 59
MIDI Data Format
............................................................................................... 60
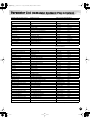
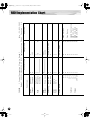
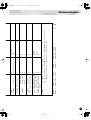
MIDI Implementation Chart
............................................................................... 70
Table of Contents

5
Overview of the PLG150-DR/PLG150-PC
●
Once connected and installed, the PLG150-DR/PLG150-PC becomes a seamless additional sound
source for the host tone generator or synthesizer — providing a total of 88 drum/percussion voices
(80 Preset, 8 User), which can be edited from the panel of the host device. The PLG150-DR/
PLG150-PC can be easily installed to any device compatible with the Modular Synthesis Plug-in
System or the XG Plug-in System.
●
A single PLG150-DR/PLG150-PC Plug-in Board functions as one part for the host device, provid-
ing up to 32 different voices (in mono sampling), and several boards can be installed to the same
host device.
●
Thanks to the built-in effect processing power, the PLG150-DR/PLG150-PC has two separate
effect blocks — Insertion and Reverb — that can be applied to each kit.
●
With the included Voice Editor, you can easily edit the sound for each note in the kit as well as the
effect parameters, and create up to eight original User kits — all from your Windows computer.
●
The PLG150-DR also features a special drum kit based on the stunning stereo drum kit of the pop-
ular Yamaha MOTIF. (Not all of the sounds are exactly the same.) For MOTIF users, this means
you can use the PLG150-DR to play high-quality drum tracks and free up maximum polyphony for
other sounds on the MOTIF.
●
The PLG150-DR also has drum kits that have the same note mapping as XG kits — making them
fully compatible with any XG song data. This means you can simply enter desired program
changes, and your drum tracks will play and sound exactly as intended — or even better!
The following items have been included in the package of your new PLG150-DR/PLG150-PC.
Please make sure that you have them all before starting to setup and use the instrument. If an item is
missing, contact the store or dealer from which you purchased the PLG150-DR/PLG150-PC.
• PLG150-DR/PLG150-PC Plug-in Board
• PLG150-DR/PLG150-PC Owner’s Manual (this book)
• CD-ROM
Main Features of the PLG150-DR/PLG150-PC
Included Items

Overview of the PLG150-DR/PLG150-PC
6
In addition to the included items listed above, you should also have the following:
■
Synthesizer/Tone Generator/Sound Card Compatible with the Modular
Synthesis or XG Plug-in Systems
In order to use the PLG150-DR/PLG150-PC, you’ll need a synthesizer, tone generator or sound card
that is compatible with the Modular Synthesis Plug-in System or the XG Plug-in System. Compatible
instruments include the MOTIF, MU128, and the SW1000XG. The synthesizer/tone generator/sound
card should also have an available slot or space for installing the PLG150-DR/PLG150-PC.
For detailed instructions on installing the PLG150-DR/PLG150-PC, refer to the owner’s manual of
the Plug-in-compatible “mother” device (e.g., MOTIF, MU128, etc.).
Tone Generation System :
AWM2 (Advanced Wave Memory 2)
Polyphony :
32 (when using mono-sampled voices)
Number of voices :
80 Preset voices, 8 User voice area
Interface :
Plug-in connector
Effects :
Insertion, Reverb
Dimensions (W x H x D) :
138.5 x 89.0 x 8.5mm
Weight :
62g
Included Items :
Owner’s Manual, CD-ROM
* Specifications subject to change without notice.
Required and Recommended Items
Installing the PLG150-DR/PLG150-PC
Specifications

7
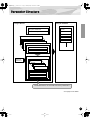
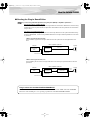
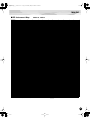
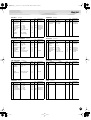
Parameter Structure
* See page 13 for details.
Part Parameters
XG Part Parameters
DR/PC Native Part Parameters
Plug-in Platform
Part Parameters
Part Parameters
Plug-in Board
Offset
The Board voices are created with these parameters.
Voice Edit
Parameters*
System Parameters
XG System Parameters
DR/PC Native System Parameters*
XG Effect Parameters
Reverb
Chorus
Variation
Insertion1
Insertion2
Part Parameters
XG Part Parameters
DR/PC Native Part Parameters*
Voice Reverb
Voice Insertion
DR/PC Voice Parameters
Inst128
Inst3
Inst2
Inst1

8
For Modular Synthesis Plug-in System Users
When the PLG150-DR/PLG150-PC is installed to a synthesizer compatible with the Modular Synthe-
sis Plug-in System, the DR/PC voices can be selected in the same way as the internal voices of the
synthesizer.
• When several boards are installed to the same host device, set the “PolyExpand” parameter on the synthesizer
to off.
• The example displays used in the following explanations are all taken from the MOTIF.
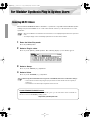
1
Enter the Voice Play mode.
Press the [VOICE] button.
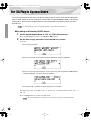
2
Select a Plug-in voice.
Press any of the [PLG1] - [PLG3] buttons. The following display (or one similar) appears.
3
Select a Group.
Press any of the GROUP [A] - [H] buttons.
4
Select a Voice.
Press any of the NUMBER [1] - [16] buttons.
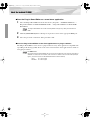
When using the PLG150-DR in the Song mode on the MOTIF, make sure to make these settings:
• Set the Receive Channel of the [PLG] part (the part to which the PLG150-DR has been assigned) to
Channel 10.
• On the MOTIF, set the internal part assigned to Channel 10 to off.
Selecting DR/PC Voices
NOTE
NOTE
For MOTIF6/MOTIF7/MOTIF8 users
To get the most out of your PLG150-DR/PLG150-PC, please go to the web address below and download
the latest version of the MOTIF operating system.
http://www.yamahasynth.com

9
For Modular Synthesis Plug-in System Users
The following explanations show how to edit the DR/PC native part parameters when creating PLG
voices, using the MOTIF Control Synthesizer as an example. For information on storing the PLG
voices with your particular Modular Synthesis Plug-in System compatible instrument, refer to the
owner’s manual of that instrument.
Keep in mind that the parameter values and settings below represent offsets of the actual voice settings. This
means that adjustments made to the parameters may not make much change in the actual sound, depending on
the original settings of the voice. For parameter values, a setting of “0” results in no change, while positive and
negative values increase and decrease the value respectively.
1
Select the desired DR/PC voice, as described in “Selecting DR/PC Voices”
on page 8.
2
Enter the Voice Edit mode.
Press the [EDIT] button.
3
Select an element to be edited.
1) Press any one of the NUMBER buttons ([1] - [4]) to edit the element parameters.
2) Press the [F4] button to select the “NATIVE” element.
4
Select the desired parameter.
Use the cursor buttons to select the desired parameter.
For a list of available parameters, see page 13.
5
Adjust the value or change the setting for the selected parameter.
Use the [INC/YES] and [DEC/NO] buttons or the data dial.
Editing the DR/PC Native Part Parameters
NOTE
NOTE

10
For XG Plug-in System Users
The PLG150-DR/PLG150-PC voices can be selected just like the voices of the XG tone generator.
Keep in mind, though, that they can only be selected when the Sound Module Mode is set to XG or
Performance. Also, the Part Assign parameter in the Utility mode (see below) must be set to the
desired Part.
The example displays used in the following explanations are all taken from the MU128.
■
Enabling and Selecting DR/PC Voices
1
Set the Sound Module Mode to “XG” or “PFM” (Performance).
Press the [MODE] button and use the [SELECT
<
/
>
] buttons.
2
Set the Part Assign parameter to the desired Part number.
To do this:
1) Press the [UTIL] button.
2) Select the “PLUGIN” menu (with the [SELECT
>
] button) and press [ENTER].
3) Select the “PLG150-DR/PLG150-PC” menu if necessary (with the [SELECT
<
/
>
] buttons),
and press [ENTER]. The Part Assign menu appears.
4) Use the [VALUE –/+] buttons or dial to change the Part number.
The Part Assign range for the XG mode is 1 - 16 and “off”; for the Performance mode, it is 1 - 4
and “off.”
Press the [EXIT] button to return to the Play mode.
When several boards are installed to the same host device, assign them to the different parts.
NOTE
NOTE

11
For XG Plug-in System Users
3
Enable the PLG150-DR/PLG150-PC board for the desired Part.
First, make sure that the appropriate Part is selected (using the [PART –/+] buttons), then press
the [SELECT] button. The icon of the selected board appears in the display and the correspond-
ing LED at the bottom of the panel (PLG-1, -2, or -3) flashes briefly.
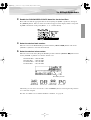
4
Select the desired bank number.
Move the cursor to the Bank Number parameter with the [SELECT
<
/
>
] buttons and use the
[VALUE –/+] buttons to select the desired bank.
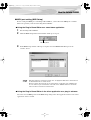
5
Select the desired voice number.
Move the cursor to the Voice (Program) Number parameter with the [SELECT
<
/
>
] buttons and
use the [VALUE –/+] buttons to select the desired voice.
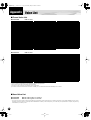
• DR Preset voice : 000, 001-080
• DR User voice : 000, 001-008
• PC Preset voice : 001, 001-080
• PC User voice : 001, 001-008
Alternately, you can select voices from a connected MIDI keyboard, or from sequencing software
on a connected computer.
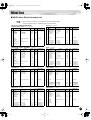
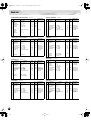
For a list of available voices and their bank/voice numbers, see page 26.
Bank Number parameter
DR Preset voice PC Preset voice PC User voiceDR User voice

For XG Plug-in System Users
12
Any of the DR/PC voices can be freely edited from the front panel with the DR/PC Native Part param-
eters. Keep in mind that changing the Part parameters does not permanently affect the original voice
settings. The edits that you make here temporarily change the settings of the currently selected voice.
When you select a different voice for the Part, the settings are applied to the newly selected voice.
• The parameter values and settings below represent offsets of the actual voice settings. This means that
adjustments made to the parameters may not make much change in the actual sound, depending on the orig-
inal settings of the voice. For parameter values, a setting of “0” results in no change, while positive and nega-
tive values increase and decrease the value respectively.
• The Part parameter settings cannot be saved in Multi Play mode. If you wish to save your Part parameter
edits, do it from the Performance mode or Plug-in Board Editor.
• The example displays used in the following explanations are all taken from the MU128.
1
Select the Part having the DR/PC voice, then select the desired voice.
Select the appropriate Part with the [PART –/+] buttons, then, with the cursor at the Voice Num-
ber parameter, select the desired voice.
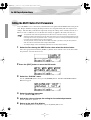
2
Press the [EDIT] button to enter the Edit mode.
3
Select the “PLUGIN” menu.
Use the [SELECT
>
] button, then press the [ENTER] button. The PLG150-DR/PLG150-PC
Edit menu appears.
4
Select the desired parameter.
Use the [SELECT
<
/
>
] buttons.
5
Adjust the value or change the setting for the selected parameter.
Use the [VALUE +/–] buttons.
6
Return to the main Play display.
Press the [EXIT] button several times, or press the [PLAY] button once.
Editing the DR/PC Native Part Parameters
NOTE

13
Parameters
These parameters are used to offset the actual settings (made on the host device) of the voices of the
PLG150-DR/PLG150-PC Plug-in Board. Tune, Pan, Level, and other settings can be made for each
of any four instruments, and Insertion effects can also be applied.
Keep in mind that these offset Part parameters do not permanently change the original kit settings.
Also remember that for parameters with values, a setting of “0” results in no change to the original
setting, while positive and negative values change the setting accordingly. For example, if the original
Pan setting for a sound is all the way to the left, a setting of “0” for the Pan parameter here does NOT
represent “center” — it simply keeps the sound at its current hard-left position.
●
Note Select 1 - Note Select 4
This determines the specific note (instrument sound) for which the same numbered Native Part
parameters will be effective. Set this parameter to the note (1 - 4) you wish to edit, then set the cor-
responding parameters (1 - 4) below to edit it.
Range:
C-2 — G8, Off
●
Note Select 1 Tune - Note Select 4 Tune
This determines the pitch of the selected note’s instrument. The greater the value the higher the
pitch. Negative values lower the pitch.
Range:
-64 — +00 — +63
●
Note Select 1 Level - Note Select 4 Level
This determines the level or volume of the selected note’s instrument.
Range:
-64 — +00 — +63
●
Note Select 1 Pan - Note Select 4 Pan
This determines the stereo position of the selected note’s instrument. The lower the value (more
negative), the further left the sound is in the stereo image. The higher the value (more positive), the
further right the sound is.
Range:
-127 — +00 — +127
●
Note Select 1 Ins Eff - Note Select 4 Ins Eff (Insertion Effect)
This determines whether the PLG150-DR/PLG150-PC’s built-in Insertion effect is applied to the
selected note’s instrument or not. (When set to “on,” the Insertion effect is applied.) When this is
set to “Inst,” the original setting for the kit is maintained.
Settings:
off, on, Inst
●
Note Select 1 Rev Send - Note Select 4 Rev Send (Reverb Send)
This determines the level of the selected note’s instrument that is sent to the PLG150-DR/PLG150-
PC’s built-in Reverb effect. This parameter has no effect if the Insertion effect (above) is on.
Range:
-127 — +00 — +127
Native Part Parameters

Parameters
14
●
INS L.Freq (Insertion Effect — EQ Low Frequency)
This determines the particular frequency which is boosted or cut (in the Low Gain parameter below)
for the selected note’s instrument. When this is set to “Vce,” the original setting for the kit (voice) is
maintained.
Settings/Range:
50Hz — 2.0kHz, Vce (**** : Not available)
●
INS L.Gain (Insertion Effect — EQ Low Gain)
This determines the level of the specified frequency (in the Low Frequency parameter above) for the
selected note’s instrument. When this is set to “Vce,” the original setting for the kit (voice) is main-
tained.
Settings/Range:
-12 — +12dB, Vce (**** : Not available)
●
INS H.Freq (Insertion Effect — EQ High Frequency)
This determines the particular frequency which is boosted or cut (in the High Gain parameter below)
for the selected note’s instrument. When this is set to “Vce,” the original setting for the kit (voice) is
maintained.
Settings/Range:
500Hz — 16kHz, Vce (**** : Not available)
●
INS H.Gain (Insertion Effect — EQ High Gain)
This determines the level of the specified frequency (in the High Frequency parameter above) for
the selected note’s instrument. When this is set to “Vce,” the original setting for the kit (voice) is
maintained.
Settings/Range:
-12 — +12dB, Vce (**** : Not available)
●
INS LFOFrq (Insertion Effect — LFO Frequency)
This determines the frequency of LFO modulation for the PLG150-DR/PLG150-PC’s built-in Inser-
tion effect.
Range:
-127 — +00 — +127 (**** : Not available)
●
INS LFODpt (Insertion Effect — LFO Frequency)
This determines the depth of LFO modulation for the PLG150-DR/PLG150-PC’s built-in Insertion
effect.
Range:
-127 — +00 — +127 (**** : Not available)
●
INS DryWet (Insertion Effect — Dry/Wet Balance)
This determines the balance between the direct, unprocessed sound (dry) and the Insertion-pro-
cessed sound (wet).
Range:
-127 — +00 — +127 (**** : Not available)
●
INS Drive (Insertion Effect — Drive)
This determines the amount of distortion overdrive for the PLG150-DR/PLG150-PC’s built-in Inser-
tion effect.
Range:
-127 — +00 — +127 (**** : Not available)
• Keep in mind that some of these parameters are offset controls; the actual resulting sound may differ depend-
ing on the selected kit.
• If the currently selected kit does not have any effect or uses an effect type not corresponding to a certain
parameter, the parameter is unavailable for editing and is indicated by asterisks (****).
• Whether an Insertion effect parameter is available or not differs depending the selected kit and its pre-
assigned Insertion effect types. For details, refer to the “DR/PC Voice Effect Parameter List” in the Reference
section (page 53).
NOTE

15
Parameters
The Native System parameter “Part Assign” is added to the Utility parameters of the XG tone genera-
tor. For more details on how to edit this, refer to the section “Enabling and Selecting DR/PC Voices”
on page 10. If you are using the PLG150-DR/PLG150-PC with an Modular Synthesis Plug-in System
compatible synthesizer, the Parts assigned to Plug-in Boards are fixed and this parameter cannot be
changed.
●
Part Assign
This determines the Part to which the PLG150-DR/PLG150-PC voice is assigned. If a Part is not
properly assigned here, none of the PLG150-DR/PLG150-PC voices can be selected for the Part.
(This applies to XG Plug-in System compatible “mother” devices.)
Settings:
1 -16, off
These parameters are used to create original voices, and as such are more detailed and offer greater
sonic control than the Native parameters. Voice Edit parameters are divided into two groups: 1) the
Common parameters, which affect all instruments in the kit (voice), and 2) the Instrument parameters,
which are set independently for each instrument. For greater ease and convenience in editing, use the
Plug-in Board Editor, contained on the included CD-ROM. For detailed instructions on using the
Plug-in Board Editor, refer to the electronic documentation on the CD-ROM.
●
Name
This determines the name for the voice or kit.
●
Volume
This determines the overall volume of the kit (voice).
Range:
0 — 127
●
Rev Send (Reverb Send)
This determines the level of the kit’s sound that is sent to the Reverb effect.
Range:
0 — 127
●
Original Kit
This lets you select one of the eighty Preset kits.
Range:
0 — 79
Native System Parameter
Voice Edit Parameters
Common Parameters

Parameters
16
●
Reverb Type
●
Reverb Parameter 1 - 16
This determines the Reverb type for the kit (voice) and allows you to set each of sixteen different
parameters. For details, refer to the “DR/PC Voice Effect Parameter List” on page 53 in the Refer-
ence section.
●
Reverb Return
This determines the return level of the Reverb signal for the kit (voice).
Range:
0 — 127
●
Reverb Pan
This determines the stereo position for the kit (voice).
Range:
L63 — R63
●
Insertion Type
●
Insertion Parameter 1 - 16
This determines the Insertion effect type for the kit (voice) and allows you to set each of sixteen dif-
ferent parameters. For details, refer to the “DR/PC Voice Effect Parameter List” on page 53 in the
Reference section.
●
Insertion Rev Send (Insertion Reverb Send)
This determines the level of the Insertion effect that is sent to the Reverb for the kit (voice).
Range:
0 — 127
●
Inst (Instrument) Pitch Coarse
This determines the coarse pitch setting of the selected instrument in semitones.
Range:
-64 — +0 — +63
●
Inst (Instrument) Pitch Fine
This determines the fine pitch setting of the selected instrument in 1-cent steps.
Range:
-64 — +0 — +63
●
Inst (Instrument) Level
This determines the level of the selected instrument.
Range:
0 — 127
●
Inst (Instrument) Alternate Group
This determines the group assignment of the selected instrument. Instruments that are assigned to
the same group cannot sound simultaneously, and mute one another — useful for sounds like hi-
hat, where a closed hi-hat cuts off the sound of an open hi-hat.
Settings:
0: Off; 1 — 127
●
Inst (Instrument) Pan
This determines the stereo position of the selected instrument. The “Random” setting randomly
assigns the sound to a pan position — useful for having different drum/percussion instruments
sound from various parts of the stereo image.
Settings/Range:
0: Random; L63 — R63
Instrument Parameters

17
Parameters
●
Inst (Instrument) Reverb Send
This determines the level of the selected instrument that is sent to the Reverb effect. This parame-
ter has no effect if the Insertion effect (below) is on.
Range:
0 — 127
●
Inst (Instrument) Insertion On/Off
This determines whether the Insertion effect is applied to the selected instrument or not.
Settings:
0: Off; 1: On
●
Inst (Instrument) Key Assign
When several notes are played at the same time, this determines whether the kit (voice) will sound
the notes simultaneously (Multi) or one sound at a time (Single).
Settings:
0: Single, 1: Multi
●
Inst (Instrument) Rcv Note Off (Receive Note Off)
This determines whether the selected instrument responds to MIDI Note Off messages or not.
Settings:
0: Off; 1: On
●
Inst (Instrument) Rcv Note On (Receive Note On)
This determines whether the selected instrument responds to MIDI Note On messages or not.
Settings:
0: Off; 1: On
●
Inst (Instrument) Filter Cutoff Frequency
This determines the cutoff frequency for the filter applied to the selected instrument. The greater
the value, the more “open” the filter, and the brighter the sound becomes. The lower the value, the
more muted the sound.
Range:
-64 — +0 — +63
●
Inst (Instrument) Filter Resonance
This determines the filter resonance or emphasis for the selected instrument.
Range:
-64 — +0 — +63
●
Inst (Instrument) EG Attack
This determines the attack rate of the EG (envelope generator) for the selected instrument.
Range:
-64 — +0 — +63
●
Inst (Instrument) EG Decay 1
This determines the first decay rate of the EG (envelope generator) for the selected instrument.
Range:
-64 — +0 — +63
●
Inst (Instrument) EG Decay 2
This determines the second or final decay rate of the EG (envelope generator) for the selected
instrument.
Range:
-64 — +0 — +63

18
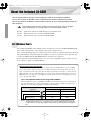
About the Included CD-ROM
This CD-ROM includes two types of data: application software and sampled audio data.
Please refer to page 19 (Windows) and 24 (Macintosh) for software instllation instructions.
You can play back the audio data from an audio CD player (or any CD playing/ripping function on
your computer.)
Never attempt to play back track 1 (containing the application software) on an audio CD player.
Doing so may damage to your hearing as well as to your CD player/audio speakers.
Track 1 : Application software; do NOT attempt to play back this track.
Track 2 : Demonstration song recorded on the PLG150-DR.
Track 3 : Demonstration song recorded on the PLG150-PC.
The included CD-ROM contain editing software to make user voices for the PLG150-DR/PLG150-
PC as well as demonstration songs and Voice data for the “mother” device.
You can start the editing software as either a stand-alone software or a plug-in application in the Open
Plug-in Technology compatible application (SQ01, etc.) You can save the user voice edited on this
software as SMF format file. The SMF format file is used for any sequencers.
For playing back the demonstration songs, you can use any compatible sequence software or hard-
ware sequencer capable of sending bulk data.
CAUTION
For Windows Users
About Open Plug-in Technology
Open Plug-in Technology (OPT) is a newly developed software format that allows control over MIDI
devices from a music software sequencer. For example, this allows you to start up and operate various
parts of your music system, such as plug-in board editors, and mixing control editors — directly from an
OPT-compatible sequencer, without having to use each separately. This also makes it unnecessary to set
MIDI drivers for each application, streamlining your music production system and making all operations
more convenient and seamless.
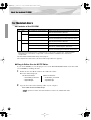
OPT Level Implementation for the Plug-in Board Editor
The client application and its compatibility with OPT can be divided into three levels, as shown below.
(For more information, refer to the documentation or help files included with the client application.)
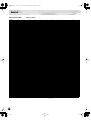
This chart shows the OPT-compatibility of the Plug-in Board Editor.
NOTE: Certain operations may not work as expected if there is no corresponding function in the cli-
ent application (sequencer, etc.). The highest level of implementation for the client application
is indicated in the OPT logo (which appears along with the version information in the applica-
tion).
OPT levels of the client
application
Plug-in Board Editor operation
Operation support Operation limits
VIEWS (Level 3)
Yes None
PROCESSORS (Level 2)
Yes None
PANELS (Level 1)
Yes None

19
About the Included CD-ROM
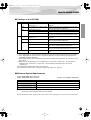
■
Contents of the CD-ROM
*1 These applications are supplied with PDF manuals. Refer to the PDF manual for operating these applications.
*2 These applications are started as either a stand-alone application or a plug-in software in the Open Plug-in
Technology compatible application.
*3 Unfortunately, Yamaha makes no guarantee concerning the stability of these programs nor can it offer user sup-
port for them.
*4 When the PLG150-DR/PLG150-PC is installed to PLG1, select the file “**PlgVc1.mid” ; when the board is
installed to PLG2, select the file “**PlgVc2.mid” ; when the board is installed to PLG3, select the file
“**PlgVc3.mid.”
For more details of demonstration songs, refer to page 25.
For a complete list of these voices, refer to the “DR/PC Plug-in Voice List” (page 52).
■
Minimum System Requirements
Plug-in Board Editor for PLG150-DR
Plug-in Board Editor for PLG150-PC (using as a stand alone application)
NOTE: When using the Editor as a plug-in with OPT-compatible software, keep in mind that the minimum system
requirements will be higher than that of the host software.
For the minimum system requirements of the other software programs, refer to the relevant manuals.
Folder Name
Application Name Contents
DR Plug_ Plug-in Board Editor for
PLG150-DR
*1 *2
Enables you to edit the PLG150-DR voices on your
computer.
Motif Plug-in Editor files for MOTIF Editor Enables you to edit the PLG150-DR voices on the Voice
Editor for MOTIF6/MOTIF7/MOTIF8.
Data Demonstration phrases Demonstration phrases created using the PLG150-DR.
Demonstration song (Drum solo) Demonstration song created using the PLG150-DR.
Plug-in Voice Data
*4
This is Plug-in voice data, featuring a total of 64 voices
that were created using the PLG150-DR Preset voices.
PC Plug_ Plug-in Board Editor for
PLG150-PC
*1 *2
Enables you to edit the PLG150-PC voices on your
computer.
Motif Plug-in Editor files for MOTIF Editor Enables you to edit the PLG150-PC voices on the Voice
Editor for MOTIF6/MOTIF7/MOTIF8.
Data Demonstration phrases Demonstration phrases created using the PLG150-PC.
Demonstration song (XG) Demonstration song for XG Plug-in System devices
(MU128, etc.) created using the PLG150-PC.
Plug-in Voice Data
*4
This is Plug-in voice data, featuring a total of 64 voices
that were created using the PLG150-PC Preset voices.
Acroread_ Acrobat Reader
*1 *3
Enables you to view each PDF manual for the applica-
tions.
CPU
Pentium (or Celeron) 450MHz or faster
OS
Windows
®
98/98SE/Me/2000/XP Home Edition/XP Professional Edition
Available Memory
16MB or more
Hard Disk
12MB or more
Display
800 x 600, High Color (16 bit)

About the Included CD-ROM
20
■
Software Installation
●
Plug-in Board Editor for PLG150-DR/PLG150-PC
1
Double-click on the “Plug_” folder in “DR”/“PC” folder.
“Setup.exe” file will be displayed.
2
Double-click on “Setup.exe.”
Setup Dialog box will be displayed.
3
Execute the installation by following the on-screen directions.
●
Acrobat Reader
In order to view the electronic (PDF) manuals included with each application, you’ll need to install
Acrobat Reader.
If an older version of Acrobat Reader is installed on your PC, you’ll need to uninstall it before proceeding.
1
Double-click on the “ACROREAD” folder.
Four different language folders will be displayed.
2
Select the language you want to use and double-click on its folder.
“arxxx***.exe” file will be displayed. (“xxx” indicates figures and “***” indicates the selected
language; e.g.,“ar500enu.exe.”)
3
Double-click on “arxxx***.exe.”
Acrobat Reader Setup Dialog box will be displayed.
4
Execute the installation by following the on-screen directions.
After installation is complete, the Acrobat folder appears on your PC (in Program Files, as the
default).
For information on using the Acrobat Reader, refer to the Reader Guide in the Help menu.
●
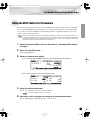
Plug-in Editor files for MOTIF Editor
If you use the MOTIF, you can edit plug-in voices of the PLG150-DR/PLG150-PC on the Voice Edi-
tor for MOTIF by installing this files.
1
Double click on the “Motif” folder in the “DR”/“PC” folder.
Three files will be displayed:
2
Copy the above files in the following folder on your PC.
Voice Editor for Motif6\Module\VEditor\Motif6\PlugIn
By default, the folder “Voice Editor for Motif6” is located in Program Files\YAMAHA\Tools.
NOTE
For the PLG150-DR:
• PLG150DR_VceList.ini
• Plg150DR.tpg
• Plg150DR.tpm
For the PLG150-PC:
• PLG150PC_VceList.ini
• Plg150PC.tpg
• Plg150PC.tpm
NOTE
Seite wird geladen ...
Seite wird geladen ...
Seite wird geladen ...
Seite wird geladen ...
Seite wird geladen ...
Seite wird geladen ...
Seite wird geladen ...
Seite wird geladen ...
Seite wird geladen ...
Seite wird geladen ...
Seite wird geladen ...
Seite wird geladen ...
Seite wird geladen ...
Seite wird geladen ...
Seite wird geladen ...
Seite wird geladen ...
Seite wird geladen ...
Seite wird geladen ...
Seite wird geladen ...
Seite wird geladen ...
Seite wird geladen ...
Seite wird geladen ...
Seite wird geladen ...
Seite wird geladen ...
Seite wird geladen ...
Seite wird geladen ...
Seite wird geladen ...
Seite wird geladen ...
Seite wird geladen ...
Seite wird geladen ...
Seite wird geladen ...
Seite wird geladen ...
Seite wird geladen ...
Seite wird geladen ...
Seite wird geladen ...
Seite wird geladen ...
Seite wird geladen ...
Seite wird geladen ...
Seite wird geladen ...
Seite wird geladen ...
Seite wird geladen ...
Seite wird geladen ...
Seite wird geladen ...
Seite wird geladen ...
Seite wird geladen ...
Seite wird geladen ...
Seite wird geladen ...
Seite wird geladen ...
Seite wird geladen ...
Seite wird geladen ...
Seite wird geladen ...
Seite wird geladen ...
Seite wird geladen ...
Seite wird geladen ...
Seite wird geladen ...
Seite wird geladen ...
-
 1
1
-
 2
2
-
 3
3
-
 4
4
-
 5
5
-
 6
6
-
 7
7
-
 8
8
-
 9
9
-
 10
10
-
 11
11
-
 12
12
-
 13
13
-
 14
14
-
 15
15
-
 16
16
-
 17
17
-
 18
18
-
 19
19
-
 20
20
-
 21
21
-
 22
22
-
 23
23
-
 24
24
-
 25
25
-
 26
26
-
 27
27
-
 28
28
-
 29
29
-
 30
30
-
 31
31
-
 32
32
-
 33
33
-
 34
34
-
 35
35
-
 36
36
-
 37
37
-
 38
38
-
 39
39
-
 40
40
-
 41
41
-
 42
42
-
 43
43
-
 44
44
-
 45
45
-
 46
46
-
 47
47
-
 48
48
-
 49
49
-
 50
50
-
 51
51
-
 52
52
-
 53
53
-
 54
54
-
 55
55
-
 56
56
-
 57
57
-
 58
58
-
 59
59
-
 60
60
-
 61
61
-
 62
62
-
 63
63
-
 64
64
-
 65
65
-
 66
66
-
 67
67
-
 68
68
-
 69
69
-
 70
70
-
 71
71
-
 72
72
-
 73
73
-
 74
74
-
 75
75
-
 76
76


in anderen Sprachen
- English: Yamaha PLG150 Owner's manual
- français: Yamaha PLG150 Le manuel du propriétaire
- español: Yamaha PLG150 El manual del propietario
- italiano: Yamaha PLG150 Manuale del proprietario
- русский: Yamaha PLG150 Инструкция по применению
- Nederlands: Yamaha PLG150 de handleiding
- português: Yamaha PLG150 Manual do proprietário
- dansk: Yamaha PLG150 Brugervejledning
- polski: Yamaha PLG150 Instrukcja obsługi
- čeština: Yamaha PLG150 Návod k obsluze
- svenska: Yamaha PLG150 Bruksanvisning
- 日本語: Yamaha PLG150 取扱説明書
- Türkçe: Yamaha PLG150 El kitabı
- suomi: Yamaha PLG150 Omistajan opas
- română: Yamaha PLG150 Manualul proprietarului
Verwandte Artikel
-
Yamaha PLG150 Bedienungsanleitung
-
-
-
-
-
-
Yamaha PLG150-DX Benutzerhandbuch
-
-
-
