Indesit WIA 122 (EX) Benutzerhandbuch
- Kategorie
- Waschmaschinen
- Typ
- Benutzerhandbuch

1
GB
English,1
Contents
Installation, 2-3
Unpacking and levelling, 2
Electric and water connections, 2-3
The first wash cycle, 3
Technical details, 3
Washing machine description, 4-5
Control panel, 4
Leds, 5
Starting and Programmes, 6
Briefly: how to start a programme, 6
Programme table, 6
Personalisations, 7
Setting the temperature, 7
Functions, 7
Detergents and laundry, 8
Detergent dispenser, 8
Preparing your laundry, 8
Special items, 8
Precautions and advice, 9
General safety, 9
Disposal, 9
Saving energy and respecting the environment, 9
Care and maintenance, 10
Cutting off the water or electricity supply, 10
Cleaning your appliance, 10
Cleaning the detergent dispenser, 10
Caring for your appliance door and drum, 10
Cleaning the pump, 10
Checking the water inlet hose, 10
Troubleshooting, 11
Service, 12
Before calling for Assistance, 12
WASHING MACHINE
WIA 122
Instructions for use
GB
Français,13
F
Deutsch,25
DE
Nederlands,37
NL

2
GB
Installation
Keep this instruction manual in a safe place for
future reference. Should the appliance be sold,
transferred or moved, make sure the instruction
manual accompanies the washing machine to inform
the new owner as to its operation and features.
Read these instructions carefully: they contain vital
information on installation, use and safety.
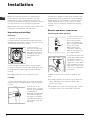
Unpacking and levelling
Unpacking
1. Unpack the washing machine.
2. Check whether the washing machine has been
damaged during transport. If this is the case, do not
install it and contact your retailer.
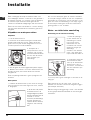
3. Remove the 3
protective screws and
the rubber washer with
the respective spacer,
situated on the rear of
the appliance (see
figure).
4. Seal the gaps using the plastic plugs provided.
5. Keep all the parts: you will need them again if the
washing machine needs to be moved to another
location.
Packaging materials are not children's toys.
Levelling
1. Install the washing machine on a flat sturdy floor,
without resting it up against walls, furniture cabinets
or other.
2. If the floor is not
perfectly level, compen-
sate for any unevenness
by tightening or
loosening the adjustable
front feet (see figure);
the angle of inclination,
measured according to
the worktop, must not
exceed 2°.
Levelling your appliance correctly will provide it with
stability and avoid any vibrations, noise and shifting
during operation. If it is placed on a fitted or loose
carpet, adjust the feet in such a way as to allow
enough room for ventilation beneath the washing
machine.
Electric and water connections
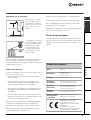
Connecting the water inlet hose
1. Insert seal A into the
end of the inlet hose
and screw the latter
onto a cold water tap
with a 3/4 gas threaded
mouth (see figure).
Before making the
connection, allow the
water to run freely until
it is perfectly clear.
2. Connect the other end
of the water inlet hose to
the washing machine,
screwing it onto the
appliance's cold water
inlet, situated on the top
right-hand side on the
rear of the appliance
(see figure).
3. Make sure there are no kinks or bends in the
hose.
The water pressure at the tap must be within the
values indicated in the Technical details table
(on the next page).
If the water inlet hose is not long enough, contact
a specialist store or an authorised serviceman.
A

3
GB
ServiceTroubleshootingPrecautions CareProgrammes DetergentsInstallation Description
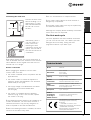
Connecting the drain hose
Connect the drain hose,
without bending it, to a
draining duct or a wall
drain situated between
65 and 100 cm from
the floor;
alternatively, place it
over the edge of a
basin, sink or tub,
fastening the duct
supplied to the tap (see
figure). The free end of
the hose should not be
underwater.
We advise against the use of hose extensions; in
case of absolute need, the extension must have the
same diameter as the original hose and must not
exceed 150 cm in length.
Electric connection
Before plugging the appliance into the mains
socket, make sure that:
the socket is earthed and in compliance with the
applicable law;
the socket is able to sustain the appliance's
maximum power load indicated in the Technical
details table (on the right);
the supply voltage is included within the values i
ndicated on the Technical details table
(on the right);
the socket is compatible with the washing
machine's plug. If this is not the case, replace
the socket or the plug.
The washing machine should not be installed in an
outdoor environment, not even when the area is
sheltered, because it may be very dangerous to
leave it exposed to rain and thunderstorms.
When the washing machine is installed, the mains
socket must be within easy reach.
Do not use extensions or multiple sockets.
The power supply cable must never be bent or
dangerously compressed.
The power supply cable must only be replaced by
an authorised serviceman.
Warning! The company denies all liability if and when
these norms are not respected.
The first wash cycle
Once the appliance has been installed, and before
you use it for the first time, run a wash cycle with
detergent and no laundry, setting the 90°C
programme without a pre-wash cycle.
65 - 100 cm
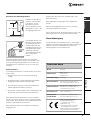
Technical details
Model
WIA 122
Dimensions
59.5 cm wide
85 cm high
52,5 cm deep
Capacity
from 1 to 5 kg
Electric
connections
voltage 220/230 Volts 50 Hz
maximum absorbed power 1850 W
Water
connections
maximum pressure 1 MPa (10 bar)
minimum pressure 0.05 MPa (0.5 bar)
drum capacity 46 litres
Spin speed
up to 1200 rpm
Control
programmes
according to
IEC456 directive
programme 3; temperature 60°C;
run with a load of 5 kg.
This appliance is compliant with the
following European Community
Directives:
- 73/23/CEE of 19/02/73 (Low
Voltage) and subsequent amendments
- 89/336/CEE of 03/05/89
(Electromagnetic Compatibility) and
subsequent amendments

4
GB
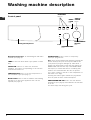
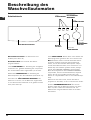
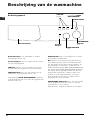
Washing machine description
Control panel
Detergent dispenser
TEMPERATURE
Knob
PROGRAMME/
ON-OFF
Knob
Leds
FUNCTION
Buttons
DOOR
LOCK
Led
Detergent dispenser: to add detergent and fabric
softener (see page 8).
LEDS: to find out which wash cycle phase is under
way.
FUNCTION buttons: to select the functions
available. The button corresponding to the function
selected will remain on.
TEMPERATURE knob: to set the temperature or
the cold wash cycle (see page 7).
DOOR LOCK Led: to find out whether the washing
machine is on and if the appliance door can be
opened (see page 5).
START/PAUSE button: starts or temporarily
interrupts programmes.
N.B.: once the programme has started, pressing this
button will stop the cycle and only the LED for the
cycle phase in progress will light up. After about 1
minute you will be able to open the door (when the
DOOR LOCK led switches off). If the DOOR LOCK
led stays lit, it means that there is something that
needs to be checked before the door is opened
(e.g.: there is water in the tub or the temperature of
the water is too high).
Pressing the button again restarts the programme
from the point at which it was interrupted.
PROGRAMME/ON-OFF knob: sets the desired
programme (see page 6) and switches the machine
on or off.
The knob stays still during the cycle.
START/
PAUSE
Button

5
GB
ServiceTroubleshootingPrecautions CareProgrammes DetergentsInstallation Description
DOOR LOCK led:
If this LED is on, the appliance door is locked to prevent it from being opened accidentally; to avoid any damages,
wait for the LED to flash before you open the appliance door.
The rapid flashing of the DOOR LOCK Led together with the flashing of at least one other LED indicates there is
an abnormality. Call for Technical Assistance.
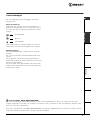
Leds
The LEDS provide important information.
This is what they can tell you:
Cycle phase under way:
During the wash cycle, the LEDs gradually illuminate
on to indicate the cycle phase under way:
Prewash/Wash
Rinse
Spin cycle
Note: during draining, the LED corresponding to the
Spin cycle phase will be turned on.
Function buttons
The FUNCTION BUTTONS also act like LEDS.
When a function is selected, the corresponding
button is illuminated.
If the function selected is incompatible with the
programme set, the button will flash and the
function will not be enabled.
If you set a function that is incompatible with
another function you selected previously, only the
last one selected will be enabled.

6
GB
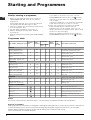
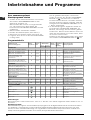
Type of fabric and degree of soil
Program-
mes
Wash
temperat.
Detergent
Fabric
softener
Cycle
length
(minutes)
Description of wash cycle
Pre-
wash
Wash
Cottons
Extremely soiled whites
(sheets, tablecloths, etc.)
1
Max 137
Pre-wash, wash cycle, rinse cycles,
intermediate and final spin cycles
Extremely soiled whites
(sheets, tablecloths, etc.)
2
Max 120
Wash cycle, rinse cycles, intermediate
and final spin cycles
Heavily soiled whites and fast
colours
3
60°C 105
Wash cycle, rinse cycles, intermediate
and final spin cycles
Slightly soiled whites and delicate
colours (shirts, jumpers, etc.)
4
40°C 72
Wash cycle, rinse cycles, intermediate
and final spin cycles
Synthetics
Heavily soiled fast colours
(baby linen, etc.)
5
60°C 77
Wash cycle, rinse cycles, anti-crease or
delicate spin cycle
Heavily soiled fast colours
(baby linen, etc.)
6
50°C 73
Wash cycle, rinse cycles, anti-crease or
delicate spin cycle
Delicate colours (all types of
slightly soiled garments)
7
40°C 58
Wash cycle, rinse cycles, anti-crease or
delicate spin cycle
Delicate colours (all types of
slightly soiled garments)
8
30°C 30
Wash cycle, rinse cycles and delicate
spin cycl
e
Delicates
Wool
9
40°C 50
Wash cycle, rinse cycles, anti-crease
and delicate spin cycle
Very delicate fabrics
(curtains, silk, viscose, etc.)
10
30°C 45
Wash cycle, rinse cycles, anti-crease or
draining cycle
PARTIAL PROGRAMMES
Rinse Rinse cycles and spin cycle
Delicate rinse cycle Rinse cycles, anti-crease or draining
Spin cycle Draining and heavy duty spin cycle
Delicate spin cycle Draining and delicate spin cycle
Draining Draining
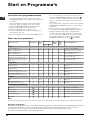
Starting and Programmes
Programme table
Briefly: starting a programme
1. Switch on the washing machine by turning the
PROGRAMME/ON-OFF knob to the desired
programme.
All the LEDS will light up for a few seconds and
the DOOR LOCK Led will begin to flash.
2. Load your laundry into the washing machine and
shut the appliance door.
3. Set the wash temperature (see page 7).
4. Add the detergent and any fabric softener
(see page 8).
5. Start he programme by pressing the START/PAUSE
button.
If you want to cancel the cycle set, turn the
PROGRAMME/ON-OFF knob to the
position
and wait for all the LEDs to illuminate and then
turn off again.
If another programme is not selected, the DOOR
LOCK led will remain lit for about 1 minute.
6. When the programme is finished, the DOOR
LOCK Led will flash to indicate that the
appliance door can be opened. Take out your
laundry and leave the appliance door ajar to allow
the drum to dry thoroughly.
Switch the washing machine off by turning the
PROGRAMME/ON-OFF knob to the
position.
Notes
For the anti-crease function, please see page 7. The information contained in the table is purely indicative.
Special programme
Daily (programme 8 for Synthetics) is designed to wash lightly soiled garments in a short amount of time: it only lasts 30
minutes and allows you to save on both time and energy. By setting this programme (8 at 30°C), you can wash
different fabrics together (except for woollen and silk items), with a maximum load of 3 kg.
We recommend the use of liquid detergent.

7
GB
ServiceTroubleshootingPrecautions CareProgrammes DetergentsInstallation Description
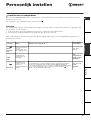
Personalisations
Setting the temperature
Turn the TEMPERATURE knob to set the wash temperature (see Programme table on page 6).
The temperature can be lowered, or even set to a cold wash (
).
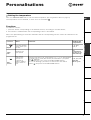
Functions
To enable a function:
1. press the button corresponding to the desired function, according to the table below;
2. the function is enabled when the corresponding button is illuminated.
Note: The rapid flashing of the button indicates that the corresponding function cannot be selected for the
programme set.
Function Effect Comments
Enabled with
programmes:
Rapid
Cuts the duration
of the wash cycle
by 30%.
1, 2, 3, 4,
5, 6, 7
1200
600
Reduces the
spin speed.
All
programmes
except for 10
and draining.
Anti-
crease
This option
reduces the
amount of
creasing on
fabrics, making
them easier to
iron.
When this function is set, programmes 5, 6, 7, 9, 10 will end with
the laundry left to soak (Anti-crease) and the Rinse cycle phase
LED will flash.
- to conclude the cycle, press the START/PAUSE button;
- to run the draining cycle alone, set the knob to the relative
symbol and press the START/PAUSE button.
5, 6, 7, 9, 10,
Delicate
Rinse cycle.

8
GB
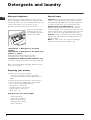
Detergent dispenser
Good washing results also depend on the correct
dose of detergent: adding too much detergent won't
necessarily make for a more efficient wash, and may
in fact cause build up on the interior of your
appliance and even pollute the environment.
Open up the detergent
dispenser and pour in
the detergent and fabric
softener, as follows.
compartment 1: Detergent for pre-wash
(powder)
compartment 2: Detergent for the wash cycle
(powder or liquid)
Liquid detergent should only be poured in
immediately prior to the wash cycle start.
compartment 3: Additives (fabric softeners, etc.)
The fabric softener should not overflow from the grid.
Do not use hand wash detergent because it may
form too much foam.
Preparing your laundry
Divide your laundry according to:
- the type of fabric/the symbol on the label.
- the colours: separate coloured garments from
whites.
Empty all pockets and check for loose buttons.
Do not exceed the weight limits stated below,
which refer to the weight when dry:
Sturdy fabrics: max 5 kg
Synthetic fabrics: max 2.5 kg
Delicate fabrics: max 2 kg
Wool: max 1 kg
How much does your laundry weigh?
1 sheet 400-500 g
1 pillow case 150-200 g
1 tablecloth 400-500 g
1 bathrobe 900-1,200 g
1 towel 150-250 g
Special items
Curtains: fold curtains and place them in a pillow
case or mesh bag. Wash them separately without
exceeding half the appliance load. Use programme
10 which excludes the spin cycle automatically.
Quilted coats and windbreakers: if they are
padded with goose or duck down, they can be
machine-washed. Turn the garments inside out and
load a maximum of 2-3 kg, repeating the rinse cycle
once or twice and using the delicate spin cycle.
Trainers: remove any mud. They can be washed
together with jeans and other tough garments, but
not with whites.
Wool: for best results, use a specific detergent,
taking care not to exceed a load of 1 kg.
Detergents and laundry
1
2
3

9
GB
Precautions and advice
ServiceTroubleshootingPrecautions CareProgrammes DetergentsInstallation Description
The washing machine was designed and built in
compliance with the applicable international safety
regulations. The following information is provided for
your safety and should consequently be read
carefully.
General safety
This appliance has been designed for non-
professional, household use and its functions must
not be changed.
This washing machine should only be used by
adults and in accordance with the instructions
provided in this manual.
Never touch the washing machine when barefoot
or with wet or damp hands or feet.
Do not pull on the power supply cable to unplug
the appliance from the electricity socket. Pull the
plug out yourself.
Do not open the detergent dispenser while the
appliance is in operation.
Do not touch the drain water as it could reach
very high temperatures.
Never force the washing machine door: this could
damage the safety lock mechanism designed to
prevent any accidental openings.
In the event of a malfunction, do not under any
circumstances touch internal parts in order to
attempt repairs.
Always keep children well away from the
appliance while in operation.
The appliance door tends to get quite hot during
the wash cycle.
Should it have to be moved, proceed with the
help of two or three people and handle it with the
utmost care. Never try to do this alone, because
the appliance is very heavy.
Before loading your laundry into the washing
machine, make sure the drum is empty.
Disposal
Disposing of the packaging material:
observe local regulations, so the packaging can
be re-used.
Disposing of an old washing machine:
before scrapping your appliance, cut the power
supply cable and remove the appliance door.
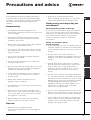
Saving energy and respecting the
environment
Environmentally-friendly technology
If you only see a little water through your appliance
door, this is because thanks to the latest Indesit
technology, your washing machine only needs less
than half the amount of water to get the best
results: an objective reached to respect the
environment.
Saving on detergent, water,
energy and time
To avoid wasting resources, the washing machine
should be used with a full load. A full load instead
of two half loads allows you to save up to 50% on
energy.
The pre-wash cycle is only necessary on
extremely soiled garments. Avoiding it will save on
detergent, time, water and between 5 and 15%
energy.
Treating stains with a stain remover or leaving
them to soak before washing will cut down the
need to wash them at high temperatures. A
programme at 60°C instead of 90°C or one at
40°C instead of 60°C will save up to 50% on
energy.
Use the correct quantity of detergent depending
on the water hardness, how soiled the garments
are and the amount of laundry you have, to avoid
wastage and to protect the environment: despite
being biodegradable, detergents do contain
ingredients that alter the natural balance of the
environment. In addition, avoid using fabric
softener as much as possible.
If you use your washing machine from late in the
afternoon until the early hours of the morning, you
will help reduce the electricity board's peak load.
If your laundry has to be dried in a tumble dryer,
select a high spin speed. Having the least water
possible in your laundry will save you time and
energy in the drying process.

10
GB
Care and maintenance
Cutting off the water or electricity
supply
Turn off the water tap after every wash. This will
limit the wear of your appliance's water system
and also prevent leaks.
Unplug your appliance when cleaning it and
during all maintenance operations.
Cleaning your appliance
The exterior and rubber parts of your appliance can
be cleaned with a soft cloth soaked in lukewarm
soapy water. Do not use solvents or abrasives.
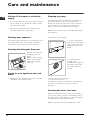
Cleaning the detergent dispenser
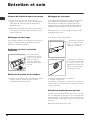
Remove the dispenser
by pulling it out (see
figure).
Wash it under running
water; this operation
should be repeated
frequently.
Caring for your appliance door and
drum
Always leave the appliance door ajar to prevent
unpleasant odours from forming.
Cleaning the pump
The washing machine is fitted with a self-cleaning
pump that does not require any maintenance.
Sometimes, small items (such as coins or buttons)
may fall into the pre-chamber that protects the
pump, situated in the lower part of the same.
Make sure the wash cycle has ended and unplug
the appliance.
To access the pre-chamber:
1. using a screwdriver,
remove the cover panel
on the lower front of the
washing machine (see
figure);
2. unscrew the lid
rotating it anti-
clockwise (see figure): a
little water may trickle
out. This is perfectly
normal;
3. clean the interior thoroughly;
4. screw the lid back on;
5. reposition the panel, making sure the hooks are
securely in place before you push it onto the
appliance.
Checking the water inlet hose
Check the water inlet hose at least once a year. If
you see any cracks, replace it immediately: during
the wash cycles, water pressure is very strong and
a cracked hose could easily split open.
Never use hoses that have already been used.

11
GB
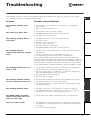
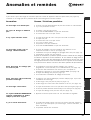
Troubleshooting
ServiceTroubleshootingPrecautions CareProgrammes DetergentsInstallation Description
Your washing machine could fail to work. Before calling for Assistance (see page 12), make sure the problem
can't easily be solved by consulting the following list.
Problem
The washing machine won't
start.
The wash cycle won't start.
The washing machine fails to
load water.
The washing machine
continuously loads and unloads
water.
The washing machine does not
drain or spin.
The washing machine vibrates
too much during the spin cycle.
The washing machine leaks.
The DOOR LOCK Led flashes
rapidly at the same time as at
least one other LED.
There is too much foam.
Possible causes/Solution:
The appliance is not plugged into the socket, or not enough to
make contact.
There has been a power failure.
The appliance door is not shut properly.
The START/PAUSE button has not been pressed.
The water tap is not turned on.
The water inlet hose is not connected to the tap.
The hose is bent.
The water tap is not turned on.
There is a water shortage.
The water pressure is insufficient.
The START/PAUSE button has not been pressed.
The drain hose is not fitted between 65 and 100 cm from the floor
(see page 3).
The free end of the hose is underwater (see page 3).
The wall drainage system doesn't have a breather pipe.
If the problem persists even after these checks, turn off the water tap,
switch the appliance off and call for Assistance. If the dwelling is on one of
the upper floors of a building, there may be drain trap problems causing the
washing machine to load and unload water continuously. In order to avoid
such an inconvenience, special anti-drain trap valves are available in shops.
The programme does not foresee the draining: some programmes
require enabling the draining manually (see page 6).
The Anti-crease function is enabled: to complete the programme,
press the START/PAUSE button (see page 7).
The drain hose is bent (see page 3).
The drain duct is clogged.
The drum was not unblocked correctly during installation (see page 2).
The washing machine is not level (see page 2).
The washing machine is closed in between furniture cabinets and
the wall (see page 2).
The water inlet hose is not screwed on correctly (see page 2).
The detergent dispenser is obstructed (to clean it, see page 10).
The drain hose is not secured properly (see page 3).
Call for Assistance because this means there is an abnormality.
The detergent is not suitable for machine washing (it should bear
the definition "for washing machines" or "hand and machine wash",
or the like).
You used too much detergent.

12
GB
Before calling for Assistance:
Check whether you can solve the problem on your own (see page 11);
Restart the programme to check whether the problem has been solved;
If this is not the case, contact an authorised Technical Service Centre on the telephone number
provided on the guarantee certificate.
Always request the assistance of authorised servicemen.
Notify the operator of:
the type of problem;
the appliance model (Mod.);
the serial number (S/N).
This information can be found on the data plate situated on the rear of the washing machine.
Service
Service

13
F
Français, 1
Sommaire
Installation, 14-15
Déballage et mise à niveau, 14
Raccordements hydrauliques et électriques, 14-15
Premier cycle de lavage, 15
Caractéristiques techniques, 15
Description du lave-linge, 16-17
Bandeau de commandes, 16
Voyants, 17
Mise en marche et Programmes, 18
En bref: démarrage d'un programme, 18
Tableau des programmes, 18
Personnalisations, 19
Sélection de la température, 19
Fonctions, 19
Produits lessiviels et linge, 20
Tiroir à produits lessiviels, 20
Triage du linge, 20
Pièces de linge particulières, 20
Précautions et conseils, 21
Sécurité générale, 21
Mise au rebut, 21
Economies et respect de l'environnement, 21
Entretien et soin, 22
Coupure de l'arrivée d'eau et de courant, 22
Nettoyage du lave-linge, 22
Nettoyage du tiroir à produits lessiviels, 22
Entretien du hublot et du tambour, 22
Nettoyage de la pompe, 22
Contrôle du tuyau d'arrivée de l'eau, 22
Anomalies et remèdes, 23
Assistance, 24
LAVE-LINGE
WIA 122
Mode d'emploi
F

14
F
Conservez ce mode d'emploi pour pouvoir le
consulter à tout moment. En cas de vente, de cession
ou de déménagement, veillez à ce qu'il suive toujours
le lave-linge pour que son nouveau propriétaire soit
informé sur son mode de fonctionnement et puisse
profiter des conseils correspondants.
Lisez attentivement les instructions: elles fournissent
d'importantes informations sur l'installation, l'utilisation
et la sécurité.
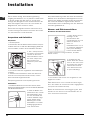
Déballage et mise à niveau
Déballage
1. Déballez le lave-linge.
2. Contrôlez que le lave-linge n'a pas été endommagé
pendant le transport. S'il est abîmé, ne le raccordez
pas et contactez votre revendeur.
3. Enlevez les 3 vis de
protection pour le
transport, le
caoutchouc et la cale,
placés dans la partie
arrière (voir figure).
4. Bouchez les trous à l'aide des bouchons plastique
fournis.
5. Conservez bien toutes ces pièces: il faudra les
remonter en cas de transport du lave-linge.
Les emballages ne sont pas des jouets pour enfants.
Mise à niveau
1. Installez le lave-linge sur un sol plat et rigide, sans
l'appuyer contre des murs, des meubles ou autre.
2. Si le sol n'est pas
parfaitement horizontal,
vissez ou dévissez les
petits pieds avant (voir
figure) pour niveler
l'appareil; son angle
d'inclinaison, mesuré
sur le plan de travail, ne
doit pas dépasser 2°.
Une bonne mise à niveau garantit la stabilité de la
machine et évite qu'il y ait des vibrations, du bruit et
des déplacements en cours de fonctionnement. Si la
machine est posée sur de la moquette ou un tapis,
réglez les petits pieds de manière à ce qu'il y ait
suffisamment d'espace pour assurer une bonne
ventilation.
Raccordements hydrauliques et
électriques
Raccordement du tuyau d'arrivée de l'eau
1. Montez le joint A sur
l'extrémité du tuyau
d'alimentation et vissez-
le à un robinet d'eau
froide à embout fileté 3/4
gaz (voir figure).
Faites couler l'eau
jusqu'à ce qu'elle soit
limpide et sans
impuretés avant de
raccorder.
2. Raccordez le tuyau
d'alimentation au lave-
linge en le vissant à la
prise d'eau prévue, dans
la partie arrière en haut
à droite (voir figure).
3. Faites attention à ce que le tuyau ne soit ni plié ni
écrasé.
La pression de l'eau doit être comprise entre les
valeurs indiquées dans le tableau des
Caractéristiques techniques (voir page ci-contre).
Si la longueur du tuyau d'alimentation ne suffit pas,
adressez-vous à un magasin spécialisé ou à un
technicien agréé.
Installation
A

15
F
Raccordement du tuyau de vidange
Raccordez le tuyau
d'évacuation, sans le
plier, à un conduit
d'évacuation ou à une
évacuation murale
placés à une distance
du sol comprise entre
65 et 100 cm (voir figure);
ou bien accrochez-le à
un évier ou à une
baignoire, dans ce cas,
fixez le support en
plastique fourni avec
l'appareil au robinet
(voir figure). L'extrémité
libre du tuyau
d'évacuation ne doit
pas être plongée dans
l'eau.
L'utilisation de tuyaux de rallonge est absolument
déconseillée, si vous ne pouvez vraiment pas faire
autrement vous devrez utiliser un tuyau de même
diamètre et de longueur maximum de 150 cm.
Branchement électrique
Avant de brancher la fiche dans la prise de courant,
contrôlez que:
la prise dispose de mise à la terre et est conforme
aux normes;
la prise est bien apte à supporter la puissance
maximale de la machine indiquée dans le tableau
des Carcatéristiques techniques (voir ci-contre);
la tension d'alimentation est bien comprise entre les
valeurs figurant dans le tableau des
Caractéristiques techniques (voir ci-contre);
la prise est bien compatible avec la fiche du lave-
linge. Autrement, remplacez la prise ou la fiche.
Votre lave-linge ne doit pas être installé dehors,
même à l'abri, car il est très dangereux de le laisser
exposé à la pluie et aux orages.
Après installation du lave-linge, la prise de courant
doit être facilement accessible.
N'utilisez ni rallonges ni prises multiples.
Le câble ne doit être ni plié ni écrasé.
Le câble d'alimentation ne doit être remplacé que
par des techniciens agréés.
Attention! Nous déclinons toute responsabilité en cas
de non respect des normes énumérées ci-dessus.
Premier cycle de lavage
Avant la première utilisation de la machine, effectuez
un cycle de lavage avec un produit lessiviel mais
sans linge et sélectionnez le programme à 90°C
sans prélavage.
65 - 100 cm
AssistanceAnomaliesPrécautions EntretienProgrammesInstallation Description
Caractéristiques techniques
Modèle
WIA 122
Dimensions
largeur 59,5 cm
hauteur 85 cm
profondeur 52,5 cm
Capacité
de 1 à 5 kg
Raccordements
électriques
tension 220/230 Volt 50 Hz
puissance maximale absorbée 1850 W
Raccordements
hydrauliques
pression maximale 1 MPa (10 bar)
pression minimale 0,05 MPa (0,5 bar)
capacité du tambour 46 litres
Vitesse
d'essorage
jusqu'à 1200 tours minute
Programmes de
contrôle selon la
norme IEC456
programme 3; température 60°C;
effectué avec une charge de 5 kg.
Cet appareil est conforme aux
Directives Communautaires suivantes:
- 73/23/CEE du 19/02/73 (Basse
Tension) et modifications suivantes
- 89/336/CEE du 03/05/89
(Compatibilité électromagnétique) et
modifications suivantes
Bac produits

16
F
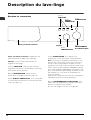
Bandeau de commandes
Description du lave-linge
Tiroir à produits lessiviels: chargement des
produits lessiviels et additifs (voir page 20).
Voyants: suivi du stade d'avancement du
programme de lavage.
Touches FONCTION: sélection des fonctions
disponibles. La touche correspondant à la fonction
sélectionnée restera allumée.
Bouton TEMPÉRATURE: sélection de la
température ou lavage à froid (voir page 19).
Voyant HUBLOT VERROUILLE: pour comprendre
si le lave-linge est branché et si le hublot peut être
ouvert (voir page 17).
Tiroir à produits lessiviels
Touche
START/PAUSE
Bouton
TEMPÉRATURE
Bouton
PROGRAMMES/
ALLUME-ETEINT
Voyants
Touches
FONCTION
Voyant
HUBLOT
VERROUILLE
Touche START/PAUSE: pour démarrer les
programmes ou les interrompre momentanément.
N.B.: une fois que le programme a démarré, si vous
appuyez sur cette touche, le lave-linge s'arrêtera et
seul le voyant correspondant à la phase en cours
clignotera; vous pourrez ouvrir le hublot au bout d'une
minute environ (voyant HUBLOT VERROUILLE éteint).
Si le voyant HUBLOT VERROUILLE reste allumé c'est
que les conditions de déverrouillage du hublot ne sont
pas remplies (ex.: cuve pleine ou température de
l'eau trop élevée).
Appuyez une nouvelle fois sur la touche, le programme
redémarrera du point où il a été interrompu.
Bouton PROGRAMMES/ALLUME-ETEINT: pour
sélectionner les programmes (voir page 18) et pour
allumer ou éteindre votre machine.
En cours de lavage, le bouton ne bouge pas.

17
F
AssistanceAnomaliesPrécautions EntretienProgrammesInstallation Description
Voyant HUBLOT VERROUILLE:
Le voyant allumé indique que le hublot est verrouillé pour empêcher toute ouverture accidentelle; attendez que
le voyant cesse de clignoter avant d'ouvrir le hublot, vous risqueriez d'endommager l'appareil.
Le clignotement rapide du voyant HUBLOT VERROUILLE en même temps qu'un autre signale une anomalie.
Appelez Service-après-vente.
Voyants
Les voyants fournissent des informations importantes.
Voilà ce qu'ils signalent:
Phases en cours:
Pendant le cycle de lavage, les voyants s'allument
progressivement pour indiquer son stade
d'avancement:
Prélavage/Lavage
Rinçage
Essorage
Remarque: pendant la phase de vidange, le voyant
correspondant à la phase Essorage s'allume.
Touches fonction
Les TOUCHES FONCTION servent aussi de voyants.
La sélection d'une fonction entraîne l'allumage du
voyant correspondant.
Si la fonction sélectionnée est incompatible avec le
programme sélectionné, la touche clignote et la
fonction n'est pas activée.
En cas de sélection d'une fonction incompatible
avec une autre précédemment sélectionnée, la
seule à être activée sera la dernière validée.
Bac produits

18
F
Mise en marche et Programmes
Tableau des programmes
Remarque
Pour la description de la fonction Anti-froissement voir page 19. Les données reportées dans le tableau sont à titre indicatif.
Programme spécial
Express 30' (programme 8 pour Synthétiques) spécialement conçu pour laver du linge peu sale en un rien de temps: il
ne dure que 30 minutes et permet ainsi de faire des économies d'énergie et de temps. Choisissez le programme
(8 à 30°C), vous pourrez laver ensemble des textiles différents (sauf laine et soie) en ne dépassant pas 3 kg de charge.
Nous vous conseillons d'utiliser des lessives liquides.
Nature des tissus et degré de
salissure
Program-
mes
Te m p .
lavage
Lessive
Assouplis-
sant
Durée du
cycle
(minutes)
Description du cycle de lavage
prélav. lavage.
Coton
Blancs extrêmement sales
(draps, nappes, etc.)
1
90°C 137
Prélavage, lavage, rinçages,
essorages intermédiaires et finaux
Blancs extrêmement sales
(draps, nappes, etc.)
2
90°C 120
Lavage, rinçages, essorages
intermédiaires et finaux
Blancs et couleurs résistantes
très sales
3
60°C 105
Lavage, rinçages, essorages
intermédiaires et finaux
Blancs peu sales et couleurs
délicates (chemises, pulls, etc.)
4
40°C 72
Lavage, rinçages, essorages
intermédiaires et finaux
Synthétiques
Couleurs résistantes très sales
(linge de bébé, etc.)
5
60°C 77
Lavage, rinçages, anti-froissement
ou essorage délicat
Couleurs résistantes très sales
(linge de bébé, etc.)
6
50°C 73
Lavage, rinçages, anti-froissement
ou essorage délicat
Couleurs délicates (linge en tout
genre légèrement sale)
7
40°C 58
Lavage, rinçages, anti-froissement
ou essorage délicat
Couleurs délicates (linge en tout
genre légèrement sale)
8
30°C 30
Lavage, rinçages et essorage
délicat
Délicats
Laine
9
40°C 50
Lavage, rinçages, anti-froissement
et essorage délicat
Tissus particulièrement délicats
(rideaux, soie, viscose, etc.)
10
30°C 45
Lavage, rinçages, anti-froissement
ou vidange
PROGRAMMES PARTIAUX
Rinçage Rinçages et essorage
Rinçage délicat
Rinçages, anti-froissement ou
vidange
Essorage Vidange et essorage énergique
Essorage délicat Vidange et essorage délicat
Vidange Vidange
En bref: démarrage d'un programme
1. Pour mettre le lave-linge en marche, tournez le
bouton PROGRAMMES/ALLUME-ETEINT
jusqu'au programme choisi.
Tous les voyants s'allument pendant quelques
secondes puis s'éteignent et le voyant HUBLOT
VERROUILLE commence à clignoter.
2. Chargez le lave-linge et fermez le hublot.
3. Sélectionnez la température de lavage (voir page 19).
4. Versez le produit lessiviel et les additifs (voir page 20).
5. Appuyez sur la touche START/PAUSE pour lancer
le programme.
Si vous voulez annuler le cycle sélectionné,
tournez le bouton PROGRAMMES/ALLUME-
ETEINT jusqu'à la position
et attendez que
tous les voyants s'allument puis s'éteignent.
Si vous ne sélectionnez aucun autre programme,
le voyant HUBLOT VERROUILLE restera allumé
pendant 1 minute environ.
6. A la fin du programme de lavage, le voyant
HUBLOT VERROUILLE clignote pour indiquer que
le hublot peut être ouvert. Sortez le linge et laissez le
hublot entrouvert pour faire sécher le tambour.
Pour éteindre le lave-linge, tournez le bouton
PROGRAMMES/ALLUME-ETEINT jusqu'à la
position
.

19
F
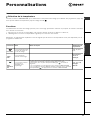
Personnalisations
AssistanceAnomaliesPrécautions EntretienProgrammesInstallation Description
Fonctions Effet Mode d'emploi
Activée avec les
programmes:
Peu sale
Pour réduire de 30%
environ la durée du
cycle de lavage.
1, 2, 3, 4, 5,
6, 7
1200
600
Pour réduire la
vitesse d'essorage.
To u s s a u f l e
10 et la
vidange.
Anti-
froissem-
ent
Pour moins froisser
les tissus et
simplifier leur
repassage.
Si cette fonction est sélectionnée, les programmes 5, 6, 7, 9, 10
s'arrêteront en laissant le linge tremper dans l'eau (Anti-
froissement) et le voyant de la phase Rinçage se mettra à
clignoter:
- pour compléter le cycle appuyez sur la touche START/PAUSE;
- pour n'effectuer que la vidange amenez le bouton sur le symbole
correspondant et appuyez sur la touche START/PAUSE.
5, 6, 7, 9, 10,
Rinçage
délicat.
C
Sélection de la température
Tournez le bouton TEMPERATURE pour sélectionner la température de lavage (voir Tableau des programmes page 18).
Vous pouvez réduire la température jusqu'au lavage à froid (
).
Fonctions
Les différentes fonctions de lavage prévues par le lave-linge permettent d'obtenir la propreté et le blanc souhaités.
Pour activer les fonctions:
1. appuyez sur la touche correspondant à la fonction désirée, d'après le tableau ci-dessous;
2. l'allumage de la touche correspondante signale que la fonction est activée.
Remarque: Le clignotement rapide de la touche signale que la fonction correspondante n'est pas disponible pour le
programme sélectionné.
Bac produits

20
F
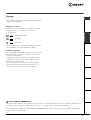
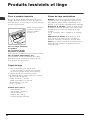
Tiroir à produits lessiviels
Un bon résultat de lavage dépend aussi d'un bon
dosage de produit lessiviel: un excès de lessive ne
lave pas mieux, il incruste l'intérieur de votre lave-linge
et pollue l'environnement.
Sortez le tiroir à produits
lessiviels et versez la
lessive ou l'additif
comme suit.
bac 1: Lessive prélavage
(en poudre)
bac 2: Lessive lavage
(en poudre ou liquide)
Versez la lessive liquide juste avant la mise en marche.
bac 3: Additifs (adoucissant, etc.)
L'assouplissant ne doit pas déborder de la grille.
N'utilisez pas de lessives pour lavage à la main,
elles génèrent trop de mousse.
Triage du linge
Triez correctement votre linge d'après:
- le type de textile / le symbole sur l'étiquette.
- les couleurs: séparez le linge coloré du blanc.
Videz les poches et contrôlez les boutons.
Ne dépassez pas les valeurs indiquées correspon-
dant au poids de linge sec:
Textiles résistants: 5 kg max.
Textiles synthétiques: 2,5 kg max.
Textiles délicats: 2 kg max.
Laine: 1 kg max.
Combien pèse le linge ?
1 drap 400-500 g
1 taie d'oreiller 150-200 g
1 nappe 400-500 g
1 peignoir 900-1.200 g
1 serviette éponge 150-250 g
Pièces de linge particulières
Rideaux: pliez-les bien et glissez-les dans une taie
d'oreiller ou dans un sac genre filet. Lavez-les seuls
sans dépasser la demi-charge. Sélectionnez le pro-
gramme 10 qui supprime automatiquement l'essorage.
Doudounes et anoraks: s'ils sont en duvet d'oie ou
de canard, ils peuvent être lavés à la machine. Lavez
les vêtements sur lenvers. La charge ne doit pas
excéder
2-3 kg. Prévoyez 2, voire 3 rinçages et un essorage
léger.
Chaussures de tennis: débarrassez-les de la
boue. Lavez-les en même temps que jeans et
vêtements résistants, jamais avec du linge blanc.
Laine: pour obtenir d'excellents résultats utilisez un
produit lessiviel spécial et ne dépassez pas une
charge de 1kg.
Produits lessiviels et linge
1
2
3
Seite wird geladen ...
Seite wird geladen ...
Seite wird geladen ...
Seite wird geladen ...
Seite wird geladen ...
Seite wird geladen ...
Seite wird geladen ...
Seite wird geladen ...
Seite wird geladen ...
Seite wird geladen ...
Seite wird geladen ...
Seite wird geladen ...
Seite wird geladen ...
Seite wird geladen ...
Seite wird geladen ...
Seite wird geladen ...
Seite wird geladen ...
Seite wird geladen ...
Seite wird geladen ...
Seite wird geladen ...
Seite wird geladen ...
Seite wird geladen ...
Seite wird geladen ...
Seite wird geladen ...
Seite wird geladen ...
Seite wird geladen ...
Seite wird geladen ...
Seite wird geladen ...
-
 1
1
-
 2
2
-
 3
3
-
 4
4
-
 5
5
-
 6
6
-
 7
7
-
 8
8
-
 9
9
-
 10
10
-
 11
11
-
 12
12
-
 13
13
-
 14
14
-
 15
15
-
 16
16
-
 17
17
-
 18
18
-
 19
19
-
 20
20
-
 21
21
-
 22
22
-
 23
23
-
 24
24
-
 25
25
-
 26
26
-
 27
27
-
 28
28
-
 29
29
-
 30
30
-
 31
31
-
 32
32
-
 33
33
-
 34
34
-
 35
35
-
 36
36
-
 37
37
-
 38
38
-
 39
39
-
 40
40
-
 41
41
-
 42
42
-
 43
43
-
 44
44
-
 45
45
-
 46
46
-
 47
47
-
 48
48


Indesit WIA 122 (EX) Benutzerhandbuch
- Kategorie
- Waschmaschinen
- Typ
- Benutzerhandbuch
in anderen Sprachen
- English: Indesit WIA 122 (EX) User guide
- français: Indesit WIA 122 (EX) Mode d'emploi
- Nederlands: Indesit WIA 122 (EX) Gebruikershandleiding