Bresser 7000024000000 Bedienungsanleitung
- Kategorie
- Tischuhren
- Typ
- Bedienungsanleitung
Dieses Handbuch ist auch geeignet für

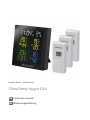
Weather Station · Wetterstation ·
ClimaTemp Hygro DLX
EN Instruction manual
DE Bedienungsanleitung

DE
Besuchen Sie unsere Website über den folgenden QR Code oder Weblink um weitere
Informationen zu diesem Produkt oder die verfügbaren Übersetzungen dieser Anleitung zu
finden.
EN
Visit our website via the following QR Code or web link to find further information on this
product or the available translations of these instructions.
FR
Si vous souhaitez obtenir plus d’informations concernant ce produit ou rechercher ce mode
d’emploi en d’autres langues, rendez-vous sur notre site Internet en utilisant le code QR ou le
lien correspondant.
NL
Bezoek onze internetpagina via de volgende QR-code of weblink, voor meer informatie over dit
product of de beschikbare vertalingen van deze gebruiksaanwijzing.
ES
¿Desearía recibir unas instrucciones de uso completas sobre este producto en un idioma
determinado? Entonces visite nuestra página web utilizando el siguiente enlace (código QR)
para ver las versiones disponibles.
IT
Desidera ricevere informazioni esaustive su questo prodotto in una lingua specifica? Venga
a visitare il nostro sito Web al seguente link (codice QR Code) per conoscere le versioni
disponibili.
www.bresser.de/P7000024000000
www.bresser.de/warranty_terms
GARANTIE · WARRANTY · GARANTÍA · GARANZIA


4
Contents
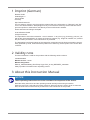
1 Imprint (German) ............................................................................................................................................5
2 Validity note ....................................................................................................................................................5
3 About this Instruction Manual.......................................................................................................................5
4 Parts overview and scope of delivery ..........................................................................................................6
5 Screen display ................................................................................................................................................7
6 Before starting operation...............................................................................................................................8
7 Setting up power supply................................................................................................................................8
8 Manual time setting ........................................................................................................................................9
9 Time zone setting ...........................................................................................................................................9
10 Alarm setting...................................................................................................................................................9
11 Snooze function..............................................................................................................................................9
12 Receiving measurements automatically ....................................................................................................10
13 Manual measurement display .....................................................................................................................10
14 HI/LO Alert.....................................................................................................................................................10
15 Clima indicator..............................................................................................................................................11
16 Trend arrow indicators.................................................................................................................................11
17 Display brightness regulation .....................................................................................................................11
18 Technical data...............................................................................................................................................11
19 EC Declaration of Conformity .....................................................................................................................12
20 Disposal.........................................................................................................................................................12
21 Warranty ........................................................................................................................................................12

5 / 24
1 Imprint (German)
Bresser GmbH
Gutenbergstr. 2
46414
Rhede
Germany
http://www.bresser.de
For any warranty claims or service enquiries, please refer to the information on "Warranty" and "Ser-
vice" in this documentation. We apologize for any inconvenience caused by the fact that we cannot
process enquiries or submissions sent directly to the manufacturer's address.
Errors and technical changes excepted.
© 2019 Bresser GmbH
All rights reserved.
The reproduction of this documentation - even in extracts - in any form (e.g. photocopy, print, etc.) as
well as the use and distribution by means of electronic systems (e.g. image file, website, etc.) without
the prior written permission of the manufacturer is prohibited.
The designations and brand names of the respective companies used in this documentation are gen-
erally protected by trade, trademark and/or patent law in Germany, the European Union and/or other
countries.
2 Validity note
This documentation is valid for the products with the following article numbers:
7000024000000
Manual version: v0420
Manual designation:
Manual_7000024000000_ClimaTemp-Hygro-DLX_en-de_BRESSER_v042020a
Always provide information when requesting service.
3 About this Instruction Manual
NOTICE
These operating instructions are to be considered a component of the device.
Read the safety instructions and the operating manual carefully before using this device.
Keep this manual in a safe place for future reference. When the device is sold or given to someone
else, the instruction manual must be provided to the new owner/user of the product.

6 / 24
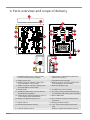
4 Parts overview and scope of delivery
3
A
B
4
5
8
9
10
12
13
11
14
16
17
20
21
22
18
19
1
15
2
6
7
1 SNOOZE/LIGHT touch sensor (snooze
function and temporary backlight)
2 Light sensor for backlight (brightness is
dimmed in the dark)
3 Display (base unit) 4 Temperature and humidity
5 Display range for channel 1 (blue) Out-
door temperature and humidity
6 Display range for channel 2 (yellow) Out-
door temperature and humidity
7 Display range for channel 3 (orange) Out-
door temperature and humidity
8 Wall bracket (base unit)
9 MODE button 10 ALARM button (alarm setting)
11 SNOOZE/LIGHT button (snooze function
and temporary backlight)
12 UP button (change selected channel (ar-
row indicator) and change value upwards)
13 DOWN button (select temperature unit °C/
°F and change value downwards)
14 MAX / MIN button
15 Battery compartment (base unit) 16 DC connection socket for barrel power
connector
17 Stand, fold-out 18 Display (wireless sensor)
19 Wall bracket (wireless sensor) 20 °C/°F slide switch (select temperature
unit)
21 Channel selector switch Battery compartment (wireless sensor)

7 / 24
Delivery content:
base unit (A), 3 pcs. wireless sensors (B)
Required batteries (not included):
Station: 3 pcs. Mignon batteries (1.5V, type AAA/LR03)
Sensor: 6 pcs. Mignon batteries (1.5V, type AAA/LR03)
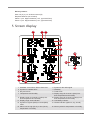
5 Screen display
CH1
1
5
19
2
8
16
9
18
17
6
15
11
12
13
10
7
3
4
14
1 Standard: current time; Alarm: alarm time 2 Symbol for the radio signal
3 Symbol for enabled alarm 4 Weekday
5 Day and month 6 Trend arrow
7 Temperature and humidity 8 Display range for channel 1 (blue) Out-
door temperature and humidity
9 Display range for channel 2 (yellow) Out-
door temperature and humidity
10 Display range for channel 3 (orange) Out-
door temperature and humidity
11 Display range arrow indicator 12 Low battery indicator
13 Symbol for highest (MAX) or lowest (MIN)
value
14 Climate indicator (optimum, dry, humid)
15 Alarm icon for high (HI AL) or low (LO AL)
temperature or humidity
16 Alarm symbol for temperature or humidity

8 / 24
17 Selected channel of the wireless sensor 18 Outdoor temperature (wireless sensor)
19 Outdoor humidity (wireless sensor)
6 Before starting operation
NOTICE
Avoid connectivity disruptions!
To avoid connectivity disruptions between the devices, consider the following points before starting
operation.
1. Place base station (receiver) and remote sensor (sender) together as close as possible.
2. Set up power supply for the base station and wait until the indoor temperature is displayed.
3. Set up power supply for the remote sensor.
4. Position the base station and the remote sensor within the effective transmission range.
5. Ensure that the base station and remote sensor are assigned to the same channel.
When changing batteries always change batteries in the main unit as well as all remote units and re-
place them in the correct order, so the remote connection can be re-established. If either of the
devices is mains-powered, the power supply must be disconnected for a short moment also for this
device when exchanging the batteries. If batteries are exchanged in only one of the devices (i.e. the
remote sensor) the signal can’t be received or can’t be received correctly.
Note, that the effective range is vastly affected by building materials and position of the main and re-
mote units. Due to external influences (various RC devices and other sources of interference), the
maximum distance can be greatly reduced. In such cases we suggest to position the main unit and the
remote sensor at other places. Sometimes all it takes is a relocation of one of these components of a
few inches!
7 Setting up power supply
Base station
1. Remove the battery compartment cover.
2. Insert the batteries into the battery compartment. Ensure that the battery polarity (+/-) is correct.
3. Replace the battery compartment cover.
4. Wait until the indoor temperature is displayed on the base station.
NOTICE!Alternatively, operation with mains power supply (DC 5V) is possible. Proceed as fol-
lows:
5. Insert the DC connector into the connection socket of the base station.
6. Insert the mains plug into the power outlet.
7. The device is energized directly.
8. Wait until the indoor temperature is displayed on the base station.
NOTICE!When switching from mains power supply to battery power supply or vice versa,
the power supply is being disabled for a short moment for technical reasons. In this process
all settings made previously, will be deleted.
Remote sensor
9. Loosen the screws at the battery compartment cover with a small Philips screwdriver and remove
the cover.
10. Insert the batteries into the battery compartment. Ensure that the battery polarity (+/-) is correct.
11. Set the channel selector switch to the desired channel.

9 / 24
NOTICE!This weather station can be operated with up to 3 remote sensors. Each remote
sensor being connected must be operated on a different channel. If only one remote sensor
is connected, it should be operated on channel 1.
12. Replace the cover and retighten it with the screw.
8 Manual time setting
1. Press and hold MODE button for approx. 3 seconds to change to time setting mode.
2. Digits to be set are flashing.
3. Press UP or DOWN button to change the value.
4. Press MODE button to confirm and continue to the next setting.
5. Settings order: Year > Month > Day > Weekday Language > 12/24-hours mode > Time zone offset
> > Hours > Minutes
6. Finally press the MODE button to save the settings and exit the setting mode.
9 Time zone setting
To set a different time zone, proceed as follows:
1. Press and hold MODE button for approx. 3 seconds to change to time setting mode.
2. Press the MODE button multiple times until the display shows the time offset 00 Hr.
3. Press UP or DOWN button to select the desired time deviation in hours (-23 up to +23 hours).
4. Finally press the MODE button to save the settings and exit the setting mode.
10 Alarm setting
1. Press the MODE button to switch to the settings mode for the alarm time. "AL" is displayed instead
of the seconds.
2. Press the UP button to enable or disable the alarm. When the alarm is enabled, the symbol ap-
pears on the display.
3. Press the MODE button for about 3 seconds to enter the settings mode for the alarm time. The
first value to be set flashes.
4. Press UP or DOWN button to change the value.
5. Press the MODE button to confirm and switch to the next setting.
6. Settings sequence: Hours > Minutes > Snooze Interval (01-20 minutes)
7. Finally, press the MODE button to save the settings and exit settings mode.
8. When the alarm sounds, press any button to stop the alarm.
11 Snooze function
1. When the alarm sounds press the SNOOZE/LIGHT touch sensor at the top of the device or the
SNOOZE/LIGHT button on the back to activate the snooze function. The alarm will sound again in
5 minutes.
2. Press any other button when the alarm sounds to interrupt the alarm until the alarm time will be
reached again.
3. The alarm will be turned off automatically if no button is pressed within 2 minutes.
4. The default interval of 5 minutes for the snooze function can be changed in the alarm setting
mode.

10 / 24
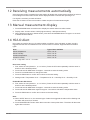
12 Receiving measurements automatically
Once the power supply is enabled, the base station will display the measurement readings for indoors.
First readings from the outdoor sensor will be displayed within 3 minutes after powering it on.
If no signal is received, proceed as follows:
Press the UP button for about 2 seconds to initate reception of measurements again.
13 Manual measurement display
1. Press MAX/MIN button several times to display the stored values one after another.
2. Display order: Current values > MAX (highest values) > MIN (lowest values)
3. When displaying highest or lowest values, press and hold MAX/MIN button for approx. 3 seconds
to delete all saved values.
14 HI/LO Alert
HI/LO alert are used to alert you of certain weather conditions. Once activated, an alarm sound is
triggered and the alert icon flashes as soon as a set value is reached. Supported areas and alarm
types:
Area Type of alert available
Indoor temperature HI AL / LO AL
Indoor humidity HI AL / LO AL
Outdoor temperature HI AL / LO AL
Outdoor humidity HI AL / LO AL
HI AL = High alert / LO AL = Low alert
HI/LO alert setting
1. First, select an area (channel 1, 2, 3 or Indoor). Press the UP button repeatedly until the arrow in-
dicator is at the desired position.
2. Press and hold ALARM button for approx. 3 seconds to enter the setting mode.
3. Press UP or DOWN button to change the value.
4. Press ALARM button to confirm and continue to the next setting.
5. Settings order: Temperature HI AL > Temperature LO AL > Humidity HI AL > Humidity LO AL
Enable/Disable HI/LO Alert
6. First, select an area (channel 1, 2, 3 or Indoor). Press the UP button repeatedly until the arrow in-
dicator is at the desired position.
7. Press and hold ALARM button for approx. 3 seconds to enter the setting mode.
8. Press and hold ALARM button again for approx. 3 seconds to activate the temperature alarm.
9. Press ALARM button to confirm and continue to the next setting.
Note:
10. When ALERT alarm is on, the area and type of alarm that triggered the alarm will be flashing and
the alarm will sound for 2 minutes.
11. Press SNOOZE/LIGHT button when alarm sounds to interrupt the alarm. The alarm will then start
again after 2 minutes.

11 / 24
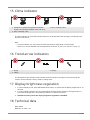
15 Clima indicator
1
2
3
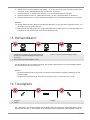
1 COMFORT: Optimal (Temperature between
20-28°C and humidity between 40% and 70%)
2 DRY: Humidity >65%
3 WET: Humidity <45%
The clima indicator is a pictorial indication based on air temperature and humidity in an attempt to de-
termine comfort level.
Note:
• Comfort indication can vary under the same temperature, depending on the humidity.
• There is no comfort indication when temperature is below 0° C (32° F) or over 60° C (140° F)
16 Trend arrow indicators
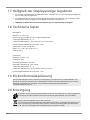
1
2
3
1 Rising 2 Steady
3 Falling
The temperature and humidity trend indicator shows the trends of changes in the forthcoming few
minutes. Arrows indicate a rising, steady or falling trend.
17 Display brightness regulation
1. In normal display mode, press SNOOZE/LIGHT button, to activate the full display brightness for 10
seconds.
2. In mains adapter operation (DC 5V) the backlight remains always activated. The light sensor en-
sures that the brightness is automatically reduced in a dark environment.
3. NOTICE!In battery mode the display brightness regulation is disabled.
18 Technical data
Base station
Batteries: 3x AAA, 1.5 V

12 / 24
Power supply (optional): DC 5V 500 mA mains plug
Temperature measuring unit: °C / °F
Temperature measuring range: -9,9°C - 60°C (-14°F - 140°F)
Humidity measuring range: RH 20% - 95%
Time format: 12 or 24 hours
Dimensions: 117 x 136 x 25 mm (B x H x T)
Weight: 244 g
Remote sensor
Batteries: 2x AAA, 1.5 V
Radio controlled signal: DCF
Transmission frequency: 433 MHz
Maximum radio frequency power: under 10mW
Temperature measuring unit: °C / °F
Temperature measuring range: -50°C - 60°C (-58°F - 140°F)
Humidity measuring range: RH 20% - 95%
19 EC Declaration of Conformity
Hereby, Bresser GmbH declares that the equipment type with item number 7000024000000 : is in
compliance with Directive: 2014/30/EU. The full text of the EU declaration of conformity is available
at the following internet address: www.bresser.de/download/7000024000000/
CE/7000024000000_CE.pdf
20 Disposal
Dispose of the packaging materials properly, according to their type, such as paper or card-
board. Contact your local waste-disposal service or environmental authority for information
on the proper disposal.
Do not dispose of electronic devices in the household garbage!
As per Directive 2012/19/EC of the European Parliament on waste electrical and electronic
equipment and its adaptation into German law, used electronic devices must be collected
separately and recycled in an environmentally friendly manner.
Do not dispose of batteries and rechargeable batteries with the household waste. You are leg-
ally required to return used batteries and rechargeable batteries. After they are used, the bat-
teries can be returned free of charge to our point of sale or to a nearby location (for example,
retailers or municipal collecting points).
Batteries and rechargeable batteries are marked with a symbol of a crossed-out dustbin and
the chemical symbol of the pollutant. “Cd” stands for Cadmium, “Hg” stands for mercury and
“Pb” stands for lead.
21 Warranty
The regular guarantee period is 2 years and begins on the day of purchase. To benefit from an exten-
ded voluntary guarantee period as stated on the gift box, registration on our website is required.

13 / 24
You can consult the full guarantee terms as well as information on extending the guarantee period and
details of our services at www.bresser.de/warranty_terms.

14
Inhaltsverzeichnis
1 Impressum ....................................................................................................................................................15
2 Gültigkeitshinweis........................................................................................................................................15
3 Zu dieser Anleitung ......................................................................................................................................15
4 Teileübersicht und Lieferumfang................................................................................................................16
5 Display-Anzeigen..........................................................................................................................................17
6 Vor der Inbetriebnahme ...............................................................................................................................18
7 Stromversorgung herstellen .......................................................................................................................18
8 Manuelle Zeiteinstellung..............................................................................................................................19
9 Zeitzone einstellen .......................................................................................................................................19
10 Weckrufeinstellung ......................................................................................................................................19
11 Schlummerfunktion......................................................................................................................................20
12 Automatische Messwerteübertragung .......................................................................................................20
13 Manuelle Messwertanzeige..........................................................................................................................20
14 Höchst-/Tiefstwert-Alarm.............................................................................................................................20
15 Klimaindikator...............................................................................................................................................21
16 Trendpfeile ....................................................................................................................................................21
17 Helligkeit der Displayanzeige regulieren....................................................................................................22
18 Technische Daten.........................................................................................................................................22
19 EG-Konformitätserklärung ..........................................................................................................................22
20 Entsorgung ...................................................................................................................................................22
21 Garantie .........................................................................................................................................................23

15 / 24
1 Impressum
Bresser GmbH
Gutenbergstr. 2
46414
Rhede
Germany
http://www.bresser.de
Für etwaige Gewährleistungsansprüche oder Serviceanfragen verweisen wir auf die Informationen zu
„Garantie“ und „Service“ in dieser Dokumentation. Wir bitten um Verständnis, dass direkt an die Her-
steller-Anschrift gerichtete Anfragen oder Einsendungen nicht bearbeitet werden können.
Irrtümer und technische Änderungen vorbehalten.
© 2020 Bresser GmbH
Alle Rechte vorbehalten.
Die Reproduktion dieser Dokumentation – auch auszugsweise – in irgendeiner Form (z.B. Fotokopie,
Druck, etc.) sowie die Verwendung und Verbreitung mittels elektronischer Systeme (z.B. Bilddatei,
Website, etc.) ohne eine vorherige schriftliche Genehmigung des Herstellers ist nicht gestattet.
Die in dieser Dokumentation verwendeten Bezeichnungen und Markennamen der jeweiligen Firmen
sind im Allgemeinen in Deutschland, der Europäischen Union und/oder weiteren Ländern waren-, mar-
ken- und/oder patentrechtlich geschützt.
2 Gültigkeitshinweis
Diese Dokumentation ist gültig für die Produkte mit den nachfolgend aufgeführten Artikelnummern:
7000024000000
Anleitungsversion: v0420
Bezeichnung dieser Anleitung:
Manual_7000024000000_ClimaTemp-Hygro-DLX_en-de_BRESSER_v042020a
Informationen bei Serviceanfragen stets angeben.
3 Zu dieser Anleitung
HINWEIS
Diese Bedienungsanleitung ist als Teil des Gerätes zu betrachten!
Lesen Sie vor der Benutzung des Geräts aufmerksam die Sicherheitshinweise und die Bedienungsan-
leitung.
Bewahren Sie diese Bedienungsanleitung für die erneute Verwendung zu einem späteren Zeitpunkt
auf. Bei Verkauf oder Weitergabe des Gerätes ist die Bedienungsanleitung an jeden nachfolgenden
Besitzer/Benutzer des Produkts weiterzugeben.

16 / 24
4 Teileübersicht und Lieferumfang
3
A
B
4
5
8
9
10
12
13
11
14
16
17
20
21
22
18
19
1
15
2
6
7
1 SNOOZE/LIGHT Berührungssensor
(Schlummerfunktion und temporäre Hin-
tergrundbeleuchtung)
2 Lichtsensor für Hintergrundbeleuchtung
(Im Dunkeln wird die Helligkeit gedimmt)
3 Display (Basisgerät) 4 Innentemperatur und Luftfeuchtigkeit
5 Anzeigebereich für Kanal 1 (blau) Außen-
temperatur und Luftfeuchtigkeit
6 Anzeigebereich für Kanal 2 (gelb) Außen-
temperatur und Luftfeuchtigkeit
7 Anzeigebereich für Kanal 3 (orange) Au-
ßentemperatur und Luftfeuchtigkeit
8 Wandhalterung (Basisgerät)
9 MODE-Taste 10 ALARM-Taste (Weckrufeinstellung)
11 SNOOZE/LIGHT-Taste (Schlummerfunkti-
on und temporäre Hintergrundbeleuch-
tung)
12 UP-Taste (Ausgewählten Kanal wechseln
(Pfeilindikator) und Wertänderung auf-
wärts))
13 DOWN-Taste (Wahl der Temperaturein-
heit °C/°F und Wertänderung abwärts)
14 MAX/MIN-Taste
15 Batteriefach (Basisgerät) 16 DC-Anschlussbuchse für Hohlstecker
17 Standfuß ausklappbar 18 Display (Funksensor)
19 Wandhalterung (Funksensor) 20 °C/°F Schiebeschalter (Wahl der Tempe-
ratureinheit)

17 / 24
21 Kanal-Wahlschalter Batteriefach (Funksensor)
Lieferumfang
Basisgerät (A), 3 Stck. Funksensoren (B)
Erforderliche Batterien (nicht im Lieferumfang enthalten):
Station: 3 Stck. Mignon-Batterien (1.5V, Typ AAA)
Sensor: 6 Stck. Mignon-Batterien (1.5V, Typ AAA)
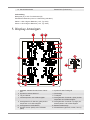
5 Display-Anzeigen
CH1
1
5
19
2
8
16
9
18
17
6
15
11
12
13
10
7
3
4
14
1 Standard: Aktuelle Uhrzeit; Alarm: Weck-
zeit
2 Symbol für das Funksignal
3 Symbol für aktiven Weckruf 4 Wochentag
5 Tag und Monat 6 Trendpfeil
7 Innentemperatur und Luftfeuchtigkeit 8 Anzeigebereich für Kanal 1 (blau) Außen-
temperatur und Luftfeuchtigkeit
9 Anzeigebereich für Kanal 2 (gelb) Außen-
temperatur und Luftfeuchtigkeit
10 Anzeigebereich für Kanal 3 (orange) Au-
ßentemperatur und Luftfeuchtigkeit
11 Anzeigebereich Pfeilindikator 12 Batteriestandanzeige
13 Symbol Höchst- (MAX) oder Tiefstwert
(MIN)
14 Klimaindikator (Optimal, trocken, feucht)

18 / 24
15 Alarm-Symbol für hohe (HI AL) oder nied-
rige (LO AL) Temperatur oder Luftfeuch-
tigkeit
16 Alarm-Symbol für Temperatur oder Luft-
feuchtigkeit
17 Gewählter Kanal vom Funksensor 18 Außentemperatur (Funksensor)
19 Außenluftfeuchtigkeit (Funksensor)
6 Vor der Inbetriebnahme
HINWEIS
Vermeidung von Verbindungsstörungen!
Um Verbindungsstörungen zwischen den Geräten zu vermeiden, sind die folgenden Punkte bei der In-
betriebnahme zu beachten.
1. Basisgerät (Empfänger) und Sensor (Sender) so nah wie möglich nebeneinander stellen/legen.
2. Stromversorgung für das Basisgerät herstellen und warten bis die Innentemperatur angezeigt wird.
3. Stromversorgung für den Sensor herstellen.
4. Basisgerät und Sensor innerhalb des effektiven Übertragungsbereichs aufstellen/betreiben.
5. Sicherstellen, dass Basisgerät und Funksensor auf den gleichen Kanal eingestellt sind.
Bei einem Batteriewechsel stets die Batterien sowohl im Basisgerät als auch im Sensor entfernen und
in richtiger Reihenfolge wieder neu einsetzen, damit die Funkverbindung erneut aufgebaut werden
kann. Wird eines der beiden Geräte über einen Netzstromanschluss betrieben, so muss auch für die-
ses bei einem Batteriewechsel kurzzeitig die Stromverbindung getrennt werden. Werden z.B. nur die
Batterien im Sensor ausgetauscht, kann das Signal anschließend gar nicht oder nicht mehr korrekt
empfangen werden.
Beachten Sie, dass die tatsächliche Reichweite von den jeweils verwendeten Baumaterialien der Ge-
bäude sowie der jeweiligen Position der Basiseinheit und des Außensensors abhängt. Durch externe
Einflüsse (diverse Funksender und andere Störquellen) kann sich die mögliche Reichweite stark ver-
ringern. In solchen Fällen empfehlen wir, sowohl für das Basisgerät als auch den Außensensor andere
Standorte zu suchen. Manchmal reicht schon ein Verschieben um wenige Zentimeter!
7 Stromversorgung herstellen
Basisgerät
1. Batteriefachdeckel entfernen.
2. Batterien in das Batteriefach einsetzen. Dabei die korrekte Ausrichtung der Batteriepole (+/-) be-
achten.
3. Batteriefachdeckel wieder aufsetzen.
4. Warten bis Innentemperatur auf dem Basisgerät angezeigt wird.
HINWEIS!Alternativ ist auch ein Betrieb mittels Netzstrom (DC 5V) möglich. Dazu folgenderma-
ßen vorgehen:
5. DC-Stecker in die Anschlussbuchse am Basisgerät stecken.
6. Netzstecker in die Steckdose stecken.
7. Das Gerät wird direkt mit Strom versorgt.
8. Warten bis Innentemperatur auf dem Basisgerät angezeigt wird.
HINWEIS!Beim Wechsel der Stromversorgungsart (Netzstrom oder Batterien) wird die
Stromversorgung technisch bedingt kurzzeitig unterbrochen. Dabei gehen alle zuvor vorge-
nommenen Einstellungen verloren.
Funksensor

19 / 24
9. Schrauben am Batteriefachdeckel mit einem geeigneten Kreuzschraubendreher entfernen und
Batteriefachdeckel abnehmen.
10. Batterien in das Batteriefach einsetzen. Dabei die korrekte Ausrichtung der Batteriepole (+/-) be-
achten.
11. Kanal-Wahlschalter auf den gewünschten Kanal einstellen.
HINWEIS!Diese Wetterstation kann mit bis zu 3 Funksensoren betrieben werden. Jeder an-
geschlossene Funksensor muss auf einem anderen Kanal betrieben werden. Ist nur ein Funk-
sensor angeschlossen, sollte dieser auf Kanal 1 betrieben werden.
12. Batteriefachdeckel wieder aufsetzen und anschrauben.
8 Manuelle Zeiteinstellung
1. MODE-Taste ca. 3 Sekunden drücken um in den Zeiteinstellungsmodus zu gelangen.
2. Die einzustellenden Ziffern blinken.
3. UP- oder DOWN-Taste drücken, um den Wert zu verändern.
4. MODE-Taste drücken, um die Eingabe zu bestätigen und zur nächsten Einstellung zu wechseln.
5. Reihenfolge der Einstellungen: Jahr > Monat > Tag > Wochentag Sprache > 12-/24-Stunden-Mo-
dus > Zeitversatz > Stunden > Minuten
6. MODE-Taste abschließend drücken, um Einstellungen zu speichern und den Einstellungsmodus
zu verlassen.
9 Zeitzone einstellen
Um eine abweichende Zeitzone einzustellen, folgendermaßen vorgehen:
1. MODE-Taste ca. 3 Sekunden drücken um in den Zeiteinstellungsmodus zu gelangen.
2. MODE-Taste mehrmals drücken bis im Display die Einstellung für den Zeitversatz 00 Hr (Time off-
set) angezeigt wird.
3. UP- oder DOWN-Taste drücken, um die gewünschte Zeitabweichung in Stunden (-23 bis +23
Stunden) zu wählen.
4. MODE-Taste abschließend drücken, um Einstellungen zu speichern und den Einstellungsmodus
zu verlassen.
10 Weckrufeinstellung
1. MODE-Taste drücken, um in den Einstellmodus für die Weckzeit zu wechseln. „AL“ wird statt der
Sekunden angezeigt.
2. UP-Taste drücken um den Alarm zu aktivieren oder deaktivieren. Bei aktiviertem Alarm erscheint
das
Symbol auf dem Display.
3. MODE-Taste etwa 3 Sekunden drücken, um in den Einstellungsmodus für die Weckzeit zu gelan-
gen. Der erste einzustellende Wert blinkt.
4. UP- oder DOWN-Taste drücken, um den Wert zu ändern.
5. MODE-Taste drücken, um die Eingabe zu bestätigen und zur nächsten Einstellung zu wechseln.
6. Reihenfolge der Einstellungen: Stunden > Minuten > Schlummerintervall (01-20 Minunten)
7. MODE-Taste abschließend drücken, um Einstellungen zu speichern und den Einstellungsmodus
zu verlassen.
8. Bei Ertönen des Weckrufs eine beliebige Taste drücken, um den Alarm zu stoppen.

20 / 24
11 Schlummerfunktion
1. Bei Ertönen des Weckrufs die SNOOZE/LIGHT-Berührungstaste oben am Gerät oder die SNOO-
ZE/LIGHT-Taste auf der Rückseite drücken, um die Schlummerfunktion zu aktivieren. Weckruf er-
tönt erneut nach 5 Minuten.
2. Beim Ertönen des Weckrufs eine beliebige andere Taste drücken, um den Weckruf bis zum erneu-
ten Erreichen der eingestellten Weckzeit auszusetzen.
3. Wird keine Taste gedrückt, schaltet sich der Weckruf automatisch nach 2 Minuten ab.
4. Der Standardintervall von 5 Minuten für die Schlummerfunktion lässt sich im Weckzeiteinstellungs-
modus ändern.
12 Automatische Messwerteübertragung
Sobald die Stromversorgung hergestellt wurde, beginnt die Basisstation mit der Anzeige der Messwer-
te für den Innenbereich. Die ersten vom Außensensor empfangenen Messwerte werden innerhalb von
etwa 3 Minuten nach Inbetriebnahme angezeigt.
Wird kein Signal empfangen, folgendermaßen vorgehen:
UP-Taste ca. 2 Sekunden drücken, um den Empfang der Messwerte erneut zu initiieren.
13 Manuelle Messwertanzeige
1. MAX/MIN-Taste mehrmals drücken, um nacheinander die gespeicherten Werte anzuzeigen.
2. Reihenfolge der Anzeige: Aktuelle Werte > MAX (Höchstwerte) > MIN (Tiefstwerte)
3. MAX/MIN-Taste während der Höchst- oder Tiefstwertanzeige etwa 3 Sekunden gedrückt halten,
um alle gespeicherten Werte unwiderruflich zu löschen.
14 Höchst-/Tiefstwert-Alarm
Mit dem Höchst-/Tiefstwert-Alarm (HI/LO) AL) können Sie sich über veränderte Wetterbedingungen in-
formieren. Einmal aktiviert, ertönt ein Alarmsignal und die Signalleuchte blinkt, sobald ein eingestellter
Wert erreicht wird. Unterstütze Bereiche und Alarmtypen:
Bereich Verfügbarer Alarm-Typ
Innentemperatur HI AL / LO AL
Luftfeuchtigkeit (innen) HI AL / LO AL
Außentemperatur HI AL / LO AL
Luftfeuchtigkeit (außen) HI AL / LO AL
HI AL = Höchstwert-Alarm / LO AL = Tiefstwert-Alarm
Höchst-/Tiefstwert-Alarm einstellen
1. Wählen Sie zuerst einen Bereich aus (Kanal 1, 2 , 3 oder Innen). Drücken Sie dafür die UP-Taste
mehrmals, bis der Pfeilindikator an der gewünschten Position ist.
2. ALARM-Taste für ca. 3 Sekunden drücken, um in den Einstellmodus zu gelangen.
3. UP- oder DOWN-Taste drücken, um den Wert zu verändern.
4. ALARM-Taste drücken, um die Eingabe zu bestätigen und zur nächsten Einstellung zu wechseln.
5. Reihenfolge der Einstellungen: Temperatur HI AL > Temperatur LO AL > Luftfeuchtigkeit HI AL >
Luftfeuchtigkeit LO AL
Höchst-Tiefstwert-Alarm ein-/ausschalten
Seite laden ...
Seite laden ...
Seite laden ...
Seite laden ...
-
 1
1
-
 2
2
-
 3
3
-
 4
4
-
 5
5
-
 6
6
-
 7
7
-
 8
8
-
 9
9
-
 10
10
-
 11
11
-
 12
12
-
 13
13
-
 14
14
-
 15
15
-
 16
16
-
 17
17
-
 18
18
-
 19
19
-
 20
20
-
 21
21
-
 22
22
-
 23
23
-
 24
24


Bresser 7000024000000 Bedienungsanleitung
- Kategorie
- Tischuhren
- Typ
- Bedienungsanleitung
- Dieses Handbuch ist auch geeignet für
in anderen Sprachen
- English: Bresser 7000024000000 Owner's manual
Verwandte Papiere
-
Bresser 7000022000000 Bedienungsanleitung
-
Bresser Temeo Life H Bedienungsanleitung
-
-
Bresser VA colour RC Weather Station Bedienungsanleitung
-
-
-
-
Bresser 7000025000000 Bedienungsanleitung
-
-