
Samsung Digital
Presenter
Software
User’s Guide
French German Italian SpanishEnglish


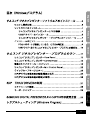
Contents (Windows Program)
Installing Samsung Digital Presenter Software......3
System requirements...............................................................................3
Installing software ....................................................................................4
Connecting Samsung Digital Presenter to PC .................................4
Installing USB driver .........................................................................5
Installing Samsung Digital Presenter program ................................7
Installation tips .........................................................................................9
How can I determine if my computer's USB port is enabled?...........9
How do I remove the USB driver and Samsung Digital Presenter program?
...10
Running Samsung Digital Presenter Program ........11
Samsung Digital Presenter View Panel overview..................................12
Samsung Digital Presenter Control Panel overview ..............................15
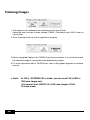
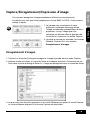
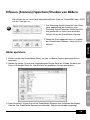
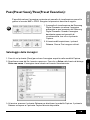
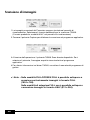
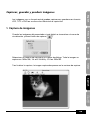
Capturing/Saving/Printing images .........................................................19
Samsung Digital Presenter Mini Control Panel overview.......................22
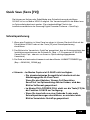
Quick Save ([F2] key) ............................................................................23
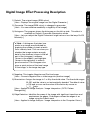
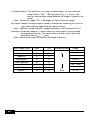
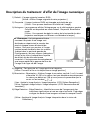
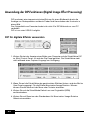
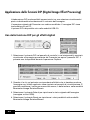
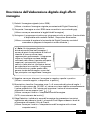
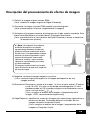
Applying DIP(Digital Image Effect Processing) Functions .....................24
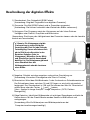
Digital Image Effect Processing Description..........................................25
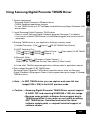
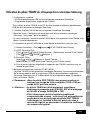
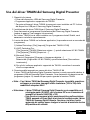
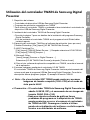
Using Samsung Digital Presenter TWAIN Driver...27
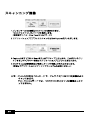
Scanning Images ..................................................................................28
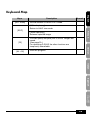
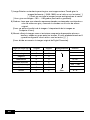
Keyboard Map ......................................................................................29
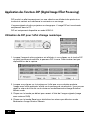
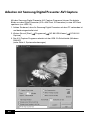
Using Samsung Digital Presenter AVI Capture
..................30
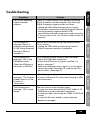
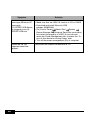
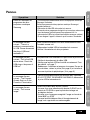
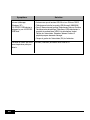
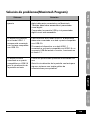
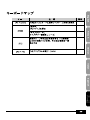
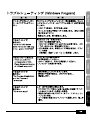
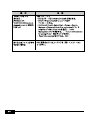
Troubleshooting..................................................................................35
1
English French German Italian Spanish

2
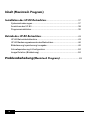
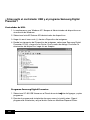
Contents (Macintosh Program)
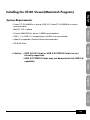
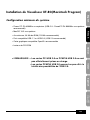
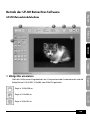
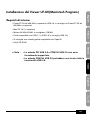
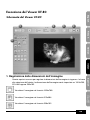
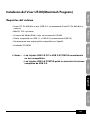
Installing the UF-80 Viewer
...................................................................37
System Requirements.............................................................................37
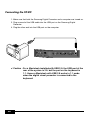
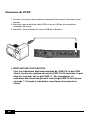
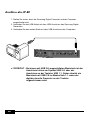
Connecting the UF-80 .............................................................................38
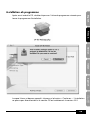
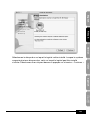
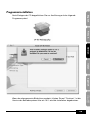
Program Installation ................................................................................39
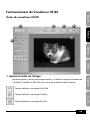
Running the UF-80 Viewer
.....................................................................43
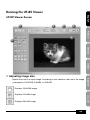
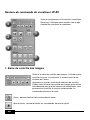
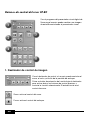
UF-80 Viewer Screen..............................................................................43
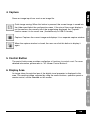
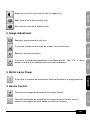
UF-80 Viewer Control Buttons.................................................................46
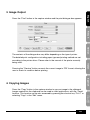
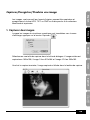
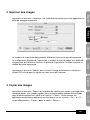
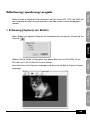
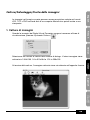
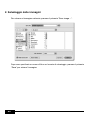
Image Capture/Save/Output....................................................................49
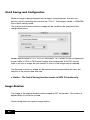
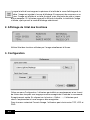
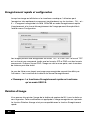
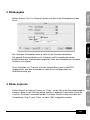
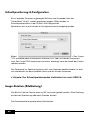
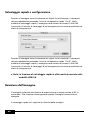
Quick Saving and Configuration..............................................................52
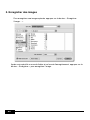
Image Rotation........................................................................................52
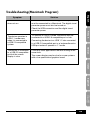
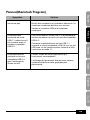
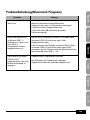
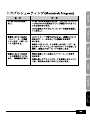
Troubleshooting(Macintosh Program)
..............................................53

3
English French German Italian Spanish
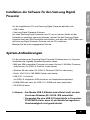
Installing Samsung Digital Presenter Software
The supplied Samsung Digital Presenter program CD contains :
• USB driver
• Samsung Digital Presenter program
To control your Samsung Digital Presenter on the PC, save the images into the
computer HDD, or print the images, you must connect Samsung Digital Presenter to
the PC through USB interface, then install the USB driver and Samsung Digital
Presenter program using the supplied program CD.
Follow the procedures below.
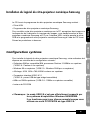
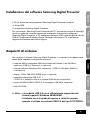
System requirements
To install the Samsung Digital Presenter software, your computer must have at least
the following system configuration :
• IBM or IBM compatible computer with a Pentium II 350Mhz or higher processor
(*USB 2.0: Pentium 4 or higher)
• Windows 98 or later (*USB 2.0: Windows 2000 pro or later)
• Display : XGA 1024 x 768, 65536 colors or higher
• USB 2.0/1.1 interface connector
(*USB 2.0: On-board type USB chipset recommended)
• 64MB or higher RAM (*USB 2.0: 128MB or higher recommended)
•CD-ROMdrive
✔Note : • USB 2.0 mode is not officially supported in the Windows
98/98SE/ME OS.
• It cannot perform at regular speed when you use
PCI/PCMCIA type USB 2.0 card.

4
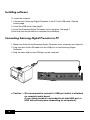
Installing software
To install the software
1. Connect your Samsung Digital Presenter to the PC with USB cable. See the
current page.
2. Install the USB driver. See page 5.
3. Install the Samsung Digital Presenter control program. See page 7.
Follow the instructions below to complete the installation:
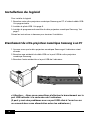
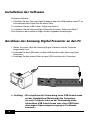
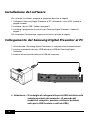
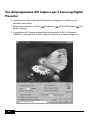
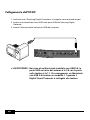
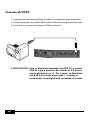
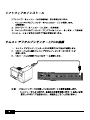
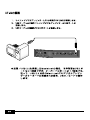
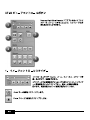
Connecting Samsung Digital Presenter to PC
1. Make sure that both the Samsung Digital Presenter and a computer are turned on.
2. Plug one end of the USB cable into the USB port on the Samsung Digital
Presenter.
3. Plug the other end into the USB port on the computer.
✔Caution : • We recommend to connect to USB port which is attached
on computer main board.
(It can make troubles in extended front-side USB port or
USB hub without power depending on computers.)
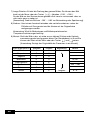
USBVGA INVGA OUTRS-232C
MOUSE
DVI

5
English French German Italian Spanish
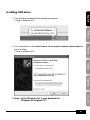
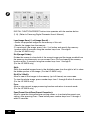
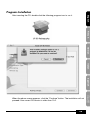
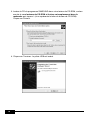
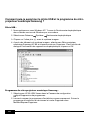
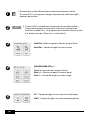
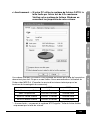
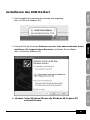
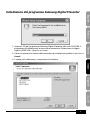
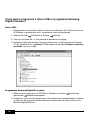
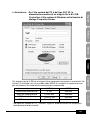
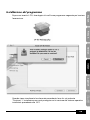
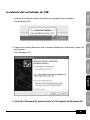
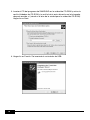
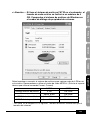
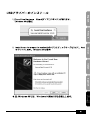
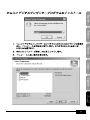
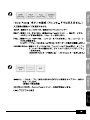
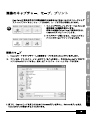
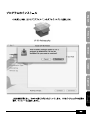
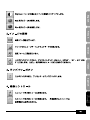
Installing USB driver
1. The Add New Hardware Wizard dialog box appears.
( Case of Windows XP )
2. Put a checkmark on the Install from a list or specific location (Advanced) box
and click Next.
( Case of Windows XP )
✔Note : In the Windows 98, it may demand the
Windows 98 original CD.

6
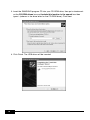
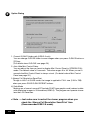
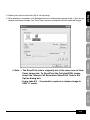
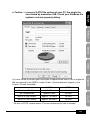
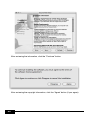
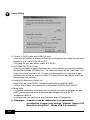
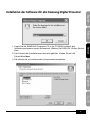
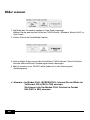
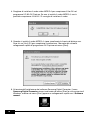
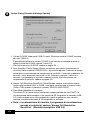
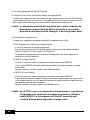
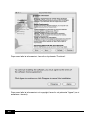
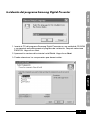
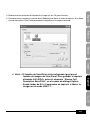
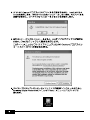
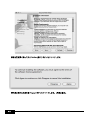
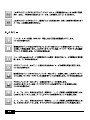
3. Insert the SAMSUNG program CD into your CD-ROM drive, then put a checkmark
on the CD-ROM drives box and Include this location in the search box then
type x:\ (where x is the drive letter for the CD-ROM drive). Click Next.
4. Click Finish. The USB driver will be inserted.

7
English French German Italian Spanish
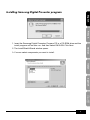
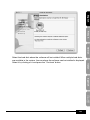
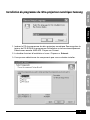
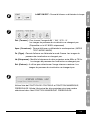
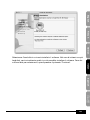
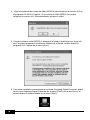
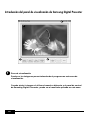
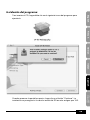
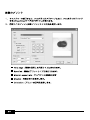
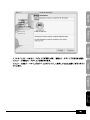
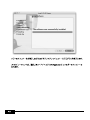
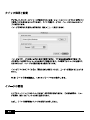
Installing Samsung Digital Presenter program
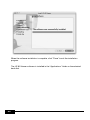
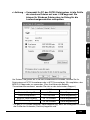
1. Insert the Samsung Digital Presenter Program CD in a CD-ROM drive and the
install program will be auto-run. And then select ENGLISH.Click Next.
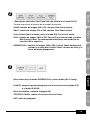
2. The InstallShield Wizard window opens.
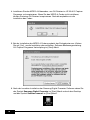
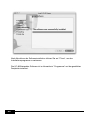
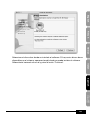
3. You can select components you want to install.

8
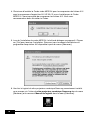
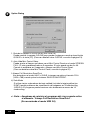
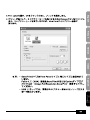
4. Choose installing MPEG-4 Video Codec for compressing AVI file in UF-80 AVI
Capture Program. If you do not install MPEG-4 Codec, You cannot compress AVI
file. We recommend to install codec.
5. When installing MPEG-4 codec, Hardware Installation dialog box appears. Click
[Continue Anyway] to complete setup. AVI Capture program shortcut and the
software manual appears in the [Start] Menu.
6. After the Samsung Digital Presenter software is properly installed, you can see the
Samsung Digital Presenter icon in the [Start] Menu and the desktop and
Software manual shortcut in the [Start] Menu.

9
English French German Italian Spanish
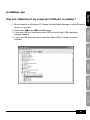
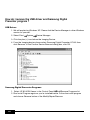
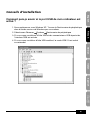
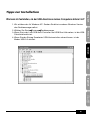
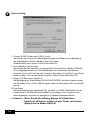
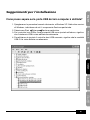
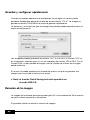
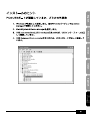
Installation tips
How can I determine if my computer’sUSBportisenabled?
1. We will explain by Windows XP. Please find the Device Manager in other Windows
version for yourself.
2. Select Start System Device Manager
3. If you see USB host controllers and a USB root hub listed, USB interface is
properly enabled.
4. If you see USB Enhanced Host controller listed, USB 2.0 mode is properly
enabled.

10
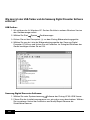
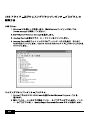
How do I remove the USB driver and Samsung Digital
Presenter program ?
USB Driver :
1. We will explain by Windows XP. Please find the Device Manager in other Windows
version for yourself.
2. Select Start System Device Manager
3. Click the plus (+) icon before the Imaging Device.
4. From the Imaging devices items select Samsung Digital Presenter UF-80, then
click Remove. In the Confirm Device Removal dialog box, click OK.
Samsung Digital Presenter Program :
1. Select UF-80 USB Viewer in the Control Panel Add/Remove Programs list
2. Run Install Program again as you’ve installed before. Follow the install program
and choose Remove button of the Modify/Repair/Remove.

11
English French German Italian Spanish
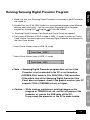
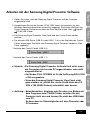
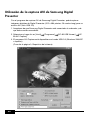
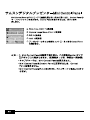
Running Samsung Digital Presenter Program
1. Make sure that your Samsung Digital Presenter is connected to the PC and both
are turned on.
2. Double-Click the UF-80 USB Viewer icon (automatically placed on the Windows
desktop when you install). You can also select Samsung Digital Presenter
program by clicking Start Program UF-80 USB Viewer
3. Samsung Digital Presenter View Panel and Control Panel are opened.
4. The current USB status (USB 2.0 mode or USB 1.1 mode) is written on Control
Panel title bar. And the images from Samsung Digital Presenter are displayed in
the View Panel window.
* Control Panel title bar (case of USB 2.0 mode)
* Control Panel title bar (case of USB 1.1 mode)
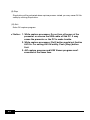
✔Note : •Samsung Digital Presenter program does not run if the
Presenter is not connected to the PC or not turned on.
•SCREEN FULL mode is fit to XGA(1024 x 768) resolution.
•If the whole view of the Samsung Digital Presenter View
Panel does not appear, check if the graphic card on your PC
supports 1024 x 768(65536 colors) or higher.
✔Caution : •While viewing, capturing or printing images on the
program or TWAIN Driver, do not turn off power of the
presenter or remove the USB cable off the PC.
It may cause the presenter or the PC to make trouble.

12
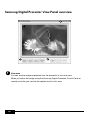
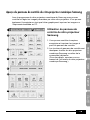
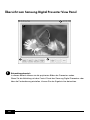
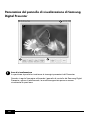
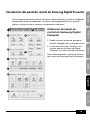
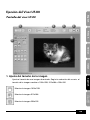
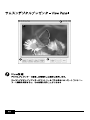
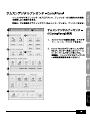
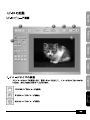
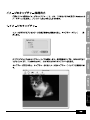
Samsung Digital Presenter View Panel overview
View area
You can see the images presented from the presenter in this view area.
When you adjust the image using the Samsung Digital Presenter Control Panel or
remote controller,you can see the applied result in this area.
2
3
1
4
1

13
English French German Italian Spanish
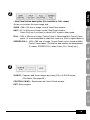
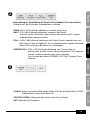
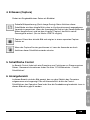
•View Panel button description (It is invisible in FULL mode).
Allows you to select the input image size.
QUAR : 256 x 192 size of image, normal View Panel window
HALF : 512 x 384 size of image, normal View Panel window.
Press [Esc] key if you want to return HALF mode in other mode.
FULL : 1024 x 768 size of image, Control Panel is closed and Mini Control Panel
opens. (It is recommended to select this mode in a XGA or higher Monitor.)
SCREEN FULL : 1024 x 768 size of image, Control Panel is also closed and Mini
Control Panel opens. The title bar and taskbar are disappeared.
(To select SCREEN FULL mode: Press [Alt + Enter] key.)
Q-SAVE : Captures and saves images by hotkey [F2] or Q-SAVE button.
(For details, See page 23.)
CONTROL PANEL : Reactivates the Control Panel window.
EXIT: Exits program.
2
3

14
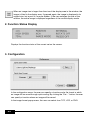
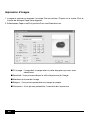
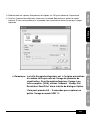
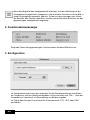
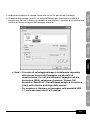
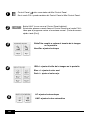
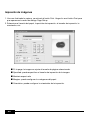
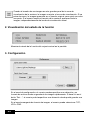
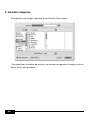
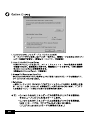
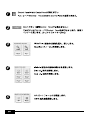
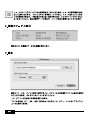
Option Dialog
1. Current Q-SAVE folder path (USB 2.0 only)
You can change Q-SAVE folder to save images when you press Q-SAVE button or
[F2] key.
(For details about Q-SAVE, see page 23.)
2. Auto-Hide Mini Control Delay
You can adjust the time you want to display Mini Control Panel in SCREEN FULL
mode. The default value is 5 seconds. The value ranges 0 to 30. When you set 0
seconds the Mini Control Panel is always visual. (For details about Mini Control
Panel see page 22.)
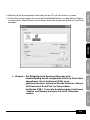
3 Always Full Resolution Save/Print
Though in HALF of QUAR mode, the image is applied to FULL size (1024 x 768)
when you press SAVE/Q-SAVE/PRINT buttons.
4) Safe Mode
Making use of some Low-end PC(include DVMT type graphic card) makes trouble
with displaying images in 20 frame/sec(USB2.0). The program can operate slower
less than 10 frame/sec.
✔Note : •Just make sure to restart the viewer program when you
check the 'Always Full Resolution Save/Print' item.
(Recommended USB 2.0 mode)
4

15
English French German Italian Spanish
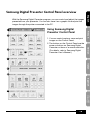
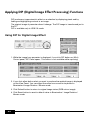
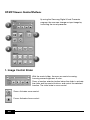
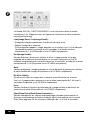
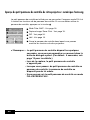
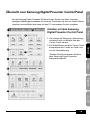
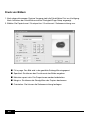
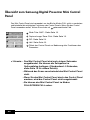
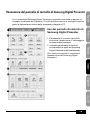
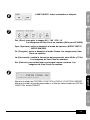
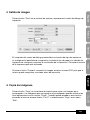
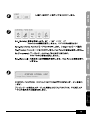
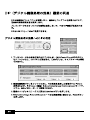
Samsung Digital Presenter Control Panel overview
With the Samsung Digital Presenter program, you can control and adjust the images
presented from your presenter. You can also save it as a graphic file and print the
images through the printer connected to the PC.
Using Samsung Digital
Presenter Control Panel
1. You can control capture, save and print
images on the Control Panel.
2. The buttons on the Control Panel are the
same as buttons on Samsung Digital
Presenter or those of a remote controller.
(For details, refer to Samsung Digital
Presenter User’s Manual.)
1
2
3
5
7
8
9
10
4
6

16
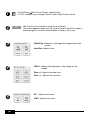
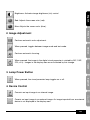
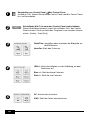
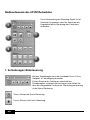
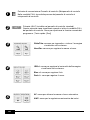
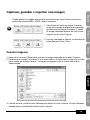
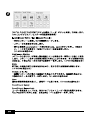
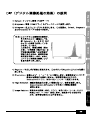
3
4
1
ControlPanel Mini Control Panel switch button
In FULL mode you can change Control Panel to Mini Control Panel.
2
HALF button (It is invisible in usual Control Panel.)
This button appears when you call Control Panel in the FULL mode. It
makes program to return normal window. (Hotkey : [Esc] key)
Wide/Tele: Reduces or enlarges the image size on the
screen.
Near/Far: Adjusts focus
IRIS+/-: Adjusts the brightness of the image on the
screen.
Blue +/-: Adjusts the blue color.
Red +/- : Adjusts the red color.
5
AF: Adjusts auto focus
AWC: Adjusts auto color

17
English French German Italian Spanish
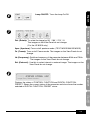
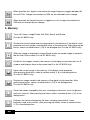
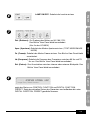
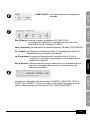
7
Rot. (Rotate): To rotate the image by 90° / 180° / 270° / 0°
The images on the View Panel do not change.
(For the UF-80DX only)
Aper. (Aperture): Turns on/off aperture mode. (TEXT MODE/IMAGE MODE)
Fz. (Freeze): Turns on/off Freeze mode. The images on the View Panel do not
change.
Hz (Frequency): Switches frequency of the presenter between 60Hz and 75Hz.
The images on the View Panel do not change.
Ext. (External): Use this to select internal or external image. The images on the
View Panel do not change.
8
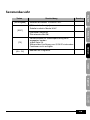
Displays the status of CONTROL FUNCTION and DIGITAL FUNCTION,
PRESET. Shows the current status of the presenter and also shows the number
selected at DIGITAL FUNCTION, PRESET status.
6
Lamp ON/OFF: Turns the lamp On/Off.

18
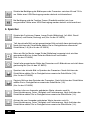
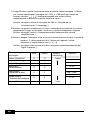
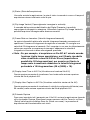
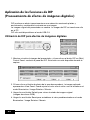
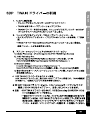
9
DIGITAL FUNCTION/PRESET button inter-operates with the number button
(1~8). (Refer to Samsung Digital Presenter User’s Manual)
I-sav(Image Save) / I-rcl(Image Recall) :
• Saves the projected image into the memory of this unit.
• Recalls the image from the memory.
•To save/recall the image, press I-sav / I-rcl button and specify the memory
location within 5 seconds using the number keys from 1 through 8.
(For the UF-80DX only)
Div2(Image Divide):
Divides the screen to show both of the current image and the image recalled from
the memory simultaneously on one screen.Press Div2 and specify the memory
location within 5 seconds using the number keys from 1 through 8.
(For the UF-80DX only)
Shift:
Shifts the recalled image shown in the divided screen from the right to left to show
the hidden portion of the image. (For the UF-80DX only)
Div9(3x3Multi):
Allow to see all the images in the memory (up to 8 frames) on one screen.
To view the whole image, press number keys from 1 through 8 within 5 seconds.
(For the UF-80DX only)
Free:
Allow to stop current image processing function and return to normal mode.
(For the UF-80DX only)
Psav(Preset Save)/Pexe(Preset Execution):
Allow to save the customized user setting values or to activate the preset user
setting. After pressing Psav / Pexe button press number keys from 1 through 4
within 5 seconds.
Seite wird geladen ...
Seite wird geladen ...
Seite wird geladen ...
Seite wird geladen ...
Seite wird geladen ...
Seite wird geladen ...
Seite wird geladen ...
Seite wird geladen ...
Seite wird geladen ...
Seite wird geladen ...
Seite wird geladen ...
Seite wird geladen ...
Seite wird geladen ...
Seite wird geladen ...
Seite wird geladen ...
Seite wird geladen ...
Seite wird geladen ...
Seite wird geladen ...
Seite wird geladen ...
Seite wird geladen ...
Seite wird geladen ...
Seite wird geladen ...
Seite wird geladen ...
Seite wird geladen ...
Seite wird geladen ...
Seite wird geladen ...
Seite wird geladen ...
Seite wird geladen ...
Seite wird geladen ...
Seite wird geladen ...
Seite wird geladen ...
Seite wird geladen ...
Seite wird geladen ...
Seite wird geladen ...
Seite wird geladen ...
Seite wird geladen ...
Seite wird geladen ...
Seite wird geladen ...
Seite wird geladen ...
Seite wird geladen ...
Seite wird geladen ...
Seite wird geladen ...
Seite wird geladen ...
Seite wird geladen ...
Seite wird geladen ...
Seite wird geladen ...
Seite wird geladen ...
Seite wird geladen ...
Seite wird geladen ...
Seite wird geladen ...
Seite wird geladen ...
Seite wird geladen ...
Seite wird geladen ...
Seite wird geladen ...
Seite wird geladen ...
Seite wird geladen ...
Seite wird geladen ...
Seite wird geladen ...
Seite wird geladen ...
Seite wird geladen ...
Seite wird geladen ...
Seite wird geladen ...
Seite wird geladen ...
Seite wird geladen ...
Seite wird geladen ...
Seite wird geladen ...
Seite wird geladen ...
Seite wird geladen ...
Seite wird geladen ...
Seite wird geladen ...
Seite wird geladen ...
Seite wird geladen ...
Seite wird geladen ...
Seite wird geladen ...
Seite wird geladen ...
Seite wird geladen ...
Seite wird geladen ...
Seite wird geladen ...
Seite wird geladen ...
Seite wird geladen ...
Seite wird geladen ...
Seite wird geladen ...
Seite wird geladen ...
Seite wird geladen ...
Seite wird geladen ...
Seite wird geladen ...
Seite wird geladen ...
Seite wird geladen ...
Seite wird geladen ...
Seite wird geladen ...
Seite wird geladen ...
Seite wird geladen ...
Seite wird geladen ...
Seite wird geladen ...
Seite wird geladen ...
Seite wird geladen ...
Seite wird geladen ...
Seite wird geladen ...
Seite wird geladen ...
Seite wird geladen ...
Seite wird geladen ...
Seite wird geladen ...
Seite wird geladen ...
Seite wird geladen ...
Seite wird geladen ...
Seite wird geladen ...
Seite wird geladen ...
Seite wird geladen ...
Seite wird geladen ...
Seite wird geladen ...
Seite wird geladen ...
Seite wird geladen ...
Seite wird geladen ...
Seite wird geladen ...
Seite wird geladen ...
Seite wird geladen ...
Seite wird geladen ...
Seite wird geladen ...
Seite wird geladen ...
Seite wird geladen ...
Seite wird geladen ...
Seite wird geladen ...
Seite wird geladen ...
Seite wird geladen ...
Seite wird geladen ...
Seite wird geladen ...
Seite wird geladen ...
Seite wird geladen ...
Seite wird geladen ...
Seite wird geladen ...
Seite wird geladen ...
Seite wird geladen ...
Seite wird geladen ...
Seite wird geladen ...
Seite wird geladen ...
Seite wird geladen ...
Seite wird geladen ...
Seite wird geladen ...
Seite wird geladen ...
Seite wird geladen ...
Seite wird geladen ...
Seite wird geladen ...
Seite wird geladen ...
Seite wird geladen ...
Seite wird geladen ...
Seite wird geladen ...
Seite wird geladen ...
Seite wird geladen ...
Seite wird geladen ...
Seite wird geladen ...
Seite wird geladen ...
Seite wird geladen ...
Seite wird geladen ...
Seite wird geladen ...
Seite wird geladen ...
Seite wird geladen ...
Seite wird geladen ...
Seite wird geladen ...
Seite wird geladen ...
Seite wird geladen ...
Seite wird geladen ...
Seite wird geladen ...
Seite wird geladen ...
Seite wird geladen ...
Seite wird geladen ...
Seite wird geladen ...
Seite wird geladen ...
Seite wird geladen ...
Seite wird geladen ...
Seite wird geladen ...
Seite wird geladen ...
Seite wird geladen ...
Seite wird geladen ...
Seite wird geladen ...
Seite wird geladen ...
Seite wird geladen ...
Seite wird geladen ...
Seite wird geladen ...
Seite wird geladen ...
Seite wird geladen ...
Seite wird geladen ...
Seite wird geladen ...
Seite wird geladen ...
Seite wird geladen ...
Seite wird geladen ...
Seite wird geladen ...
Seite wird geladen ...
Seite wird geladen ...
Seite wird geladen ...
Seite wird geladen ...
Seite wird geladen ...
Seite wird geladen ...
Seite wird geladen ...
Seite wird geladen ...
Seite wird geladen ...
Seite wird geladen ...
Seite wird geladen ...
Seite wird geladen ...
Seite wird geladen ...
Seite wird geladen ...
Seite wird geladen ...
Seite wird geladen ...
Seite wird geladen ...
Seite wird geladen ...
Seite wird geladen ...
Seite wird geladen ...
Seite wird geladen ...
Seite wird geladen ...
Seite wird geladen ...
Seite wird geladen ...
Seite wird geladen ...
Seite wird geladen ...
Seite wird geladen ...
Seite wird geladen ...
Seite wird geladen ...
Seite wird geladen ...
Seite wird geladen ...
Seite wird geladen ...
Seite wird geladen ...
Seite wird geladen ...
Seite wird geladen ...
Seite wird geladen ...
Seite wird geladen ...
Seite wird geladen ...
Seite wird geladen ...
Seite wird geladen ...
Seite wird geladen ...
Seite wird geladen ...
Seite wird geladen ...
Seite wird geladen ...
Seite wird geladen ...
Seite wird geladen ...
Seite wird geladen ...
Seite wird geladen ...
Seite wird geladen ...
Seite wird geladen ...
Seite wird geladen ...
Seite wird geladen ...
Seite wird geladen ...
Seite wird geladen ...
Seite wird geladen ...
Seite wird geladen ...
Seite wird geladen ...
Seite wird geladen ...
Seite wird geladen ...
Seite wird geladen ...
Seite wird geladen ...
Seite wird geladen ...
Seite wird geladen ...
Seite wird geladen ...
Seite wird geladen ...
Seite wird geladen ...
Seite wird geladen ...
Seite wird geladen ...
Seite wird geladen ...
Seite wird geladen ...
Seite wird geladen ...
Seite wird geladen ...
Seite wird geladen ...
Seite wird geladen ...
Seite wird geladen ...
Seite wird geladen ...
Seite wird geladen ...
Seite wird geladen ...
Seite wird geladen ...
Seite wird geladen ...
Seite wird geladen ...
Seite wird geladen ...
Seite wird geladen ...
Seite wird geladen ...
Seite wird geladen ...
Seite wird geladen ...
Seite wird geladen ...
Seite wird geladen ...
Seite wird geladen ...
Seite wird geladen ...
Seite wird geladen ...
Seite wird geladen ...
Seite wird geladen ...
Seite wird geladen ...
Seite wird geladen ...
Seite wird geladen ...
Seite wird geladen ...
Seite wird geladen ...
Seite wird geladen ...
Seite wird geladen ...
Seite wird geladen ...
Seite wird geladen ...
Seite wird geladen ...
Seite wird geladen ...
Seite wird geladen ...
Seite wird geladen ...
Seite wird geladen ...
Seite wird geladen ...
Seite wird geladen ...
Seite wird geladen ...
Seite wird geladen ...
Seite wird geladen ...
Seite wird geladen ...
Seite wird geladen ...
Seite wird geladen ...
Seite wird geladen ...
Seite wird geladen ...
Seite wird geladen ...
Seite wird geladen ...
Seite wird geladen ...
Seite wird geladen ...
Seite wird geladen ...
Seite wird geladen ...
Seite wird geladen ...
Seite wird geladen ...
Seite wird geladen ...
Seite wird geladen ...
Seite wird geladen ...
Seite wird geladen ...
Seite wird geladen ...
-
 1
1
-
 2
2
-
 3
3
-
 4
4
-
 5
5
-
 6
6
-
 7
7
-
 8
8
-
 9
9
-
 10
10
-
 11
11
-
 12
12
-
 13
13
-
 14
14
-
 15
15
-
 16
16
-
 17
17
-
 18
18
-
 19
19
-
 20
20
-
 21
21
-
 22
22
-
 23
23
-
 24
24
-
 25
25
-
 26
26
-
 27
27
-
 28
28
-
 29
29
-
 30
30
-
 31
31
-
 32
32
-
 33
33
-
 34
34
-
 35
35
-
 36
36
-
 37
37
-
 38
38
-
 39
39
-
 40
40
-
 41
41
-
 42
42
-
 43
43
-
 44
44
-
 45
45
-
 46
46
-
 47
47
-
 48
48
-
 49
49
-
 50
50
-
 51
51
-
 52
52
-
 53
53
-
 54
54
-
 55
55
-
 56
56
-
 57
57
-
 58
58
-
 59
59
-
 60
60
-
 61
61
-
 62
62
-
 63
63
-
 64
64
-
 65
65
-
 66
66
-
 67
67
-
 68
68
-
 69
69
-
 70
70
-
 71
71
-
 72
72
-
 73
73
-
 74
74
-
 75
75
-
 76
76
-
 77
77
-
 78
78
-
 79
79
-
 80
80
-
 81
81
-
 82
82
-
 83
83
-
 84
84
-
 85
85
-
 86
86
-
 87
87
-
 88
88
-
 89
89
-
 90
90
-
 91
91
-
 92
92
-
 93
93
-
 94
94
-
 95
95
-
 96
96
-
 97
97
-
 98
98
-
 99
99
-
 100
100
-
 101
101
-
 102
102
-
 103
103
-
 104
104
-
 105
105
-
 106
106
-
 107
107
-
 108
108
-
 109
109
-
 110
110
-
 111
111
-
 112
112
-
 113
113
-
 114
114
-
 115
115
-
 116
116
-
 117
117
-
 118
118
-
 119
119
-
 120
120
-
 121
121
-
 122
122
-
 123
123
-
 124
124
-
 125
125
-
 126
126
-
 127
127
-
 128
128
-
 129
129
-
 130
130
-
 131
131
-
 132
132
-
 133
133
-
 134
134
-
 135
135
-
 136
136
-
 137
137
-
 138
138
-
 139
139
-
 140
140
-
 141
141
-
 142
142
-
 143
143
-
 144
144
-
 145
145
-
 146
146
-
 147
147
-
 148
148
-
 149
149
-
 150
150
-
 151
151
-
 152
152
-
 153
153
-
 154
154
-
 155
155
-
 156
156
-
 157
157
-
 158
158
-
 159
159
-
 160
160
-
 161
161
-
 162
162
-
 163
163
-
 164
164
-
 165
165
-
 166
166
-
 167
167
-
 168
168
-
 169
169
-
 170
170
-
 171
171
-
 172
172
-
 173
173
-
 174
174
-
 175
175
-
 176
176
-
 177
177
-
 178
178
-
 179
179
-
 180
180
-
 181
181
-
 182
182
-
 183
183
-
 184
184
-
 185
185
-
 186
186
-
 187
187
-
 188
188
-
 189
189
-
 190
190
-
 191
191
-
 192
192
-
 193
193
-
 194
194
-
 195
195
-
 196
196
-
 197
197
-
 198
198
-
 199
199
-
 200
200
-
 201
201
-
 202
202
-
 203
203
-
 204
204
-
 205
205
-
 206
206
-
 207
207
-
 208
208
-
 209
209
-
 210
210
-
 211
211
-
 212
212
-
 213
213
-
 214
214
-
 215
215
-
 216
216
-
 217
217
-
 218
218
-
 219
219
-
 220
220
-
 221
221
-
 222
222
-
 223
223
-
 224
224
-
 225
225
-
 226
226
-
 227
227
-
 228
228
-
 229
229
-
 230
230
-
 231
231
-
 232
232
-
 233
233
-
 234
234
-
 235
235
-
 236
236
-
 237
237
-
 238
238
-
 239
239
-
 240
240
-
 241
241
-
 242
242
-
 243
243
-
 244
244
-
 245
245
-
 246
246
-
 247
247
-
 248
248
-
 249
249
-
 250
250
-
 251
251
-
 252
252
-
 253
253
-
 254
254
-
 255
255
-
 256
256
-
 257
257
-
 258
258
-
 259
259
-
 260
260
-
 261
261
-
 262
262
-
 263
263
-
 264
264
-
 265
265
-
 266
266
-
 267
267
-
 268
268
-
 269
269
-
 270
270
-
 271
271
-
 272
272
-
 273
273
-
 274
274
-
 275
275
-
 276
276
-
 277
277
-
 278
278
-
 279
279
-
 280
280
-
 281
281
-
 282
282
-
 283
283
-
 284
284
-
 285
285
-
 286
286
-
 287
287
-
 288
288
-
 289
289
-
 290
290
-
 291
291
-
 292
292
-
 293
293
-
 294
294
-
 295
295
-
 296
296
-
 297
297
-
 298
298
-
 299
299
-
 300
300
-
 301
301
-
 302
302
-
 303
303
-
 304
304
-
 305
305
-
 306
306
-
 307
307
-
 308
308
-
 309
309
-
 310
310
-
 311
311
-
 312
312
-
 313
313
-
 314
314
-
 315
315
-
 316
316
-
 317
317
-
 318
318
-
 319
319
-
 320
320
-
 321
321
-
 322
322
-
 323
323
-
 324
324
-
 325
325
-
 326
326
-
 327
327
-
 328
328
-
 329
329
-
 330
330
-
 331
331
-
 332
332
-
 333
333
-
 334
334
-
 335
335
-
 336
336


