Amprobe AM-TR300 Bedienungsanleitung
- Kategorie
- Messen, Testen
- Typ
- Bedienungsanleitung

TR300
Temperature and
Relative Humidity
Data Logger
Users Manual
UÊ`iÊ`½i«
UÊi`iÕ}Ã>`LÕV
UÊ>Õ>Ê`½1Ã
UÊ>Õ>Ê`iÊÕÃ
UÊÛB`>À>`L

1
}Ã
TR300
Temperature and Relative
Humidity Data Logger
Users Manual
TR300_Rev001
© 2008 Amprobe Test Tools.
All rights reserved.

2
Limited Warranty and Limitation of Liability
Your Amprobe product will be free from defects in material and workmanship for 1 year from the
date of purchase. This warranty does not cover fuses, disposable batteries or damage from accident,
neglect, misuse, alteration, contamination, or abnormal conditions of operation or handling.
Resellers are not authorized to extend any other warranty on Amprobe’s behalf. To obtain service
during the warranty period, return the product with proof of purchase to an authorized Amprobe
Test Tools Service Center or to an Amprobe dealer or distributor. See Repair Section for details.
THIS WARRANTY IS YOUR ONLY REMEDY. ALL OTHER WARRANTIES - WHETHER EXPRESS, IMPLIED
OR STAUTORY - INCLUDING IMPLIED WARRANTIES OF FITNESS FOR A PARTICULAR PURPOSE OR
MERCHANTABILITY, ARE HEREBY DISCLAIMED. MANUFACTURER SHALL NOT BE LIABLE FOR ANY
SPECIAL, INDIRECT, INCIDENTAL OR CONSEQUENTIAL DAMAGES OR LOSSES, ARISING FROM ANY
CAUSE OR THEORY. Since some states or countries do not allow the exclusion or limitation of an
implied warranty or of incidental or consequential damages, this limitation of liability may not apply
to you.
Repair
All test tools returned for warranty or non-warranty repair or for calibration should be accompanied
by the following: your name, company’s name, address, telephone number, and proof of purchase.
Additionally, please include a brief description of the problem or the service requested and include
the test leads with the meter. Non-warranty repair or replacement charges should be remitted in the
form of a check, a money order, credit card with expiration date, or a purchase order made payable
to Amprobe® Test Tools.
In-Warranty Repairs and Replacement – All Countries
Please read the warranty statement and check your battery before requesting repair. During the
warranty period any defective test tool can be returned to your Amprobe® Test Tools distributor
for an exchange for the same or like product. Please check the “Where to Buy” section on www.
amprobe.com for a list of distributors near you. Additionally, in the United States and Canada In-
Warranty repair and replacement units can also be sent to a Amprobe® Test Tools Service Center (see
address below).
Non-Warranty Repairs and Replacement – US and Canada
Non-warranty repairs in the United States and Canada should be sent to a Amprobe® Test Tools
Service Center. Call Amprobe® Test Tools or inquire at your point of purchase for current repair and
replacement rates.
In USA In Canada
Amprobe Test Tools Amprobe Test Tools
Everett, WA 98203 Mississauga, ON L4Z 1X9
Tel: 877-AMPROBE (267-7623) Tel: 905-890-7600
Non-Warranty Repairs and Replacement – Europe
European non-warranty units can be replaced by your Amprobe® Test Tools distributor for a nominal
charge. Please check the “Where to Buy” section on www.amprobe.com for a list of distributors near
you.
European Correspondence Address*
Amprobe® Test Tools Europe
Beha-Amprobe GmbH
In den Engematten 14
79286 Glottertal, Germany
Tel.: +49 (0) 7684 8009 - 0
*(Correspondence only – no repair or replacement available from this address. European customers
please contact your distributor.)

3
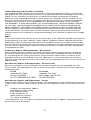
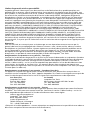
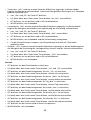
Sensor
2.5”X 2.0” LCD display
Speaker
Alarm LED
Record LED
Start/Stop to turn on and off
the unit
Mode
Set
¡Up scroll
¢Down scroll
9V DC adaptor (>= 500mA.
Depth:9mm Inner: 1.35mm.
Outer: 3.5mm) Not Included
USB adaptor (USB cable is
optional accessory)
Tripod mounting screw (tripod
not included)
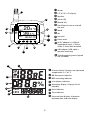
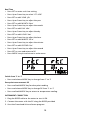
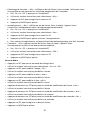
Primary display: Displays the measured
temperature in °C or °F.
DP: Dew point indicator
REC: recording indicator
Low battery indicator
Secondary display: Displays the air
humidity
Date indicator
Time indicator
Date and time display: Alternates
between date and time display
DP
REC 20.8 °C
36.5 %
Y-M-D 08-02-13
1
2
5
3
4
6789
10
12
11
13
%
DP
REC
Y-M-D
H:M:S
2
3
4
5
6
7
1
8

4
TR300
Temperature and Relative Humidity Data Logger
CONTENTS
Introduction.........................................................................................................................................5
Unpacking and Inspection..................................................................................................................5
Operation ............................................................................................................................................5
Setting Mode .................................................................................................................................5
Sample point:.................................................................................................................................6
Start Mode: ....................................................................................................................................6
Start Time: ......................................................................................................................................7
Sample Rate ...................................................................................................................................8
Alarm Set........................................................................................................................................9
Real Time......................................................................................................................................10
Switch from °F to °C.....................................................................................................................10
Dew point measurement: DP......................................................................................................10
Instrument Connection.....................................................................................................................10
RS232 PC interface capabilities ...................................................................................................11
Download Suite Software installation .......................................................................................11
Operation.....................................................................................................................................11
Troubleshooting................................................................................................................................11
Specifications.....................................................................................................................................12

5
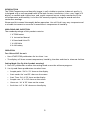
INTRODUCTION
The TR300 Temperature and humidity logger is well suitable to monitor indoor air quality. It
is designed with a wall-mounted hook in the back for easy installation. It has a very large LCD
display, an audible and visible alarm, and a quick response sensor to help monitor easily the
air temperature and humidity. It also has 16K memory capacity storage to record and save
continuous readings.
Please read this manual thoroughly before operation. You will find it very easy to operate and
a valuable instrument to measure & record the air temperature & humidity.
UNPACKING AND INSPECTION
The standard package of this product contains:
1 X TR300 meter
1 X Instruction Manual
1 X Download Suite CD
1 X USB Cable
4 X AA battery
OPERATION
Turn ON and OFF the unit
Press START/STOP pushbutton for less than 1 secUÊ
The display will show current temperature, humidity, the date and time in alternate fashion.UÊ
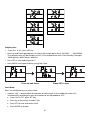
Setting Mode (See Fig 4 for Symbols meaning)
Press SET pushbutton to enter the setting mode or use the software program .1.
Use Up and Down pushbuttons to select from:2.
Sample point: ‘PtS’ & ‘P1’ show on the displayUÊ
Start mode: Stn’ and ‘P2’ show on the screenUÊ
Start Time: ‘Stt’ & ‘P3’ show on the displayUÊ
Sample rate: ‘Sr’ & ‘P4’ show on the screenUÊ
Alarm set: ‘AL’ & ‘P5’ show on the screenUÊ
Real time: ‘rtC’ & ‘P6’ shown on the displayUÊ

6
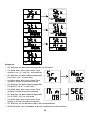
Sample point:
From ‘Pts’ & ‘P1’, press SET keyUÊ
Press up and Down pushbuttons to select the sample point from 1h(1000)…….16h(16000). UÊ
The sample point will be divided in half: ½ for temperature and ½ for humidity. Example:
16000 points= 8000 Temp + 8000 RH
Press SET to save and return to P1UÊ
Press MODE to escape without saving the valueUÊ
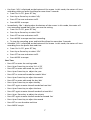
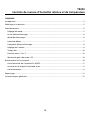
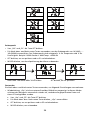
Start Mode:
Press Up and Down keys to select from:
Repeat: ‘rEp’ is displayed on the bottom of the screen. In this mode the meter will UÊ
automatically record again once the memories are uploaded to a PC.
From ‘Stn’ & ‘P2’, press SET key
Q
Press Up or Down key to select ‘rEp’Q
Press SET to save and return to P2Q
Press MODE to escapeQ
Press Up and Down Press SET to save

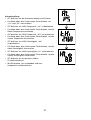
7
Key Start: ‘hEy’ is displayed on the bottom of the screen. In this mode, the meter will start UÊ
recording when you press Start/Stop for more than 2 seconds.
From ‘Stn’ & ‘P2’, press SET key
Q
Press Up or Down key to select ‘hEy’Q
Press SET to save and return to P2Q
Press MODE to escapeQ
Immediately: ‘|Nn’ is displayed on the bottom of the screen. In this mode, the meter will UÊ
start recording immediately after you save the setting.
From ‘Stn’ & ‘P2’, press SET key
Q
Press Up or Down key to select ‘|Nn’’Q
Press SET to save and return to P2Q
Press MODE to escape and start recording.Q
To stop the recording, press and hold Start/Stop for more than 2 seconds.Q
Schedule: ‘SCh’ is displayed on the bottom of the screen. In this mode, the meter will start UÊ
recording from the preset date and time.
From ‘Stn’ & ‘P2’, press SET key
Q
Press Up or Down key to select ‘SCh’’Q
Press SET to save and return to P2Q
Press MODE to escape Q
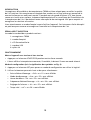
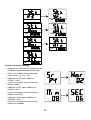
Start Time:
Press SET to enter the setting modeUÊ
Press Up or Down key to select ‘Stt’ & ‘P3’UÊ
Press SET to enter edit mode for year ‘YEr’UÊ
Press Up or Down key to adjust the yearUÊ
Press SET to enter edit mode for month ‘Mon’UÊ
Press Up or Down key to adjust the monthUÊ
Press SET to enter edit mode for day ‘dAt’UÊ
Press Up or Down key to adjust the dayUÊ
Press SET again to enter the edit mode foe hour’Hor’UÊ
Press Up or Down key to adjust the hourUÊ
Press SET again to enter the edit mode of minute’NI n’UÊ
Press Up or Down key to adjust the minuteUÊ
Press SET again to enter the edit mode for Second ‘Sec’UÊ
Press Up or Down key to adjust the secondUÊ
Press SET to save the date and timeUÊ
Press MODE to quitUÊ

8
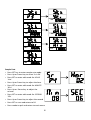
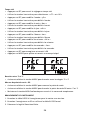
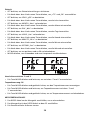
Sample Rate
Press SET key to enter sample rate modeUÊ
Press Up or Down key to select ‘Sr & P4’UÊ
Press SET to enter edit mode for HOURUÊ
‘Hor’
Press Up or Down key to adjust the hourUÊ
Press SET to enter edit mode for MINUTEUÊ
‘N| n’
Press Up or Down key to adjust the UÊ
minute
Press SET to enter edit mode for SECONDUÊ
‘SEc’
Press Up or Down key to adjust the secondUÊ
Press SET to save and return to P4UÊ
Press mode to quit and return to main menuUÊ
Y-M-D
Y-M-D
Y-M-D
H:M:S
H:M:S
H:M:S

9
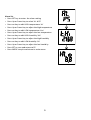
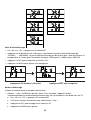
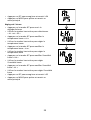
Alarm Set
Press SET key to enter the alarm settingUÊ
Press Up or Down key to select ‘AL & P5’UÊ
Press set key to edit HIGH temperature ‘tH’UÊ
Press Up or Down key to adjust the high temperatureUÊ
Press set key to edit LOW temperature ‘tLo’UÊ
Press Up or Down key to adjust the low temperatureUÊ
Press set key to edit HIGH humidity ‘HH’UÊ
Press Up or Down key to adjust the high humidityUÊ
Press set key to edit LOW humidity ‘HL’UÊ
Press Up or Down key to adjust the low humidityUÊ
Press SET to save and return to P5UÊ
Press MODE to quit and return to main menuUÊ

10
Real Time
Press SET to enter real time settingUÊ
Press Up or Down key to select ‘rTC & P6”UÊ
Press SET to edit YEAR ‘yEr’UÊ
Press Up or Down key to adjust the yearUÊ
Press SET to edit MONTH ‘Non’UÊ
Press Up or Down key to adjust the monthUÊ
Press SET to edit DAY ‘dAt’UÊ
Press Up or Down key to adjust the dayUÊ
Press SET to edit HOUR ‘Hor’UÊ
Press Up or Down key to adjust the hourUÊ
Press SET to edit MINUTE ‘Mi n’UÊ
Press Up or Down key to adjust the minuteUÊ
Press SET to edit SECOND ‘Sec’UÊ
Press Up or Down key to adjust the secondUÊ
Press SET to save and return to P6UÊ
Press MODE to quit and return to main menuUÊ
Switch from °F to °C
Press and release MODE key to change from °F to °CUÊ
Dew point measurement: DP
Press and hold MODE key for dew point readingUÊ
Press and release MODE key to change DP from °F to °CUÊ
Press and hold MODE key to return to temperature reading.UÊ
INSTRUMENT CONNECTION
Plug the RS232 cable to the meter to turn it ON.1.
Connect the meter with the PC using the RS232 provided2.
Start the Download Suite software program3.
H:M:S

11
RS232 PC interface capabilities
The RS232 cable and the Download Suite software are required to transfer data to a PC. The
RS232 port is located on the right side of the instrument. There is an optional USB converter kit
(RS-USB) available for PCs with no available RS232 port.
Download Suite Software installation
Insert the Download Suite CD into the CD-ROM drive.
To install the software, follow the on-screen instructions.
Operation
Open the program, double-click the Download Suite icon. 1.
Click on work “with instrument” and then “next”2.
Select TR300 and click on “next”3.
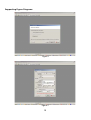
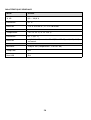
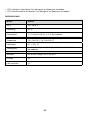
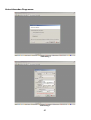
Select Program device and click on NEXT . Click on NEXT again to open the programming 4.
screen (see Figs 1&2)
Setup the parameters and click OK to start recording5.
To download file from the device, repeat steps 1 and 2. Select Download and click NEXT.6.
(See Fig.1)
Click NEXT again to start downloading the file. Select the location where you want to store 7.
the file and click NEXT, YES or NO, and FINISH
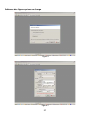
Click on “Visualizations” to select digital meter, generic historical graph, or generic historical 8.
table.(See Fig.3)
Select the parameters you want to visualize and click OK.9.
NB. Refer to help menu for more details on how to use the Download Suite.
TROUBLESHOOTING
Power on but no display or meter doesn’t work .
Check whether the DC power is connected or not.UÊ
Make sure you press ”START/STOP” key for more than 0.1 Sec.UÊ
Check the batteries and see if they make good contact and the polarity is correct.UÊ
Replace the batteries and try again.UÊ
Error Codes.
E02: The value is underflow.UÊ
E03: The value is overflow.UÊ
E04: Wrong value is caused by E02 or E03.UÊ
E11: RH calibration error. Need to re-calibrate.UÊ
E32: IC read/write error. Return the meter for repair.UÊ
E33:Circuit error in measurement portion. Return the meter for repair.UÊ

12
SPECIFICATIONS
Mode Range
RH % 0.0 ~ 100.0%
Resolution 0.1%
Accuracy +/-3% @ 10~90%;+/-5% @ others
Temperature -20°C to 70°C (-4°F to 158°F)
Resolution 0.1°C (0.1°F)
Accuracy ±0.6°C (±1°F) @ 0–50°C (32–122°F); ±1.2°C (±2°F) @ others
Memory Up to 16K (Temp: 8K + RH: 8K)
Real Time Yes
USB Port Yes

13
Figure 2
Figure 1
Supporting Figure Diagrams

14
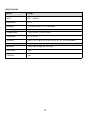
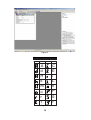
DISPLAYALPHABET LIST
A
d
H
k
m
o
r
t
C
E
i
L
n
P
S
y
Display DisplayMeaning Meaning
Figure 3
Figure 4

Français
TR300
Centrale de mesure
d’humidité relative et
de températures
Mode d’emploi
TR300_Rev001
© 2008 Amprobe Test Tools.
Tous droits réservés.

16
Limites de garantie et de responsabilité
Amprobe garantit l’absence de vices de matériaux et de fabrication de ce produit pendant une
période d’un an prenant effet à la date d’achat. Cette garantie ne s’applique pas aux fusibles, aux
piles jetables ni à tout produit mal utilisé, modifié, contaminé, négligé ou endommagé par accident
ou soumis à des conditions anormales d’utilisation et de manipulation. L’obligation de garantie
d’Amprobe est limitée, au choix d’Amprobe, au remboursement du prix d’achat ou à la réparation/
remplacement gratuit d’un produit défectueux. Les distributeurs agréés par Amprobe ne sont pas
autorisés à appliquer une garantie plus étendue au nom d’Amprobe. Pour bénéficier de la garantie,
renvoyez le produit accompagné d’un justificatif d’achat auprès d’un centre de services agréé par
Amprobe Test Tools ou d’un distributeur ou d’un revendeur Amprobe. Voir la section Réparation
pour tous les détails. LA PRESENTE GARANTIE EST LE SEUL ET EXCLUSIF RECOURS. TOUTES AUTRES
GARANTIES, EXPLICITES, IMPLICITES OU STATUTAIRES, NOTAMMENT LE CAS ECHEANT LES
GARANTIES DE QUALITE MARCHANDE OU D’ADAPTATION A UN OBJECTIF PARTICULIER, SONT
EXCLUES PAR LES PRESENTES. AMPROBE, LA SOCIÉTÉ MÈRE OU SES FILIALES NE PEUVENT EN AUCUN
CAS ÊTRE TENUES RESPONSABLES DES DOMMAGES PARTICULIERS, INDIRECTS, ACCIDENTELS OU
CONSÉCUTIFS, NI D’AUCUNS DÉGÂTS OU PERTES DE DONNÉES, SUR UNE BASE CONTRACTUELLE,
EXTRA-CONTRACTUELLE OU AUTRE. Etant donné que certaines juridictions n’admettent pas les
limitations d’une condition de garantie implicite, ou l’exclusion ou la limitation de dégâts accidentels
ou consécutifs, il se peut que les limitations et/ou les exclusions de cette garantie ne s’appliquent pas
à votre cas.
Réparation
Tous les outils de test renvoyés pour un étalonnage ou une réparation couverte ou non par la
garantie doivent être accompagnés des éléments suivants : nom, raison sociale, adresse, numéro
de téléphone et justificatif d’achat. Ajoutez également une brève description du problème ou du
service demandé et incluez les cordons de mesure avec l’appareil. Les frais de remplacement ou
de réparation hors garantie doivent être acquittés par chèque, mandat, carte de crédit avec date
d’expiration, ou par bon de commande payable à l’ordre de Amprobe® Test Tools.
Remplacements et réparations sous garantie – Tous pays
Veuillez lire la déclaration de garantie et vérifier la pile avant de demander une réparation. Pendant
la période de garantie, tout outil de test défectueux peut être renvoyé auprès de votre distributeur
Amprobe® Test Tools pour être échangé contre un produit identique ou similaire. Consultez la
section « Where to Buy » sur le site www.amprobe.com pour obtenir la liste des distributeurs dans
votre région. Au Canada et aux Etats-Unis, les appareils devant être remplacés ou réparés sous
garantie peuvent également être envoyés dans un centre de services Amprobe® Test Tools (voir page
suivante pour les adresses).
Remplacements et réparations hors garantie – Canada et Etats-Unis
Les appareils à réparer hors garantie au Canada et aux Etats-Unis doivent être envoyés dans un
centre de services Amprobe® Test Tools. Appelez Amprobe® Test Tools ou renseignez-vous auprès de
votre lieu d’achat pour connaître les tarifs en vigueur de remplacement ou de réparation.
Aux Etats-Unis Au Canada
Amprobe Test Tools Amprobe Test Tools
Everett, WA 98203 Mississauga, Ontario L4Z 1X9 Canada
Tél. : 877-993-5853 Tél. : 905-890-7600
Fax : 425-446-6390 Fax : 905-890-6866
Remplacements et réparations hors garantie – Europe
Les appareils européens non couverts par la garantie peuvent être remplacés par votre distributeur
Amprobe® Test Tools pour une somme nominale. Consultez la section « Where to Buy » sur le site
www.amprobe.com pour obtenir la liste des distributeurs dans votre région.
Adresse postale européenne*
Amprobe® Test Tools Europe
Beha-Amprobe GmbH
In den Engematten 14
79286 Glottertal, Allemagne
Tél. : +49 (0) 7684 8009 – 0
*(Réservée à la correspondance – Aucune réparation ou remplacement n’est possible à cette adresse.
Nos clients européens doivent contacter leur distributeur.)

17
Capteur
Affichage LCD 2,5 x 2,0 pouces
Haut-parleur
Témoin d’alarme
Témoin d’enregistrement
Bouton marche/arrêt pour
mettre l’appareil hors tension
et sous tension.
Mode
Réglage
¡Défilement vers le haut
¢Défilement vers le bas
Adaptateur c.c. 9 V (>= 500 mA.
Profondeur : 9 mm. Interne :
1,35 mm. Externe : 3,5 mm.)
Non fourni
Adaptateur USB (le cordon USB
est un accessoire en option)
Vis de montage sur trépied
(trépied non inclus)
Affichage primaire : Affiche la
température mesurée en °C ou °F
DP : Indicateur du point de rosée
REC : Indicateur d’enregistrement
Témoin de batterie faible
Affichage secondaire : Affiche
l’humidité de l’air
Indicateur de date
Indicateur de l’heure
Affichage de la date et de l’heure :
Bascule entre l’affichage de la date et
de l’heure
DP
REC 20.8 °C
36.5 %
Y-M-D 08-02-13
1
2
5
3
4
6789
10
12
11
13
%
DP
REC
Y-M-D
H:M:S
2
3
4
5
6
7
1
8

18
TR300
Centrale de mesure d’humidité relative et de température
SOMMAIRE
Introduction.........................................................................................................................................5
Déballage et inspection......................................................................................................................5
Fonctionnement..................................................................................................................................5
Réglage du mode...........................................................................................................................5
Point d’échantillonnage................................................................................................................6
Mode de démarrage......................................................................................................................6
Heure de début..............................................................................................................................7
Fréquence d’échantillonnage .......................................................................................................8
Réglage de l’alarme.......................................................................................................................9
Temps réel ....................................................................................................................................10
Basculer entre °F et °C .................................................................................................................10
Mesure du point de rosée : DP....................................................................................................10
Branchement de l’instrument...........................................................................................................10
Fonctionnalités de l’interface PC-RS232.....................................................................................11
Installation du logiciel Download Suite .....................................................................................11
Fonctionnement...........................................................................................................................11
Dépannage ........................................................................................................................................11
Caractéristiques générales................................................................................................................12

19
INTRODUCTION
L’enregistreur d’humidité et de températures TR300 est bien adapté pour surveiller la qualité
de l’air intérieur. Cet enregistreur est équipé d’un crochet sur sa face arrière qui permet de le
monter facilement sur une paroi murale. Il possède un très grand afficheur LCD, une alarme
sonore et visuelle et un capteur à réponse rapide optimisant la surveillance de l’humidité et de
la température de l’air. Il possède en outre une capacité de stockage de 16 K pour acquérir et
enregistrer les résultats en continu.
Lisez attentivement ce mode d’emploi avant d’utiliser l’appareil. Cet instrument facile d’emploi
est précieux pour mesurer et enregistrer l’humidité et la température de l’air.
DÉBALLAGE ET INSPECTION
Le module standard de ce produit contient :
1 x enregistreur TR300
1 x mode d’emploi
1 x CD Download Suite
1 x cordon USB
4 x piles AA
FONCTIONNEMENT
Mettre l’appareil sous tension et hors tension
Appuyez sur le bouton START/STOP pendant moins d’une seconde.UÊ
L’écran affiche la température courante, l’humidité, la date et l’heure en mode alterné.UÊ
Mode de configuration (voir la signification des symboles en Fig. 4)
Appuyez sur le bouton SET pour passer en mode de configuration ou utiliser le logiciel.1.
Utilisez les boutons-poussoirs haut et bas pour sélectionner :2.
Point d’échantillonnage : « PtS » et « P1 » sont affichésUÊ
Mode de démarrage : « Stn » et « P2 » sont affichésUÊ
Heure de début: « Stt » et « P3 » sont affichésUÊ
Fréquence d’échantillonnage : « Sr » et « P4 » sont affichésUÊ
Réglage de l’alarme : « AL » et « P5 » sont affichésUÊ
Temps réel : « rtC » et « P6 » sont affichésUÊ
Seite wird geladen ...
Seite wird geladen ...
Seite wird geladen ...
Seite wird geladen ...
Seite wird geladen ...
Seite wird geladen ...
Seite wird geladen ...
Seite wird geladen ...
Seite wird geladen ...
Seite wird geladen ...
Seite wird geladen ...
Seite wird geladen ...
Seite wird geladen ...
Seite wird geladen ...
Seite wird geladen ...
Seite wird geladen ...
Seite wird geladen ...
Seite wird geladen ...
Seite wird geladen ...
Seite wird geladen ...
Seite wird geladen ...
Seite wird geladen ...
-
 1
1
-
 2
2
-
 3
3
-
 4
4
-
 5
5
-
 6
6
-
 7
7
-
 8
8
-
 9
9
-
 10
10
-
 11
11
-
 12
12
-
 13
13
-
 14
14
-
 15
15
-
 16
16
-
 17
17
-
 18
18
-
 19
19
-
 20
20
-
 21
21
-
 22
22
-
 23
23
-
 24
24
-
 25
25
-
 26
26
-
 27
27
-
 28
28
-
 29
29
-
 30
30
-
 31
31
-
 32
32
-
 33
33
-
 34
34
-
 35
35
-
 36
36
-
 37
37
-
 38
38
-
 39
39
-
 40
40
-
 41
41
-
 42
42


Amprobe AM-TR300 Bedienungsanleitung
- Kategorie
- Messen, Testen
- Typ
- Bedienungsanleitung
in anderen Sprachen
- English: Amprobe AM-TR300 Owner's manual
- français: Amprobe AM-TR300 Le manuel du propriétaire
Verwandte Artikel
-
Amprobe TR300 Temperature Relative Humidity Data Bedienungsanleitung
-
-
-
Amprobe TMA40-A Benutzerhandbuch
-
-
-
-
-
-