
AMW Re 460 1/4
Hohlweggasse 1/4a Dokument Version 1.00
A-1030 Wien http://amw.huebsch.at © Ing. Arnold Hübsch 2018
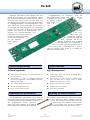
Re 460
Herzliche Gratulation zum Erwerb der PluX
Re460 Tauschplatine. Die Umrüstplatine eignet
sich sowohl für die ältere Version mit dem Lämp-
chen als auch die neueren mit den LEDs und
den kleinen Zusatzplatinen. Hauptziel der Platine
ist vorbildgerechteres Lichtmanagement. Dies
wird durch die Nutzung aktueller Schnittstellen-
technologie hier PluX ermöglicht. Der Umrüstsatz
richtet sich sowohl an Analog als auch Digital-
bahner. Der Umbau ist unkompliziert, es
werden nur Schraubendreher und
Lötkolben zum Umlöten der vor-
handenen Drähte benötigt.
Es sind keine Fräsarbei-
ten am Rahmen
beim Umbau
nötig.
Lichtmanagement
Weiß, Einzel-Weiß und Rot so vorhanden sind ge-
trennt schaltbar
Stromquellen für LEDs zur Helligkeitsstabilisation
auch im Analogbetrieb, damit Helligkeit Geschwin-
digkeitsunabhängig
Fern– Abblendlicht durch dimmen
Lötpads für Führerstands Licht
4 bzw. 2 LEDs bereits montiert
Die mitgelieferten Motorfahnen sind nicht auf
der Platine verlötet um einen günstigen Versand
zu ermöglichen. Die Motorfahnen werden in
die ausgefrästen Löcher gesteckt,
oben und unten verlötet. Das sorgt für
eine belastbare Verbindung zur Platine.
Produkt Möglichkeiten
Anpassung der Motorfahnen
Congratulations for acquiring PluX Re
460 replacement board. This board
is designed to cover the o l d -
er board variant
with bulbs as
well as
t h e
ne w e r
V a r i a n t
with LEDs. The
enhanced features
are possible by using the
PluX interface. This kit ad-
dresses analog as well as digital
model railroaders. The installation is
easy no special tools are required just a
screw driver and a soldering iron to recon-
nect the pickup wires. There is no milling re-
quired to install the parts.
Light Management
White, single White and red (if available) light is
operated individually
Current sources for LEDs are used to stabilize bright-
ness, this works also in analog mode i.e. stabile
brightness independent of speed
High and low beam via dimming
Soldering pads for cab light
4 or 2 LEDs preinstalled
The supplied motor contacts are not mounted
on the board to allow cheaper shipping
costs. The contacts are positioned in the
milled holes and soldered on both sides
of the board. This ensures a resilient
connection which can pic up the force.
Product Features
Adjusting the Motor Contacts

2/4 Re 460 AMW
Dokument Version 1.00 Hohlweggasse 1/4a
© Ing. Arnold Hübsch 2018 http://amw.huebsch.at A-1030 Wien
Re 460
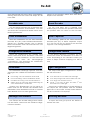
Die Platine erlaubt alle LEDs einzeln anzusteu-
ern. F0 vorne hinten ist an die weißen LEDs konfi-
guriert. FA1 FA2 des PluX Steckers führen zu den
weißen Einzel-LEDs. Für die neueren Loks mit LED
auf der Platine ist nur eine LED montiert die
andere beiden LEDs sind auf der vorhandenen
kleinen Tochterplatine die weiter benutzt wird.
FA3/4 stehen an Lötpads an den Schmalsei-
ten der Platine zur
Verfügung. Hier kann
Rot angeschlossen
werden. Bei den
älteren Modellen
kann Rot nur mit
etwas Bastelaufwand nachgerüstet werden.
An den Schmalseiten der Platine sind auch
Lötpads für den Abgriff des + Signal vom Deco-
der.
Für ZIMO Decoder werden folgende Einstel-
lungen vorgeschlagen:
CV33/34=1 / 2 ........................ Standard weiß v/h
CV35=15............................. Rangierfahrt weiß v/h
CV36=12............................... Einzelweiß beide ein
CV127=2........................ weiß richtungsabhängig
CV128=1......................... weiß richtungsabhängig
Für klassisches Fernlicht via Dimmen:
CV60=30............................................ Abblendlicht
CV114=240 .............. nur weiß Fern/Abblendlicht
CV119=131 ........................................... F6 Fernlicht
Die LEDs werden über eine Stromquellen
Schaltung betrieben. Durch verändern des
Widerstandswerts kann die Helligkeit verändert
werden. Ein Kurzschluss der Widerstände führt zu
Zuordnung Lichtausgänge
CV Einstellungen
Schaltung
The board offers individual control of every
light output. F0 front and rear are wired to the
white LEDs. FA1 and FA2 go the single withe
LEDs. The newer locos with LEDs on the board
has only 2 mounded LEDs. The other LEDs are on
the existing small doughter boards whicht will
be reused.
FA3/4 are available on soldering pads blose
to the small side of
the board. It is de-
signed to connect
red. For the older
models there is some
effort necessary to
install red light.
Near the narrow end of the board there are
soldering pads to connect + signal of the de-
coder.
For ZIMO Decoders the following CV values
are recommended:
CV33/34=1/2 ............................. standard white f/r
CV35=15 ............................. shunting light white f/r
CV36=12 ............................ both sides single white
CV127=2 ...................................... white directional
CV128=1 ...................................... white directional
For classic high beam via dimming:
CV60=30 ..................................................low beam
CV114=240 ........... only white should be dimmed
CV119=131 ....................................... F6 high beam
The LEDs are driven through a current source.
By modifying the resistor the brightness can be
changed. A shortcut of the resistor leads to a
maximum current of roughly 10mA, default
Assignment of Light Outputs
CV Values
Circuit

AMW Re 460 3/4
Hohlweggasse 1/4a Dokument Version 1.00
A-1030 Wien http://amw.huebsch.at © Ing. Arnold Hübsch 2018
Re 460
einer Stromquelle mit etwa 10mA, Standardein-
stellung etwa 3mA bei weiß und 900µA für die
roten LEDs.
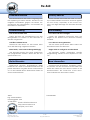
Auf der Platine befinden sich 2 Lötpunkte (SP)
um den Lautsprecher anzuschließen. Von die-
sen laufen die Lautsprecher Drähte nach unten
Richtung Dieseltank.
Über den Lötbrücken von SJ1 kann zwischen
Decoder Plus (D+) oder Pufferkondensatoraus-
gange (C+) gewählt werden. Die C+ Brücke
bitte nur benutzen wenn der Decoder eine 16V
Begrenzung bietet.
Wenn die Fahrtrichtung des Modells nicht
stimmt dann bitte Motor umdrehen oder über
CV29 + 1 per SW umdrehen. Je nach Decoder
Hersteller sind auch die Lichtausgänge
„umzudrehen“ das geschieht am einfachsten
Über Functionmapping CV33ff.
Für Schweitzer Fahrzeuge typische Licht Ein-
stellungen des Vorbilds sind Großteiles nachstell-
bar:
Lok und Zug: vorne 3x weiß hinten rechts weiß
Lok an Pendelzug: vorne 3x weiß hinten dunkel
Lok alleine als Lok Zug: vorne 3x weiß, hinten rot
Traktion D-Lok 3x vorne weiß, hinten dunkel Zug Lok:
vorne dunkel hinten 1x weiß rechts
Andere Licht Einstellungen um ins Depot zu
fahren sind mit der Technik der Modelle nicht
darstellbar. Diese Betriebsmodi sind im Modell-
bahn Betrieb auch nur selten gewünscht.
Das Öffnen des Modells erfolgt durch Abzie-
hen der Puffer, dann kann das Gehäuse abge-
nommen werden.
Sounddecoder
Puffer Kondensator
Konfigurationsvarianten
Lichtkunde
Montage und Hinweise
current on the board is about 3mA and about
900µA for the red LEDs.
On the PCB there are 2 soldering pads
marked (SP) to connect the speaker. From here
the speaker wires run down to the fuel tank.
The soldering pads on SJ1 select between
decoder plus (D+) or buffer capacitor output
(C+). Pls only use the C+ jumper if the decoder
supports a 16V voltage limitation.
If the driving direction is incorrect just turn
around the motor. An alternative is to add 1 to
CV29. Depending in the decoder vendor you
need to adjust function mapping CVs 33ff as
well.
The mayor swiss light configurations is availa-
ble with this board:
Loco and train: front 3 x white rear white right
Loco and pasanger train: front 3x white rear dark
Loco alone: front 3x white rear red
Consist 1
st
loco front 3x white, rear dark, 2
nd
loco
front dark rear 1x white right
Other light configurations to signal driving to
the depot are not possible with the installed
light bars of the model. Usually model railroad-
ers are not aware of it anyways.
To open the body just pull off the buffers to
release the case.
Sound Decoder
Buffer Capacitor
Configuration Variants
Light Configuration
Mounting and Hints

4/4 Re 460 AMW
Dokument Version 1.00 Hohlweggasse 1/4a
© Ing. Arnold Hübsch 2018 http://amw.huebsch.at A-1030 Wien
Re 460
Bitte behandeln Sie die Platine sorgfältig. Es ist
kein Spielzeug für kleine Kinder. Achten Sie auf
mögliche Kurzschlüsse gegen Lok-Chassis, be-
sonders bei den Motorfahnen, um Schäden an
Decodern zu vermeiden
Kein Licht Lok fährt nicht
Prüfen Sie bitte die Lötverbindung von den
Drehgestellen zur Platine. Ist der Decoder or-
dentlich eingesetzt?
Lok fährt verkehrt herum
Drehen Sie den Motor um. Mit CV29+1 kann
auch die Richtung umgekehrt werden.
Einzel weiß / rot ist nicht richtungsabhängig
Alle Decoder müssen für solche Lichtfunktio-
nen programmiert werden. Setzen Sie die ent-
sprechenden CVs
Ergänzende Hinweise, Praxisbeispiele, Bilder
finden Sie am AMW. Am AMW befindet sich die
jeweils aktuellste Ausgabe dieser Dokumentati-
on. In der Fußzeile dieses Dokuments finden sie
einen Versionshinweis.
Sicherheitshinweise
Fehlerbehebung
Weiterführendes
Please handle this board with care. It is not a
toy for little children! Check for shortcuts against
the loco body, especially at the motor con-
tacts, this might damage the decoder immedi-
ately.
Loco does not move no light
Check the soldering connection from the
bogies to the board. Is the decoder correctly
installed.
Loco drives in wrong direction
Turn the motor upside down. With CV29+1 the
decoder reverses the direction.
Single white or red light is not directional
All decoders require application specific
programming. Please set the required CV val-
ues.
Supplemental information, installation advic-
es, pictures can be accessed via the AMW. The
AMW also carries the most recent version of this
documentation. The footer line of this docu-
ment indicates the document version.
Security Advices
Error Handling
More information
AMW Fachhändler
Ing. Arnold Hübsch
Hohlweggasse 1/4a
A-1030 Wien
E-Mail: office@huebsch.at
http://amw.huebsch.at
+43 (699) 126 77 335
-
 1
1
-
 2
2
-
 3
3
-
 4
4


in anderen Sprachen
- English: AMW Plux Re 460 User manual
Andere Dokumente
-
Ecler FA2-LP & FA2-HP Benutzerhandbuch
-
Viessmann 5254 Operating Instructions Manual
-
 LGB 23330 Benutzerhandbuch
-
Lenz Digital Plus STANDARD PLUS V2 Information
-
 LGB 21812 Benutzerhandbuch
-
-
roco LOKMAUS 2 Benutzerhandbuch
-
MD mXion DRIVE-S Benutzerhandbuch
-
-
PIKO BR S 499 Instructions For Use Manual

