
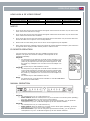
EXZELLENZ HDMI MATRIX 4x2 | 4K
Bedienungsanleitung / User manual / Mode d‘emploi

BEDIENUNGSANLEITUNG
SICHERHEITSHINWEISE
1. ALLGEMEIN
Lesen, beachten und befolgen Sie bitte folgende Sicherheitshinweise. Bewahren Sie die Bedienungsanleitung
bitte auf. Beachten Sie alle Warnhinweise auf den Komponenten und in der Bedienungsanleitung.
2. BESTIMMUNGSGEMÄSSER GEBRAUCH
Die Komponenten sind ausschließlich für den Betrieb innerhalb von Gebäuden konzipiert. Schließen Sie sie so
an, wie es in der Bedienungsanleitung vorgegeben ist. Verwenden Sie ausschließlich vom Hersteller
empfohlenes Zubehör.
3. FEUCHTIGKEIT
Wählen Sie einen Montageort für die Komponenten aus, welcher frei von hoher relativer Luftfeuchtigkeit oder
gar Nässe ist. Benutzen Sie die Komponenten niemals in der Nähe von Wasser. Nässe kann, wie bei allen nicht
speziell hierfür konstruierten Produkten, die elektrische Isolierung überbrücken und damit ein
lebensgefährliches Risiko darstellen. Die Komponenten dürfen nicht Tropf- oder Spritzwasser ausgesetzt
werden.
4. PRODUKTSCHUTZ
Setzen Sie die Komponenten keinesfalls höherer Feuchtigkeit aus. Starke Temperaturschwankungen,
Feuchtigkeit und längere Lichtbestrahlung können den Komponenten Schaden zufügen und seine Optik
verändern. Stellen Sie sicher, dass keine Fremdkörper oder Flüssigkeiten in die Komponenten gelangen.
5. PLATZIERUNG
Die Komponenten sind ausschließlich für den Gebrauch innerhalb von Gebäuden ausgelegt.
Positionieren Sie die Komponenten nicht in der Nähe von Wärmequellen, Heizungen, Heizungsventilen, Öfen
oder anderen Geräten, die Hitze entwickeln. Die Komponenten dürfen nur im angegebenen Temperaturbereich
gelagert und betrieben werden. Die Komponenten erwärmen sich im Betrieb.
6. ANSCHLUSS
Die Komponenten dürfen nur an die angegebene Spannung angeschlossen werden!
Alle Kabel müssen so platziert werden, dass keine Gefahr der Beschädigung (z.B. durch Trittbelastung, Möbel
o.ä.) besteht. Beim Entfernen von Kabeln niemals am Kabel, sondern ausschließlich an dem Stecker anfassen
und ziehen.
Im Stand-By Modus sind die Komponenten nicht vollständig vom Stromnetz getrennt. Um z.B. bei längerer
Abwesenheit unnötige Risiken und Energieverbrauch zu vermeiden, sollten die Komponenten vom Netzstrom
getrennt werden.
7. WARTUNG
Überlassen Sie die Wartung im Falle ausschließlich qualifiziertem Fachpersonal. Wartung ist notwendig bei
jeglicher Art von Schäden, d. h. bei beschädigten Kabeln und Steckern sowie nach Verschütten von
Flüssigkeiten oder nach Herabfallen von Objekten auf die Komponenten, bei Herunterfallen von Komponenten,
beim Hineingelangen von Fremdkörpern in die Komponenten und wenn die Komponenten Regen oder
Feuchtigkeit ausgesetzt wurden oder die Funktion durch andere Einflüsse beeinträchtigt sein kann.
8. PFLEGE
Trennen Sie die Komponenten von der Stromversorgung bevor Sie sie reinigen. Reinigen Sie die Komponenten
nur mit einem weichen, trockenen und fusselfreien Tuch bzw. mit einem Pinsel. Verwenden Sie auf keinen Fall
Scheuermittel, Alkohol, Waschbenzin, Möbelpolitur oder Ähnliches.
02
Beschreibung: EXZELLENZ HDMI MATRIX 4x2 | 4K
Art-Nr.: 0062450424
EAN: 4001985511907
Made in Taiwan

MODE D’EMPLOI
BEDIENUNGSANLEITUNG
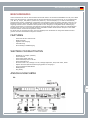
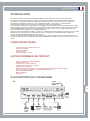
BESCHREIBUNG
Vielen Dank dass Sie sich für diese Produkt entschieden haben. Der Exzellenz HDMI Matrix 4x2 4k, kurz HDMI
Matrix oder Kreuzschiene, unterstützt das 4k Ultra HD Videoformat. An ihn können bis zu vier Quellengeräte
(z.B. Blu-ray -Player, PS4, DVB-C/T/S Receiver, NAS etc.) und zwei Displays (z. B. LED TV oder Beamer)
angeschlossen werden. Unabhängig voneinander kann die Matrix jedem der beiden Ausgänge jeden der vier
Eingänge zuordnen. Das heißt, dass parallel zwei verschiedene Quellen wiedergegeben und an je einem TV
angezeigt werden können. Zusätzlich steht parallel zu dem Ausgang A ein digitaler SP-Dif Audioausgang
(optisch und koaxial) zur Verfügung. Die Bedienung erfolgt direkt am Gerät oder mittels der übersichtlichen
Fernbedienung und wird durch die LED-Anzeigen unterstützt. Mobile Geräte können bequem in den HDMI
Anschluss auf der Vorderseite eingesteckt werden.
Für Profis: bei der Vermischung alter und neuer Displays kann bei Bedarf der integrierte EDID Generator
genutzt und über DIP Schalter konfiguriert werden.
FEATURES
- Unterstütz 4k Ultra HD Formate
- EDID Generator
- Digitaler Audioausgang
- Fernbedienung
- Ein frontseitiger HDMI Eingang
WEITERE PRODUKTDATEN
- Bandbreite 10,2 Gbps (340MHz)
- Unterstützt 3D
- Unterstützt 1080p (Full HD)
- Unterstützt Deep Color multi-bit
- Unterstützt HDCP 1.3
- HD Audio: DTS™ HD, Dolby® True HD, Dolby® Digital Plus, PCM, DVD Audio, SACD
- Optisch & koaxial S/P-DIF Audioausgang parallel zu Ausgang A
- Acht verschiedene EDID Modes
- Metallgehäuse
- Plug & Play
ANSCHLUSSSCHEMA
A.
03

BEDIENUNGSANLEITUNG
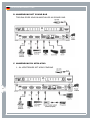
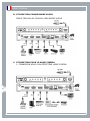
B. ANWENDUNG MIT SOUND BAR
TOSLINK ODER KOAXIALANSCHLUSS AN SOUND BAR
C. ANWENDUNG IM HEIM-KINO
1. AV-VERSTÄRKER MIT HDMI EINGANG
04

MODE D’EMPLOI
BEDIENUNGSANLEITUNG
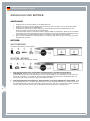
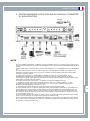
2. AV-VERSTÄRKER MIT TOSLINK ODER KOAX-EINGANG
HINWEISE
- Falls Sie einem oder beiden Bildschirmen 4K2K- und 3D-Quellen zuordnen möchten: Bitte vergewissern
Sie sich, dass alle Zielgeräte dieselben 4K2K- und 3D-HDMI-Formate unterstützen.
4K2K- und 3D-Bildsignale können nicht an TV-Geräte übertragen werden, die diese Formate nicht
unterstützen.
- Output-A unterstützt unmodifizierte digitale SPDIF-Audioausgabe (koaxial/optisch). Er lässt sich mit
einem AV-Receiver verbinden, der für einen digitalen Audioeingang (koaxial/optisch) ausgelegt ist.
- Der Ausgang (koaxial/optisch) des digitalen SPDIF-Audioformats basiert auf dem HDMI Output-A.
Wenn die an Output-A und Output-B angeschlossenen Endgeräte (HDTV oder Projektor) nur für
Stereo-Audio geeignet sind, kann der digitale Audioausgang auch nur ein PCM-Stereo-Audiosignal
ausgeben.
- Einstellen des Formats des Audioausgangs: (Informieren Sie sich bitte in der Anleitung des
Quellgeräts.)
1. Prüfen Sie das Audioformat des Films. (Stereo, DTS® 5.1, und Dolby® Digital 5.1 etc.)
2. Stellen Sie das Audio-Ausgangsformat des Quellgeräts ein. Z. B. PCM unkomprimiert oder Bit
Stream (Dolby® Digital 5.1, DTS® 5.1 etc.)
3. Wählen Sie im Hauptmenü das Audio-Ausgangsformat und die Sprache aus.
- Für Audiosignale in HD-Qualität (Dolby® TrueHD, DTS-HD Master AudioTM) und sonstige Audioformate
mit hohen Bandbreitenanforderungen nutzen Sie bitte den HDMI-Anschluss.
- Wenn das Audio-Ausgangsformat vom angeschlossenen Endgerät (HDTV, Home Theater Receiver,
Aktivbox) nicht unterstützt wird, hören Sie möglicherweise Störgeräusche oder keinen Ton aus den
Lautsprechern.
- Wenn Sie zur Ausgabe des Audiosignals einen AV-Receiver oder ein anderes Lautsprechersystem
benutzen möchten, empfehlen wir, den HDTV-Lautsprecher abzuschalten.
- Wir empfehlen, Endgeräte (HDTV, Projektor, AV-Receiver usw.) und Quellgeräte (Blue-ray Player, PS3
usw.) zu verwenden, die die höchstmögliche Auflösung und Farbtiefe sowie das fortschrittlichste
Audioformat unterstützen.
05

BEDIENUNGSANLEITUNG
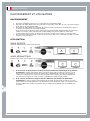
ANSCHLUSS UND BETRIEB
ANSCHLUSS
1. Schließen Sie das 5V-DC-Netzteil an der HDMI-Matrix an.
2. Verbinden Sie die von den HD-Quellen (PS3, DVD Player, Blue-ray Player usw.) kommenden HDMI-
Kabel mit den Eingängen der HDMI-Matrix.
3. Verbinden Sie das von Ihrem HD-Gerät (HDTV oder Projektor) kommende HDMI-Kabel mit dem
Ausgang (Output-A oder Output-B) der HDMI-Matrix.
※ Der Anschluss Output-A unterstützt weitere digitale SPDIF-Audioausgänge. Wenn Ihr AV-Verstärker
oder Audiosystem kein HDMI-Eingangssignal unterstützt, können Sie den digitalen Audioausgang über
ein koaxiales oder optisches Kabel mit Ihrem AV-Verstärker oder Audiosystem verbinden.
4. Wenn Sie die Verbindungen hergestellt haben, leuchten die LEDs Active-A (bzw. Active-B) rot und die
Eingangs-LED grün auf.
BETRIEB
MATRIXBETRIEB
Gesonderte Auswahl für jeden Ausgang
SPLITTER- BETRIEB
Eine HD-Quelle auf beide Ausgänge aufteilen
A. Falls die Quellgeräte keine automatische Erkennung/keine automatische Einstellung
unterstützen, stellen Sie zuerst die Audio- und Video-Signalausgänge des Quellgeräts ein und
vergewissern Sie sich, dass die Einstellungen auch durch die Displays / TVs unterstützt werden. Wenn der
Anwender die Quelle z. B. so einstellt, dass ein 1080p-Videosignal gesendet wird, das Endgerät aber nur
bis zu 720p oder 1080i unterstützt, zeigt das Endgerät kein Bild.)
B. Falls die Quellgeräte die Funktionen „Auto Detection“ und „Auto Adjustment“ unterstützen, stellt
das Quellgerät die Audio- und Video- Ausgangssignale auf den optimalen Standard ein. Dabei kommt einer
der folgenden 8 Modi zum Einsatz. Das Audio-/Videosignal kann auch durch den Benutzer selbst eingestellt
werden. Achten Sie bitte darauf, dass die Einstellung von den Endgeräten unterstützt wird.
06

MODE D’EMPLOI
BEDIENUNGSANLEITUNG
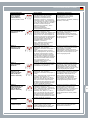
Erkennungsmodus
Modus-Aktion
Empfohlene Anwendung
Modus 1
Video und Audio
H.C.F. (Highest
Common Factor )
※ Voreingestellter Modus
Wählt die höchsten möglichen Audio-
und Videoformate, die von beiden
Endgeräten unterstützt werden.
(Unterstützen beispielsweise die
Endgeräte an Output A und Output B
verschiedene Audio- und Videoformate
(z. B. das beste für Output A verfügbare
Format ist 1080p/12 Bit auf 2 Kanälen,
das beste Format für Output B
1080i/8 Bit auf 2 Kanälen), wird in
Modus 1 automatisch
1080i/8 Bit/2 Kanäle als
Ausgangsstandard ausgewählt.)
Anwendung mit TV-Wand,
Sportgaststätte oder sonstige
Anwendung mit untereinander
verbundenen HDTVs mit
unterschiedlichen Standards (Auflösung,
Farbtiefe, Tonformat).
Modus 2
Video Maximum und
Audio H.C.F.
Video: Wählt das höchste durch die
Endgeräte an Output A und B
unterstützte Videoformat. (Beispiel: Das
beste Video-Format an Ausgang A ist
1080p/12 Bit, das andere Endgerät an
Ausgang B unterstützt in diesem Modus
maximal 1080p/8 Bit, das Quellgerät
wird automatisch 1080p/12 Bit als
Ausgabestandard erkennen und
auswählen.) [Hinweis 1]
Audio: Wählt das höchste mögliche
Audioformat, das von beiden
Endgeräten unterstützt wird.
Heimkino-Anwendung; Zwei-Zimmer-
Anwendung; wenn die Quelle mit der
bestmöglichen Auflösung
wiedergegeben werden soll und der
Audio-Standard an beiden Endgeräten
die Primäroption für das Audio-
Ausgangssignal ist.
Modus 3
Video H.C.F. und
Audio Maximum
Video: Wählt das höchste mögliche
Videoformat, das von beiden
Endgeräten unterstützt wird (Output A
und B).
Audio: Wählt das höchste mögliche
Audio-Ausgangsformat, das von einem
der beiden angeschlossenen Geräte
unterstützt wird. (Beispiel: Das beste
Audio-Format an Ausgang A ist Dolby
5.1, das andere Endgerät an Ausgang B
unterstützt in diesem Modus maximal
2 CH und wird Dolby 5.1 als
Ausgabestandard erkennen und
auswählen.) [Hinweis 2]
Heimkino-Anwendung; Zwei-Zimmer-
Anwendung; wenn die Quelle mit der
bestmöglichen Tonqualität
wiedergegeben werden soll und der
bestmögliche Video-Standard an beiden
Endgeräten die Primäroption für das
Video-Ausgangssignal ist.
Modus 4
Video und Audio
Maximum
Wählt das höchste durch die Endgeräte
an Output A und B unterstützte Video-
und Audioformat. [Hinweis 3]
Heimkino-Anwendung; Zwei-Zimmer-
Anwendung; wenn die Quelle mit der
bestmöglichen Bild- und Tonqualität
wiedergegeben werden soll, wird das
bestmögliche Format für die Video- und
Audio-Ausgangssignale gewählt.
Modus 5
Video H.C.F. &
Audio vorgegeben
(AAC, Dolby 5.1,
DTS 5.1 und 2 CH)
Video: Wählt das höchste mögliche
Videoformat, das von beiden
Endgeräten unterstützt wird (Output A
und B).
Audio: Wählt das Audio-Ausgangssignal
aus einem der folgenden vier
Standards: AAC, Dolby 5.1, DTS 5.1
oder 2 CH Falls das über das koaxiale
oder optische Kabel angeschlossene
Quellgerät auf AAC eingestellt ist, wird
der Audio-Ausgangsstandard ebenfalls
auf AAC eingestellt. [Hinweis 4]
Heimkino-Anwendung; traditionelle
Audioverstärker unterstützen teilweise
nur Audioeingänge über Toslink oder
Koaxialkabel – bitte nutzen Sie in
diesem Fall die entsprechenden
Anschlüsse für die Audioausgabe. In
diesem Modus kann die bessere
Tonqualität des Verstärkers als Audio-
Ausgangsstandard gewählt werden.
Modus 6
Video Maximum und
Audio vorgegeben
(AAC, Dolby 5.1,
DTS 5.1 und 2 CH)
Video: Wählt das höchste durch die
Endgeräte an Output A und B
unterstützte Videoformat. [Hinweis 3]
Audio: Wählt das Audio-Ausgangssignal
aus einem der folgenden vier
Standards: AAC, Dolby 5.1, DTS 5.1
oder 2 CH Falls das über das koaxiale
oder optische Kabel angeschlossene
Quellgerät auf AAC eingestellt ist, wird
der Audio-Ausgangsstandard ebenfalls
auf AAC eingestellt. [Hinweis 4]
Heimkino-Anwendung; traditionelle
Audioverstärker unterstützen nur
Audioeingänge über Toslink oder
Koaxialkabel anstelle von HDMI-Kabeln.
In diesem Modus kann die bessere
Tonqualität des Verstärkers als
Ausgangsstandard für Audio gewählt
werden.
Modus 7
Reserviert
Dieser Modus entspricht dem Modus 1
Dieser Modus entspricht dem Modus 1
Modus 8
Priorität Output A
Das beste Format des an Output A
angeschlossenen Geräts wird als
primärer Standard für die Audio- und
Video-Ausgangssignale ausgewählt.
[Hinweis 5]
Heimkino-Anwendung; oder: Benutzer
wählt ein primäres Endgerät durch
Anschluss an Anschluss 1.
07

BEDIENUNGSANLEITUNG
HDMI 4K2K- UND 3D-VIDEOFORMAT
Frame Packing
nebeneinander (Halb)
übereinander
4K2K
1920x1080p / 23,98/24 Hz
1920x1080i / 59.94/60 Hz
1920x1080p / 23,98/24 Hz
4096x2160 / 23.98/24 Hz
1280x720p / 59,94/60 Hz
1920x1080i / 50 Hz
1280x720p / 59,94/60 Hz
3840x2160 / 23.98/24 Hz
1280x720p / 50Hz
1280x720p / 50Hz
HINWEISE
1. Falls eins der Endgeräte das beste Videoformat des anderen nicht unterstützt, zeigt das Gerät mit dem
niedrigeren Videoformat kein Bild an.
2. Falls eins der Endgeräte das beste Audioformat des anderen nicht unterstützt, gibt das Gerät mit dem
niedrigeren Audioformat keinen Ton oder Störgeräusche aus.
3. Falls beide Endgeräte das jeweils beste Format des anderen nicht unterstützen, gibt das Gerät mit dem
niedrigeren Format weder Ton noch Bild aus.
4. Vergewissern Sie sich bitte, dass das ausgewählte Audio-Format durch den Verstärker unterstützt wird.
5. Falls das andere Endgerät an Ausgang B den Ausgangsstandard von Ausgang B nicht unterstützt, gibt
das Endgerät an Ausgang B weder Bild noch Ton wieder.
BEDIENUNG MIT DER FERNBEDIENUNG
- Für die Ausgänge A und B ist je ein Satz Ein/Aus- und Auswahltasten vorhanden. Die
Ausgänge A und B lassen sich somit einzeln steuern.
- Ausgang A:
Schalten Sie die Signalübertragung über Output A mithilfe der „Power“-Taste
für Output A auf der Fernbedienung ein. Die Kontroll-Led („Active-A“) an der
Frontabdeckung leuchtet auf. Drücken Sie die Ein/Aus-Taste für den Ausgang A
erneut, um den Ausgang in den Standby-Modus zu schalten.
Mittels der Nummerntasten schalten Sie zwischen den Quellen um.
- Ausgang B:
Schalten Sie die Signalübertragung über Output B mithilfe der „Power“-Taste
für Output A auf der Fernbedienung ein. Die Kontroll-Led („Active-A“) an der
Frontabdeckung leuchtet auf. Drücken Sie die Ein/Aus-Taste für den Ausgang B
erneut, um den Ausgang in den Standby-Modus zu schalten.
Mittels der Nummerntasten schalten Sie zwischen den Quellen um.
- Rücksetzen:
Mittels der Taste „Reset“ auf der Fernbedienung versetzen Sie die HDMI-
Schaltmatrix wieder in ihren ursprünglichen Status
BEDIENUNG AM GERÄT
- Beiden Ausgängen (A und B) können individuell Quellgeräte zugewiesen und auch einzeln ein- und
ausgeschaltet werden.
- Ausgang A:
Die Taste „Select/Power“ verfügt über mehrere Funktionen.
Ein-/Ausschalten: Halten Sie die Taste „Select/Power“ 2 Sekunden lang gedrückt, um das
Gerät in den Bereitschaftsmodus zu schalten (Standby); drücken Sie die Taste „Select/Power“
einmalig, um den Umschalter zu aktivieren.
Wahl der Quelle: Wenn Sie den Eingangskanal wechseln möchten, drücken Sie die Taste
einmal. Eine aufleuchtende LED zeigt den aktiven Kanal an.
- Ausgang B:
Die Taste „Select/Power“ verfügt über mehrere Funktionen.
Ein-/Ausschalten: Halten Sie die Taste 2 Sekunden lang gedrückt, um das Gerät in den
Bereitschaftsmodus zu schalten (Standby); drücken Sie die Taste „Select/Power“ einmalig,
um den Umschalter zu aktivieren.
Wahl der Quelle: Wenn Sie den Eingangskanal wechseln möchten, drücken Sie die Taste
einmal. Eine aufleuchtende LED zeigt den aktiven Kanal an.
08

MODE D’EMPLOI
BEDIENUNGSANLEITUNG
Diese Funktion arbeitet zyklisch.
Wenn Sie einen Kanal ausgewählt haben, wird dies durch das Leuchten der entsprechenden LED angezeigt.
Wenn Sie Kanal 1 ausgewählt haben, leuchtet die CH1-LED.
- Rücksetzen:
Mittels der Reset-Taste an der Rückseite des Gerätes versetzen Sie die HDMI-Schaltmatrix
wieder in ihren ursprünglichen Status.
FEHLERSUCHE
1. Wenn kein Bild angezeigt wird, führen Sie bitte folgende Schritte durch:
Stellen Sie sicher, dass die direkte Verbindung von dem Quellgerät zum Anzeigegerät ohne HDMI-
Umschalter funktioniert.
Überprüfen Sie alle Anschlüsse und Stecker.
Vergewissern Sie sich, dass das Anschlusskabel unbeschädigt ist.
Vergewissern Sie sich, dass die HDMI-Schaltmatrix eingeschaltet ist (oder setzen Sie das Gerät
zurück).
2. Wenn nur ein Bild, aber kein Ton ausgegeben wird:
Prüfen Sie die Kabelverbindung auf korrekten Sitz.
Es ist möglich, dass HDCP beim ersten Anschließen nicht richtig funktioniert. Setzen Sie bitte Ihre
HDMI-Schaltmatrix zurück.
Haben Sie einen Ausgang an Ihren Videorecorder angeschlossen? HDCP sperrt das Audiosignal.
3. Wenn die Schaltmatrix über ein koaxiales oder optisches Audiokabel mit einem AV-Verstärker verbunden
wird, aber der Ton nicht funktioniert:
Überprüfen Sie den Anschluss.
Das koaxiale/optische Audiokabel muss an den entsprechenden Anschluss Ihres AV-Verstärkers
angeschlossen werden.
Am AV-Verstärker muss der korrekte koaxiale/optische Eingang ausgewählt werden.
Vergewissern Sie sich, dass der AV-Receiver das Audioformat unterstützt. Falls es sich bei dem
Audioformat um Dolby® oder DTS® handelt, muss auch Ihr Home Theater Dolby® bzw. DTS®
dekodieren können.
4. Wenn die Schaltmatrix über ein koaxiales/optisches Audiokabel mit einem AV-Verstärker verbunden wird und
der Audioausgang nur ein Stereo-Audiosignal an den AV-Receiver liefert.
Da das mit dem Ausgang A verbundene HD-Fernsehgerät (bzw. der Projektor) nur ein Stereo-
Audiosignal unterstützt, gibt der koaxiale/optische Audioausgang das dem Ausgang A entsprechende
Audiosignal aus.
Informationen zur Einstellung des Ausgabeformats finden Sie auf Seite 3.
5. Wenn die Auflösung nicht im 1080p-Format angezeigt wird:
Vergewissern Sie sich, dass Ihre Quell- und Anzeigegeräte voll 1080p-fähig sind.
Vergewissern Sie sich, dass Ihre HDMI-Kabel ein 1080p-Videosignal übertragen können.
6. Wenn Ihr Gerät kein 4K2K- und 3D-Bild anzeigt:
Vergewissern Sie sich, dass Ihre Quell- und Anzeigegeräte die 4K2K- und 3D-Funktion sowie dasselbe
4K2K- und 3D-Format unterstützen.
Vergewissern Sie sich, dass der Abspielmodus (Videoausgang) des Blu-ray Players auf 4K2K- und 3D
oder AUTO eingestellt ist.
Vergewissern Sie sich, dass der Video-Inhalt das 4K2K- und 3D-Format besitzt.
7. Falls das Bild nicht im korrekten 4K2K- und 3D-Format angezeigt wird, prüfen Sie das Quellformat ihrer
Quellgeräte (Blue-ray Player, PS3 etc.) und Anzeigen (TV oder Projektor) auf die korrekten Einstellungen.
8. Wenn das Bild spiegelbildlich angezeigt wird (mit senkrechter oder waagerechter Symmetrieachse),
vergewissern Sie sich, dass das Fernsehgerät bzw. der Projektor das 4K2K- und 3D-Format unterstützt und die
entsprechende Funktion aktiviert ist. Wenn das Fernsehgerät bzw. der Projektor das 4K2K- und 3D-Videoformat
nicht unterstützt, schalten Sie den 4K2K- und 3D-Abspielmodus der Quellgeräte bitte aus.
09

BEDIENUNGSANLEITUNG
HINWEISE
Der Hersteller behält sich vor, ohne vorherige schriftliche Ankündigung Änderungen an Gerät,
Verpackung und jeglicher mitgelieferter Dokumentation vorzunehmen.
HDMI, das HDMI-Logo und High-Definition Multimedia Interface sind Marken oder eingetragene Marken
der HDMI Licensing LLC in den Vereinigten Staaten und in anderen Ländern.
Die Exzellenz HDMI Matrix enthält die HDMI
TM
-Technologie.
Marken und Markennamen sind Eigentum der jeweiligen Inhaber.
PS3 ist eine Marke von Sony Computer Entertainment Inc.
Dolby ist eine eingetragene Marke von Dolby Laboratories.
DTS ist eine eingetragene Marke und die DTS-Logos und das Symbol sind Marken von DTS, Inc.
LIEFERUMFANG
HDMI Matrix
Steckernetzteil
Fernbedienung
Bedienungsanleitung
ENTSORGUNG
Veraltete oder defekte Geräte die mit der durchgestrichenen Mülltonne gekennzeichnet sind dürfen nicht über
den gewöhnlichen Hausmüll entsorgt werden sondern müssen gemäß der geltenden Landesgesetzgebung bei
den zuständigen Sammelstellen abgegeben werden. Durch die ordnungsgemäße Entsorgung werden
Ressourcen und Umwelt geschont.
Batterien gehören ebenfalls NICHT in den Hausmüll. Sie sind gesetzlich verpflichtet, gebrauchte Batterien zur
fachgerechten Entsorgung zurückzugeben. Batterien können kostenlos überall wo gleichartige Batterien
verkauft werden oder bei den öffentlichen Sammelstellen abgegeben werden.
Vereinfachte EU-Konformitätserklärung
Hiermit erklärt die in-akustik GmbH & Co. KG, dass dieses Gerät der Niederspannungs-Richtlinie 2014/35/EU,
der EMV Richtline 2004/108/EG und der RoHS Richtlinie 2011/65/EU entspricht. Der vollständige Text der EU-
Konformitätserklärung ist unter der folgenden Internetadresse verfügbar: www.in-akustik.com
Sonstige Hinweise
Angaben ohne Gewähr. Irrtümer und Änderungen vorbehalten. Produktabbildungen ähnlich.
10

MODE D’EMPLOI
OPERATING MANUAL
SAFETY INSTRUCTIONS
1. GENERAL
Read, observe and adhere to the following safety instructions. Please keep the operating manual. Observe all
the warning notices on the components and in the operating manual.
2. PROPER USE
The components are solely designed for operation indoors. Connect them as specified in the operating
instructions. Only use accessories which have been recommended by the manufacturer.
3. HUMIDITY
Select an installation location for the components which does not have a high level of relative humidity and is
free of moisture. Never use the components near water. Moisture can bypass the electrical insulation and pose
a lethal danger, as it can for all products not specially designed to be water-resistant. The components may not
be exposed to dripping or sprayed water.
4. PRODUCT PROTECTION
Do not under any circumstances expose the components to high levels of humidity. Extreme temperature
fluctuations, humidity and extended exposure to light can damage the components and alter their appearance.
Make sure that no foreign objects or liquids enter the components.
5. POSITIONING
Do not position the components near sources of heat, heaters, heating valves, ovens or other heat-producing
devices. The components may only be stored and operated in the temperature range stated. The components
heat up during operation.
6. CONNECTION
The components must only be connected to the specified rated voltage!
All cables must be positioned in such a way that there is no danger of them being damaged (e.g. being stepped
on, placed under furniture etc.). Never remove cables by pulling the cable; instead, always hold the plug when
disconnecting.
In stand-by mode, the components are not completely disconnected from the mains supply. To avoid any
unnecessary hazards or energy consumption during longer absences, the components should be disconnected
from the mains supply.
7. MAINTENANCE
Maintenance on the product may only be performed by persons qualified to do so. Maintenance is necessary in
all cases of damage, i.e. in the case of damaged cables and plugs, as well as after liquid spills or objects falling
on the components, components falling down, foreign bodies entering the components, exposure of
components to rain or humidity, or other influences impairing the functioning of the components.
8. LOOKING AFTER THE PRODUCT
Disconnect the components from the power supply before cleaning them Always clean the components with a
soft, dry and lint-free cloth, or with a brush. Do not under any circumstances use scouring powder, alcohol,
benzine, furniture polish or similar substances.
11
Designation: EXZELLENZ HDMI MATRIX 4x2 | 4K
Item-No: 0062450424
EAN: 4001985511907
Made in Taiwan

OPERATING MANUAL
INTRODUCTION
Thanks for your purchase of the HDMI
TM
Matrix Switcher. Your satisfaction is very important to us.
The HDMI
TM
matrix switcher is designed to make the use of your home entertainment equipments more
comfortable.The Exzellenz HDMI Matrix Switcher is an ideal product for Home Theater application, Family Room
or Entertainment (Game) Room application, HTiB (or Sound bar) application, Sports Bar application, or
share HD sources to 2 different rooms. The feature designed SPDIF digital audio output (Coaxial & Optical)
makes users easily share the digital audio of the 4 source devices by connecting one coaxial or optical audio
cable to an audio system which does not support HDMI connection. Moreover, the new added feature of
supporting 4K2K & 3D video format also helps you enjoy the true 4K2K & 3D content more easily.
With the splitter and matrix function, users can share the same source device to 2 HDTVs (or projectors); also
each HDTV (or projector) can be set to use one of the input source devices independently. The Exzellenz HDMI
Matrix is designed with 8 detection modes selection function. By setting to different detectionmodes, users can
define the output video and audio format.
FEATURES
- Supports 4k Ultra HD formats
- EDID generator
- Digitaler audio output
- Remote control
- Ein frontseitiger HDMI Eingang
FURTHER PRODUCT DATA
- Bandwidth 10,2 Gbps (340MHz)
- Supports 3D
- Supports 1080p (Full HD)
- Supports Deep Color multi-bit
- Supports HDCP 1.3
- HD Audio: DTS™ HD, Dolby® True HD, Dolby® Digital Plus, PCM, DVD Audio, SACD
- Optisch & koaxial S/P-DIF audio output parallel to Ausgang A
- Eight differenz EDID Modes
- Metal case
- Plug & Play
CONNECTION ILLUSTRATION
A.
12

MODE D’EMPLOI
OPERATING MANUAL
B. SOUND BAR APPLICATION
TOSLINK OR COAXIAL TO SOUND BAR
C. HOME THEATER APPLICATION
1. HDMI CONNECTION TO A HOME THEATER RECEIVER
13

OPERATING MANUAL
2. TOSLINK OR COAXIAL DIGITAL AUDIO TO AMPLIFIER
3.
NOTE
- If you want to select or distribute 4K2K & 3D source to either one or two of the displays, please
make sure all of the sink devices support the same HDMI 4K2K & 3D video format as the source.
The 4K2K & 3D image cannot be delivered to TVs which do not support 4K2K & 3D video format.
- Output-A supports an unmodified SPDIF (coaxial/optical) digital audio output. Users can use it to
connect to a Home Theater system which supports a coaxial/optical digital audio input.
- The output of the SPDIF (coaxial/optical) digital audio format is based on the HDMI Output-A. If
the sink devices (HDTV or Projector), which connected to Output A and Output B, can only
support stereo audio, the coaxial/optical digital audio may also send out PCM stereo audio.
- For audio output format adjustment: (Please refer to the source device manual.)
1. Check the supported audio format of the feature film. (Stereo, DTS® 5.1, and Dolby® Digital
5.1...etc)
2. Set the audio output format of source device. Ex. uncompressed PCM or Bit Stream (Dolby®
Digital 5.1, DTS® 5.1 ...etc.)
3. Select the output of audio format and language from the main feature menu.
- For HD quality audio (Dolby® TrueHD, DTS-HD Master AudioTM), or other audio formats that
need high bandwidth for audio transmission, please use HDMI connection for the HD audio
transmission.
- If the output audio format is not supported by the sink device (HDTV, Home Theater receiver,
Sound Bar Speaker), you may hear noise form the speakers or you will not hear any sound from
the speakers.
- If you want to use a Home Theater System or other speaker system for audio output, it is
recommended to mute the audio speaker of the HDTV.
- It is recommended all the connected sink devices (HDTV, Projector, Home Theater Receiver…etc.) and
source devices (Blue-ray Player, PS3…etc.) support the same highest resolution, color deep and audio
format.
14

MODE D’EMPLOI
OPERATING MANUAL
CONNECTION & OPERATION
CONNECTION
1. Connect the DC 5V power adaptor to the HDMI Matrix Switcher
2. Connect the HDMI cables from the HD sources (PS3, DVD player, Blue-ray Player…etc) to the input
ports of the HDMI Matrix Switcher
3. Connect the HDMI cables from your HD display (HDTV or projector) to the output port (Port A or
Port B) of the HDMI Matrix Switcher.
※ Output Port A supports additional SPDIF digital audio output. If your Home Theater (or Sound
System) doesn’t support HDMI input, you can use a coaxial/optical audio cable to connect the digital
audio to your Home Theater (or Sound System).
4. After you finish the connection, the Active-A (or Active-B) indication LED (red), and input indication
LED (green) will be lighted on
OPERATION
MATRIX MODE
Individual Selection for each output port
SPLITTER MODE
Sharing same HD source to both outputs
A. If source devices do not support the function of Auto Detection & Auto Adjustment, please
set the output audio and video signal of the source device first, and make sure the setting can be
supported by the sink devices. For example, if user set the source to send out a 1080p video signal,
but the sink device can only support up to 720p or 1080i, you will not have picture the sink device.
B. If source devices support the function of Auto Detection & Auto Adjustment, the source device
will auto adjust the output audio and video signal to the optimal standard based on the following 8
different modes. Users can also set the audio/video output signal by themselves. Please make sure
the setting can be supported by the sink devices.
15

OPERATING MANUAL
Detection Mode
Mode Action
Recommended Application
Mode 1
Video & Audio
H.C.F. (Highest
Common Factor )
※ Preset Mode
Select the output audio and video signal
to the highest format which can be
supported by both of the sink devices.
(For example, when the sink devices of
Output A and Output B support different
video and audio formats, the highest
format of Output A is 1080p/12-bit & 2
channels, the other sink device of
Output B supports the highest format to
1080i/8-bit & 2 channels, under Mode
1, it will automatically detect and
choose 1080i/8-bit & 2 channels as the
output standard.)
TV wall application, sports bar
application, or other application
that different standard
(Resolution, Color Deep) HDTVs
are connected together.
Mode 2
Video Maximum &
Audio H.C.F.
Video: Select the output video signal to
the highest video format which
supported by Output
A or Output B sink devices. (For
example, the highest video format of
Output A is 1080p/12-bit, the other sink
device of Output B supports the highest
format to 1080i/8-bit, under this Mode,
the source
device will automatically detect and
choose
1080p/12-bit as the output standard.)
[Notice 1]
Audio: Select the output audio signal to
the highest audio format that supported
by both of the sink devices.
Home Theater application; Two
rooms application; When the
source needs to be shown with
the best resolution, and the audio
standard that supported by both
of two sink devices will be the
primary option for audio output
signal.
Mode 3
Video H.C.F. &
Audio Maximum
Video: Select the output video signal to
the highest format that supported by
both of the sink devices (Output A &
Output B).
Audio: Select the output audio signal to
the highest audio format which
supported by one of the connected
devices. (For example, the highest
audio format of Output A is Dolby 5.1,
the other sink device of Output B
supports the highest format to 2 CH,
under this Mode, and it will detect and
choose Dolby 5.1 as the output
standard.) [Notice 2]
Home Theater application; Two
rooms application; When the
source needs to be presented
with the best sound quality, and
the highest video format that
supported by both of two sink
devices will be the primary option
for video output signal.
Mode 4
Video & Audio
Maximum
Select the output video and audio signal
to the highest format that supported by
Output A or Output B sink devices.
[Notice 3]
Home Theater application; Two
rooms application; When the
source needs to be displayed
with the best resolution and
sound, the highest format will be
chosen for the video & audio
output signal.
Mode 5
Video H.C.F. &
Audio Specified
(AAC, Dolby 5.1,
DTS 5.1, and 2 CH)
Video: Select the output video signal to
the highest format that supported by
both of the sink devices (Output A &
Output B).
Audio: Set the output audio signal as
one of the following 4 standards: AAC,
Dolby 5.1, DTS 5.1 or 2 CH. If the audio
format of coaxial/optical cable
connected source device is AAC, the
output audio standard will be AAC as
well. [Notice 4]
Home Theater application;
Traditional audio amplifier may
only support Toslink or coaxial
for audio input connection,
please use the Toslink or Coaxial
connector for audio output
connection. Under this mode, the
better sound quality of amplifier
can be designated as the output
audio standard.
Mode 6
Video Maximum &
Audio Specified
(AAC, Dolby 5.1,
DTS 5.1, and 2 CH)
Video: Select the output video signal to
the highest video format which
supported by Output A or Output B sink
devices. [Notice 3]
Audio: Set the output audio signal as
one of the following 4 standards: AAC,
Dolby 5.1, DTS 5.1 or 2 CH. If the audio
format of coaxial/optical cable
connected source device is AAC, the
output audio standard will be AAC as
well. [Notice 4]
Home Theater application;
Traditional audio amplifier always
used Toslink or coaxial cable
instead of HDMI cable for
connection, under this mode, the
better sound quality of amplifier
can be designated as the output
audio standard.
Mode 7
Reserved
The mode will remain the same
functions as Mode 1.
The applications of this mode are
same as Mode 1.
Mode 8
Priority of Output A
The highest format of Output A
connected device will be chosen for the
primary output video and audio signal
standard. [Notice 5]
Home Theater application, or
user assigns a primary sink
device by connect it to port 1.
16

MODE D’EMPLOI
OPERATING MANUAL
HDMI 4K2K & 3D VIDEO FORMAT
Frame packing
Side-by-Side (Half)
Top-and-Bottom
4K2K
1920x1080p@23.98/24Hz
1920x1080i@59.94/60Hz
1920x1080p@23.98/24Hz
4096x2160@23.98/24Hz
1280x720p@59.94/60Hz
1920x1080i@50Hz
1280x720p@59.94/60Hz
3840x2160@23.98/24Hz
1280x720p@50Hz
1280x720p@50Hz
NOTICE
1. If one of the sink devices does not support the highest video format of the other one, the device with
lower video format will show no image.
2. If one of the sink devices does not support the highest audio format of the other one, the device with
lower audio format will become soundless.
3. If one of the sink devices does not support the highest format of the other one, the device with lower
format will either have no picture or no sound presented.
4. Please make sure the setting of the source device can be supported by the amplifier.
5. If the other sink device of Output B does not support the output standard of Output A, the sink device
of Output B will be displayed either without picture or without sound.
IR REMOTE OPERATION
- Two sets of power and selection keys are available for Output A and
Output B. The power and selection of Output A and Output B can be
controlled individually.
- Output A:
Use the power key of Output A on the IR remote controller to turn
on the signal transmission of Output A. The power indication LED
(Active-A) of Output A on the front panel will be lighted on. Press
the power key of Output A one more time to turn the Output A to
standby.
Use number keys to switch between sources.
- Output B:
Use the power key of Output B on the IR remote controller to turn
on the signal transmission of Output B. The power indication LED
(Active-B) of Output B on the front panel will be lighted on. Press
the power key of Output B one more time to turn the Output B to
standby.
Use number keys to switch between sources.
- Reset:
Use the Reset key on the IR remote controller to reset the HDMI Matrix
Switcher to the initial status.
MANUAL OPERATION
- Output A and Output B have individual source selection and power control key.
- Output A:
The “Select/Power” key is a multi-function key.
Power Control: Press the “Select/Power” key for 2 seconds to turn off the power (Standby);
press the “Select/Power” key once to turn on the switcher.
Source Selection: If you want to change the input channel manually, you can press the
“Select/Power” key once. A LED will be lighted up for the channel indication.
- Output B:
The “Select/Power” key is a multi-function key.
Power Control: Press the button for 2 seconds to turn off the power (Standby); press the
“Select/Power” key once to turn on the switcher.
Source Selection: If you want to change the input channel manually, you can press the
“Select/Power” key once. A LED will be lighted up for the channel indication.
17

OPERATING MANUAL
The procedure is a cyclic function
When you selected the channel, there will be a LED on to present the channel. If you select channel
1, the CH1 LED will light on.
- Reset:
Use the Reset key on the back of the Matrix Switcher to reset the HDMI Matrix Switcher to the
initial status.
TROUBLE SHOOTING
1. When there is no picture presented, please:
Make sure the direct connection from the source device to the display device without the HDMI
Switcher is working.
Check all connectors connect well or not.
Check the connecting cable is damaged or not.
Check the power of HDMI matrix switcher (or reset the matrix switcher)
2. When there is only picture displayed and without sound:
Check the cable connection to see if it fits properly.
Check your cable to see if it supports video transmission only (DVI) or it is damaged.
HDCP may not match very well at first connection; please reset your HDMI matrix switcher.
Do you connect any output to your video recorder? HDCP will lock up audio part.
3. When use a coaxial/optical audio cable to connect the matrix switcher to a Home Theater System, no
sound is delivered by the Home Theater System.
Please check the connection.
The coaxial/optical audio cable needs to be connected to the coaxial/optical audio input port of the
Home Theater System.
The audio input selection of the Home Theater System needs to be selected to a corresponding
coaxial/optical audio input.
Please make sure the output audio format can be supported by the Home Theater System. If the
audio format is in Dolby® or DTS® format, the Home Theater needs to support Dolby® or DTS®
decoding.
4. When use a coaxial/optical audio cable to connect the matrix switcher to a Home Theater System, the
coaxial/optical audio output only delivers stereo audio signal to the Home Theater System.
Because the HDTV (or Projector) which connected to the Output-A can only support stereo audio
signal, the coaxial/optical audio output will send out the audio signal based on the Output A.
Please refer to the page 3 for audio output format adjustment.
5. When resolution could not show in 1080p.
Make sure your sources and displays are fully supporting 1080p.
Make sure your HDMI cables are capable of transmitting 1080P video signal.
6. When 4K2K & 3D content could not be shown on your display.
Please make sure your sources and displays are 4K2K & 3D supported devices and also support
the same 4K2K & 3D format.
Please check the play mode of Blue-ray player has been set 4K2K & 3D mode or AUTO mode for
video output.
Please make sure the video content is 4K2K & 3D content.
7. If the presented picture is not a proper 4K2K & 3D image, please check whether the 4K2K & 3D
format of your sources (Blue-ray player, PS3, etc.) and displays (TV or projector) are correct setting.
8. If the presented picture is symmetric, which showed with up and down or right and left symmetric
image, please check whether the TV or projector supports 4K2K & 3D display function and make sure
the function is enabled. If the TV or projector does not support 4K2K & 3D video format, please turn
off the 4K2K & 3D play mode of sources.
18

MODE D’EMPLOI
OPERATING MANUAL
NOTICE
Manufacturer reserves the right to make changes in the hardware, packaging and any accompanying
documentation without prior written notice.
HDMI, the HDMI Logo and High-Definition Multimedia Interface are trademarks or registered
trademarks of HDMI Licensing LLC in the United States and other countries.
Exzellenz HDMI Matrix incorporates HDMI
TM
technology.
Trademarks and brand names are the properties of their respective owners.
PS3 is a trademark of Sony Computer Entertainment Inc.
Dolby is a registered trademark of Dolby Laboratories.
DTS is a registered trademark & the DTS logos and Symbol are trademarks of DTS, Inc.
SCOPE OF DELIVERY
HDMI Matrix
Power adaptor
Remote Control
Operating Manual
DISPOSAL
Old or defective devices that are labelled with a crossed-out rubbish bin may not be disposed of with
conventional household waste. They must be handed in at local recycling centres in accordance with the
applicable national legislation. Proper disposal helps to conserve resources and protect the environment.
Batteries should NOT go into the garbage. You are bound to properly dispose of spent batteries by law. You can
bring your batteries to any battery-selling shop or public collecting points
Simplified EU declaration of conformity
Hereby, in-akustik GmbH & Co. KG declares that this device is in compliance with directive low voltage
2014/35/EU; EMV 2004/108/EG and RoHS 2011/65/EU. The full text of the EU declaration of conformity is
available at the following internet address: www.in-akustik.com
MISC
Indication without guarantee. All product images similar. We reserve the right to make changes.
19

MODE D‘EMPLOI
CONSIGNES DE SÉCURITÉ
1. GÉNÉRALITÉS
Veuillez lire, suivre et respecter les consignes de sécurité suivantes. Veuillez conserver ce mode d'emploi.
Veuillez tenir compte de tous les avertissements indiqués sur les éléments et dans le mode d'emploi.
2. UTILISATION CONFORME
Les éléments sont exclusivement conçus pour une exploitation à l'intérieur de bâtiments. Raccordez-les tel que
décrit dans le mode d'emploi. N'utilisez que des accessoires recommandés par le fabricant.
3. HUMIDITÉ
Choisissez comme emplacement pour les éléments des lieux exempts d'humidité relative élevée ou exempts de
toute humidité. N'utilisez jamais les éléments à proximité d'eau. L'humidité peut, comme sur tous les produits
qui ne sont pas spécialement construits à cet effet, s'infiltrer dans les appareils en dépit de l'isolation électrique
et représenter un danger de mort. N'exposez les éléments ni à des gouttes d'eau ni à des éclaboussures.
4. PROTECTION DU PRODUIT
N'exposez jamais les éléments à une forte humidité. De fortes variations de température, l'humidité ainsi
qu'une exposition prolongée aux rayons du soleil peuvent endommager les éléments et en modifier l'aspect
extérieur. Veillez à ce qu'aucun corps étranger ou liquide ne pénètre dans les éléments.
5. EMPLACEMENT
Ne placez pas les éléments à proximité de sources de chaleur, de chauffages, de robinets de chauffage, de
chaudières ou d'autres appareils dégageant de la chaleur. Les éléments ne doivent être stockés et utilisés que
dans la plage de température indiquée. Les éléments chauffent lors de leur fonctionnement.
6. RACCORDEMENT
Ne raccordez les éléments qu'à la tension indiquée !
Les câbles doivent tous être placés de telle sorte qu'ils ne risquent pas d'être détériorés (p. ex. par une
circulation régulière, par des meubles, etc.). Lorsque vous débranchez un câble, ne tirez jamais sur celui-ci
mais uniquement sur la fiche elle-même.
En mode de veille, les éléments ne sont pas complètement coupés du secteur. Pour éviter des risques et une
consommation d'énergie inutiles, par exemple lors d'une absence prolongée, coupez les éléments du secteur.
7. MAINTENANCE
Ne confiez la maintenance nécessaire qu'à des professionnels qualifiés. Des travaux de maintenance sont
nécessaires après tout type de dommages, p. ex. si les câbles ou les fiches sont endommagés ainsi qu'après
l'écoulement de liquides ou la chute d'objets sur les éléments, si les éléments sont tombés ou s'ils ont été
soumis à la pluie ou à l'humidité, ou encore s'ils ne fonctionnent plus correctement pour d'autres raisons.
8. ENTRETIEN
Coupez les éléments du secteur avant de les nettoyer. Pour nettoyer les éléments, utilisez uniquement un
chiffon doux, sec et non pelucheux ou un pinceau. N'utilisez en aucun cas des produits abrasifs, de l'alcool, de
l'essence de nettoyage, des produits d'entretien pour meubles ou des produits similaires.
20
Seite wird geladen ...
Seite wird geladen ...
Seite wird geladen ...
Seite wird geladen ...
Seite wird geladen ...
Seite wird geladen ...
Seite wird geladen ...
Seite wird geladen ...
Seite wird geladen ...
Seite wird geladen ...
Seite wird geladen ...
Seite wird geladen ...
-
 1
1
-
 2
2
-
 3
3
-
 4
4
-
 5
5
-
 6
6
-
 7
7
-
 8
8
-
 9
9
-
 10
10
-
 11
11
-
 12
12
-
 13
13
-
 14
14
-
 15
15
-
 16
16
-
 17
17
-
 18
18
-
 19
19
-
 20
20
-
 21
21
-
 22
22
-
 23
23
-
 24
24
-
 25
25
-
 26
26
-
 27
27
-
 28
28
-
 29
29
-
 30
30
-
 31
31
-
 32
32


Inakustik Exzellenz Matrix 4k Bedienungsanleitung
- Typ
- Bedienungsanleitung
- Dieses Handbuch eignet sich auch für
in anderen Sprachen
Verwandte Artikel
-
 Inakustik Premium HDMI Switch 3->1 Bedienungsanleitung
-
 Inakustik Exzellenz HDMI Switch 4->2 Bedienungsanleitung
-
 Inakustik Premium Switch 3 -> 1 Bedienungsanleitung
-
 Inakustik Exzellenz HDMI Matrix SP-DIF Bedienungsanleitung
-
 Inakustik Exzellenz HDMI Switch 4->1 Benutzerhandbuch
-
 Inakustik Star Switch Bedienungsanleitung
-
 Inakustik Exzellenz HDMI Splitter 1->8 Bedienungsanleitung
-
 Inakustik Star HDMI Switch 4k Bedienungsanleitung
-
 Inakustik Premium HDMI Splitter 4K Bedienungsanleitung
-
 Inakustik Premium HDMI Splitter Bedienungsanleitung


Andere Dokumente
-
Roline Bi-Directional HDMI Switch 4K60, 2-way Benutzerhandbuch
-
DeLOCK 62492 Datenblatt
-
Wentronic Ultra HDMI Matrix 2x4 Benutzerhandbuch
-
Hama 00042540 Bedienungsanleitung
-
ClickTronic 60804 Benutzerhandbuch
-
König KN-HDMIMAT20 Spezifikation
-
-
-
-