Electrolux PVF750UOB Benutzerhandbuch
- Kategorie
- Kochfelder
- Typ
- Benutzerhandbuch
Dieses Handbuch ist auch geeignet für


CONTENTS
1. SAFETY INFORMATION....................................................................................2
2. SAFETY INSTRUCTIONS..................................................................................5
3. INSTALLATION.................................................................................................. 7
4. PRODUCT DESCRIPTION.............................................................................. 11
5. DAILY USE....................................................................................................... 11
6. HINTS AND TIPS............................................................................................. 12
7. CARE AND CLEANING....................................................................................13
8. TROUBLESHOOTING......................................................................................14
9. TECHNICAL DATA...........................................................................................16
10. ENERGY EFFICIENCY.................................................................................. 16
WE’RE THINKING OF YOU
Thank you for purchasing an Electrolux appliance. You’ve chosen a product that
brings with it decades of professional experience and innovation. Ingenious and
stylish, it has been designed with you in mind. So whenever you use it, you can
be safe in the knowledge that you’ll get great results every time.
Welcome to Electrolux.
Visit our website to:
Get usage advice, brochures, trouble shooter, service and repair information:
www.electrolux.com/support
Register your product for better service:
www.registerelectrolux.com
Buy Accessories, Consumables and Original spare parts for your appliance:
www.electrolux.com/shop
CUSTOMER CARE AND SERVICE
Always use original spare parts.
When contacting our Authorised Service Centre, ensure that you have the
following data available: Model, PNC, Serial Number.
The information can be found on the rating plate.
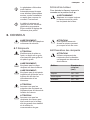
Warning / Caution-Safety information
General information and tips
Environmental information
Subject to change without notice.
1.
SAFETY INFORMATION
Before the installation and use of the appliance, carefully
read the supplied instructions. The manufacturer is not
responsible for any injuries or damages that are the
result of incorrect installation or usage. Always keep the
www.electrolux.com2

instructions in a safe and accessible location for future
reference.
1.1 Children and vulnerable people safety
• This appliance can be used by children aged 8 years
and above and by persons with reduced capabilities
provided that they have been given instruction and/or
supervision regarding the safe use of the appliance
and understand the potential hazards involved.
• Do not let children play with the appliance.
• Keep all packaging away from children and dispose of
it appropriately.
• Keep children and pets away from the appliance when
it operates or when it cools down. Accessible parts are
hot.
• If the appliance has a child safety device, this should
be activated.
• Children shall not carry out cleaning and user
maintenance of the appliance without supervision.
• Children aged 3 years and under must be kept away
from this appliance when it is in operation at all times.
1.2 General Safety
• WARNING: The appliance and its accessible parts
become hot during use. Care should be taken to avoid
touching heating elements. Children less than 8 years
of age shall be kept away unless continuously
supervised.
• Do not operate the appliance by means of an external
timer or separate remote-control system.
• WARNING: Unattended cooking on a hob with fat or
oil can be dangerous and may result in fire.
• NEVER try to extinguish a fire with water, but switch
off the appliance and then cover flame e.g. with a lid
or a fire blanket.
• CAUTION: The cooking process has to be supervised.
A short term cooking process has to be supervised
continuously.
ENGLISH 3

• WARNING: Danger of fire: Do not store items on the
cooking surfaces.
• Metallic objects such as knives, forks, spoons and lids
should not be placed on the hob surface since they
can get hot.
• Do not use a steam cleaner to clean the appliance.
• If the glass ceramic surface / glass surface is cracked,
switch off the appliance to avoid the possibility of
electric shock.
• In case of hotplate glass breakage:
– shut immediately off all burners and any electrical
heating element and isolate the appliance from the
power supply,
– do not touch the appliance surface,
– do not use the appliance.
• If the supply cord is damaged, it must be replaced by
the manufacturer, an authorized Service or similarly
qualified persons in order to avoid a hazard.
• Where the appliance is directly connected to the
power supply, an all-pole isolating switch with a
contact gap is required. Complete disconnection in
compliance with the conditions specified in
overvoltage category III must be guaranteed. The
earth cable is excluded from this.
• When you route the mains cable, make sure that the
cable doesn't come into direct contact (for example
using insulating sleeving) with parts that can reach
temperatures of more than 50°C above room
temperature.
• WARNING: Use only hob guards designed by the
manufacturer of the cooking appliance or indicated by
the manufacturer of the appliance in the instructions
for use as suitable or hob guards incorporated in the
appliance. The use of inappropriate guards can cause
accidents.
www.electrolux.com4

2. SAFETY INSTRUCTIONS
This appliance is suitable for the
following markets: IT
2.1 Installation
WARNING!
Only a qualified person must
install this appliance.
Prior to installation, ensure
that the local distribution
conditions (nature of the gas
and gas pressure) and the
adjustment of the appliance
are compatible.
• Remove all the packaging.
• Do not install or use a damaged
appliance.
• Follow the installation instruction
supplied with the appliance.
• Keep the minimum distance from the
other appliances and units.
• Always take care when moving the
appliance as it is heavy. Always use
safety gloves and enclosed footwear.
• Seal the cut surfaces with a sealant to
prevent moisture to cause swelling.
• Protect the bottom of the appliance
from steam and moisture.
• Do not install the appliance adjacent
to a door or under a window. This
prevents hot cookware to fall from the
appliance when the door or the
window is opened.
• If the appliance is installed above
drawers make sure that the space,
between the bottom of the appliance
and the upper drawer, is sufficient for
air circulation.
• The bottom of the appliance can get
hot. Make sure to install a non-
combustible separation panel under
the appliance to prevent access to the
bottom.
2.2 Electrical Connection
WARNING!
Risk of fire and electrical
shock.
• All electrical connections should be
made by a qualified electrician.
• The appliance must be earthed.
• Before carrying out any operation
make sure that the appliance is
disconnected from the power supply.
• Make sure that the electrical
information on the rating plate agrees
with the power supply. If not, contact
an electrician.
• Make sure the appliance is installed
correctly. Loose and incorrect
electricity mains cable or plug (if
applicable) can make the terminal
become too hot.
• Use the correct electricity mains
cable.
• Do not let the electricity mains cable
tangle.
• Make sure that a shock protection is
installed.
• Use the strain relief clamp on the
cable.
• Make sure the mains cable or plug (if
applicable) does not touch the hot
appliance or hot cookware, when you
connect the appliance to the near
sockets
• Do not use multi-plug adapters and
extension cables.
• Make sure not to cause damage to
the mains plug (if applicable) or to the
mains cable. Contact our Authorised
Service Centre or an electrician to
change a damaged mains cable.
• The shock protection of live and
insulated parts must be fastened in
such a way that it cannot be removed
without tools.
• Connect the mains plug to the mains
socket only at the end of the
installation. Make sure that there is
access to the mains plug after the
installation.
• If the mains socket is loose, do not
connect the mains plug.
• Do not pull the mains cable to
disconnect the appliance. Always pull
the mains plug.
• Use only correct isolation devices: line
protecting cut-outs, fuses (screw type
fuses removed from the holder), earth
leakage trips and contactors.
• The electrical installation must have
an isolation device which lets you
disconnect the appliance from the
ENGLISH 5

mains at all poles. The isolation
device must have a contact opening
width of minimum 3 mm.
2.3 Gas connection
• All gas connections should be made
by a qualified person.
• Before installation, make sure that the
local distribution conditions (nature of
the gas and gas pressure) and the
adjustment of the appliance are
compatible.
• Make sure that there is air circulation
around the appliance.
• The information about the gas supply
is on the rating plate.
• This appliance is not connected to a
device, which evacuates the products
of combustion. Make sure to connect
the appliance according to current
installation regulations. Pay attention
to requirements regarding adequate
ventilation.
2.4 Use
WARNING!
Risk of injury, burns and
electrical shock.
The use of inappropriate hob
guards can cause accidents.
• Remove all the packaging, labelling
and protective film (if applicable)
before first use.
• Use this appliance in a household
environment.
• Do not change the specification of this
appliance.
• Make sure that the ventilation
openings are not blocked.
• Do not let the appliance stay
unattended during operation.
• Set the cooking zone to “off” after
each use.
• Do not put cutlery or saucepan lids on
the cooking zones. They can become
hot.
• Do not operate the appliance with wet
hands or when it has contact with
water.
• Do not use the appliance as a work
surface or as a storage surface.
• When you place food into hot oil, it
may splash.
WARNING!
Risk of fire and explosion
• Fats and oil when heated can release
flammable vapours. Keep flames or
heated objects away from fats and
oils when you cook with them.
• The vapours that very hot oil releases
can cause spontaneous combustion.
• Used oil, that can contain food
remnants, can cause fire at a lower
temperature than oil used for the first
time.
• Do not put flammable products or
items that are wet with flammable
products in, near or on the appliance.
WARNING!
Risk of damage to the
appliance.
• Do not keep hot cookware on the
control panel.
• Do not let cookware to boil dry.
• Be careful not to let objects or
cookware fall on the appliance. The
surface can be damaged.
• Do not activate the cooking zones
with empty cookware or without
cookware.
• Do not put aluminium foil on the
appliance.
• Cookware made of cast iron,
aluminium or with a damaged bottom
can cause scratches on the glass /
glass ceramic. Always lift these
objects up when you have to move
them on the cooking surface.
• Use only stable cookware with the
correct shape and diameter larger
than the dimensions of the burners.
• Make sure cookware is centrally
positioned on the burners.
• Make sure the flame does not go out
when you quickly turn the knob from
the maximum to the minimum
position.
• Use only the accessories supplied
with the appliance.
• Do not install a flame diffuser on the
burner.
• The use of a gas cooking appliance
results in the production of heat and
moisture. Provide good ventilation in
the room where the appliance is
installed.
www.electrolux.com6

• Prolonged intensive use of the
appliance may call for additional
ventilation, for example opening of a
window, or more effective ventilation,
for example increasing the level of
mechanical ventilation where present.
• This appliance is for cooking
purposes only. It must not be used for
other purposes, for example room
heating.
• Do not let acid liquids, for example
vinegar, lemon juice or limescale
remover, touch the hob. This can
cause matt patches.
• Discoloration of the enamel has no
effect on the performance of the
appliance.
2.5 Care and cleaning
• Clean regularly the appliance to
prevent the deterioration of the
surface material.
• Deactivate the appliance and let it
cool down before you clean it.
• Disconnect the appliance from the
electrical supply before maintenance.
• Do not use water spray and steam to
clean the appliance.
• Clean the appliance with a moist soft
cloth. Only use neutral detergents. Do
not use abrasive products, abrasive
cleaning pads, solvents or metal
objects.
2.6 Disposal
WARNING!
Risk of injury or suffocation.
• Contact your municipal authority for
information on how to discard the
appliance correctly.
• Disconnect the appliance from the
mains supply.
• Cut off the mains electrical cable
close to the appliance and dispose of
it.
• Flat the external gas pipes.
2.7 Service
• To repair the appliance contact an
Authorised Service Centre.
• Use original spare parts only.
3. INSTALLATION
WARNING!
Refer to Safety chapters.
3.1 Before the installation
Before you install the hob, write down the
information bellow from the rating plate.
The rating plate is on the bottom of the
hob.
Model .......................................
PNC .........................................
Serial number ...........................
3.2 Gas Connection
WARNING!
The following instructions
about installation,
maintenance and ventilation
must be carried out by
qualified personnel in
compliance with the
regulation in force (UNI-CIG
7129 - 7131). Make sure that
the kitchen is well ventilated:
keep natural ventilation
holes open (at least 100
cm²) or install a mechanical
extractor hood.
Choose fixed connections or use a
flexible pipe in stainless steel in
compliance with the regulation in force. If
you use flexible metallic pipes, be careful
they do not come in touch with mobile
parts or they are not squeezed. Also be
ENGLISH 7

careful when the hob is put together with
an oven.
Make sure that the gas
supply pressure of the
appliance obeys the
recommended values.
If the supplied pressure has not the
specified value, it is necessary to
assemble a proper pressure regulator in
compliance with the standard UNI EN 88.
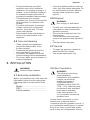
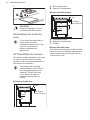
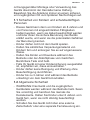
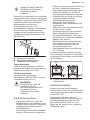
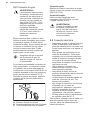
The adjustable connection is fixed to the
comprehensive ramp by means of a
threaded nut G 1/2". Screw the parts
without force, adjust the connection in
the necessary direction and tighten
everything.
A B C
A. End of shaft with nut
B. Washer supplied with the appliance
C. Elbow supplied with the appliance
Rigid connection:
Carry out connection by using metal rigid
pipes (copper with mechanical end)
(UNI-CIG 7129).
Flexible connection:
Use a flexible pipe in stainless steel
(UNI-CIG 9891) with a maximum length 2
m.
WARNING!
When installation is
complete, make sure that
the seal of each pipe fitting
is correct. Use a soapy
solution, not a flame!
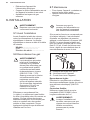
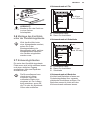
3.3 Electrical connection
• Make sure that the rated voltage and
type of power on the rating plate
agree with the voltage and the power
of the local power supply.
• This appliance is supplied with a
mains cable. It has to be supplied with
a correct plug which can hold the load
that the rating plate rates. Make sure
that you install the plug in a correct
socket.
• Always use a correctly installed
shockproof socket.
• Make sure that there is an access to
the mains plug after the installation.
• Do not pull the mains cable to
disconnect the appliance. Always pull
the mains plug.
• There is a risk of fire when the
appliance is in connection with an
extension cable, an adapter or a
multiple connection. Make sure that
the ground connection agrees with the
standards and regulations.
• Do not let the power cable to heat up
to a temperature higher than 90° C.
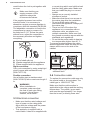
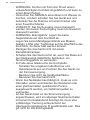
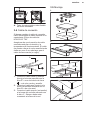
To prevent contact between the cable
and the appliance below the hob use the
clamps which are on the side of the
cabinet.
A
A. Rigid copper pipe or flexible pipe of
stainless steel
3.4 Connection cable
To replace the connection cable use only
the special cable or its equivalent. The
cable type is: H05V2V2-F T90.
Make sure that the cable section is
applicable to the voltage and the working
temperature. The yellow / green earth
wire must be approximately 2 cm longer
than the brown (or black) phase wire.
www.electrolux.com8

L
N
1. Connect the green and yellow (earth)
wire to the terminal which is marked
with the letter 'E', or the earth symbol
, or coloured green and yellow.
2. Connect the blue (neutral) wire to the
terminal which is marked with the
letter 'N' or coloured blue.
3. Connect the brown (live) wire to the
terminal which is marked with the
letter 'L'. It must always be connected
to the network phase.
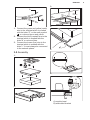
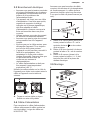
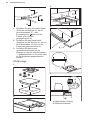
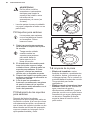
3.5 Assembly
1.
2.
3.
min.
55 mm
min.
650 mm
560 mm
490 mm
min.
150 mm
30 mm
4.
5.
6.
B
A
A) supplied seal
B) assembled bracket
ENGLISH 9

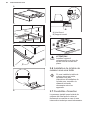
7.
CAUTION!
Install the appliance only on
a worktop with flat surface.
3.6 Installing hob under the
hood
If you install the hob under a
hood, please see the
installation instructions of the
hood for the minimum
distance between the
appliances.
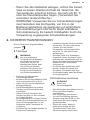
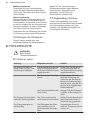
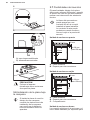
3.7 Possibilities for insertion
The panel installed below the hob must
be easy to remove and let an easy
access in case a technical assistance
intervention is necessary.
The burner flame may be
extinguished by an air flow, if
the removable panel is not
installed. The air flow may
occur when you open or
close the cabinet door or
drawer.
Kitchen unit with door
min 20 mm
(max 150 mm)
30 mm
60 mm
B
A
A. Removable panel
B. Space for connections
Kitchen unit with drawer
min 20 mm
(max 150 mm)
30 mm
C
A
60 mm
B
A. Removable panel
B. Space for connections
C. Drawer
Kitchen unit with oven
The electrical connection of the hob and
the oven must be installed separately for
safety reasons and to let easy remove
oven from the unit.
www.electrolux.com10

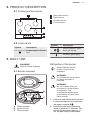
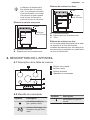
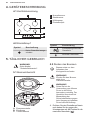
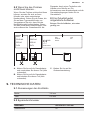
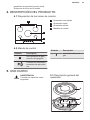
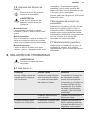
4. PRODUCT DESCRIPTION
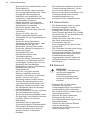
4.1 Cooking surface layout
4
3
2
1
1
Semi-rapid burner
2
Rapid burner
3
Auxiliary burner
4
Control knobs
4.2 Control knob
Symbol Description
no gas supply / off posi‐
tion
Symbol Description
ignition position / maxi‐
mum gas supply
minimum gas supply
5. DAILY USE
WARNING!
Refer to Safety chapters.
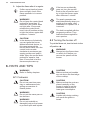
5.1 Burner overview
B
C
A
A. Flame spreader
B. Ignition candle
C. Thermocouple
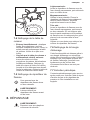
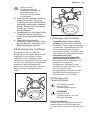
5.2 Ignition of the burner
Always light the burner
before you put on the
cookware.
WARNING!
Do not light the burner when
the flame spreader is
removed.
WARNING!
Be very careful when you
use open fire in the kitchen
environment. The
manufacturer declines any
responsibility in case of the
flame misuse.
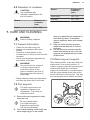
1. Push the control knob down and turn
it counterclockwise to the maximum
gas supply position ( ).
2. Keep the control knob pushed for
equal or less than 10 seconds. This
lets the thermocouple warm up. If
not, the gas supply is interrupted.
ENGLISH 11

3. Adjust the flame after it is regular.
If after some tries the burner
does not light, check if the
flame spreader is in correct
position.
WARNING!
Do not keep the control knob
pushed for more than 15
seconds. If the burner does
not light after 15 seconds,
release the control knob,
turn it into off position and try
to light the burner again after
minimum 1 minute.
CAUTION!
In the absence of electricity
you can ignite the burner
without electrical device; in
this case approach the
burner with a flame, turn the
control knob counter-
clockwise to maximum gas
supply position and push it
down. Keep the control knob
pushed for equal or less
than 10 seconds to let the
thermocouple warm up.
If the burner accidentally
goes out, turn the control
knob to the off position and
try to light the burner again
after minimum 1 minute.
The spark generator can
start automatically when you
switch on the mains, after
installation or a power cut. It
is normal.
The hob is supplied with the
progressive valves. They
make the flame regulation
more precise.
5.3 Turning the burner off
To put the flame out, turn the knob to the
off position
.
WARNING!
Always turn the flame down
or switch it off before you
remove the pans from the
burner.
6. HINTS AND TIPS
WARNING!
Refer to Safety chapters.
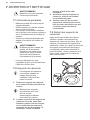
6.1 Cookware
CAUTION!
Do not use cast iron pans,
clay or earthenware pots,
grilling accessories or
toaster plates.
WARNING!
Do not put the same pan on
two burners.
WARNING!
Do not put unstable or
damaged pots on the burner
to prevent spills and injuries.
CAUTION!
Make sure that pot handles
are not above the front edge
of the cooktop.
CAUTION!
Make sure that the pots are
placed centrally on the
burner in order to get the
maximum stability and a
lower gas consumption.
CAUTION!
Liquids spilt during cooking
can cause the glass to
break.
www.electrolux.com12

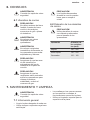
6.2 Diameters of cookware
CAUTION!
Use cookware with
diameters applicable to the
size of burners.
Burner Diameter of
cookware
(mm)
Rapid 180 - 260
Burner Diameter of
cookware
(mm)
Semi-rapid 140 - 220
Auxiliary 100 - 160
7. CARE AND CLEANING
WARNING!
Refer to Safety chapters.
7.1 General information
• Clean the hob after each use.
• Always use cookware with clean
bottom.
• Scratches or dark stains on the
surface have no effect on how the hob
operates.
• Use a special cleaner applicable for
the surface of the hob.
WARNING!
Do not use knives, scrapers
or similar instruments to
clean the surface of the
glass or between the rims of
the burners and the frame (if
applicable).
• Wash stainless steel parts with water,
and then dry them with a soft cloth.
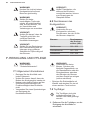
7.2 Pan supports
The pan supports are not
resistant to washing in a
dishwasher. They must be
washed by hand.
1. Remove the pan supports to easily
clean the hob.
Be very careful when
you replace the pan
supports to prevent the
hob top from damage.
2. The enamel coating occasionally can
have rough edges, so be careful
when you wash the pan supports by
hand and dry them. If necessary,
remove stubborn stains with a paste
cleaner.
3. After you clean the pan supports,
make sure that they are in correct
positions.
4. For the burner to operate correctly,
make sure that the arms of the pan
supports are aligned with the centre
of the burner.
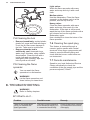
7.3 Removing pan supports
After cleaning hobs, make sure that pan
supports are in a correct position. In
order to properly place the pan supports,
make sure that an arm of the pan
support is positioned in correspondence
with the grips placed at the base of the
burner as shown in the picture. This way,
the pan support will be stable and fixed.
ENGLISH 13

7.4 Cleaning the hob
• Remove immediately: melted plastic,
plastic foil, sugar and food with sugar.
If not, the dirt can cause damage to
the hob. Take care to avoid burns.
• Remove when the hob is
sufficiently cool: limescale rings,
water rings, fat stains, shiny metallic
discoloration. Clean the hob with a
moist cloth and non-abrasive
detergent. After cleaning, wipe the
hob dry with a soft cloth.
7.5 Cleaning the flame
spreader
You can wash the flame
spreaders in a dishwasher.
WARNING!
Let the flame spreaders cool
down before you clean them.
Light stains:
Wash the flame spreader with warm
water and soap and dry it with a soft
cloth.
Medium stains:
Use the dishwasher. Place the flame
spreader on the bottom rack in a flat
position, with the top side up.
Heavy stains:
Clean the flame spreader with warm
water and soap, then wash it in the
dishwasher. If the stain is still present
wash the top of the flame spreader with a
grill cleaner and run through the
dishwasher again.
Use a toothpick to clean the holes of the
flame spreader.
7.6 Cleaning the spark plug
This feature is obtained through a
ceramic ignition candle with a metal
electrode. Keep these components well
clean to prevent difficult lighting and
check that the burner crown holes are
not obstructed.
7.7 Periodic maintenance
Speak to your local Authorised Service
Centre periodically to check the
conditions of the gas supply pipe and the
pressure adjuster, if fitted.
8. TROUBLESHOOTING
WARNING!
Refer to Safety chapters.
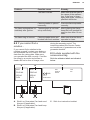
8.1 What to do if...
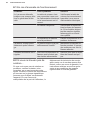
Problem Possible cause Remedy
There is no spark when
you try to activate the
spark generator.
The hob is not connected
to an electrical supply or it
is connected incorrectly.
Check if the hob is correct‐
ly connected to the electri‐
cal supply.
www.electrolux.com14

Problem Possible cause Remedy
The fuse is blown. Make sure that the fuse is
the cause of the malfunc‐
tion. If the fuse is blown
again and again, contact a
qualified electrician.
Flame spreader is placed
incorrectly.
Place the flame spreader
correctly.
The flame extinguishes im‐
mediately after ignition.
Thermocouple is not heat‐
ed up sufficiently.
After lightning the flame,
keep the knob pushed for
equal or less than 10 sec‐
onds.
The flame ring is uneven. Flame spreader holes are
blocked with food residues.
Make sure that the flame
spreader is clean.
8.2 If you cannot find a
solution...
If you cannot find a solution to the
problem yourself, contact your dealer or
an Authorised Service Centre. Give the
data from the rating plate. Make sure,
you operated the hob correctly. If not the
servicing by a service technician or
dealer will not be free of charge, also
during the warranty period. The
instructions about the Service Centre
and conditions of guarantee are in the
guarantee booklet.
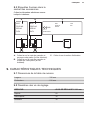
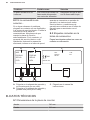
8.3 Labels supplied with the
accessories bag
Stick the adhesive labels as indicated
below:
MOD.
PROD.NO.
SER.NO
DATA
MOD.
PROD.NO.
SER.NO
DATA
MOD.
PROD.NO.
SER.NO.
03 IT
MADE IN ITALY
TYPE
IP20
0049
A B C
A. Stick it on Guarantee Card and send
this part (if applicable).
B. Stick it on Guarantee Card and keep
this part (if applicable).
C. Stick it on instruction booklet.
ENGLISH 15

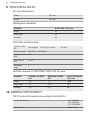
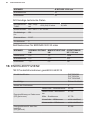
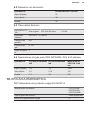
9. TECHNICAL DATA
9.1 Hob dimensions
Width 740 mm
Depth 510 mm
9.2 Bypass diameters
BURNER Ø BYPASS 1/100 mm
Rapid 52
Semi-rapid 35
Auxiliary 32
9.3 Other technical data
TOTAL POW‐
ER:
Gas original: G20 (2H) 20 mbar 8,9 kW
Electric supply: 220-240 V ~ 50-60 Hz
Appliance cate‐
gory:
I2H
Gas connec‐
tion:
G 1/2"
Appliance
class:
3
9.4 Gas burners for NATURAL GAS G20 20 mbar
BURNER NORMAL POWER
kW
MINIMUM POWER
kW
INJECTOR MARK
1/100 mm
Rapid 2,9 1,2 120B
Semi-rapid 2,0 0,75 102
Auxiliary 1,0 0,5 73F
10. ENERGY EFFICIENCY
10.1 Product information according to EU 66/2014
Model identification PVF750UOB,
PVF750UON,
PVF750UONS
Type of hob Built-in hob
www.electrolux.com16

Number of gas burners 5
Energy efficiency per gas burner
(EE gas burner)
Left rear - Semi-rapid 58.3%
Right rear - Semi-rapid 57.8%
Centre middle - Rapid 57.7%
Left front - Auxiliary not applicable
Right front - Auxiliary not applicable
Energy efficiency for the gas hob
(EE gas hob)
57.9%
EN 30-2-1: Domestic cooking appliances burning gas - Part 2-1 : Rational use of
energy - General
10.2 Energy saving
• Before use, make sure that the burners and pan supports are assembled correctly.
• Use cookware with diameters applicable to the size of burners.
• Center the pot on the burner.
• When you heat up water, use only the amount you need.
• If it is possible, always put the lids on the cookware.
• When the liquid starts to boil, turn down the flame to barely simmer the liquid.
• If it is possible, use a pressure cooker. Refer to its user manual.
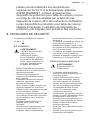
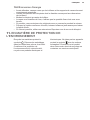
11. ENVIRONMENTAL CONCERNS
Recycle materials with the symbol .
Put the packaging in relevant containers
to recycle it. Help protect the
environment and human health by
recycling waste of electrical and
electronic appliances. Do not dispose of
appliances marked with the symbol
with the household waste. Return the
product to your local recycling facility or
contact your municipal office.
ENGLISH 17

TABLE DES MATIÈRES
1. INFORMATIONS DE SÉCURITÉ..................................................................... 18
2. CONSIGNES DE SÉCURITÉ........................................................................... 21
3. INSTALLATION................................................................................................ 24
4. DESCRIPTION DE L'APPAREIL......................................................................27
5. UTILISATION QUOTIDIENNE..........................................................................28
6. CONSEILS........................................................................................................29
7. ENTRETIEN ET NETTOYAGE.........................................................................30
8. DÉPANNAGE................................................................................................... 31
9. CARACTÉRISTIQUES TECHNIQUES.............................................................33
10. RENDEMENT ÉNERGÉTIQUE......................................................................34
NOUS PENSONS À VOUS
Merci d'avoir acheté un appareil Electrolux. Vous avez choisi un produit qui
bénéficie de décennies d'expérience professionnelle et d'innovation. Ingénieux et
élégant, cet appareil a été conçu pour vous. C'est la raison pour laquelle vous
pouvez avoir la certitude d'obtenir d'excellents résultats à chaque utilisation.
Bienvenue chez Electrolux.
Visitez notre site Web pour :
Obtenir des conseils d'utilisation, des brochures, un dépanneur, des
informations sur le service et les réparations :
www.electrolux.com/support
Enregistrer votre produit pour un meilleur service :
www.registerelectrolux.com
Acheter des accessoires, des consommables et des pièces de rechange
d'origine pour votre appareil :
www.electrolux.com/shop
SERVICE ET ASSISTANCE À LA CLIENTÈLE
Utilisez toujours des pièces de rechange d'origine.
Avant de contacter notre centre de service agréé, assurez-vous de disposer des
informations suivantes : Modèle, PNC, Numéro de série.
Les informations se trouvent sur la plaque signalétique.
Avertissement/Mise en garde-Information de sécurité
Informations générales et conseils
Informations environnementales
Sous réserve de modifications.
1.
INFORMATIONS DE SÉCURITÉ
Avant d'installer et d'utiliser cet appareil, lisez
soigneusement les instructions fournies. Le fabricant ne
pourra être tenu pour responsable des blessures et
dégâts résultant d'une mauvaise installation ou
www.electrolux.com18

utilisation. Conservez toujours les instructions dans un
lieu sûr et accessible pour vous y référer ultérieurement.
1.1 Sécurité des enfants et des personnes
vulnérables
• Cet appareil peut être utilisé par des enfants de plus
de 8 ans et par des personnes dont les capacités sont
réduites, à condition qu'ils soient surveillés ou qu'ils
aient reçu des instructions concernant l'utilisation
sécurisée de l'appareil et qu'ils comprennent les
risques encourus.
• Ne laissez pas les enfants jouer avec l'appareil.
• Ne laissez pas les emballages à la portée des enfants
et jetez-les convenablement.
• Tenez les enfants et les animaux éloignés de
l'appareil lorsqu'il est en cours de fonctionnement ou
lorsqu'il refroidit. Les parties accessibles sont
chaudes.
• Si l'appareil est équipé d'un dispositif de sécurité
enfants, nous vous recommandons de l'activer.
• Les enfants ne doivent pas nettoyer ni entreprendre
une opération de maintenance sur l'appareil sans
surveillance.
• Les enfants de moins de 3 ans doivent être tenus
éloignés de l'appareil en permanence lorsqu'il est en
fonctionnement.
1.2 Sécurité générale
• AVERTISSEMENT : L'appareil et ses parties
accessibles deviennent chauds pendant son
fonctionnement. Veillez à ne pas toucher les éléments
chauffants. Les enfants de moins de 8 ans doivent
être tenus à l'écart, à moins d'être surveillés en
permanence.
• Ne faites pas fonctionner l'appareil avec un minuteur
externe ou un système de commande à distance.
• AVERTISSEMENT : Il peut être dangereux de laisser
chauffer de la graisse ou de l'huile sans surveillance
FRANÇAIS 19

sur une table de cuisson car cela pourrait provoquer
un incendie.
• N'essayez JAMAIS d'éteindre un feu avec de l'eau.
Éteignez l'appareil puis couvrez les flammes, par
exemple avec un couvercle ou une couverture
ignifuge.
• ATTENTION : Toute cuisson doit être surveillée. Une
cuisson courte doit être surveillée en permanence.
• AVERTISSEMENT : Risque d'incendie : Ne rangez
pas d'objets sur la surface de cuisson.
• Ne posez pas d'objets métalliques tels que couteaux,
fourchettes, cuillères ou couvercles sur la table de
cuisson car ils pourraient chauffer.
• N'utilisez pas de nettoyeur vapeur pour nettoyer
l'appareil.
• Si la surface vitrocéramique / en verre est fissurée,
éteignez l'appareil pour éviter tout risque
d'électrocution.
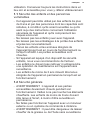
• En cas de bris de verre de la plaque de cuisson :
– éteignez immédiatement tous les brûleurs et toutes
les résistances électriques puis isolez l'appareil de
l'alimentation électrique,
– ne touchez pas la surface de l'appareil,
– n'utilisez plus l'appareil.
• Si le câble d'alimentation est endommagé, il doit être
remplacé par le fabricant, un service de maintenance
agréé ou un technicien qualifié afin d'éviter tout
danger.
• Si l'appareil est relié directement à l'alimentation
électrique, installez un sectionneur avec une ouverture
de contact. Il est indispensable de garantir une
déconnexion complète conformément aux conditions
de surtension de catégorie III. Le fil de terre n'est pas
concerné.
• Lorsque vous acheminez le câble d'alimentation,
assurez-vous qu'il n'entre pas en contact direct (par
exemple, à l'aide d'un manchon isolant) avec des
www.electrolux.com20
Seite laden ...
Seite laden ...
Seite laden ...
Seite laden ...
Seite laden ...
Seite laden ...
Seite laden ...
Seite laden ...
Seite laden ...
Seite laden ...
Seite laden ...
Seite laden ...
Seite laden ...
Seite laden ...
Seite laden ...
Seite laden ...
Seite laden ...
Seite laden ...
Seite laden ...
Seite laden ...
Seite laden ...
Seite laden ...
Seite laden ...
Seite laden ...
Seite laden ...
Seite laden ...
Seite laden ...
Seite laden ...
Seite laden ...
Seite laden ...
Seite laden ...
Seite laden ...
Seite laden ...
Seite laden ...
Seite laden ...
Seite laden ...
Seite laden ...
Seite laden ...
Seite laden ...
Seite laden ...
Seite laden ...
Seite laden ...
Seite laden ...
Seite laden ...
Seite laden ...
Seite laden ...
Seite laden ...
Seite laden ...
Seite laden ...
Seite laden ...
Seite laden ...
Seite laden ...
-
 1
1
-
 2
2
-
 3
3
-
 4
4
-
 5
5
-
 6
6
-
 7
7
-
 8
8
-
 9
9
-
 10
10
-
 11
11
-
 12
12
-
 13
13
-
 14
14
-
 15
15
-
 16
16
-
 17
17
-
 18
18
-
 19
19
-
 20
20
-
 21
21
-
 22
22
-
 23
23
-
 24
24
-
 25
25
-
 26
26
-
 27
27
-
 28
28
-
 29
29
-
 30
30
-
 31
31
-
 32
32
-
 33
33
-
 34
34
-
 35
35
-
 36
36
-
 37
37
-
 38
38
-
 39
39
-
 40
40
-
 41
41
-
 42
42
-
 43
43
-
 44
44
-
 45
45
-
 46
46
-
 47
47
-
 48
48
-
 49
49
-
 50
50
-
 51
51
-
 52
52
-
 53
53
-
 54
54
-
 55
55
-
 56
56
-
 57
57
-
 58
58
-
 59
59
-
 60
60
-
 61
61
-
 62
62
-
 63
63
-
 64
64
-
 65
65
-
 66
66
-
 67
67
-
 68
68
-
 69
69
-
 70
70
-
 71
71
-
 72
72


Electrolux PVF750UOB Benutzerhandbuch
- Kategorie
- Kochfelder
- Typ
- Benutzerhandbuch
- Dieses Handbuch ist auch geeignet für
in anderen Sprachen
- English: Electrolux PVF750UOB User manual
- français: Electrolux PVF750UOB Manuel utilisateur
- español: Electrolux PVF750UOB Manual de usuario