Dell H815dw Cloud MFP Printer Schnellstartanleitung
- Kategorie
- Multifunktionale
- Typ
- Schnellstartanleitung
Seite wird geladen ...

2
Thank you
for choosing Dell
Merci d'avoir choisi Dell
Grazie per aver scelto Dell
Vielen Dank, dass Sie sich für Dell entschieden haben
Gracias por elegir Dell
Seite wird geladen ...
Seite wird geladen ...
Seite wird geladen ...
Seite wird geladen ...
Seite wird geladen ...
Seite wird geladen ...
Seite wird geladen ...
Seite wird geladen ...
Seite wird geladen ...

12
Wireless Printer (Dell H815dw only)
Imprimante sans fil (Dell H815dw uniquement) | Stampante wireless (solo Dell H815dw)
Drahtlos-Drucker (nur Dell H815dw) | Impresora inalámbrica (Dell H815dw solamente)
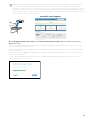
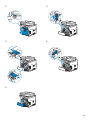
1 Wait for
Dell Printer Easy Install
wizard to find your printer.
Attendez que l'assistant Dell Printer Easy Install détecte votre imprimante.
Attendere che la procedura guidata Dell Printer Easy Install trovi la stampante.
Warten Sie, bis der Dell Printer Easy Install-Assistent den Drucker gefunden hat.
Espere a que el asistente de Dell Printer Easy Install encuentre la impresora.
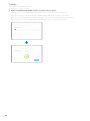
2 After the printer is found, click
Install
to complete the setup.
Une fois l'imprimante trouvée, cliquez sur Installer pour terminer l'installation.
Dopo aver trovato la stampante, fare clic su Installa per completare la configurazione.
Klicken Sie auf Installieren, um die Einrichtung abzuschließen, nachdem der Drucker gefunden wurde.
Tras detectar la impresora, haga clic en Instalar para completar la configuración.
Seite wird geladen ...

14
USB Printer
Imprimante USB | Stampante USB
USB-Drucker | Impresora USB
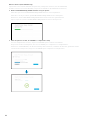
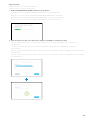
1 Wait for
Dell Printer Easy Install
wizard to find and install your printer.
Attendez que l'assistant Dell Printer Easy Install détecte et installe votre imprimante.
Attendere che la procedura guidata Dell Printer Easy Install trovi e installi la stampante.
Warten Sie, bis der Dell Printer Easy Install-Assistent den Drucker gefunden und installiert hat.
Espere a que el asistente de Dell Printer Easy Install encuentre e instale la impresora.
Seite wird geladen ...

16
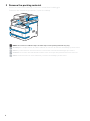
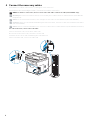
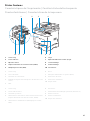
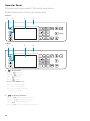
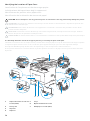
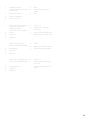
1 Service Tag 6 Fach 1
2 Vorderer USB-Anschluss 7 Optionale 550-Blatt-Zufuhr (Fach 2)
3 Bedienerkonsole 8 Tonerkassette
4 Duplex Automatischer Dokumenteneinzug (DADF) 9 Trommeleinheit
5 Universalzuführung (MPF) 10 Vordere Abdeckung
1 Service Tag 6 Bandeja 1
2 Puerto USB frontal 7 Alimentador de 550 hojas opcional (Bandeja2)
3 Panel del operador 8 Cartucho de tóner
4 Alimentador automático de documentos dúplex
(DADF)
9 Cartucho de tambor
10 Cubierta frontal
5 Alimentador multifunción (MPF)
Seite wird geladen ...

18
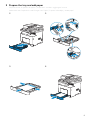
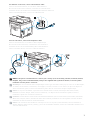
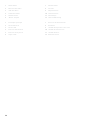
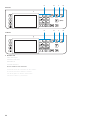
1 Netzschalter 7 Netzanschluss
2 Ethernet-Anschluss 8 Schacht
3 USB-Anschluss 9 Duplex-Einheit
4 Telefonanschluss 10 Transfereinheit
5 Netzanschluss 11 Fixieranlage
6 "Blauer" Stopfen 12 Hintere Abdeckung
1 Interruptor principal 7 Conector de alimentación
2 Puerto Ethernet 8 Conducto
3 Puerto USB 9 Unidad de impresión a dos caras
4 Conector del teléfono 10 Unidad de transferencia
5 Conector de la pared 11 Unidad del fusor
6 Tapón "azul" 12 Cubierta trasera

19
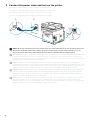
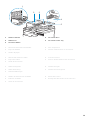
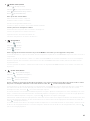
1 DADF Feed Roller 4 Document Glass
2 DADF Cover 5 Document Feeder Tray
3 Document Guides
1 Rouleau d'alimentation du CADRV 4 Vitre d'exposition
2 Capot du CADRV 5 Plateau d'alimentation en documents
3 Guides du papier
1 Rullo di alimentazione DADF 4 Vetro documenti
2 Coperchio DADF 5 Vassoio di alimentazione dei documenti
3 Guide dei documenti
1 DADF-Einzugsrolle 4 Dokumentenglas
2 DADF-Abdeckung 5 Dokumenteneinzugsfach
3 Dokumentführungen
1 Rodillo de alimentación del DADF 4 Cristal del escáner
2 Cubierta del DADF 5 Bandeja del alimentador de documentos
3 Guías de documentos
2
3
4
5
1
Seite wird geladen ...
Seite wird geladen ...
Seite wird geladen ...
Seite wird geladen ...
Seite wird geladen ...
Seite wird geladen ...
Seite wird geladen ...

27
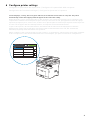
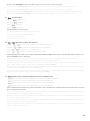
To delete a tile Tap and hold the tile you want to delete until appears, and then
drag the tile to . Tap
OK
to delete the tile.
Sélectionner une mosaïque Tapez sur le bouton se trouvant dans le menu Dock pour afficher les
mosaïques regroupées sous ce bouton, puis tapez sur la mosaïque
souhaitée.
Faire défiler l'écran Faites défiler l'écran en faisant glisser le doigt sur l'écran. Pour accélérer
le défilement, donnez un petit coup à l'écran.
Afficher l'état de l'imprimante Faites glisser la poignée de la barre de notification vers le bas.
Pour déplacer une mosaïque Tapez et restez appuyé sur la mosaïque que vous souhaitez déplacer,
puis faites-la glisser vers l'emplacement désiré.
Pour ajouter une mosaïque Tapez sur la mosaïque
Ajout App
.
Supprimer une mosaïque Tapez et restez appuyé sur la mosaïque que vous souhaitez supprimer
jusqu'à ce que apparaisse, puis faites-la glisser vers . Tapez sur
OK
pour effacer le pavé.
Per selezionare un riquadro Toccare il pulsante nel Menu Dock in modo da visualizzare i riquadri
raggruppati dal pulsante, quindi toccare il riquadro desiderato.
Per scorrere la schermata Scorrere lo schermo trascinandolo con un dito. Per scorrere più
rapidamente, toccare velocemente lo schermo.
Per visualizzare lo stato della stampante. Trascinare verso il basso l'handle della barra di notifica.
Per spostare un riquadro Toccare e tenere premuto il riquadro da spostare e trascinarlo nel punto
desiderato.
Per aggiungere un riquadro Toccare il riquadro
Aggiungi app
.
Per eliminare un riquadro Toccare il riquadro da eliminare per qualche secondo finché non appare
, quindi trascinarlo a . Toccare
OK
per eliminare il riquadro.
Zur Auswahl einer Kachel Tippen Sie auf die Schaltfläche im Dock-Menü, um die Kacheln
anzuzeigen, die unter der Schaltfläche zusammengefasst sind, und
tippen Sie dann auf die gewünschte Kachel.
Zum Blättern im Bildschirm Blättern Sie die Seiten, indem Sie den Finger über den Bildschirm ziehen.
Um schneller zu blätter, wischen Sie schnell über den Bildschirm.
Zum Anzeigen des Druckerstatus Ziehen Sie den Ziehpunkt der Benachrichtigungsleiste nach unten.
Zum Verschieben einer Kachel Tippen Sie die Kachel, die Sie verschieben möchten, an und halten Sie sie
fest und ziehen Sie sie an die gewünschte Position.
Zum Hinzufügen einer Kachel Tippen Sie auf die Kachel
App hinzufügen
.
Zum Löschen einer Kachel Tippen Sie auf die Kachel, die Sie löschen möchten, und halten Sie sie
fest, bis angezeigt wird. Ziehen Sie die Kachel dann auf . Tippen
Sie auf
OK
, um die Kachel zu löschen.
Para seleccionar un mosaico Toque el botón del Menú del Dock para mostrar los mosaicos agrupados
en el botón y después toque el mosaico que desee.
Para desplazar la pantalla Arrastre el dedo por la pantalla para pasar la pantalla. Para desplazarse
más rápidamente, dé un toque rápido a la pantalla.
Para mostrar el estado de la impresora Arrastre hacia abajo el controlador de la barra de notificaciones.
Para mover un mosaico Mantenga tocado el mosaico que desee mover y, a continuación,
arrástrelo hasta el lugar que desee.
Para añadir un mosaico Toque el mosaico
Agregar aplicación
.
Para eliminar un mosaico Toque y mantenga pulsado el mosaico que desee eliminar hasta que
aparezca y después arrastre el mosaico a . Toque
Aceptar
para
eliminar el mosaico.

28
Dell Printer Hub
(Dell™ Cloud Multifunction Printer | H815dw only)
Dell Printer Hub
(Dell™ Cloud Multifunction Printer | H815dw uniquement)
Dell Printer Hub
(solo Dell™ Cloud Multifunction Printer | H815dw)
Dell Printer Hub
(nur Dell™ Cloud Multifunction Printer | H815dw)
Dell Printer Hub
(Dell™ Cloud Multifunction Printer | H815dw solamente)
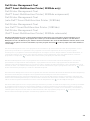
Dell Printer Hub is a program that monitors and informs you of the printer status and allows you to customize the printer
settings. The program also notifies you of the firmware/software updates. For convenient use, you can access the Dell
Document Hub from the Dell Printer Hub. The Dell Printer Hub is included on your Software and Documentation disc
and is installed with the manuals, drivers, and software for the printer. For more information, open the program and click
on the top right of the main window to see the FAQs.
Dell Printer Hub est un programme de surveillance qui vous informe de l'état de l'imprimante et vous permet de
personnaliser ses paramètres. Ce programme vous avertit également des mises à jour de logiciel/micrologiciel. Pour
plus de commodité, vous pouvez accéder à l'application Dell Document Hub depuis Dell Printer Hub. L'application Dell
Printer Hub figure sur votre disque Software and Documentation, et contient des manuels, des pilotes et des logiciels
destinés à votre imprimante. Pour plus d'informations, ouvrez le programme et cliquez sur en haut à droite de la
fenêtre principale pour afficher la FAQ.
Dell Printer Hub è un programma che monitora e informa sullo stato della stampante e consente di personalizzare le
impostazioni della stampante. Il programma informa anche sugli aggiornamenti del firmware/software. Per un uso
pratico, è possibile accedere a Dell Document Hub da Dell Printer Hub. Dell Printer Hub è incluso nel disco Software and
Documentation e viene installato insieme ai manuali, ai driver e al software della stampante. Per ulteriori informazioni,
aprire il programma e fare clic su in alto a destra nella finestra principale per vedere le domande frequenti.
Der Dell Printer Hub ist ein Programm, das den Druckerstatus überwacht und mitteilt und eine Anpassung der
Druckereinstellungen ermöglicht. Das Programm benachrichtigt Sie auch über Firmware-/Softwareaktualisierungen. Für
eine bequeme Verwendung können Sie über Dell Printer Hub auf Dell Document Hub zugreifen. Dell Printer Hub ist auf
der CD Software and Documentation enthalten und wird mit den Bedienungsanleitungen, Treibern und der Software für
den Drucker installiert. Für weitere Informationen öffnen Sie das Programm und klicken Sie oben rechts im Hauptfenster
auf , um die FAQs anzuzeigen.
Dell Printer Hub es un programa que monitorea y notifica el estado de la impresora y permite personalizar la
configuración de la impresora. El programa también le notifica actualizaciones de firmware/software. Para un uso
cómodo, puede acceder a Dell Document Hub desde Dell Printer Hub. Dell Printer Hub se incluye en el disco Software
and Documentation y se instala con los manuales, controladores y software para la impresora. Para obtener más
información, abra el programa y haga clic en en la parte superior derecha de la ventana principal para consultar las
preguntas más frecuentes.

29
Dell Printer Management Tool
(Dell™ Smart Multifunction Printer | S2815dn only)
Dell Printer Management Tool
(Dell™ Smart Multifunction Printer | S2815dn uniquement)
Dell Printer Management Tool
(solo Dell™ Smart Multifunction Printer | S2815dn)
Dell Printer Management Tool
(nur Dell™ Smart Multifunction Printer | S2815dn)
Dell Printer Management Tool
(Dell™ Smart Multifunction Printer | S2815dn solamente)
Dell Printer Management Tool is a program that monitors and informs you of the printer status and allows you to
customize the printer settings. The program also notifies you of the firmware/software updates. The Dell Printer
Management Tool is included on your Software and Documentation disc and is installed with the manuals, drivers, and
software for the printer. For more information, open the program and click on the top right of the main window to
see the FAQs.
Dell Printer Management Tool est un programme de surveillance qui vous informe de l'état de l'imprimante et vous
permet de personnaliser ses paramètres. Ce programme vous avertit également des mises à jour de logiciel/
micrologiciel. Le programme Dell Printer Management Tool figure sur votre disque Software and Documentation, et
contient des manuels, des pilotes et des logiciels destinés à votre imprimante. Pour plus d'informations, ouvrez le
programme et cliquez sur en haut à droite de la fenêtre principale pour afficher la FAQ.
Dell Printer Management Tool è un programma che monitora e informa sullo stato della stampante e consente di
personalizzare le impostazioni della stampante. Il programma informa anche sugli aggiornamenti del firmware/
software. Dell Printer Management Tool è incluso nel disco Software and Documentation e viene installato insieme ai
manuali, ai driver e al software della stampante. Per ulteriori informazioni, aprire il programma e fare clic su in alto a
destra nella finestra principale per vedere le domande frequenti.
Das Dell Printer Management Tool ist ein Programm, das den Druckerstatus überwacht und mitteilt und eine Anpassung
der Druckereinstellungen ermöglicht. Das Programm benachrichtigt Sie auch über Firmware-/
Softwareaktualisierungen. Dell Printer Management Tool ist auf der CD Software and Documentation enthalten und
wird mit den Bedienungsanleitungen, Treibern und der Software für den Drucker installiert. Für weitere Informationen
öffnen Sie das Programm und klicken Sie oben rechts im Hauptfenster auf , um die FAQs anzuzeigen.
Dell Printer Management Tool es un programa que monitorea y notifica el estado de la impresora y permite personalizar
la configuración de la impresora. El programa también le notifica actualizaciones de firmware/software. Dell Printer
Management Tool se incluye en el disco Software and Documentation y se instala con los manuales, controladores y
software para la impresora. Para obtener más información, abra el programa y haga clic en en la parte superior
derecha de la ventana principal para consultar las preguntas más frecuentes.

30
Dell Document Hub App
Application Dell Document Hub | Dell Document Hub App
Dell Document Hub-App | Aplicación Dell Document Hub
Easily access and share documents, images and digital content with the Dell Document Hub app. This innovative cloud
collaboration solution connects your printer and devices to popular cloud services, providing a flexible and secure way
to collaborate from virtually anywhere. Using your computer or mobile device, you can search file across multiple cloud
services simultaneously to print documents or you can scan documents directly to the cloud using the app. Visit
Windows Store, Google Play™ store, and App Store to download the apps. For more information about using the Dell
Document Hub, see the FAQs in Dell.com/documenthub.
Avec l'application Dell Document Hub, vous accédez aux documents, images et contenus numériques et les partagez
facilement. Cette solution de collaboration en nuage innovante connecte votre imprimante et vos périphériques aux
services cloud populaires, fournissant ainsi un moyen de collaboration flexible et sécurisé depuis pratiquement
n'importe où. Grâce à votre ordinateur ou périphérique mobile, vous pouvez rechercher des fichiers simultanément sur
plusieurs services cloud pour imprimer des documents ou encore numériser des documents directement vers le cloud
en utilisant l'application. Rendez-vous sur Windows Store, Google Play™ Store et App Store pour télécharger les
applications. Pour en savoir plus sur l'utilisation de Dell Document Hub, consultez la FAQ sur Dell.com/documenthub.
L'app Dell Document Hub consente di accedere e condividere con facilità documenti, immagini e contenuto digitale.
Questa innovativa soluzione di collaborazione nel cloud connette la stampante e i dispositivi ai servizi cloud più diffusi,
offrendo un mezzo flessibile e sicuro per collaborare da qualsiasi luogo. Utilizzando il computer o un dispositivo mobile
è possibile cercare file su molteplici servizi cloud contemporaneamente per stampare documenti, oppure è possibile
eseguire la scansione dei documenti direttamente nel cloud utilizzando l'app. Per scaricare le app visitare il Windows
Store, il negozio Google Play™ e l'App Store. Per ulteriori informazioni sull'uso di Dell Document Hub, vedere le
domande frequenti nel sito Dell.com/documenthub.
Greifen Sie einfach auf Dokumente zu und teilen Sie Dokumente, Bilder und digitale Inhalte mit der Dell Document Hub-
App. Diese innovative Cloud-Lösung für Zusammenarbeit verbindet Ihren Drucker und Ihre Geräte mit häufig
verwendeten Cloud-Diensten und stellt so eine flexible und sichere Möglichkeit bereit, von nahezu überall
zusammenzuarbeiten. Mit dem Computer oder einem mobilen Gerät können Sie nach Dateien in mehreren Cloud-
Diensten gleichzeitig suchen, um Dokumente mit der App zu drucken oder direkt in die Cloud zu scannen. Besuchen Sie
den Windows Store, Google Play™ Store oder den App Store, um die Apps herunterzuladen. Weitere Informationen zur
Verwendung von Dell Document Hub finden Sie in den FAQs unter Dell.com/documenthub.
Acceda a documentos, imágenes y contenido digital y compártalos fácilmente con la aplicación Dell Document Hub.
Esta innovadora solución de colaboración conecta su impresora y sus dispositivos con servicios de nube populares y
proporciona una forma segura y flexible de colaborar desde virtualmente cualquier lugar. Con su ordenador o
dispositivo móvil, puede buscar un archivo en varios servicios de nube simultáneamente para imprimir documentos o
bien puede escanear documentos directamente a la nube desde la aplicación. Visite Windows Store, Google Play™ store
y App Store para descargar las aplicaciones. Para obtener más información acerca del uso de Dell Document Hub,
consulte las preguntas frecuentes en Dell.com/documenthub.
Seite wird geladen ...
Seite wird geladen ...

33
Impossibile impostare la connessione
wireless utilizzando WPS-PBC (Wi-Fi
Protected Setup-Push Button
Configuration).
Premere il pulsante WPS sul punto di accesso LAN wireless o sul router entro due
minuti dall'avvio dell'operazione WPS sulla stampante. Per ulteriori informazioni
sul punto di accesso LAN wireless o sul router, consultare la documentazione
fornita con il punto di accesso LAN wireless o con il router.
Impossibile impostare la connessione
wireless utilizzando WPS-PIN (Wi-Fi
Protected Setup-Personal
Identification Number).
Verificare che il PIN inserito nel computer sia corretto.
Problem Maßnahme
Die Wireless-Verbindung kann nicht
eingerichtet werden.
Stellen Sie sicher, dass das Ethernet-Kabel und das USB-Kabel vom Drucker
getrennt sind.
Stellen Sie sicher, dass Wi-Fi auf Ein gesetzt ist. Weitere Informationen finden Sie
in der Benutzerhandbuch.
Die Firewall des Computers blockiert möglicherweise die Kommunikation mit
dem Drucker. Deaktivieren Sie die Firewall des Computers.
Die Wireless-Verbindung kann nicht
mit WPS (Wi-Fi Protected Setup)
eingerichtet werden.
Stellen Sie sicher, dass die Sicherheitseinstellung des WLAN-Access Points oder
Routers auf WPA oder WPA2 eingestellt ist. WEP wird bei WPS nicht unterstützt.
Die Wireless-Verbindung kann nicht
mit WPS-PBC (Wi-Fi Protected Setup-
Push Button Configuration)
eingerichtet werden.
Drücken Sie die WPS-Taste am WLAN-Access Point oder Router innerhalb von
zwei Minuten, nachdem Sie den WPS-Vorgang beim Drucker gestartet haben.
Ausführliche Informationen zum WLAN-Access Point oder Router finden Sie in
der Bedienungsanleitung im Lieferumfang des WLAN-Access Points oder
Routers.
Die Wireless-Verbindung kann nicht
mit WPS-PIN (Wi-Fi Protected Setup-
Personal Identification Number)
eingerichtet werden.
Überprüfen Sie, ob die beim Computer eingegebene PIN korrekt ist.
Problema Acción
No se puede configurar la conexión
inalámbrica.
Asegúrese de que el cable Ethernet y el cable USB estén desconectados de la
impresora.
Asegúrese de que Wi-Fi está ajustado en Activado. Para obtener más
información, consulte la Guía del usuario.
El cortafuegos del ordenador puede estar bloqueando la comunicación con la
impresora. Deshabilite el cortafuegos del ordenador.
No se puede configurar la conexión
inalámbrica con WPS (Wi-Fi Protected
Setup).
Asegúrese de que la configuración de seguridad del punto de acceso inalámbrico
de la LAN sea WPA o WPA2. WEP no se admite en WPS.
No se puede configurar la conexión
inalámbrica con WPS-PBC (Wi-Fi
Protected Setup-Push Button
Configuration).
Pulse el botón WPS en el punto de acceso inalámbrico de la LAN o el router
antes de que transcurran dos minutos desde el inicio de la operación WPS en la
impresora. Si desea más información sobre el punto de acceso inalámbrico de la
LAN o el router, consulte el manual que se proporciona con el punto de acceso
inalámbrico de la LAN o el router.
No se puede configurar la conexión
inalámbrica con WPS-PIN (Wi-Fi
Protected Setup-Personal
Identification Number).
Compruebe si el PIN que ha introducido en el ordenador es correcto.
Problema Operazioni da effettuare
Seite wird geladen ...

35
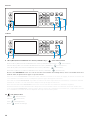
1 CADRV (chargeur
automatique de documents
recto verso)
5 Bac1
6 Chargeur 550 feuilles en
option
2 Module de fusion 7 MPF
3 Rouleau chauffant
4 Unité recto verso
1 Alimentatore automatico di
documenti fronte/retro
(Duplex Automatic
Document Feeder, DADF)
5 Cassetto 1
6 Alimentatore 550 fogli
opzionale
2 Fusore 7 Alimentatore multifunzione
(Multipurpose Feeder, MPF)
3 Regi Roll
4 Duplexer
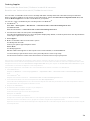
1 Duplex Automatischer
Dokumenteneinzug (DADF)
5 Fach 1
6 Optionale 550-Blatt-Zufuhr
2 Fixieranlage 7 Universalzuführung (MPF)
3 Regi Roll
4 Duplexer
1 Alimentador automático de
documentos dúplex (DADF)
5 Bandeja 1
6 Alimentador de 550 hojas
opcional
2 Unidad del fusor 7 Alimentador multifunción
(MPF)
3 Regi Roll
4 Duplexer
Seite wird geladen ...
Seite wird geladen ...

38
Replacing the toner cartridge
Remplacement de la cartouche de toner | Sostituzione della cartuccia del toner
Ersetzen der Tonerkassette | Sustitución del cartucho de tóner
To replace the toner cartridge, see "Maintaining Your Printer" in the
User's Guide
.
Pour remplacer la cartouche de toner, reportez-vous à la section "Entretien de votre imprimante" du
Guide de
l'utilisateur
.
Per sostituire la cartuccia del toner, consultare "Manutenzione della stampante" nella
Guida per l'utente.
Um die Tonerkassette zu ersetzen, schlagen sie unter "Wartung des Druckers" in der
Benutzerhandbuch
nach.
Para sustituir el cartucho de tóner, consulte "Mantenimiento de la impresora" en la
Guía del usuario.
Cleaning the printer
Nettoyage de l'imprimante | Pulizia della stampante
Reinigen des Druckers | Limpieza de la impresora
To clean the printer, see "Maintaining Your Printer" in the
User's Guide
.
Pour nettoyer l'imprimante, reportez-vous à la section "Entretien de votre imprimante" du
Guide de l'utilisateur
.
Per pulire la stampante, consultare "Manutenzione della stampante" nella
Guida per l'utente.
Um den Drucker zu reinigen, schlagen Sie unter "Wartung des Druckers" in der
Benutzerhandbuch
nach.
Para limpiar la impresora, consulte "Mantenimiento de la impresora" en la
Guía del usuario.
Seite wird geladen ...

40
Utilizzando una stampante collegata in rete, è possibile ordinare materiali di consumo, come una cartuccia del toner e
una cartuccia a tamburo, direttamente da Dell online. Digitare l'indirizzo IP della stampante nel browser Web, avviare
Dell Printer Configuration Web Tool e fare clic su Ordinare i materiali consumabili a: per ordinare materiali consumabili
per la stampante.
È possibile inoltre ordinare i componenti di consumo in base al seguente metodo in Windows
®
.
1Per Windows
®
7:
Fare clic su Start Tutti i programmi Stampanti Dell Dell Printer Hub o Dell Print Management Tool.
Per Windows
®
10:
Fare clic sul pulsante Start Dell Printer Hub o Dell Print Management Tool.
2 Per Dell Printer Hub, selezionare la stampante in
Stampanti personali
.
Per Dell Printer Management Tool, selezionare la stampante visualizzata per impostazione predefinita, oppure
un'altra stampante dall'elenco a discesa nell'angolo in alto a destra della schermata.
3Fare clic su
Materiali di consumo
.
4 Ordinare i materiali di consumo dal web o telefonicamente.
Se si ordina da Web:
a Selezionare il tipo di stampante e il nome.
b Fare clic su Avanti.
Se si ordina per telefono:
Contattare il numero visualizzato nell'angolo in alto a sinistra della finestra oppure fare clic su Contatti.
Per garantirsi il migliore servizio, disporre prontamente del Service Tag della stampante Dell.
Consultare la sezione relativa alle caratteristiche della stampante di questo documento in modo da individuare il
Service Tag della stampante.
Sie können Verbrauchsmaterialien, wie Tonerkassetten und Trommeleinheiten, von Dell online bestellen, wenn Sie
einen vernetzten Drucker verwenden. Geben Sie die IP-Adresse Ihres Druckers in Ihren Webbrowser ein, starten Sie das
Dell Printer Configuration Web Tool, und klicken Sie auf Verbrauchsmaterialien bestellen bei:, um Verbrauchsmaterial
für Ihren Drucker zu bestellen.
Unter Windows
®
können Sie Verbrauchsmaterialien auch über das folgende Verfahren bestellen.
1Für Windows
®
7:
Klicken Sie auf Start Alle Programme Dell Printers Dell Printer Hub oder Dell Print Management Tool.
Für Windows
®
10:
Klicken Sie auf die Start-Taste
Dell Printer Hub oder Dell Print Management Tool.
2 Wählen Sie für Dell Printer Hub den Drucker und
Eigene Drucker
aus.
Wählen Sie für Dell Printer Management Tool den standardmäßig angezeigten Drucker oder einen anderen Drucker
aus dem Dropdown-Menü in der oberen rechten Ecke des Bildschirms aus.
3 Klicken Sie auf
Versorgungsmaterialien
.
4 Bestellen Sie Versorgungsmaterialien entweder über das Internet oder über das Telefon.
Für eine Bestellung per Internet:
a Wählen Sie Ihren Druckertyp und den Druckernamen aus.
b Klicken Sie auf Weiter.
Bei telefonischer Bestellung:
Rufen Sie die Telefonnummer an, die in der linken oberen Ecke des Fensters angezeigt wird, oder klicken Sie auf
Kontaktieren.
Um sicherzustellen, dass Sie den bestmöglichen Service erhalten, halten Sie das Serviceetikett Ihres Dell-Druckers
bereit.
Beachten Sie den Abschnitt Druckerfunktionen dieses Dokuments, um das Service Tag Ihres Druckers zu lokalisieren.
Seite wird geladen ...
Seite wird geladen ...
Seite wird geladen ...
Seite wird geladen ...
-
 1
1
-
 2
2
-
 3
3
-
 4
4
-
 5
5
-
 6
6
-
 7
7
-
 8
8
-
 9
9
-
 10
10
-
 11
11
-
 12
12
-
 13
13
-
 14
14
-
 15
15
-
 16
16
-
 17
17
-
 18
18
-
 19
19
-
 20
20
-
 21
21
-
 22
22
-
 23
23
-
 24
24
-
 25
25
-
 26
26
-
 27
27
-
 28
28
-
 29
29
-
 30
30
-
 31
31
-
 32
32
-
 33
33
-
 34
34
-
 35
35
-
 36
36
-
 37
37
-
 38
38
-
 39
39
-
 40
40
-
 41
41
-
 42
42
-
 43
43
-
 44
44


Dell H815dw Cloud MFP Printer Schnellstartanleitung
- Kategorie
- Multifunktionale
- Typ
- Schnellstartanleitung
in anderen Sprachen
Verwandte Artikel
-
Dell S2810dn Smart Printer Schnellstartanleitung
-
Dell H825cdw Cloud MFP Laser Printer Schnellstartanleitung
-
-
-
-
-
-
-
Dell 2355dn Multifunction Mono Laser Printer Benutzerhandbuch
-
Dell B2375dnf Mono Multifunction Printer Schnellstartanleitung
Andere Dokumente
-
Xerox MO3097Y6-1 Benutzerhandbuch
-
HP Neverstop Laser MFP 1200a Schnellstartanleitung
-
HP Neverstop Laser 1001nw Schnellstartanleitung
-
Panasonic KX-CLPK1 Installationsanleitung
-
Lexmark C752 Bedienungsanleitung
-
HP (Hewlett-Packard) 1218 Benutzerhandbuch
-
HP LaserJet 4300 Printer series Installationsanleitung
-
Canon i-SENSYS MF631Cn Benutzerhandbuch
-
-