Samsung LE20S81B Benutzerhandbuch
- Kategorie
- LCD-Fernseher
- Typ
- Benutzerhandbuch

LCD TV
LE20S8
Owner’s Instructions
Before operating the unit,
please read this manual thoroughly,
and retain it for future reference.
BN68-01177N-01
ON-SCREEN MENUS
PC DISPLAY
TELETEXT
Register your product at www.samsung.com/global/register
Record your Model and Serial number here for future reference.
▪ Model _______________ ▪ Serial No. _______________
BN68-01177N-cover.indd 1 2007-07-28 ¿ÀÈÄ 5:56:38
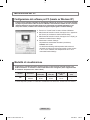
Seite laden ...
Seite laden ...

English - 2
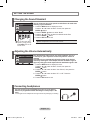
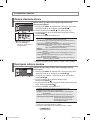
CONNECTING AND PREPARING YOUR TV
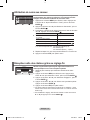
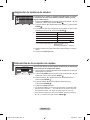
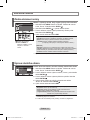
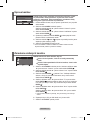
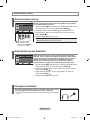
List of Parts
Please make sure the following items are included with your LCD TV.
If any items are missing, contact your dealer.
Remote Control &
Batteries
(AAA x 2)
Power Cord Cover-Bottom Stand Screw X 4 Stand Cleaning Cloth
Owner’s Instructions
Warranty card
Safety Guide
Registration Cards
Warranty card / Safety Guide /
Registration Cards (Not available in all locations)
➣
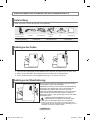
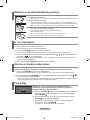
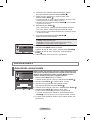
Installing the Stand
Installing the Wall Mount Kit
< 2 >
< 3 >
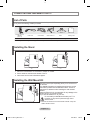
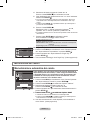
1. Place the TV faced down on a soft cloth or cushion on a table.
2. Put the stand into the hole at the bottom of the TV.
3. Insert screw into the hole indicated and tighten.
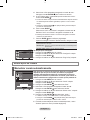
Wall mount items (sold separately) allow you to mount the TV
on the wall.
For detailed information on installing the wall mount, see the
instructions provided with the Wall Mount items. Contact a
technician for assistance when installing the wall mounted
bracket.
Samsung Electronics is not responsible for any damage to the
product or injury to yourself or others
if you elect to install the TV on your own.
Do not install your Wall Mount Kit while your TV is
turned on. It may result in personal injury due to
electric shock.
Remove the stand and cover the bottom hole with a cap and
fasten with two screws.
➣
M4 X L16
BN68-1177N-Eng-0824.indd 2 2007-08-24 �� 4:04:28
Seite laden ...
Seite laden ...

English - 5
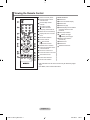
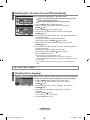
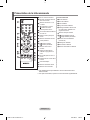
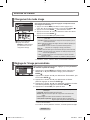
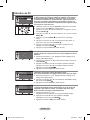
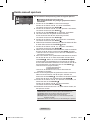
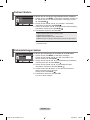
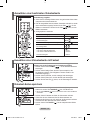
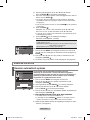
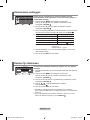
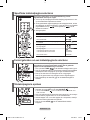
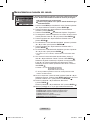
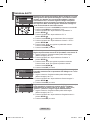
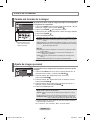
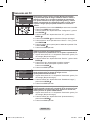
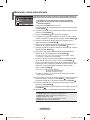
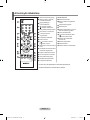
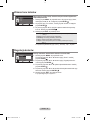
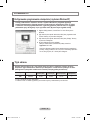
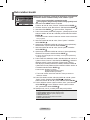
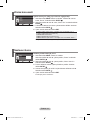
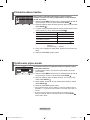
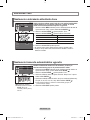
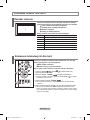
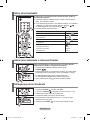
Viewing the Remote Control
1
Television Standby button
Teletext Functions
3
Teletext hold
6
Exit from the teletext display
7
Teletext index
8
Teletext sub page
9
Teletext display/mix both teletext
information and the normal
broadcast
0
Fastext topic selection
@
P : Teletext next page
P
: Teletext previous page
#
Teletext mode selection
(LIST/FLOF)
$
Teletext reveal
&
Teletext store
*
Teletext size selection
2
Number buttons for direct
channel access
3
One/Two-digit channel
selection
4
: Volume increase
: Volume decrease
5
Temporary sound switch-off
6
Selects the TV mode directly
7
Displays the main on-screen
menu
8
Sound effect selection
!
Previous channel
@
P
: Next channel
P
: Previous channel
#
Available source selection
$
Use to see information on the
current broadcast
%
Exit the on-screen menu
^
Control the cursor in the menu
&
Automatic Power-off
(
Picture effect selection
)
Sound mode selection
The performance of the remote control may be affected by bright
light.
For details, refer to further instructions.
➣
➣
BN68-1177N-Eng-0824.indd 5 2007-08-24 �� 4:04:31
Seite laden ...
Seite laden ...
Seite laden ...

English - 9
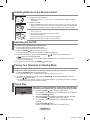
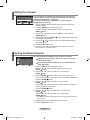
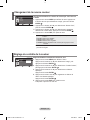
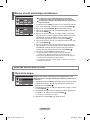
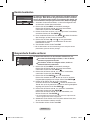
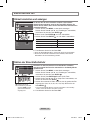
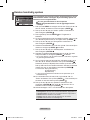
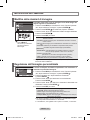
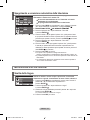
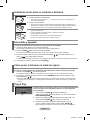
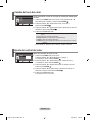
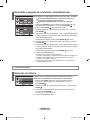
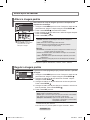
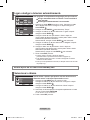
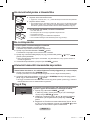
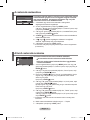
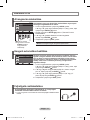
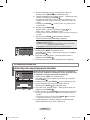
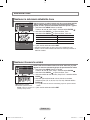
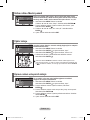
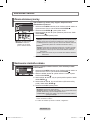
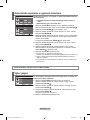
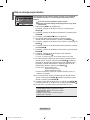
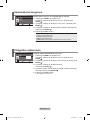
You can exclude the channels you chose from the channels you
scanned. When you scan through the stored channels, those you
have chosen to skip are not displayed.
All channels that you do not specifically choose to skip are
displayed during scanning.
1. Use the number buttons to directly select the channel that will be
added or deleted.
2. Press the MENU button to display the menu.
Press the ▲ or ▼ button to select “Channel”, then press the
ENTER button.
3. Press the ▲ or ▼ button to select “Add/Delete”, then press the
ENTER button.
4. Repeatedly pressing the ENTER button will alternate between add
channel and delete channel.
5. Press the P or P buttons to switch to the appropriate channel,
then repeat above.
6. Press the EXIT button to exit.
You can view any channel (including an erased channel) by using the
number buttons on the remote control.
➣
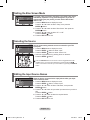
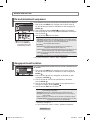
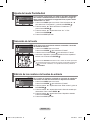
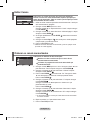
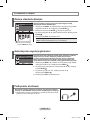
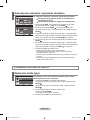
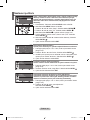
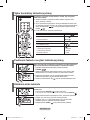
Editing the Channels
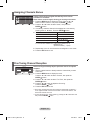
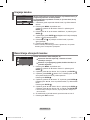
You can exchange the numbers of two channels, in order to:
Modify the numeric order in which the channels have been
automatically stored.
Give easily remembered numbers to the channels that you
watch most often.
1. Press the MENU button to display the menu.
Press the ▲ or ▼ button to select “Channel”, then press the
ENTER button.
2. Press the ▲ or ▼ button to select “Sort”, then press the
ENTER button.
3. Press the ENTER button to select “From”. Press the ▲ or ▼
button until the channel number that you wish to change is displayed.
Press the
ENTER button.
4. Press the ▲ or ▼ button to select “To”, then press the
ENTER button.
Press the ▲ or ▼ button until the new number by which you wish to
identify the channel is displayed.
Press the ENTER button.
5. Press the ▲ or ▼ button to select “Store”, then press the
ENTER button.
Press the ▲ or ▼ button to select “OK”, then press the
ENTER button.
The selected channel is exchanged with the one previously stored to the
chosen number.
6. Repeat steps 3 to 5 for another channel to be sorted.
7. Press the EXIT button to exit.
➣
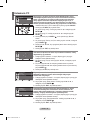
Sorting the Stored Channels
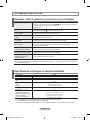
Change Enter Return
Add/Delete
Add
P1 Not in Memory
From : P1
To : P --
Stor e : ?
Move Enter Return
Sort
BN68-1177N-Eng-0824.indd 9 2007-08-24 �� 4:04:36
Seite laden ...

English - 11
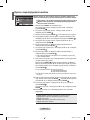
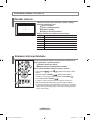
Cont ra st 10 0
Brig ht nes s 4 5
Shar pn ess 75
Colo ur 55
Tin t
G50
R50
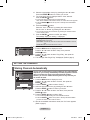
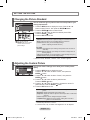
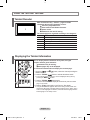
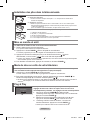
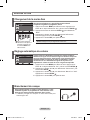
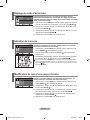
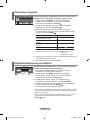
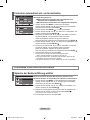
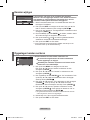
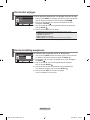
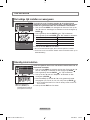
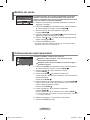
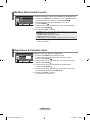
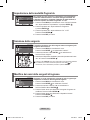
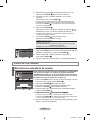
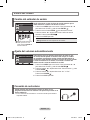
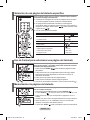
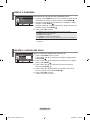
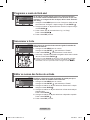
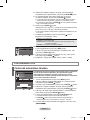
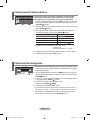
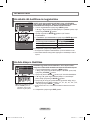
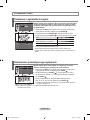
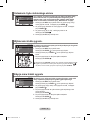
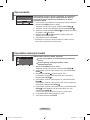
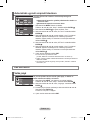
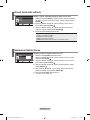
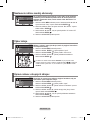
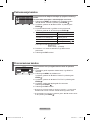
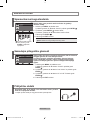
SETTING THE PICTURE
You can select the type of picture which best corresponds to your
viewing requirements.
1. Press the MENU button to display the menu. Press the ▲ or ▼
button to select “Picture”, then press the ENTER button.
2. Press the ENTER button to select “Mode”.
3. Press the ▲ or ▼ button to select the desired picture effect.
Press the ENTER button.
4. Press the EXIT button to exit.
Dynamic: Selects the picture for high-definition in a bright room.
Standard: Selects the picture for optimum display in a normal environment.
Movie: Selects the picture for comfortable display in a dark room.
Custom: Select to view your favorite display settings.
(Refer to “Adjusting the Custom Picture”)
[PC mode]
Entertain: High brightness. (For watching motion pictures such as a DVD or
Video CD.)
Internet: Medium brightness. (For working with a mixture of images such as
text and graphics.)
Text: Normal brightness. (For documentations or works involving heavy text.)
Custom: Select to view your favorite display settings.
In the PC mode, “Entertain”, “Internet”, “Text”, “Custom” appears.
➣
You can also press the
P.MODE button on the remote
control to select one of the
picture settings.
Changing the Picture Standard
Your set has several settings which allow you to control picture
quality.
1. Press the MENU button to display the menu.
Press the ▲ or ▼ button to select “Picture”, then press the
ENTER button.
2. Press the ▲ or ▼ button to select “Custom”, then press the
ENTER button.
3. Press the ▲ or ▼ button to select a particular item.
Press the ENTER button.
4. Press the ◄ or ► button to decrease or increase the value of a
particular item. Press the ENTER button.
5. Press the EXIT button to exit.
Contrast: Adjusts the lightness and darkness between objects and the back-
ground.
Brightness: Adjusts the brightness of the whole screen.
Sharpness: Adjusts the outline of objects to either sharpen them or make them
more dull.
Colour: Adjusts the colours, making them lighter or darker.
Tint(NTSC only): Adjusts the colour of objects, making them more red or
green for a more natural look.
If you make any changes to these settings, the picture mode is
automatically switched to “Custom”.
In the PC mode, only “Contrast” and “Brightness” can be adjusted.
➣
➣
Adjusting the Custom Picture
Dyna mi c
Stan da rd
Movi e
Cust om
Move Enter Return
Mode
Move Enter Return
Custom
BN68-1177N-Eng-0824.indd 11 2007-08-24 �� 4:04:39

English - 12
You can select the most comfortable colour tone to your eyes.
1. Press the MENU button to display the menu.
Press the ▲ or ▼ button to select “Picture”, then press the
ENTER button.
2. Press the ▲ or ▼ button to select “Colour Tone”, then press the
ENTER button.
3. Press the ▲ or ▼ button to select the desired colour tone setting.
Press the
ENTER button.
4. Press the EXIT button to exit.
♦ Cool 2: Makes the colour temperature bluer than “Cool 1” menu.
♦ Cool 1: Makes whites bluish.
♦ Normal: Keeps whites white.
♦ Warm1: Makes whites reddish.
♦ Warm2
: Makes the colour temperature redder than “Warm1” menu.
In the PC mode, “Cool” ,“Normal”, “Warm”, “Custom” appears.
➣
Changing the Colour Tone
Move Enter Return
Colour Tone
Cool 2
Cool 1
Norm al
Wa rm1
Wa rm2
Adjust the individual R, G, B Colour Controls.
1. Press the MENU button to display the menu.
Press the ▲ or ▼ button to select “Picture”, then press the
ENTER button.
2. Press the ▲ or ▼ button to select “Colour Control”, then press the
ENTER button.
3. Press the ▲ or ▼ button to select a particular item.
Press the ENTER button.
4. Press the ◄ or ► button to decrease or increase the value of a
particular item. Press the ENTER button.
5. Press the EXIT button to exit.
Available in PC Mode Only.
➣
Adjusting the Colour Control
Move Enter Return
Colour Control
Red 0
Gree n 1 9
Blue 5 0
BN68-1177N-Eng-0824.indd 12 2007-08-24 �� 4:04:40
Seite laden ...

English - 14
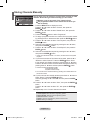
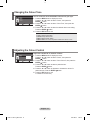
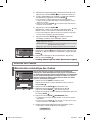
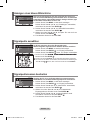
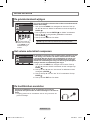
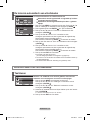
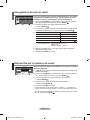
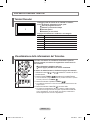
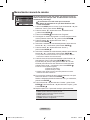
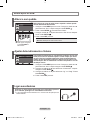
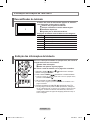
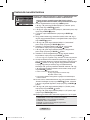
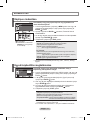
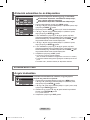
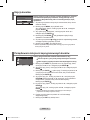
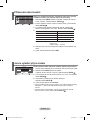
SETTING THE TIME
You can set the TV’s clock so that the current time is displayed
when you press the INFO button. You must also set the time if you
wish to use the automatic On/Off timers.
1. Press the MENU button to display the menu.
Press the ▲ or ▼ button to select “Setup”, then press the
ENTER button.
2. Press the ENTER button to select “Time”.
3. Press the ENTER button to select “Clock Set”.
4.
To... Press the...
Move to “Hour” or “Minute”
◄ or ► button.
Set the “Hour” or “Minute”
▲ or ▼ button.
Confirm the setting ENTER button.
5. Press the EXIT button to exit.
If you disconnect the power cord, you have to set the clock again.
You can also set hour and minute by pressing the number buttons on the
remote control.
➣
➣
Setting and Displaying the Current Time
You can select a time period of between 30 and 180 minutes after
which the television automatically switches to standby mode.
1. Press the MENU button to display the menu.
Press the ▲ or ▼ button to select “Setup”, then press the
ENTER button.
2. Press the ENTER button to select “Time”.
3. Press the ▲ or ▼ button to select “Sleep Timer”, then press the
ENTER button.
4. Press the ▲ or ▼ button repeatedly until the desired time appears
(Off, 30, 60, 90, 120, 150, 180).
Press the ENTER button.
The TV automatically switches to standby mode when the timer reaches 0.
5. Press the EXIT button to exit.
➣
Setting the Sleep Timer
Press the SLEEP button
on the remote control
repeatedly until the
appropriate time interval
appears.
Move Enter Return
Clock Set
Hour M inu te
0000
P1
Mono
Pict ur e : Dyna mi c
Soun d : Stan da rd
00:0 0
Cloc k Set 00: 00
Slee p Ti me r : Of f
On Tim er : O ff
Off Ti me r : Of f
Move Enter Return
Time
BN68-1177N-Eng-0824.indd 14 2007-08-24 �� 4:04:43

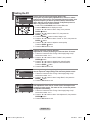
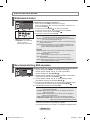
English - 15
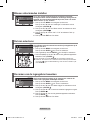
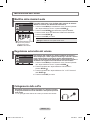
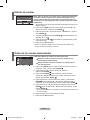
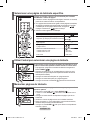
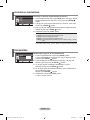
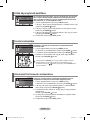
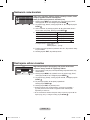
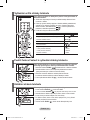
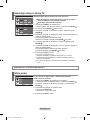
You can set the On/Off timers so that the set will:
Switch on automatically and tune to the channel of your
choice at the time you select.
Switch off automatically at the time you select.
1. Press the MENU button to display the menu.
Press the ▲ or ▼ button to elect “Setup”, then press the
ENTER button.
2. Press the ENTER button to select “Time”.
3. Press the ▲ or ▼ button to select “On Timer”, then press the
ENTER button.
4. Press the ▲ or ▼ button to adjust “Hour”, then press the ► button to
move to the next step.
Set other items using the same method as above.
When finished, press the ENTER button to return.
5. Press the ▲ or ▼ button to select “Off Timer”, then press the
ENTER button.
6. Press the ▲ or ▼ button to adjust “Hour”, then press the ► button to
move to the next step.
Set other items using the same method as above.
When finished, press the ENTER button to return.
7. Press the EXIT button to exit.
The first step is to set the television’s clock.
(refer to “Setting and Displaying the Current Time” on page 14)
You can also set hour and minute by pressing the number buttons on the
remote control.
The "Activation" setting must be set to "On" in order for the timers to
work.
➣
➣
➣
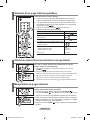
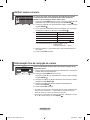
Switching the Television On and Off Automatically
SETTING THE OTHERS
When you start using your set for the first time, you must select the
language which will be used for displaying menus and indications.
1. Press the MENU button to display the on-screen menu.
Press the ▲ or ▼ button to select “Setup”, then press the
ENTER button.
2. Press the ▲ or ▼ button to select “Language”, then press the
ENTER button.
3. Select a particular language by pressing the ▲ or ▼ button
repeatedly.
Press the ENTER button.
You can choose one of 12 languages.
4. Press the EXIT button to exit.
➣
Choosing Your Language
Move Adjust Return
On Timer
Hour M in ute
0000
Vol ume
Prog ra mme
Acti va tio n
P 1 0 0 Off
Move Adjust Return
Off Timer
Hour M in ute
0000
Acti va tio n
Off
Move Enter Return
Language
▼
Engl is h
Deut sc h
Fran ça is
Nede rl and
Espa ño l
Ital ia no
Sven sk a
Port ug uês
BN68-1177N-Eng-0824.indd 15 2007-08-24 �� 4:04:44

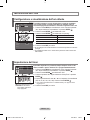
English - 16
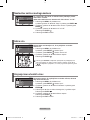
If no signal is being received or the signal is very weak, a blue screen
automatically replaces the noisy picture background. If you wish to
continue viewing the poor picture, you must set the "Blue Screen"
mode to "Off".
1. Press the MENU button to display the menu.
Press the ▲ or ▼ button to select “Setup”, then press the
ENTER button.
2. Press the ▲ or ▼ button to select “Blue Screen” then press the
ENTER button.
3. Press the ▲ or ▼ button to select “On” or “Off”.
Press the ENTER button.
4. Press the EXIT button to exit.
Setting the Blue Screen Mode
You can select among external sources connected to your TV’s
input jacks.
1. Press the MENU button to display the menu.
Press the ENTER button to select “Input”.
2. Press the ENTER button to select “Source List”.
3. Select the required device by pressing the ▲ or ▼ button.
Press the ENTER button.
Press the SOURCE button on the remote control to toggel between all the
available source. TV mode can be selected by pressing the
TV or P /
button on the remote control but you cannot select it by pressing the SOURCE
button.
Selecting the Source
Name the device connected to the input jacks to make your input
source selection easier.
1. Press the MENU button to display the menu.
Press the ENTER button, to select “Input”.
2. Press the ▲ or ▼ button to select “Edit Name”, then press the
ENTER button.
3. Press the ▲ or ▼ button to input select input source that you wish to
edit.
Press the ENTER button.
4. Press the ▲ or ▼ button to select the required device.
Press the ENTER button.
5. Press the EXIT button to exit.
Editing the Input Source Names
Setup
Tim e
Plug & Pl ay
Lang ua ge : En glish
Blue S cre en : On
PC
Move Enter Return
Source List
TV
Ext. : --- -
AV : --- -
S-Vide o : --- -
PC : ----
Move Enter Return
Edit Name
----
VCR
DVD
Cabl e STB
HD S TB
Sate ll ite S TB
AV Rec ei ver
DVD Re cei ve r
Move Enter Return
▼
BN68-1177N-Eng-0824.indd 16 2007-08-24 �� 4:04:46

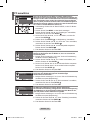
English - 17
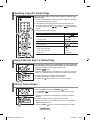
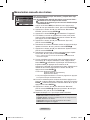
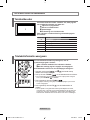
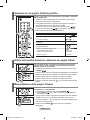
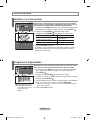
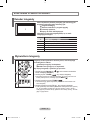
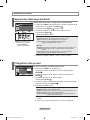
USING THE TELETEXT FEATURE
Most set channels carry “ teletext ”, pages of written
information that provide information such as:
Television programme times.
News bulletins and Weather forecasts.
Sports results.
Subtitles for the hard of hearing.
The teletext pages are organized according to six categories:
Part
Contents
A
Selected page number.
B
Broadcasting station identity.
C
Current page number or search status.
D
Date and time.
E
Text.
F
Status information.
Teletext Decoder
You can display teletext information at any time, but signal
reception must be good. Otherwise:
Information may be missing.
Some pages may not be displayed.
To activate the teletext mode and display the contents page:
1. Using the P ( ) or P ( ) button, select the channel providing the
teletext service.
2. Press the TTX/MIX ( ) button to activate the teletext mode.
The contents page is displayed. It can be redisplayed at any time by
pressing the MENU ( ) button.
3. Press the TTX/MIX ( ) button again.
The actual broadcast will be displayed simultaneously with the teletext
page on the screen.
4. Press the TV( ) button again to exit from the Text display.
If any broken character appears while Text is being viewed, make sure
that the Text language is identical with the language in the “Setup” menu
mode. If both languages are different, select the same language with the
Text language on the “Setup” menu.
➣
➣
➣
Displaying the Teletext Information
BN68-1177N-Eng-0824.indd 17 2007-08-24 �� 4:04:47
Seite laden ...

English - 19
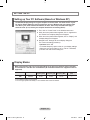
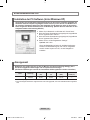
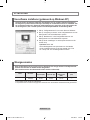
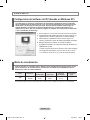
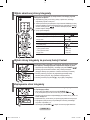
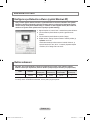
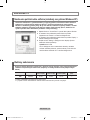
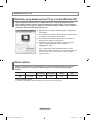
SETTING THE PC
The Windows display-settings for a typical computer are shown below. The actual screens on your
PC may be different depending upon your particular version of Windows and your particular video
card. Even if your actual screens look different, the same, basic set-up information will apply in
almost all cases. (If not, contact your computer manufacturer or Samsung Dealer.)
1. First, click on “Control Panel” on the Windows start menu.
2. When the control panel window appears, click on “Appearance
and Themes” and a display dialog-box will appear.
3.
When the control panel window appears, click on “Display” and
a display dialog-box will appear.
4. Navigate to the “Settings” tab on the display dialog-box.
The correct size setting (resolution):
Optimum: 640 X 480
If a vertical-frequency option exists on your display settings
dialog box, the correct value is “60” or “60 Hz”. Otherwise,
just click “OK” and exit the dialog box.
Setting up Your PC Software (Based on Windows XP)
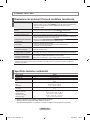
Display Modes
Both screen position and size will vary depending on the type of PC monitor and its resolution.
The resolutions in the table are recommended. (All resolutions between the supported limits are
supported)
Mode Resolution
Horizontal
Frequency (kHz)
Vertical
Frequency (Hz)
Pixel Clock
Frequency (MHz)
Sync Polarity
(H/V)
VGA
720X400
640X480
31.469
31.469
70.087
59.940
28.322
25.175
- / +
- / -
The interlace mode is not supported.
The set might operate abnormally if a non-standard video format is selected.
➣
➣
BN68-1177N-Eng-0824.indd 19 2007-08-24 �� 4:04:49
Seite laden ...
Seite laden ...
Seite laden ...
Seite laden ...

Français - 2
CONNEXION ET PREPARATION DE VOTRE TELEVISEUR
Liste de pièces
Veuillez vous assurer que les composants suivants sont bien inclus avec votre téléviseur LCD.
Le cas échéant, contactez votre revendeur.
Remote Control &
Batteries
(AAA x 2)
Power Cord Bouchon - Base Vis de pied X4 Support Chiffon de nettoyage
Manuel d’utilisation
Carte de garantie
Manuel de sécurité
Cartes d’enregistrement
Carte de garantie / Manuel de sécurité / Cartes d’enregistrement (Non disponibles dans tous les pays)
➣
Installation du support
Installation du support mural
1. Placez le téléviseur sur la table, écran vers le bas, sur un chiffon doux ou un coussin.
2. Placez le support dans l’orifice à la base du téléviseur.
3. Insérez la vis dans le trou indiqué resserrez-la.
Les élements du support mural (vendus séparément) permettent
de fixer le téléviseur au mur.
Pour plus d’informations sur l’installation du support mural,
reportez-vous aux instructions fournies avec les élements
du support mural. Faites appel à un technicien pour installer
la fixation murale. Samsung Electronics ne saurait être tenu
responsable de tout dommage sur le produit ni de toute blessure
subie par vous ou par d’autres personnes si vous choisissez
d’effectuer l’installation murale.
N’installez pas votre kit de montage mural lorsque votre
téléviseur est en fonctionnement. Une blessure par choc
électrique pourrait en résulter.
Enlevez le support, bouchez l’orifice de la base et fermez à l’aide
de deux vis
.
➣
M4 X L16
< 2 >
< 3 >
BN68-1177N-Fre-0824.indd 2 2007-08-24 �� 4:03:22
Seite laden ...
Seite laden ...
Seite laden ...
Seite laden ...
Seite laden ...
Seite laden ...
Seite laden ...
Seite laden ...
Seite laden ...
Seite laden ...
Seite laden ...
Seite laden ...

Français - 15
Vous pouvez activer ou désactiver la minuterie afin que:
Le téléviseur s’allume automatiquement et se positionne
sur lachaîne de votre choix au moment que vous avez choisi.
Le téléviseur s’éteigne automatiquement au moment que
vous avezchoisi.
1.
Appuyez sur le bouton MENU pour afficher le menu. Appuyez sur le bouton
▲ ou ▼ pour sélectionner “Configuration”, puis sur la touche ENTER
.
2. Appuyez sur le bouton ENTER pour sélectionner “Horloge”.
3. Appuyez sur le bouton ▲ ou ▼ pour sélectionner “Minut. ON”, puis
sur la touche ENTER .
4. Appuyez sur le bouton ▲ ou ▼ pour régler “Heure”, puis appuyez
sur le bouton ► pour passer à l’étape suivante. Effectuez les autres
paramétrages à l’aide de la même méthode que celle ci-dessus.
Lorsque vous avez terminé, appuyez sur le bouton ENTER
.
5. Appuyez sur le bouton ▲ ou ▼ pour sélectionner “Minut. OFF”, puis
sur la touche ENTER .
6. Appuyez sur le bouton ▲ ou ▼ pour régler “Heure”, puis appuyez
sur le bouton ► pour passer à l’étape suivante. Effectuez les autres
paramétrages à l’aide de la même méthode que celle ci-dessus.
Lorsque vous avez terminé, appuyez sur le bouton ENTER
.
7. Appuyez sur le bouton EXIT pour quitter le menu.
La première étape consiste à régler l’horloge du téléviseur.
(reportez-vous à “Réglage et affichage de l’heure” à la page 14)
Vous pouvez également régler les heures et les minutes en appuyant
sur les touches numériques de la télécommande.
Le paramètre “Activation” doit être réglé sur “Marche” pour que les
minuteries fonctionnent.
➣
➣
➣
Marche et arrêt automatique du téléviseur
REGLAGE DES AUTRES OPTIONS
Lorsque vous utilisez le téléviseur pour la première fois, vous
devez sélectionner la langue utilisée pour afficher les menus et les
indications.
1. Appuyez sur le bouton MENU pour afficher le menu affiché à l’écran.
Appuyez sur le bouton ▲ ou ▼ pour sélectionner “Configuration”,
puis sur la touche ENTER .
2. Appuyez sur le bouton ▲ ou ▼ pour sélectionner “Langue”, puis sur
la touche ENTER .
3. Sélectionnez la langue voulue en appuyant de façon répétée sur la
touche ▲ ou ▼. Appuyez sur le bouton ENTER .
Vous pouvez choisir parmi 12 langues
.
4. Appuyez sur le bouton EXIT pour quitter le menu.
➣
Choix de la langue
Déplacer Régler Retour
Minut. ON
Heur e Minu te
0000
Vol ume
Prog ra mme
Acti va tio n
P 1 0 0
Arrê t
Déplacer Régler Retour
Minut. OFF
Heur e Minu te
0000
Acti va tio n
Arrê t
Déplacer Entrer Retour
Langue
▼
Engl is h
Deut sc h
Fran ça is
Nede rl and
Espa ño l
Ital ia no
Sven sk a
Port ug uês
BN68-1177N-Fre-0824.indd 15 2007-08-24 �� 4:03:38
Seite laden ...
Seite laden ...
Seite laden ...
Seite laden ...
Seite laden ...

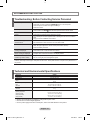
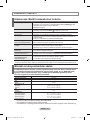
Français - 21
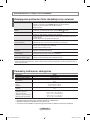
Spécications techniques et environnementales
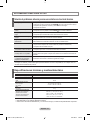
RECOMMENDATIONS FOR USE
Dépannage : Avant de contacter le personnel du service d’assistance
La conception et les spécifications sont susceptibles de changer sans préavis.
Ce périphérique est un appareil numérique de classe B.
Pour les caractéristiques d’alimentation et de consommation électrique, voir l’étiquette fixée au produit.
➣
➣
➣
Nom du modèle
LE20S8
Taille de l’écran (diagonale)
20
pouces
Résolution PC
640 X 480 @ 60 Hz
Son
Sortie
3W X 2
Dimensions (L x P x H)
Corps
Avec pied
574 mm X 70 mm X 428 mm
574 mm X 196 mm X 468 mm
Poids
avec support
8 kg
Considérations environnementales
Température de fonctionnement
Humidité au cours du fonctionnement
Température de stockage
Humidité sur le lieu de stockage
de 10 °C à 40 °C (de 50 °F à 104 °F)
de 10 % à 80 %, sans condensation
de -20 °C à 45 °C (de -4 °F à 113 °F)
de 5 % à 95 %, sans condensation
Aucune image ou aucun son
Vérifiez que la prise est bien branchée à une prise murale.
Vérifiez que vous avez appuyé sur le bouton POWER situé sur la façade de votre téléviseur.
Vérifiez les paramètres de contraste et de luminosité.
Vérifiez le volume.
Image normale mais aucun
son
Vérifiez le volume.
Vérifiez si le bouton MUTE
de la télécommande a été touché.
Aucune image ou une image
en noir et blanc
Réglez les paramètres de couleur.
Vérifiez que le système d’émission sélectionné est correct.
Interférence du son et de
l’image
Essayez d’identifier l’appareil électrique qui perturbe le téléviseur et éloignez-le.
Branchez le téléviseur sur une autre prise.
Image neigeuse ou oue,
son déformé
Vérifiez l’orientation, l’emplacement et les connexions de votre antenne.
Cette interférence est souvent due à l’utilisation d’une antenne intérieure.
Dysfonctionnements de la
télécommande
Remplacez les piles de la télécommande.
Nettoyez la partie supérieure de la télécommande (zone d’émission des signaux).
Vérifiez les connecteurs des piles.
Le message
“Vérif. câble signal” s’afche.
Assurez-vous que le câble de signal est bien branché au PC ou aux sources vidéo.
Assurez-vous que les sources vidéo ou le PC sont allumés.
En mode PC, le message
“Mode non pris en charge” s’afche.
Vérifiez la résolution maximale et la fréquence de l’adaptateur vidéo.
Comparez ces valeurs aux données des modes d’affichage.
L’écran est noir et le témoin
d’alimentation clignote à
intervalle régulier.
Sur votre ordinateur, allez sur : Alimentation, Câble de signal.
Le mode de gestion d’alimentation est activé.
Le panneau LCD TFT est doté de sous-pixels (921 600) exigeant le déploiement d’une technologie sophistiquée. Il se
peut cependant que quelques pixels clairs ou foncés apparaissent sur l’écran. Ces pixels n’auront aucune incidence sur
les performances du produit.
BN68-1177N-Fre-0824.indd 21 2007-08-24 �� 4:03:44
Seite laden ...

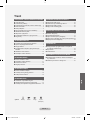
Deutsch - 1
ANSCHLIESSEN UND VORBEREITEN DES FERNSEHGERÄTS
Lieferumfang ...............................................................2
Anbringen des Fußes
.................................................2
Anbringen der Wandhalterung
.................................... 2
Bedienfeld
...................................................................3
Anschlussfeld
.............................................................4
Fernbedienung
...........................................................5
Batterien in die Fernbedienung montieren
.................6
Ein-und Ausschalten
...................................................6
Schalten des Fernsehgeräts in den Standby-Modus
.. 6
Plug & Play
.................................................................6
EINSTELLEN DER KANÄLE
Kanäle automatisch speichern ...................................7
Kanäle manuell speichern
..........................................8
Kanäle bearbeiten
......................................................9
Gespeicherte Kanäle sortieren
................................... 9
Kanalnamen zuweisen
.............................................10
Senderfeinabstimmung durchführen
........................10
EINSTELLEN DES BILDES
Bildstandard ändern ................................................. 11
Benutzereinstellung Bild anpassen
.......................... 11
Farbwert ändern
.......................................................12
Farbeinstellungen ändern
.........................................12
EINSTELLEN DES TONS
Tonwiedergabestandard ändern ...............................13
Lautstärke automatisch einstellen
............................13
Kopfhörer anschließen
.............................................13
EINSTELLEN DER ZEIT
Uhrzeit einstellen und anzeigen ...............................14
Stellen der Einschlafschaltuhr
..................................14
Fernseher automatisch ein- und ausschalten
........... 15
VORNEHMEN SONSTIGER EINSTELLUNGEN
Sprache der Bedienerführung wählen ...................... 15
Anzeigen eines blauen Bildschirms
..........................16
Signalquelle auswählen
............................................16
Signalquellennamen bearbeiten
...............................16
VERWENDEN DER VIDEOTEXT-FUNKTION
Videotextdecoder ......................................................17
Anzeigen von Videotextinformationen
......................17
Auswählen einer bestimmten Videotextseite
............18
Auswählen einer Videotextseite mit Fastext
.............18
Videotext-Seiten speichern
.......................................18
KONFIGURIEREN DES PCS
Installation der PC-Software (Unter Windows XP) ... 19
Anzeigemodi
.............................................................19
PC auswählen
..........................................................20
EMPFEHLUNGEN FÜR DEN BETRIEB
Fehlerbehebung: Vor der Kontaktaufnahme mit
dem Kundendienst....................................................21
Technische Daten und Umgebungsbedingungen
....21
Deutsch
Inhalt
Symbole
Tastendruck
Wichtig Hinweis
Zielwahltaste
Deutsch - 1
BN68-1177N-Ger-0824.indd 1 2007-08-24 �� 4:05:41

Deutsch - 2
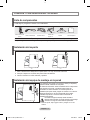
ANSCHLIESSEN UND VORBEREITEN DES FERNSEHGERÄTS
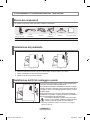
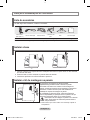
Lieferumfang
Überprüfen Sie die Verpackung Ihres LCD-Fernsehgeräts auf Vollständigkeit.
Sollten Teile fehlen, wenden Sie sich bitte an Ihren Händler.
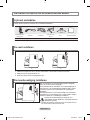
Fernbedienung und 2
Batterien (Typ AAA)
Netzkabel Untere Abdeckung
4 Schrauben für
Standfuß
Fuß Reinigungstuch
Bedienungsanleitung
Garantiekarte
Handbuch mit
Sicherheitshinweisen
Registrierkarten
Garantiekarte / Handbuch mit Sicherheitshinweisen / Registrierkarten (nicht überall verfügbar)
➣
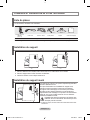
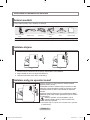
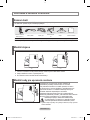
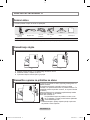
Anbringen des Fußes
Anbringen der Wandhalterung
1. Legen Sie das Fernsehgerät mit dem Bildschirm nach unten auf ein weiches Tuch auf einem Tisch.
2. Setzen Sie den Standfuß in die Aussparung an der Unterseite des Fernsehgeräts ein.
3. Führen Sie die Schraube in die angegebene Bohrung ein, und ziehen Sie sie fest.
Mit der separat erhältlichen Wandhalterung können Sie das
Fernsehgerät an einer Wand befestigen.
Detaillierte Informationen zum Montieren der Wandhalterung
finden Sie in den Anweisungen, die im Lieferumfang der
Wandhalterung enthalten sind. Lassen Sie sich beim
Anbringen der Wandmontagehalterung von einem Techniker
helfen. Samsung Electronics haftet nicht für Schäden an
Gerät oder Personen, wenn die Montage vom Kunden selbst
durchgeführt wird.
Installieren Sie die Wandhalterung nicht bei
angeschaltetem Fernsehgerät. Sie könnten dabei
einen Stromschlag erhalten und sich verletzen.
Entfernen Sie den Fuß, und decken Sie die Aussparung an
der Unterseite des Fernsehgeräts mit einer Abdeckung ab und
befestigen Sie diese mit zwei Schrauben.
➣
M4 X L16
< 2 >
< 3 >
BN68-1177N-Ger-0824.indd 2 2007-08-24 �� 4:05:43

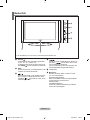
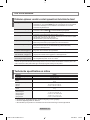
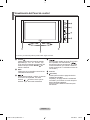
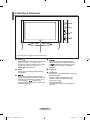
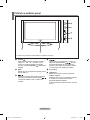
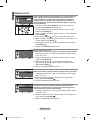
Deutsch - 3
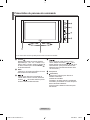
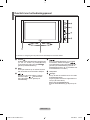
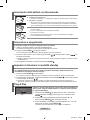
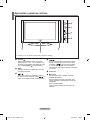
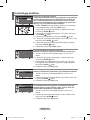
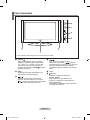
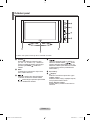
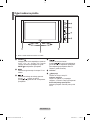
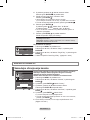
Bedienfeld
1 SOURCE
S
chaltet zwischen allen verfügbaren Signalquellen
um (TV - Ext. - AV - S-Video - PC).
Im Bildschirmmenü können Sie diese Taste wie die
Taste ENTER auf der Fernbedienung verwenden.
2 MENU
Drücken Sie diese Taste, um ein Bildschirmmenü zu den
Funktionen des TVGeräts einzublenden
.
3
Drücken Sie diese Tasten, um die Lautstärke zu erhöhen
oder zu verringern. Im Bildschirmmenü können Sie die
Schaltflächen wie die Tasten
und
auf der
Fernbedienung verwenden.
4
Kanäle wechseln. Im Bildschirmmenü können Sie
die Tasten wie die Tasten und auf
der Fernbedienung verwendenl.
(Ohane Fernbedienung kann der Fernseher über
die Kanalwahltasten eingeschaltet werden.)
5 Lautsprecher
6 (Netztaste)
Drücken Sie diese Taste, um das TV-Gerät
ein- und auszuschalten.
Stromversorgungsanzeige
Blinkt und schaltet sich aus bei eingeschalteter
Stromversorgung; leuchtet auf im
Standbymodus.
Fernbedienungssensor
Zielen Sie mit der Fernbedienung auf diesen
Sensor am Fernsehgerät.
Die Produktfarbe und -form kann je nach Modell unterschiedlich sein.
➣
BN68-1177N-Ger-0824.indd 3 2007-08-24 �� 4:05:44

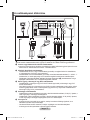
Deutsch - 4
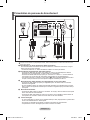
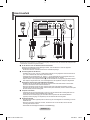
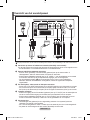
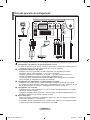
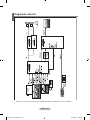
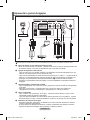
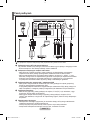
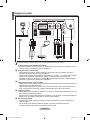
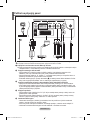
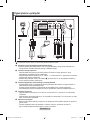
Anschlussfeld
Die Produktfarbe und -form kann je nach Modell unterschiedlich sein.
➣
Wenn Sie ein externes Gerät an das Fernsehgerät anschließen möchten, muss das Gerät unbedingt ausgeschaltet sein.
Achten Sie beim Anschließen von Kabeln an die Ausgänge des Geräts darauf, das die Kabel den entsprechenden
farbcodierten Anschlüssen zugeordnet werden.
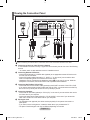
1
An der Antenne oder am Kabelfernsehnetz anschließen
Damit die Fernsehkanäle korrekt empfangen werden, muss der Monitor an eine der folgenden
Signalquellen angeschlossen sein:
- Terrestrische Antenne / Kabelfernsehanschluss / Satellitenempfänger
3 Connecting External A/V Devices
- Schließen Sie ein Cinch- oder ein S-Video-Kabel (optional) an ein geeignetes externes A/V-Gerät an
(z. B. einen Videorekorder, DVD-Player oder Camcorder.
- Verbinden Sie den Audioausgang “R - AUDIO - L” auf der Rückseite des Fernsehgeräts über Cinch-
Audiokabel (optional) mit dem entsprechenden Audioausgang des A/V -Geräts.
-
Kopfhörer können an den Kopfhöreranschluss (2) auf der Rückseite des Fernsehgeräts angeschlossen werden.
Wenn Kopfhörer angeschlossen sind, ist die Tonwiedergabe über die eingebauten Lautsprecher abgeschaltet.
4
Set-Top-Box, Videorecorder oder DVD-Gerät anschließen
- Schließen Sie das SCART-Kabel (optional) des Videorecorders oder DVD-Geräts an den SCART-
Anschluss des Videorecorders oder DVD-Geräts an.
- Wenn Sie sowohl Set-Top-Box als auch Videorecorder (oder DVD-Gerät) anschließen möchten,
verbinden Sie die Set-Top-Box mit dem Videorecorder (oder DVD-Gerät) und den Videorecorder (oder
das DVD-Gerät) mit dem Fernsehgerät.
5
Computer anschließen
- Verbinden Sie die PC-Eingangsbuchse “PC IN (PC)” auf der Rückseite des Fernsehgeräts über ein
D-Sub-Kabel (optional) mit der Grafikkarte des Computers.
- Verbinden Sie den Audioausgang der Soundkarte des Computers über das Stereoaudiokabel
(optional) mit dem Eingang “PC IN (AUDIO)” auf der Rückseite des Fernsehgeräts.
6
Kensington-Schloss
- Das Kensington-Schloss (optional) dient zur Sicherung des Fernsehgeräts bei Verwendung an einem
öffentlichen Ort.
- Wenn Sie ein Schloss verwenden möchten, wenden Sie sich an den Händler, bei dem Sie das
Fernsehgerät erworben haben.
-
Die Position des Kensington-Schlosses ist modellabhängig.
Netzkabelbuchse
BN68-1177N-Ger-0824.indd 4 2007-08-24 �� 4:05:45

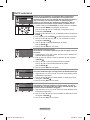
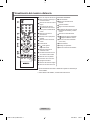
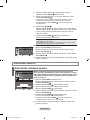
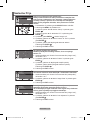
Deutsch - 5
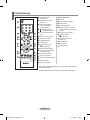
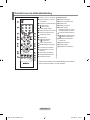
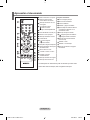
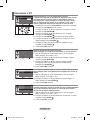
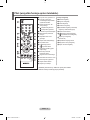
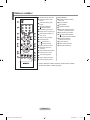
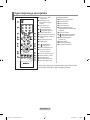
Fernbedienung
1
Standby-Taste des
Fernsehgeräts
Videotext-Funktionen
3
Standbild
6
Videotextanzeige verlassen
7
Videotext-Index
8
Untergeordnete Seite
9
Videotext anzeigen / Videotext
und Fernsehübertragung zugleich
anzeigen
0
Fastext-Thema auswählen
@
P
: Nächste Seite
P
: Vorige Seite
#
Navigationsart wechseln
(LIST/FLOF)
$
Seite aufdecken
&
Seite speichern
*
Textgröße wählen
2
Zifferntasten für direkte
Kanalwahl
3
Taste zum Auswählen
von ein-/ zweistelligen
Programmplätzen
4
:
Lautstärkeerhöhung
:
Lautstärkeverminderung
5
Ton vorübergehend aussc
halten
6
Modus TV direkt aufrufen
7
OSD-Menü anzeigen
8
Audioeffektauswah
!
Voriger Sender
@
P
: Nächster Sender
P
: Voriger Sender
#
Wahl verfügbarer Quellen
$
I
nformationen zur aktuellen
Sendung anzeigen
%
OSD-Menü ausblenden
^
Den Cursor im Menü
&
Sleep-Timer aktivieren/stellen
(
Bildeffekt wählen
)
Audiomodusauswahl
Die Funktion der Fernbedienung kann durch helle Lichteinstrahlung
beeinträchtigt werden.
Weitere Informationen finden Sie in den folgenden Anweisungen.
➣
➣
BN68-1177N-Ger-0824.indd 5 2007-08-24 �� 4:05:45

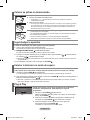
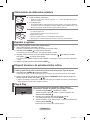
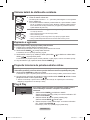
Deutsch - 6
Das Netzkabel ist auf der Rückseite des Geräts angeschlossen.
1.
Schließen Sie das Netzkabel an eine geeignete Netzsteckdose an.
Die Standby-Anzeige auf der Vorderseite des Geräts leuchtet auf.
2.
Drücken Sie die Taste POWER auf dem Bedienfeld des Fernsehgeräts.
Das Programm, das Sie zuletzt gesehen haben, wird automatisch angezeigt.
3.
Drücken Sie auf der Fernbedienung die Zifferntasten (0~9) oder eine der Programmplatz-Wahltasten
( / ) oder drücken Sie rechts auf dem Bedienfeld die Taste .
Wenn Sie das Gerät zum ersten Mal einschalten, können Sie die Sprache auswählen, in der die Menüs angezeigt werden.
4. Um das Gerät auszuschalten, drücken Sie erneut die Taste POWER .
➣
➣
➣
Ein-und Ausschalten
Zur Verringerung des Stromverbrauchs kann das Gerät in den Standby-Modus geschaltet werden.Der Standby-
Modus ist nützlich, wenn Sie das Gerät vorübergehend ausschalten möchten (z. B. während einer Mahlzeit).
1.
Drücken Sie auf der Fernbedienung die Taste POWER .
“Der Bildschirm wird ausgeschaltet, und auf der Vorderseite des Fernsehgeräts leuchtet die Standby-Anzeige auf.”
2.
Drücken Sie einfach erneut die Taste POWER , eine Zifferntaste (0~9) oder die Kanalwechseltaste
( / ) um das Gerät wieder einzuschalten.
Lassen Sie das Gerät nicht für längere Zeit im Standby-Modus (z. B. wenn Sie verreist sind).
Ziehen Sie sicherheitshalber den Netzstecker und trennen Sie das Antennenkabel.
➣
➣
Schalten des Fernsehgeräts in den Standby-Modus
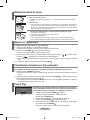
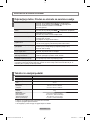
Wenn das Fernsehgerät zum ersten Mal eingeschaltet wird, werden automatisch einige
Grundeinstellungen abgefragt. Die folgenden Einstellungen können vorgenommen werden.
1.
Drücken Sie auf der Fernbedienung die Taste POWER Die Meldung
“Start Plug & Play” wird angezeigt und “OK” ist usgewählt.
Drücken Sie die Taste
ENTER .
2.
Wählen Sie die entsprechende Sprache aus, indem Sie die Taste
oder
drücken. Bestätigen Sie Ihre Auswahl mit der Taste
ENTER .
3.
Die Meldung “Antenneneingang prüfen” wird eingeblendet. Das
Kästchen “OK” ist ausgewählt. Drücken Sie die Taste ENTER .
Überprüfen Sie, ob das Antennenkabel richtig angeschlossen ist.
➣
Plug & Play
Plug & Play
1.
Nehmen Sie die Batteriefachabdeckung ab.
2.
Legen Sie zwei AAA-Batterien ein.
Achten Sie darauf, dass die Pole der Batterien wie im Batteriefach angezeigt ausgerichtet sind.
3. Schieben Sie die Abdeckung wieder auf die Fernbedienung.
Wenn die Fernbedienung für einen längeren Zeitraum nicht verwendet wird, nehmen
Sie die Batterien heraus, und lagern Sie sie an einem kühlen, trockenen Ort. Die
Fernbedienung funktioniert bis zu einer Entfernung von 7 m zum Fernseher. (Bei
normaler Nutzung des Fernsehers halten die Batterien ungefähr ein Jahr.
Sollte die Fernbedienung nicht funktionieren, überprüfen Sie Folgendes:
1. Ist das Fernsehgerät eingeschaltet?
2. Wurden der Plus- und Minuspol der Batterien vertauscht?
3. Sind die Batterien leer?
4. Liegt ein Stromausfall vor oder ist das Netzkabel des Fernsehgeräts nicht eingesteckt?
Batterien und Akkus gehören nicht in den Hausmüll. Als Verbraucher sind Sie verpflichtet,
alte Batterien und Akkus zur umweltschonenden Entsorgung zurückzugeben. Sie können
alte Batterien und Akkus bei den öffentlichen Sammelstellen in Ihrer Gemeinde oder überall
dort abgeben, wo Batterien und Akkus der betreffenden Art verkauft werden.
➣
➣
➣
➣
Batterien in die Fernbedienung montieren
Eingabe
Start Plug & Play
OK
BN68-1177N-Ger-0824.indd 6 2007-08-24 �� 4:05:46
Seite laden ...
Seite laden ...
Seite laden ...
Seite laden ...
Seite laden ...
Seite laden ...
Seite laden ...
Seite laden ...
Seite laden ...
Seite laden ...
Seite laden ...
Seite laden ...
Seite laden ...
Seite laden ...
Seite laden ...
Seite laden ...
Seite laden ...
Seite laden ...
Seite laden ...
Seite laden ...
Seite laden ...
Seite laden ...
Seite laden ...
Seite laden ...
Seite laden ...
Seite laden ...
Seite laden ...
Seite laden ...
Seite laden ...
Seite laden ...
Seite laden ...
Seite laden ...
Seite laden ...
Seite laden ...
Seite laden ...
Seite laden ...
Seite laden ...
Seite laden ...
Seite laden ...
Seite laden ...
Seite laden ...
Seite laden ...
Seite laden ...
Seite laden ...
Seite laden ...
Seite laden ...
Seite laden ...
Seite laden ...
Seite laden ...
Seite laden ...
Seite laden ...
Seite laden ...
Seite laden ...
Seite laden ...
Seite laden ...
Seite laden ...
Seite laden ...
Seite laden ...
Seite laden ...
Seite laden ...
Seite laden ...
Seite laden ...
Seite laden ...
Seite laden ...
Seite laden ...
Seite laden ...
Seite laden ...
Seite laden ...
Seite laden ...
Seite laden ...
Seite laden ...
Seite laden ...
Seite laden ...
Seite laden ...
Seite laden ...
Seite laden ...
Seite laden ...
Seite laden ...
Seite laden ...
Seite laden ...
Seite laden ...
Seite laden ...
Seite laden ...
Seite laden ...
Seite laden ...
Seite laden ...
Seite laden ...
Seite laden ...
Seite laden ...
Seite laden ...
Seite laden ...
Seite laden ...
Seite laden ...
Seite laden ...
Seite laden ...
Seite laden ...
Seite laden ...
Seite laden ...
Seite laden ...
Seite laden ...
Seite laden ...
Seite laden ...
Seite laden ...
Seite laden ...
Seite laden ...
Seite laden ...
Seite laden ...
Seite laden ...
Seite laden ...
Seite laden ...
Seite laden ...
Seite laden ...
Seite laden ...
Seite laden ...
Seite laden ...
Seite laden ...
Seite laden ...
Seite laden ...
Seite laden ...
Seite laden ...
Seite laden ...
Seite laden ...
Seite laden ...
Seite laden ...
Seite laden ...
Seite laden ...
Seite laden ...
Seite laden ...
Seite laden ...
Seite laden ...
Seite laden ...
Seite laden ...
Seite laden ...
Seite laden ...
Seite laden ...
Seite laden ...
Seite laden ...
Seite laden ...
Seite laden ...
Seite laden ...
Seite laden ...
Seite laden ...
Seite laden ...
Seite laden ...
Seite laden ...
Seite laden ...
Seite laden ...
Seite laden ...
Seite laden ...
Seite laden ...
Seite laden ...
Seite laden ...
Seite laden ...
Seite laden ...
Seite laden ...
Seite laden ...
Seite laden ...
Seite laden ...
Seite laden ...
Seite laden ...
Seite laden ...
Seite laden ...
Seite laden ...
Seite laden ...
Seite laden ...
Seite laden ...
Seite laden ...
Seite laden ...
Seite laden ...
Seite laden ...
Seite laden ...
Seite laden ...
Seite laden ...
Seite laden ...
Seite laden ...
Seite laden ...
Seite laden ...
Seite laden ...
Seite laden ...
Seite laden ...
Seite laden ...
Seite laden ...
Seite laden ...
Seite laden ...
Seite laden ...
Seite laden ...
Seite laden ...
Seite laden ...
Seite laden ...
Seite laden ...
Seite laden ...
Seite laden ...
Seite laden ...
Seite laden ...
Seite laden ...
Seite laden ...
Seite laden ...
Seite laden ...
Seite laden ...
Seite laden ...
Seite laden ...
Seite laden ...
Seite laden ...
Seite laden ...
Seite laden ...
Seite laden ...
Seite laden ...
Seite laden ...
Seite laden ...
Seite laden ...
Seite laden ...
Seite laden ...
Seite laden ...
Seite laden ...
Seite laden ...
Seite laden ...
Seite laden ...
Seite laden ...
Seite laden ...
-
 1
1
-
 2
2
-
 3
3
-
 4
4
-
 5
5
-
 6
6
-
 7
7
-
 8
8
-
 9
9
-
 10
10
-
 11
11
-
 12
12
-
 13
13
-
 14
14
-
 15
15
-
 16
16
-
 17
17
-
 18
18
-
 19
19
-
 20
20
-
 21
21
-
 22
22
-
 23
23
-
 24
24
-
 25
25
-
 26
26
-
 27
27
-
 28
28
-
 29
29
-
 30
30
-
 31
31
-
 32
32
-
 33
33
-
 34
34
-
 35
35
-
 36
36
-
 37
37
-
 38
38
-
 39
39
-
 40
40
-
 41
41
-
 42
42
-
 43
43
-
 44
44
-
 45
45
-
 46
46
-
 47
47
-
 48
48
-
 49
49
-
 50
50
-
 51
51
-
 52
52
-
 53
53
-
 54
54
-
 55
55
-
 56
56
-
 57
57
-
 58
58
-
 59
59
-
 60
60
-
 61
61
-
 62
62
-
 63
63
-
 64
64
-
 65
65
-
 66
66
-
 67
67
-
 68
68
-
 69
69
-
 70
70
-
 71
71
-
 72
72
-
 73
73
-
 74
74
-
 75
75
-
 76
76
-
 77
77
-
 78
78
-
 79
79
-
 80
80
-
 81
81
-
 82
82
-
 83
83
-
 84
84
-
 85
85
-
 86
86
-
 87
87
-
 88
88
-
 89
89
-
 90
90
-
 91
91
-
 92
92
-
 93
93
-
 94
94
-
 95
95
-
 96
96
-
 97
97
-
 98
98
-
 99
99
-
 100
100
-
 101
101
-
 102
102
-
 103
103
-
 104
104
-
 105
105
-
 106
106
-
 107
107
-
 108
108
-
 109
109
-
 110
110
-
 111
111
-
 112
112
-
 113
113
-
 114
114
-
 115
115
-
 116
116
-
 117
117
-
 118
118
-
 119
119
-
 120
120
-
 121
121
-
 122
122
-
 123
123
-
 124
124
-
 125
125
-
 126
126
-
 127
127
-
 128
128
-
 129
129
-
 130
130
-
 131
131
-
 132
132
-
 133
133
-
 134
134
-
 135
135
-
 136
136
-
 137
137
-
 138
138
-
 139
139
-
 140
140
-
 141
141
-
 142
142
-
 143
143
-
 144
144
-
 145
145
-
 146
146
-
 147
147
-
 148
148
-
 149
149
-
 150
150
-
 151
151
-
 152
152
-
 153
153
-
 154
154
-
 155
155
-
 156
156
-
 157
157
-
 158
158
-
 159
159
-
 160
160
-
 161
161
-
 162
162
-
 163
163
-
 164
164
-
 165
165
-
 166
166
-
 167
167
-
 168
168
-
 169
169
-
 170
170
-
 171
171
-
 172
172
-
 173
173
-
 174
174
-
 175
175
-
 176
176
-
 177
177
-
 178
178
-
 179
179
-
 180
180
-
 181
181
-
 182
182
-
 183
183
-
 184
184
-
 185
185
-
 186
186
-
 187
187
-
 188
188
-
 189
189
-
 190
190
-
 191
191
-
 192
192
-
 193
193
-
 194
194
-
 195
195
-
 196
196
-
 197
197
-
 198
198
-
 199
199
-
 200
200
-
 201
201
-
 202
202
-
 203
203
-
 204
204
-
 205
205
-
 206
206
-
 207
207
-
 208
208
-
 209
209
-
 210
210
-
 211
211
-
 212
212
-
 213
213
-
 214
214
-
 215
215
-
 216
216
-
 217
217
-
 218
218
-
 219
219
-
 220
220
-
 221
221
-
 222
222
-
 223
223
-
 224
224
-
 225
225
-
 226
226
-
 227
227
-
 228
228
-
 229
229
-
 230
230
-
 231
231
-
 232
232
-
 233
233
-
 234
234
-
 235
235
-
 236
236
-
 237
237
-
 238
238
-
 239
239
-
 240
240
-
 241
241
-
 242
242
-
 243
243
-
 244
244
-
 245
245
-
 246
246
-
 247
247
-
 248
248
-
 249
249
-
 250
250
-
 251
251
-
 252
252
-
 253
253
-
 254
254
-
 255
255
-
 256
256
-
 257
257
-
 258
258
-
 259
259
-
 260
260
-
 261
261
-
 262
262
-
 263
263
-
 264
264
-
 265
265
-
 266
266
-
 267
267
-
 268
268
-
 269
269
-
 270
270
-
 271
271


Samsung LE20S81B Benutzerhandbuch
- Kategorie
- LCD-Fernseher
- Typ
- Benutzerhandbuch
in anderen Sprachen
- English: Samsung LE20S81B User manual
- français: Samsung LE20S81B Manuel utilisateur
- español: Samsung LE20S81B Manual de usuario
- italiano: Samsung LE20S81B Manuale utente
- Nederlands: Samsung LE20S81B Handleiding
- slovenčina: Samsung LE20S81B Používateľská príručka
- português: Samsung LE20S81B Manual do usuário
- polski: Samsung LE20S81B Instrukcja obsługi
- čeština: Samsung LE20S81B Uživatelský manuál
Verwandte Papiere
-
Samsung LE19R71W Benutzerhandbuch
-
Samsung LE46S86BD Benutzerhandbuch
-
Samsung LE26R89 Benutzerhandbuch
-
Samsung LE-37M86BD Benutzerhandbuch
-
Samsung LE32R86WDX Benutzerhandbuch
-
Samsung LE40B551 Benutzerhandbuch
-
-
Samsung LE40S62B Benutzerhandbuch
-
Samsung LE-32M86BD Benutzerhandbuch