
INSTRUCTION MANUAL
MODE D’EMPLOI
BEDIENUNGSANLEITUNG
MANUAL DE INSTRUCCIONES
E
G
F
S
English
Français
DeutschEspañol

English
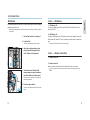
Introduction..................................................................................................... 4
Notes .............................................................................................................. 5
Custom Functions .......................................................................................... 6
Deutsch
Einleitung........................................................................................................ 20
Hinweise......................................................................................................... 21
Custom-Funktionen ........................................................................................ 22
Français
Introduction..................................................................................................... 36
Notes .............................................................................................................. 37
Fonctions Personnalisables ........................................................................... 38
Español
Introducción.................................................................................................... 52
Notas .............................................................................................................. 53
Funciones Personalizadas ............................................................................. 54
3

5
NOTES
-When using your camera with Wireless Controller IR-1N in single-
frame mode with the camera’s built-in flash, the built-in flash may not
start charging until the IR-1N transmitting button is pressed and the first
picture may not be taken. The shutter is released each time the button
is pressed again. In both continous and single-frame mode, the built-in
flash will keep charging until either the built-in flash is down or the
camera’s main switch is moved to LOCK.
-Total camera weight is reduced to 825g by using titanium and
magnesium alloys for the outer shell.
-When using the camera in bright sunlight on warm days, use caution.
The temperature of the metal body can become very warm.
-Data Memory Back DM-9, Vertical Control Grip VC-9, and other
accessories are available for use with the DYNAX 9Ti / MAXXUM 9 Ti
camera.
-This manual replaces pages 91 to 102 in the DYNAX 9 / MAXXUM 9
manual, covering the custom functions. New features found in the
Custom Functions include;
•Cust 14 -The LED glowing time of selected local-focus area can be
extended.
•Cust 18 -The PA/Ps creative program control is available with the
front control dial, while the control of the exposure compensation is
available with the rear control dial.
•Cust 22 -The AF illuminator can be cancelled.
•Cust 23 -To prevent accidental turning of the dials while carrying the
camera, the front/rear control dials can be disengaged when the
exposure is not being metered.
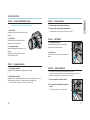
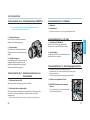
In honor of being awarded the Japan Camera Grand Prix award for the
−
9
camera*, Minolta Co., Ltd. is proud to offer the DYNAX 9Ti /
MAXXUM 9Ti (Titanium model) limited edition camera. One thousand
cameras will be produced. This camera possesses all the same award
winning features of the DYNAX 9 / MAXXUM 9 model, plus some
additional features that will provide even more opportunities to enhance
your photographic creativety and enjoyment.
Minolta, for the first time, employs a magnesium alloy for the camera
base, and titanium for the upper shell of the SLR camera body to pro-
vide a slightweight and strong camera. Wet-type rubber is used to pro-
vide a non-slip touch. Other features such as a 100% viewfinder, top
continuous drive speed of 5.5 frames per second (4.5 frames per sec-
ond with autofocus tracking), shutter speeds up to 1/12000 second,
and easy-to-operate controls are inherited from the DYNAX 9 /
MAXXUM 9 model.
To get the most from your camera, please familiarize youself with both
the DYNAX 9 / MAXXUM 9 manual and this manual.
* Japanese version of DYNAX 9 / MAXXUM 9
English
4

76
Cust 1 — AF/Release priority
1 – AF priority
Shutter will not release until or appears in the viewfinder.
2 – Release Priority
Shutter releases even if the focus cannot be confirmed.
Use release priority when photographing moving
subjects.
• RP will appear in the data panel.
Cust 2 — Film Rewind Start
1 – Automatic
Film is automatically rewound at the end of the roll.
2 – Manual
User must press the manual-rewind button to initiate rewind.
Cust 3 — Film Tip
1 – Film is completely rewound into the cartridge.
2 – Leader is left out of the cartridge after rewind.
3 – Leader left out after rewind. / Camera setup for Mid Reload.
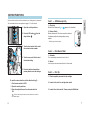
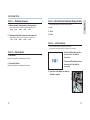
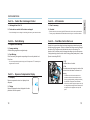
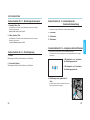
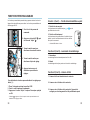
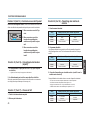
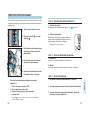
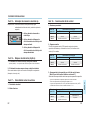
2. Press the ISO button , then the
adjust button .
CUSTOM FUNCTIONS
1. Open the control panel door.
Use the custom functions to tailor the camera to your shooting style or preferences.
The customizable functions are explained on pages 7-19 of this manual.
3. Turn the front control dial to select
the custom function number.
To reset the custom functions to their default setting (1)…
1. Turn the main switch to LOCK.
2. Open the control panel door.
3. Press the adjust button and turn the main switch to
ON.
•will blink in the data panel when the custom functions are returned to
their default settings.
5. Press the shutter-release button
partway down to enter the settings.
4. Turn the rear control dial to select
the desired setting.
English

98
Cust 4 — DX Memory
1 – DX Memory Off
Film speed is always set to the DX-coded ISO. Non-DX-coded film is set to the
previous roll’s ISO.
2 – DX Memory On
Changes to the film speed for a DX coded roll are saved and applied to future rolls
with the same DX coded ISO. Use to consistently over/under-expose a specific film
type.
•Film must be loaded before the ISOcan be changed.
Cust 5 — Release Lock (Film)
1 – Release Lock Off
2 – Release Lock On
Shutter cannot be released unless film is loaded or the back cover is open.
•blinks in the frame counter if the shutter-release button is pressed when film is not
loaded.
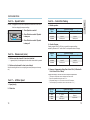
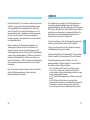
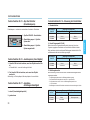
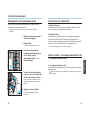
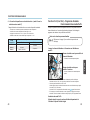
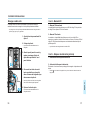
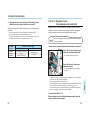
Mid Reload
Mid Reload decreases the chances of accidental double exposure when reloading a
partially exposed roll of film.
•Reloading a partially exposed roll increases the risk of film damage (scratches) caused by
dust and grit.
1. Set custom function 3 to setting 3 .
2. Load the film.
•The film is automatically advanced to frame 1.
3. Open the control panel door, then
press and hold the adjust button
until 1 blinks in the data panel.
4. Turn either control dial until the
frame number you want to advance
the film to blinks in the data panel.
•Advance the film a minimum of two frames past
the last exposed frame.
5. Press the adjust button.
•The film is automatically advanced to the desired
frame.
English
CUSTOM FUNCTIONS

1 – Selectable focus area
Press the AF button and turn the control dial to
specify the desired local focus area.
1110
Cust 9 — AF Button
2 – Spot Focus
Press the AF button to focus using the center focus
sensor.
Cust 10 — AE-Lock Button
1 – Press to activate, release to cancel.
2 – Press once to activate, press again to
cancel.
•Turning the built-in flash on or off cancels AE lock.
• AEL appears in the viewfinder when AE-lock button is active (down).
•Slow sync is selected when the built-in flash is up or an attached accessory flash is on.
•Manual shift is selected when the exposure mode is set to manual.
Cust 8 — Frame Counter
1 – Frame counter in data panel counts up.
2 – Frame counter in data panel counts down.
•The frame counter counts up when non-DX coded film is loaded.
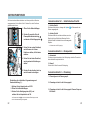
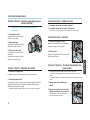
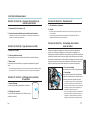
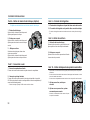
Cust 6 — Focus Hold Button (Lens)
1 – Focus Hold
Pressing the focus-hold button on the lens locks
the focus.
2 – Spot Focus
Pressing the focus-hold button on the lens
selects the center focus sensor.
The mounted lens must have a focus hold button.
3 – Continuous Focus
Select this setting when focusing on moving
subjects.
Pressing the focus-hold button on the lens
selects continuous focus.
Cust 7 — Eyepiece Sensor
1 – Grip sensor activated
Eyepiece sensor is activated when the grip sensor is tripped.
2 – Main switch activated
Eyepiece sensor is activated when the main switch is in the ON position. Use this
setting when the grip sensor is not being tripped (user wearing gloves).
•Slide the main switch to LOCK when the camera is not being used.
CUSTOM FUNCTIONS
English

1312
Cust 13 — Meter/Data Panel Illuminator Display Duration
1 – 5 sec
2 – 10 sec
3 – 30 sec
•Selecting longer display durations reduces battery performance.
Cust 14 — AF Area Display
1 - Focus Area LEDs display the active
focus area for 0.1 sec after the
focus locks.
2 – Focus Area LEDs display the active
focus area for 0.6 sec after the
focus locks.
3 – Local focus areas display only when the
AF button is pressed.
•Press and hold the AF button to display the focus area LEDs.
•Pressing the lens focus hold button does not display the focus area LEDs.
Cust 11 — Bracketing Sequence
1 – Metered exposure, Underexposure(s), Over-exposure(s)
•A5 frame bracket in 1/2EV increments is exposed in the following order…
Normal ➝ -0.5EV ➝ +0.5EV ➝ -1.0EV ➝ +1.0EV
2 – Underexposure(S), Metered exposure, Over-exposure(s)
•A5 frame bracket in 1/2EV increments is exposed in the following order…
-1.0EV ➝ -0.5EV ➝ Normal ➝ +0.5EV ➝ +1.0EV
Cust 12 — Rewind Speed
1 – Fast Rewind
Rewinds a 36 exposure roll in approximately 6 seconds.
2 – Slow (silent) Rewind
Rewinds a 36 exposure roll in approximately 9 seconds.
CUSTOM FUNCTIONS
English

1514
Cust 18 — Control Dial Tasking
1 – Default operation
2 – Creative Program
Creative program control (PA /Ps) lets you override the exposure settings
selected by the camera in P- mode. A and S- mode operation does not change.
Changes the tasking for the rear control dial to exposure compensation.
•The exposure compensation value is displayed in the meter index.
•Exposure compensation dial must be set to +/– 0.
•Compensation range is +/– 3 EV for both 1/2 and 1/3 EV increments.
•The bottom display in the viewfinder does not show the marks “+” or “
_
”.
Control Dial Tasking
No function
Aperture
Shutter speed
Front Control Dial Rear Control Dial
Exposure
Mode
P- Mode
A- Mode
S - Mode
No function
Aperture
Shutter speed
Control Dial Tasking
Ps - shutter speed
Aperture
Shutter speed
Front Control Dial Rear Control Dial
Exposure
Mode
P- Mode
A- Mode
S - Mode
P
A - aperture
Aperture
Shutter speed
Cust 15 — Eyestart Switch
1 – Turns Eyestart on and off.
2 – Turns Dial-lock on and off. Eyestart
is always on.
3 – Turns Dial-lock on and off. Eyestart
is always off.
Dial-lock - Disengages the control dials to prevent an accidental turn of the control
dials from changing the exposure settings.
Cust 16 — Release Lock (Lens)
1 – Shutter cannot be released if a lens is not attached.
•– – appears (blinks) in the data panel when the shutter-release button is pressed.
2 – Shutter can be released if a lens is not attached.
Use when mounting the lens to a non-coupling lens mount (telescope, microscope
etc.).
Cust 17 — AF Drive Speed
1 – Speed priority
2 – Silent drive
CUSTOM FUNCTIONS
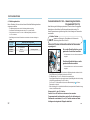
3 – Exposure Compensation Using Rear Control Dial - (PA Mode with
Front Control Dial in P Mode)
Control Dial Tasking
PA - aperture
Aperture
Shutter speed
Front Control Dial Rear Control Dial
Exposure
Mode
P- Mode
A- Mode
S - Mode
Exposure
compensation
English

1716
4 – Exposure Compensation Using Rear Control Dial - (PS Mode
with Front Control Dial in P Mode)
Changes the tasking for the rear control dial to exposure compensation.
•The exposure compensation value is displayed in the meter index.
•Exposure compensation dial must be set to +/– 0.
•Compensation range is +/– 3 EV for both 1/2 and 1/3 EV increments.
•The bottom display in the viewfinder does not show the marks “+” or “
_
”.
Control Dial Tasking
Ps - shutter speed
Aperture
Shutter speed
Front Control Dial Rear Control Dial
Exposure
Mode
P- Mode
A- Mode
S - Mode
Exposure
compensation
CUSTOM FUNCTIONS
•The aperture and shutter speed change in 1/2 or 1/3 EV increments depending on the
position of the exposure compensation dial.
•Flash can not be used with the P
A and PS modes.
-Built-in and accessory flashes will not fire when the P
A and Ps modes are active.
-P
A and Ps modes can not be selected when appears in the viewfinder.
•If the shutter speed or aperture blink, the required setting is not available. Turn the control
dial until the blinking stops.
While the aperture/shutter speed are displayed in P-mode…
Turn the front control dial to change
the shutter speed.
•Aperture is adjusted automatically.
Cancelling PA / Ps Mode
Wait until the displayed data disappears from the data panel or raise
the built-in flash.
Turn the rear control dial to change the
aperture.
•Shutter speed is adjusted automatically.
Cust 18-2 Creative Program
P
A /Ps Mode Operation
After the AE system has been activated, you can change the shutter speed or
aperture selected by the camera. Creative program remains active until the data
panel display disappears.
Refer to page 13 to change the data panel display duration.
Custom Function Notes
English

1918
Cust 19 — Control Dial - Exchanged Control
1 – Unchanged from Cust 18.
2 – Front and rear control dial functions exchanged.
•Control dial tasking does not change for bracketing, data memory, and custom functions.
Cust 20 — Flash Metering
1 – 4-Segment Flash Metering
2 – Average metering
All flash metering segments are weighted evenly.
3 – Spot Metering
Flash is metered by the segment corresponding to the currently selected Local
Focus Area.
•Do not recompose the image after locking focus. Flash exposure is TTLmetered by the
segment used to lock focus.
Cust 21 — Exposure Compensation Display
1 – No display
Exposure compensation value is not displayed in the
data panel.
2 – Display
Exposure compensation value is displayed in the data
panel when the dial is operated.
CUSTOM FUNCTIONS
Cust 22 — AF Illuminator
1 – Fires if necessary.
2 – Canceled
•Both the camera’s and accessory flash’s AF iIluninator will not fire under any circumstance.
•Focusing may be difficult without AF illumination under low-light or low contrast conditions.
Cust 23 — Front/Rear Control Dial Lock
1 – Off
Front/Rear dials are functional.
Use dial lock to prevent the settings from being changed by accidental turning of the
dial while carrying the camera. If dial lock is selected, the settings cannot be changed
by rotation of the Front/Rear control dial when the camera is not metering. The
operation of the Front/Rear control dial changes the settings only when the exposure
is being metered (eg: when the shutter button is being pressed partway down, or when
Eye-start is activating AF & AE).
2 – On
The settings cannot be changed by rotation of the
front/rear control dials when the camera is not
metering.
•Front/Rear control dials are functional for the
operations which use bottons inside the control
panel (eg: setting bracketing, reading stored data),
and when AEL is displayed in the viewfiender.
•In M mode, the shutter speed and aperture can only
be changed while metering. Both the shutter speed
and aperture will be displayed in the body data
panel.
English

2120
Mit der Minolta Dynax 9 Ti ist ein exklusives Sondermodell der Dynax 9
entstanden, die wegen ihrer unübertroffenen Ausstattungsmerkmale,
ihrer Leistungsfähigkeit und Zuverlässigkeit bereits voll anerkannt
wurde. Die Dynax 9Ti wird in einer limitierten Auflage von nur 1000
Kameras weltweit produziert. Zusätzlich zu den Leistungsmerkmalen
der Dynax 9 wurde die Dynax 9Ti mit weiteren praxisgerechten
Funktionen ausgestattet, die die Möglichkeit zu noch mehr Kreativität
und Fotografierspaß bieten.
Minolta verwendete für das Kameragehäuse Magnesium- und
Titanlegierungen, beides leichte und sehr harte Materialien. Für
sicheren Halt sorgt der mit einem neuen Material gummierte Griff.
Ausstattungsmerkmale, wie z.B. der Sucher mit 100% Sucherbildinhalt,
maximale Transportgeschwindigkeit von 5,5 Bildern in der Sekunde im
Dauerlauf (mit Schärfenachführung 4,5 Bilder in der Sekunde), die
kürzeste Verschlußzeit von 1/12000 s und einfach zu handhabende und
sinnvoll angeordnete Bedienungselemente wurden von der Dynax 9
übernommen.
Bevor Sie Ihre Kamera in Gebrauch nehmen, sollten Sie sich mit den
Inhalten der Bedienungsanleitung zur Dynax 9 sowie dieser
Bedienungsanleitung vertraut machen.
HINWEISE
-Bei Verwendung der Fernsteuerung IR-1N im Einzelbildbetrieb und
dem aktivierten eingebauten Blitzgerät, beginnt die Aufladung des
eingebauten Blitzgerätes, sobald der Sendeauslöser der Fernsteuerung
IR-1N das erste Mal gedrückt wird. Eine Verschlußauslösung erfolgt bei
jedem Drücken des Sendeauslösers. Das eingebaute Blitzgerät ist so
lange blitzbereit, bis entweder das Blitzgerät eingeklappt oder der
Hauptschalter der Kamera auf LOCK gestellt wird.
-Durch die Verwendung von Titan- und Magnesiumlegierungen für das
Gehäuse wurde das Gewicht der Kamera auf 825 g reduziert.
-Achtung, in der Sonne und bei sehr hohen Temperaturen kann sich
das Metallgehäuse der Kamera stark erhitzen.
-Die Datenrückwand DM-9, der Funktionshandgriff VC-9 sowie anderes
Zubehör ist ebenfalls für die Verwendung an der Dynax 9Ti geeignet.
-Diese Bedienungsanleitung ersetzt die Seiten 91 bis 102 der
Bedienungsanleitung zur Dynax 9 bezüglich der Custom-Funktionen.
Die erweiterten Custom-Funktionen beinhalten:
•Cust 14 -Die Dauer der LED-Anzeige kann verlängert werden.
•Cust 18 -P
A/Ps –Funktion kann von dem vorderen Einstellrad
unterstützt werden, während die Belichtungskorrekturwerte von dem
hinteren Einstellrad gesteuert werden.
•Cust 22 -Das AF-Beleuchtungsgerät kann auf Wunsch abgeschaltet
werden.
•Cust 23 -Mit dieser Funktion kann das vordere und hintere
Einstellrad deaktiviert werden, um ein unabsichtliches Verändern der
Einstellungen zu verhindern. Diese Sperre kann nicht aktiviert
werden, solange die Kamera eine Belichtungsmessung vornimmt.
Deutsch

2322
CUSTOM-FUNKTIONEN
2. Drücken Sie zuerst die Taste für
Filmempfindlichkeitseinstellung
und danach die Bestätigungstaste .
1. Öffnen Sie die Bedienfeldklappe.
Sie können bestimmte Kamerafunktionen nach Ihren persönlichen Wünschen
umprogrammieren. Auf den Seiten 23 bis 35 erfahren Sie, welche Funktionen
geändert werden können.
3. Drehen Sie das vordere Einstellrad,
um die Nummer der Custom-
Funktion zu wählen, die Sie ändern
möchten.
Rückstellung aller individuellen Programmierungen auf
Standardeinstellung (1)...
1. Schieben Sie den Hauptschalter auf LOCK.
2. Öffnen Sie die Bedienfeldklappe.
3. Drücken Sie die Bestätigungstaste (ADJ), und
schieben Sie den Hauptschalter auf ON.
•Im Datenmonitor blinkt , und alle individuellen Einstellungen werden
auf ihre Standardeinstellung zurückgestellt.
5. Drücken Sie den Auslöser leicht an,
um die Auswahl zu bestätigen.
4. Drehen Sie das hintere Einstellrad,
um die gewünschte Einstellung zu
wählen.
Custom-Funktion Nr. 1 – Schärfe/Auslöse-Priorität
1 – Schärfe-Priorität
Die Kamera löst nicht aus, solange nicht oder im Datenmonitor des
Suchers angezeigt wird.
2 – Auslöse-Priorität
Die Kamera läßt sich auch dann auslösen, wenn das
Objekt nicht in der Schärfe liegt. Benutzen Sie die
Auslöse-Priorität für Aufnahmen von sich bewegenden
Objekten.
•Im Datenmonitor wird RPangezeigt.
Custom-Funktion Nr. 2 – Rückspulstart
1 – Automatisch
Die Kamera beginnt automatisch mit der Rückspulung, sobald der Film nach der
letzten Aufnahme komplett belichtet ist.
2 – Manuell
Drücken Sie die Taste für manuelle Rückspulung.
Custom-Funktion Nr. 3 – Filmanfang
1 – Film wird ganz in die Patrone gespult.
2 – Filmanfang wird nicht in die Patrone gespult.
3 – Filmanfang wird nicht in die Patrone gespult / Kamera Setup zum
Mid Reload.
Deutsch

2524
CUSTOM-FUNKTIONEN
Mid Reload
In dieser Funktion wird ein teilweise belichteter Film automatisch bis zu einem
freien Bildfeld transportiert. Das spart Zeit und verhindert versehentliche
Doppelbelichtungen.
•Der Film bleibt in der Patrone vor Kratzern und Staub geschützt.
1. Setzen Sie die Custom-Funktion Nr. 3
auf Einstellung 3.
2. Legen Sie den Film ein.
•Der Film wird automatisch bis zum ersten Bildfeld
transportiert.
3. Drücken Sie auf dem Bedienfeld die
Bestätigungstaste (ADJ) so lange,
bis 1 im Datenfeld blinkt.
4. Drehen Sie eines der Einstellräder,
bis die Bildnummer, zu der der Film
weitertransportiert werden soll, im
Datenfeld blinkt.
•Wählen Sie vorsichtshalber die übernächste
Bildnummer nach der letzten belichteten
Aufnahme, um Überlappungen zu vermeiden.
5. Drücken Sie die Bestätigungstaste
(ADJ).
•Der Film wird automatisch bis zu der gewählten
Bildnummer transportiert.
Custom-Funktion Nr. 4 – DX-Speicherung
1 – AUS
Die Kamera stellt automatisch die Filmempfindlichkeit von DX-codierten Filmen ein.
Filme ohne DX-Code werden auf den ISO-Wert des vorher verwendeten Films
eingestellt.
2 – EIN
Wenn Sie die Filmempfindlichkeit eines DX-codierten Films ändern, speichert die
Kamera die geänderte Einstellung und verwendet sie bei Einlegen des nächsten
Films mit der gleichen Anfangsempfindlichkeit wieder. Benutzen Sie deshalb immer
den gleichen Filmtyp, um Über- oder Unterbelichtungen zu vermeiden.
•Die Filmempfindlichkeitseinstellung kann nur bei eingelegtem Film geändert werden.
Custom-Funktion Nr. 5 – Auslösesperre (kein Film)
1 – AUS
Verschluß kann immer ausgelöst werden.
2 – EIN
Verschluß kann nur ausgelöst werden, wenn sich ein Film in der Kamera befindet.
•Wenn der Auslöser gedrückt wird und sich kein Film in der Kamera befindet, blinkt im
Bildzähler.
Deutsch

2726
CUSTOM-FUNKTIONEN
Custom-Funktion Nr. 6 –
Schärfespeichertaste (OBJEKTIV)
1 – Schärfespeicherung
Durch Drücken der Schärfespeichertaste am
Objektiv wird die Schärfe gespeichert.
2 – Spot-Autofokus
Durch Drücken der Schärfespeichertaste am
Objektiv wird der nur der zentrale Kreuzsensor
gewählt.
Das verwendete Objektiv muß über eine Schärfespeichertaste
verfügen. (Nicht bei allen AF-Objektiven.)
3 – Nachführ-Autofokus
Diese Einstellung sollte für Aufnahmen von sich
bewegenden Objekten gewählt werden. Bei
gedrückter Schärfespeichertaste am Objektiv
wird der Nachführ-Autofokus gewählt.
Custom-Funktion Nr. 7 – Aktivieren der Sensoren am
Suchereinblick
1 – Aktivierung über den Griff
Die Sensoren werden durch Berührung des Griffs aktiviert.
2 – Aktivierung über den Hauptschalter
Die Sensoren werden durch Schieben des Hauptschalters auf „ON“ aktiviert. Dies
ist sinnvoll, wenn Sie beim Fotografieren Handschuhe tragen oder der Griff
losgelassen wird.
•Schieben Sie den Hauptschalter auf „LOCK“, wenn die Kamera nicht in Gebrauch ist.
1 – Auswahl des AF-Meßfeldes
Drücken Sie die AF-Taste und drehen Sie das
Einstellrad, um das aktive AF-Meßfeld zu wählen.
Custom-Funktion Nr. 9 – AF-Taste
2 – Spot-Autofokus
Drücken Sie die AF-Taste, um die Schärfe mittels des
zentralen Sensors zu speichern.
Custom-Funktion Nr. 10 – Belichtungsspeicher-Taste
1 – Funktion nur bei gedrückter Taste
2 – EIN/AUS-Schaltung durch einmaliges
Drücken
•Auf- oder Herunterklappen des eingebauten Blitzgerätes
löscht die Belichtungsspeicherung.
• AEL erscheint im Suchermonitor bei festgehaltener Taste.
•Bei Blitzzuschaltung oder montiertem Zubehör-Blitzgerät ist die Langzeit-
Blitzsynchronisation aktiv.
•Bei manueller Belichtungseinstellung Umschaltung auf Manuell Shift.
Custom-Funktion Nr. 8 – Bildzähler
1 – Addierend
2 – Subtrahierend
•Bei nicht DX-codierten Filmen ist nur der addierende Bildzähler möglich.
Deutsch

2928
CUSTOM-FUNKTIONEN
Custom-Funktion Nr. 11 – Belichtungsreihensequenz
1 – Standard, Minus, Plus
•Die Belichtungen von 5 Bildern in halben Belichtungsstufen werden in folgender
Reihenfolge vorgenommen...
Normal, -0,5 EV, +0,5 EV, -1,0 EV, +1,0 EV
2 – Minus, Standard, Plus
•Die Belichtungen von 5 Bildern in halben Belichtungsstufen werden in folgender
Reihenfolge vorgenommen...
-1,0 EV, -0.5 EV, Normal, +0.5 EV, +1.0 EV
Custom-Funktion Nr. 12 – Filmrückspulung
1 – schnell
Rückspulung eines Films mit 36 Aufnahmen in ca. 6 Sekunden.
2 – Slow (silent) Rewind
Rückspulung eines Films mit 36 Aufnahmen in ca. 9 Sekunden.
Custom-Funktion Nr. 13 – Einschaltdauer der
Datenmonitorbeleuchtung
1 – 5 Sekunden
2 – 10 Sekunden
3 – 30 Sekunden
•Die Wahl einer längeren Einschaltdauer reduziert die Batterieleistung.
Custom-Funktion Nr. 14 –
Anzeige des aktiven AF-Sensors
1 – LED-Anzeige für ca. 0,1 s nachdem
die Schärfe gespeichert ist.
2 – LED-Anzeige für ca. 0,6 s nachdem
die Schärfe gespeichert ist.
3 – LED-Anzeige nur bei gedrückter AF-
Taste.
•Bei dieser Funktion werden die aktiven AF-Sensoren rot
hinterleuchten im Saucher angezeigt.
•Halten Sie die AF-Taste gedrückt, um die AF-Meßfelder anzuzeigen.
•Die AF-Sensoren werden nicht angezeigt, wenn die Schärfespeicher-Taste am Objektiv
gedrückt wird.
Deutsch

3130
CUSTOM-FUNKTIONEN
Custom-Funktion Nr. 15 – Eye-Start-Schalter
(Einstellradsperre)
1 – Eye-Start EIN/AUS – Grundfunktion.
2 – Einstellräder gesperrt – Eye-Start-
System aktiv.
3 – Einstellräder gesperrt – Eye-Start-
System ausgeschaltet.
Einstellradsperre – verhindert ein versehentliches Verstellen der Einstellräder.
Custom-Funktion Nr. 16 – Auslösesperre (ohne Objektiv)
1 – Verschluß läßt sich nicht auslösen, wenn kein Objektiv montiert Der
ist
•Im Datenfeld blinkt – –wenn der Auslöser gedrückt wird.
2 – Der Verschluß läßt sich auslösen, auch wenn kein Objektiv
montiert ist.
Wird benötigt, um Teleskop-Adapter, Mikroskop-Adapter o.ä. anzuschließen.
Custom-Funktion Nr. 17 – Autofokus-
Antriebsgeschwindigkeit
1 – schnell (Geschwindigkeitspriorität)
2 – geräuscharm
Custom-Funktion Nr. 18 – Steuerung der Einstellräder
1 – Standardfunktion
2 – Kreativ-Programmshift (PA/Ps)
Während man mit der Programmautomatik arbeitet, kann man die von dem
Programm vorgegebene Kombination aus Verschlußzeit und Blende in halben
Stufen verändern, wobei der resultierende Belichtungswert erhalten bleibt. In Zeit-
und Blendenautomatik sind keine Änderungen möglich.
Mit der Einstellung 3 können mit dem hinteren Einstellrad Belichtungskorrekturen
vorgenommen werden.
•Der Belichtungskorrekturwert wird im Belichtungsindikator angezeigt.
•Das Einstellrad für Belichtungskorrektur muß auf +/- 0 gesetzt werden.
•Die Korrekturen lassen sich in 1/2 oder 1/3 Belichtungsstufen jeweils bis zu
+/- 3 EV vornehmen.
•Beim Betätigen des hinteren Einstellrades verschwinden die unteren Anzeigen im Sucher.
Steuerung der Einstellräder
Keine FunktionAperture
Blende
Verschlußzeit
Vorderes Einstellrad Hinteres Einstellrad
Belichtungs-
funktion
P-Funktion
A-Funktion
S-Funktion
Keine Funktion
Blende
Verschlußzeit
Steuerung der Einstellräder
Ps - Verschlußzeit
Blende
Verschlußzeit
Vorderes Einstellrad Hinteres Einstellrad
Belichtungs-
funktion
P-Funktion
AFunktion
S-Funktion
P
A - Blende
Blende
Verschlußzeit
3 – Belichtungskorrektur
Steuerung der Einstellräder
PA - Blende
Blende
Verschlußzeit
Vorderes Einstellrad Hinteres Einstellrad
Belichtungs-
funktion
P-Funktion
AFunktion
S-Funktion
Belichtungskorrektur
Deutsch

33
32
CUSTOM-FUNKTIONEN
4 – Belichtungskorrektur
Mit der Einstellung 3 können mit dem hinteren Einstellrad Belichtungskorrekturen
vorgenommen werden.
•Der Belichtungskorrekturwert wird im Belichtungsindikator angezeigt.
•Das Einstellrad für Belichtungskorrektur muß auf +/- 0 gesetzt werden.
•Die Korrekturen lassen sich in 1/2 oder 1/3 Belichtungsstufen jeweils bis zu
+/- 3 EV vornehmen.
•Beim Betätigen des hinteren Einstellrades verschwinden die unteren Anzeigen im
Sucher.
Steuerung der Einstellräder
PS - Verschlußzeit
Blende
Verschlußzeit
Vorderes Einstellrad Hinteres Einstellrad
Belichtungs-
funktion
P-Funktion
AFunktion
S-Funktion
Belichtungskorrektur
•Abhängig von der Einstellung des Einstellrades für Belichtungskorrektur verändern sich die
Werte für Blende und Verschlußzeit in halben oder 1/3 Stufen.
• Ein Blitzgerät kann in P
A
- und P
S
- Funktion nicht verwendet werden.
Das eingebaute Blitzgerät oder ein angeschlossenes System-Blitzgerät zündet nicht, solange
die Kreativ-Programmsteuerung P
A
oder P
S
aktiv ist.
Die P
A
- oder P
S
- Funktion arbeitet nicht, wenn das Blitzeinschaltsignal im Sucher-
Datenmonitor zu sehen ist.
• Blinkt die Anzeige für die Verschlußzeit oder Blende, das entsprechende Einstellrad so lange
drehen, bis das Blinken aufhört.
Während in P-Funktion die Blende/Verschlußzeit im Datenmonitor
angezeigt wird...
Das vordere Einstellrad drehen, um die
gewünschte Verschlußzeit zu wählen.
•Der Blendenwert wird von der Kamera automatisch
angepaßt.
Verlassen der PA- oder PS- Funktion -
Um die P
A- bzw. Ps-Funktion zu verlassen und zur normalen
Programmautomatik zurückzukehren, warten Sie, bis die Anzeigen im
Datenmonitor verschwinden. P
A- und PS- Funktion werden auch beim
Aufklappen des eingebauten Blitzgeräts deaktiviert.
Das hintere Einstellrad drehen, um die
gewünschte Blende zu wählen.
•Die Verschlußzeit wird von der Kamera automatisch
angepaßt.
Custom-Funktion Nr. 18-2 – Anwendung des Kreativ-
Programmshift (P
A /Ps)
Nach Aktivierung des Belichtungssystems kann die von der Kamera vorgegebene
Kombination aus Verschlußzeit und Blende parallel verschoben werden. Die
Kreativ-Programmsteuerung bleibt so lange aktiv, bis die Anzeigen im Datenmonitor
verschwinden.
Angaben zur Änderung der Einschaltdauer der Datenmonitor-
Beleuchtung finden Sie auf Seite 29.
Funktion Custom
Deutsch

3534
CUSTOM-FUNKTIONEN
Custom-Funktion Nr. 19 – Austausch der
Einstellradfunktion
1 – Wie Custom-Funktion Nr. 18.
2 – Austausch der Einstellradfunktion von vorderem zum hinteren
Einstellrad.
•Die Belegung der Einstellräder bezüglich Belichtungsreihen, Datenspeicherung und
Custom-Funktionen ändert sich nicht.
Custom-Funktion Nr. 20 – Blitzbelichtungsmessung
1 – Mehrzonen-Blitzbelichtungsmessung
2 – Mittenbetonte Integralmessung
Bei dieser Blitzbelichtungsmeßmethode werden alle vier Meßsegmente gleichmäßig
zur Blitzbelichtungsmessung herangezogen.
3 – Spotmessung
Bei dieser Blitzbelichtungsmeßmethode wird nur das zentrale Meßsegment zur
Blitzbelichtungsmessung herangezogen.
•Nachdem die Schärfe bestätigt ist, sollte der Bildausschnitt nicht mehr verändert werden.
Die TTL-Blitzbelichtungsmessung erfolgt durch das Segment, das mit dem AF-Sensor
übereinstimmt, der für die Scharfeinstellung zuständig ist.
Custom-Funktion Nr. 21 – Anzeige des
Belichtungskorrekturwertes
1 – Keine Anzeige
Der Belichtungskorrekturwert wird nicht im
Datenmonitor angezeigt.
2 – Anzeige
Anzeige im Datenmonitor, wenn die Belichtungskorrektur
mit dem Einstellrad vorgenommen wird.
Custom-Funktion Nr. 22 – AF-Beleuchtungsgerät
1 – Zündet Bei Bedarf
2 – Ausgeschaltet
•Weder das AF-Beleuchtungsgerät des eingebauten Blitzgerätes noch das des externen
Blitzgerätes wird aktiviert.
•Bei geringem Umgebungslicht oder Motiven mit geringem Kontrast kann die
Scharfeinstellung ohne AF-Beleuchtungsgerät schwierig sein.
Custom-Funktion Nr. 23 – Sperre des vorderen/hinteren
Einstellrades
1 – Aus
Vorderes/hinteres Einstellrad funktioniert.
Mit dieser Funktion kann der Fotograf das vordere und hintere Einstellrad
deaktivieren, um ein unabsichtliches Verändern der Einstellungen zu verhindern.
Diese Sperre kann nicht aktiviert werden, solange die Kamera eine
Belichtungsmessung vornimmt.
2 – Ein
Vorderes/hinteres Einstellrad funktioniert nur,
während die Kamera eine Belichtungsmessung
vornimmt.
•Vorderes/hinteres Einstellrad funktioniert nur für den
Betrieb der Tasten im Bedienfeld (Bestätigung von
Belichtungsreihen, Abrufen der gespeicherten
Daten) und wenn AEL im Suchermonitor angezeigt
wird.
•In M-Funktion können Verschlußzeit und Blende nur
während der Belichtungsmessung geändert werden.
Verschlußzeit und Blendenwert werden im
Datenmonitor der Kamera angezeigt.
Deutsch

3736
Après avoir eu l'honneur d'être récompensé du Japan Camera Grand
Prix pour son boîtier -9*, Minolta Co., Ldt. est fier de vous présenter
l'édition limitée DYNAX 9Ti / MAXXUM 9Ti (version Titane). Mille
boîtiers seront produits. En plus de toutes celles qui ont fait du DYNAX
9 / MAXXUM 9 un modèle primé, cet appareil possède de nouvelles
caractéristiques, qui vous permettront d'explorer d'autres possibilités
pour améliorer votre créativité photographique, et décupleront votre
plaisir de photographier.
Minolta a, pour la première fois, utilisé un alliage de magnésium pour
la structure du boîtier et du titane pour le capot supérieur de cet
appareil reflex, afin de lui assurer la légèreté et la robustesse néces-
saire. Son revêtement caoutchouté assure par ailleurs une prise en
main ferme, antidérapante. Ses autres caractéristiques, comme le
viseur 100%, l'entraînement continu à 5,5 images par seconde (4,5
images par seconde en suivi autofocus continu), la vitesse d'obturation
maximale de 1/12.000 s et les commandes ergonomiques sont héritées
du modèle DYNAX 9 / MAXXUM 9.
Pour tirer le meilleur parti de votre appareil, veuillez vous familiariser
avec le mode d'emploi du DYNAX 9 / MAXXUM 9 et ce manuel.
* Version japonaise du DYNAX 9 / MAXXUM 9
- Lorsque l'appareil est utilisé, en mode vue par vue, avec le contrôleur
sans cordon IR-1N et le flash intégré, ce dernier peut ne pas com-
mencer à se charger et la première photo risque de ne pas être prise
tant que le bouton de la télécommande n'a pas été pressé une pre-
mière fois. L'obturateur se déclenchera alors chaque fois que le bouton
de la télécommande sera actionné. Dans les modes d'entraînement
continu et vue par vue, le flash intégré continuera à se charger jusqu'à
ce qu'il soit rétracté ou que l'interrupteur principal soit placé sur OFF.
- Le poids total du boîtier est réduit à 825 g du fait de l'utilisation du
titane et des alliages de magnésium pour les coques externes.
- Lorsque vous utilisez l'appareil en plein soleil ou par de fortes
chaleurs, faites attention à la température des revêtements
métalliques, qui peut devenir très élevée.
- Le dos mémodateur DM-9, la poignée de contrôle verticale VC-9 et
les autres accessoires disponibles sont utilisables avec le DYNAX 9Ti /
MAXXUM 9Ti.
- Ce manuel remplace les pages 91 à 102 du mode d'emploi du
DYNAX 9 / MAXXUM 9, traitant des fonctions personnalisables. Les
nouvelles caractéristiques des fonctions personnalisables portent sur :
•Fonction 14 - La durée de la surbrillance de la plage AF
sélectionnée, qui peut être paramétrée.
•Fonction 18 - Le décalage du programme P
A/PS, qui est possible
avec la molette avant, tandis que la correction d'exposition peut être
réglée avec la molette arrière.
•Fonction 22 - L'illuminateur AF, qui peut être annulé.
•Fonction 23 - La possibilité de verrouillage des molettes de
sélection avant et arrière, tant que la mesure de l'exposition est
inactive, afin d'éviter toute rotation inopinée pendant le transport de
l'appareil.
NOTES
Français

3938
FUNCTIONS PERSONNALISABLES
2. Appuyer sur la touche ISO , puis
sur la touche “Adjust” .
1. Ouvrir le volet du panneau de
commande.
Les fonctions personnalisables permettent de programmer certaines fonctions de
l’appareil selon des préférences personnelles. Les fonctions personnalisables sont
décrites pages 39 à 51.
3. Tourner la molette avant pour
sélectionner le numéro de fonction.
Pour réinitialiser les fonctions personnalisables à leur réglages par
défaut (1) :
1. Placer l’interrupteur principal en position LOCK.
2. Ouvrir le volet du panneau de commande.
3. Appuyer sur la touche “Adjust” et replacer l’interrupteur principal
sur ON.
•L’indication clignote sur l’écran lorsque les fonctions personnalisables sont ré-
initialisées à leur réglage par défaut.
5. Appuyer à mi-course sur le
déclencheur pour valider les
réglages.
4. Tourner la molette arrière pour
sélectionner l’option de réglage.
Fonction 1 (Cust 1)
–
Priorité déclenchement/Mise au point
1 - Priorité à la mise au point
Le déclenchement est impossible tant que ou ne sont
pas affichées dans le viseur.
2 - Priorité au déclenchement
Le déclenchement est possible même si la netteté n’est pas
parfaite. La priorité au déclenchement est utile en rafale sur
des sujets en mouvement.
•L’indication RP s’affiche sur l’écran.
Fonction 2 (Cust 2) – Lancement du rembobinage
1 - Automatique
Le rembobinage est lancé automatiquement en fin de film.
2 - Manuel
Le rembobinage est lancé par pression sur la touche de rembobinage .
Fonction 3 (Cust 3) – Amorce du film
1 - L’amorce du film est absorbée dans la cartouche.
2 - L’amorce reste à l’extérieur de la cartouche.
3 - L’amorce reste à l’extérieur de la cartouche / L’appareil est
configuré pour le rechargement d’un film partiellement exposé.
Français
Seite wird geladen ...
Seite wird geladen ...
Seite wird geladen ...
Seite wird geladen ...
Seite wird geladen ...
Seite wird geladen ...
Seite wird geladen ...
Seite wird geladen ...
Seite wird geladen ...
Seite wird geladen ...
Seite wird geladen ...
Seite wird geladen ...
Seite wird geladen ...
Seite wird geladen ...
Seite wird geladen ...
-
 1
1
-
 2
2
-
 3
3
-
 4
4
-
 5
5
-
 6
6
-
 7
7
-
 8
8
-
 9
9
-
 10
10
-
 11
11
-
 12
12
-
 13
13
-
 14
14
-
 15
15
-
 16
16
-
 17
17
-
 18
18
-
 19
19
-
 20
20
-
 21
21
-
 22
22
-
 23
23
-
 24
24
-
 25
25
-
 26
26
-
 27
27
-
 28
28
-
 29
29
-
 30
30
-
 31
31
-
 32
32
-
 33
33
-
 34
34
-
 35
35


Minolta Maxxum 9Ti Bedienungsanleitung
- Typ
- Bedienungsanleitung
- Dieses Handbuch eignet sich auch für
in anderen Sprachen
Verwandte Artikel
-
Minolta FREEDOM ACTION 60 Benutzerhandbuch
-
-
-
-
-
-
-
-
Konica Minolta ZOOM 70B Benutzerhandbuch