Epson ELPIF03 Projector Interface Board DisplayPort Benutzerhandbuch
- Typ
- Benutzerhandbuch


3
EnglishFrançaisDeutschItalianoEspañol
( )
( )
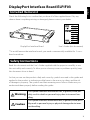
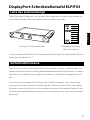
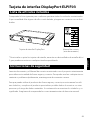
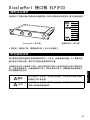
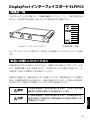
DisplayPort Interface Board ELPIF03
Included Items List
Check the following list to conrm that you have all of the supplied items. If by any
chance there is anything missing or damaged, please contact your dealer.
DisplayPort Interface Board User's Guide (this document)
* To install/remove the interface boards, you need a commercially available No. 2 cross-
head screwdriver.
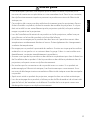
Safety Instructions
Read this document and the User's Guide supplied with the projector carefully to use
this unit safely and correctly. To allow you to solve any issues or problems quickly, keep
this document close to hand.
So that you can use the product safely and correctly, symbols are used in this guide and
applied to the product to indicate possible harm to the user or to others and the risk
of damage to property. The symbols and their meaning are as follows. Make sure you
understand them properly before reading this guide.
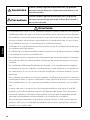
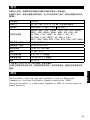
Warning
This symbol indicates information that, if ignored, could pos-
sibly result in death or personal injury due to incorrect han-
dling.
Caution
This symbol indicates information that, if ignored, could possi-
bly result in personal injury or physical damage due to incor-
rect handling.

4
EnglishFrançaisDeutschItalianoEspañol
( )
( )
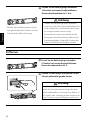
Warning
•
This is a class A product. In a domestic environment this product may cause radio
interference in which case the user may be required to take adequate measures.
•
Special techniques are required to install or remove this product, so make sure you
contact a specialist or your local dealer. Failure to do so may cause electric shock or
malfunctions to occur.
•
Disconnect the power cord from the projector before installing/removing this prod-
uct to/from the projector.
Installing/removing the product while the power cord is connected may cause elec-
tric shock to occur.
•
Do not use sprays that contain ammable gas to remove dust or lint from the prod-
uct. The high heat generated inside the projector may cause a re.
•
Do not use or install in locations where it may be subject to water or rain, or high
humidity, such as outdoors, in a bathroom, or shower room, and so on. Otherwise, it
could cause a re or electric shock to occur.
•
Do not place the product in a location subject to high levels of dust or humidity, or
in a location subject to smoke or steam such as on a work surface or near a humidi-
er. Otherwise, it could cause a re or electric shock to occur.
•
Unless you are a qualied service technician, do not open the product's case unless
instructed to do so in the User's Guide. Never disassemble or remodel the product.
There are high-voltage components inside the product that could cause re, electric
shock, or an accident to occur.
•
Do not place containers containing water or any chemical products and so on near
this product. If anything spills or enters the product, it could cause a re or electric
shock to occur.

5
EnglishFrançaisDeutschItalianoEspañol
( )
( )
Caution
•
Special techniques are required to install or remove this product, so make sure you
contact a specialist or your local dealer. Otherwise, unexpected malfunctions could
occur due to static electricity and so on.
•
This product has been designed for exclusive use with Epson projectors. Before in-
stalling this product, check the projector's model number. If this product is installed
on anything except for the specied projector, it may cause damage to this product
or the projector.
•
When installing/removing this product to/from the projector, be careful not to
injure yourself on the edge of the product or the edge of the slot.
•
Do not use or store in places where the product might be subjected to high and
low extremes of temperature. Also, avoid any sudden changes in temperature.
•
Do not store this product within reach of children. There is a risk of children swallow-
ing screws or them getting stuck in the throat. If any screws are swallowed acciden-
tally, contact a doctor immediately.
•
Make sure that no dust or trash enters the slot when installing this product. If dust
or trash enters the projector, it could cause a malfunction.
•
Do not touch the connectors on this product with your hands. If this product is
damaged by static electricity it will not operate correctly. Make sure you discharge
any static build up before handling this product.
•
After removing this product from the projector, store it in an anti-static bag.
•
When cleaning this product, do not use a wet cloth or solvents such as alcohol,
benzene, or thinner. Doing so could cause an electric shock or malfunction to occur.

6
EnglishFrançaisDeutschItalianoEspañol
( )
( )
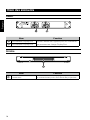
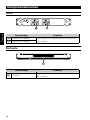
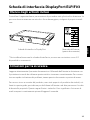
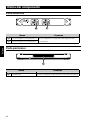
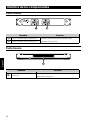
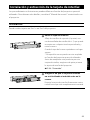
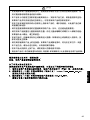
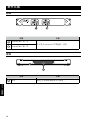
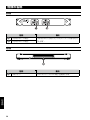
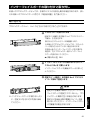
Part Names
Front
Name Function
A
DisplayPort1 In port
Inputs signals for computers that support
DisplayPort.
B
DisplayPort2 In port
Rear
Name Function
A
Connector Connects to the projector's Slot ports.

7
EnglishFrançaisDeutschItalianoEspañol
( )
( )
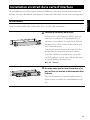
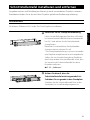
Installing and Removing the Interface Board
Procedures and illustrations may dier depending on the projector you are using. For
details, see the "User's Guide" supplied with the projector.
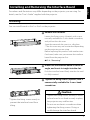
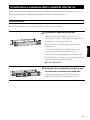
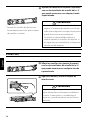
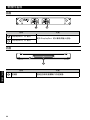
Installing
You can install boards in Slot1 or Slot2 on the projector.
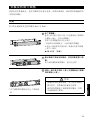
A
Remove the slot cover.
Loosen the fixing screws (4 points) with a com-
mercially available No. 2 cross-head screwdriver,
and pull out the slot cover.
Store the removed slot cover in a safe place.
* The slot cover may not be attached depending
on the projector you are using.
Before replacing this product with another inter-
face board, make sure you remove the interface
board from the projector first.
P. 8 - “Removing”
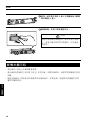
B
Make sure the interface board is not at an
angle, and insert it straight into the slot.
Push the interface board firmly into the slot until
it is fully inserted.
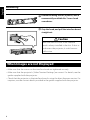
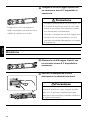
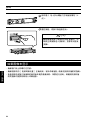
* Tighten the xing screws evenly to
prevent the interface board from
tilting.
C
Tighten the xing screws (4 points) with a
commercially available No. 2 cross-head
screwdriver.
Caution
•
Tighten the xing screws securely. If the in-
terface board is not xed securely in place,
the projector may malfunction.
•
Do not use an electric screwdriver when
tightening the xing screws. Doing so
could damage the interface board.

8
EnglishFrançaisDeutschItalianoEspañol
( )
( )
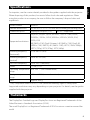
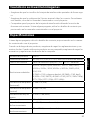
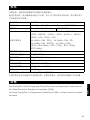
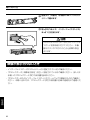
Removing
A
Loosen the xing screws (4 points) with a
commercially available No. 2 cross-head
screwdriver.
B
Grip the knob, and pull the interface board
straight out.
Caution
Make sure the slot cover or an interface
board is always installed in the slot. If dust or
trash enters the projector, it could cause a
malfunction.
When Images are not Displayed
•
Make sure that the screws on the interface board are tightened securely.
•
Make sure that the projector's [Video Terminal Settings] are correct. For details, see the
guides supplied with the projector.
•
Check that the projector or the interface board is using the latest rmware version. For
inquiries, use the contact details provided in the guides supplied with the projector.

9
EnglishFrançaisDeutschItalianoEspañol
( )
( )
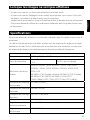
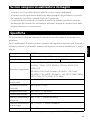
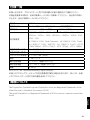
Specications
For inquiries, use the contact details provided in the guides supplied with the projector.
When disposing of this product, be sure to follow local rules and regulations. When
using this product in a company, be sure to follow the company's disposal rules and
regulations.
Product name ELPIF03
External dimensions W 180
H 23.5 D 133 mm (not including protruding parts)
Connection ports DisplayPort In port (
2) HDCP2.2 supported
Supported resolutions
WQXGA*, WQHD, QXGA, WUXGA*, 1920
1080, UXGA,
WSXGA+, SXGA+, SXGA, WXGA++, WXGA+, WXGA, XGA,
SVGA, VGA
4K (3840 x 2160, Dual Columns), 4K (3840 x 2160, Dual), 4K
(4096 x 2160, SMPTE), 4K (3840 x 2160), HDTV (1080i/1080p),
HDTV (720p), SDTV (576p), SDTV (480p)
Scanning frequency
(horizontal)
27 to 98/270 (kHz)
Scanning frequency
(vertical)
24 to 60/120 (Hz)
Dot clock frequency 25 to 297/1188 (MHz)
Power 17 Vdc, 0.7 A
Operating temperature
range
0 to +50
C (no condensation)
Storage temperature
range
-10 to +60
C (no condensation)
Mass Approx. 450 g
* Only compatible when a VESA CVT-RB (Reduced Blanking) signal is being input.
Supported resolutions may vary depending on your projector. For details, see the guides
supplied with the projector.
Trademarks
The DisplayPort Certied Logo and DisplayPort Icons are Registered Trademarks of the
Video Electronics Standards Association (VESA).
The word DisplayPort is a Registered Trademark of VESA in various countries around the
world.

10
EnglishFrançaisDeutschItalianoEspañol
( )
( )
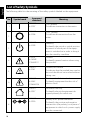
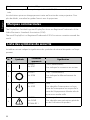
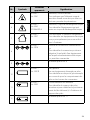
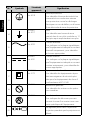
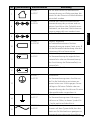
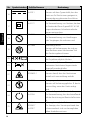
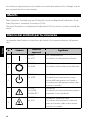
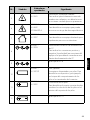
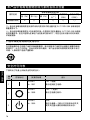
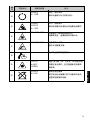
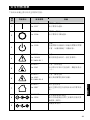
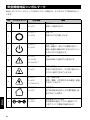
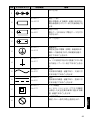
List of Safety Symbols
The following table lists the meaning of the safety symbols labeled on the equipment.
No. Symbol mark
Approved
standards
Meaning
1
IEC60417
No. 5007
"ON" (power)
To indicate connection to the mains.
2
IEC60417
No. 5008
"OFF" (power)
To indicate disconnection from the
mains.
3
IEC60417
No. 5009
Stand-by
To identify the switch or switch position
by means of which part of the equip-
ment is switched on in order to bring it
into the stand-by condition.
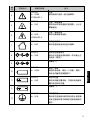
4
ISO7000
No. 0434B
IEC3864-B3.1
Caution
To identify general caution when using
the product.
5
IEC60417
No. 5041
Caution, hot surface
To indicate that the marked item can be
hot and should not be touched without
taking care.
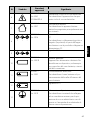
6
IEC60417
No. 6042
ISO3864-B3.6
Caution, risk of electric shock
To identify equipment that has risk of
electric shock.
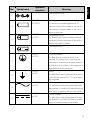
7
IEC60417
No. 5957
For indoor use only
To identify electrical equipment de-
signed primarily for indoor use.
8
IEC60417
No. 5926
Polarity of d.c. power connector
To identify the positive and negative
connections (the polarity) on a piece of
equipment to which a d.c. power supply
may be connected.

11
EnglishFrançaisDeutschItalianoEspañol
( )
( )
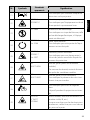
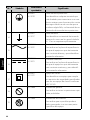
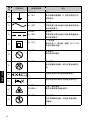
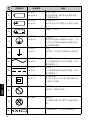
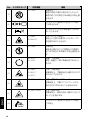
No. Symbol mark
Approved
standards
Meaning
9
-
The same as No. 8
10
IEC60417
No. 5001B
Battery, general
On battery powered equipment. To
identify a device for instance a cover for
the battery compartment, or the con-
nector terminals.
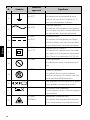
11
IEC60417
No. 5002
Positioning of cell
To identify the battery holder itself and
to identify the positioning of the cell(s)
inside the battery holder.
12
-
The same as No. 11
13
IEC60417
No. 5019
Protective earth
To identify any terminal which is in-
tended for connection to an external
conductor for protection against electric
shock in case of a fault, or the terminal of
a protective earth electrode.
14
IEC60417
No. 5017
Earth
To identify an earth (ground) terminal in
cases where symbol No. 13 is not explic-
itly required.
15
IEC60417
No. 5032
Alternating current
To indicate on the rating plate that the
equipment is suitable for alternating cur-
rent only; to identify relevant terminals.
16
IEC60417
No. 5031
Direct current
To indicate on the rating plate that the
equipment is suitable for direct current
only; to identify relevant terminals.

12
EnglishFrançaisDeutschItalianoEspañol
( )
( )
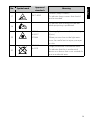
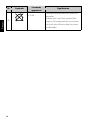
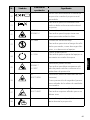
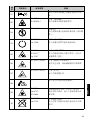
No. Symbol mark
Approved
standards
Meaning
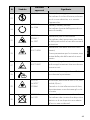
17
IEC60417
No. 5172
Class II equipment
To identify equipment meeting the
safety requirements specied for Class II
equipment according to IEC 61140.
18
ISO 3864
General prohibition
To identify actions or operations that are
prohibited.
19
ISO 3864
Contact prohibition
To indicate injury that could occur due
to touching a specic part of the equip-
ment.
20
---
Never look into the projection lens while
the projector is on.
21
---
To indicate that the marked item don't
place anything on projector.
22
ISO3864
IEC60825-1
Caution, laser radiation
To indicate the equipment has a laser
radiation part.
23
ISO 3864
Disassembly prohibition
To indicate a risk of injury, such as elec-
tric shock, if the equipment is disassem-
bled
24
EC60417
No. 5266
Standby, partial standby
To indicate that part of the equipment is
in the ready status.
25
ISO3864
IEC60417
No. 5057
Caution, movable parts
To indicate that you must keep away
from movable parts according to protec-
tion standards.
26
IEC
60417-6056
Caution (Moving Fan Blades)
As a safety precaution, stay away from
the moving fan blades.

13
EnglishFrançaisDeutschItalianoEspañol
( )
( )
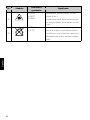
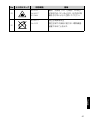
No. Symbol mark
Approved
standards
Meaning
27
IEC
60417-6043
Caution (Sharp Corners)
To indicate sharp corners that should
not be touched.
28
---
To indicate that looking into the lens
while projecting is prohibited.
29
ISO7010
No.W027
ISO3864
Warning, light emission (UV, visible light,
IR, etc.)
When you are close to the light emis-
sions, be careful not to injure your eyes
or skin.
30
IEC60417
No.5109
Usage prohibition in residential areas
To indicate that this is an electrical
device or a device that is not suitable for
use in residential areas.

14
EnglishFrançaisDeutschItalianoEspañol
( )
( )

15
FrançaisDeutschItalianoEspañol
( )
( )
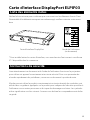
Carte d'interface DisplayPort ELPIF03
Liste des éléments inclus
Vériez la liste suivante pour conrmer que vous avez tous les éléments fournis. Dans
l'éventualité d'un élément manquant ou endommagé, veuillez contacter votre reven-
deur.
Carte d'interface DisplayPort Guide de l'utilisateur
(ce document)
* Pour installer/retirer les cartes d'interface, vous avez besoin d'un tournevis cruciforme
N
2 disponible dans le commerce.
Instructions de sécurité
Lisez attentivement ce document et le Guide de l'utilisateur fourni avec le projecteur
pour utiliser cet appareil correctement et en toute sécurité. Pour vous permettre de
résoudre rapidement des problèmes, conservez ce document à portée de main.
An de pouvoir utiliser le produit correctement et en toute sécurité, des symboles sont
utilisés dans ce guide et appliqués sur le produit pour indiquer des blessures possibles à
l'utilisateur ou aux autres personnes et le risque de dommages aux biens. Les symboles
et leur signication sont les suivants. Assurez-vous de bien les comprendre avant de lire
ce guide.

16
FrançaisDeutschItalianoEspañol
( )
( )
Avertissement
Ce symbole indique des informations dont le non-res-
pect risquent d'entraîner des blessures graves, voire
mortelles, en raison d'une manipulation incorrecte
Mise en garde
Ce symbole indique des informations dont le non-res-
pect risquent d'entraîner des dommages corporels ou
matériels, en raison d'une manipulation incorrecte
Avertissement
•
Il s'agit d'un produit de classe A. Dans un environnement domestique, ce produit
peut causer des interférences radio, auquel cas il peut être demandé à l'utilisateur
de prendre des mesures adéquates.
•
Des techniques spéciales sont requises pour installer ou retirer ce produit, assu-
rez-vous de contacter un spécialiste ou votre revendeur local. Ne pas procéder de la
sorte peut causer une décharge électrique ou des dysfonctionnements.
•
Débranchez le cordon électrique du projecteur avant d'installer/de retirer ce produit
sur le/du projecteur.
Installer/retirer le produit pendant que le cordon électrique est branché peut causer
une décharge électrique.
•
N'utilisez pas de vaporisateurs qui contiennent des gaz inammables pour enlever
la poussière ou les peluches du produit. La chaleur élevée générée à l'intérieur du
projecteur peut causer un incendie.
•
Ne l'utilisez pas ou ne l'installez pas dans des lieux où il peut être exposé à l'eau, à
la pluie ou à une humidité élevée, comme à l'extérieur, dans une salle de bains, une
salle de douche, etc. Dans le cas contraire, un incendie ou une décharge électrique
peuvent se produire.
•
Ne placez pas le produit dans un lieu soumis à des niveaux élevés de poussière ou
d'humidité ou dans un lieu soumis à de la fumée ou à de la vapeur, comme sur une
surface de travail ou à proximité d'un humidicateur. Dans le cas contraire, un incen-
die ou une décharge électrique peuvent se produire.
•
À moins que vous ne soyez un technicien de service qualié, n'ouvrez pas le boî-
tier du produit sauf si vous y êtes invité dans le Guide de l'utilisateur. Ne démontez
et ne réagencez jamais le produit. Les composants sous haute tension présents à
l'intérieur du produit peuvent causer un incendie, une décharge électrique ou un
accident.
•
Ne placez pas de récipients contenant de l'eau, des produits chimiques, etc. à proxi-
mité de ce produit. Si un élément coule ou pénètre dans le produit, cela peut causer
un incendie ou une décharge électrique.

17
FrançaisDeutschItalianoEspañol
( )
( )
Mise en garde
•
Des techniques spéciales sont requises pour installer ou retirer ce produit, assu-
rez-vous de contacter un spécialiste ou votre revendeur local. Dans le cas contraire,
des dysfonctionnements imprévus peuvent se produire en raison de l'électricité
statique, etc.
•
Ce produit a été conçu pour être utilisé exclusivement avec les projecteurs Epson.
Avant d'installer ce produit, vériez le numéro de modèle du projecteur. Si ce pro-
duit est installé sur un autre élément que le projecteur spécié, cela peut endom-
mager ce produit ou le projecteur.
•
Lors de l'installation/du retrait de ce produit sur le/du projecteur, veillez à ne pas
vous blesser sur le bord du produit ou le bord de la fente.
•
N'utilisez ou ne rangez pas le produit dans des lieux où il peut être soumis à des
températures extrêmement élevées et basses. Évitez également les changements
soudains de température.
•
Ne rangez pas ce produit à proximité des enfants. Il existe un risque que les enfants
avalent les vis ou que les vis se coincent dans la gorge. Si des vis sont avalées acci-
dentellement, contactez immédiatement un médecin.
•
Assurez-vous que de la poussière ou des déchets ne pénètrent pas dans la fente lors
de l'installation de ce produit. Si de la poussière ou des déchets pénètrent dans le
projecteur, cela peut causer un dysfonctionnement.
•
Ne touchez pas les connecteurs de ce produit avec vos mains. Si ce produit est
endommagé par l'électricité statique, il ne fonctionnera pas correctement. Assu-
rez-vous de décharger toute accumulation d'électricité statique avant de manipuler
ce produit.
•
Après avoir retiré ce produit du projecteur, rangez-le dans un sachet antistatique.
•
Lors du nettoyage de ce produit, n'utilisez pas de chion humide ni de solvants tels
que de l'alcool, du benzène ou du diluant. Procéder de la sorte peut causer une
décharge électrique ou un dysfonctionnement.

18
FrançaisDeutschItalianoEspañol
( )
( )
Nom des éléments
Avant
Nom Fonction
A
Port d'entrée DisplayPort1
Permet l'entrée des signaux pour les ordinateurs
qui prennent en charge DisplayPort.
B
Port d'entrée DisplayPort2
Arrière
Nom Fonction
A
Connecteur Se connecte aux ports de la fente du projecteur.

19
FrançaisDeutschItalianoEspañol
( )
( )
Installation et retrait de la carte d'interface
Les procédures et les illustrations peuvent diérer en fonction du projecteur que vous
utilisez. Pour plus de détails, consultez le "Guide de l'utilisateur" fourni avec le projecteur.
Installation
Vous pouvez installer des cartes dans Slot1 ou Slot2 du projecteur.
A
Enlevez le couvercle de la fente.
Desserrez les vis de fixation (4 points) avec un
tournevis cruciforme N
2 disponible dans le
commerce, puis retirez le couvercle de la fente.
Rangez en lieu sûr le couvercle de la fente que
vous venez de retirer.
* Le couvercle de la fente peut ne pas être fixé
en fonction du projecteur que vous utilisez.
Avant de remplacer ce produit par une autre
carte d'interface, assurez-vous d'abord de retirer
la carte d'interface du projecteur.
P. 20 - “Retrait”
B
Assurez-vous que la carte d'interface n'est
pas inclinée et insérez-la directement dans
la fente.
Poussez fermement la carte d'interface dans la
fente jusqu'à ce qu'elle soit complètement insé-
rée.

20
FrançaisDeutschItalianoEspañol
( )
( )
* Serrez uniformément les vis de xa-
tion pour empêcher la carte d'inter-
face de basculer.
C
Serrez les vis de xation (4 points) avec un
tournevis cruciforme N
2 disponible dans
le commerce.
Mise en garde
•
Serrez bien les vis de xation. Si la carte
d'interface n'est pas xée solidement en
place, le projecteur peut connaître un dys-
fonctionnement.
•
N'utilisez pas un tournevis électrique pour
serrer les vis de xation. Procéder de la
sorte peut endommager la carte d'inter-
face.
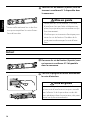
Retrait
A
Desserrez les vis de xation (4 points) avec
un tournevis cruciforme N
2 disponible
dans le commerce.
B
Saisissez la poignée et retirez directement
la carte d'interface.
Mise en garde
Assurez-vous que le couvercle de la fente ou
qu'une carte d'interface est toujours installé
dans la fente. Si de la poussière ou des dé-
chets pénètrent dans le projecteur, cela peut
causer un dysfonctionnement.
Seite laden ...
Seite laden ...
Seite laden ...
Seite laden ...
Seite laden ...
Seite laden ...
Seite laden ...
Seite laden ...
Seite laden ...
Seite laden ...
Seite laden ...
Seite laden ...
Seite laden ...
Seite laden ...
Seite laden ...
Seite laden ...
Seite laden ...
Seite laden ...
Seite laden ...
Seite laden ...
Seite laden ...
Seite laden ...
Seite laden ...
Seite laden ...
Seite laden ...
Seite laden ...
Seite laden ...
Seite laden ...
Seite laden ...
Seite laden ...
Seite laden ...
Seite laden ...
Seite laden ...
Seite laden ...
Seite laden ...
Seite laden ...
Seite laden ...
Seite laden ...
Seite laden ...
Seite laden ...
Seite laden ...
Seite laden ...
Seite laden ...
Seite laden ...
Seite laden ...
Seite laden ...
Seite laden ...
Seite laden ...
Seite laden ...
Seite laden ...
Seite laden ...
Seite laden ...
Seite laden ...
Seite laden ...
Seite laden ...
Seite laden ...
Seite laden ...
Seite laden ...
Seite laden ...
Seite laden ...
Seite laden ...
Seite laden ...
Seite laden ...
Seite laden ...
Seite laden ...
Seite laden ...
Seite laden ...
Seite laden ...
Seite laden ...
Seite laden ...
Seite laden ...
Seite laden ...
Seite laden ...
Seite laden ...
Seite laden ...
Seite laden ...
Seite laden ...
Seite laden ...
Seite laden ...
Seite laden ...
Seite laden ...
Seite laden ...
Seite laden ...
Seite laden ...
Seite laden ...
Seite laden ...
Seite laden ...
Seite laden ...
-
 1
1
-
 2
2
-
 3
3
-
 4
4
-
 5
5
-
 6
6
-
 7
7
-
 8
8
-
 9
9
-
 10
10
-
 11
11
-
 12
12
-
 13
13
-
 14
14
-
 15
15
-
 16
16
-
 17
17
-
 18
18
-
 19
19
-
 20
20
-
 21
21
-
 22
22
-
 23
23
-
 24
24
-
 25
25
-
 26
26
-
 27
27
-
 28
28
-
 29
29
-
 30
30
-
 31
31
-
 32
32
-
 33
33
-
 34
34
-
 35
35
-
 36
36
-
 37
37
-
 38
38
-
 39
39
-
 40
40
-
 41
41
-
 42
42
-
 43
43
-
 44
44
-
 45
45
-
 46
46
-
 47
47
-
 48
48
-
 49
49
-
 50
50
-
 51
51
-
 52
52
-
 53
53
-
 54
54
-
 55
55
-
 56
56
-
 57
57
-
 58
58
-
 59
59
-
 60
60
-
 61
61
-
 62
62
-
 63
63
-
 64
64
-
 65
65
-
 66
66
-
 67
67
-
 68
68
-
 69
69
-
 70
70
-
 71
71
-
 72
72
-
 73
73
-
 74
74
-
 75
75
-
 76
76
-
 77
77
-
 78
78
-
 79
79
-
 80
80
-
 81
81
-
 82
82
-
 83
83
-
 84
84
-
 85
85
-
 86
86
-
 87
87
-
 88
88
-
 89
89
-
 90
90
-
 91
91
-
 92
92
-
 93
93
-
 94
94
-
 95
95
-
 96
96
-
 97
97
-
 98
98
-
 99
99
-
 100
100
-
 101
101
-
 102
102
-
 103
103
-
 104
104
-
 105
105
-
 106
106
-
 107
107
-
 108
108


Epson ELPIF03 Projector Interface Board DisplayPort Benutzerhandbuch
- Typ
- Benutzerhandbuch
in anderen Sprachen
Verwandte Papiere
Sonstige Unterlagen
-
Goobay 54780 Benutzerhandbuch
-
Acclaim Lighting APS-480-24 Installationsanleitung
-
Rupes EK150AES Planetary Sanders Benutzerhandbuch
-
NEC NP01SW2 Bedienungsanleitung
-
VISIOMED THERMOFLASH LX-260T EVOLUTION Benutzerhandbuch
-
LG HU85LS Bedienungsanleitung
-
Christie L2K1500 Benutzerhandbuch
-
Christie L2K1000 Benutzerhandbuch
-
Samsung SP-LSP9TFA Benutzerhandbuch