Yamaha AT-800 Bedienungsanleitung
- Kategorie
- Flachbildschirmzubehör
- Typ
- Bedienungsanleitung

English Français Deutsch Svenska Italiano Español Nederlands
中文 한국어
Русский
ATTACHMENT
ATTACHE
AT-800
Owner’s Manual
Mode d’emploi
Bedienungsanleitung
Bruksanvisning
Manuale di istruzioni
Manual de instrucciones
Gebruiksaanwijzing
Инструкция по эксплуатации
使用说明书
사용 설명서
JTG

i
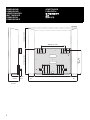
DIMENSIONS
DIMENSIONS
ABMESSUNGEN
MATTSKISSER
DIMENSIONI
DIMENSIONES
AFMETINGEN
ГАБАРИТЫ
各个部分的尺寸
크기
200 mm (7-7/8")
51 mm
(2")
51 mm
(2")
22 mm
(7/8")
61.5 mm
(2-3/8")
90 mm
(3-1/2")
227 mm (8-7/8")
215.5 mm
(8-1/2")
183 mm (7-1/4")
308 mm (12-1/8")
410 mm (16-1/8")
(ISX-800)

1 En
English
ATTACHMENT
AT-800
Owner’s Manual
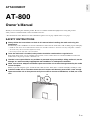
Thank you for selecting this Yamaha product. Be sure to read this manual thoroughly before using this product.
After you have read this manual, retain it for future reference.
* For information on the dimensions of the Attachment, please refer to page i (back of the cover page).
SAFETY INSTRUCTIONS
Always follow the instructions set forth in this manual when installing the audio unit using this
Attachment.
Insufficiently secure installation or insecure Attachment could cause the audio unit to fall, resulting in personal injury.
• Install the audio unit so that it will withstand extended use and will not fall due to vibrations caused by earthquakes or children.
• To ensure safety, all screws must be tightened securely.
• Never hang from the audio unit or the Attachment.
Once the audio unit is installed, safety checks should be conducted on a regular basis.
If the audio unit is used over an extended period of time, screws can become loose and the installation can become
weaker due to the passage of time, vibrations, etc.
Yamaha is not responsible for any accident or personal injury caused by a falling audio unit, nor for
damage to a wall caused by inappropriate wall conditions or inadequate installation.
Make sure to leave adequate ventilation space around the unit to allow heat generated by the audio
unit to dissipate.
Failure to provide adequate space around the unit could cause the audio unit to overheat internally, resulting in a fire.
Install the audio unit in a location where the unit’s buttons will be easily accessible. Leave enough
space around the unit so that you can easily insert a CD or connect a USB device, or iPod, etc. to the
unit.
iPod
USB
CD

2 En
Make sure the package contains the following items.
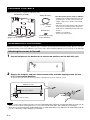
Make sure that you leave adequate ventilation space around the unit and follow the instructions below. Be sure to use the
specified mounting screws for installation to prevent the audio unit from falling. Illustrations for each step use the ISX-800.
1 Use the template on the back cover to mark screw positions on the wall with a pin.
2
Remove the template, and then attach commercially-available tapping screws
(ø6
mm
(1/4")) in the marked positions.
To prevent the wall surface from being damaged, drill pilot holes, then attach the screws.
Notes
• Choose a secure wall or beam to fasten the screws. Do not install them into walls made of weak material that can easily come off,
such as mortar or plywood wall panels. Loose screws could cause the audio unit to fall, resulting in personal injury.
• Do not use screws shorter than the specified length, nails, or double-sided adhesive tape. Otherwise, the audio unit may fall due
to wear or vibration, possibly resulting in personal injury.
PACKAGE CONTENTS
ASSEMBLING PROCEDURE
Attaching the screws to the wall
Attachment (AT-800)
Have the following items ready in addition:
• Commercially available tapping screws (x4)
(
ø
6 mm (1/4") , 31 mm (1-1/4") or more in
length, 7 mm (1/4") or more in screw head
diameter)
• M4 screws that came with the audio unit (x4)
(If the screws are being used to mount the
audio unit on a dedicated stand, remove the
screws.)
• Phillips(+) screwdriver
(Do not use electric tools.)
Weight: 1.3 kg (2.9 lbs)
Safety wire (x2)
Length: 300 mm
(11-3/4")
Washer (x2)
(for M6, 16 mm (5/8")
of outer diameter)
7 mm (1/4") or more
25 mm (1") or more
200 mm (7-7/8")
6mm
(1/4")

3 En
English
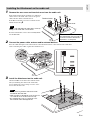
1 Remove the rear cover and terminal cover from the audio unit.
If the audio unit has been mounted on a dedicated
stand, remove the stand. Also, remove the power
cable, antenna and/or external devices.
Four M4 screws that you remove from the stand
will be used in Step
3
.
Note
Spread a soft cloth under the audio unit to avoid any
damage to the audio unit or work surface.
For more information, refer to the Assembly Guide
for the ISX-800.
2 Connect the power cable, antenna and/or external devices.
Pass the cables through a hole in the bottom of the Attachment, then connect them to the audio unit.
After connecting the cables, replace the terminal cover.
3 Install the Attachment on the audio unit.
Attach four M4 screws that came with the audio
unit (for attaching the stand to the audio unit).
Do not tighten the screws using excessive force.
Do not use electric tools.
Notes
• Be careful not to pinch the cables between the
Attachment and audio unit.
• Make sure that you identify the screws for the rear
cover and the screws for the stand correctly.
• If you tighten the screws on a slant, the screw
threads in the audio unit might break.
Installing the Attachment on the audio unit
The rear cover and the screws you
removed from the rear cover will not
be used to install the Attachment.
Keep them in a safe place.
Terminal cover
Rear cover

4 En
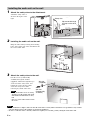
1 Attach the safety wires to the Attachment.
Attach the safety wires as
shown in the figure on the
right.
2 Installing the audio unit on the wall.
Hang the audio unit by hooking the mounting
holes on the upper part of the Attachment onto
the screws in the wall.
3 Attach the safety wires to the wall.
Pass the screws (commercially
available) through the washers
(supplied), and then through the loops
on the end of the safety wires, and
tighten the screws into the wall to
secure the safety wires while
removing any slack of the wires.
Notes
• Make sure that the screws are strong
enough to bear the weight of the audio
unit and the Attachment in case they
fall.
• Choose a secure wall or beam to fasten
the screws.
Notes
• After installation is complete, make sure that the audio unit is securely affixed. Yamaha is not responsible for any accident
caused by inappropriate wall conditions or inadequate installation.
• Be sure to secure the cables so that they will not be caught by feet or hands, possibly causing the audio unit to fall.
Installing the audio unit on the wall
Slip one end through
the loop at the other
end
Safety wire
Screw
(
ø6 mm;
commercially
available)
Washer
(supplied)

Printed in China WZ39290
© 2011 Yamaha Corporation
200 mm (7-7/8")
-
 1
1
-
 2
2
-
 3
3
-
 4
4
-
 5
5
-
 6
6
-
 7
7


Yamaha AT-800 Bedienungsanleitung
- Kategorie
- Flachbildschirmzubehör
- Typ
- Bedienungsanleitung
in anderen Sprachen
- English: Yamaha AT-800 Owner's manual
- français: Yamaha AT-800 Le manuel du propriétaire
- español: Yamaha AT-800 El manual del propietario
- italiano: Yamaha AT-800 Manuale del proprietario
- русский: Yamaha AT-800 Инструкция по применению
- Nederlands: Yamaha AT-800 de handleiding
- português: Yamaha AT-800 Manual do proprietário
- dansk: Yamaha AT-800 Brugervejledning
- svenska: Yamaha AT-800 Bruksanvisning
- Türkçe: Yamaha AT-800 El kitabı
- suomi: Yamaha AT-800 Omistajan opas
Verwandte Papiere
-
Yamaha SWR2311P Bedienungsanleitung
-
-
-
-
Yamaha DBR15 Benutzerhandbuch
-
-
-
-
Yamaha VXC4 Bedienungsanleitung
-