
MS880
Cruise control
Installation and Operating Manual. . . . . . . . 9
Geschwindigkeitsregler
Montage- und Bedienungsanleitung. . . . .43
Régulateurs de vitesse
Instructions de montage
et de service . . . . . . . . . . . . . . . . . . . . . . . . .79
Regulador de velocidad
Instrucciones de montaje y de uso . . . . . . 116
Regulador de velocidade
Instruções de montagem e manual de
instruções. . . . . . . . . . . . . . . . . . . . . . . . . . 151
IRegolatore di velocità
Istruzioni di montaggio e d’uso . . . . . . . .186
Snelheidsregelaar
Montagehandleiding en
gebruiksaanwijzing . . . . . . . . . . . . . . . . . 222
Sebességszabályozó
Szerelési és használati útmutató. . . . . . . 257
EN
DE
FR
ES
PT
IT
NL
HU
DRIVING SUPPORT
CRUISE CONTROL
MS880--IO--WEST.book Seite 1 Mittwoch, 7. September 2016 5:49 17

MS880--IO--WEST.book Seite 2 Mittwoch, 7. September 2016 5:49 17

MS880
3
1 2 3 4
9
6
8
5 7
10 11
12
13 14
15
16
17
18 19 20 21
1
MS880--IO--WEST.book Seite 3 Mittwoch, 7. September 2016 5:49 17

MS880
4
2
3
1 2
43
5
6 7 8 9
4
MS880--IO--WEST.book Seite 4 Mittwoch, 7. September 2016 5:49 17

MS880
5
5
1
6
MS880--IO--WEST.book Seite 5 Mittwoch, 7. September 2016 5:49 17

MS880
6
1
2
6
5
34
7
8
9
10
CAN Low
CAN High
3 A
bl
bl/ws
ge
brbr/ws
gn
gn/ws
vt
or
bl
7
MS880--IO--WEST.book Seite 6 Mittwoch, 7. September 2016 5:49 17

MS880
7
2
1
gn/ws
vt
8
EN: 17
DE: 51
FR: 88
ES: 124
PT: 160
IT: 195
NL: 231
HU: 266
1
br
br/ws
0 V
12 V
9
EN: 21
DE: 55
FR: 91
ES: 128
PT: 163
IT: 199
NL: 234
HU: 269
MS880--IO--WEST.book Seite 7 Mittwoch, 7. September 2016 5:49 17

MS880
8
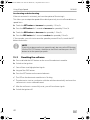
bl br ge gn or pk rt sw vt ws
EN Blue Brown Yellow Green Orange Pink Red Black Violet White
DE Blau Braun Gelb Grün Orange Pink Rot Schwarz Violett Weiss
FR Bleu Marron Jaune Vert Orange Rosa Rouge Noir Lila Blanc
ES Azul Marrón Amarillo Verde Naranja Rose Rojo Negro Violeta Blanco
PT Azul Castanho Amarelo Verde
Cor de
laranja
Cor de
rosa
Vermelho Preto Violeta Branco
IT Blu Marrone Giallo Verde
Aranci-
one
Rosa Rosso Nero Violetto Bianco
NL Blauw Bruin Geel Groen Oranje Roze Rood Zwart Paars Wit
HU Kék Barna Sárga Zöld Narancs Rózsaszín Piros Fekete Ibolya Fehér
MS880--IO--WEST.book Seite 8 Mittwoch, 7. September 2016 5:49 17

EN
MS880
9
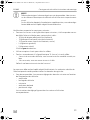
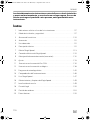
Please read this instruction manual carefully before installation and first
use, and store it in a safe place. If you pass on the product to another
person, hand over this instruction manual along with it.
Contents
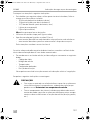
1 Notes on using the manual. . . . . . . . . . . . . . . . . . . . . . . . . . . . . . . . . . . . . . .10
2 Safety and installation instructions . . . . . . . . . . . . . . . . . . . . . . . . . . . . . . . . .10
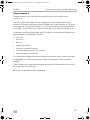
3 Scope of delivery . . . . . . . . . . . . . . . . . . . . . . . . . . . . . . . . . . . . . . . . . . . . . .12
4 Accessories . . . . . . . . . . . . . . . . . . . . . . . . . . . . . . . . . . . . . . . . . . . . . . . . . . .13
5 Intended use . . . . . . . . . . . . . . . . . . . . . . . . . . . . . . . . . . . . . . . . . . . . . . . . . .13
6 Technical description . . . . . . . . . . . . . . . . . . . . . . . . . . . . . . . . . . . . . . . . . . .14
7 Installing MagicSpeed . . . . . . . . . . . . . . . . . . . . . . . . . . . . . . . . . . . . . . . . . .16
8 Connecting the electrical power to MagicSpeed. . . . . . . . . . . . . . . . . . . . .18
9 Installing the control element (accessory) . . . . . . . . . . . . . . . . . . . . . . . . . . 25
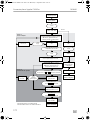
10 Setting procedure. . . . . . . . . . . . . . . . . . . . . . . . . . . . . . . . . . . . . . . . . . . . . 25
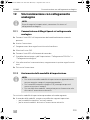
11 Synchronising with a CAN-bus connection. . . . . . . . . . . . . . . . . . . . . . . . . 27
12 Synchronising with an analogue connection. . . . . . . . . . . . . . . . . . . . . . . . 30
13 Self-diagnosis program. . . . . . . . . . . . . . . . . . . . . . . . . . . . . . . . . . . . . . . . . 37
14 Testing functions . . . . . . . . . . . . . . . . . . . . . . . . . . . . . . . . . . . . . . . . . . . . . . 38
15 Using MagicSpeed . . . . . . . . . . . . . . . . . . . . . . . . . . . . . . . . . . . . . . . . . . . . 39
16 Maintaining and cleaning MagicSpeed. . . . . . . . . . . . . . . . . . . . . . . . . . . . .41
17 Troubleshooting . . . . . . . . . . . . . . . . . . . . . . . . . . . . . . . . . . . . . . . . . . . . . . .41
18 Guarantee . . . . . . . . . . . . . . . . . . . . . . . . . . . . . . . . . . . . . . . . . . . . . . . . . . . .41
19 Disposal. . . . . . . . . . . . . . . . . . . . . . . . . . . . . . . . . . . . . . . . . . . . . . . . . . . . . .41
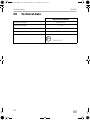
20 Technical data . . . . . . . . . . . . . . . . . . . . . . . . . . . . . . . . . . . . . . . . . . . . . . . . 42
MS880--IO--WEST.book Seite 9 Mittwoch, 7. September 2016 5:49 17

EN
Notes on using the manual MS880
10
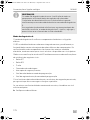
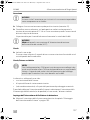
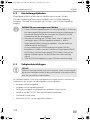
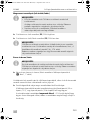
1 Notes on using the manual
!
A
I
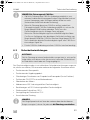
2 Safety and installation instructions
The manufacturer accepts no liability for damage in the following cases:
• Faulty assembly or connection
• Damage to the product resulting from mechanical influences and excess voltage
• Alterations to the product without express permission from the manufacturer
• Use for purposes other than those described in the operating manual
Please observe the prescribed safety instructions and stipulations from the
vehicle manufacturer and service workshops.
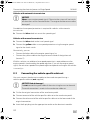
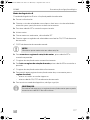
!
WARNING!
Inadequate supply cable connections could result in short circuits, which
could have as a consequence that:
• Cable fires occur
• The airbag is triggered
• Electronic control devices are damaged
• Electric functions fail (indicators, brake light, horn, ignition, lights)
A
NOTICE!
To prevent the risk of short circuits, always disconnect the negative
terminal of the vehicle's electrical system before working on it.
If the vehicle has an additional battery, its negative terminal should also be
disconnected.
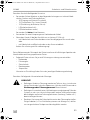
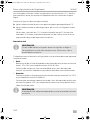
WARNING!
Safety instruction: Failure to observe this instruction can cause fatal or
serious injury.
NOTICE!
Failure to observe this instruction can cause material damage and impair
the function of the product.
NOTE
Supplementary information for operating the product.
MS880--IO--WEST.book Seite 10 Mittwoch, 7. September 2016 5:49 17

EN
MS880 Safety and installation instructions
11
Please observe the following instructions:
• When working on the following cables, only use insulated cable lugs, plugs and
flat push-on receptacles:
– 30 (direct supply from positive battery terminal)
– 15 (connected positive terminal, behind the battery)
– 31 (return line from the battery, earth)
– L (indicator lights left)
– R (indicator lights right)
Do not use terminal strips.
• Use a crimping tool to connect the cables.
• When connecting to cable 31 (earth), screw the cable
– to the vehicle's earth bolt with a cable lug and a gear disc or
– to the sheet-metal bodywork with a cable lug and a self-tapping screw.
Ensure that there is a good earth connection.
If you disconnect the negative terminal of the battery, all data stored in the volatile
memories will be lost.
• The following data must be set again, depending on the vehicle equipment
options:
–Radio code
– Vehicle clock
–Timer
– On-board computer
– Seat position
You can find instructions for making these settings in the appropriate operating
instructions.
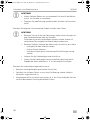
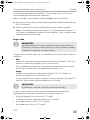
Observe the following installation instructions:
!
CAUTION!
• Secure the parts installed in the vehicle in such a way that they cannot
become loose under any circumstances (sudden braking, accidents)
and cause injuries to the occupants of the vehicle.
• Secure any parts of the system covered by the bodywork in such a
manner that they cannot be come loose or damage other parts and
cables or impair vehicle functions (steering, pedals, etc).
• Always follow the safety instructions of the vehicle manufacturer.
Some work (e.g. on retention systems such as the AIRBAG etc.) may
only be performed by qualified specialists.
MS880--IO--WEST.book Seite 11 Mittwoch, 7. September 2016 5:49 17

EN
Scope of delivery MS880
12
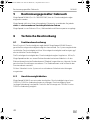
A
NOTICE!
• To prevent damage when drilling, make sure there is sufficient space
on the other side for the drill head to come out.
• Deburr all drill holes and treat them with a rust-protection agent.
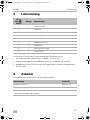
Observe the following instructions when working with electrical parts:
A
NOTICE!
• When testing the voltage in electrical cables, only use a diode test
lamp or a voltmeter.
Test lamps with an illuminant take up voltages which are too high and
which can damage the vehicle's electronic system.
• When making electrical connections, ensure that:
– they are not kinked or twisted
– they do not rub on edges
– they are not laid in sharp edged ducts without protection.
• Insulate all connections.
• Secure the cables against mechanical wear with cable binders or insu-
lating tape, for example to existing cables.
Please observe the following instructions in particular:
• Observe the applicable legal regulations.
• When driving, make sure no other road users can be injured.
• MagicSpeed is designed as an additional aid; i. e., it does not relieve you of the
duty of taking due care when driving.
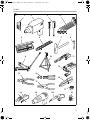
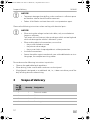
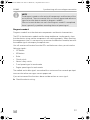
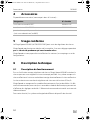
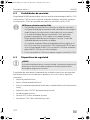
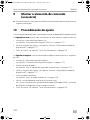
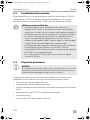
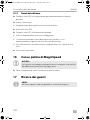
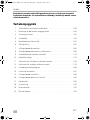
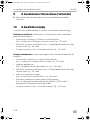
3Scope of delivery
No. in
fig. 4,
page 4
Quantity Designation
1 1 Electronic module
2 1 Cable set
3 1 Clutch switch
4 1 Fastening plate
MS880--IO--WEST.book Seite 12 Mittwoch, 7. September 2016 5:49 17

EN
MS880 Accessories
13
For the system to function correctly, you will also require:
• a control element (see chapter “Accessories” on page 13)
• a vehicle-specific cable set (see www.dometic.eu/ms880)
• if applicable, a CAN bus interface (see chapter “Connection options” on
page 14)
4Accessories
Available as accessory (not included in scope of delivery):
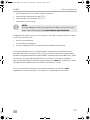
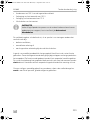
5 Intended use
MagicSpeed MS880 (ref. no. 9600000382) can be used as a cruise control.
MagicSpeed is designed as an aid for drivers; it does not relieve you of the duty
to take proper care when driving.
MagicSpeed is designed for installation in cars, caravans and vans.
5 1 Double-sided adhesive tape
6 1 Cable duct
7 10 Cable binders
8 2 Fastening screw
9 1 3 A fuse
Designation Ref. no.
Control lever MS-BE7 9600000387
CAN bus interface CBI150 9600000428
Vehicle-specific cable sets
(see www.dometic.eu/ms880)
–
No. in
fig. 4,
page 4
Quantity Designation
MS880--IO--WEST.book Seite 13 Mittwoch, 7. September 2016 5:49 17

EN
Technical description MS880
14
6 Technical description
6.1 Function description
When used as a cruise control, MagicSpeed MS880 keeps the preset speed of your
choice as constant as possible. The system compares the actual speed to the set
speed and corrects the actual speed as necessary.
The activation speed of the cruise control is about 40 km/h.
MagicSpeed is comprised of an electronic module and a cable set. The electronic
module is connected to a control element (accessory) with which you can make the
required settings. The control element is fitted in the dashboard area.
The system is equipped with various safety features for your protection.
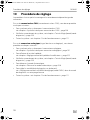
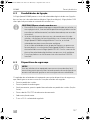
6.2 Connection options
MagicSpeed MS880 can process either a digital speed signal from the CAN bus
(CAN bus connection) or an analogue speed signal (analogue connection). A CAN
bus connection is not possible in all vehicles with a CAN bus.
I
NOTE for vehicles with CAN bus
• You can find out whether a CAN bus connection is possible for your
vehicle from the vehicle-specific product overview on our home-
page, or by calling to enquire (see rear page of the manual for
contact data).
• If your vehicle features a CAN bus, but a CAN bus connection is not
possible according to the vehicle list, MagicSpeed MS880 must be
connected using a analogue connector. This will require the speed
signal to be received in analogue form.
If the speed signal is only available on the CAN bus in digital form,
you will require the CAN bus interface MagicSpeed CBI150 for the
installation of MagicSpeed MS880. This converts the digital speed
signal from the CAN bus into an analogue one.
• A CAN bus interface is not required for the CAN bus connection.
MS880--IO--WEST.book Seite 14 Mittwoch, 7. September 2016 5:49 17

EN
MS880 Technical description
15
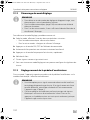
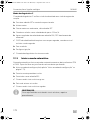
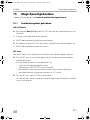
6.3 Safety features
A
The cruise control is equipped with numerous safety features to switch it off if any of
the following situations arise:
• The brake is applied hard
• Pressing the clutch pedal
• Pressing the accelerator and brake pedal at the same time (savior function)
• The ON/OFF button on the control element is pressed
• The engine overspeeds
• Braking to 50 % of the set speed
• Accelerating to 150 % of the set speed
• Increases the engine speed by 150 %
• Decreases the engine speed by 75 %
• The ignition is switched off
I
The cruise control also switches off if there are problems with the brake lights, such
as:
• Defective brake lights
• A defective fuse
• A loose connection to the brake light switch
In an emergency (e.g. accelerator sticks), you can use the savior function. It is
activated by pressing the accelerator and the brake pedal at the same time. It is
deactivated when the brake pedal is released. The savior function switches the
accelerator to idle electronically, it does not apply the brake. Therefore, keep the
brake pedal pressed down until the vehicle stops.
To guarantee safe and economical operation, never use the cruise control in
congested traffic or on wet, slippery roads.
NOTICE!
If your vehicle has a steering wheel lock, make sure that it is not activated
when the key is in the ignition or a gear is selected.
NOTE
If MagicSpeed ever fails to react to one of these occurrences, you can
always switch off the ignition.
MS880--IO--WEST.book Seite 15 Mittwoch, 7. September 2016 5:49 17

EN
Installing MagicSpeed MS880
16
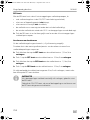
7 Installing MagicSpeed
I
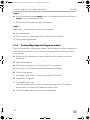
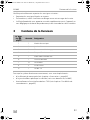
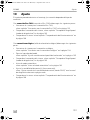
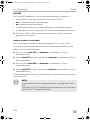
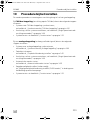
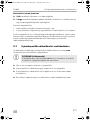
7.1 Tools required
For installation and assembly and the electrical connection, you will need the
following tools fig. 1, page 3.
To fasten the module and the cables, you may need additional screws and cable
binders.
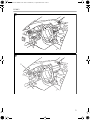
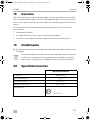
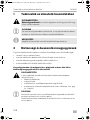
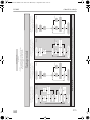
7.2 Installing the electronic module
I
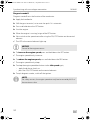
• Install the electronic module
– behind the glove compartment
– behind the footwell on the driver or passenger side
– under the dashboard on the driver side
– not anywhere subject to heat or moisture
– not in the engine compartment
– not near high-voltage components
– not directly next to ventilator nozzles.
• Where possible, use existing holes in the vehicle.
A
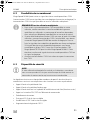
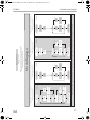
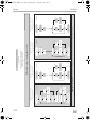
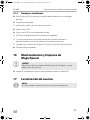
➤ Select a suitable installation location (fig. 5, page 5).
Do not fasten the electronic module before you have decided where to lay the
cables.
➤ After finishing assembly, fasten the module to the selected position:
screw the electronic module securely to the vehicle with the screws supplied or
use double-sided adhesive tape.
NOTE
If you do not have sufficient technical knowledge for installing and
connecting the components in vehicles, you should have a specialist
install the system in your vehicle.
NOTE
When selecting the installation location, observe the following
instructions:
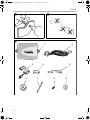
NOTICE!
Before drilling holes, make sure the drill bit will not damage anything on
the other side (fig. 2, page 4).
MS880--IO--WEST.book Seite 16 Mittwoch, 7. September 2016 5:49 17

EN
MS880 Installing MagicSpeed
17
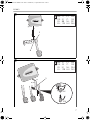
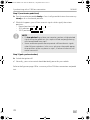
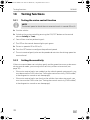
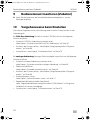
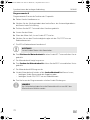
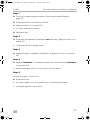
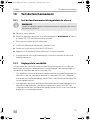
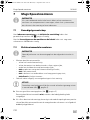
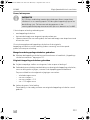
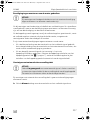
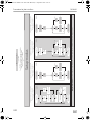
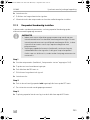
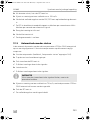
7.3 Installing the clutch switch
I
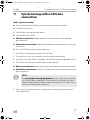
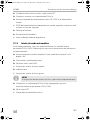
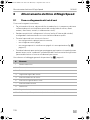
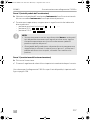
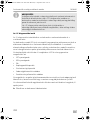
Install the clutch switch as follows (fig. 8, page 7):
➤ Fasten the magnet (fig. 8 1, page 7) to the clutch pedal using double-sided
adhesive tape or cable binders.
➤ Fasten the clutch switch (fig. 8 2, page 7) in the footwell using the screws
supplied or double-sided adhesive tape.
➤ Connect the 2-pole clutch switch compact plug (fig. 8 2, page 7) with the
2-pole compact plug on the cruise control cable set.
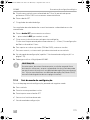
I
NOTE
Check whether your vehicle features a clutch switch. If it does, you do
not have to install the clutch switch supplied.
NOTE
On vehicles with manual transmission, you can use the clutch switch to
prevent engine overspeed. The cruise control switches off automatically
when you press down the clutch.
MS880--IO--WEST.book Seite 17 Mittwoch, 7. September 2016 5:49 17

EN
Connecting the electrical power to MagicSpeed MS880
18
8 Connecting the electrical power to
MagicSpeed
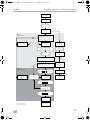
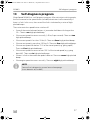
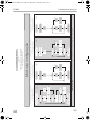
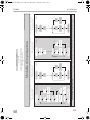
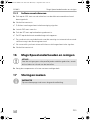
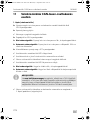
8.1 Laying and connecting the cable set
Please note the following:
• To prevent damage to the cables when laying them, ensure that they are far
enough away from hot or moving vehicle components (exhaust pipes, drive
shafts, light systems, fans, heater etc.).
• Wrap insulating tape around every connection on the cable (even inside the
vehicle).
• When laying the cables, make sure:
– they are not kinked or twisted
– they do not rub on edges
– they are not laid in sharp-edged ducts without protection (fig. 3, page 4).
• Protect every hole you drill against water penetration, e.g. by using a cable with
a sealant and by spraying the cable and the the cable sleeve with sealant.
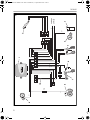
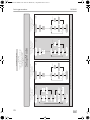
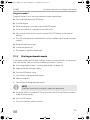
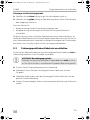
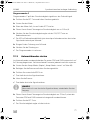
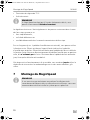
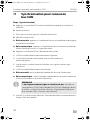
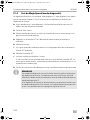
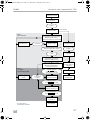
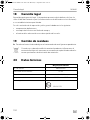
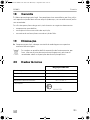
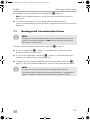
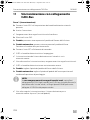
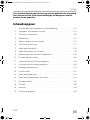
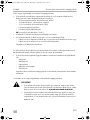
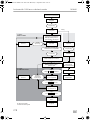
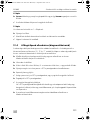
You will find a summary of the wiring in fig. 7, page 6.
No. Component
1 Electronic module
2 Control element
3 Ignition coil
4 Engine speed signal
5 Brake light switch
6 Original clutch switch
7Clutch switch
8 Ignition
9 Travel speed signal
10 Vehicle-specific cable set (not included)
MS880--IO--WEST.book Seite 18 Mittwoch, 7. September 2016 5:49 17

EN
MS880 Connecting the electrical power to MagicSpeed
19
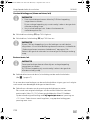
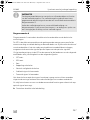
Orange
A
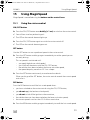
➤ Connect the orange cable to a connected positive terminal (terminal 15).
➤ Use a voltmeter to check whether the selected positive terminal carries the full
operating voltage of 12 V and that the orange cable carries no voltage when the
ignition is off.
This test is usually done at the fuse box.
A
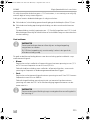
Green
➤ Insulate the green cable.
This cable is not needed. The required earth signal is taken from the accelerator
cable set.
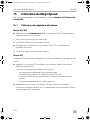
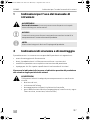
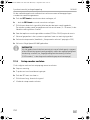
Green/white and violet
I
Alternatively, you can connect the purple cable with:
• a clutch switch
• the control lamp for the activated parking brake
• (automatic transmission only): the control lamp for park or neutral
You can connect the clutch switch supplied or the vehicle's original clutch switch (if
available) to the green/white and purple cable.
Using the clutch switch supplied
➤ Install the clutch switch as described in chapter “Installing the clutch switch” on
page 17.
NOTICE!
Make sure the ignition is switched off. Otherwise a fuse may blow.
NOTICE!
Do not connect the orange cable to the voltage supply for the vehicle
accessories (ACC).
NOTE
With a CAN bus connection, these cables are only connected when
there is no clutch signal on the CAN bus in your vehicle. See also the
information in the vehicle-specific product overview at
www.dometic.eu/ms880.
MS880--IO--WEST.book Seite 19 Mittwoch, 7. September 2016 5:49 17

EN
Connecting the electrical power to MagicSpeed MS880
20
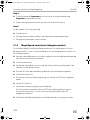
Using the original clutch switch
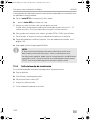
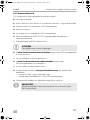
➤ Cut off the two-pin plug from the green/white and purple cable.
➤ Connect the purple cable with the original clutch switch cable, whose signals
change when you apply the clutch pedal.
The purple cable can process the following changes:
– Connect to earth
– From earth to ∞
– From earth to +12 V
– From +12 V to earth
➤ Insulate the green/white cable.
This cable is not required when using an original clutch switch.
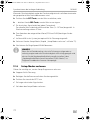
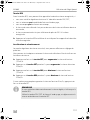
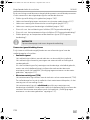
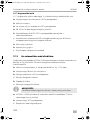
Twisted cable pair (blue and blue/white)
I
➤ Connect the blue cable (P3) to CAN high.
➤ Connect the blue/white cable (P2) to CAN low.
I
NOTE
• Both these cables are only connected when there is a CAN bus
connection.
They are not required for analogue connection. In this case, insulate
the ends and store them.
• Do not mix up the cables. Otherwise the cruise control will not
function.
NOTE
For a CAN bus connection, all cables in the cable set are now
connected. You can now install the control element, see chapter “Install-
ing the control element (accessory)” on page 25.
In this case, insulate the ends of the remaining four cables and store
them.
MS880--IO--WEST.book Seite 20 Mittwoch, 7. September 2016 5:49 17
Seite wird geladen ...
Seite wird geladen ...
Seite wird geladen ...
Seite wird geladen ...
Seite wird geladen ...
Seite wird geladen ...
Seite wird geladen ...
Seite wird geladen ...
Seite wird geladen ...
Seite wird geladen ...
Seite wird geladen ...
Seite wird geladen ...
Seite wird geladen ...
Seite wird geladen ...
Seite wird geladen ...
Seite wird geladen ...
Seite wird geladen ...
Seite wird geladen ...
Seite wird geladen ...
Seite wird geladen ...
Seite wird geladen ...
Seite wird geladen ...
Seite wird geladen ...
Seite wird geladen ...
Seite wird geladen ...
Seite wird geladen ...
Seite wird geladen ...
Seite wird geladen ...
Seite wird geladen ...
Seite wird geladen ...
Seite wird geladen ...
Seite wird geladen ...
Seite wird geladen ...
Seite wird geladen ...
Seite wird geladen ...
Seite wird geladen ...
Seite wird geladen ...
Seite wird geladen ...
Seite wird geladen ...
Seite wird geladen ...
Seite wird geladen ...
Seite wird geladen ...
Seite wird geladen ...
Seite wird geladen ...
Seite wird geladen ...
Seite wird geladen ...
Seite wird geladen ...
Seite wird geladen ...
Seite wird geladen ...
Seite wird geladen ...
Seite wird geladen ...
Seite wird geladen ...
Seite wird geladen ...
Seite wird geladen ...
Seite wird geladen ...
Seite wird geladen ...
Seite wird geladen ...
Seite wird geladen ...
Seite wird geladen ...
Seite wird geladen ...
Seite wird geladen ...
Seite wird geladen ...
Seite wird geladen ...
Seite wird geladen ...
Seite wird geladen ...
Seite wird geladen ...
Seite wird geladen ...
Seite wird geladen ...
Seite wird geladen ...
Seite wird geladen ...
Seite wird geladen ...
Seite wird geladen ...
Seite wird geladen ...
Seite wird geladen ...
Seite wird geladen ...
Seite wird geladen ...
Seite wird geladen ...
Seite wird geladen ...
Seite wird geladen ...
Seite wird geladen ...
Seite wird geladen ...
Seite wird geladen ...
Seite wird geladen ...
Seite wird geladen ...
Seite wird geladen ...
Seite wird geladen ...
Seite wird geladen ...
Seite wird geladen ...
Seite wird geladen ...
Seite wird geladen ...
Seite wird geladen ...
Seite wird geladen ...
Seite wird geladen ...
Seite wird geladen ...
Seite wird geladen ...
Seite wird geladen ...
Seite wird geladen ...
Seite wird geladen ...
Seite wird geladen ...
Seite wird geladen ...
Seite wird geladen ...
Seite wird geladen ...
Seite wird geladen ...
Seite wird geladen ...
Seite wird geladen ...
Seite wird geladen ...
Seite wird geladen ...
Seite wird geladen ...
Seite wird geladen ...
Seite wird geladen ...
Seite wird geladen ...
Seite wird geladen ...
Seite wird geladen ...
Seite wird geladen ...
Seite wird geladen ...
Seite wird geladen ...
Seite wird geladen ...
Seite wird geladen ...
Seite wird geladen ...
Seite wird geladen ...
Seite wird geladen ...
Seite wird geladen ...
Seite wird geladen ...
Seite wird geladen ...
Seite wird geladen ...
Seite wird geladen ...
Seite wird geladen ...
Seite wird geladen ...
Seite wird geladen ...
Seite wird geladen ...
Seite wird geladen ...
Seite wird geladen ...
Seite wird geladen ...
Seite wird geladen ...
Seite wird geladen ...
Seite wird geladen ...
Seite wird geladen ...
Seite wird geladen ...
Seite wird geladen ...
Seite wird geladen ...
Seite wird geladen ...
Seite wird geladen ...
Seite wird geladen ...
Seite wird geladen ...
Seite wird geladen ...
Seite wird geladen ...
Seite wird geladen ...
Seite wird geladen ...
Seite wird geladen ...
Seite wird geladen ...
Seite wird geladen ...
Seite wird geladen ...
Seite wird geladen ...
Seite wird geladen ...
Seite wird geladen ...
Seite wird geladen ...
Seite wird geladen ...
Seite wird geladen ...
Seite wird geladen ...
Seite wird geladen ...
Seite wird geladen ...
Seite wird geladen ...
Seite wird geladen ...
Seite wird geladen ...
Seite wird geladen ...
Seite wird geladen ...
Seite wird geladen ...
Seite wird geladen ...
Seite wird geladen ...
Seite wird geladen ...
Seite wird geladen ...
Seite wird geladen ...
Seite wird geladen ...
Seite wird geladen ...
Seite wird geladen ...
Seite wird geladen ...
Seite wird geladen ...
Seite wird geladen ...
Seite wird geladen ...
Seite wird geladen ...
Seite wird geladen ...
Seite wird geladen ...
Seite wird geladen ...
Seite wird geladen ...
Seite wird geladen ...
Seite wird geladen ...
Seite wird geladen ...
Seite wird geladen ...
Seite wird geladen ...
Seite wird geladen ...
Seite wird geladen ...
Seite wird geladen ...
Seite wird geladen ...
Seite wird geladen ...
Seite wird geladen ...
Seite wird geladen ...
Seite wird geladen ...
Seite wird geladen ...
Seite wird geladen ...
Seite wird geladen ...
Seite wird geladen ...
Seite wird geladen ...
Seite wird geladen ...
Seite wird geladen ...
Seite wird geladen ...
Seite wird geladen ...
Seite wird geladen ...
Seite wird geladen ...
Seite wird geladen ...
Seite wird geladen ...
Seite wird geladen ...
Seite wird geladen ...
Seite wird geladen ...
Seite wird geladen ...
Seite wird geladen ...
Seite wird geladen ...
Seite wird geladen ...
Seite wird geladen ...
Seite wird geladen ...
Seite wird geladen ...
Seite wird geladen ...
Seite wird geladen ...
Seite wird geladen ...
Seite wird geladen ...
Seite wird geladen ...
Seite wird geladen ...
Seite wird geladen ...
Seite wird geladen ...
Seite wird geladen ...
Seite wird geladen ...
Seite wird geladen ...
Seite wird geladen ...
Seite wird geladen ...
Seite wird geladen ...
Seite wird geladen ...
Seite wird geladen ...
Seite wird geladen ...
Seite wird geladen ...
Seite wird geladen ...
Seite wird geladen ...
Seite wird geladen ...
Seite wird geladen ...
Seite wird geladen ...
Seite wird geladen ...
Seite wird geladen ...
Seite wird geladen ...
Seite wird geladen ...
Seite wird geladen ...
Seite wird geladen ...
Seite wird geladen ...
Seite wird geladen ...
Seite wird geladen ...
Seite wird geladen ...
Seite wird geladen ...
Seite wird geladen ...
Seite wird geladen ...
Seite wird geladen ...
Seite wird geladen ...
Seite wird geladen ...
Seite wird geladen ...
Seite wird geladen ...
Seite wird geladen ...
Seite wird geladen ...
Seite wird geladen ...
Seite wird geladen ...
Seite wird geladen ...
Seite wird geladen ...
Seite wird geladen ...
Seite wird geladen ...
Seite wird geladen ...
Seite wird geladen ...
Seite wird geladen ...
-
 1
1
-
 2
2
-
 3
3
-
 4
4
-
 5
5
-
 6
6
-
 7
7
-
 8
8
-
 9
9
-
 10
10
-
 11
11
-
 12
12
-
 13
13
-
 14
14
-
 15
15
-
 16
16
-
 17
17
-
 18
18
-
 19
19
-
 20
20
-
 21
21
-
 22
22
-
 23
23
-
 24
24
-
 25
25
-
 26
26
-
 27
27
-
 28
28
-
 29
29
-
 30
30
-
 31
31
-
 32
32
-
 33
33
-
 34
34
-
 35
35
-
 36
36
-
 37
37
-
 38
38
-
 39
39
-
 40
40
-
 41
41
-
 42
42
-
 43
43
-
 44
44
-
 45
45
-
 46
46
-
 47
47
-
 48
48
-
 49
49
-
 50
50
-
 51
51
-
 52
52
-
 53
53
-
 54
54
-
 55
55
-
 56
56
-
 57
57
-
 58
58
-
 59
59
-
 60
60
-
 61
61
-
 62
62
-
 63
63
-
 64
64
-
 65
65
-
 66
66
-
 67
67
-
 68
68
-
 69
69
-
 70
70
-
 71
71
-
 72
72
-
 73
73
-
 74
74
-
 75
75
-
 76
76
-
 77
77
-
 78
78
-
 79
79
-
 80
80
-
 81
81
-
 82
82
-
 83
83
-
 84
84
-
 85
85
-
 86
86
-
 87
87
-
 88
88
-
 89
89
-
 90
90
-
 91
91
-
 92
92
-
 93
93
-
 94
94
-
 95
95
-
 96
96
-
 97
97
-
 98
98
-
 99
99
-
 100
100
-
 101
101
-
 102
102
-
 103
103
-
 104
104
-
 105
105
-
 106
106
-
 107
107
-
 108
108
-
 109
109
-
 110
110
-
 111
111
-
 112
112
-
 113
113
-
 114
114
-
 115
115
-
 116
116
-
 117
117
-
 118
118
-
 119
119
-
 120
120
-
 121
121
-
 122
122
-
 123
123
-
 124
124
-
 125
125
-
 126
126
-
 127
127
-
 128
128
-
 129
129
-
 130
130
-
 131
131
-
 132
132
-
 133
133
-
 134
134
-
 135
135
-
 136
136
-
 137
137
-
 138
138
-
 139
139
-
 140
140
-
 141
141
-
 142
142
-
 143
143
-
 144
144
-
 145
145
-
 146
146
-
 147
147
-
 148
148
-
 149
149
-
 150
150
-
 151
151
-
 152
152
-
 153
153
-
 154
154
-
 155
155
-
 156
156
-
 157
157
-
 158
158
-
 159
159
-
 160
160
-
 161
161
-
 162
162
-
 163
163
-
 164
164
-
 165
165
-
 166
166
-
 167
167
-
 168
168
-
 169
169
-
 170
170
-
 171
171
-
 172
172
-
 173
173
-
 174
174
-
 175
175
-
 176
176
-
 177
177
-
 178
178
-
 179
179
-
 180
180
-
 181
181
-
 182
182
-
 183
183
-
 184
184
-
 185
185
-
 186
186
-
 187
187
-
 188
188
-
 189
189
-
 190
190
-
 191
191
-
 192
192
-
 193
193
-
 194
194
-
 195
195
-
 196
196
-
 197
197
-
 198
198
-
 199
199
-
 200
200
-
 201
201
-
 202
202
-
 203
203
-
 204
204
-
 205
205
-
 206
206
-
 207
207
-
 208
208
-
 209
209
-
 210
210
-
 211
211
-
 212
212
-
 213
213
-
 214
214
-
 215
215
-
 216
216
-
 217
217
-
 218
218
-
 219
219
-
 220
220
-
 221
221
-
 222
222
-
 223
223
-
 224
224
-
 225
225
-
 226
226
-
 227
227
-
 228
228
-
 229
229
-
 230
230
-
 231
231
-
 232
232
-
 233
233
-
 234
234
-
 235
235
-
 236
236
-
 237
237
-
 238
238
-
 239
239
-
 240
240
-
 241
241
-
 242
242
-
 243
243
-
 244
244
-
 245
245
-
 246
246
-
 247
247
-
 248
248
-
 249
249
-
 250
250
-
 251
251
-
 252
252
-
 253
253
-
 254
254
-
 255
255
-
 256
256
-
 257
257
-
 258
258
-
 259
259
-
 260
260
-
 261
261
-
 262
262
-
 263
263
-
 264
264
-
 265
265
-
 266
266
-
 267
267
-
 268
268
-
 269
269
-
 270
270
-
 271
271
-
 272
272
-
 273
273
-
 274
274
-
 275
275
-
 276
276
-
 277
277
-
 278
278
-
 279
279
-
 280
280
-
 281
281
-
 282
282
-
 283
283
-
 284
284
-
 285
285
-
 286
286
-
 287
287
-
 288
288
-
 289
289
-
 290
290
-
 291
291
-
 292
292


Dometic MS880 Bedienungsanleitung
- Typ
- Bedienungsanleitung
- Dieses Handbuch eignet sich auch für
in anderen Sprachen
- français: Dometic MS880 Mode d'emploi
- español: Dometic MS880 Instrucciones de operación
- italiano: Dometic MS880 Istruzioni per l'uso
- Nederlands: Dometic MS880 Handleiding
- português: Dometic MS880 Instruções de operação
Verwandte Artikel
-
Waeco MS880 Bedienungsanleitung
-
Dometic MS880 Bedienungsanleitung
-
-
-
-
-
-
-
-