Hama 00052801 Bedienungsanleitung
- Kategorie
- Subwoofer
- Typ
- Bedienungsanleitung

0 0052801/04.08
All listed brands are trademarks of the corresponding companies. Errors and omissions excepted,
and subject to technical changes. Our general terms of delivery and payment are applied.
Hama GmbH & Co KG
D-86651 Monheim/Germany
www.hama.com

5.1 Subwoofer-System
»Q 650«
PC-HARDWARE
00052801

2
d
Bedienungsanleitung
FR
SR
CEN
INPUT
FL
SL
SW
OUTPUT
FR
SR
CEN
FL
SL
Speaker Mic
Soundcard
Front Right Front Left
Surround Right Surround Left
Center

3
Inhaltsverzeichnis
• Packungsinhalt
• Positionierung
• Anschließen des Lautsprechersystems
• Bedienung und Klangeinstellungen
• Einstellungen unter Windows XP
• Einstellungen unter Windows Vista
• FAQ
• Sicherheitshinweise
• Technische Daten
Packungsinhalt
• 1 x Subwoofer
• 3 x Front-/Center-Satelliten mit 2 m Kabellänge
• 2 x Rear-Satelliten mit 5 m Kabellänge
• 1 x Fernbedienung
• 3 x Audio-Kabel
Bitte prüfen Sie beim Auspacken das alle Komponenten
enthalten sind und keine äußerlichen Schäden (geknickte
Kabel, beschädigte Isolierung, etc.) aufweisen.
Wir empfehlen Ihnen, die Verpackung mit den Styropor-
einlagen für spätere Transporte aufzubewahren.
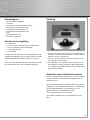
Positionierung
1. Stellen Sie die Front-Satelliten rechts und links
vom Monitor und den Center-Satelliten oberhalb des
Monitores auf und richten sie so aus, damit sie in Ihre
Richtung zeigen.
2. Die Rear-Satelliten sollten Sie seitlich leicht hinter
Ihrer Sitzposition anbringen.
3. Den Subwoofer können Sie unter Ihrem Schreibtisch
platzieren. Die genaue Position spielt hierbei keine
entscheidende Rolle, da tiefe Töne vom menschlichen
Gehör schwer lokalisierbar sind.
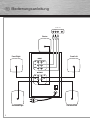
Anschließen des Lautsprechersystems
Verbinden Sie die Audio-Kabel mit dem Audio-Eingang an
der Rückseite des Subwoofers und den entsprechenden
Buchsen Ihrer Soundkarte.
Verbinden Sie die Lautsprecheranschlusskabel mit dem
Audio-Ausgang am Subwoofer und den Netzstecker mit
einer freien Steckdose.
Sollten die Lautsprecheranschlusskabel für die von
Ihnen gewünschte Positionierung nicht lang genug sein,
können Sie Verlängerungskabel mit einer Cinch-Kupplung
und einem Cinch-Stecker verwenden, um die
erforderliche Kabellänge zu erreichen.
Bitte lesen Sie sich vor der Inbetriebnahme die
Sicherheitshinweise durch.

4
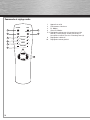
Bedienung und Klangeinstellungen
1. Standby
2. Stumm-Schalter
3. 5.1-Modus
4. Virtual 5.1-Modus
5.-8. Lautstärkeregler für den rechten hinteren
Lautsprecher (5), den linken hinteren Lautsprecher
(6), den Center-Lautsprecher (7) und den
Subwoofer/Bass (8)
9. Balance-Regler
10. Regler für Gesamtlautstärke
1 2
3 4
5
6
7
8
9
10
STANDBY
SRD RIGHT
SRD LEFT
CENTER
SUBWOOFER
MUTE
5.1 VIRTUAL 5.1
LR
Vol +
Vol -

5
Einstellungen unter Windows XP
Öffnen Sie in Ihrer Systemsteuerung das ‚Sounds und
Audiogeräte’-Menü
Klicken Sie bei ‚Lautsprechereinstellungen’ auf den
Button ‚Erweitert ...’
Wählen Sie ‚5.1 Surround Sound-Lautsprecher’ aus und
klicken auf ‚OK’.
Ihre Soundeinstellungen wurden damit für dieses
Lautsprechersystem optimiert.
Wenn Sie die Satelliten nicht wie beschrieben, im
gleichen Abstand zu Ihrem Kopf positionieren konnten,
können Sie jetzt noch die Lautstärke der Satelliten
ausgleichen.
Klicken Sie dazu bei ‚Lautsprechereinstellungen’ auf den
Button ‚Lautstärke ...’.
Hier können Sie den Pegel für die verschiedenen
Ausgansgkanäle regeln. Erhöhen bzw. verringern Sie
die Pegel für die rechten und den linken Satelliten nach
Ihren Wünschen und klicken Sie dann auf ‚OK’ um die
Änderungen zu bestätigen.

6
Einstellungen unter Windows Vista
Öffnen Sie in Ihrer Systemsteuerung das ‚Sound’-Menü.
Wählen Sie dann Ihre Soundkarte aus und klicken Sie auf
‚Konfi gurieren’.
Wählen Sie in dem neuen Menü ‚5.1 Surround’ aus.
Klicken Sie auf ‚Weiter’ und im nächsten Menü ebenfalls
auf ‚Weiter’.
Deaktivieren Sie die Haken neben ‚Vorne links und rechts’
und ‚Surround-Lautsprecher’. Klicken Sie auf ‚Weiter’ und
im nächsten Fenster auf ‚Fertig stellen’.
Ihre Soundeinstellungen wurden damit für dieses Laut-
sprechersystem optimiert.
Wenn Sie die Satelliten nicht wie beschrieben, im gleichen
Abstand zu Ihrem Kopf positionieren konnten, können Sie
jetzt noch die Lautstärke der Satelliten ausgleichen.
Klicken Sie dazu im ‚Sound’-Menü auf ‚Eigenschaften’
und dann im neu geöffneten Fenster auf den Reiter
‚Pegel’ und den Button ‚Balance’.
Hier können Sie den Pegel für die verschiedenen Aus-
gangskanäle einzeln regeln. Erhöhen bzw. verringern Sie
die Pegel für die verschiedenen Lautsprecher nach Ihren
Wünschen und klicken Sie dann auf ‚OK’ um die Eingabe
zu bestätigen.

7
FAQ
Subwoofer und Satelliten funktionieren nicht
Stellen Sie sicher, dass der Netzschalter am Subwoofer
auf ‚ON’ gestellt ist und die verwendete Steckdose unter
Spannung steht.
Sollte dadurch das Problem nicht behoben werden
können, überprüfen Sie die Soundeinstellungen Ihres
Computers.
Windows XP
Windows Vista
Vergewissern Sie sich, das die verwendete Soundkarte
als Standardgerät für die Soundwiedergabe im ‚Sounds
und Audiogeräte’-Menü (XP) bzw. ‚Sound’-Menü (Vista)
der Systemsteuerung eingetragen ist und die ‚Ton aus’-
Funktion nicht aktiviert ist.
Der Sound wirkt verzerrt
Überprüfen Sie das die Stecker sämtlicher Laut-
sprecheranschlusskabel und der Audio-Kabel ganz in
den Buchsen verschwunden sind und nicht herausragen.
Stellen Sie sicher, dass die Einstellungen in Ihrem
Betriebsystem wie im Punkt ‚Einstellungen unter
Windows XP’ bzw. ‚Einstellungen unter Windows
Vista’ angegeben vorgenommen wurden.
Sicherheitshinweise:
• Verwenden Sie den Lautsprecher nur in trocknen und
geschlossenen Räumen
• Stellen Sie sicher, dass die Netzspannung 230 V / 50 Hz
beträgt
• Verlegen Sie die Kabel so, dass man nicht darauf
treten oder darüber stolpern und nicht durch
daraufl iegende Gegenstände beschädigt werden kann
• Es dürfen keine Gegenstände wie z.B. Büroklammern,
etc. in das Lautsprechergehäuse gelangen, da diese
einen Kurzschluß verursachen könnten
• Vermeiden Sie jeglichen Kontakt mit Flüssigkeiten
•
Verwenden Sie zum Reinigen nur ein trockenes oder bei
starker Verschmutzung ein leicht angefeuchtetes Tuch
• Durch das Ausschalten am Netzschalter wird der Laut-
sprecher nicht von der Netzspannung getrennt. Zur
vollständigen Trennung von der Netzspannung muss
der Netzstecker aus der Steckdose gezogen werden
• Reparaturen dürfen nur von autorisiertem
Fachpersonal durchgeführt werden
Technische Daten:
Subwoofer
Ausgangsleistung: 5,5 Watt; <2% THD+n
Frequenzgang: 25 Hz - 4,5 kHz
Abmessungen: 16 x 25,5 x 24 cm
Tieftöner: 102 mm
Satelliten:
Ausgangsleistung: 5 x 1,5 Watt; <4% THD+n
Frequenzgang: 180 Hz - 20 kHz
Abmessungen: 8,7 x 9,7 x 11,5 cm
Lautsprecher: 69 mm
Die angegebene Sinusleistung bezieht sich auf die
Verstärkerleistung.
Kontakt- und Supportinformationen:
Bei defekten Produkten:
Bitte wenden Sie sich bei Produktreklamationen an
Ihren Händler oder an die Hama Produktberatung.
Internet/World Wide Web
Produktunterstützung, neue Treiber oder Produktinfor-
mationen bekommen Sie unter www.hama.com
Support Hotline – Hama Produktberatung:
Tel. +49 (0) 9091 / 502-115
Fax +49 (0) 9091 / 502-272
e-mail: [email protected]

8
d
Bedienungsanleitung
g
Operating Instruction
FR
SR
CEN
INPUT
FL
SL
SW
OUTPUT
FR
SR
CEN
FL
SL
Speaker Mic
Soundcard
Front Right Front Left
Surround Right Surround Left
Center

9
Contents
• Package contents
• Placement
• Connecting the loudspeaker system
• Operation and sound settings
• Settings with Windows XP
• Settings with Windows Vista
• FAQ
• Safety notes
• Specifi cations
Package Contents
1 x Subwoofer
3 x Front/centre satellites with 2 m cable length
2 x Rear satellites with 5 m cable length
1 x Remote control
3 x Audio cable
While you are unpacking, ensure that all components are
included and that there is no visible damage (crimped
cables, damaged insulation, etc.)
We recommend that you keep the packaging, including
the Styrofoam inserts, for transport at a later time.
Positioning
1. Place the front satellites to the right and left of the
monitor and the centre satellite above the monitor and
position them so that they face toward you.
2. Place the rear satellites to the side and slightly behind
your seating position.
3. You can place the subwoofer underneath your desk.
Because the human ear cannot localise low tones, the
exact position of the subwoofer is not crucial.
Connecting the Loudspeaker System
Connect the audio cable to the audio input on the rear of
the subwoofer and to the corresponding sockets on your
sound card.
Connect the loudspeaker connection cable to the audio
output on the subwoofer and connect the mains plug to
an available wall socket.
If the loudspeaker connection cable is not long enough
to allow for the placement that you want, you can use
extension cables with RCA sockets and RCA plugs so that
the cable is long enough.
Carefully read through the safety notes before using the
device for the fi rst time.

10
Operation and Sound Setting
1. Standby
2. Mute switch
3. 5.1-Modus
4. Virtual 5.1-Modus
5.-8. Volume control for the right rear loudspeaker (5),
the left rear loudspeaker (6), the centre
loudspeaker (7) and the subwoofer/bass (8)
9. Balance control
10. Total volume control
1 2
3 4
5
6
7
8
9
10
STANDBY
SRD RIGHT
SRD LEFT
CENTER
SUBWOOFER
MUTE
5.1 VIRTUAL 5.1
LR
Vol +
Vol -

11
Settings with Windows XP
Open „Sounds and Audio Devices“ from your control
panel.
Click „Advanced...“ under „Speaker settings“
Select “5.1 surround sound speakers” and click “OK”.
Your sound settings are now optimised for this
loudspeaker system.
If you cannot place the satellites, as was described, so
that they are at equal distances from your head, you can
now balance the volume between the two satellites.
To do this, click „Speaker volume...“ under
„Speaker settings“
You can control the level for the various output channels
here. Increase or decrease the level for the right and
left satellites as you need, then click „OK“ to confi rm the
changes.

12
Settings with Windows Vista
Open „Sound“ from your control panel.
Select your sound card and then click „Confi gure“.
In the new menu, select “5.1 Surround”. Click “Next”.
In the next menu, also click “Next”.
Clear the checkmarks from the boxes next to “Front left
and right” and “Surround speakers”. Click “Next”. In the
next window, click “Finish”.
Your sound settings are now optimised for this
loudspeaker system.
If you cannot place the satellites, as was described, so
that they are at equal distances from your head, you can
now balance the volume between the two satellites.
Klicken Sie dazu im ‚Sound’-Menü auf ‚Eigenschaften’
und dann im neu geöffneten Fenster auf den Reiter
‚Pegel’ und den Button ‚Balance’.
You can individually control the level for the various
output channels here. Increase or decrease the level for
the different loudspeakers as you need, then click “OK”
to confi rm the entry.

13
FAQ
The subwoofer and the satellites do not work
Be sure that the on/off on the subwoofer is set to „ON“
and that the wall socket that you are using is live.
Be sure that here are no devices or cables plugged into
the two connectors on the cable remote control.
If this does not solve the problem, check your computer‘s
sound settings.
Windows XP
Windows Vista
Be sure that the sound card you are using is the default
device for sound playback under „Sounds and Audio
Devices“ (XP) or „Sound“ (Vista) in the control panel and
that there is no checkmark next to the „Mute“ function.
The sound is distorted
Check to be sure that the plugs for all loudspeaker
connection cables and the audio cables are inserted
fully into the sockets and do not stick out.
Be sure that you have made the settings in your operating
system as is described in „Settings with Windows XP“ or
„Settings with Windows Vista“.
Safety notes:
• Use the loudspeakers only in closed, dry spaces.
• Be sure that the mains power supply is 230 V/50 Hz.
• Route that cable so that no one will walk on it or trip
over it and so that it cannot be damaged by objects
that lie on it.
• Do not allow objects such as paper clips, etc. to enter
the speaker, since these may cause a short circuit.
• Keep all liquids away.
• Use only a dry cloth for cleaning. If the unit is
extremely soiled, use a slightly dampened cloth.
• Switching off the on/off switch does not disconnect
the speaker from the mains voltage. The mains plug
must be pulled out of the wall socket in order to
disconnect the speakers from the mains voltage
completely.
• Repair work may only be performed by authorized
technicians.
Specifi cations:
Subwoofer
Output power: 5,5 Watt; <2% THD+n
Frequency response: 25 Hz - 4,5 kHz
Dimensions: 16 x 25,5 x 24 cm
Woofers: 102 mm
Satellites:
Output power: 5 x 1,5 Watt; <4% THD+n
Frequency response: 180 Hz - 20 kHz
Dimensions: 8,7 x 9,7 x 11,5 cm
Loudspeakers: 69 mm
The indicated sine-wave power output refers to the
amplifi er power output.
Support and contact information
If products are defective:
Please contact your dealer or Hama Product Consulting
if you have any product claims.
Internet / World Wide Web:
Product support, new drivers or product information can
be found at www.hama.com
Support Hotline – Hama Product Consulting:
Tel. +49 (0) 9091 / 502-115
Fax +49 (0) 9091 / 502-272
E-mail: [email protected]

14
d
BedienungsanleitungMode d‘emploi
f
FR
SR
CEN
INPUT
FL
SL
SW
OUTPUT
FR
SR
CEN
FL
SL
Speaker Mic
Soundcard
Front Right Front Left
Surround Right Surround Left
Center

15
Table des matières
• Contenu de l´emballage
• Positionnement
• Raccordement du système de haut-parleur
• Utilisation et réglages du son
• Réglages sous Windows XP
• Réglages sous Windows Vista
• FAQ, Questions fréquemment posées
• Mesures de sécurité
• Données techniques
Packungsinhalt
• Contenu de l‘emballage
• 1 caisson de graves
• 3 satellites avant / latéraux avec câbles de 2 m
• 2 satellites arrière avec câbles de 5 m
• 1 télécommande
• 3 câbles audio
Lors du déballage, veuillez vérifi er qu´il y ait tous les
composants et que ceux-ci ne présentent pas de
dommage extérieur (câble plié, isolation abimée, etc...).
Nous vous recommandons de garder l´emballage avec
les parties en polystyrène pour d´éventuels transports
futurs.
Positionnement
1. Placez les satellites avant à droite et à gauche du
moniteur et le satellite central au-dessus du moniteur,
puis orientez-les dans votre direction.
2. Placez les satellites arrière légèrement derrière
l’endroit où vous êtes assis.
3. Vous pouvez placer le caisson de graves sous votre
bureau. La position ne joue aucun rôle, car les graves
ne peuvent pas être clairement situés par l’oreille
humaine.
Branchement du système de haut-parleurs
Branchez le câble audio à l’entrée audio de la face
arrière du caisson de graves et à la prise correspondante
de votre carte-son.
Reliez le câble de liaison du haut-parleur avec la sortie
audio du caisson de graves et la fi che de réseau à une
prise de courant disponible.
Si les câbles de branchement de haut-parleur ne sont
pas assez longs pour pouvoir positionner les
haut-parleurs à l´endroit que vous souhaitez, vous pouvez
utiliser une rallonge dotée d´une une prise RCA et d´une
fi che RCA afi n d´avoir la longueur de câble nécessaire.
Avant la mise en marche, veuillez lire avec attention les
mesures de sécurité.

16
Commande et réglage audio
1. Appareil en veille
2. Commutateur silencieux
3. 5.1-Modus
4. Virtual 5.1-Modus
5.-8. Réglage du volume pour le haut-parleur arrière
droit (5), le haut-parleur arrière gauche (6), le
haut-parleur central (7) et le caisson de graves (8).
9. Réglage de la balance
10. Réglage du volume général
1 2
3 4
5
6
7
8
9
10
STANDBY
SRD RIGHT
SRD LEFT
CENTER
SUBWOOFER
MUTE
5.1 VIRTUAL 5.1
LR
Vol +
Vol -

17
Réglages sous Windows XP
Dans le panneau de confi guration, ouvrez le menu
‚Appareils audio et sonores’.
Dans „Réglages des haut-parleurs“ appuyez sur le
bouton ‚Elargi ...’
Sélectionnez « haut-parleurs Surround Sound 5.1 », puis
cliquez sur « OK ».
Si vous n´avez pas pu installer les satellites comme il est
décrit, à savoir à la même distance par rapport à votre
tête, vous pouvez également équilibrer le volume.
Pour cela, veuillez cliquer sur „Réglages des
haut-parleurs“ sur le bouton „Volume....“.
Vous pouvez ici régler les différents canaux de sortie
individuellement. Vous pouvez augmenter ou diminuer
le niveau du bruit du haut-parleur satellite droit (R) et
gauche (L) selon vos souhaits et cliquez alors sur ‚OK’
pour confi rmer votre introduction.

18
Réglages sous Windows Vista
Dans le panneau de confi guration, ouvrez le menu ’Sons“.
Sélectionnez alors votre carte son puis cliquez sur
‚Confi gurer’.
Sélectionnez « 5.1 Surround » dans le nouveau menu.
Cliquez sur « Suivant », puis également sur « Suivant »
dans le nouveau menu.
Décochez les cases à côté, « avant gauche et droite » et
« haut-parleur Surround ». Cliquez sur « Suivant », puis
sur « Terminer » dans la fenêtre suivante.
Vos réglages du son ont donc été optimisés pour ce
système de haut-parleur.
Si vous n´avez pas pu installer les satellites comme il est
décrit, à savoir à la même distance par rapport à votre
tête, vous pouvez également équilibrer le volume.
Pour cela, veuillez cliquer dans le menu „Son“ sur
„Propriétés“ puis dans la fenêtre nouvellement ouverte
sur „Niveau“ puis sur le bouton „Equilibre/Balance“.
Vous pouvez ici régler séparément le volume pour les
différents canaux de sortie. Augmentez ou diminuez le
volume des différents haut-parleurs en fonction de vos
besoins, puis cliquez sur « OK » afi n de confi rmer votre
saisie.

19
Questions fréquemment posées
Le caisson de graves et les satellites ne fonctionnent pas.
Vérifi ez que l´interrupteur d´alimentation au caisson de
graves soit sur la position ‚ON’ et que la prise de courant
utilisée soit sous tension.
Si le problème persiste, veuillez vérifi er les réglages du
son de votre ordinateur.
Windows XP
Windows Vista
Assurez-vous que la carte son utilisée est inscrite comme
appareil standard pour la reproduction sonore dans
le menu „Appareils sonores et audio“ (XP) ou le menu
„Son’ (Vista) dans le panneau de confi guration et que la
fonction ‚Son éteint’ ne soit pas activée.
Le son est déformé.
Contrôlez que les fi ches des tous les câbles des haut-par-
leurs et que le câble audio sont bien totalement insérés
dans les prises et ne dépassent pas. Assurez-vous que
les réglages dans votre système d´exploitation comme
dans le point „Réglages sous Windows XP“ ou „Réglages
sous Windows Vista“ aient été effectués.
Consignes de sécurité :
• Utilisez le haut-parleur uniquement dans des pièces
fermées et sèches.
• Vérifi ez que la tension en courant soit de 230 V / 50 Hz.
• Posez le câble de manière à ce que personne ne
marche ou trébuche dessus et qu´aucun objet posé
dessus ne soit endommagé.
• Prêtez attention qu´aucun objet comme par exemple
des agrafes ne pénètre dans le boîtier des haut-
parleurs car cela pourrait provoquer un court-circuit.
• Evitez tout contact avec les liquides.
• Pour le nettoyage, utilisez uniquement un chiffon sec
ou un chiffon légèrement humidifi é en cas de saleté
tenace
• En éteignant l´interrupteur d´alimentation, le haut-
parleur n´est pas séparé de la tension du réseau.
Afi n de séparer entièrement le haut-parleur de la
tension du réseau, il est nécessaire d´enlever la fi che
de réseau de la prise de courant.
• Les réparations doivent uniquement être effectuées
par du personnel qualifi é
Caractéristiques techniques :
Caisson de graves
Puissance de sortie : 5,5 Watt; <2% THD+n
Gamme de fréquence : 25 Hz - 4,5 kHz
Dimensions : 16 x 25,5 x 24 cm
Sous-graves : 102 mm
Satellites :
Puissance de sortie : 5 x 1,5 Watt; <4% THD+n
Gamme de fréquence : 180 Hz - 20 kHz
Dimensions : 8,7 x 9,7 x 11,5 cm
Haut-parleur : 69 mm
La puissance sinusoïdale indiquée se base sur la puissance
d‘amplifi cation.
Support technique et contact
En cas d’appareil défectueux :
En cas de réclamation concernant le produit, veuillez
vous adresser à votre revendeur ou au département
conseil produits de Hama.
Internet / World Wide Web
Notre support technique, les nouveaux pilotes et les
informations produits sont disponibles sous :
www.hama.com
Ligne téléphonique directe d’assistance –
Conseil produits Hama :
Tél. +49 (0) 9091 / 502-115
Fax +49 (0) 9091 / 502-272
E-mail : [email protected]
Seite wird geladen ...
Seite wird geladen ...
Seite wird geladen ...
Seite wird geladen ...
Seite wird geladen ...
Seite wird geladen ...
-
 1
1
-
 2
2
-
 3
3
-
 4
4
-
 5
5
-
 6
6
-
 7
7
-
 8
8
-
 9
9
-
 10
10
-
 11
11
-
 12
12
-
 13
13
-
 14
14
-
 15
15
-
 16
16
-
 17
17
-
 18
18
-
 19
19
-
 20
20
-
 21
21
-
 22
22
-
 23
23
-
 24
24
-
 25
25
-
 26
26


Hama 00052801 Bedienungsanleitung
- Kategorie
- Subwoofer
- Typ
- Bedienungsanleitung
in anderen Sprachen
- English: Hama 00052801 Owner's manual
- français: Hama 00052801 Le manuel du propriétaire
- Nederlands: Hama 00052801 de handleiding
Verwandte Artikel
-
Hama 00057133 Bedienungsanleitung
-
-
-
-
-
-
-
-
-