Gardena Tiller BL 7/25 with rotating rake Benutzerhandbuch
- Typ
- Benutzerhandbuch

Bodenkrümler BL 7/25 mit Kreiselrechen
Tiller BL 7/25 with rotating rake
Emietteur-aérateur BL 7/25
Borderfrees BL 7/25 met roterende hark
Myllare BL 7/25 med roterande kratta
Dissodatore BL 7/25 con disco spianatore
Desmenuzador BL 7/25 con rastrillo rotativo
Cultivador BL 7/25 com ancinho rotativo
Gebrauchsanweisung
Operating Instructions
Mode d’emploi
Gebruiksaanwijzing
Bruksanvisning
Istruzioni per l’uso
Manual de instrucciones
Instruções de manejo
GARDENA
®

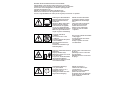
Beachten Sie die Sicherheitshinweise auf dem Gerät:
Please adhere to the following safety instructions on the unit:
Veuillez observer les instructions de sécurité figurant sur l’appareil :
Houdt u zich aan de veiligheidsvoorschriften op het apparaat:
Följ bruksanvisningen noga:
Attenzione ai simboli di sicurezza sull’apparecchio:
Observen las indicaciones de seguridad en el aparato:
Por favor siga atentamente as instruções de segurança fornecidas no aparelho:
Achtung! Vor Inbetriebnahme
Gebrauchsanweisung lesen!
Warning! Read instruction
handbook!
Attention ! Merci de lire atten-
tivement le mode d’emploi
avant d’utiliser cet appareil !
Let op! Voor ingebruikname
gebruiksaanwijzing doorlezen!
OBS! Läs igenom bruksanvis-
ningen noga före användning!
Vor Regen und Nässe
schützen!
Do not use in rain or wet
conditions!
Protégez l’appareil de la pluie
et de l’humidité !
Stel het apparaat niet bloot
aan vocht!
Använd inte maskinen i regn
eller fuktig miljö!
Dritte aus dem Gefahrenbereich
fernhalten!
Keep bystanders away!
Maintenez tout tiers hors de la
zone de travail !
Zorg ervoor dat derden buiten
de gevarenzone blijven!
Tillse att inga obehöriga vistas
inom arbetsområdet!
Umlaufendes Werkzeug!
Tool goes behind!
L’appareil tourne encore !
Apparaat loopt na!
Verktyget fortsätter att rotera
något efter avstängning.
Attenzione ! Prima di mettere
in funzione l’attrezzo, leggere
attentamente le istruzioni per
l’uso!
¡Atención! Antes de la puesta
en marcha, lea el presente
manual de instrucciones.
Atenção! Leia o Manual de
instruções antes de utilizar
o aparelho!
Non esporre l’attrezzo all’umidità
o alla pioggia!
¡Proteja el aparato de la lluvia
y la humedad!
Proteja o aparelho da chuva
e da humidade!
Tenere lontano i terzi dalla zona
di lavoro!
¡Mantenga a terceros fuera del
área de trabajo!
Mantenha terceiros fora da área
de perigo!
Attenzione! Pericolo!
L’utensile in rotazione può
causare lesioni!
El aparato en funcionamiento
puede causar lesiones.
O aparelho depois de desligado
ainda levará uns instantes até
parar totalmente.


1110
GG
Voltage V 12 =
Operation with Accu A 12 or
Accu-Pack AP 12 min approx. 30 - 40
Working diameter
of crumbling head mm 70
Working diameter of rotating rake mm 250
Rotation speed of accessory tools rpm 280
Weight kg 2.0
Working area related emission
characteristic value L
PA
1)
dB (A) 70
Noise level L
WA
dB (A) 81
Vibrations a
vhw
1)
ms
-2
< 2.5
1)
Measuring method pursuant to EN 786
GARDENA accu-system V12
Tiller BL 7/25 with rotating rake
1. Technical data
Please read and follow these
operating instructions carefully.
Familiarise yourself with the unit’s
features, its proper use and the
safety instructions included.
A
For safety reasons chil-
dren under the age of 16
or people who are not familiar
with these operating instruc-
tions should not use this Tiller.
Please keep these operating
instructions in a safe place.
2. Information regarding the operating instructions
5.1 Assembly/changing the
accessory tools (ill. A / A1/ B)
The Tiller is delivered with two
unassembled accessory tools.
The crumbling head (1) serves
to crumble the upper layer of
soil of a cultivated surface. The
rotating rake (2) serves to finely
level after crumbling.
Assembly of an accessory tool
1. Remove the Accu from
the unit!
2. Stand the Tiller on the handle
(3).
3. Place the accessory tool
(crumbling head (1) or rotating
rake (2)) onto the three bayonet
pins (5) by means of the centre
pin (4) and press down. Turn
the accessory tool clockwise
until the red safety knob (6)
snaps in.
Changing the accessory tool
1. Remove the Accu from
the unit!
2. Stand the Tiller on the handle
(3).
3. To unlock and remove the
accessory tool (crumbling head
or rotating rake), simultane-
ously press the red safety knob
(6) and turn the accessory
tool counter clockwise.
4. Assembly as described above.
Attention! Before assembly
or exchanging an accessory
tool always clear the head sup-
port (7) of possible remaining
soil (also refer to point 6. Main-
tenance / Service / Storage).
5.2 How to snap-in / remove
the Accu (ill. A1)
Insert the Accu (8) with the nipple
(9) into the attachment part (10).
Snap the Accu (8) and the coun-
terpart (11) over the two orange
knobs (12). Listen for an audible
snap-in. Release the Accu (8)
from the unit by simultaneously
pressing the two orange locking
knobs (2) on the handle (3) or
respectively on the Accu-Pack
AP 12. Remove the Accu (8).
5.3 Working position (ill. C)
Just lift the unit by the handle (3)
and guide handle (14). The ac-
cessory tool is guided vertically
over the cultivated surface.
5.4 Adjusting the guide handle
to correct working position
(ill. D)
By loosening the fastening screw
(15) the guide handle (14) can
conveniently be adjusted accord-
ing to user’s height and area of
use.
5.5 Operation (ill. A1 / C-G)
Snap in the Accu (8), as de-
scribed under 5.2.
Switch the unit on by pressing
the starting switch (13) on the
handle (3). The Tiller automati-
cally switches off when releasing
the starting switch (13).
Hold the Tiller in normal work-
ing position before switching
on (see ill. C/E/F).
A
The safety devices in-
stalled by the manufac-
turer must not be removed
or by-passed, e. g. by binding
the on/off switch to the handle.
This will prevent the Tiller
switching off automatically,
and may cause serious injury.
Do not operate the unit with
an external power source!
Attention! The Tiller will take a
while to stop running after the
unit is switched off.
5.6 Working with the Tiller on
cultivated surfaces (ill. C / E-G)
Crumbling of friable soil
conditions (ill. E)
For assembly of the crumbling
head (1) see point 5.1.
For preparation of a cultivated
area with friable conditions in
early spring, and for fine crum-
bling when preparing beds
for sowing.
Guide the crumbling head (1)
vertically in the soil. To ease the
load, start the Tiller just before
dipping into the soil surface.
A fine crumbling structure of the
upper layer of soil is obtained
by pulling in circular movements.
Levelling of areas
with the rotating rake (ill. F)
For assembly of the rotating rake
(2) see point 5.1.
To level the soil surface, move
the roating rake (2) evenly across
the pre-crumbled soil in circular
movements.
Crumbling between plants
(ill. C/G)
For assembly of the crumbling
head (1) see point 5.1.
The Tiller with crumbling head (1)
is especially suitable for fine
crumbling and loosening of soil
around existing plants.
5. Initial operation (ill. A-G)
The GARDENA Tiller BL 7/25 is
designed for loosening and level-
ling smaller cultivated surfaces
in private house and hobby
gardens.
This Tiller is for private use only
and is not designed for use in
public facilities, parks, sporting
grounds, roads, agriculture or
forestry.
It is essential to observe the
manufacturer’s operating instruc-
tions to ensure the unit’s proper
functioning. These instructions
also contain advice for service,
maintenance and repair.
A
Attention! For safety
reasons the unit must not
be used for scarifying lawn
surfaces.
4. Product use
This unit is part of a comprehen-
sive garden programme from
GARDENA, the accu-system V12.
In order to operate this product,
you need additional items from
the accu-system V12 range:
1. Power supply/accu:
accu-system V12
Accu A 12, Art.No. 2109,
or
accu-system V12
Accu-Pack AP 12, Art.No. 2110
2. Battery charger:
accu-system V12
Battery Charger NL 12,
Art.No. 2105
(for Accu A 12 and Accu-Pack
AP 12)
or
accu-system V12
High-speed Battery Charger
SL 60, Art.No. 2100
(only for Accu-Pack AP 12,
Art.No. 2110)
3. Introduction

1312
GG
The GARDENA Tiller requires
minimal maintenance.
Always keep the contacts in
the attachment part (10) and on
the Accu (8) free of dirt.
Remaining soil and dirt should
be removed with a dry rag or
brush. Remaining soil and dirt
should be removed after each
use.
Repairs may only be carried
out by GARDENA Service
Centres or dealers authorised
by GARDENA.
A
Attention! Always re-
move the Accu before
working on the Tiller (checking,
cleaning, maintenance). Risk
of injury!
To avoid injury to persons and
product damage: Ne
ver clean
the Tiller with running water or
with a water jet, in particular
a high pressure water jet.
Store the Tiller in a dry place
where it is protected from frost.
The Tiller should be stored
out of the reach of children.
Observe the manufacturer’s
assembly hints when attaching
or exchanging the accessory
tools.
If you have any problem with
your Tiller, please contact our
Customer Service or return the
defective unit together with a
short description of the problem
and, if covered under guarantee,
with the warranty card duly com-
pleted and signed, directly to one
of the GARDENA Service Centres
listed on the back of this leaflet.
We expressly point out that,
in accordance with the product
liability law, we are not liable
for any damage caused by our
units if it is due to improper
repair or if parts exchanged are
not original GARDENA parts
or parts approved by us, and,
if the repairs were not carried
out by a GARDENA Service
Centre or an authorised spe-
cialist. The same applies to
spare parts and accessories.
6. Maintenance / service / storage
A
Inspect the unit
before each use
Before each use, inspect the
Tiller. Do not use the Tiller if
safety devices (starting switch)
and/or accessory tools have
been damaged or are worn.
Never by-pass safety devices.
Inspect the area to be culti-
vated before and during work.
Remove any obstructions
such as stones. During work
look out for obstructions.
If, in spite of care, you come
into contact with an obstruc-
tion whilst cutting, turn off
the Tiller and remove it.
Check the unit for possible
damage and have it repaired,
if necessary.
A Use/responsibility
This Tiller can cause serious
injuries!
Only use the Tiller for the
purposes specified in these
instructions.
You are responsible for the
safety in the working area.
Make sure that there are no
other people (especially chil-
dren) or animals within or
near the working area.
Never use the Tiller with
damaged or defective acces-
sory tools!
After use remove the Accu. The
Tiller – especially the acces-
sory tools – must be checked
regularly for damages and
repaired properly, if necessary.
Wear eye protection or pro-
tective glasses!
Wear non-skid shoes and long
trousers to protect your legs.
Keep hands and feet away from
the accessory tools – above
all, when starting work.
Ensure that you have secure
foothold whilst working.
Attention! Take extra care when
walking backwards. You may
stumble.
Only work when the visibility
is good.
A Interrupting work
Never leave the Tiller unat-
tended in the working place.
If you stop work, store the
Tiller in a safe place and
remove the Accu.
Should you stop work in order
to get to another working place,
always switch off the Tiller to
go there and remove the Accu.
A Work place safety
Make yourself familiar with
the surroundings and look out
for dangers which you may not
detect due to machinery noise.
Never use the Tiller when it is
raining or in a damp, wet area.
Do not use the Tiller in or near
swimming pools or ponds.
A
Electrical safety /
fire risk
The contacts of the Accu
should never be bridged. Dan-
ger of short circuit – fire risk!
7. Advice for proper use / safety instructions
Description of the unit:
accu-system V12 Tiller
Type: BL 7/25
Art. No. : 2190
EU directives:
Machinery Directive 89/392/EC
mod. 91/368/EC
Electromagnetic Compatibility
89/336/EC
Directive 93/68/EC
Harmonised
European standards:
EN 292-1
EN 292-2
National standards:
DIN VDE 0730-1
DIN VDE 0730-2ZP
Year of CE marking:
1996
Ulm, 11.11.1996
J. Katzer
Technical Dept. Manager
The undersigned
GARDENA Kress + Kastner GmbH · Hans-Lorenser-Str. 40 · D-89079 Ulm
hereby certifies that, when leaving our factory, the units indicated below are in accordance with the
harmonised EU guidelines, EU standards of safety and product specific standards.
This certificate becomes void if the units are modified without our approval.
EU Certificate of Conformity

38
D
Garantie
GARDENA gewährt für dieses
Produkt 1 Jahr Garantie (ab Kauf-
datum). Diese Garantieleistung
bezieht sich auf alle wesentlichen
Mängel des Gerätes, die nach-
weislich auf Material- oder
Fabrikationsfehler zurückzuführen
sind. Sie erfolgt durch die Ersatz-
lieferung eines einwandfreien
Gerätes oder durch die kosten-
lose Reparatur des eingesandten
Gerätes nach unserer Wahl,
wenn folgende Voraussetzungen
gewährleistet sind:
.Das Gerät wurde sachgemäß
und laut den Empfehlungen
in der Gebrauchsanweisung
behandelt. Es wurde weder
vom Käufer noch von einem
Dritten versucht, das Gerät
zu reparieren.
.Das Gerät wurde ausreichend
frankiert direkt an eine der
GARDENA Servicestellen
gesandt, unter Beifügung
der vollständig ausgefüllten
Garantiekarte bzw. des
Rechnungsbeleges.
Diese Hersteller-Garantie berührt
die gegenüber dem Händler/
Verkäufer bestehenden Gewähr-
leistungsansprüche nicht.
Verschleißteile (z. B. Krümler-
kopf; Kreiselrechen) sind von
der Garantie ausgeschlossen.
G
Guarantee
GARDENA guarantees this pro-
duct for 12 months (from date of
purchase). This guarantee covers
all serious defects of the unit
that can be proved to be material
or manufacturing faults. Under
guarantee we will either replace
the unit or repair it free of charge
if the following conditions apply:
.The unit must have been
handled properly and in keep-
ing with the requirements of
the operating instructions.
In addition, no attempt at repair
by the customer or a non-
authorised third party is per-
mitted.
.The unit is returned directly
postage paid to a GARDENA
Service Centre together with
the warranty card duly com-
pleted and signed.
This manufacturer’s guarantee
does not affect the user’s
existing warranty claims against
the dealer/seller.
Parts subject to wear (e. g.
crumbling head; rotating rake)
are excluded from this guar-
antee.
F
Garantie
Pour mieux vous servir,
GARDENA accorde pour cet
appareil une garantie contrac-
tuelle de 1 an à compter du jour
de l’achat. Elle est assurée sur
décision de GARDENA par le
remplacement gratuit des pièces
défectueuses ou de l’appareil.
En tout état de cause s’applique
la garantie légale couvrant toutes
les conséquences des défauts
ou vices cachés (article 1641 et
suivants du Code Civil).
Pour que ces garanties soient
valables, les conditions suivantes
doivent être remplies :
.L’appareil a été manipulé de
manière adéquate, suivant les
instructions du mode d’emploi.
.Il n’y a eu aucun essai de
réparation, ni par le client, ni
par un tiers.
.L’appareil et la carte de
garantie dûment remplie ont
été retournés en port payé
au Service Après-Vente de
GARDENA France.
Une intervention sous garantie
ne prolonge pas la durée initiale
de la garantie contractuelle.
Toutes les revendications dé-
passant le contenu de ce texte
ne sont pas couvertes par la
garantie, quel que soit le motif
de droit.
Pendant la période de garantie,
le Service Après-Vente effec-
tuera, à titre payant, les répara-
tions nécessaires par suite de
manipulations erronées.
La garantie ne s’applique pas
aux pièces d’usure normale
(par ex. aérateur, émietteur).
N
Garantie
GARDENA geeft op dit product
1 jaar garantie (vanaf de aan-
koopdatum). Deze garantie heeft
betrekking op alle wezenlijke
defecten aan het toestel, die aan-
wijsbaar op materiaal- of fabri-
cagefouten berusten. Garantie
vindt plaats door de levering van
een vervangend apparaat of door
de gratis reparatie van het inge-
stuurde apparaat, naar onze
keuze, indien aan de volgende
voorwaarden is voldaan:
.Het apparaat werd vakkundig
en volgens de adviezen in de
gebruiksaanwijzing behandeld.
Noch de koper, noch een
derde persoon heeft getracht
het apparaat te repareren.
.Het apparaat werd voldoende
gefrankeerd aan de GARDENA
technische dienst gestuurd,
met toevoeging van een volle-
dig ingevulde garantiekaart
resp. kopie van de rekening.
Deze garantie van de producent
heeft geen betrekking op de ten
aanzien van de handelaar/ ver-
koper bestaande aansprakelijk-
heid.
Onderdelen die aan slijtage
onderhevig zijn (bijv. ver-
kruimelkop; roterende hark)
vallen niet onder de garantie.

41
Garantiekarte
Warranty Card
Carte de garantie
Garantiekaart
Garantikort
Certificato di garanzia
Tarjeta de garantía
Carta de garantia
GARDENA accu-system V12 Bodenkrümler BL 7/25 mit Kreiselrechen
GARDENA accu-system V12 Tiller BL 7/25 with rotating rake
Emietteur-aérateur BL 7/25 accu-system V12 GARDENA, réf. 2190
GARDENA accu-system V12 Borderfrees BL 7/25 met roterende hark
GARDENA accu-system V12 Myllare BL 7/25 med roterande kratta
GARDENA Dissodatore BL 7/25 accu-system V12 con disco spianatore
GARDENA Desmenuzador BL 7/25 accu-system V12 con rastrillo rotativo
Cultivador BL 7/25 GARDENA accu-system V12 com ancinho rotativo
wurde gekauft am:
Purchase date:
Acheté le (date et lieu d’achat) :
Werd gekocht op:
Inköpsdatum:
Data di acquisto:
Fecha de compra:
Comprado em:
Beanstandung:
Reasons for complaint:
Défaut constaté :
Klacht:
Reklamation:
Reclamo:
Avería:
Motivo de reclamação:
Händlerstempel:
Dealer’s stamp /Receipt:
Cachet du revendeur :
Stempel van de handelaar:
Återförsäljarens stämpel:
Timbro del rivenditore:
Sello del comerciante:
Carimbo do vendedor:
✃

Deutschland
GARDENA
Kress + Kastner GmbH
GARDENA Service
Hans-Lorenser-Straße 40
D-89079 Ulm
Produktfragen: (07 31) 490-123
Reparaturen: (07 31) 490-290
Argentina
Unitán s.a.i.c.a.
Paseo Colón 221 – P. 10 °
1399 Buenos Aires
Australia
NYLEX Corporation Ltd.
25-29 Nepean Highway
P.O. Box 68
Mentone, Victoria 3194
Austria
GARDENA Österreich
Gesellschaft m.b.H.
Stettnerweg 11-15
2100 Korneuburg
Belgium
MARKT (Belgium) NV/SA
Sterrebeekstraat 163
1930 Zaventem
Canada
Continental Industries
100, Summerlea Road
Brampton, Ontario
Canada L6T 4X3
Chile
Comercial Maquinex
Nueva Panamericana Sur,
Nº 1050
San Bernardo
Santiago de Chile
Cyprus
FARMOKIPIKI LTD
P.O. Box 7098
74, Digeni Akrita Ave.
1641 Nicosia
Czech Republic
GARDENA spol. s.r.o.
Brn`´enská 634
66442 Brno-Mod`´rice
Denmark
GARDENA Danmark A/S
Bejlerholm 10
9400 Nørresundby
Finland
Habitec Oy
Martinkyläntie 52
01720 Vantaa
France
GARDENA France
Service Après-Vente
BP 50080
95948 ROISSY CDG Cedex
Great Britain
GARDENA UK Ltd.
27-28 Brenkley Way
Blezard Business Park
Seaton Burn
Newcastle upon Tyne
NE13 6DS
Greece
Agrokip
G. Psomadopoulos & Co.
20, Lykourgou str.
Kallithea
Athens
Hungary
GARDENA Magyarország Kft.
Késmárk utca 22
1158 Budapest
Iceland
Heimilistaeki hf
Saetun 8
P.O. Box 5340
125 Reykjavik
Italy
GARDENA Italia S.r.l.
Via Donizetti 22
20020 Lainate (Mi)
Japan
KAKUDAI Mfg. Co. Ltd.
1-4-4, Itachibori Nishi-ku
Osaka 550
Luxembourg
Magasins Jules Neuberg
Grand Rue 30
Case Postale No. 12
Luxembourg 2010
Netherlands
MARKT (Holland) BV
Postbus 219
1380 AE Weesp
New Zealand
NYLEX
New Zealand Limited
Head Office
22, Ormiston Road
Private Bag
South Auckland Mail Centre
Auckland
Norway
GARDENA Norge A/S
Postboks 214
2013 Skjetten
Poland
GARDENA Polska Sp. z o.o.
Orzeszyn 35a
k/Piaseczna
05-532 Baniocha
Portugal
MARKT (Portugal), Lda.
Recta da Granja do Marquês
Algueirão
2725 Mem Martins
Russia / Россия
АО АМИДА
ул. Моcфилмовcкая 66
117330 Моcква
Singapore
Variware
Holland Road Shopping Centre
227-A 1st Fl., Unit 29
Holland Avenue
Singapore 1027
Slowenia
Silk d.o.o. Trgovina
Brodiљиe 15
1236 Trzin
South Africa
GARDENA
South Africa (Pty.) Ltd.
P.O. Box 11534
Vorna Valley 1686
Spain
ANMI Andreu y Miriam S.A.
Calle Pere IV, 111
08018 Barcelona
Sweden
GARDENA Svenska AB
Box 9003
20039 Malmö
Switzerland
GARDENA Kress + Kastner AG
Bitziberg 1
8184 Bachenbülach
Turkey
Bahçe Tarim ve Sulama
Araçlari Ticaret A.Þ.
Soðanlik Yolu, Yalniz
Selvi Sok. No: 21
81440 Kartal-Ýstanbul
USA
GARDENA
3085 Shawnee Drive
Winchester, VA 22604
2190 -20.960.01/0962
GARDENA Kress + Kastner GmbH
Postfach 27 47, D- 89070 Ulm
http://www.gardena.de
-
 1
1
-
 2
2
-
 3
3
-
 4
4
-
 5
5
-
 6
6
-
 7
7
-
 8
8


Gardena Tiller BL 7/25 with rotating rake Benutzerhandbuch
- Typ
- Benutzerhandbuch
in anderen Sprachen
Verwandte Papiere
-
Gardena Metal Hose Trolley Benutzerhandbuch
-
-
-
-
-
-
-
-
-