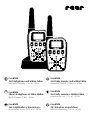
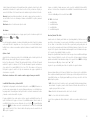
Reer 50133 Bedienungsanleitung
- Kategorie
- Baby-Videomonitore
- Typ
- Bedienungsanleitung
Dieses Handbuch eignet sich auch für

Care&Talk
2in1 Babyphone und Walkie-Talkie
Gebrauchsanleitung // Art.Nr.: 50133
Care&Talk
2in1 baby monitor and walkie talkie
Instruction manual // item. no.: 50133
Care&Talk
2dans1 Babyphone et Talkie-Walkie
Mode d‘emploi // Réf. : 50133
Care&Talk
2in1 Baby monitor e Walkie-talkie
Istruzioni per l‘uso // N. art.: 50133
Care&Talk
2en1 vigilabebés y transmisores
Instrucciones de uso // N° d‘art.: 50133
Care&Talk
2V1 babyfoon en portofoon
Gebruiksaanwijzing // Art.nr.: 50133
FR

2 3
Technische Daten und Funktionen......... 04–05
Allgemeine Sicherheitshinweise ............ 06
Sicherheitshinweise zur Installation ....... 06–07
Lieferumfang/Gerätebeschreibung ......... 07
Gerätebeschreibung Babyeinheit ......... 08–09
Inbetriebnahme..........................10
2in1: Betriebsarten Babyphone
oder Walkie-Talkie ...................... 10
Dati tecnici e funzioni .................. 58–59
Avvertenze di sicurezza generali ............ 60
Istruzioni di sicurezza per l‘installazione .... 60–61
Dotazione/Descrizione dell‘apparecchio ..... 61
Descrizione dell‘apparecchio unità bambino 62–63
Messa in funzione........................64
2in1: modalità operative „Baby monitor“
e „Walkie-talkie“ ....................... 64
Technical data and functions ............. 22–23
General safety instructions ................ 24
Safety instructions regarding installation.... 24–25
Scope of delivery/Device description ........ 25
Device description baby unit............. 26–27
Before first use ..........................28
2 in 1: baby monitor or walkie talkie operating
modes ............................... 28
Especificaciones técnicas y funciones ...... 76–77
Indicaciones generales de seguridad ........ 78
Indicaciones de seguridad para la instalación 78–79
Volumen de suministro/Descripción
del dispositivo ......................... 79
Descripción del dispositivo unidad infantil... 80–81
Puesta en funcionamiento .................82
2en1: régimen de servicio para vigilar
al niño o del transmisor .................. 82
Technische gegevens en functies ......... 94–95
Algemene veiligheidsaanwijzingen.......... 96
Veiligheidsaanwijzing voor de installatie.... 96–97
Leveringsomvang/Beschrijving van
het apparaat ........................... 97
Beschrijving van het apparaat babyeenheid 98–99
Ingebruikname .........................100
2V1: bedrijfsmodi van de babyfoon
of portofoon .......................... 100
Caractéristiques techniques et fonctions .... 40–41
Consignes générales de sécurité............ 42
Conseils de sécurité pour l‘installation ..... 42–43
Contenu de la livraison/Description
de l’appareil ........................... 43
Description de l’appareil unité bébé ....... 44–45
Mise en service .........................46
2dans1 : modes de fonctionnement
Babyphone ou talkie-walkie .............. 46
Kapitel 1: Verwendung in der
Betriebsart „Babyphone“................ 11–16
Kapitel 2: Verwendung in der
Betriebsart „Walkie-Talkie“ .............. 16–19
Reinigung und Wartung................... 19
Problembehebung....................... 20
Serviceadresse und Hotline ................ 20
Garantie/Hinweise zum Umweltschutz ...... 21
Capitolo 1: Uso nella modalità
operativa „Baby monitor“ ............... 65–70
Capitolo 2: Uso nella modalità
operativa „Walkie-talkie“................ 70–73
Pulizia e manutenzione................... 73
Soluzione problemi ..................... 74
Assistenza tecnica....................... 74
Garanzia/Prescrizioni in materia di
tutela ambientale ....................... 75
Chapter 1: Use in „baby monitor“
operating mode ...................... 29–34
Chapter 2: Use in „walkie talkie“
operating mode ...................... 34–37
Cleaning and maintenance ................ 37
Troubleshooting......................... 38
Service Address And Technical Hotline ....... 38
Warranty/Environmental protection ......... 39
Capítulo1: Uso en el régimen de
servicio „vigilabebés“ .................. 82–87
Capítulo 2: Uso en el régimen de
servicio „transmisor“................... 87–90
Limpieza y mantenimiento ............... 91
Solución de problemas ................... 92
Dirección de servicio y línea directa técnica ....92
Garantía/Indicaciones sobre la
protección medioambiental ............... 93
Hoofdstuk 1: Gebruik als „babyfoon”..... 100–105
Hoofdstuk 2: Gebruik als „portofoon“ .... 105–108
Reiniging en onderhoud ................. 109
Probleemoplossing ..................... 110
Dienst Adres En Technische Hotline......... 110
Waarborg/Aanwijzingen betreffende
milieubescherming .................... 111
Chapitre 1 : Utilisation dans le mode
de fonctionnement „Babyphone“ ......... 47–52
Chapitre 2 : Utilisation dans le mode
de fonctionnement talkie-walkie ......... 52–55
Nettoyage et entretien ................... 55
Résolution des problèmes................. 56
Adresse du service d‘assistance téléphonique . 56
Garantie/Informations sur la protection
environnementale . . . . . . . . . . . . . . . . . . . . . . 57
Inhaltsverzeichnis
ÍndiceContents
InhoudsopgaveTable des matières
Indice
FR

4 5
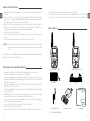
Care&Talk 2in1 Babyphone und Walkie-Talkie
Herzlichen Glückwunsch zum Erwerb Ihres neuen reer Babyphones. Das Care&Talk ist ein
analoges Audio-Babyphone, welches zusätzlich als Walkie-Talkie verwendet werden kann.
In der Einstellung als Babyphone überträgt das Gerät in Kombination mit dem beiliegenden
Kabel-Mikrofon zuverlässig die Geräusche Ihres Babys. Dank des Kabel-Mikrofons reduziert
sich die elektronische Strahlung in der Nähe des Kindes um bis zu 90%. Zudem verfügt das
Babyphone über verschiedene Mikrofonempfindlichkeitsstufen. Haben Sie die VOX-Funktion
aktiviert, so schaltet das Gerät automatisch in einen „Ruhemodus“, wenn das Kind schläft.
Dank optionalem Akkubetrieb und robustem Gürtelclip kann das handliche Babyphone so-
wohl stationär (Ladeschale) als auch mobil (Akku) verwendet werden. Wir sind sicher, Sie
werden lange Zeit Freude an der Qualität unseres Produktes haben.
Bitte nehmen Sie sich ein paar Minuten Zeit um die Sicherheitshinweise gründlich zu lesen.
Nur wenn alle der hier aufgeführten Punkte gewährleistet sind, kann das reer Babyphone
bedenkenlos verwendet werden. Bewahren Sie die Bedienungsanleitung für späteres Nach-
schlagen sorgfältig auf.
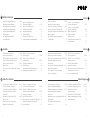
Technologie PMR 446
Frequenzbereich 446.00625 - 446.09375 MHz
Anzahl Kanäle 8 PMR446-Kanäle, 38 CTCSS-Töne, 18 voreingestellte
Kanäle/CTCSS-Kombinationen für die Betriebsart
„Babyphone“
Sender Babyeinheit Spannungsversorgung mit Netzteil oder Akku: 950
mAh 3,7 V Li-Ion
Empfänger Elterneinheit Spannungsversorgung mit Netzteil oder Akku: 950
mAh 3,7 V Li-Ion
Input 100-240V, 50/60 Hz, 0,2A
Output 5V, 500mA
Sendeleistung 500 mW
Reichweite bis zu 5.000 m
Kabellänge Netzteile ca. 1,15 m
Kabellänge Mikrofon-Kabel ca. 2 m
Anschlüsse für Audiozubehör Mikrofon 2,5 mm, Kopfhörer 3,5 mm
Betriebstemperaturbereich -20 bis +55°C
angewandte technische Norm EN 300 296-2
Kanal Frequenztabelle (MHz) Kanal Frequenztabelle (MHz)
1
446.00625
5
446.05625
2
446.01875
6
446.06875
3
446.03125
7
446.08125
4
446.04375
8
446.09375
Nr. Freq. Nr. Freq. Nr. Freq. Nr. Freq.
1
67.0
11
97.4
21
136.5
31
192.8
2
71.9
12
100.0
22
141.3
32
203.5
3
74.4
13
103.5
23
146.2
33
210.7
4
77.0
14
107.2
24
151.4
34
218.1
5
79.7
15
110.9
25
156.7
35
225.7
6
82.5
16
114.8
26
162.2
36
233.6
7
85.4
17
118.8
27
167.9
37
241.8
8
88.5
18
123.0
28
173.8
38
250.3
9
91.5
19
127.3
29
179.9
OF
-
10
94.8
20
131.8
30
186.2
Technische Daten und Funktionen
Frequenztabelle PMR 446
CTCSS Code-Tabelle

6 7
Allgemeine Sicherheitshinweise
Sicherheitshinweise zur Installation
Lieferumfang
! Überprüfen Sie vor jeder Benutzung das Gerät auf offensichtliche Beschädigungen. Sollten
Sie Schäden feststellen, darf dieses Gerät nicht verwendet werden.
! Stellen Sie sicher, dass die Betriebsspannung der Steckdose, der des Netzteils entspricht.
Prüfen Sie, insbesondere auf einer Auslandsreise, ob die lokale Netzspannung mit der
angegebenen Spannung auf den Geräten bzw. den Netzteilen übereinstimmt.
! Die Geräte und Netzteile dürfen, mit Ausnahme des Deckels am Akkufach, nicht geöffnet
werden, da dies zu Stromschlägen führen kann. Sollte ein Gerät fehlerhaft arbeiten, ver-
suchen Sie bitte NICHT das Problem selbst zu beheben. In diesem Fall bitten wir Sie, sich
an Ihren Händler zu wenden.
! Bewahren Sie den Akku außerhalb der Reichweite von Kindern auf.
! Vermeiden Sie die Berührung von metallischen Gegenständen mit dem Akku - bzw.
Stromanschlusskontakten an den Geräten.
! Lassen Sie Kinder unter 36 Monaten nicht mit dem Gerät spielen.
ACHTUNG! Dieses Babyphone wurde ausschließlich als Hilfsmittel für die Beobachtung Ihres
Babys entwickelt. Es darf weder als Ersatz für die Aufsichtspflicht der Eltern, noch
als medizinisches Gerät angesehen werden!
Verwenden Sie immer nur die im Lieferumfang enthaltenen Akkus in den beiden Geräten!
Bei Verwendung ungeeigneter Batterietypen besteht Explosionsgefahr!
• Platzieren Sie die Babyeinheit immer außer Reichweite des Kindes (Mindestabstand 1 Meter).
• Legen Sie das Babyphone niemals in das Baby- oder Kinderbett bzw. den Laufstall.
• Um eine Strangulation mit dem Mikrofon-Kabel zu verhindern, befestigen und sichern
Sie das Kabel-Mikrofon so, dass das Kind dieses nicht zu sich ziehen bzw. dies nicht zum
Spielen verwenden kann. Verwenden Sie hierzu am besten die beigelegten Kabelbinder.
• Um eine Strangulation mit dem Netzkabel zu verhindern, sichern Sie die Kabel außerhalb
der Reichweite von Kindern. Verwenden Sie keine Verlängerungskabel.
• Um eine bestmögliche Übertragung zu gewährleisten, sollten die Geräte idealerweise in
aufrechter und in erhöhter Position aufgestellt werden.
• Platzieren Sie den Empfänger NICHT in der Nähe von anderen Funkgeräten oder Mikrowel-
len. Die Abstrahlung dieser Geräte kann den Empfang stark beeinträchtigen.
• Verwenden Sie die Geräte nicht in Wassernähe oder an feuchten Orten. Tauchen Sie die
Geräte nicht in Wasser.
• Spülen Sie die Geräte nicht unter fließendem Wasser ab.
• Bedecken Sie das Babyphone nicht mit einem Handtuch, Kleidung oder einer Decke.
• Vermeiden Sie extreme Hitze und direkte Sonneneinstrahlung.
• Bewahren Sie den abnehmbaren Gürtelclip außerhalb der Reichweite von Kindern unter 36
Monaten auf, da dieser ein verschluckbares Kleinteil darstellt, hier besteht Erstickungsgefahr.
• Lassen Sie Kinder unter 36 Monaten nicht mit dem Gerät spielen, da die Gummi-Abde-
ckung der Zubehörteile ein verschluckbares Kleinteil darstellt, hier besteht Erstickungs-
gefahr.
1 × Babyeinheit (Sender) 1 × Elterneinheit (Empfänger)
2 × Akkus 2 × Ladestationen
1 × Kabel-Mikrofon
5 × Kabelkanäle/-binder
2 × Netzteile 1 × Bedienungsanleitung

8 9
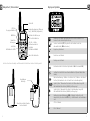
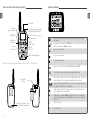
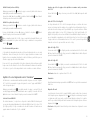
Babyeinheit / Elterneinheit Display und Symbole
Der Unterschied zwischen Baby- und Elterneinheit besteht in dem Motiv auf der Babyeinheit.
Empfangen: Das Gerät empfängt Geräusche der anderen Einheit. Diese
können Sie über den Lautsprecher hören.
Senden: Sendetaste (PTT) ist gedrückt oder das Gerät sendet im
Automatik-Modus (VOX siehe unten)
Roger Beep ist aktiviert.
Tastentöne sind aktiviert.
Tastensperre ist aktiviert.
Reichweitenkontrolle ist aktiviert (automatisch: AU oder manuell: Pb)
Suchlauf: Das Gerät führt einen Kanalsuchlauf durch (Nur im Walkie-Talkie
Modus).
Batteriestandsanzeige: 3 Balken = der Akku ist voll, 1 Balken = der Akku ist
fast leer (Bitte während oder sofort nach dem Senden überprüfen!)
Symbol „Eltern“: Elterneinheit. Das Gerät ist als Elterneinheit eingestellt.
Wird im Walkie-Talkie Modus (PMR446) nicht angezeigt.
Symbol „Baby“: Babyeinheit. Das Gerät ist als Babyeinheit eingestellt.
Wird im Walkie-Talkie Modus (PMR446) nicht angezeigt.
VOX
Intelligente Geräuschaktivierung (VOX) ist aktiviert: Das Gerät sendet
automatisch (ohne Druck der PTT Taste), sobald Geräusche im Kinderzimmer
sind.
CT
CTCSS ist aktiviert.
DC
DCS ist aktiviert.
Status LED
PPT-Taste
Gegensprechfunktion
Anschluss für Zubehör, wie
z.B. das Kabel-Mikrofon
Menü-Taste
Tastensperre
AN/AUS - Schalter
Reichweitenkontrolle
Sicherheitsverschluss-Schraube
für das Akkufach
abnehmbarer
Gürtelclip
Lautstärke
AUSWAHL nach OBEN
Lautstärke
AUSWAHL nach UNTEN
Micro-USB-Ladebuchse
Geräuschpegelanzeige (Elternein-
heit) / Nachtlicht (Babyeinheit)
MON-Taste
BLACK
RED
BLACK
RED

10 11
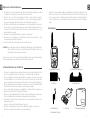
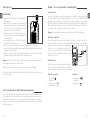
Inbetriebnahme
BLACK
RED
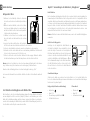
Einlegen der Akkus
1. Entfernen Sie den Gürtelclip. Ziehen Sie hierzu an
der Lasche und ziehen Sie den Gürtelclip nach unten
weg.
2. Öffnen Sie nun das Akkufach, in dem Sie die Schrau-
be mit einem Schraubenzieher lösen und entfernen,
und das Fach durch leichtes Drücken und paralleles
Schieben nach unten abnehmen.
3. Schließen Sie den Stecker des Li-Ion-Akkus vorsich-
tig an die Buchse im Batteriefach an (rote Leitung
rechts).
4. Legen Sie den Akku in das Gerät ein. Die beiden Ka-
bel sollten sich zwischen der Batterie und dem Stecker befinden.
5. Setzen Sie den Akkufachdeckel wieder ein und verschrauben Sie diesen wieder.
6. Verbinden Sie beide Ladeschalen mit den im Lieferumfang befindlichen Netzteilen und
stecken Sie diese dann in eine 230 V-Steckdose ein.
7. Stellen Sie die Geräte in die Ladeschale. Während des Ladevorgangs blinken die Balken
der Batteriestandsanzeige auf und das Lämpchen an der Ladeschale leuchtet rot.
Hinweis: Laden Sie beide Geräte vor der ersten Verwendung vollständig auf, bis die Ladean-
zeige 3 Balken anzeigt. Dies kann beim ersten Ladevorgang 4 Stunden dauern.
Wenn der Akku vollständig geladen ist erscheint im Display die Anzeige „FULL“.
Sie können die Akkus auch ohne Ladeschale direkt über die Micro-USB-Ladebuchse am Gerät
laden.
2in1: Betriebsarten Babyphone oder Walkie-Talkie
Bitte beachten Sie, dass diese Gebrauchsanleitung aufgrund der Doppelfunktion des Gerätes
aus zwei Kapiteln besteht. Im ersten Teil (Kapitel 1) finden Sie eine Anleitung, wie Sie Ihre
Geräte für die Babyüberwachung einrichten können, im zweiten Teil finden Sie Informatio-
nen über die Verwendung als Walkie-Talkie (normales PMR 446 Handfunkgerät), welche Sie
oder Ihre Kinder vielleicht später verwenden möchten.
Kapitel 1: Verwendung in der Betriebsart „Babyphone“
Kabel-Mikrofon
Für die Benutzung als Babyphone befindet sich ein externes Mikrofon im Lieferumfang. Die
Verwendung dieses Kabel-Mikrofons hat die folgenden Vorteile: Es ist empfindlicher als das
eingebaute Mikrofon und kann daher auch Geräusche aus weiterer Entfernung wahrnehmen.
So können Sie die Entfernung zwischen Babygerät und Babybett vergrößern. Die Funkstrah-
lung in der Nähe des Kindes wird dadurch erheblich vermindert. Darüber hinaus können
Sie das Babygerät so aufstellen, dass Sie die bestmögliche Funkreichweite erzielen - zum
Beispiel auf dem Fensterbrett oder auf einem Schrank.
Hinweis: Schließen Sie immer das Kabel-Mikrofon an, wenn Sie das Care&Talk als Babyphone
verwenden.
Aufstellen des Babygerätes
Befestigen Sie das mitgelieferte Kabel-Mikrofon in
der Nähe des Babybetts, aber außerhalb der Reich-
weite Ihres Babys. Verwenden Sie das mitgelieferte
Klebeband, um das Mikrofon sicher zu befestigen und
sichern Sie das Kabel anschließend mithilfe der mit-
gelieferten Kabelbinder und Kabelführungen. Öffnen
Sie die Gummiabdeckung für die Zubehöranschlüsse
(der MIC/EAR-Buchse) auf der rechten Seite des Ge-
räts und stecken Sie den Stecker des Kabel-Mikrofons
in die obere Buchse.
Standardeinstellungen
Schalten Sie die Geräte ein, indem Sie den An/Aus-Schalter ca. 3 Sek. gedrückt halten. Prü-
fen Sie die Standardeinstellungen. Genauere Informationen zu den einzelnen Einstellungen
finden Sie im folgenden Kapitel.
Babygerät (mit Sternchen-Bedruckung):
• Babymodus:
• Kanal: 01b
• Überwachungsempfindlichkeit: VOX
• Talk Back Funktion: aus
Elterneinheit:
• Elternmodus:
• Kanal: 01P
• Reichweitenkontrolle:

12 13
Prüfen Sie nun die Sendefunktion des Babygerätes, indem Sie auf das angeschlossene Ka-
bel-Mikrofon klopfen. An der Elterneinheit wird nun entsprechend der Ton übertragen und
zusätzlich flackern die weißen LEDs oberhalb des Displays auf. Diese dienen als optische
Anzeige des Geräuschpegels.
Achtung: Bei geringem Abstand zwischen beiden Geräten können Pfeiftöne aufgrund der
Rückkopplung entstehen. Reduzieren Sie in diesem Fall die Lautstärke der Elterneinheit oder
erhöhen Sie den Abstand.
Hinweis: Bei Störungen wechseln Sie auf einen anderen Kanal.
Lautstärke
Stellen Sie die gewünschte Lautstärke an der Elterneinheit durch die Auswahltasten /
ein. Im Display erscheint bis .
Stellen Sie auf diese Weise auch die Lautstärke an der Babyeinheit ein. Die Lautstärkeeinstel-
lung an dem Babygerät ist wichtig, falls Sie zu Ihrem Baby sprechen wollen (Gegensprech-
funktion). Anderenfalls wird empfohlen, die Lautstärke des Babygeräts auf die niedrigste
Stufe einzustellen.
Kanal einstellen
Drücken Sie die Menütaste und stellen Sie mit den Auswahltasten / einen Überwa-
chungskanal ein. Drücken Sie die PTT-Taste, um die Einstellung zu speichern. Oder warten
Sie alternativ einfach einige Sekunden.
Es gibt 18 mögliche Einstellungen, 01b bis 18b für die Babyeinheit und 01P bis 18P für die El-
terneinheit. Die Zahlen 1 bis 18 stehen für voreingestellte Kombinationen von PMR446-Funk-
kanälen und CTCSS-Tönen. Diese Zahlen gelten nur für Funkgeräte dieses Typs. Eine Kommu-
nikation mit Babyphonen anderer Marken ist nicht möglich.
Hinweis: Achten Sie darauf, dass die Kanalnummer auf beiden Geräten übereinstimmt!
Mikrofonempfindlichkeit und VOX-Funktion
Das Babyphone ist mit einer intelligenten Geräuschaktivierung (VOX) ausgestattet. Der Sen-
der schaltet, falls keine Geräusche im Raum vorhanden sind, auf minimalen Energiever-
brauch und Strahlenreduktion um. Sobald die Babyeinheit Geräusche wahrnimmt, aktiviert
sie die Funkverbindung und überträgt die Geräusche an die mobile Elterneinheit.
Das Babyphone verfügt über vier auswählbare Mikrofonempfindlichkeitsstufen. Im Aus-
lieferungszustand befindet sich das Gerät auf Stufe 4 (höchste Empfindlichkeit). Um die
Mikrofon empfindlichkeit zu ändern, drücken Sie 2-mal kurz die -Taste. Auf dem Bildschirm
erscheint nun Vo und das 04
VOX
blinkt. Sie können mit den Auswahltasten / Stufe
01-04 auswählen. Drücken Sie kurz die PTT-Taste oder warten Sie 5 Sekunden, um die Ein-
stellung zu speichern.
Schalten Sie die Mikrofonempfindlichkeit an der Babyeinheit auf 04, falls Sie schon beim
leisesten Geräusch alarmiert werden wollen. Steht die Mikrofonempfindlichkeit auf dem
Status 01, so werden Sie erst bei lauteren Geräuschen alarmiert.
Sie können die VOX-Funktion auch ausschalten durch die Auswahl Vo oF.
oF VOX ist deaktiviert
1. niedrige Empfindlichkeit
2. mittlere Empfindlichkeit
3. hohe Empfindlichkeit
4. höchste Empfindlichkeit
Gegensprechfunktion/Talk Back Funktion
Wenn Ihr Baby weint, möchten Sie vielleicht zu Ihrem Baby sprechen, um es zu beruhigen
und zu signalisieren, dass Sie bereits auf dem Weg sind. Grundsätzlich können Sie immer zu
Ihrem Kind sprechen wenn dieses ruhig ist. Spricht oder weint das Kind müssen Sie warten,
bis das Kind ein Pause macht oder, im Falle von Dauerweinen, die Talk Back Funktion die
Übertragung unterbricht. Dies passiert nach 10 Sekunden ununterbrochener Übertragung.
Dann haben Sie ein Zeitfenster von 10 Sekunden, um zum Kind zu sprechen.
Um die Talk Back Funktion nutzen zu können, muss diese an der Babyeinheit eingeschaltet
sein. So schalten Sie die Talk Back Funktion ein oder aus:
Drücken Sie 2 Sekunden die MON-Taste an der Babyeinheit. Das Display zeigt kurz tb und
danach die neue Einstellung on oder of an.
Vergewissern Sie sich, dass die Lautstärke an der Babyeinheit passend eingestellt ist.
Um die Talk Back Funktion bestmöglich nutzen zu können haben Sie drei Einstellungsmög-
lichkeiten. Diese werden an der Babyeinheit eingestellt, indem Sie 5-mal kurz auf die Menü-
taste drücken bis rb im Display erscheint. Wählen Sie dann mittels der Auswahltasten /
die gewünschte Einstellung:
1. rb tb: Sie hören einen Signalton, wenn das Babygerät die Übertragung nach 10 Sekunden
unterbricht, obwohl das Kind noch weint. Nun haben Sie ein Zeitfenster von 10 Sekunden,
um zum Kind zurückzusprechen.
2. rb on: Sie hören am Ende jeder Übertragung einen Signalton
3. rb of: Signaltöne sind deaktiviert
Wir empfehlen Ihnen die Einstellung rb tb zu verwenden, wenn Sie die Gegensprech-
funktion regelmäßig nutzen möchten.

14 15
Reichweitenkontrolle
Dieses Babyphone ist mit einem optischen und akustischen Reichweitenkontrollsystem aus-
gestattet. In regelmäßigen Intervallen kontrolliert die Elterneinheit den beidseitigen Kontakt.
Wird die Reichweite überschritten oder wird die Verbindung aufgrund von anderen Störun-
gen unterbrochen, beginnt die Status-LED an der Elterneinheit rot zu blinken und es ertönt in
regelmäßigen Abständen ein Signalton.
Bei der Reichweitenkontrolle können Sie zwischen der automatischen und manuellen Reich-
weitenkontrolle wählen oder diese ausschalten.
Hierzu drücken Sie 3-mal die -Taste der Elterneinheit, bis links auf dem Display an-
gezeigt wird. Die aktuelle Einstellung (nur an der Elterneinheit verfügbar), AU, Pb oder oF,
blinkt rechts auf dem Display. Wählen Sie mit den Auswahltasten / entweder AU für die
automatische Reichweitenkontrolle oder Pb aus, um bei Bedarf die manuelle Reichweiten-
Kontrolle durchzuführen. Wählen Sie oF, um die Reichweiten-Funktion komplett auszuschal-
ten. Drücken Sie kurz die PTT-Taste oder warten Sie 5 Sekunden, um die Einstellung zu
speichern.
1) automatische Reichweitenkontrolle (AU)
Die automatische Reichweitenkontrolle ist im Babysitter-Modus automatisch aktiviert. Diese
Funktion überprüft automatisch im Minutentakt, ob sich Baby- und Elterneinheit in Funk-
reichweite befinden. Die Elterneinheit sendet eine Anfrage an das Babygerät. Dieses erwi-
dert das Signal. Wenn mehr als 2 Minuten lang keine Antwort empfangen wird, ist die Funk-
verbindung unterbrochen. Das kann daran liegen, dass die beiden Geräte außer Reichweite
sind, dass die Batterien des anderen Geräts zu schwach sind, das Gerät ausgeschaltet ist
oder es Störungen auf dem eingestellten Funkkanal gibt. Solange eine Verbindung besteht,
wird das Symbol konstant angezeigt. Das Symbol blinkt, wenn die Verbindung unter-
brochen ist und 5 Signaltöne zeigen an, dass auf eine Anfrage keine Antwort empfangen
wurde. Wenn sich beide Geräte wieder in Funkreichweite befinden, wird das Symbol nach 2
Minuten wieder dauerhaft angezeigt.
2) manuelle Reichweitenkontrolle (Pb)
Sie können auch manuell überprüfen, ob sich die Babyeinheit in Funkreichweite befindet.
Dazu muss die Reichweiten-Funktion an der Elterneinheit auf Pb eingestellt sein. Drücken
Sie die -Taste und warten Sie einige Sekunden. Die Babyeinheit beantwortet Ihre Anfrage
und die Elterneinheit gibt eine Melodie wieder. Jetzt können Sie sicher sein, dass sich beide
Geräte in Funkreichweite befinden.
3) Reichweitenkontrolle deaktivieren (oF)
Die Reichweiten-Kontrolle kann deaktiviert werden, wenn sie nicht benötigt wird.
Hinweis: Wir empfehlen Ihnen, wenn Sie die Umgebung kennen und das Babyphone schon
mehrfach in diesem Umfeld ausprobiert haben, auf die manuelle Reichweitenkontrolle um-
zustellen bzw. diese zu deaktivieren. Wollen Sie die Strahlung und den Energieverbrauch
minimieren (ECO-Modus), dann deaktivieren Sie die Reichweitenkontrolle oder verwenden
die manuelle Reichweitenkontrolle.
Geräuschpegelanzeige (Elterneinheit)
Die 3 LEDs oberhalb vom Display dienen der visuellen Anzeige des Geräuschpegels vom
Kinderzimmer.
Drücken Sie 4-mal die -Taste, bis FL links auf dem Display angezeigt wird. Die aktuelle
Einstellung, AU oder 01 bis 03 blinkt auf der rechten Seite des Displays.
Durch Drücken der Auswahltasten / ändern Sie die Einstellung.
• Wählen Sie AU, um die Visualisierung des Geräuschpegels zu aktivieren. Wenn das Baby
nur ein wenig weint, leuchtet nur 1 LED auf. Wenn das Baby ein wenig lauter schreit,
leuchten 2 LEDs auf. Wenn das Baby sehr laut schreit, leuchten alle 3 LEDs auf.
• Wählen Sie 01, 02 oder 03 aus, dann ist die Anzahl der LEDs nicht mehr abhängig von der
Lautstärke des Kindes. Es leuchtet immer die gewählte Anzahl an LEDs auf.
Nachtlicht (Babyeinheit)
Das in der Babyeinheit integrierte Nachtlicht schafft durch ein warmes Scheinen eine be-
ruhigende Umgebung für Ihr Kind. Das Nachtlicht kann nur über die Babyeinheit aktiviert
werden.
Drücken Sie 4-mal die -Taste, bis FL links auf dem Display angezeigt wird. Die aktuelle
Einstellung, oF oder 01 bis 03 blinkt auf der rechten Seite des Displays. Durch Drücken der
Auswahltaste / wählen Sie 01 bis 03 aus, um 1 bis 3 LEDs anzuschalten. Wählen Sie oF,
um alle LEDs auszuschalten.
Umschalten zur Betriebsart „Babyphone“
Dieser Schritt ist nur notwendig, wenn die Geräte zuvor als PMR446-Funkgerät verwendet
wurden.

16 17
Babyeinheit (mit Sternchen-Bedruckung)
Halten Sie die -Taste gedrückt, während Sie das Gerät einschalten. (Die beiden äußeren
Knöpfe parallel gedrückt halten).
Drücken Sie die Auswahltasten / und wählen bA aus. Das Babysymbol wird ange-
zeigt. Zur Speicherung der Einstellung kurz die PTT- Taste drücken.
Elterneinheit (ohne Bedruckung)
Halten Sie die -Taste gedrückt, während Sie das Gerät einschalten. (Die beiden äußeren
Knöpfe parallel gedrückt halten).
Drücken Sie die Auswahltasten / und wählen PA aus. Das Elternsymbol wird
angezeigt. Zur Speicherung der Einstellung kurz die PTT-Taste drücken.
Jetzt wird der Überwachungskanal (01 bis 18), gefolgt von b am Babygerät oder P an der
Elterneinheit, angezeigt. Zusätzlich werden die entsprechenden Symbole oder an-
gezeigt.
Verwendung mehrerer Babygeräte
Mit Hilfe weiterer Babygeräte können mehrere Kinder bzw. Räume überwacht werden. Hier-
für müssen alle Geräte auf den gleichen Kanal eingestellt sein. In dieser Anwendung emp-
fehlen wir die Reichweitenkontrolle zu deaktivieren, da durch die unterschiedlichen Geräte
Fehlalarme entstehen können.
Bitte beachten Sie, dass das Elterngerät immer nur 1 Kind zur Zeit hören kann. Außerdem
sollte die Lautstärke an den Babyeinheiten auf 0 reduziert werden, da sich die Kinder an-
dernfalls gegenseitig hören bzw. stören könnten.
Kapitel 2: Verwendung in der Betriebsart „Walkie-Talkie“
Im Auslieferungszustand sind beide Geräte auf die Betriebsart „Babyphone“ eingestellt. Um
auf die Betriebsart „PMR446 Funkgerät“ umzustellen, führen Sie die folgenden Schritte aus.
Halten Sie die -Taste gedrückt, während Sie das Gerät einschalten (die An/Aus-Taste we-
nige Sekunden gedrückt halten). Durch Drücken der Auswahltasten / wählen Sie ro aus.
Um die Einstellung zu speichern, drücken Sie kurz die PTT-Taste.
Kanalwahl PMR446
Dieses Sende-/Empfangssystem verfügt über 8 PMR446-Kanäle. Darüber hinaus können
Sie die Kodierung mittels CTCSS-Töne (38 mögliche Codes) für jeden PMR446 Kanal einzeln
auswählen. Der Code wird rechts von der Kanalnummer als eine kleine, zweistellige Zahl
zwischen 01 und 38 oder oF angezeigt.
Stellen Sie sicher, dass alle Funkgeräte auf den gleichen Kanal und CTCSS-Ton einge-
stellt sind.
Drücken Sie 1-mal die -Taste und wählen Sie dann mit den Auswahltasten / den
gewünschten PMR446-Kanal aus.
CTCSS- oder DCS-Codes einstellen
Die zusätzlichen CTCSS- oder DCS-Codes dienen dazu, das Mithören von anderen Gesprächen
auf dem gleichen Kanal zu vermeiden. Dies bedeutet aber nicht, dass Übertragung abhör-
geschützt ist. Es ist immer möglich, nicht verschlüsselte analoge Funksignale abzuhören. Die
CTCSS- (Continuous Tone Coded Squelch Signal, Subton-Squelch-Verfahren) oder DCS- (Digital
Coded Squelch, digital codierte Rauschsperre) Töne sind nicht hörbare Töne auf niedriger Fre-
quenz, die zusammen mit dem Mikrofonsignal übertragen werden. Beim Empfang überprüft
das Gerät, ob ein CTCSS- oder DCS-Ton übertragen wird und schaltet den Lautsprecher nur
dann an, wenn der richtige Code empfangen wird.
CTCSS-Code einstellen:
Drücken Sie 1-mal die -Taste. Auf dem Display blinkt 01 bis 38 oder oF. Drücken Sie die
Auswahltasten /, um den gewünschten Code einzustellen. Um die Einstellung abzuspei-
chern, drücken Sie kurz die PTT-Taste.
DCS-Code einstellen:
Drücken Sie 2-mal die -Taste. Auf dem Display blinkt 01 bis 38 oder oF. Drücken Sie die
Auswahltasten /, um den gewünschten Code einzustellen. Um die Einstellung abzu-
speichern, drücken Sie kurz die PTT-Taste.
Hinweis: Es kann nur CTCSS oder DCS aktiviert sein.
Senden
Drücken und halten Sie die PTT-Taste zum Senden. Lassen Sie die Taste wieder los, um zu
empfangen.
Kanalsuchlauf
Der Kanalsuchlauf durchsucht alle PMR446-Kanäle nach Signalen. Drücken Sie lang auf die
-Taste, um den Suchlauf zu starten. Der Suchlauf wird unterbrochen, sobald ein Sig-
nal empfangen wird. Dann können Sie 8 Sekunden in den Kanal hineinhören, bevor der
Suchlauf fortgesetzt wird. Um den Suchlauf zu beenden, drücken Sie noch einmal lang auf
die -Taste.
Hinweis: Der Kanalsuchlauf ist nur in der Betriebsart „PMR446“ verfügbar.

18 19
Ruftonmelodie auswählen
Drücken Sie 9-mal die -Taste. Auf dem Display wird C angezeigt, gefolgt von der aktuellen
Einstellung, die blinkend angezeigt wird. Drücken Sie die Auswahltasten /, um den
Rufton aus 01 bis 03 oder oF auszuwählen. Um die Einstellung zu speichern, drücken Sie
kurz die PTT-Taste.
Ruffunktion
Drücken Sie kurz die -Taste.
Das Gerät sendet eine Ruftonmelodie an alle anderen Geräte auf diesem Kanal in Funkreich-
weite. Die Ruftonmelodie kann im Menü ausgewählt oder ausgeschaltet werden.
Hinweis: Die Ruffunktion ist nur in der Betriebsart „PMR446“ verfügbar.
Tastensperre
Alle Tasten außer der PTT-Taste können gesperrt werden, um eine versehentliche Bedienung
zu verhindern.
Tasten sperren: Drücken und halten Sie die -Taste für ungefähr 3 Sekunden, bis das Sym-
bol für die Tastensperre angezeigt wird.
Tasten entsperren: Drücken und halten Sie die Taste noch einmal für ungefähr 3 Sekunden,
bis das Symbol für die Tastensperre erlischt.
VOX als Freisprechfunktion
Dies ist die Empfindlichkeitseinstellung für die Freisprechfunktion. Das Gerät erkennt auto-
matisch, wenn Sie sprechen - Sie müssen die PTT-Taste nicht drücken. Dies kann sehr nütz-
lich sein, wenn Sie gerade keine Hand frei haben, um die PTT-Taste zu drücken.
Die Stufen 1 bis 4 entsprechen den gleichen Empfindlichkeitsstufen wie bei der Betriebsart
„Babyphone“.
oF VOX ist deaktiviert, normale Bedienung mit der PTT-Taste (Standardeinstellung)
1. niedrige Empfindlichkeit
2. mittlere Empfindlichkeit
3. hohe Empfindlichkeit
4. höchste Empfindlichkeit
Monitor-Funktion
Um auch sehr schwache Signale zu empfangen, kann die automatische Rauschsperre deak-
tiviert werden. Dies kann am Rande des Empfangsbereichs, oder wenn die Kommunikation
gestört wird, nützlich sein. Außerdem können Sie so einfach hören, was auf dem ausgewähl-
ten Kanal passiert. Um die Monitor-Funktion zu aktivieren oder deaktivieren, drücken Sie die
MON-Taste lange (auf der linken Seite des Geräts unter der PTT-Taste). Die Monitorfunktion
ist nur in der Betriebsart „PMR446“ verfügbar.
Roger-Beep
Das Gerät kann eine Tonsequenz senden, nachdem die PTT-Taste losgelassen wurde.
Drücken Sie 5-mal die -Taste, bis rb auf dem Display angezeigt wird.
Drücken Sie /, um on oder oF einzustellen.
Um die Einstellung zu speichern, drücken Sie kurz die PTT- Taste.
Wenn der Roger-Beep aktiviert ist, wird das Symbol angezeigt. Der Roger-Beep ist nur in
der Betriebsart „PMR446“ verfügbar.
Tastenton
Bei Tastendruck wird ein kurzer Signalton wiedergegeben. Um den Tastenton ein- oder aus-
zuschalten:
Drücken Sie 6-mal die -Taste, bis bP auf dem Display angezeigt wird.
Drücken Sie /, um on oder oF auszuwählen.
Um die Einstellung abzuspeichern, drücken Sie kurz die PTT-Taste.
Wenn der Tastenton aktiviert ist, wird das Symbol angezeigt. Der Tastenton ist nur in der
Betriebsart „PMR446“ verfügbar.
Reichweiten-Kontrolle im PMR446-Betrieb
Die Reichweiten-Funktion ist auch in der Betriebsart „PMR446“ verfügbar:
Wählen Sie zwischen AU (automatisch an), Pb (nur manuelle Reichweitenüberprüfung) oder
oF, um die Reichweiten-Funktion auszuschalten. Die Aktivierung oder Deaktivierung der
Reichweiten-Funktion wird an dem Gerät vorgenommen, mit der Sie die Reichweiten-Kon-
trolle durchführen wollen. Auch wenn die Reichweiten-Funktion an dem anderen Gerät de-
aktiviert ist, können Sie eine Reichweitenüberprüfung von Ihrem Gerät aus vornehmen.
In Funknetzwerken, die aus mehr als 2 gleichen Geräten bestehen, macht die Reichwei-
ten-Kontrolle keinen Sinn, weil nicht festgestellt werden kann, welches Gerät antwortet.
Daher gibt es keine Reichweiten-Kontrolle für mehrere Geräte im Netzwerk.
Reinigung und Wartung
Ziehen Sie immer die Netzteile aus der Netzsteckdose, bevor Sie das
Gerät reinigen. Verwenden Sie ausschließlich ein leicht feuchtes Tuch.
Tauchen Sie das Gerät nicht in Wasser. Benutzen Sie keinerlei chemi-
sche Reinigungsmittel. Dieses Produkt erfordert keine spezielle Wartung.
Reparaturen am Gerät dürfen nur von einem Fachmann durchgeführt
werden.

20 21
Problembehebung
Problem
Mögliche Ursache Maßnahme
Lauter Pfeifton
(Rückkopplung)
• Der Abstand zwischen Baby-
und Elterneinheit ist zu gering.
• Erhöhen Sie die Distanz zwi-
schen Baby- und Elterneinheit.
Rauschen / Verbindung bricht ab • Baby-/ Elterneinheit befinden
sich in der Nähe von störenden
Geräten (z.B. Mikrowelle) oder
metallischen Gegenständen.
• Die maximale Reichweite ist
überschritten.
• Der Akku der Baby-/Elternein-
heit ist zu schwach.
• Versuchen Sie die Störquelle
ausfindig zu machen und plat-
zieren Sie die Geräte an einer
anderen Stelle.
• Verkürzen Sie die Distanz zwi-
schen Baby- und Elterneinheit.
• Schließen Sie das Gerät an die
Stromversorgung an.
Verzögerte/keine Gegensprech-
funktion
• Ihr Kind weint, aber Sie
versuchen außerhalb des
„Frei“-Zeitrahmens gegenzu-
sprechen
• Schalten Sie am besten die Talk
Back Funktion auf rb tb oder rb
on und sprechen Sie nach dem
Signalton
Keine Gegensprechfunktion • Die Talk Back Funktion ist nicht
aktiviert.
• Schalten Sie die Talk Back Funktion
an der Babyeinheit ein.
Babyeinheit springt bei zu leisen
Geräuschen an
• Mikrofonempfindlichkeit ist zu
empfindlich eingestellt.
• Bitte wählen Sie eine niedrigere
VOX-Stufe aus. Die Lautstärke
am Babygerät ist zu niedrig
eingestellt.
Babyeinheit springt nur bei
lauten Geräuschen an
• Mikrofonempfindlichkeit ist zu
niedrig eingestellt.
• Bitte wählen Sie eine höhere
VOX-Stufe aus.
LED leuchtet rot • Die Elterneinheit sendet
• Elterneinheit ist in der Lade-
schale, der Akku wird geladen
• Keine Maßnahme erforderlich
• Keine Maßnahme erforderlich,
die LED erlischt, wenn der Akku
vollständig geladen ist
LED leuchtet grün • Die Elterneinheit empfängt
Geräusche
• Keine Maßnahme erforderlich
LED leuchtet an der Babyeinheit
nicht, obwohl das Gerät lädt
• An der Babyeinheit leuchtet
die LED nicht, um den kleinen
Liebling nicht zu stören
• Auf dem Display wird FULL
angezeigt bzw. der Batterie-
balken ist voll, wenn der Akku
vollständig geladen ist
Serviceadresse und Hotline
reer GmbH
Muehlstraße 41
71229 Leonberg
Garantie
Dieses Produkt darf am Ende seiner Lebensdauer nicht über den normalen
Hausmüll entsorgt werden, sondern muss an einer Sammelstelle für das Recy-
cling von elektrischen Geräten abgegeben werden. Das Symbol auf dem Pro-
dukt, in der Gebrauchsanleitung oder auf der Verpackung weist darauf hin. Die
Werkstoffe sind gemäß Ihrer Kennzeichnung wieder verwendbar. Werfen Sie
verbrauchte Batterien nicht in den Hausmüll, sondern in den Sondermüll oder
in eine Batterie-Sammelstation im Fachhandel.
Mit der Wiederverwendung, der stofflichen Ver-
wertung oder anderen Formen der Verwertung
von Altgeräten leisten Sie einen wichtigen Bei-
trag zum Schutze unserer Umwelt. Bitte fragen
Sie bei Ihrer Gemeindeverwaltung nach der zu-
ständigen Entsorgungsstelle.
Hinweise zur Verwendung von Akkus: Wenn
die Geräte längere Zeit nicht verwendet werden, wird empfohlen, den Stecker der Akkus
von den Geräten abzuziehen. Laden Sie die Li-Ion-Akkus bei Nichtverwendung alle sechs
Monate auf.
Hinweise zum Umweltschutz
Bitte Kaufbeleg, Gebrauchsanleitung und Artikelnummer aufbewahren. Gewährleistungs-
ansprüche oder Ansprüche aus Garantieversprechen sind ausschließlich mit dem Händler ab-
zuwickeln. Alle technischen Daten, Informationen sowie Eigenschaften des in diesem Werk
beschriebenen Produktes wurden nach bestem Wissen zusammengestellt und entsprechen
dem Stand bei Veröffentlichung. Die von reer bereitgestellten Informationen sollten korrekt
und zuverlässig sein. Die Firma reer übernimmt dennoch keinerlei Haftung für mögliche Feh-
ler in diesem Dokument und behält sich das Recht vor, ohne vorherige Ankündigung, Ände-
rungen am Produktdesign beziehungsweise an den Spezifikationen vorzunehmen. Verviel-
fältigung und Weitergabe von Informationen aus diesem urheberrechtlich geschützten Werk
in irgendeiner Form oder auf irgendeine Weise, grafisch, elektronisch oder mechanisch,
durch Fotokopieren, Aufzeichnen auf Band oder Speichern in einem Datenabfragesystem,
auch auszugsweise, bedürfen einer vorherigen schriftlichen Genehmigung der Firma reer.
Der Hersteller/Händler gibt für dieses Produkt zwei Jahre Garantie ab Kaufdatum. Diese
Garantie umfasst alle Ausfälle durch defekte Bauteile oder fehlerhafte Funktionen innerhalb
der Gewährleistungsfrist, ausgenommen Abnutzung wie leere Batterien, Kratzer auf dem
Display, defekte Gehäuse, defekte Antenne und Defekte aufgrund externer Einflüsse wie
Korrosion, Überspannung durch unsachgemäße externe Stromversorgung oder die Verwen-
dung ungeeigneter Zubehörteile. Mängel, die durch nicht bestimmungsgemäßen Gebrauch
verursacht werden, sind ebenfalls von der Garantie ausgeschlossen. Bitte bewahren Sie die
Rechnung/den Kassenbon, das Handbuch und die Artikelnummer auf. Garantie- und Ge-
währleistungsansprüche sind ausschließlich über den Händler abzuwickeln.
Die Servicehotline ist unter +49 (0)7152 / 92852-0
(normale Festnetzpreise) bzw. per E-Mail unter
info@ reer.de erreichbar. Bevor Sie bei einem Prob-
lem ein vermeintlich defektes Gerät zurückschicken,
können Sie Zeit und Versandkosten sparen, indem Sie
sich per Hotline helfen lassen.

22 23
Care&Talk 2 in 1 baby monitor and walkie talkie
Congratulations on the purchase of your new reer baby monitor. Care&Talk is an analog baby
monitor which can also be used as a walkie talkie. When set to the baby monitor operating
moden, the device reliably transmits your baby‘s sounds in combination with the included
cable microphone. Thanks to the cable microphone, electrical radiation in the child‘s proxim-
ity is reduced by up to 90 %. On top of that, it is possible to adjust the sensitivity of the mi-
crophone to different degrees. After activation of the VOX function, the device automatically
switches to „sleeper mode“ during the child‘s sleep. Thanks to its optional battery operation,
the baby monitor can be used as a stationary or mobile unit. We are confident that you will
enjoy the quality of our product for many years to come.
Please take a few minutes to read through the safety instructions carefully. You will only be
able to use the reer baby monitor with confidence if all of the points mentioned here have
been B3checked. Please keep the instruction manual in a safe place for future reference.
Technology PMR 446
Frequency range 446.00625 - 446.09375 MHz
Number of channels 8 PMR446 channels, 38 CTCSS tones, 18 pre-set
channels/CTCSS combinations for the „baby monitor“
operating mode
Transmitter baby unit Charging network and battery: 950 mAh 3.7 V Li-Ion
Receiver parental unit Charging network and battery: 950 mAh 3.7 V Li-Ion
Input 100-240V, 50/60 Hz, 0,2A
Output 5V, 500mA
Transmitter power 500 mW
Range up to 5000 m
Length of power source cable approx. 1.15 m
Length of microphone cable approx. 2 m
Attachment for audio accessories Mikrofon 2,5 mm, headset 3,5 mm
Operating temperature range -20°C to + 55°C
Applied technical Standard EN 300 296-2
Channel Frequency table (MHz) Channel Frequency table (MHz)
1
446.00625
5
446.05625
2
446.01875
6
446.06875
3
446.03125
7
446.08125
4
446.04375
8
446.09375
No. Freq. No. Freq. No. Freq. No. Freq.
1
67.0
11
97.4
21
136.5
31
192.8
2
71.9
12
100.0
22
141.3
32
203.5
3
74.4
13
103.5
23
146.2
33
210.7
4
77.0
14
107.2
24
151.4
34
218.1
5
79.7
15
110.9
25
156.7
35
225.7
6
82.5
16
114.8
26
162.2
36
233.6
7
85.4
17
118.8
27
167.9
37
241.8
8
88.5
18
123.0
28
173.8
38
250.3
9
91.5
19
127.3
29
179.9
OF
-
10
94.8
20
131.8
30
186.2
Technical data and functions
Frequency table PMR 446
CTCSS Code Table

24 25
General safety instructions
Safety instructions regarding installation
Scope of delivery
! Check the unit for visible damage before each use. If you detect any damage, do not use
the unit.
! Make sure that the operating voltage of the power outlet matches that of the mains
adapter. Check - especially when travelling abroad - that the local mains voltage matches
the voltage specified on the units and/or mains adapters.
! Except for the battery compartment cover, never open the units or mains adapters, as
there is a risk of electric shock. If a unit does not work correctly, please do NOT try to fix
the problem yourself. Please contact your dealer with any problems.
! Keep battery out of reach of children.
! Avoid contact between metallic objects and the battery contacts or power leads on the
devices.
! Do not allow children younger than 36 months to play with the device.
CAUTION! This baby monitor was designed exclusively for monitoring your baby. It may
neither be regarded as a substitute for parental supervision nor as a medical
device.
For both devices, use only the batteries that are included with the purchase! Using unsuitable
battery types poses an explosion hazard!
• Always place the baby unit out of your child´s reach (minimum distance: 1 metre).
• Never place the baby monitor inside the crib, cot or playpen.
• To prevent strangulation on the microphone fasten and secure the microphone cable in
such a way that the child cannot pull it and use it for playing. It is best to use the included
cable clips for this purpose.
• The power lead must be secured out of the reach of children to avoid any risk of strangu-
lation. Do not use extension cables.
• To ensure optimal transmission, the units must be kept upright at all times and placed in
an elevated position.
• DO NOT place the receiver in the vicinity of radio transceivers or microwaves. Radiant
emissions from these devices can significantly affect radio reception.
• Do not use the units near water or in humid places. Do not submerge the units in water.
• Do not rinse the units under running water.
• Do not cover the baby monitor with towels, clothes or blankets.
• Avoid extreme heat and direct sunlight.
• Keep removable belt buckle out of the reach of children under 36 months of age. This is a
small piece that can be swallowed and there is a risk of suffocation.
• Do not allow children under 36 months of age to play with the device. The rubber
accessory cover is a small piece that can be swallowed and there is a risk of suffocation.
1 × child unit (transmitter) 1 × parental unit (receiver)
2 × battery 2 × charger
1 × cable microphone
5 × cable channels/binders
2 × power source 1 × manual

26 27
Device descriptio baby unit/parent unit Symbol and display
Difference between child and parental unit consists of the motif on the child unit.
Reception: device receives sounds of other unit. Can be heard through
loudspeaker.
Transmission: The transmission (PTT) button is pressed and the device trans-
mits in automatic mode (VOX see below)
Roger Beep is activated.
Key tones are activated.
Keypad lock is activated.
Range control is activated (automatically: AU or manually: Pb)
Search: Device searches channels (only in walkie talkie mode).
Battery status indicator: 3 lines = battery is fully charged, 1 line = battery is
almost discharged (check during or immediately after broadcast!)
„Parent“ symbol: parental unit. The device is set as the parent unit. It does
not appear in walkie talkie mode (PMR446).
„Baby“ symbol: Child unit. The device is set as the child unit. It does not
appear walkie talkie mode (PMR446).
VOX
Intelligent audio activation (VOX) is activated: the device is transmitting
automatically (without pressing the PTT button) if a sound is heard in the
baby‘s room.
CT
CTCSS is activated.
DC
DCS is activated.
Status LED
PTT button
Intercom function
Connections for accessories, e.g.
cable microphone
Menu button
Keypad lock
On/Off
Range control
Safety lock by means of screw
on the battery compartment
Removable
belt clip
Volume
Select up
Volume
Select down
Micro USB charging input
Noise level indicator (parental
unit)/Night light (child unit)
MON button
BLACK
RED
BLACK
RED

28 29
Before first use
BLACK
RED
Insert Battery
1. Remove the belt clip. Pull the eye and pull the belt
clip downward.
2. Open the battery compartment by releasing it and
removing the screw with a screwdriver and with
light pressure and a parallel sliding movement
downward, remove the compartment.
3. Carefully connect the Li-Ion battery plug to the
female connector in the battery compartment (red
lead on the right).
4. Insert battery into device. Both cables should be
between battery and male connector.
5. Slide the cover back onto the battery compartment back and screw it on again.
6. Connect the two chargers with the power supplies that are included in the purchase and
plug them into a 230 V outlet.
7. Place the devices into the charger. During charging, the line blinks on the charg-
ing status indicator light and the light on the charger is red.
Warning: Before first use, fully charge both devices until the charging status light shows 3
lines. During first charging, this can last 4 hours.
When the battery is fully charged, the message „FULL“ appears on the display.
You can also charge the battery without a charger directly via the micro USB charging con-
nector on the device.
2 in 1: baby monitor or walkie talkie operating modes
Do not forget that due to the two functions of the device, this instruction manual consists
of two chapters. In the first part (chapter 1) you will find instructions on how to use the
devices in the baby monitor mode; the second section provides information on how to use
your device as a transmitter (a normal PMR 446 hand-held radio) that you or your children
may later want to use.
Chapter 1: Use in „baby monitor“ operating mode
Cable microphone
For use as a baby monitor, an external microphone also forms part of the package. Using
this cable microphone has the following advantages: it is more sensitive than the built-in
microphone and can capture sounds from a greater distance. In this way you can extend
the distance between the child unit and the baby‘s bed. This greatly reduces radiation in the
child‘s proximity. In addition, you can place the child unit in such a way as to achieve the
best possible reach - for example, on the bedside or a cupboard.
Warning: If you use Care&Talk as a baby monitor, always connect the cable microphone.
Installation of child unit
Attach the supplied cable microphone near the baby‘s bed, but out of reach of your child. To
secure the microphone securely use the supplied adhesive tape and then secure the cable
with the supplied cable clips and cable guides. Open
the rubber cover for connectiong accessories (MIC/
EAR connector) on the right side of the device, and
plug the male cable microphone connector into the
top female connector.
Standard settings
Turn on the devices by pressing the power switch for
about 3 seconds. Check standard settings. You will find
precise information about each setting in the next chapter.
Child unit (star motif):
• Baby mode:
• Channel: 01b
• Sensitivity control: VOX
• Talk Back function: OFF
Parent unit:
• Parental mode:
• Channel: 01P
• Range control:

30 31
Check the broadcast function of the child unit by tapping on the supplied cable microphone.
The tone is now being transmitted on the parental unit and, in addition, the white LED lights
up above the display. These have the function of optically displaying the sound level.
Caution: With insufficient distance between both devices, squealing tones may be produced.
In this case, lower the volume of the parental unit and increase the distance.
Warning: In the event of a breakdown, choose a different channel.
Volume
Use the / buttons to set the parental unit to the desired volume. to
will appear on the display.
In this way, you can also set the volume on the child unit. It is important to set the volume
on the child unit if you want to talk to your child (speaking function). Otherwise, we recom-
mend setting the child unit volume to the lowest level.
Set Channel
Press the button in the menu and use buttons / to set the channel. Press the PTT button
to save settings. Or you can wait for several seconds.
There are 18 possible settings, 01b to18b for the child unit and 01P to 18P for the parental
unit. Numbers 1 through 18 are intended for pre-set combinations of PMR446 channels and
CTCSS tones. These numbers are valid only for radio devices of this type. Communication
between baby monitors of other brands is not possible.
Warning: The numbers of channels on both devices must match!
Microphone sensitivity and VOX function
The baby monitor is equipped with smart sound activation (VOX). The transmitter switches
to minimum energy consumption and reduces radiation if there is no sound in the room.
If the child unit registers sounds, it activates the radio link and transmits the sounds to the
mobile parental unit.
The baby monitor has four elective levels of microphone sensitivity. The device is factory-set
to level 4 (maximum sensitivity). To change the sensitivity of the microphone, briefly press
button twice. Vo now appears on the screen and 04
VOX
blinks. With buttons /
you can choose the level 01-04. To save the settings, briefly press the PTT button or wait
5 seconds.
If you want to be notified even about the smallest sound, turn the microphone sensitivity
on the child unit to 04. If the microphone is set to sensitivity 01, you will be alerted when
louder sounds occur.
By selecting Vo oF, you can turn off the VOX function.
oF VOX is deactivated
1. low sensitivity
2. medium sensitivity
3. high sensitivity
4. highest sensitivity
Intercom function/Talk Back function
When your child starts to cry, you can talk to him to calm him down and show to him that
you are already on the way. Essentially, you can always talk to your child when he is calm.
If your child talks or cries, you have to wait until he pauses. In case of persistent crying,
the Talk Back function will interrupt the transmission. This will happen after 10 seconds of
uninterrupted transmission. In this way, you have the chance to talk your child for a period
of 10 seconds.
In order to be able to use the Talk Back function, the child unit must be turned on. Turn Talk
Back function off or on as follows: Hold the MON button on the child unit for 2 seconds. tb
will briefly appear on the display and then new on or off settings.
Make sure that the desired volume is set on the child unit.
For optimal use of the Talk Back Function, you have three available possibilities. These are
set on the child unit by briefly pressing the button in the menu 5× until rb appears in the
display. Then, with the / buttons, select the required setting:
1. rb tb: You will hear a beep if the child unit interrupts the transmission after 10 seconds,
even if the baby is still crying. You now have 10 seconds for talking to your child.
2. rb on: At the end of each transmission, you will hear a beep.
3. rb of: Beeps are deactivated.
If you wish to regularly use the speaking function, we recommend using the rb tb setting.

32 33
Range control
This baby nursery is equipped with an optical and acoustic range control system. The paren-
tal unit checks two-way contact at regular intervals. When range is exceeded or interruption
of connection due to other breakdowns, the LED status starts blinking red on the parental
unit and a signal tone sounds at regular intervals.
When checking the range, youc can choose automatic or manual range control or turn it off.
To do so, press the button 3× on to the parental unit until appears on the left side
of the display. Current settings (available only on the parental unit), AU, Pb, or oF flashes to
the right of the display. Press / to select either AU for automatic range control or Pb,
if you need to manually check the range. Select oF to completely turn off the range control
function. To save the settings, briefly press the PTT button or wait for 5 seconds.
1) automatic range control (AU)
Automatic range control is automatically activated in baby monitor mode. This function au-
tomatically, checks in minute intervals, whether the child and parental unit are out of reach.
The parental unit sends a signal to the child unit. This repeats the signal. If the parental unit
does not receive a reply for more than 2 minutes, the radio connection is interrupted. The
reason may be that both devices are out of reach, that the batteries of the other device are
too weak, that the device is turned off, or that the set radio channel is faulty. While connec-
tion is active, the symbol is constantly displayed. When the connection is interrupted,
the symbol flashes and 5 beeps sound, which means that the child unit is not responding
to the signal. Once the two devices are connected, the symbol appears permanently after
two minutes.
2) manual reach control (Pb)
You can also check manually if you are finding the child unit within range. For this, the reach
function must be set to Pb on the parental unit. Press the -button and wait for several
seconds. The child unit will answer your question and the parental unit will react with a
melody. Now you can be sure that both devices are within range.
3) deactivation of range control (oF)
Range control can be deactivated if it is not needed.
Warning: We recommend that if you know the surrounding environment and have tried the
baby monitor several times in this environment, you re-set the range control to manual, or
to deactivate it. If you want to minimize radiation and energy consumption (ECO mode),
deactivate range control or use manual range control.
Display of noise level (parental unit)
The visual control of the noise level in a child‘s room is provided 3 LEDs above the display.
Press button 4×, until FL appears to the right of the display. The current setting, AU or
01-03 is flashing on the right side of the display.
Pressing / buttons will change the setting.
• If you wish to activate visualisation of noise level, select AU. If the baby cries little, only
1 LEDs light up. If the baby cries louder, 2 LEDs light up. If the baby cries very loud, all 3
LEDs light up.
• If you select 01, 02 or 03, the number of LEDs lighting up does not depend on the baby‘s
loudness. The selected number of LEDs will always light up.
Night light (baby unit)
The night light integrated in the child unit creates a soothing environment for your child
thanks to its warm light. Night light can be activated only on the child unit.
Press button 4×, until FL appears to the left of the display. Current settings, oF or 01-03
flashes t0 to the right of the display. If you wish to choose among 1-3 LED, press / but-
tons and select 01-03. In order to turn off all LED, select oF.
Switching over to „baby monitor“ operating mode
This step is only necessary in the case that the devices were previously used as as PMR446
radio devices.

34 35
Child unit (star motif)
Hold down button while turning on device. (Hold down both outer buttons in parallel).
Press / buttons and select bA. The child symbol will be displayed. In order to save
the settings, briefly press the PTT button.
Parental unit (without motif)
Hold down button while turning on device. (Hold down both outer buttons in parallel).
Press / buttons and select PA. The parental symbol will be displayed. In order to
save the settings, briefly press the PTT button.
Now the channel (01 to 18) is displayed, which, on the child unit, is supplemented by the
letter b, or on the parent unit, by the letter P. Then, the corrsponding symbols or
will be displayed.
Using several child units
With the help of several child units, you can monitor multiple children, event. multiple
rooms. For this, all devices must be set to the same channel. When using in this way, we
recommend deactivating reach control, as due to variouse devices, false alarms may occur.
Keep in mind that in the parental unit, you can hear only one child at a given time. Besides
this, you should lower the volume on child units to 0, as otherwise, the children could mu-
tually listen to each other or disturb each other.
Chapter 2: Use in „walkie talkie“ operating moden
Both devices are factory-set to the „baby monitor operating mode. If you wish to re-set the
devices to the operating mode „radio device PMR446“, execute the following steps.
Hold down the button while turning on the device (hold down the OFF/ON button for
several seconds). By pressing the / button, select ro. In order to save the settings,
briefly press the PTT button.
Selection of PMR446 channel
This broadcasting/receiving system has 8 PMR446 channels available. On top of this, you
can select individual PMR446 coding for each channel individually through CTCSS tones (38
possible codes). The code will appear to the right of the number of the channel as a small
two-digit number between 01 and 38 or oF.
Make sure that all devices are set to the same channel and CTCSS tone.
Press button 1× and then choose the required PMR446 channel with the help of /
buttons.
Setting CTCSS or DCS code
Additional CTCSS or DCS codes serve to prevent listening in on other conversations on the
same channel. This does not mean, however, that the transmission is protected against in-
terception. There is always the possibility that unencrypted analog radio signals will be inter-
cepted. CTCSS (Continuous Tone Coded Squelch Signal) or DCS (Digital Coded Squelch) tones
are tones beyond the low frequency audibility threshold, which are transmitted together
with the microphone signal. In case of reception, the device will check whether a CTCSS or
DCS tone is transmitted and will turn on the speaker only when the correct code is received.
Setting the CTCSS code:
Press button once. 01–38 or oF flashes on the display. For setting the required code, press
/ buttons. In order to save the settings, briefly press the PTT button.
Setting the DCS code:
Press the button 2×. 01–38 or oF flashes on the display. For setting the required code,
press / buttons. In order to save the settings, briefly press the PTT button.
Warning: it is possible to activate only CTCSS or DCS.
Transmission
To broadcast, press and hold down PTT button. To receive, let go the button again.
Searching for channels
This function will search all PMR446 channels according to signal. To start search, hold down
button for a long time. The search is interrupted as soon as the signal is captured. You
can then listen to the channel for a period of 8 seconds, until the search continues. After
ending the search, hold down button for a long time once again.
Warning: searching channels is availavle only in the „PMR446“ operating mode.
Ringtone selection
Press button 9×.C will appear on the display, as well as current settings, which will flash.
To select ringtone from possibilities 01-03 or oF, press / buttons. In order to save the
settings, briefly press the PTT button.

36 37
Call
Briefly press button.
The device will send ringtone to all other devices within reach on this channel. You can select
the ringtone in the selection or turn it off.
Warning: calling function is availavle only in the „PMR446“ operating mode.
Keypad lock
All buttons except for PTT button can be turned off, to prevent accidental re-setting.
Locking buttons: Press and hold button for roughly 3 seconds, until the button lock
symbol appears.
Unlocking buttons: Press and hold button once again for roughly 3 seconds, until the
button lock symbol disappears.
VOX as hands-free
This is the sensitivity setting for hands-free. The device automatically recognizes when you
speak - you don‘t need to press the PTT button. This can be useful at a moment when your
hands are not free to press the PTT button.
Levels 1-4 correspond to the same sensitivity levels as under the „baby monitor“ operating
mode.
oF VOX is deactivated; normal operation with the help of PTT button (standard setting)
1. low sensitivity
2. medium sensitivity
3. high sensitivity
4. highest sensitivity
Monitoring functions
For reception of very weak signals, it is possible to deactivate automatic noise gate. This may
be useful in the border area of reception or when communication is faulty. Besides this, you
can easily listen to what is going on on the selected channel. To activate or deactivate moni-
toring functions, hold down MON button (on the left side of the device under the PTT button)
for a long time. Monitoring function is available only in the „PMR446“ operating mode.
Roger-Beep
The device can broadcast a tone sequence after releasing the PTT button.
Press the button 5×, until rb appears on the display.
Press /, by which you will set on or oF.
For saving settings, briefly press the PTT button.
When Roger Beep is activated, the appears. Roger Beep is available only in the „PMR446“
operating mode.
Button tone
When pressing the buttons, a short signal tone sounds. For turning the sound of the buttons
on or off:
Press the button 6×, until bP appears on the display.
Press /, by which you can choose on or oF.
For saving settings, briefly press the PTT button.
When the key sound is activated, the symbol appears. Key sound is only available in
„PMR446“ operating mode.
Range control in PMR446 operating mode
choose between AU (automatic), Pb (only manual range control) or oF, by which you will
turn offthe range control function. Activation or deactivation of range control is done on the
device on which you wish to effect range control. Even if the range control function is deac-
tivated on another device, you can undertake range control on your device..
In radio networks that consist of more than 2 of the same device, there is no sense in range
control because it is not possible to determine which device corresponds to it. This is why no
reach control exists for multiple devices in network.
Cleaning and maintenance
Always disconnect the mains adapters from the wall power socket before cleaning the unit.
Only use a slightly dampened cloth. Do not submerge the unit in water. Do not use chemical
detergents.This product does not require any special maintenance. Repairs to the unit must
be carried out by skilled personnel only.

38 39
Troubleshooting
Problem Possible cause Action
Loud squealing (feedback) • The baby unit is too close to the
parent unit.
• Increase the distance between
the baby unit and the parent
unit.
Signal noise/connection inter-
rupted
• The baby/parent unit is close to
interfering devices (e.g. micro-
wave) or metal objects.
• The maximum range has been
exceeded.
• Battery of child/parental unit is
too weak.
• Try to find the source of inter-
ference and move the units to a
different position.
• Reduce the distance between
the baby unit and the parent
unit.
• Connect device to power
source.
Belated/answering back function • Your baby is crying, but you are
trying to talk him outside of the
„free“ interval.
• It is best to switch the Talk Back
function to rb tb or rb on and
talk after the tone sounds.
No function for answering back • Talk Back function is not
activated.
• Turn on Talk Back function on the
child unit.
Baby unit reacts upon noises that
are too quiet
• The microphone sensitivity is
set too high.
• Please select a low VOX level.
The volume on the child unit is
set too low.
Baby unit only reacts upon noises
that are loud
• The microphone sensitivity is
set too low.
• Please choose a higher level
of VOX.
LED light up red • Parent unit is broadcasting.
• The parent unit is in the charg-
er, the battery is charging.
• No action required.
• No action is required, the LED
lights up as soon as the battery
is fully charged.
LED lights up green • The parent unit receives sounds. • No action required.
The LED on the child unit is off,
even when the device is charging
• There is no LED on the child unit
so the light wouldn‘t disturb
your little darling.
• Fully charged battery signaled
by FULL on the display, event.
by the appropriate number of
lines.
Service Address And Technical
Hotline
reer GmbH
Muehlstraße 41
71229 Leonberg
Warranty
At the end of its life, this product must not be disposed of as normal domestic
waste, but should be recycled at a collection point for electrical appliances.
Please see the relevant symbol on the product, in the user manual and pack-
aging. Materials can be recycled as specified. Do not put used batteries into
household waste. Instead they should be disposed of as hazardous waste or
with a battery collection station provided by the dealer. An important contri-
bution to the protection of the environment can be made by reusing the unit, recycling its
components or otherwise reusing old appliances. Please contact your local council to find
out more about an appropriate disposal centre.
Instructions for battery use: If the devices are
not used for longer time, it is recommended to
disconnect the plug of the battery pack from the
radio. Recharge the Li-Ion Batteries every six
month when stored.
Environmental protection
Please retain your receipt, the user manual and item number. Warranty claims or claims from
promises of guarantee must be processed by the dealer. The technical specification, informa-
tion and characteristics of the product described herein have been compiled to the best of
our knowledge and belief and are correct at the time of printing. Any information provided
by reer should be correct and authoritative. Nevertheless, reer does not accept liability for
potential errors in this document and reserves the right to make changes to the product
design and/or specifications without prior notice.Reproduction and disclosure of information
contained in this copyright-protected document, in any form or by any means - graphical,
electronic or mechanical by photocopying, recording on tape or storage in a data retrieval
system (even in part), require prior written consent from reer.
The manufacturer/distributor provides a 2-year warranty on this device from the date of
purchase. This warranty covers all flaws due to defective components or defective functions
during the warranty period, with the exception of wear, e.g. dead batteries, scratches on
the display, damaged housing, defective antenna and flaws due to external influences such
as corrosion, poor external power supply or use of inappropriate accessory parts. Defects
caused by inappropriate use are also excluded from the warranty. Please retain your bill/
payment receipt, manual, and product number. Claims arising from the warranty and product
liability must be exercised exclusively through the distributor.
The technical assistance hotline may be contacted
at +49 (0)7152 / 92852-0 (standard price for calling
a fixed line), or at the e-mail info@ reer.de. Before
submitting a supposedly malfunctioning device to a
claim, contacting the technical assistance hotline
may save you time and costs.
Seite wird geladen ...
Seite wird geladen ...
Seite wird geladen ...
Seite wird geladen ...
Seite wird geladen ...
Seite wird geladen ...
Seite wird geladen ...
Seite wird geladen ...
Seite wird geladen ...
Seite wird geladen ...
Seite wird geladen ...
Seite wird geladen ...
Seite wird geladen ...
Seite wird geladen ...
Seite wird geladen ...
Seite wird geladen ...
Seite wird geladen ...
Seite wird geladen ...
Seite wird geladen ...
Seite wird geladen ...
Seite wird geladen ...
Seite wird geladen ...
Seite wird geladen ...
Seite wird geladen ...
Seite wird geladen ...
Seite wird geladen ...
Seite wird geladen ...
Seite wird geladen ...
Seite wird geladen ...
Seite wird geladen ...
Seite wird geladen ...
Seite wird geladen ...
Seite wird geladen ...
Seite wird geladen ...
Seite wird geladen ...
Seite wird geladen ...
Seite wird geladen ...
-
 1
1
-
 2
2
-
 3
3
-
 4
4
-
 5
5
-
 6
6
-
 7
7
-
 8
8
-
 9
9
-
 10
10
-
 11
11
-
 12
12
-
 13
13
-
 14
14
-
 15
15
-
 16
16
-
 17
17
-
 18
18
-
 19
19
-
 20
20
-
 21
21
-
 22
22
-
 23
23
-
 24
24
-
 25
25
-
 26
26
-
 27
27
-
 28
28
-
 29
29
-
 30
30
-
 31
31
-
 32
32
-
 33
33
-
 34
34
-
 35
35
-
 36
36
-
 37
37
-
 38
38
-
 39
39
-
 40
40
-
 41
41
-
 42
42
-
 43
43
-
 44
44
-
 45
45
-
 46
46
-
 47
47
-
 48
48
-
 49
49
-
 50
50
-
 51
51
-
 52
52
-
 53
53
-
 54
54
-
 55
55
-
 56
56
-
 57
57


Reer 50133 Bedienungsanleitung
- Kategorie
- Baby-Videomonitore
- Typ
- Bedienungsanleitung
- Dieses Handbuch eignet sich auch für
in anderen Sprachen
- English: Reer 50133 Owner's manual
- français: Reer 50133 Le manuel du propriétaire
- español: Reer 50133 El manual del propietario
- italiano: Reer 50133 Manuale del proprietario
- Nederlands: Reer 50133 de handleiding
Verwandte Artikel
Andere Dokumente
-
Nedis WLTK0500BK Bedienungsanleitung
-
Midland XT70, Paar, PMR+LPD, Blisterpack Bedienungsanleitung
-
SereneLife SLBCAM20EU Bedienungsanleitung
-
Me FS-2 Bedienungsanleitung
-
Albrecht Bambini Babysitter PMR Einzelgerät Bedienungsanleitung
-
-
Alecto FR-09 Bedienungsanleitung
-
SWITEL BCC 68 Benutzerhandbuch
-
SwissVoice Babycom 143 Benutzerhandbuch
-
Tigex Excellence Bedienungsanleitung