Tunturi C60 Benutzerhandbuch
- Kategorie
- Fitness, Gymnastik
- Typ
- Benutzerhandbuch

C60
OWNER'S MANUAL P. 2-13
BETRIEBSANLEITUNG S. 14 -2 5
MODE D'EMPLOI P. 26 - 37
HANDLEIDING P. 38 - 4 9
MANUALE D'USO P. 50 - 61
MANUAL DEL USUARIO P. 62-76
BRUKSANVISNING S. 74 - 8 4
KÄYTTÖOHJE S. 85 - 9 5
www.tunturi.com
SERIAL NUMBER
SERIENNUMMER
NUMERO DE SERIE
NÚMERO DE SERIE
NUMERO DI SERIE
SERIENUMMER
SERIENNUMMER
SARJANUMERO

2
O W N E R ' S M A N U A L
•
C 6 0
IMPORTANT SAFETY
INSTRUCTIONS
Read this guide through carefully
before assembling, using or servicing
your fitness equipment. Please keep
the guide somewhere safe; it will
provide you now and in the future with
the information you need to use and
maintain your equipment. Always follow
these instructions with care. Please
note that the warranty does not cover
damage due to shipping or negligence of
adjustment or maintenance instructions
described in this manual.
NOTE ABOUT YOUR
HEALTH
• Before you start any training, consult a
physician to check your state of health.
• If you experience nausea, dizziness
or other abnormal symptoms while
exercising, stop your workout at once
and consult a physician.
• To avoid muscular pain and strain,
begin each workout by warming up and
end it by cooling down (slow pedaling at
low resistance). Don’t forget to stretch at
the end of the workout.
NOTE ABOUT
THE EXERCISING
ENVIRONMENT
• The equipment is not to be used
outdoors.
• Place the equipment on a firm, level
surface. Place the equipment on a
protective base to avoid any damages to
the floor beneath the equipment.
• Make sure that the exercising
environment has adequate ventilation.
To avoid catching cold, do not exercise
in a draughty place.
• In training, the equipment tolerates
an environment measuring +10°C to
+35°C. The equipment can be stored
in temperatures ranging between -15°C
and +40°C. Air humidity in the training or
storage environment must never exceed
90 %.
NOTE ABOUT USING
THE EQUIPMENT
• If children are allowed to use the
equipment, they should be supervised
and taught to use the equipment
properly, keeping in mind the child’s
physical and mental development and
their personality.
• Before you start using the equipment,
make sure that it functions correctly
in every way. Do not use a faulty
equipment.
• Press the keys with the tip of the
finger; your nails may damage the key
membrane.
• Never lean on the meter.
• Never remove the side covers. Do not
step on the frame casing.
• Only one person may use the
equipment at a time.
• Hold the handlebar for support when
getting on or off the equipment.
• Wear appropriate clothing and shoes
when exercising.
• Protect the meter from sunlight and
always dry the surface of the meter if
there are any drops of sweat on it.
• The equipment must not be used by
persons weighing over 135 kg.
• The equipment has been designed for
home use. The Tunturi warranty applies
only to faults and malfunctions in home
use (24 months).
• Make sure the equipment is unplugged
CONTENTS
ASSEMBLY ................................................................3
EXERCISING .............................................................5
CONSOLE ..................................................................7
OPERATING THE CONSOLE ....................................7
TRANSPORT AND STORAGE ...............................12
MAINTENANCE ......................................................12
TECHNICAL SPECIFICATIONS ...............................13

G B
3
O W N E R ' S M A N U A L
•
C 6 0
before carrying out any assembly or
maintenance procedures.
• Do not attempt any servicing or
adjustments other than those described
in this guide. Everything else must
be left to someone familiar with the
maintenance of electromechanical
equipments and authorised under the
laws of the country in question to carry
out maintenance and repair work.
• This product must be grounded. If
it should malfunction or breakdown,
grounding provides a path of least
resistance for electric current to reduce
the risk of electric shock. This product
is equipped with a cord having an
equipment-grounding conductor and
a grounding plug. The plug must be
plugged into an appropriate outlet that
is properly installed and grounded in
accordance with all local codes and
ordinances.
DANGER:
Improper connection of the equipment-
grounding conductor can result in a risk
of electric shock. Check with a qualified
electrician or serviceman if you are
in doubt as to whether the product is
properly grounded. Do not modify the
plug provided with the product - if it will
not fit the outlet, have a proper outlet
installed by a qualified electrician.
SAVE THIS INSTRUCTION MANUAL
WELCOME TO THE WORLD
OF TUNTURI EXERCISING!
Your choice shows that you really want to invest
in your well being and condition; it also shows you
really value high quality and style. With Tunturi
Fitness Equipment, you’ve chosen a high quality,
safe and motivating product as your training partner.
Whatever your goal in training, we are certain this is
the training equipment to get you there. You’ll find
information about using your exercise equipment and
what makes for efficient training at Tunturi’s website
at W WW.TUNTURI.COM.
ASSEMBLY
Start by unpacking the equipment. Two people are
needed for the assembly. Check that you have the
following parts:
1. Frame
2. Front support
3. Rear support
4. Front frame tube
5. Arms (2)
6. Footrests (2)
7. Meter
8. Handlebar
9. Shaft
10. Transformer
11. Assembly kit (contents marked with * in the spare
part list): keep the assembly tools, as you may need
them e.g. for adjusting the equipment
If necessary, please contact your dealer with the
model, equipment serial no. and spare part no. of the
missing part. You’ll find a spare part list at the back of
this guide. The packaging includes a silicate bag for
absorbing moisture during storage and transportation.
Please dispose of the bag once you have unpacked
the equipment. The directions left, right, front and
back are defined as seen from the exercising position.
Allow at least 100 cm of clearance around the
equipment.
FRONT SUPPORT
Attach the front support with transportation wheels to
the main frame with two bolts, washers and locking
sleeves.
REAR SUPPORT

4
O W N E R ' S M A N U A L
•
C 6 0
Push the stand feet to the rear support ends and attach
the rear support to the main frame with two bolts,
washers and locking sleeves.
FRONT FRAME TUBE
Remove the rubber band from around meter cable
coming from the frame tube. Attach the meter cable to
the connector coming from the front frame tube. Push
the front frame tube inside the frame tube: do not
damage the meter cable! Attach the front frame tube
tight to the frame with the washers and attachment
screws.
FOOTRESTS
Attach the footrests to the position of your choice on
the pedal shafts with two screws, two washers / screw
and locking nuts.
ARMS
Push the metal shaft through the bracket housing of
the left arm. Attach now the left arm to the front frame
tube by pushing the metal shaft through the opening
in the tube. Push the right arm on the shaft and lock
it by tightening a large washer, a locking sleeve and a
screw to the both ends of the shaft. Tighten the arms
using two Allen keys.
Push the left footrest support forward so that you
can push the tube in the front of the foot rest support
inside the arm tube. Lock the tube with the locking
screw. Repeat the procedure with the right footrest
support.

G B
5
O W N E R ' S M A N U A L
•
C 6 0
METER AND HANDLEBAR
Attach the handle bar into the front frame tube.
Thread the hand pulse cords through the opening in
the front frame tube. Pull the screws tightly so that the
handlebar does not move during the training. Push the
plastic covers onto the screws.
Connect the cables from the handlebar to the
corresponding connectors of the console. Insert the
connected cables into the handlebar support tube, but
make sure they are not damaged when the console is
attached. Place the meter in position at the end of the
handlebar support tube and attach the console using 4
mounting screws.
TRANSFORMER
Before connecting the equipment to a power source,
make sure that local voltage matches that indicated on
the type plate: the equipment operates at either 230 V
or 115 V (North American version). Plug the socket
end of the transformer cord into the connector, just
above the rear support in the center of the frame, and
the other end into the wall socket.
NOTE! The equipment must be connected to a
grounded wall socket. Do not use extension wires
when connecting the equipment to the power source.
Make sure the power cord does not run underneath the
equipment.
DA NG ER : Always switch off the power and unplug
this appliance from the electrical outlet immediately
after using.
WA RN ING: To reduce the risk of burns, fire, electric
shock, or injury to persons:
1) An appliance should never be left unattended when
plugged in. Unplug from outlet when not in use,
and before carrying out any maintenance or repair
procedures.
2) Do not operate under blanket or other combustive
material. Excessive heating can occur and cause fire,
electric shock, or injury to persons.
EXERCISING
EXERCISE LEVEL
When you’ve not exercised for a long time, you
should have your condition checked and consult a
doctor, if you are over 40, your physical condition
is poor, you suffer from a chronic illness or have
health problems, or you have injuries to or problems
in your muscles. For endurance exercising, it’s good
to exercise at least 3 times a week, but remember for
your health that once a week is better than not at all.
The effects of exercising will show after just a few
weeks. If you’re very unfit, start with a 20 minute
workout. Once your condition improves, you can train
for 30-60 minutes depending on your goal.

6
O W N E R ' S M A N U A L
•
C 6 0
The best training to improve your general fitness is
properly efficient, not too heavy and not too easy. It’s
good to sweat while working out, but important still
to be able to talk comfortably. This type of exercise
is called aerobic or endurance exercise and your body
produces the required energy by burning body fat with
the aid of oxygen. This in turn leads to a reduction in
fat tissue. No matter what your goal, you’ll get the
best results by training at the right level of effort, and
the best measure is your own heart rate. First find
your maximum heart rate i.e. where the rate doesn’t
increase with added effort. If you don’t know your
maximum heart rate, please use the following formula
as a guide:
220 – AGE
The maximum varies from person to person. The
maximum heart rate diminishes on average by one
point per year. If you belong to one of the risk groups
mentioned earlier, ask a doctor to measure your
maximum heart rate for you. We have defined three
different heart rate zones to help you with targeted
training.
BEGINN E R
•
50-60 % of maximum heart rate
Also suitable for weight-watchers, convalescents
and those who haven’t exercised for a long time.
Three sessions a week of at least a half-hour each
is recommended. Regular exercise considerably
improves beginners’ respiratory and circulatory
performance and you will quickly feel your
improvement.
TR AINER
•
60-70 % of maximum heart rate
Perfect for improving and maintaining fitness.
Even reasonable effort develops the heart and lungs
effectively, training for a minimum of 30 minutes at
least three times a week. To improve your condition
still further, increase either frequency or effort, but not
both at the same time!
ACT I VE TR AIN ER
•
70-80 % of maximum heart rate
Exercise at this level suits only the fittest and
presupposes long-endurance workouts.
Rest is as important as exercise in a fitness program.
If you for instance exercise conscientiously for three
weeks, it’s good to make the following week a little
lighter.
MEASURING HEART RATE WITH HAND
SENSORS
Pulse is measured wiith sensors which are located
in the hand supports and which measure the
pulse eachtime the user touches both sensors
simultaneously. For reliable pulse measurement, the
skin must be in continuous contact with the sensors
and the skin in contact with the sensors should be
slightly moist. Too dry or too moist skin will impair
hand pulse measurement. Please note also that active
use of the upper body muscles during exercise
may interfere with hand pulse measurement: active
muscles transmit similar electronic signals as the heart
muscle. Therefore, we recommend that arms be kept
relaxed during pulse measurement.
TELEMETRIC HEART RATE MEASUREMENT
The most reliable way of measuring the heart rate
is telemetric measurement using a transmitter belt.
If you want to measure your heart rate this way
during your workout, moisten the grooved electrodes
on the transmitter belt with saliva or water. Fasten
the transmitter just below the chest with the elastic
belt, firmly enough so that the electrodes remain in
contact with the skin while pedaling, but not so tight
that normal breathing is prevented. If you wear the
transmitter and belt over a light shirt, moisten the shirt
slightly at the points where the electrodes touch the
shirt. The transmitter automatically transmits the heart
rate reading to the meter up to a distance of about 1
meter. The heart rate value is displayed in the meter.
Follow your heart rate during the training.
REMARKS ON TELEMETRIC MEASUREMENT
If the electrode surfaces are not moist, the heart
rate reading will not appear on the display. If the
electrodes are dry, they must be moistened again.
Allow the electrodes to warm up properly to ensure
accurate heart rate measurement. If there are several
telemetric heart rate measurement equipments next
to each other, the distance between them should be
at least 1.5 m. Similarly, if there is only one receiver
and several transmitters in use, only one person with a
transmitter should be within transmission range. The
transmitter is switched to an active state only when
it is being used for measurement. Sweat and other
moisture can, however, keep the transmitter in an
active state and waste battery energy. Therefore it is
important to dry the electrodes carefully after use.
When selecting training attire, please note that some
fibers used in clothes (e.g. polyester, polyamide)
create static electricity, which may prevent reliable
heart rate measurement.
Please note that a mobile phone, television and other
electrical appliances form an electro-magnetic field
around them, which will cause problems in heart rate
measurement.

G B
7
O W N E R ' S M A N U A L
•
C 6 0
CONSOLE
1
2
3
4
5
KEYS
1. BACK/STOP
Use the BACK/STOP button to navigate back towards
the main menu. During training, you can stop or pause
your training session by pressing the BACK/STOP
button.
2. ZOOM
Focusing the graphical profile display during training.
Press ZOOM to increase the size of the displayed
profile image (two-, four-, eight- or sixteenfold).
Pressing the key five times restores the profile image
to its original size.
3. TRAINING
Use the TRAINING button to open the TRAINING
menu. The TRAINING menu includes the following
training programs: QUICK START, MANUAL,
TARGET HR, TARGET EFFORT, PROGRAMS, T-
RIDE, T-TRAINER, OWN TRAINING and FITNESS
TEST.
4. USER
Press the USER button to open the USER menu.
The USER menu includes the following functions:
CREATE USER, SELECT/CHANGE USER, EDIT
USER, DELETE USER, SETTINGS and USER
LOG.
5. SELECTION DIAL
The selection dial functions in two ways:
A) Rotating the dial. By rotating the dial clockwise,
you can scroll the menus downwards or to the right,
and increase values or resistance. By rotating the dial
anti-clockwise, you can scroll the menus upwards or
to the left, and decrease values or resistance.
B) Pressing the dial. By pressing the dial, you can
accept the selection you made when rotating the dial.
During training, you can accept the function displayed
at the bottom centre of the display.
DISPLAY
During training, you can see the following training
values on the left side of the display: time, distance,
energy consumption, effort, RPM, heart rate and
speed.
OPERATING THE CONSOLE
To activate the meter, connect the device to a power
source, and then press any key or start pedaling. The
meter will now display the TRAINING menu. If you
do not press a key, or pedal for more than 5 minutes,
the meter automatically switches off.
The values in a workout that has been interrupted
are saved in the memory of the user interface for 5
minutes, after which they are reset. You can restart the
interrupted exercise by pedaling within 5 minutes.
On the display, you can see advice messages. They are
preceded by the letter i on a white background. You
can remove the messages from the display by pressing
the selection dial.
USER MENU
You can access the USER menu by pressing the
USER button. We recommend that you choose a user
code and save your personal details: these details are
needed e.g. for a more accurate estimation of your
energy consumption. At the same time, you can set
the units to be displayed and check the total training
values. If you select a username, you can save your
training session and display your personal heart rate
levels in different colors when training according to
your heart rate. Once you have created a username
or started to use an existing username, you can see
it at the top right corner of the display. You can
also exercise without a username. If you do this, a
username will not be shown on the top right of the
display, and the default settings (45 years, 70 kg,
male) will be used for your training session. You can
save user data for up to 20 different users.
IMPORTANT! If you wish to view your personal
training sessions saved on the USER LOG, always
remember to select your own username. You can
also start using a username in the middle of your
training session by pressing the USER button and then
selecting your own username. Your training session
will not be interrupted. After selecting your username,
you can return to the training data by pressing the
BACK/STOP button.
IMPORTANT! If you want to save your training session,
you must select a username.
CREATE USER
To create a user:
1. Press the USER button. The USER menu appears.
2. Select CREATE USER by rotating the selection
dial. Confirm your selection by pressing the selection
dial.
3. Select a language by rotating the selection dial and
confirm your selection by pressing the dial.

8
O W N E R ' S M A N U A L
•
C 6 0
4. Enter your name. Move from one letter to another
by rotating the selection dial. Confirm the selected
letter by pressing the selection dial. Once you have
entered your name, select OK and press the selection
dial.
5. Select the units you wish to use. (Metric 1 (kg, km,
kcal), Metric 2 (kg, km, kJ), or the corresponding
imperial units Imperial 1 (lb, mi, kcal), Imperial 2 (lb,
mi, kJ)). Make your selection by rotating the selection
dial, and confirm by pressing the dial. You will
automatically be taken to the next setting.
6. Select the target display for the set values. COUNT
DOWN shows the values as they decrease from your
target toward zero. COUNT UP shows the values
as they increase toward your target. Confirm your
selection by pressing the selection dial. You will be
taken to the next setting.
7. Set your gender by rotating the selection dial.
Confirm your selection.
8. Set your age. Confirm your selection.
9. Set your height. Confirm your selection.
10. Set your weight. Confirm your selection.
11. Set your maximum heart rate. The meter calculates
your estimated maximum heart rate using the formula
220 - age. If you know your exact maximum heart
rate, you can adjust the estimated maximum heart rate
given by the meter.
12. Set your anaerobic threshold. The equipment uses
your maximum heart rate to calculate an estimate
of your threshold heart rate (80% of your maximum
heart rate). If you know your exact anaerobic
threshold heart rate, you can adjust the estimate given
by the meter.
13. Set the aerobic threshold. The equipment uses your
maximum heart rate to calculate an estimate of your
threshold heart rate (60% of your maximum heart
rate). If you know your exact aerobic threshold heart
rate, you can adjust the estimate given by the meter.
IMPORTANT! The meter can store up to 20 usernames
at a time.
SELECT/CHANGE USER
Once you have created a username for yourself,
select it at the beginning of your training session by
choosing SELECT/CHANGE USER and confirm it
using the selection dial.
EDIT USER
By selecting EDIT USER you can edit your user data.
DELETE USER
By selecting DELETE USER you can delete users.
Activate the username you want to delete and then
select DELETE USER. Confirm the selection by
pressing the selection dial.
SETTINGS
By selecting SETTINGS you can update the meter
firmware version, adjust the display contrast, see the
cycle’s total values and turn the button sounds on or
off.
USER LOG
By selecting the USER LOG you can view the
training data of the selected user. You can view either
the last training session data or a summary of all the
user’s sessions. Exit the training data by pressing
BACK/STOP.
TRAINING MENU
You can access the TRAINING menu by pressing the
TRAINING button. From the TRAINING menu, you
can select one of the following training sessions by
pressing the selection dial:
QUICK START
This program allows you to start the MANUAL
program without using user settings.
1. Select QUICK START. Confirm the selection by
pressing the selection dial and start your training
session by pedalling.
2. You can increase or decrease the resistance (1-58
Nm) using the selection dial.
3. To stop the training session, press the BACK/STOP
button. You can then stop the session by selecting
EXIT, save the session to the memory by selecting
SAVE AND EXIT or continue your training session
by selecting CONTINUE.
MANUAL
Allows you to set your effort level with the selection
dial during the workout.
1. Select MANUAL.
2. Using the selection dial, choose your target value
for the session: time, distance or energy consumption.
Confirm your selection by pressing the selection dial.
3. Set the target value for the session using the
selection dial: set time (10-180 minutes), distance
(3-100 km) or energy consumption (50-2000 kcal).
Confirm your selection by pressing the selection dial.
4. Start your training session by pedalling. You can
increase or decrease the resistance (1-58 Nm) using
the selection dial. During training, you can display
resistance or heart rate using the selection dial.
5. Once the target value has been achieved, the meter
gives an audio signal. You can continue with your
exercise if you wish.
6. To stop the training session, press the BACK/STOP
button. You can then stop the session by selecting
EXIT, save the session to the memory by selecting
SAVE AND EXIT or continue your training session
by selecting CONTINUE.
TARGET HR
This program allows you to preset your pulse level,
i.e. the resistance is regulated so that your pulse
remains at the requested level. If the pulse tends to
rise, resistance is reduced automatically and vice
versa. The set value can be changed also during the
workout. The program requires measurement of heart
rate.
1. Select your TARGET HR.

G B
9
O W N E R ' S M A N U A L
•
C 6 0
2. Set the heart rate level (80-220) for the training
session using the selection dial. Confirm your
selection by pressing the selection dial.
3. Using the selection dial, choose your target duration
for the session measured in time, distance or energy
consumption. Confirm your selection by pressing the
selection dial.
4. Set the target value for the session using the
selection dial: set time (10-180 minutes), distance
(3-100 km) or energy consumption (200-8000 kcal).
Confirm your selection by pressing the selection dial.
5. Start your training session by pedalling. Using the
selection dial, you can change the heart rate level (80-
220). During training, you can display resistance or
heart rate using the selection dial.
6. Once the target value has been achieved, the meter
gives an audio signal. You can continue with your
exercise if you wish.
7. To stop the training session, press the BACK/STOP
button. You can then stop the session by selecting
EXIT, save the session to the memory by selecting
SAVE AND EXIT or continue your training session
by selecting CONTINUE.
TARGET EFFORT
By selecting the TARGET EFFORT program, you
can set the desired effort value in watts, i.e. pedalling
effort will be independent of pedal rotations. The set
effort value can also be changed during the workout.
1. Select TARGET EFFORT.
2. Set the effort level (20-600 W) of your training
session using the selection dial. Confirm your
selection by pressing the selection dial.
3. Using the selection dial, choose your target duration
for the session measured in time, distance or energy
consumption. Confirm your selection by pressing the
selection dial.
4. Set the target value for the session using the
selection dial: set time (10-180 minutes), distance
(3-100 km) or energy consumption (200-8000 kcal).
Confirm your selection by pressing the selection dial.
5. Start your training session by pedalling. You can
increase or decrease the resistance (20-600 W) using
the selection dial. During training, you can display
effort or heart rate using the selection dial.
6. Once the target value has been achieved, the meter
gives an audio signal. You can continue with your
exercise if you wish.
7. To stop the training session, press the BACK/STOP
button. You can then stop the session by selecting
EXIT, save the session to the memory by selecting
SAVE AND EXIT or continue your training session
by selecting CONTINUE.
PROGRAMS
This program contains ready-made training profiles.
The program changes automatically the intensity level
during your workout. The display shows the profile
and the changes, and the intensity can be manually
adjusted.
1. Select PROGRAMS.
2. Select a program (1-10) using the selection dial.
Profiles P1-P5 are watt control programs and P6-P10
are target heart rate programs requiring heart rate
measurement. Confirm your selection by pressing the
selection dial.
3. Using the selection dial, choose your target duration
for the session measured in time or distance. Confirm
your selection by pressing the selection dial.
4. Set the target value for the session using the
selection dial: time (10-180 minutes) or distance
(3-100 km). Confirm your selection by pressing the
selection dial.
5. Start the program by pedaling. You can increase
or decrease the resistance using the selection dial.
During training, you can display effort or heart rate
using the selection dial. The heart rate display requires
heart rate measurement.
6. Once the target value has been achieved, the meter
gives an audio signal. You can continue with your
exercise if you wish.
7. To stop the training session, press the BACK/STOP
button. You can then stop the session by selecting
EXIT, save the session to the memory by selecting
SAVE AND EXIT or continue your training session
by selecting CONTINUE.
PROFILE P1. 3-peak effort profile for the improvement
of oxygen uptake capacity. With relatively low
yet long lasting peaks, this profile is suitable for
beginners. With default setting, max. watt value is
125, average watt value is 98.
P1 Rolling Hills
0
25
50
75
100
125
150
175
200
225
Duration
Watt
PROFILE P2. 3-peak effort profile for the improvement
of oxygen uptake capacity. With peaks relatively short
in duration, this profile is suitable for beginners. With
default setting, max. watt value is 150, average watt
value is 102.
P2 Hill Climb
0
25
50
75
100
125
150
175
200
225
Duration
Watt
PROFILE P3. Multi-peak effort profile for the
improvement of explosive strength. Peaks are
relatively short in duration, and the level of effort
varies irregularly. This profile is suitable for all fitness
levels. With default setting, max. watt value is 150,
average watt value is 117.

10
O W N E R ' S M A N U A L
•
C 6 0
P3 Cross Country
0
25
50
75
100
125
150
175
200
225
Duration
Watt
PROFILE P4. Uphill effort profile for the improvement
of endurance fitness. Peaks are relatively longlasting,
increasing in intensity until the closing phase of the
profile. This profile is specifically suitable for the
physically fit. With default setting, max. watt value is
210, average watt value is 133.
P4 Stamina
0
25
50
75
100
125
150
175
200
225
Duration
Watt
PROFILE P5. Interval effort profile with regular
changes and a clear difference between peaks and
the basic level of effort. The default values are preset
to an average effort of 138 W and a maximum effort
of 200 W. Please note that this profile allows you
to separately adjust the peaks and the basic level of
effort.
P5 Power Interval
0
25
50
75
100
125
150
175
200
225
Duration
Watt
PROFILE P6. 3-peak heart rate profile for the
improvement of oxygen uptake capacity. With
relatively longlasting peaks, this profile is suitable
for beginners. With default setting, max. HR value is
125, average HR is 112.
P6 Fatburner 1
0
20
40
60
80
100
120
140
160
180
Duration
BPM
PROFILE P7. Uphill heart rate profile where the
heart rate increases steadily until the midpoint of the
profile, steadily decreasing thereafter. This profile is
suitable for beginners. With default setting, max. HR
value is 150, average HR is 121.
P7 Fatburner 2
0
20
40
60
80
100
120
140
160
180
Duration
BPM
PROFILE P8. 3-peak heart rate profile for the
improvement of endurance fitness. Peaks are relatively
longlasting, but the heart rate level remains fairly
constant throughout. This profile is suitable for all
fitness levels. With default setting, max. HR value is
140, average HR is 120.
P8 Cardio Strength
0
20
40
60
80
100
120
140
160
180
Duration
BPM
PROFILE P9. Uphill heart rate profile for the
improvement of endurance fitness. Peaks are relatively
longlasting, increasing in intensity until the closing
phase of the profile. This profile is specifically
suitable for the physically fit. With default setting,
max. HR value is 170, average HR is 131.
P9 Cardio Climb
0
20
40
60
80
100
120
140
160
180
Duration
BPM
PROFILE P10. 3-peak heart rate profile for the
improvement of oxygen uptake capacity. Peaks are
relatively longlasting, with each followed by a steady
recovery period. This profile is specifically suitable
for the physically fit. With default setting, max. HR
value is 160, average HR is 133.
P10 Cardio Interval
0
20
40
60
80
100
120
140
160
180
Duration
BPM

G B
11
O W N E R ' S M A N U A L
•
C 6 0
T-TRAINER
As you select the T-TRAINER program, you can
exercise under control through six different training
modules at intervals. After every two minutes of
training, there is a one-minute recovery time. The
display show the training model, time, speed and
muscle groups on which the training influences most
efficiently.
1. Select T-TRAINER. Confirm the selection by
pressing the selection dial. The display shows one of
the six training modules. After the module has been
introduced, the display shows the pulse and resistance.
Start the training by following the instructions on the
display. Each of the performance modules takes two
minutes.
2. The program shifts automatically to a one-minute
recovery period. At the end of the recovery period, the
program automatically starts the next training module.
3. By pressing the selection dial you can move to
the next stage, either to the training module or to the
recovery time.
4. To stop the T-TRAINER exercise and to return to
the start menu, press the BACK/STOP key.
T-RIDE
T-RIDE TRAINING simulates riding a bike on a
natural terrain. During training, you can change gears
using the selection dial and watch the altitude profile.
1. Select T-RIDE.
2. Select the terrain and confirm your selection.
3. Set the starting point for the session using the
selection dial.
4. Set the ending point for the session using the
selection dial.
5. Start your training session by pedalling. You can
change gears (1–8) using the selection dial. During
training, you can display altitude profile or heart rate
using the selection dial. The heart rate display requires
heart rate measurement.
6. Once you have completed the route, the meter
beeps and the training session ends.
7. To stop the training session, press the BACK/STOP
button. You can then stop the session by selecting
EXIT, save the session to the memory by selecting
SAVE AND EXIT or continue your training session
by selecting CONTINUE.
OWN TRAINING
You can create and save up to 100 training programs
on the meter.
SAVING A PROGRAM
1. End your training session by pressing BACK/STOP.
2. Select SAVE AND EXIT and confirm your
selection.
3. Enter a name for the training session and confirm it
using the selection dial.
IMPORTANT! You can only save programs that are
longer than 10 minutes.
IMPORTANT! To save a training session you will need
to select a username.
USING SAVED PROGRAMS
1. Select OWN TRAINING.
2. Select a training session from the list.
3. Select the desired execution method:
A) Replay = repeat a previously saved exercise.
B) Edit = edit the duration of a previously saved
exercise before you start.
C) Race = compete against a previously saved
workout.
NOTE! You can only use programme profiles
created in the Manual function. These profiles
show effort as a constant torque (Nm).
4. Confirm your selection by pressing the selection
dial.
A) Replay = start pedaling to begin the exercise.
You can adjust the effort level with the selection
dial.
B) Edit = select the duration of the exercise with
the selection dial (set the time to 10-180 minutes).
Start pedaling to begin the exercise. You can adjust
the effort level with the selection dial.
C) Race = Using the selection dial, select the race
mode (time: the distance you can pedal in a given
time; or distance: how fast you can cover a given
distance) and confirm your selection using the
selection dial. The display shows a previously
saved program. Start pedalling to begin the race.
The dash line on the display shows whether you are
ahead or behind the benchmark training session,
which is the most recently saved training session
using this program. The distance to the previously
saved session is also displayed: the previously
saved training session is shown with a light vertical
dash line, and your race effort is shown with a dark
vertical dash line.
5. To stop the training session, press the BACK/STOP
button. You can then stop the session by selecting
EXIT, save the session to the memory by selecting
SAVE AND EXIT or continue your training session
by selecting CONTINUE.
FITNESS TEST
The meter uses a multi-step fitness test. The test
begins at a low level of effort, which increases
steadily in accordance with the selected test type.
A multi-step test is a safe and reliable, submaximal
means of measuring a person’s physical fitness
level. The test continues until the test subject has
achieved his or her individual target heart rate (85%
of maximum heart rate). The test requires the use
of a heart rate belt: the meter monitors changes in
the heart rate throughout the test, using the data to
calculate an estimate of the tested person’s maximum
oxygen uptake capacity. The maximum oxygen
uptake capacity is the best measure of a person’s
physical fitness level. After the test, the meter
gives versatile information on your fitness level: a
description and a numerical value (ml/kg/min).
PREPARING FOR THE TEST
1. Make sure that the data associated with your
username is updated – the meter uses the user data as
a basis for the fitness test.
2. Select FITNESS TEST.

12
O W N E R ' S M A N U A L
•
C 6 0
3. Using the selection dial, select the most suitable
fitness category for you:
A) Inactive = no regular exercise, poor physical
condition
B) Active = regular exercise, average or good
physical condition
C) Athletic = active training, good or excellent
physical condition
4. The display shows the appropriate test type for each
fitness category:
A) Step time = duration of different effort levels in
the test
B) First step = initial effort level
C) Step power = effort level of steps (in watts), the
test features several steps
5. Confirm your selection by pressing the selection
dial.
6. If necessary, you can adjust your target heart rate
value using the selection dial. Confirm your settings
using the selection dial.
7. The display informs you that you can stop the test
once you reach the target heart rate for the test. Start
the test by pressing the selection dial.
PERFORMING THE TEST
1. The display shows the selected test step type. Start
pedaling to begin the test. A red diagram that updates
as you progress in the test represents your heart rate.
A discontinuous line in red indicates your target heart
rate.
2. Once the target heart rate level has been achieved,
the meter gives an audio signal and displays a
message. We recommend that you end the test
here, unless you are relatively fit. If you have set
your target heart rate correctly (that is, if you have
calculated your maximum heart rate accurately
enough), continuing the test beyond this point will not
increase the accuracy of the result. If you overestimate
your maximum heart rate, your fitness level will
be overestimated. Similarly, if you underestimate
your maximum heart rate, your fitness level will be
underestimated.
3. To stop the test once you reach the target heart rate
level, press the BACK/STOP button or stop pedaling.
The meter will now switch to the test result display:
A) Aerobic fitness = an estimate of your fitness
level in your regular effort zone, which gives the
best indication of the state of your health-related
fitness.
B) MET value = a reading that shows the multiple
of your maximum oxygen uptake at complete rest.
C) ml/kg/min = a reading that tells how many
millilitres of oxygen per kilogram of body weight
per minute your body consumes.
D) l/min = a reading that tells your oxygen uptake
in litres per minute. Unlike the above values, l/min
does not take account of the user’s body weight.
E) Wmax = an estimate of your maximal exercise
power, measured in watts.
F) W/kg = the ratio of your maximal exercise power
to your weight.
MEN / MAXIMAL OXYGEN UPTAKE (VO2MAX)
1 = VERY POOR - 7 = EXCELLENT
AGE 1 2 3 4 5 6 7
18-19 <33 33-38 39-44 45-51 52-57 58-63 >63
20-24 <32 32-37 38-43 44-50 51-56 57-62 >62
25-29 <31 31-35 36-42 43-48 49-53 54-59 >59
30-34 <29 29-34 35-40 41-45 46-51 52-56 >56
35-39 <28 28-32 33-38 39-43 44-48 49-54 >54
40-44 <26 26-31 32-35 36-41 42-46 47-51 >51
45-49 <25 25-29 30-34 35-39 40-43 44-48 >48
50-54 <24 24-27 28-32 33-36 37-41 42-46 >46
55-59 <22 22-26 27-30 31-34 35-39 40-43 >43
60-65 <21 21-24 25-28 29-32 33-36 37-40 >40
WOMEN / MAXIMAL OXYGEN UPTAKE (VO2MAX)
1 = VERY POOR - 7 = EXCELLENT
AGE 1 2 3 4 5 6 7
18-19 <28 28-32 33-37 38-42 43-47 48-52 >52
20-24 <27 27-31 32-36 37-41 42-46 47-51 >51
25-29 <26 26-30 31-35 36-40 41-44 45-49 >49
30-34 <25 25-29 30-33 34-37 38-42 43-46 >46
35-39 <24 24-27 28-31 32-35 36-40 41-44 >44
40-44 <22 22-25 26-29 30-33 34-37 38-41 >41
45-49 <21 21-23 24-27 28-31 32-35 36-38 >38
50-54 <19 19-22 23-25 26-29 30-32 33-36 >36
55-59 <18 18-20 21-23 24-27 28-30 31-33 >33
60-65 <16 16-18 19-21 22-24 25-27 28-30 >30
TRANSPORT AND STORAGE
Please follow these instructions when carrying
and moving the equipment about, because lifting
it incorrectly may strain your back or risk other
accidents:
NOTE! Always switch the power off and unplug the
power cord before you start moving the equipment
around!
The device is easy to move by pushing along on the
integrated transport wheels. Tilt the device from the
front and push along the floor on the wheels at the
front support.
To prevent the equipment malfunctioning, store in
a dry place with as little temperature variation as
possible and protected from dust.
MAINTENANCE
The equipment requires very little maintenance.
Check, however, from time-to-time that all screws and
nuts are tight.
•
After exercising, clean the equipment with a soft,
absorbent cloth. Do not use solvents. .
•
Never remove the equipment’s protective casing.

G B
13
O W N E R ' S M A N U A L
•
C 6 0
MALFUNCTIONS
NOTE! Despite continuous quality control, defects
and malfunctions caused by individual components
may occur in the equipment. In most cases it’s
unnecessary to take the whole device in for repair,
as it’s usually sufficient to replace the defective
part. Always give the model, serial number of your
equipment and in case of malfunctions also conditions
of use, nature of malfunction and any error code.
When you encounter unusual behavior from the
device, simply turn the power off, wait 1 minute
and turn the power on. This should clear incidental
errors and ready the device for normal operation
again. If after you have reset the device by turning
the power off and on again, and the device is still
not operational, contact your local Tunturi dealer for
service.
If you require spare parts, always give the model,
serial number of your equipment and the spare part
number for the part you need. The spare part list
is at the back of this manual. Use only spare parts
mentioned in the spare part list.
TECHNICAL SPECIFICATIONS
Length .........................................146 cm
Width ...........................................65 cm
Height ..........................................157 cm
Weight .........................................82 kg
The C60 meets the requirements of the EU’s EMC
Directives on electromagnetic compatibility (89/336/
EEC) and electrical equipment designed for use
within certain voltage limits (73/23/EEC). This
product therefore carries the CE label.
The North American versions (115 V) comply with
FCC requirements on electromagnetic compatibility
and are accordingly marked with the FCC label.
The North American versions also comply with the
following safety standards: UL 1647 and CSA C 22.2
No. 68-92.
The C60 crosstrainer meets EN precision and safety
standards (Class HA, EN-957).
Due to our continuous policy of product development,
Tunturi reserves the right to change specifications
without notice.
NOTE! The instructions must be followed carefully
in the assembly, use and maintenance of your
equipment. The warranty does not cover damage
due to negligence of the assembly, adjustment and
maintenance instructions described herein. Changes
or modifications not expressly approved by Tunturi
Oy Ltd will void the user’s authority to operate the
equipment!
We wish you many enjoyable trainings with your
new Tunturi training partner!

14
B E T R I E B S A N L E I T U N G
•
C 6 0
•
Das Gerät nie ohne die seitlichen Abdeckungen
benutzen.
•
Dieses Gerät ist nicht für den Einsatz in
Feuchträumen (Sauna, Schwimmbad) vorgesehen.
•
Beim Training muss die Umgebungstemperatur
zwischen +10°C und +35°C liegen. Zur
Aufbewahrung kann das Gerät bei Temperaturen
zwischen -15°C und +40°C gelagert
werden. Die Luftfeuchtigkeit darf nie 90 %
überschreiten.
•
Vor Beginn des Trainings sicherstellen, dass das
Gerät völlig intakt ist. Auf keinen Fall mit einem
fehlerhaften Gerät trainieren.
•
Zum Auf-und Absteigen am Lenker abstützen. Nicht
auf das Gehäuse treten.
•
Zur Benutzung des Gerätes stets angemessene
Kleidung und Schuhwerk tragen.
•
Nie die Hände in die Nähe von beweglichen Teilen
bringen.
•
Zur Vermeidung von Muskelkater Auf- und
Abwärmtraining nicht vergessen.
•
Keine anderen als die in dieser Betriebsanleitung
beschriebenen Wartungsmassnahmen und
Einstellungen vornehmen. Die angegebenen
Wartungsanweisungen sind einzuhalten.
•
Das Gerät darf nicht von Personen benutzt werden,
deren Gewicht über 135 kg liegt.
•
Ihr neuer Heimtrainer von Tunturi wurde für das
Heimtraining entwickelt. Die Garantie dieses Gerätes
beträgt 24 Monate für das Heimtraining. Sowohl
Tunturi, als auch seine nationalen Vertretungen
übernehmen keine Haftung für Verletzungen
oder Geräteschäden, die sich bei Dauereinsatz in
gewerblichen Fitnesscentern, Sportvereinen und
vergleichbaren Einrichtungen ergeben.
HERZLICH WILLKOMMEN IN DER WELT DES
TRAINIERENS MIT TUNTURI!
Durch Ihren Kauf haben Sie bewiesen, dass Ihnen
Ihre Gesundheit und Ihre Kondition viel wert sind;
auch haben Sie gezeigt, dass Sie Qualität zu schätzen
wissen. Mit einem Tunturi-Fitnessgerät haben Sie
sich für ein hochwertiges, sicheres und motivierendes
Produkt als Trainingspartner entschieden. Welches
Ziel Sie auch immer mit Ihrem Training verfolgen,
wir sind sicher, dass Sie es mit diesem Fitnessgerät
erreichen. Hinweise zu Ihrem Trainingsgerät und
zum effektiven Training damit finden Sie auf der
Internetseite von Tunturi W W W.TU N T U RI .COM .
MONTAGE
Montieren Sie das Gerät mit einer weiteren Person.
Prüfen Sie, dass folgende Teile enthalten sind:
1. Rahmen
2. Vorderes Stützbein
3. Hinteres Stützbein
4. Vorderes Rahmenrohr
5. Handgriffe (2 Stück)
WICHTIGE
SICHERHEITSHINWEISE
Dieses Handbuch ist ein wesentlicher Bestandteil
Ihrer Trainingsausrüstung. Lesen Sie dieses Handbuch
bitte sorgfältig durch, bevor Sie Ihr Trainingsgerät
montieren, mit ihm trainieren oder es warten. Bitte
bewahren Sie dieses Handbuch; es wird Sie jetzt
und zukünftig darüber informieren, wie Sie Ihr
Gerät benutzen und warten. Befolgen Sie diese
Anweisungen immer sorgfältig. Für Schäden, die
durch Missachtung der beschriebenen Einstellungs-
und Wartungsanweisungen entstehen, besteht kein
Garantie-Anspruch!
•
Vor Beginn eines Trainingsprogrammes einen Arzt
konsultieren.
•
Bei Übelkeit, Schwindelgefühl oder anderen
anomalen Symptomen sollte das Training sofort
abgebrochen und unverzüglich ein Arzt aufgesucht
werden.
•
Dieses Gerät hat ein geschwindigkeitsabhängiges
Bremssystem, d.h. je schneller Sie schreiten, desto
höher ist die Belastung.
•
Aufgrund des natürlichen Spieltriebes und der
Experimentierfreudigkeit der Kinder können
Situationen und Verhaltensweisen entstehen, für die
das Trainingsgerät weder gebaut noch abgesichert ist
und die eine Verantwortung seitens des Herstellers
ausschliessen.Wenn Sie dennoch Kinder an das
Trainingsgerät lassen, müssen Sie deshalb deren
geistige und körperliche Entwicklung und vor
allem deren Temperament berücksichtigen, sie
gegebenenfalls beaufsichtigen und sie vor allem auf
die richtige Benutzung des Gerätes hinweisen.
•
Das Gerät sollte grundsätzlich nur von einer Person
benutzt werden.
•
Der Anwendungsbereich dieses Trainingsgerätes ist
der Heimbereich.
•
Das Gerät daft nur in Innenräumen benutzt werden.
•
Das Gerät auf möglichst ebenen Untergrund stellen.
•
Stützen Sie sich nie gegen das Cockpit ab!
•
Bedienen Sie die Tasten mit der Fingerkuppe. Ein
Fingernagel kann die Membrane der Tasten
beschädigen.
INHALT
WICHTIGE SICHERHEITSHINWEISE .....................14
MONTAGE ................................................................14
TRAINIEREN MIT TUNTURI ...................................17
COCKPIT ..................................................................18
BETRIEB DES COCKPITS ......................................18
TRANSPORT UND LAGERUNG ............................25
WARTUNG ..............................................................25
TECHNISCHE DATEN ............................................25

15
D
B E T R I E B S A N L E I T U N G
•
C 6 0
6. Fussbretter (2 Stück)
7. Messgerät
8. Armstütze
9. Stange
10. Netzanschluss
11. Beutel mit Montagezubehör (Inhalt mit * im
Ersatzteilverzeichnis gekennzeichnet): Bewahren Sie
die Montageteile sorgfältig auf, denn Sie können sie
später u.a. zur Justierung benötigen
Sollte Ihr Gerät unvollständig sein, wenden Sie sich
bitte unter Angabe des Modells, der Seriennummer
und Nummer des fehlenden Teiles an Ihren Tunturi-
Händler. Die Ersatzteilnummer geht aus der Liste
am Ende dieser Betriebsanleitung hervor. Der
beiliegende Beutel mit Granulat dient als Klimaschutz
während des Transportes und soll nach Montage
beseitigt werden. Die Beschreibung der Lage von
Teilen (rechts, links, vorne, hinten) geht von der
Blickrichtung beim Training aus. Bitte beachten Sie
beim Aufstellen des Gerätes, dass in jede Richtung
wenigstens 100 cm Freiraum vorhanden ist.
VORDERES STÜTZBEIN
Befestigen Sie das mit einem Transportrad
versehen vordere Stützbein mit zwei Schrauben,
Unterlegscheiben und Arretierungsscheiben am
Rahmen.
HINTERES STÜTZBEIN
Drücken Sie die Kunststoffschutzkappen auf die
Enden der hinteren Stützbeine und befestigen
Sie das hintere Stützbein mit zwei Schrauben,
Unterlegscheiben und Arretierungsscheiben am
Rahmen.
VORDERES RAHMENROHR
Entfernen Sie die Gummibandhalterung der aus dem
Rahmenrohr kommenden Messleitung. Schliessen Sie
die aus dem Rahmenrohr kommende Messleitung an
der Klemme am vorderen Rahmenrohr an. Schieben
Sie das vordere Rohr in das Rahmenrohr: Achten
Sie darauf, dass die Messleitung nicht beschädigt
wird! Befestigen Sie das vordere Rahmenrohr mit
Unterlegscheiben und Befestigungsschrauben.
FUSSBRETTER
Befestigen Sie die Pedalbretter an der gewünschten
mit zwei Schrauben und zwei Unterlegscheiben pro
Schraube und Muttern an dem Pedalschaft.

16
B E T R I E B S A N L E I T U N G
•
C 6 0
HANDGRIFFE
Schieben Sie die Metallstange durch die Achsbuchse
des linken Handgriffs, positionieren Sie den Griff
neben der Befestigungsbohrung des vorderen
Rohres und schieben Sie die Stange auch durch die
Achsbohrung. Schieben Sie anschliessend den rechten
Griff auf das Ende der Metallstange und arretieren
Sie die Stange, indem Sie an Enden der Achsbuchse
des rechten Griffs eine grosse Unterlegschraube, eine
Arretierungsscheibe und eine Befestigungsschraube
anbringen. Ziehen Sie die Griffe mit zwei
Inbusschrauben fest.
Schieben Sie den linken Pedalschaft so nach vorn,
dass Sie das vorn am Pedalschaft befindliche
Befestigungsrohr in den Griff hineinschieben
können. Befestigen Sie den Griff mit einer Schraube
am Fussbrett. Wiederholen Sie diese Schritte am
rechtseitigen Griff.
MESSGERÄT UND ARMSTÜTZE
Die Handstütze an das vordere Rahmenrohr
befestigen. Die Handpulsekabel durch die Öffnung in
der Mitte des vorderen Rahmenrohres schieben. Die
Schrauben so fest einschrauben, dass die Handstütze
sich nicht während des Trainings bewegt. Die
Kunststoffschützen auf Platz einstellen.
Verbinden Sie die Kabel vom Lenkerbügel mit den
entsprechenden Anschlüssen am Cockpit. Führen Sie
die verbundenen Kabel in die Lenkerbügelstütze ein.
Achten Sie darauf, dass sie beim Anschliessen des
Anzeigegeräts nicht beschädigt werden. Bringen Sie
das Cockpit am Ende der Lenkerbügelstütze an, und
befestigen Sie es mit 4 Halterungsschrauben.

17
D
B E T R I E B S A N L E I T U N G
•
C 6 0
NETZANSCHLUSS
Schliessen Sie den Transformator an die Buchse
oberhalb des hinteren Standprofils an. Verbinden Sie
das Transformatorkabel mit einer Steckdose.
* Nach Beendigung Ihres Trainings trennen Sie das
Gerät bitte immer vom Netz.
* Vergewissern Sie sich, dass das Gerät nicht auf dem
Netzkabel steht!
TRAINIEREN MIT TUNTURI
DAS TRAININGSNIVEAU
Wenn Sie lange Zeit keinen Sport ausgeübt haben,
sollten Sie sich von einem Arzt untersuchen lassen,
falls Sie über 40 Jahre alt sind, Ihre körperliche
Verfassung schlecht ist, an einer chronischen
Krankheit leiden oder gesundheitliche Probleme
haben oder Muskelprobleme oder -verletzungen
haben. Wer an Herz- oder Kreislaufkrankheiten
leidet, sollte seine körperliche Verfassung vor Beginn
des Trainings untersuchen lassen. Ausdauertraining
sollten Sie wenigstens dreimal pro Woche
absolvieren. Aber: auch einmal pro Woche ist besser
als keinmal. Die Auswirkungen des Trainings zeigen
sich bereits nach wenigen Wochen. Wenn Sie keine
gute Kondition haben, beginnen Sie mit 20minütigen
Trainingseinheiten. Sobald sich Ihre Kondition
verbessert, können Sie je nach Ihren Zielen 30-60
Minuten trainieren.
Am besten steigern Sie Ihre allgemeine Fitness durch
ein Training mit mässiger Leistung - nicht zu stark
und nicht zu schwach. Das Schwitzen während der
Übungen tut gut, aber auf jeden Fall sollten Sie dabei
bequem sprechen können. Diese Art von Training
nennt man aerobes oder Ausdauertraining. Dabei
bezieht Ihr Körper die benötigte Energie, indem er mit
Unterstützung von Sauerstoff Körperfett verbrennt.
Das wiederum führt zu einer Reduzierung des
Fettgewebes. Egal, welches Ziel Sie erreichen wollen,
die besten Resultate erhalten Sie mit einem Training
auf dem richtigen Leistungsniveau, und das beste
Mass ist dabei Ihre eigene Herzfrequenz. Ermitteln
Sie zuerst Ihre maximale Herzfrequenz. Wenn Sie Ihre
maximale Herzfrequenz nicht kennen, orientieren Sie
sich an der nachfolgenden Formel:
2 20 – A LTE R
Das Maximum unterscheidet sich von Mensch zu
Mensch. Die maximale Herzfrequenz verringert sich
pro Jahr durchschnittlich um einen Punkt. Wenn Sie
zu einer der bereits genannten Risikogruppen zählen,
bitten Sie einen Arzt, Ihre maximale Herzfrequenz
festzustellen. Wir haben drei Herzfrequenzbereiche
definiert, die Sie bei Ihrem zielgerichteten Training
unterstützen.
ANFÄNG ER
•
50-60 % der maximalen Herzfrequenz
Sie ist ausserdem für Übergewichtige und
Rekonvaleszenten geeignet, sowie für diejenigen,
die seit langem nicht mehr trainiert haben. Drei
Trainingseinheiten pro Woche von jeweils einer
halben Stunde Dauer sind angemessen. Regelmässiges
Training verbessert die Leistungsfähigkeit der
Atmungs- und Kreislauforgane eines Anfängers
ganz entscheidend und schon bald werden Sie die
Verbesserung spüren.
FO RTGESCHR I TTENE
•
60-70 % der maximalen
Herzfrequenz
Perfekt geeignet zur Verbesserung und Erhaltung
der Fitness. Damit stärken Sie Ihr Herz und Ihre
Lungen mehr, als auf dem Anfänger-niveau. Wir
empfehlen mindestens 3 Trainingseinheiten pro
Woche mit jeweils mindestens 30 Minuten. Wenn
Sie Ihr Fitnessniveau noch weiter erhöhen möchten,
trainieren Sie häufiger oder intensiver, aber nicht
beides zugleich.
AK TI VE SPO RTLER
•
70-80 % der maximalen
Herzfrequenz
Das Training auf diesem Niveau ist nur für
durchtrainierte Sportler geeignet und setzt ein
Langzeit-Ausdauertraining voraus.
Pausen sind so wichtig wie die Übungen eines
Fitnessprogrammes. Wenn Sie beispielsweise drei
Wochen lang gewissenhaft trainiert haben, sollten Sie
in der nachfolgenden vierten Woche ein wenig kürzer
treten.
HERZFREQUENZMESSUNG MIT
HANDSENSOREN
Dieses Gerät misst den Puls mit Sensoren, die in
den Handstutzen sitzen und jedes Mal dann den
Puls messen, wenn der Benutzer beide Sensoren
gleichzeitig berührt. Für eine verlässliche
Pulsmessung sollte die Haut ständigen Kontakt
mit den Sensoren haben und an den Kontaktstellen
leicht feucht sein. Eine zu trockene oder zu
feuchte Haut beeinträchtigt die Handpulsmessung.
Beachten Sie bitte, dass auch ein aktiver Einsatz der
oberen Körpermuskeln während des Trainings die
Pulsmessung über die Hand beeinträchtigen kann:
Aktive Muskeln übertragen ähnliche, elektronische
Signale wie der Herzmuskel. Daher wird empfohlen,
die Arme während der Pulsmessung entspannt zu
halten.

18
B E T R I E B S A N L E I T U N G
•
C 6 0
DRAHTLOSE HERZFREQUENZMESSUNG
Als zuverlässigste Art der Herzfrequenzmessung hat
sich die drahtlose Herzfrequenzabnahme erwiesen,
bei der die Herzschläge mit einem Elektrodengurt von
der Brust abgenommen werden. Vom Gurt werden die
Impulse danach über ein elektromagnetisches Feld an
den Empfänger in der Elektronikanzeige übertragen.
Zur drahtlosen Herzfrequenzmessung während
des Trainings die gegen die Haut kommenden
Elektroden am Elektrodengurt sorgfältig mit Wasser
oder Speichel anfeuchten. Wird der Elektrodengurt
über einem dünnen Hemd getragen, sind die gegen
die Elektroden gerichteten Flächen ebenfalls zu
befeuchten. Den Sender mit Hilfe des Gurtes fest
unterhalb der Brustmuskulatur befestigen und darauf
achten, dass der Gurt beim Training nicht verrutscht.
Den Elektrodengurt jedoch nicht so festziehen, dass z.
B. die Atmung erschwert wird. Der Sender kann den
Pulswert bis zu einer Entfernung von zirka 1 m an den
Empfänger übertragen. Der Herzfrequenzwert wird
in der Anzeige angezeigt. Die Herzfrequenzwerte
und besonders die kleine Leuchtdiode unterhalb
der Herzfrequenzanzeige während des Trainings
beobachten. Der Indikator sollte im Tempo der
Herzfrequenz blinken.
Achten Sie bei Ihrer Trainingskleidung darauf, dass
bestimmte für Kleidungsstücke verwendete Fasern
(z.B. Polyester, Polyamid) statische elektrische
Ladungen verursachen, die ein Hindernis für eine
zuverlässige Herzfrequenzmessung sein können.
Beachten Sie auch, dass durch Handys, Fernsehgeräte
und andere elektrische Geräte elektromagnetische
Felder entstehen, die Probleme bei der
Herzfrequenzmessung verursachen können.
COCKPIT
1
2
3
4
5
FUNKTIONSTASTEN
1. BACK/STOP
Verwenden Sie die Taste BACK/STOP, um zum
Hauptmenü zurückzugelangen. Während des
Trainings können Sie die Trainingseinheit beenden
oder vorübergehend anhalten, indem Sie die Taste
BACK/STOP drücken.
2. ZOOM
Überwachung des grafischen Profils im Display
während des Trainings. Durch Drücken der
ZOOMTaste vergrößern Sie das Bild des Profils auf
der Anzeige (zwei-, vier-, acht- und sechzehnfach),
bis beim fünften Drücken das
3. TRAINING
Drücken Sie die Taste TRAINING, um das Menü
TRAINING zu öffnen. Das Menü TRAINING
enthält folgende Trainingsprogramme: QUICK
START, MANUAL, TARGET HR, TARGET
EFFORT, PROGRAMS, T-RIDE, T-TRAINER, OWN
TRAINING und FITNESS TEST.
4. USER
Drücken Sie die Taste USER, um das Menü USER
zu öffnen. Das Menü USER enthält die folgenden
Funktionen: CREATE USER, SELECT/CHANGE
USER, EDIT USER, DELETE USER, SETTINGS
und USER LOG.
5. DREHSCHALTER
Der Drehschalter hat zwei Funktionsweisen:
A) Drehen des Drehschalters Wenn Sie den
Drehschalter im Uhrzeigersinn drehen, können Sie
die Menüs abwärts oder nach rechts durchblättern
sowie Werte oder Widerstand erhöhen. Wenn Sie den
Drehschalter gegen den Uhrzeigersinn drehen, können
Sie die Menüs aufwärts oder nach rechts durchblättern
sowie Werte oder Widerstand verringern.
B) Drücken des Drehschalters Wenn Sie auf den
Drehschalter drücken, können Sie die Auswahl
bestätigen, die Sie durch Drehen des Drehschalters
vorgenommen haben. Während des Trainings können
Sie die Funktion bestätigen, die am unteren Rand in
der Mitte des Displays angezeigt wird.
DISPLAY
Während des Trainings werden auf der linken Seite
des Displays folgende Trainingswerte angezeigt: Zeit,
zurückgelegte Strecke, Energieverbrauch, Leistung,
Drehzahl, Herzfrequenz und Geschwindigkeit.
BETRIEB DES COCKPITS
Das Cockpit wird aktiviert, indem Sie das Gerät
an eine Stromquelle anschließen und danach mit
dem Treten beginnen oder irgendeine Cockpittaste
betätigen. Im Cockpit erscheint dann das Menü
TRAINING.
Wird das Gerät etwa 5 Minuten lang nicht betrieben,
schaltet sich das Cockpit automatisch aus. Die
Trainingsdaten werden bei Unterbrechung des
Trainings 5 Minuten lang gespeichert. Danach werden
alle Werte auf Null gesetzt.

19
D
B E T R I E B S A N L E I T U N G
•
C 6 0
Im Display werden Empfehlungen angezeigt. Ihnen
wird der Buchstabe i auf weißem Hintergrund
vorangestellt. Sie können die Empfehlungen vom
Display löschen, indem Sie den Drehschalter drücken.
MENÜ USER
Sie können auf das Menü USER zugreifen, indem Sie
die Taste USER drücken. Wir empfehlen Ihnen einen
Benutzercode zu wählen und Ihre persönlichen Daten
abzuspeichern. Diese Informationen werden u.a. bei
der präziseren Einschätzung des Energieverbrauchs
benötigt. Gleichzeitig können Sie auch die bei dem
Laufband verwendeten Maßeinheiten eingeben sowie
die Gebrauchsgesamtwerte des Laufbands ablesen.
Wenn Sie einen Benutzernamen auswählen, können
Sie persönliche Trainingseinheiten speichern und
Herzfrequenzstufen in unterschiedlichen Farben
anzeigen, wenn Sie ein Herzfrequenztraining
durchführen. Nachdem Sie einen Benutzernamen
eingegeben oder einen vorhandenen Benutzernamen
ausgewählt haben, wird dieser rechts oben im Display
eingeblendet. Sie können auch ohne Benutzernamen
trainieren. In diesem Fall wird kein Benutzername
rechts oben im Display angezeigt, und für die
Trainingseinheit werden die Standardeinstellungen
(45 Jahre, 70 kg, männlich) verwendet. Es können für
maximal 20 Benutzer Daten gespeichert werden.
WICHTIG! Wenn Sie Trainingseinheiten anzeigen
möchten, die mit Hilfe der Funktion USER LOG
gespeichert wurden, müssen Sie Ihren Benutzernamen
auswählen. Sie können auch während einer
Trainingseinheit einen Benutzernamen auswählen,
indem Sie die Taste USER drücken und Ihren
Benutzernamen auswählen. Die Trainingseinheit
wird dadurch nicht unterbrochen. Nachdem Sie Ihren
Benutzernamen ausgewählt haben, können Sie die
Trainingsdaten wieder anzeigen, indem Sie die Taste
BACK/STOP drücken.
WICHTIG! Wenn Sie die Trainingseinheit speichern
möchten, müssen Sie einen Benutzernamen
auswählen.
CREATE USER
So erstellen Sie einen Benutzer:
1. Drücken Sie die Taste USER. Das Menü USER
wird angezeigt.
2. Wählen Sie CREATE USER aus, indem Sie den
Drehschalter drehen. Bestätigen Sie die Auswahl
durch Drücken des Drehschalters.
3. Wählen Sie eine Sprache aus, indem Sie den
Drehschalter drehen und die Auswahl durch Drücken
des Drehschalters bestätigen.
4. Geben Sie Ihren Namen ein. Sie gelangen von
einem Buchstaben zum nächsten, indem Sie den
Drehschalter drehen. Bestätigen Sie den ausgewählten
Buchstaben durch Drücken des Drehschalters. Wenn
Sie Ihren Namen eingegeben haben, wählen Sie OK
aus, und drücken Sie anschließend den Drehschalter.
5. Wählen Sie die gewünschten Einheiten aus.
(METRIC 1 (kg, km, kcal), METRIC 2 (kg, km,
kJ) oder die entsprechenden britischen Einheiten
IMPERIAL 1 (lb, mi, kcal), IMPERIAL 2 (lb, mi, kJ)).
Treffen Sie Ihre Auswahl, indem Sie den Drehschalter
drehen, und bestätigen Sie sie durch Drücken des
Drehschalters. Sie gelangen automatisch zur nächsten
Einstellung.
6. Wählen Sie die Zielanzeige für die eingegebenen
Werte aus. Wenn Sie COUNT DOWN auswählen,
werden die Werte angezeigt, die von Ihrem Zielwert
in Richtung Null abfallen. Wenn Sie COUNT UP
wählen, werden die Werte angezeigt, die in Richtung
auf Ihren Zielwert zunehmen. Bestätigen Sie die
Auswahl durch Drücken des Drehschalters. Sie
gelangen zur nächsten Einstellung.
7. Geben Sie Ihr Geschlecht ein, indem Sie den
Drehschalter drehen. Bestätigen Sie Ihre Auswahl.
8. Geben Sie Ihr Alter ein. Bestätigen Sie Ihre
Auswahl.
9. Geben Sie Ihre Körpergröße ein. Bestätigen Sie Ihre
Auswahl.
10. Geben Sie Ihr Gewicht ein. Bestätigen Sie Ihre
Auswahl.
11. Geben Sie Ihre maximale Herzfrequenz ein.
In der Steuerung wird Ihre geschätzte maximale
Herzfrequenz mit Hilfe der Formel „220 - Alter“
berechnet. Wenn Sie den genauen Wert Ihrer
maximalen Herzfrequenz kennen, können Sie die
geschätzte maximale Herzfrequenz korrigieren, die
von der Steuerung berechnet wurde.
12. Geben Sie Ihren anaeroben Schwellenwert
ein. Das Gerät berechnet Ihre geschätzte
Schwellenherzfrequenz aufgrund Ihrer maximalen
Herzfrequenz.
(80 % der maximalen Herzfrequenz). Wenn Sie Ihre
genaue anaerobe Schwellenherzfrequenz kennen,
können Sie die von der Steuerung berechnete
Schätzung korrigieren.
13. Geben Sie den aeroben Schwellenwert
ein. Das Gerät berechnet Ihre geschätzte
Schwellenherzfrequenz aufgrund Ihrer maximalen
Herzfrequenz.
(60 % der maximalen Herzfrequenz). Wenn Sie
Ihre genaue aerobe Schwellenherzfrequenz kennen,
können Sie die von der Steuerung berechnete
Schätzung korrigieren.
WICHTIG! In der Steuerung können maximal 20
Benutzernamen gespeichert werden.
SELECT/CHANGE USER
Wenn Sie für sich einen Benutzernamen
erstellt haben, aktivieren Sie ihn zu Beginn der
Trainingseinheit. Wählen Sie hierzu SELECT/
CHANGE USER aus, und bestätigen Sie die Auswahl
mit dem Drehschalter.
EDIT USER
Wenn Sie EDIT USER auswählen, können Sie Ihre
Benutzerdaten bearbeiten.
DELETE USER
Wenn Sie DELETE USER auswählen, können Sie
Benutzer löschen. Aktivieren Sie den Benutzernamen,
den Sie löschen möchten, und wählen Sie
anschließend DELETE USER aus. Bestätigen Sie die
Auswahl, indem Sie den Drehschalter drücken.

20
B E T R I E B S A N L E I T U N G
•
C 6 0
SETTINGS
Wenn Sie SETTINGS auswählen, können Sie die
Firmware-Version der Steuerung aktualisieren,
den Displaykontrast ändern, die Gesamtwerte des
Heimtrainers anzeigen und die Tastensignaltöne
aktivieren bzw. deaktivieren.
USER LOG
Wenn Sie USER LOG auswählen, können Sie
die Trainingsdaten des ausgewählten Benutzers
anzeigen. Sie können entweder die Daten der letzten
Trainingseinheit oder eine Zusammenfassung aller
Trainingseinheiten des Benutzers anzeigen. Die
Trainingsdaten werden geschlossen, wenn Sie die
Taste BACK/STOP drücken.
MENÜ TRAINING
Sie können das Menü TRAINING öffnen, indem Sie
die Taste TRAINING drücken. Im Menü TRAINING
können Sie eine der folgenden Trainingseinheiten
auswählen, indem Sie den Drehschalter drücken:
QUICK START
Mit Hilfe der QUICK START (Schnellstart)-
Taste gelangen Sie sofort zum MANUAL-
Trainingsprogramm ohne Benutzereinstellungen.
1. Wählen Sie QUICK START aus. Bestätigen Sie
die Auswahl, indem Sie den Drehschalter drücken,
und beginnen Sie die Trainingseinheit, indem Sie die
Pedale betätigen.
2. Sie können den Widerstand (1 – 58 Nm) mit Hilfe
des Drehschalters erhöhen oder verringern.
3. Drücken Sie die Taste BACK/STOP, um die
Trainingseinheit zu beenden. Sie können dann
die Trainingseinheit beenden, indem Sie EXIT
auswählen, die Daten der Trainingseinheit speichern,
indem Sie SAVE AND EXIT auswählen, oder die
Trainingseinheit fortsetzen, indem Sie CONTINUE
auswählen.
MANUAL
In der Betriebsart MANUAL können Sie die
Belastung mit Hilfe des Drehschalters verringern
oder erhöhen. In der MANUAL-Betriebsart kann die
Belastung mit dem Drehschalter reduziert oder erhöht
werden.
1. Wählen Sie MANUAL aus.
2. Wählen Sie Ihren Zielwert für die
Trainingseinheit mit Hilfe des Drehschalters
aus: TIME (Zeit), DISTANCE (Strecke) oder
ENERGY CONSUMPTION (Energieverbrauch).
Bestätigen Sie die Auswahl durch Drücken des
Drehschalters.
3. Geben Sie den Zielwert für die Trainingseinheit mit
Hilfe des Drehschalters ein: Geben Sie die Zeit (10
– 180 Minuten), die Strecke (3 – 100 km) oder den
Energieverbrauch (50 – 2000 kcal) ein. Bestätigen Sie
die Auswahl durch Drücken des Drehschalters.
4. Beginnen Sie die Trainingseinheit, indem Sie die
Pedale betätigen. Sie können den Widerstand (1
– 58 Nm) mit Hilfe des Drehschalters erhöhen oder
verringern. Während des Trainings können Sie den
Widerstand oder die Herzfrequenz mit Hilfe des
Drehschalters anzeigen.
5. Nach Erreichen des Trainingszielwertes ertönt
ein Signalton. Sie können dennoch das Programm
fortsetzen.
6. Drücken Sie die Taste BACK/STOP, um die
Trainingseinheit zu beenden. Sie können dann
die Trainingseinheit beenden, indem Sie EXIT
auswählen, die Daten der Trainingseinheit speichern,
indem Sie SAVE AND EXIT auswählen, oder die
Trainingseinheit fortsetzen, indem Sie CONTINUE
auswählen.
TARGET HR (PULS-KONSTANTE)
Bei diesem Programm wird die Trainingsbelastung
abhängig vom Puls gesteuert. Beginnt der
Puls zu steigen, reduziert der elektronische
Steuermechanismus automatisch den Tretwiderstand
und umgekehrt. Der eingegebene Pulswert kann
auch während des Trainings verändert werden. Das
Programm erfordert die Messung der Herzfrequenz.
1. Wählen Sie TARGET HR aus.
2. Geben Sie die Herzfrequenzstufe (80 – 220) für
die Trainingseinheit mit Hilfe des Drehschalters
ein. Bestätigen Sie die Auswahl durch Drücken des
Drehschalters.
3. Wählen Sie die Zieldauer der Trainingseinheit aus,
die nach Zeit, Strecke oder
Energieverbrauch gemessen wird. Bestätigen Sie die
Auswahl durch Drücken des Drehschalters.
4. Geben Sie den Zielwert der Trainingseinheit mit
Hilfe des Drehschalters ein: Geben Sie die Zeit (10
– 180 Minuten), die Strecke (3 – 100 km) oder den
Energieverbrauch (200 – 8000 kcal) ein. Bestätigen
Sie die Auswahl durch Drücken des Drehschalters.
5. Beginnen Sie die Trainingseinheit, indem Sie
die Pedale betätigen. Mit Hilfe des Drehschalters
können Sie die Herzfrequenzstufe ändern (80 – 220).
Während des Trainings können Sie Widerstand oder
Herzfrequenz mit Hilfe des Drehschalters anzeigen.
6. Nach Erreichen des Trainingszielwertes ertönt
ein Signalton. Sie können dennoch das Programm
fortsetzen.
7. Drücken Sie die Taste BACK/STOP, um die
Trainingseinheit zu beenden. Sie können dann
die Trainingseinheit beenden, indem Sie EXIT
auswählen, die Daten der Trainingseinheit speichern,
indem Sie SAVE AND EXIT auswählen, oder die
Trainingseinheit fortsetzen, indem Sie CONTINUE
auswählen.
TARGET EFFORT
Wenn Sie das Programm TARGET EFFORT
auswählen, können Sie die gewünschte Leistung
in Watt eingeben, d. h. die Tretleistung ist von den
Pedalumdrehungen unabhängig. Die eingegebene
Leistung kann auch während des Trainings geändert
werden.
1. Wählen Sie TARGET EFFORT aus.
2. Geben Sie die Leistungsstufe (20 – 600 W) mit
Hilfe des Drehschalters ein. Bestätigen Sie die
Seite wird geladen ...
Seite wird geladen ...
Seite wird geladen ...
Seite wird geladen ...
Seite wird geladen ...
Seite wird geladen ...
Seite wird geladen ...
Seite wird geladen ...
Seite wird geladen ...
Seite wird geladen ...
Seite wird geladen ...
Seite wird geladen ...
Seite wird geladen ...
Seite wird geladen ...
Seite wird geladen ...
Seite wird geladen ...
Seite wird geladen ...
Seite wird geladen ...
Seite wird geladen ...
Seite wird geladen ...
Seite wird geladen ...
Seite wird geladen ...
Seite wird geladen ...
Seite wird geladen ...
Seite wird geladen ...
Seite wird geladen ...
Seite wird geladen ...
Seite wird geladen ...
Seite wird geladen ...
Seite wird geladen ...
Seite wird geladen ...
Seite wird geladen ...
Seite wird geladen ...
Seite wird geladen ...
Seite wird geladen ...
Seite wird geladen ...
Seite wird geladen ...
Seite wird geladen ...
Seite wird geladen ...
Seite wird geladen ...
Seite wird geladen ...
Seite wird geladen ...
Seite wird geladen ...
Seite wird geladen ...
Seite wird geladen ...
Seite wird geladen ...
Seite wird geladen ...
Seite wird geladen ...
Seite wird geladen ...
Seite wird geladen ...
Seite wird geladen ...
Seite wird geladen ...
Seite wird geladen ...
Seite wird geladen ...
Seite wird geladen ...
Seite wird geladen ...
Seite wird geladen ...
Seite wird geladen ...
Seite wird geladen ...
Seite wird geladen ...
Seite wird geladen ...
Seite wird geladen ...
Seite wird geladen ...
Seite wird geladen ...
Seite wird geladen ...
Seite wird geladen ...
Seite wird geladen ...
Seite wird geladen ...
Seite wird geladen ...
Seite wird geladen ...
Seite wird geladen ...
Seite wird geladen ...
Seite wird geladen ...
Seite wird geladen ...
Seite wird geladen ...
Seite wird geladen ...
Seite wird geladen ...
Seite wird geladen ...
Seite wird geladen ...
Seite wird geladen ...
-
 1
1
-
 2
2
-
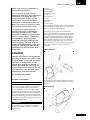 3
3
-
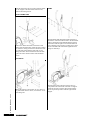 4
4
-
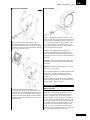 5
5
-
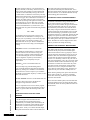 6
6
-
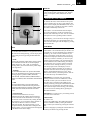 7
7
-
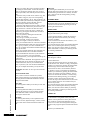 8
8
-
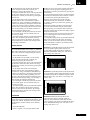 9
9
-
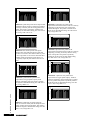 10
10
-
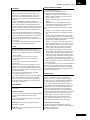 11
11
-
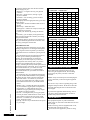 12
12
-
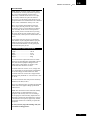 13
13
-
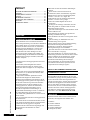 14
14
-
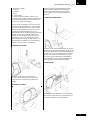 15
15
-
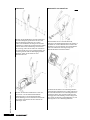 16
16
-
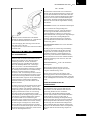 17
17
-
 18
18
-
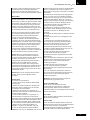 19
19
-
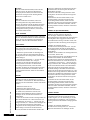 20
20
-
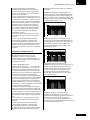 21
21
-
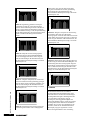 22
22
-
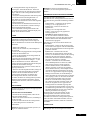 23
23
-
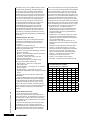 24
24
-
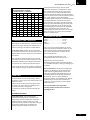 25
25
-
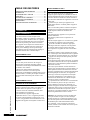 26
26
-
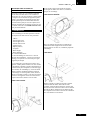 27
27
-
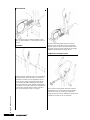 28
28
-
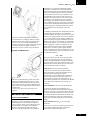 29
29
-
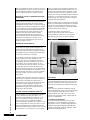 30
30
-
 31
31
-
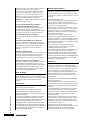 32
32
-
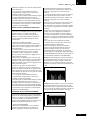 33
33
-
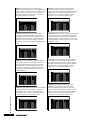 34
34
-
 35
35
-
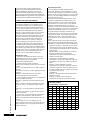 36
36
-
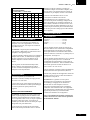 37
37
-
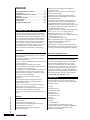 38
38
-
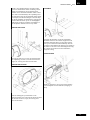 39
39
-
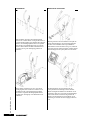 40
40
-
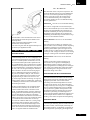 41
41
-
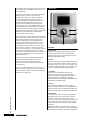 42
42
-
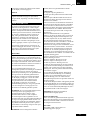 43
43
-
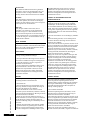 44
44
-
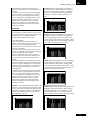 45
45
-
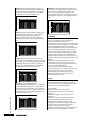 46
46
-
 47
47
-
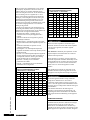 48
48
-
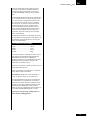 49
49
-
 50
50
-
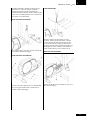 51
51
-
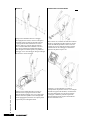 52
52
-
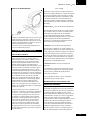 53
53
-
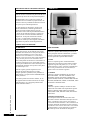 54
54
-
 55
55
-
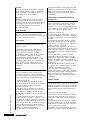 56
56
-
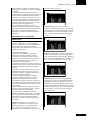 57
57
-
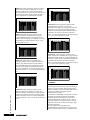 58
58
-
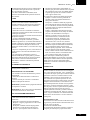 59
59
-
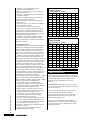 60
60
-
 61
61
-
 62
62
-
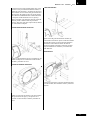 63
63
-
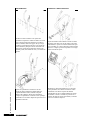 64
64
-
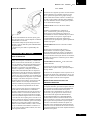 65
65
-
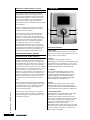 66
66
-
 67
67
-
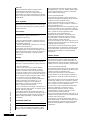 68
68
-
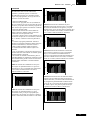 69
69
-
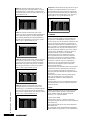 70
70
-
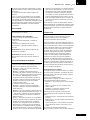 71
71
-
 72
72
-
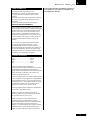 73
73
-
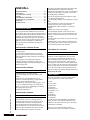 74
74
-
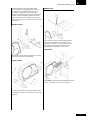 75
75
-
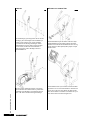 76
76
-
 77
77
-
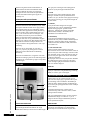 78
78
-
 79
79
-
 80
80
-
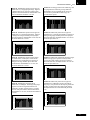 81
81
-
 82
82
-
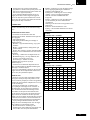 83
83
-
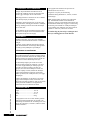 84
84
-
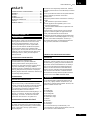 85
85
-
 86
86
-
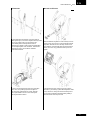 87
87
-
 88
88
-
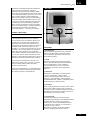 89
89
-
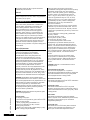 90
90
-
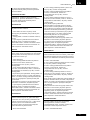 91
91
-
 92
92
-
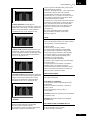 93
93
-
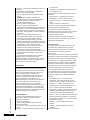 94
94
-
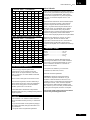 95
95
-
 96
96
-
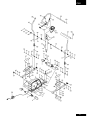 97
97
-
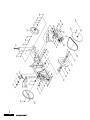 98
98
-
 99
99
-
 100
100


Tunturi C60 Benutzerhandbuch
- Kategorie
- Fitness, Gymnastik
- Typ
- Benutzerhandbuch
in anderen Sprachen
- français: Tunturi C60 Manuel utilisateur
- español: Tunturi C60 Manual de usuario
- italiano: Tunturi C60 Manuale utente
- Nederlands: Tunturi C60 Handleiding
- svenska: Tunturi C60 Användarmanual
Verwandte Artikel
-
Tunturi C65 Benutzerhandbuch
-
-
-
-
Tunturi E80 Upright Bike Benutzerhandbuch
-
-
-
-
-