Lindy USB 3.2 Gen 2x2 Dual M.2 NVMe SSD Enclosure Benutzerhandbuch
- Typ
- Benutzerhandbuch

© LINDY Group - SECOND EDITION
(August 2023)
USB 3.2 Gen 2x2 Dual M.2 NVMe SSD
Enclosure with Clone Feature
User Manual English
Benutzerhandbuch Deutsch
Manuel Utilisateur Français
Manuale Italiano
Manual de Usuario Español
No. 43382
lindy.com

User Manual English
Safety Instructions
! WARNING !
Please read the following safety information carefully and always keep this document with
the product.
Failure to follow these precautions can result in serious injuries or death from electric
shock, fire or damage to the product.
Touching the internal components or a damaged cable may cause electric shock, which
may result in death.
This device is a switching type power supply and can work with supply voltages in the range 100 - 240
VAC For worldwide usability four different AC adapters are enclosed: Euro type, UK type, US/Japan type
and Australia/New Zealand type. Use the appropriate AC adapter as shown in the picture and ensure it
is firmly secured in place and does not detach by pulling before installing into a power socket.
To reduce risk of fire, electric shocks or damage:
Do not open the product nor its power supply. There are no user serviceable parts inside.
Only qualified servicing personnel may carry out any repairs or maintenance.
Never use damaged cables.
Do not expose the product to water or places of moisture.
Do not use this product outdoors it is intended for indoor use only.
Do not place the product near direct heat sources. Always place it in a well-ventilated place.
Do not place heavy items on the product or the cables.
Please ensure any adapters are firmly secured and locked in place before inserting into a wall socket
Instructions for Use of Power Supply
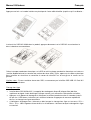
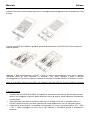
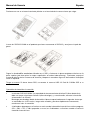
Attach the required country adapter to the plug:
Place the country adapter on the power supply unit so that the 2 lugs on the lower end of the adapter fit
into the corresponding recesses on the power supply unit. Then slide the adapter down until it clicks into
place.
To remove, push the button and slide the adapter upwards.

User Manual English
Introduction
Thank you for purchasing the USB 3.2 Gen 2x2 Dual M.2 NVMe SSD Enclosure. This product has been
designed to provide trouble free, reliable operation. It benefits from both a LINDY 2 year warranty and free
lifetime technical support. To ensure correct use, please read this manual carefully and retain it for future
reference.
The Lindy USB 3.2 Gen 2x2 Dual M.2 NVMe SSD Enclosure allows the user to install two PCIe/NVMe
based M.2 SSDs as an external drive to USB hosts like laptops or PCs. The additional Clone feature
enables duplicating M.2 NVMe SSDs - even without connection to a computer ("offline cloning"). Support
for the USB 3.2 Gen 2x2 standard guarantees SuperSpeed 20Gbps data transfer rates. UASP support
also ensures faster speeds for UASP enabled computers.
Package Contents
USB 3.2 Gen 2x2 Dual M.2 NVMe SSD Enclosure
0.25m USB 3.2 Gen 2x2 Type C to C cable
Multi-Country Power Supply 12VDC 2A with country adapters (EU, UK; US, AUS)
2x thermal conductive pad
2x thermal conductive plate
4x M.2 rubber plug
Lindy Manual
Specification
Interface: USB to 2x PCIe/NVMe M.2 SSD
Interface Standard: USB 3.2 Gen 2x2, PCIe 3.0 x2
Supported Bandwidth: 20Gbps (USB), 32Gbps - each up to 16Gbps (PCI 3.0 x2)
Chipset: JMS586U
Compatibility: USB Type C equipped computers
Special Features: supports 42/60/80mm SSDs, UASP & TRIM, LED indicator for Clone process
Inputs: 1 x USB Type C (Female)
Outputs: 2 x PCIe based M.2 (Female), M key and B+M key
Power: 5.5/2.5mm DC socket
Product Dimensions WxDxH: 143x77x17.5mm (5.63x3.03x0.69in)
Housing Material: Aluminium and ABS
Net Weight: 0.174kg (0.38lb)
Operating Temperature: 5°C - 35°C (41°F - 95°F)
Storage Temperature: -10°C - 90°C (-14°F - 122°F)
Humidity: 10 - 90% RH (non-condensing)

User Manual English
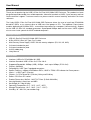
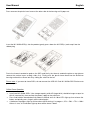
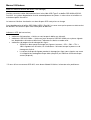
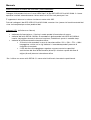
Overview
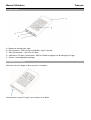
A: Offline Clone Button
B: Upstream Port: USB 3.2 Gen 2x2 20Gbps Type C Female
C: Power Port: 12V DC 5.5x2.5mm
D: LED Indicators for Power, M.2 NVMe SSD and Offline Clone Progress
E: Secure-Lock: Lock & Unlock
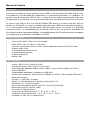
Installation & Operation
Please follow the steps below for installation:
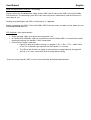
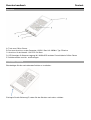
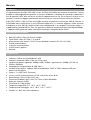
Unlock the secure lock E by sliding the switch to the right.

User Manual English
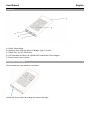
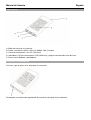
Press once on the plastic inner frame at the other side of the housing until it pops out:
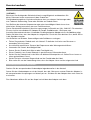
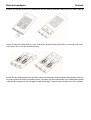
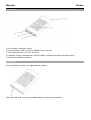
Insert the M.2 NVMe SSD(s) into the product, gently press down the M.2 SSD(s) and snap it into the
rubber plug.
Paste the thermal conductive pad on the SSD and finally the thermal conductive plate on top (please
remove the surface layers on both sides first). Finally push the plastic frame back into the Aluminium
housing and lock the secure lock E by sliding the switch to the left.
Please note: If you want to clone SSDs, do not connect the USB 3.2 Dual M.2 NVMe SSD Enclosure to
your computer
Offline Clone Operation
Install two M.2 NVMe SSDs* (the storage capacity of disk B (target disk) should be larger or equal to
disk A (source disk), then connect the power supply to the enclosure.
Press and hold the clone button A for about 3 seconds until all 4 blue LEDs light up, then release the
button and quickly press it again, offline clone begins.
4 indicators of progress light up in blue when offline cloning is in progress, 25% > 50% > 75% > 100%
flickers in turn, all 4 indicators light up when offline clone is done.

User Manual English
Read and Write Access to SSDs* (no cloning)
Please connect the included power supply and the USB Type C cable to the USB 3.2 Dual M.2 NVMe
SSD Enclosure. The operating system will install necessary drivers automatically and the Enclosure is
now ready for use.
Reading of and writing on two SSDs simultaneously is supported.
Before unplugging the USB 3.2 Dual M.2 NVMe SSD Enclosure make sure data transfer processes are
completed to avoid data loss.
LED Indicators (from top to bottom)
Power Indicator: lights up in green when the power is on.
M.2 NVMe SSD Indicators: Light up in yellow when the M.2 NVMe SSD is inserted, flickers while
reading and writing; the indicator is off in sleep mode.
Offline Clone Progress Indicators:
Light up in blue when offline cloning is in progress: 25% > 50% > 75% > 100% flicker
in turn, all 4 indicators light up when the clone process is finished;
The LED of disk A flickers to report an error while the storage capacity of target disk
(disk B) is less than source disk (disk A) during offline cloning.
*If you are using a new M.2 SSD, it must first be initialized, formatted and partitioned.

Benutzerhandbuch Deutsch
Sicherheitshinweise
! GEFAHR !
Bitte lesen Sie die folgenden Sicherheitshinweise sorgfältig durch und bewahren Sie
dieses Dokument immer zusammen mit dem Produkt auf.
Die Nichtbeachtung dieser Vorsichtsmaßnahmen kann zu schweren Verletzungen oder
zum Tod durch Stromschlag, Feuer oder Schäden am Produkt führen.
Das Berühren der internen Komponenten oder eines beschädigten Kabels kann einen
elektrischen Schlag verursachen, der zum Tod führen kann.
Dieses Schaltnetzteil arbeitet mit Anschlussspannungen im Bereich von 100…240 VAC. Für weltweiten
Einsatz sind vier verschiedene AC-Adapter für Europa, Großbritannien, USA/Japan und
Australien/Neuseeland enthalten. Verwenden Sie den geeigneten Adapter wie es die Abbildung zeigt.
Stellen Sie bitte sicher, dass der Adapter fest eingerastet ist und sich nicht abziehen lässt, bevor Sie ihn
in die Steckdose stecken.
Um die Gefahr von Bränden, Stromschlägen oder Schäden zu verringern:
Öffnen Sie weder das Produkt noch sein Netzteil. Es befinden sich keine vom Benutzer zu
wartenden Teile im Inneren.
Ausschließlich qualifiziertes Personal darf Reparaturen oder Wartungen durchführen.
Verwenden Sie niemals beschädigte Kabel.
Setzen Sie das Produkt nicht Wasser oder Feuchtigkeit aus.
Dieses Produkt ist nur für den Gebrauch in geschlossenen Räumen bestimmt.
Stellen Sie das Produkt nicht in der Nähe von direkten Wärmequellen auf. Stellen Sie es immer an
einem gut belüfteten Ort auf.
Stellen Sie keine schweren Gegenstände auf das Produkt oder die Kabel.
Bitte stellen Sie vor der Verwendung sicher, dass alle Adapter sicher und fest eingerastet sind
Anwendungshinweise für das Netzteil
Stecken Sie den entsprechenden Länderadapter folgendermaßen in das Netzteil:
Setzen Sie den Länderadapter so auf das Netzteil, dass die 2 Nasen am unteren Ende des Adapters in
die entsprechenden Aussparungen am Netzteil passen. Schieben Sie den Adapter dann nach unten, bis
er einrastet.
Zum Abnehmen drücken Sie auf den Knopf und schieben den Adapter nach oben.

Benutzerhandbuch Deutsch
Einführung
Wir freuen uns, dass Ihre Wahl auf ein LINDY-Produkt gefallen ist und danken Ihnen für Ihr Vertrauen. Sie
können sich jederzeit auf unsere Produkte und einen guten Service verlassen. Dieses Lindy USB 3.2 Gen
2x2 Dual M.2 NVMe SSD gehäuse mit Clone-Funktion unterliegt einer 2-Jahres LINDY Herstellergarantie
und lebenslangem kostenlosen, technischen Support. Bitte lesen Sie diese Anleitung sorgfältig und
bewahren Sie sie auf.
Dieses Lindy USB 3.2 Dual M.2 NVMe SSD Gehäuse ermöglicht die Verwendung von zwei PCIe/NVMe-
basierten M.2-SSD als mobiles, externes Laufwerk für PCs oder Notebooks. Die zusätzliche Clone-
Funktion ermöglicht das Duplizieren von M.2 NVMe SSDs - auch ohne Verbindung zu einem Computer
("Offline Cloning"). Es unterstützt USB 3.2 Gen 2x2 SuperSpeed-Datenraten bis 20Gbit/s. "USB Attached
SCSI" (UASP) garantiert ebenfalls hohe Geschwindigkeiten für UASP-fähige Computer.
Lieferumfang
USB 3.2 Dual M.2 NVMe SSD Gehäuse
0.25m USB 3.2 Gen 2x2 Kabel Typ C / C
Multi-Country Netzteil 12VDC 2A mit Länderadaptern (EU, UK; US, AUS)
2x Wärmeleitpad
2x Wärmeleitblech
4x M.2 Gummihalterung
Lindy Handbuch
Spezifikationen
Schnittstelle: USB auf 2x PCIe/NVMe M.2 SSD
Schnittstellen-Standard: USB 3.2 Gen 2x2, PCIe 3.0 x2
Unterstützte Bandbreite: 20Gbit/s, 32Gbit/s - each up to 16Gbit/s (PCI 3.0 x2)
Chipsatz: JMS586U
Kompatibilität: Computer mit USB-Anschluss Typ C
Spezielle Eigenschaften: Unterstützt 42/60/80mm SSDs, UASP & TRIM, LED-Anzeige für den
Clone-Prozess
Eingänge: 1 x USB Typ C (Buchse)
Ausgänge: 2 x PCIe-basierte M.2 (Buchse), M Key and B+M Key
Stromversorgung / Netzteil: 5.5/2.5mm DC-Buchse
Gehäuseabmessungen BxTxH: 143x77x17.5mm (5.63x3.03x0.69in)
Kabellänge: 0.25m (0.82ft)
Gehäusematerial: Aluminium und ABS
Nettogewicht Gerät/e: 0.174kg (0.38lb)
Betriebstemperatur: 5°C - 35°C (41°F - 95°F)
Lagertemperatur: 10°C - 90°C (-14°F - 122°F)
Feuchtigkeit: 10 - 90% RH (nicht-kondensierend)

Benutzerhandbuch Deutsch
Übersicht
A: Taste zum Offline-Clonen
B: Port zum Anschluss an den Computer: USB 3.2 Gen 2x2 20Gbit/s Typ C Buchse
C: Anschluss für ein Netzteil: 12V DC 5.5x2.5mm
D: LED-Anzeigen für Stromversorgung, M.2 NVMe SSD und den Fortschritt beim Offline-Clonen
E: Schiebeschalter zum Ver- und Entriegeln
Installation & Betrieb
Bitte befolgen Sie die nachstehenden Schritte zu Installation:
Entriegeln Sie die Sicherung E, indem Sie den Schalter nach rechts schieben.

Benutzerhandbuch Deutsch
Drücken Sie auf den inneren Kunststoffrahmen auf der anderen Seite des Gehäuses, bis er herausspringt:
Setzen Sie die M.2-NVMe-SSD(s) in das Produkt ein, drücken Sie die M.2-SSD(s) vorsichtig nach unten
und fixieren Sie sie mit der Gummihalterung.
Kleben Sie das Wärmeleitpad auf die SSD und anschließend das Wärmeleitblech darauf (bitte entfernen
Sie zuerst jeweils die Folien auf beiden Seiten). Schieben Sie abschließend den Kunststoffrahmen wieder
in das Aluminiumgehäuse und verriegeln Sie die Sicherung E, indem Sie den Schalter nach links schieben.

Benutzerhandbuch Deutsch
Bitte beachten Sie:
Wenn Sie SSDs clonen möchten, schließen Sie das USB 3.2 Dual M.2 NVMe SSD-Gehäuse nicht an
Ihren Computer an.
Offline-Clone-Betrieb
Installieren Sie zwei M.2-NVMe-SSDs* (die Speicherkapazität von Laufwerk B (Ziellaufwerk) sollte
größer oder gleich der von Laufwerk A (Quelllaufwerk) sein) und schließen Sie dann das Netzteil an
das Gehäuse an.
Halten Sie die Clone-Taste A ca. 3 Sekunden lang gedrückt, bis alle 4 blauen LEDs aufleuchten;
lassen Sie dann die Taste los und drücken Sie sie schnell erneut, das Offline-Clonen beginnt.
4 Fortschrittsanzeigen leuchten blau, wenn der Offline-Clone-Vorgang läuft; 25% > 50% > 75% >
100% blinken nacheinander; alle 4 Anzeigen leuchten, wenn der Offline-Clone-Vorgang
abgeschlossen ist.
Lese- und Schreibzugriff auf SSDs* (kein Clonen)
Bitte schließen Sie das mitgelieferte Netzteil und das USB-Typ-C-Kabel an das USB 3.2 Dual M.2 NVMe
SSD-Gehäuse an. Das Betriebssystem installiert automatisch die notwendigen Treiber und das Gehäuse
ist nun einsatzbereit.
Das Lesen und Schreiben auf zwei SSDs gleichzeitig wird unterstützt.
Bevor Sie das USB 3.2 Dual M.2 NVMe SSD-Gehäuse abtrennen, stellen Sie sicher, dass die
Datenübertragungsprozesse abgeschlossen sind, um Datenverluste zu vermeiden.
LED-Anzeigen (von oben nach unten)
Stromanzeige: leuchtet grün, wenn der Strom eingeschaltet ist.
M.2 NVMe SSD-Anzeigen: Leuchtet gelb, wenn eine M.2 NVMe-SSD eingelegt ist, blinkt beim
Lesen und Schreiben; die Anzeige ist im Ruhezustand ausgeschaltet.
Offline-Clone-Fortschrittsanzeigen:
Leuchten blau auf, wenn der Offline-Klonvorgang läuft: 25% > 50% > 75% > 100%
blinken abwechselnd; alle 4 Anzeigen leuchten auf, wenn der Klonvorgang beendet
ist;
Die LED von Laufwerk A blinkt, um einen Fehler zu melden, wenn beim Offline-Clonen
die Speicherkapazität des Ziellaufwerks (Laufwerk B) geringer ist als die des
Quelllaufwerks (Laufwerk A).
*
Wenn Sie eine neue M.2 SSD verwenden, muss diese zunächst initialisiert, formatiert und partitioniert
werden.

Manuel Utilisateur Français
Consignes de sécurité
! ATTENTION !
Merci de lire attentivement ces instructions de sécurité et de les conserver avec le
produit.
Le non-respect de ces précautions peut causer un choc électrique entrainant des
blessures graves, voire mortelles, un incendie ou des dommages au produit.
Toucher les composants internes ou un câble endommagé peut provoquer un choc
électrique pouvant entraîner la mort.
Cet appareil est une alimentation à découpage et peut fonctionner avec des tensions d'alimentation de
100...240 VAC Pour une utilisation dans le monde entier, quatre adaptateurs secteur différents sont
inclus : Type Euro, type UK, type US/Japon et type Australie/Nouvelle-Zélande. Utilisez l'adaptateur
secteur approprié comme indiqué sur la photo et assurez-vous qu'il est solidement fixé en place et qu'il
ne se détache pas en tirant avant de l'installer dans une prise électrique.
Pour éviter les risques d'incendie, de choc électrique ou de dommages:
N'ouvrez pas l'appareil ni son alimentation électrique. Il n'y a pas de pièces réparables par
l'utilisateur à l'intérieur.
Seul un personnel d'entretien qualifié est autorisé à effectuer toute réparation ou entretien.
Ne jamais utiliser de câble endommagé.
Ne pas mouiller le produit et ne pas l'exposer à l'humidité.
N'utilisez pas ce produit à l'extérieur, il est destiné à un usage intérieur uniquement.
Ne pas placer le produit à proximité de sources de chaleur. Toujours le placer dans un endroit
suffisamment ventilé.
Ne pas déposer de charge lourde sur le produit ou sur les câbles.
Veuillez vous assurer que l'adaptateur utilisé est fermement fixé et verrouillé en place avant de
l'insérer dans une prise murale.
Instructions d’utilisation de l’alimentation
Fixez l'adaptateur secteur requis sur la fiche :
Placez l'adaptateur secteur sur le bloc d'alimentation de sorte que les deux ergots situés à l'extrémité
inférieure de l'adaptateur s'insèrent dans les logements correspondants du bloc d'alimentation.
Faites ensuite glisser l'adaptateur vers le bas jusqu'à ce qu'il se verrouille.
Pour le retirer, appuyez sur le bouton et faites glisser l'adaptateur vers le haut.

Manuel Utilisateur Français
Introduction
Nous sommes heureux que votre choix se soit porté sur un produit LINDY et vous remercions de votre
confiance. Vous pouvez compter à tout moment sur la qualité de nos produits et de notre service. Ce
boitier USB 3.2 Gen 2x2 Dual SSD M.2 NVMe est soumis à une durée de garantie LINDY de 2 ans et
d’une assistance technique gratuite à vie. Merci de lire attentivement ces instructions et de les conserver
pour future référence.
Le boîtier SSD USB 3.2 Gen 2x2 Dual M.2 NVMe de Lindy permet à l'utilisateur d'installer deux SSD M.2
PCIe/NVMe en tant que disque externe sur des hôtes USB tels que des ordinateurs portables ou des PC.
Sa fonction de clonage permet de dupliquer les SSD M.2 NVMe, même sans connexion à un ordinateur
("clonage hors ligne"). La prise en charge de la norme USB 3.2 Gen 2x2 garantit des taux de transfert de
données SuperSpeed allant jusqu’à 20Gbit/s. La prise en charge UASP garantit également des vitesses
plus rapides pour les ordinateurs compatibles UASP.
Contenu de l’emballage
Boitier USB 3.2 Gen 2x2 Dual SSD M.2 NVMe
Câble USB 3.2 Gen 2x2 Type C vers C, 0.25m
Alimentation multi-pays 12VDC 2A avec adaptateurs secteur (EU, UK, US, AUS)
2x pad thermique
2x plaque conductrice thermique
4x patin caoutchouc M.2
Manuel Lindy
Spécifications
Interface : USB vers 2x SSD PCIe/NVMe M.2
Norme Interface : USB 3.2 Gen 2x2, PCIe 3.0 x2
Bande passante prise en charge : 20Gbit/s (USB), 32Gbit/s – 2 x 16Gbit/s (PCI 3.0 x2)
Chipset : JMS586U
Compatibilité : ordinateurs équipés en USB Type C
Caractéristiques spécifiques : pour SSD 42/60/80mm, UASP & TRIM, indicateur LED pour le clonage
Entrée : 1 x USB Type C (femelle)
Sorties : 2 x PCIe M.2 (femelle), clé M et B+M
Alimentation : prise DC 5.5/2.5mm
Dimensions du produit LxlxH : 143x77x17.5mm (5.63x3.03x0.69in)
Matériau du boitier : Aluminium et ABS
Poids net : 0.174kg (0.38lb)
Température de fonctionnement : 5°C - 35°C (41°F - 95°F)
Température de stockage : -10°C - 90°C (-14°F - 122°F)
Humidité relative : 10 - 90% RH (sans condensation)

Manuel Utilisateur Français
Vue d’ensemble
A : Bouton de clonage hors-ligne
B : Port Upstream : USB 3.2 Gen 2x2 20Gbit/s Type C femelle
C : Port d’alimentation : 12V DC 5.5x2.5mm
D : Indicateurs LED pour l’alimentation, SSD M.2 NVMe et progression du clonage hors ligne
E : Verrou : verrouillage/déverrouillage
Installation & Utilisation
Merci de suivre les étapes ci-dessous pour l’installation :
Déverrouillez le verrou E en glissant le loquet sur la droite.

Manuel Utilisateur Français
Appuyez une fois sur le cadre intérieur en plastique de l'autre côté du boîtier jusqu'à ce qu'il se détache :
Insérez le/les SSD M.2 NVMe dans le produit, appuyez doucement sur le SSD M.2 et enclenchez-le
dans le bouchon en caoutchouc.
Collez le tampon conducteur thermique sur le SSD et enfin la plaque conductrice thermique sur le dessus
(veuillez d'abord enlever les couches de surface des deux côtés). Enfin, repoussez le cadre en plastique
dans le boîtier en aluminium et verrouillez le verrou de sécurité E en faisant glisser le verrou vers la
gauche.
Veuillez noter : Si vous souhaitez cloner des SSD, ne connectez pas le boîtier SSD USB 3.2 Dual M.2
NVMe à votre ordinateur.
Clonage hors ligne
Installez deux SSD NVMe M.2*, la capacité de stockage du disque B (disque cible) doit être
supérieure ou égale à celle du disque A (disque source), puis connectez l'alimentation au boîtier.
Appuyez sur le bouton de clonage A et maintenez-le enfoncé pendant environ 3 secondes jusqu'à
ce que les 4 LED bleues s'allument, puis relâchez le bouton et appuyez de nouveau rapidement
dessus, le clonage hors ligne commence.
4 indicateurs de progression s'allument en bleu lorsque le clonage hors ligne est en cours, 25% >
50% > 75% > 100% clignotent à tour de rôle, les 4 indicateurs s'allument lorsque le clonage hors ligne
est terminé.

Manuel Utilisateur Français
Accès en lecture et écriture des SSD* (sans clonage)
Veuillez connecter le bloc d'alimentation fourni et le câble USB Type C au boîtier SSD NVMe USB 3.2
Dual M.2. Le système d'exploitation installe automatiquement les pilotes si nécessaires et le boîtier est
maintenant prêt à être utilisé.
La lecture et l'écriture simultanées sur deux disques SSD sont prises en charge.
Avant de débrancher le boîtier SSD NVMe USB 3.2 Dual M.2, assurez-vous que les processus de transfert
de données sont terminés pour éviter toute perte de données.
Indicateurs LED (de haut en bas)
Indicateur d’alimentation : s’éclaire en vert lorsque le boitier est alimenté.
Indicateurs SSD M.2 NVMe : s’éclaire en jaune lorsque le SSD M.2 NVMe est en place, clignote
lors d’opérations de lecture et d’écriture, l’indicateur est éteint en mode veille.
Indicateurs de progression du clonage hors ligne :
S'éclaire en bleu quand le clonage hors ligne est en cours : 25% > 50% > 75% >
100% clignotent en utilisation, les 4 indicateurs s’allument lorsque le processus de
clonage est finalisé.
Le voyant du disque A clignote pendant le clonage hors ligne, pour signaler une erreur
si la capacité de stockage du disque cible (disque B) est inférieure à celle du disque
source (disque A).
*
Si vous utilisez un nouveau SSD M.2, vous devez d'abord l'initialiser, le formater et le partitionner.

Manuale Italiano
Istruzioni di sicurezza
! ATTENZIONE !
Per favore leggete la seguente informativa e conservate sempre questo documento con
il prodotto.
La mancata osservanza di queste precauzione può causare seri infortuni o la morte per
folgorazione, incendi o danneggiare il prodotto.
Toccare i componenti interni o un cavo danneggiato può causare uno shock elettrico che può condurre
alla morte.
Questo dispositivo ha un alimentatore a commutazione che può funzionare con tensioni di alimentazione
all’interno del range 100…240 VAC. La fornitura comprende quattro adattatori AC per prese di tutto il
mondo: Euro, UK, US/Giappone e Australia/Nuova Zelanda. Utilizzate l’adattatore AC appropriato e
montatelo come mostrato nell’immagine, assicurandovi che sia fissato correttamente e che non si
stacchi estraendolo dalla presa.
Per ridurre il rischio di incendi, folgorazione o danni:
Non aprite il prodotto o l’alimentatore. Non esistono componenti utilizzabili all'interno.
La riparazione o manutenzione del prodotto può essere effettuata solo da personale qualificato.
Non utilizzare mai cavi danneggiati.
Non fate entrare il prodotto in contatto con acqua e non utilizzatelo in luoghi umidi.
Questo prodotto è pensato esclusivamente per l’uso in ambienti interni.
Non posizionate il prodotto nelle vicinanze di sorgenti di calore. Installatelo sempre in luoghi ben
ventilati.
Non appoggiate oggetti pesanti sul prodotto o sui cavi.
Vi preghiamo di assicurarvi che ogni adattatore sia fermamente inserito e bloccato in sede prima di
collegarlo a una presa di corrente.
Istruzioni per l’uso dell’alimentatore
Collegare l'adattatore nazionale richiesto alla spina:
Posizionare l'adattatore nazionale sull'alimentatore in modo che le 2 alette sull'estremità inferiore
dell'adattatore si inseriscano nei corrispondenti incavi dell'alimentatore. Quindi far scorrere l'adattatore
verso il basso finché non scatta in posizione.
Per rimuoverlo, premere il pulsante e far scorrere l'adattatore verso l'alto.

Manuale Italiano
Introduzione
Vi ringraziamo per aver Box SSD USB 3.2 Gen 2x2 Dual M.2 NVMe con funzione di clonazione. Questo
prodotto è stato progettato per garantirvi la massima affidabilità e semplicità di utilizzo ed è coperto da 2
anni di garanzia LINDY oltre che da un servizio di supporto tecnico a vita. Per assicurarvi di farne un uso
corretto vi invitiamo a leggere attentamente questo manuale e a conservarlo per future consultazioni.
Il Box SSD USB 3.2 Gen 2x2 Dual M.2 NVMe consente all'utente di installare due SSD M.2 basate su
PCIe/NVMe come unità esterna su host USB come laptop o PC. La funzione aggiuntiva Clone consente
di duplicare le unità SSD M.2 NVMe anche senza collegamento a un computer ("clonazione offline"). Il
supporto dello standard USB 3.2 Gen 2x2 garantisce velocità di trasferimento dati SuperSpeed 20Gbps.
Il supporto UASP garantisce inoltre velocità più elevate per i computer abilitati UASP
Contenuto della confezione
Box SSD USB 3.2 Gen 2x2 Dual M.2 NVMe
Cavo USB 3.2 Gen 2x2 Tipo C / C da 0,25
Alimentazione multi-country 12V DC 2A con adattatori nazionali (EU, UK; US, AUS)
2x pad termo-conduttivi
2x piastre termo-conduttive
4x M.2 fermo in gomma
Manuale
Caratteristiche
Interfacce: USB to 2x PCIe/NVMe M.2 SSD
Interfacce Standard: USB 3.2 Gen 2x2, PCIe 3.0 x2
Larghezza di banda supportata: 20Gbps (USB), 32Gbps – ognuno fino a 16Gbps (PCI 3.0 x2)
Chipset: JMS586U
Compatibilità: Computer dotati di USB Tipo C
Caratteristiche speciali: supporta SSD da 42/60/80mm, UASP e TRIM, indicatore LED per il
processo di clonazione
Ingressi: 1 x USB Tipo C (Femmina)
Uscite: 2 x M.2 (femmina) basati su PCIe, chiave M e chiave B+M
Alimentazione: Presa DC da 5,5/2,5 mm
Dimensioni Prodotto LxAxP: 143x77x17.5mm (5.63x3.03x0.69in)
Materiale: Alluminio e ABS
Peso Netto: 0.174kg (0.38lb)
Temperatura Operativa: 5°C - 35°C (41°F - 95°F)
Temperatura di stoccaggio: -10°C - 90°C (-14°F - 122°F)
Umidità: 10 - 90% RH (senza condensa)

Manuale Italiano
Panoramica
A: Pulsante per Clonazione Offline
B: Porta upstream: USB 3.2 Gen 2x2 20Gbps Tipo C femmina
C: Porta Alimentazione: 12V DC 5.5x2.5mm
D: Indicatori LED per alimentazione, SSD M.2 NVMe e avanzamento della clonazione offline
E: Secure-Lock: Blocco e sblocco
Installazione
Per l'installazione seguire i passaggi indicati di seguito:
Spostare il blocco di sicurezza E facendo scorrere l'interruttore verso destra.

Manuale Italiano
Premere una volta sul telaio interno in plastica sul lato opposto dell'alloggiamento fino a quando non viene
estratto:
Inserire l'unità SSD M.2 NVMe nel prodotto, premere delicatamente l'unità SSD M.2 e farla scattare nel
tappo di gomma..
Applicare il pad termoconduttivo sull'SSD e infine la piastra termoconduttiva sulla parte superiore
(rimuovere prima gli strati superficiali su entrambi i lati). Infine, spingere il telaio in plastica
nell'alloggiamento in alluminio e spostare il blocco di sicurezza E facendo scorrere l'interruttore a sinistra.
Nota: se si desidera clonare le unità SSD, non collegare il box SSD USB 3.2 Dual M.2 NVMe al computer
Clonazione Offline
Installare due unità SSD M.2 NVMe* (la capacità di archiviazione del disco B (disco di destinazione)
deve essere maggiore o uguale a quella del disco A (disco di origine), quindi collegare l'alimentatore
al contenitore).
Tenere premuto il pulsante di clonazione A per circa 3 secondi finché non si accendono tutti e 4 i
LED blu, quindi rilasciare il pulsante e premerlo di nuovo rapidamente: inizia la clonazione offline.
4 indicatori di avanzamento si accendono in blu quando è in corso la clonazione offline, 25% > 50%
> 75% > 100% lampeggiano a turno, tutti e 4 gli indicatori si accendono quando la clonazione è
terminata.
Seite wird geladen ...
Seite wird geladen ...
Seite wird geladen ...
Seite wird geladen ...
Seite wird geladen ...
Seite wird geladen ...
Seite wird geladen ...
Seite wird geladen ...
Seite wird geladen ...
-
 1
1
-
 2
2
-
 3
3
-
 4
4
-
 5
5
-
 6
6
-
 7
7
-
 8
8
-
 9
9
-
 10
10
-
 11
11
-
 12
12
-
 13
13
-
 14
14
-
 15
15
-
 16
16
-
 17
17
-
 18
18
-
 19
19
-
 20
20
-
 21
21
-
 22
22
-
 23
23
-
 24
24
-
 25
25
-
 26
26
-
 27
27
-
 28
28
-
 29
29


Lindy USB 3.2 Gen 2x2 Dual M.2 NVMe SSD Enclosure Benutzerhandbuch
- Typ
- Benutzerhandbuch
in anderen Sprachen
Verwandte Artikel
Andere Dokumente
-
LINDAY 3.0 USB micro SATA Enclosure Benutzerhandbuch
-
ICY BOX IB-2914MSCL-C31 Bedienungsanleitung
-
Renkforce 1x HDD copy station SATA Bedienungsanleitung
-
Dell OptiPlex 7490 All-In-One Bedienungsanleitung
-
Dell OptiPlex 7090 Bedienungsanleitung
-
Dell OptiPlex 5090 Bedienungsanleitung
-
DeLOCK 63331 Datenblatt
-
DeLOCK 42635 Datenblatt
-
MSI MEG Z590 UNIFY Bedienungsanleitung
-
ENERMAX ESC001 Benutzerhandbuch