Alesis Crimson II SE Mesh Kit Benutzerhandbuch
- Kategorie
- Digitale Klaviere
- Typ
- Benutzerhandbuch


2

3
User Guide (English)
Introduction
Box Contents
Crimson II Drum Module User Guide
Power Adapter Safety & Warranty Manual
Support
For the latest information about this product (system requirements, compatibility information,
etc.) and product registration, visit alesis.com.
For additional product support, visit alesis.com/support.
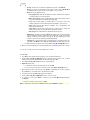
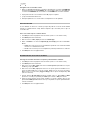
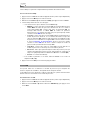
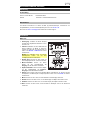
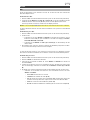
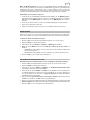
Features
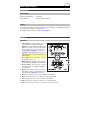
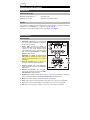
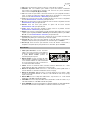
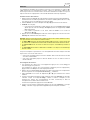
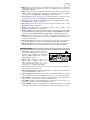
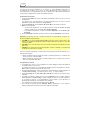
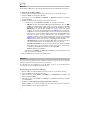
Top Panel
1. Power Input: Connect this input to a power
outlet using the included power adapter.
2. USB Port: Connect a USB flash drive to this
USB port to record songs to it, load samples
from it, save kits to it, or load kits from it.
See Operation > USB Drive to learn more.
Important: Your USB flash drive must use a
FAT32 file system to work properly with the
drum module.
3. Power Button: Press this button to power
the drum module on or off.
4. Master Volume: Turn this knob to adjust the
volume level of the outputs on the rear panel.
5. Phones Volume: Turn this knob to adjust
the volume level of the phones output on
the rear panel.
6. Display: This screen shows various menus
and options to help you configure and use the
drum module. See Operation to learn more.
7. Menu: Press this button to access the Kit Menu in the display.
8. Down: Press this button to move down one option in the display.
9. Up: Press this button to move up one option in the display.
10. Enter: Press this to confirm your selection or to enter a submenu.
11. Exit: Press this button to cancel your selection or to exit a submenu.
1
3
4
5
6
7
89
10 11
12
13 14 15 16
17
18
19
20
21
2

4
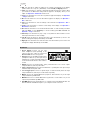
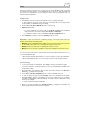
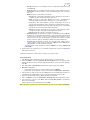
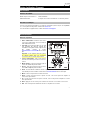
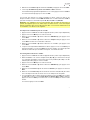
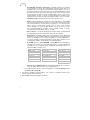
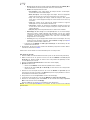
12. Dial: Turn this dial to adjust the setting of the currently selected item in the display
(number values, kits, songs, etc.). Alternatively, use the Left () and Right () buttons.
13. Click: Press this button to activate or deactivate the built-in metronome (“click”). When
you activate it, the Metronome settings will also appear in the display, which you can
adjust. See Operation > Metronome to learn more.
14. Song: Press this button to access the Song Selection page in the display. See Operation
> Songs to learn more.
15. Kit: Press this button to access the Kit Selection page in the display. See Operation >
Kits to learn more.
16. Save: Press this button to save the settings of the current kit. See Operation > Kits to
learn more.
17. Tempo: Press this button to view the current tempo in the display. See Operation >
Metronome to learn more.
18. Record: Press this button to record-arm the drum module. To start recording, hit a drum
pad, press Enter, or press Start/Stop. To cancel recording, press Exit or Record. See
Operation > Songs to learn more.
19. Start/Stop: Press this button to play or stop a song. When the drum module is record-
armed, press this button to start recording.
20. Left ()
: Press this button to decrease the value of the selected item (or move to the
previous setting) in the display. Alternatively, turn the dial.
21. Right (): Press this button to increase the value of the selected item (or move to the next
setting) in the display. Alternatively, turn the dial.
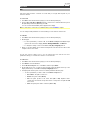
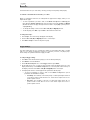
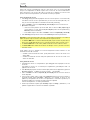
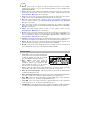
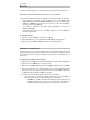
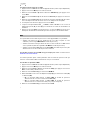
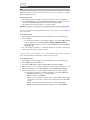
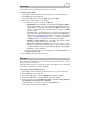
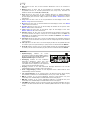
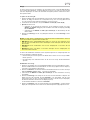
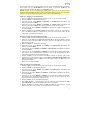
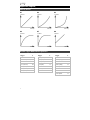
Rear Panel
1. Phones Output: Connect 1/8” (3.5 mm)
stereo headphones (sold separately) to this
output. Control the volume by turning the
Phones Volume knob on the top panel.
2. Aux Input: Connect an additional audio player
(smartphone, tablet, etc.) to this input using a
standard 1/8” (3.5 mm) stereo/TRS cable. The
sound will be mixed with the drum module’s
sounds.
3. Outputs: Connect your audio interface, mixer, powered monitors, etc. to these outputs
using standard 1/4” (6.35 mm) TRS cables.
4. Crash 2 Trigger Input: Connect the included Crash 2 cymbal pad to this input using a
standard 1/4” (6.35 mm) TRS cable.
5. Tom 4 Trigger Input: Connect an optional single- or dual-zone drum pad to this input
using a standard 1/4” (6.35 mm) TS or TRS cable, respectively.
6. MIDI In: Connect an external MIDI device (sequencer, drum machine, etc.) to this input
using a standard 5-pin MIDI cable.
7. MIDI Out: Connect an external MIDI device (synthesizer, sound module, etc.) to this
output using a standard 5-pin MIDI cable.
8. USB MIDI Port: Connect this USB port to a computer using a standard USB cable. The
drum module will send MIDI messages to your computer over this connection.
1
2
33
45
6
7
8

5
Operation
Kits
A kit in the drum module is a selection of sounds that you can play with the pads of your
electronic drum kit.
To select a kit:
1. Press Kit to enter the Kit Selection page (if you are not already viewing it).
2. Use the dial or Left () and Right () buttons to select a kit. To switch between the preset
kits (001–054) and user kits (055–074), press Kit.
You can use each kit immediately after it appears in the display.
Note: To learn how to select a kit on a USB flash drive, see the USB Drive chapter.
You can change certain parameters of each kit, letting you customize its overall sound.
To edit a kit:
1. Press Kit to enter the Kit Selection page (if you are not already viewing it).
2. On this page:
• To select a parameter you want to edit, use the Down and Up buttons: Kit (the large
option in the center of the display), Volume, EQ High, EQ Middle, and EQ Low.
• To change the setting or value, use the dial or Left () and Right () buttons.
3. When you are done editing, we recommend saving the kit. See the instructions later in this
chapter to learn how to do this.
In a kit, each sound is called a “voice.” You can change each voice and set some of its
parameters, letting you customize the collection of sounds in a kit.
To edit a voice:
1. Press Kit to enter the Kit Selection page (if you are not already viewing it).
2. Press Menu to enter the Kit Menu.
3. Use the Down and Up buttons to select Voice, and then press Enter.
4. Hit the pad whose voice you want to edit. The pad’s name will appear at the top of the
display. Alternatively, use the dial or Left () and Right () buttons.
5. The display will show the pad’s current voice and its parameters. On this page:
• To
select a parameter you want to edit, use the Down and Up buttons:
o Voice Name: The pad’s current voice.
o Volume: The pad’s volume (00–16).
o Pan: The pad’s position in the stereo field (-08 to +08). Negative values
correspond to the left side, and positive values correspond to the right side. 00
is the center.
o Pitch: The pad’s pitch offset in semitones (-08 to +08).

6
o Reverb: The amount of reverb effect applied to the pad’s sound (00–16).
o Decay: The amount of time it takes for the pad’s sound to decay (-05–00). 00 is
the default and the longest amount of time. -05 is a very short time.
o Mode: The pad’s playback mode:
Poly (polyphonic): Each hit will trigger the sample and allow the sample to
“overlap” itself if you hit it several times.
Mono (monophonic): Each hit will trigger the sample and instantly silence
any previous sample from the pad that is still playing.
Loop: Each hit will trigger the sample. When it reaches the end of the
sample, it will return to the beginning. Hit the pad again to stop the loop.
Stop: Hitting the pad will silence all samples, stop song playback, and
deactivate the metronome.
Tmp (tempo): Hit the pad several times at a regular rate to change the
tempo to match that rate. Each hit will also trigger the sample.
Clk (click): Each hit will activate or deactivate the metronome.
o Mute Group: The pad’s mute group (00–16). Normally, when you hit a pad while
another triggered sample is playing, the new sample will overlap the currently
playing one. When you hit a pad in a mute group, all other samples whose pads
are in the same mute group will stop playing immediately.
o Pad Song: The song that starts when you hit the pad. The song will stop when you
hit it again. If the Mode is set to Stop (described above), this feature will not work.
• To edit the parameter’s setting or value, use the dial or Left () and Right ()
buttons.
6. When you are done editing, we recommend saving the kit. See below to learn how to do this.
You can also save the current sounds and settings as a user kit.
To save a kit:
1. Press Kit to enter the Kit Selection page (if you are not already viewing it).
2. Use the dial or Left () and Right () buttons to select the kit you want to save. To switch
between the preset kits (001–054) and user kits (055–074), press Kit.
3. Press Save. Rename Kit will appear at the top of the display.
4. Optional: On this page:
• To change the currently selected character, turn the dial.
• To move to the next or previous character, press the Left () or Right () buttons.
5. After entering the name of the new kit, press Down to select Save (to continue saving the
kit) or Cancel (to cancel and return to the Kit Selection page.
6. The desired user kit and Save? will appear in the display.
7. Use the dial or Left () and Right () buttons to select a user kit.
8. To confirm your choice, press Enter to confirm your choice. Sa
ve OK! will appear briefly in
the display.
To cancel the operation at any point, press Exit.
Note: To learn how to save a kit to a USB flash drive, see the USB Drive chapter.

7
Songs
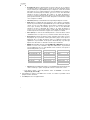
There are 120 preset songs that you can play along to. Songs 001–060 include a full band
accompaniment to play along to, Songs 061–070 are percussion loops, and Songs 071–120
are “one-shot” accompaniments. You can adjust the volume of the accompaniment and your
electronic drum kit separately.
To play a song:
1. Press Song to enter the Song Selection page (if you are not already viewing it).
To switch between the preset songs and user songs (001–120 and 121–125) and the
songs available on a USB flash drive, press Song.
2. Use the dial or Left () and Right () buttons to select a song.
3. Optional: On this page:
• To select a parameter you want to edit, use the Down and Up buttons: Song (the
large option in the center of the display), Accomp Vol, and Drum Vol.
• To change the setting or value, use the dial or Left () and Right () buttons.
4. Press Start/Stop to play the song. Press Start/Stop again to stop it.
Important: In order to play audio files or MIDI files properly on the drum module, make sure
the files are formatted in the following way:
• MIDI files must be Standard MIDI Files (SMF), Type 0. The track number must be less than
16, the PPQN must be 480 or less, and the file size must be 128 kb or less.
• WAV files must be 16-bit and use a sampling rate of 48 kHz or lower.
• MP3 files must use a bit rate of 320 kbps or lower and a sampling rate of 48 kHz or lower.
You can record your performances and save them to the drum module’s built-in memory or to
a connected USB flash drive.
• When using the module’s internal memory, you can record up to 5 user songs as MIDI files.
• When using a USB flash drive, you can record up to 99 user songs as MP3 audio files.
To record a song:
1. To record a song with accompaniment, press Song to enter the Song Selection page.
To record a song with your drum performance only (no accompaniment), press Kit to enter
the Kit Selection page.
2. Press Record to record-arm the drum module. The button will flash, and Record to
Usersong___? will appear in the display.
3. Use the dial or Left () and Right () buttons to select an available user song.
4. To start recording, hit a pad or press Start/Stop. A pre-count will appear in the display.
When Recording… appears in the display, the song is recording (if you are recording a
song with accompaniment, it will begin playing). The length of the recording will be shown
at the top of the display.
To cancel recording instead, press Record.
5. When you are done recording, press Start/Stop. Saving… will appear in the display. The
previous page will return when saving is completed.

8
Metronome
The built-in metronome (or “click track”) can help you keep a steady tempo while playing.
To activate or deactivate the metronome, press Click.
When you activate the metronome, its settings will also appear in the display, which you can
adjust. On this page:
• To select a parameter you want to edit, use the Down and Up buttons: Time Sig (the
time signature), Volume, Interval (how often the metronome clicks), Sound, and Output
(whether the metronome plays through all of the module’s outputs [All] or just the phones
output [Phones]).
• To change the setting or value, use the dial or Left () and Right () buttons.
• To exit the page, press Exit, or press Click to deactivate the metronome.
To change the tempo:
1. Press Tempo. The current tempo will appear in the display.
2. Use the dial or Left () and Right () buttons to set the tempo.
3. Press Exit or Tempo to return to the previous page.
Trigger Settings
The drum module also lets you customize the settings of each trigger (drum pad or cymbal
pad). You can change its parameters, letting you customize your kit to your playing style.
These settings are “global” and therefore apply to all kits.
To edit your trigger setting:
1. Press Kit to enter the Kit Selection page (if you are not already viewing it).
2. Press Menu to enter the Kit Menu.
3. Use the Down and Up buttons to select Trigger, and then press Enter.
4. Hit the pad whose voice you want to edit. The pad’s name will appear at the top of the
display. Alternatively, use the Down and Up buttons to select the pad’s name at the top of
the display, and then use the dial or Left () and Right () buttons to change it.
5. The display will show the current trigger and its parameters. On this page:
• To select a parameter you want to edit, use the Down and Up buttons (not all
parameters are available for all pads):
o Sensitivity: The sensitivity of the head (center) of a drum pad. Higher values let
you produce louder sounds with less force. Lower values require more force to
produce quieter sounds.
o Rim Sens: The sensitivity of the rim of a drum pad. Higher values let you
produce louder sounds with less force. Lower values require more force to
produce quieter sounds.

9
o Head-Rim Adj: The amount of crosstalk reduction between the head (center)
and rim of a drum pad. Higher values reduce the probability that the pad’s rim
sound will be triggered when you play its head only and vice versa (due to the
force being transferred through the pad). Don’t set this value too high, though! If
this value is too high, you may not be able to trigger its sound if you intentionally
play both the head and rim at the same time; it may be silenced because the
module incorrectly interprets the hit as crosstalk.
o Threshold: The amount of force required to trigger the sound.
o Xtalk: The amount of crosstalk reduction. Higher values reduce the probability
that the pad’s sound will be triggered when you play another pad (due to the
force being transferred through a rack, through the floor, etc.). Don’t set this
value too high, though! If this value is too high, you may not be able to trigger its
sound if you play another pad at the same time; it may be silenced because the
module incorrectly interprets the hit as crosstalk.
o Curve: The velocity curve of the pad. This controls the relationship between the
amount of playing force and the volume level of the pad’s sound.
o Retrig Cancel: The required amount of time between successive hits of the pad
to produce the sound for both hits. If this setting is too high, some notes may
not trigger when you play faster or perform rolls. If this setting is too low, you
may trigger extra, undesired notes while playing normally.
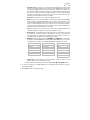
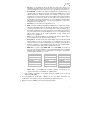
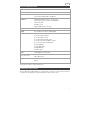
o MIDI Note: When the drum module’s USB MIDI port or MIDI Out is connected to
a computer or external MIDI device, the pad will send this MIDI note to it. If you are
not using those connections, this setting will not affect the trigger or its sound.
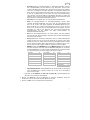
Kick Drum 36 Tom 3 (Center) 43 Crash 1 49
Snare Drum (Center) 38 Tom 3 (Rim) 75 Crash 1 (Edge) 49
Snare Rim 40 Tom 4 (Center) 41 Crash 2 57
Tom 1 (Center) 50 Tom 4 (Rim) 73 Crash 2 (Edge) 57
Tom 1 (Rim) 82 Ride Bow 51 Hi-Hat Open 8
Tom 2 (Center) 47 Ride Edge 59 Hi-Hat Closed 8
Tom 2 (Rim) 80 Ride Bell 53 Hi-Hat Pedal 22
Hi-Hat Splash 23
o Splash Sens: The sensitivity of the hi-hat pedal to create a “splash” sound
rather than the usual “closed pedal” sound.
• To edit the parameter’s setting or value, use the dial or Left () and Right () buttons.
6. To save your changes, press Save. Otherwise, your changes will be lost when you power
off the drum module.
7. Press Exit to return to the previous page.

10
Utility
The Utility menu lets you configure various settings for the module itself.
To use the Utility menu:
1. Press Kit to enter the Kit Selection page (if you are not already viewing it).
2. Press Menu to enter the Kit Menu.
3. Use the Down and Up buttons to select Utility, and then press Enter.
4. The display will show the Utility menu. On this page:
• To select an option, use the Down and Up buttons:
o GM Mode: When activated (On), MIDI messages sent into the drum module’s
MIDI In will trigger sounds from the General MIDI (GM) specification. When
deactivated (Off), MIDI messages sent into the drum module’s MIDI In will
trigger the module’s internal sounds (the ones played by each kit). See MIDI to
learn more about this.
o Local Ctrl: When activated (On), playing the pads connected to the drum
module will trigger the drum module’s internal sounds. When deactivated (Off),
playing the pads will send MIDI notes from the drum module to a connected
computer or MIDI device. See Trigger Settings to learn how to set the MIDI
notes. See MIDI to learn how to use the drum module to send MIDI.
o Lefty Mode: When activated (On), the pads connected to the drum module are
reversed to accommodate left-handed playing.
o Auto Power: This feature sets the drum module to power off automatically if it is
not used for a certain amount of time. You can set this to 30 minutes, 60
minutes, or turn it off (Off).
o Contrast: The display’s contrast.
• To edit the parameter’s setting or value, use the dial or Left () a
nd Right () buttons.
5. Press Exit to return to the previous page.
USB Drive
You can use the drum module with a USB flash drive to record songs to it, load samples from
it, save kits to it, or load kits from it.
Your USB flash drive can have a capacity of 4–64 GB, and it must use a FAT32 file system to
work properly with the drum module.
To format a connected USB flash drive:
1. Press Kit to enter the Kit Selection page (if you are not already viewing it).
2. Press Menu to enter the Kit Menu.
3. Use the Down and Up buttons to select USB Memory, and then press Enter.
4. Use the Down and Up buttons to select Format, and then press Enter.
5. The display will show The USB memory will be erased! Enter or Exit?
To format the drive (which will also erase its contents), press Enter.
To cancel formatting, press Exit.

11
You can also load your own samples to use as voices within a kit. Each sample must be a 16-
bit WAV file with a maximum size of 15 MB. It can have a sampling rate of 48, 44.1, 32, 22.05,
or 11.025 kHz.
Note: Samples that you have loaded to the drum module can only be deleted all at once. In
other words, if you have loaded multiple samples into a kit (or to multiple kits), you cannot
delete only one of your samples; you must delete all of them.
To load a sample from a USB flash drive:
1. Press Kit to enter the Kit Selection page (if you are not already viewing it).
2. Press Menu to enter the Kit Menu.
3. Use the Down and Up buttons to select USB Memory, and then press Enter.
4. Use the Down and Up buttons to select Sample Load, and then press Enter. A list of your
samples will appear in the display.
5. Use the Down and Up buttons to select a sample, and then press Enter.
6. When Load to User Voice? appears in the display, press Enter to load the sample or Exit
to cancel. You may need to wait a minute for the sample to load, depending on its size.
To save a kit to a USB flash drive:
1. Press Kit to enter the Kit Selection page (if you are not already viewing it).
2. Use the dial or Left () and Right () buttons to select the kit you want to save. To switch
between the preset kits (001–054) and user kits (055–074), press Kit.
3. Press Menu to enter the Kit Menu.
4. Use the Down and Up buttons to select USB Memory, and then press Enter.
5. Use the Down and Up buttons to select Kit Save, and then press Enter.
6. Use the Down and Up buttons to select a kit number (00–99). A number with no name
next to it indicates an empty kit. A number with a name next to it indicates a saved kit.
7. To save the kit to the selected number, press Enter. If the number already has a kit saved
to it, Data will be overwritten! Enter or Exit? will appear in the display. Press Enter to
overwrite the kit or Exit to return to the list of kits.
To cancel, press Exit.
To load a kit from a USB flash drive:
1. Press Kit to enter the Kit Selection page (if you are not already viewing it).
2. Press Menu to enter the Kit Menu.
3. Use the Down and Up buttons to select USB Memory, and then press Enter.
4. Us
e the Down and Up buttons to select Kit Load, and then press Enter.
5. Use the Down and Up buttons to select a kit number (00–99). A number with no name
next to it indicates an empty kit. A number with a name next to it indicates a saved kit.
6. To load the selected kit, press Enter.
7. When Load to User___? appears in the display, use the dial or Left () and Right ()
buttons to select the desired “destination” user kit number.
8. Press Enter to load the kit or Exit to cancel. You may need to wait a minute for the kit to
load, depending on its size.

12
MIDI
You can connect the drum module to another MIDI device, allowing you to do any of the following:
• use your Crimson II Kit to trigger sounds in software on your computer (connected to the
drum module’s USB MIDI port)
• use your Crimson II Kit to trigger sounds in an external MIDI sound module or synthesizer
(connected to the drum module’s MIDI Out)
• use another MIDI device (connected to the drum module’s MIDI In) to trigger sounds in
the Crimson II Drum Module
To change the MIDI note number sent by each pad, see Trigger Settings.
You may need to adjust some settings in the drum module to ensure all MIDI communication
can be properly sent or received.
To adjust the MIDI settings:
1. Press Kit to enter the Kit Selection page (if you are not already viewing it).
2. Press Menu to enter the Kit Menu.
3. Use the Down and Up buttons to select Utility, and then press Enter. The display will
show the Utility menu.
4. Use the Down and Up buttons to select GM Mode.
5. Use the dial or Left () and Right () buttons to select On or Off.
• On: MIDI messages sent into the drum module’s MIDI In will trigger sounds from the
General MIDI (GM) specification.
• Off: MIDI messages sent into the drum module’s MIDI In will trigger the module’s
internal sounds (the ones played by each kit).
6. Use the Down and Up button
s to select Local Ctrl.
7. Use the dial or Left () and Right () buttons to select On or Off.
• On: Playing the pads connected to the drum module will trigger the drum module’s
internal sounds.
• Off: Playing the pads will send MIDI notes from the drum module to a connected
computer (connected to the USB MIDI port) or MIDI device (connected to the MIDI
Out). See Trigger Settings to learn how to set the MIDI notes.
8. Press Exit to return to the Kit Menu. Press it once more to return to the Kit Selection page.
Accessing the module’s programs: You can use an external MIDI device (e.g., a MIDI
keyboard or sequencer) to access the drum module’s other sound libraries (“programs”), such
as piano, bass, strings, etc. Select a different program by sending a Program Change
message from your external device. Each program uses a dedicated MIDI channel (1–16).
Channel 10 is reserved for the drum sounds.

13
To record to an external sequencer:
1. Use a standard MIDI cable (sold separately) to connect the drum module’s MIDI Out to
your sequencer’s MIDI In. Use another MIDI cable to connect the sequencer’s MIDI Out to
your module’s MIDI In.
2. Set the active track of your sequencer to Channel 10, and start recording.
3. Play your electronic drum kit!
4. Stop recording on your sequencer. Your performance has been recorded.
Hi-Hat Selection
If you are using an Alesis Pro X Hi-Hat (instead of the RealHat hi-hat control pedal included with
your Crimson II Kit), you will need to configure the module type for that type of hi-hat control.
To select the type of hi-hat control:
1. Press Kit to enter the Kit Selection page (if you are not already viewing it).
2. Press Menu to enter the Kit Menu.
3. Use the Down and Up buttons to select HiHat Type.
4. Use the dial or Left () and Right () buttons to select On or Off.
• Pedal: Select this if you are using the RealHat hi-hat control pedal included with your
Crimson II Kit.
• Pro-X: Select this if you have upgraded to the Alesis Pro X Hi-Hat.
5. Press Exit to return to the previous page.
Factory Reset
To return the drum module to its original default settings:
1. Press Kit to enter the Kit Selection page (if you are not already viewing it).
2. Press Menu to enter the Kit Menu.
3. Use the Down and Up buttons to select Factory Reset, and then press Enter.
4. Use the Down and Up buttons to select which settings you want to return to the defaults:
Kit (only the user kits), Song (only the user songs), Voice (only the user voices), Trigger
Settings (all trigger settings), or All (all of the above).
5. When All data will be lost! Enter or Exit? appears in the display, press Enter to continue
or Exit to cancel.
6. Wait a minute while the module restores its default settings. After Reset OK! appears in
the display, the default settings are restored.
7. Press Exit to return to the previous page.

14
Guía del usuario (Español)
Introducción
Contenido de la caja
Módulo de batería Crimson II Guía del usuario
Adaptador de corriente Manual de seguridad y garantía
Soporte
Para obtener la información más reciente acerca de este producto (requisitos de sistema,
información de compatibilidad, etc.) y registrarlo, visite alesis.com.
Para obtener soporte adicional del producto, visite alesis.com/support.
Características
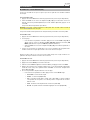
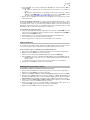
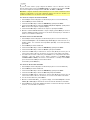
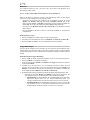
Panel superior
1. Entrada de corriente: Conecte esta entrada
a un tomacorriente utilizando el adaptador
de alimentación incluido.
2. Puerto USB: Conecte una unidad de
memoria USB este puerto USB para grabar
canciones en ella, cargar muestras desde
ella, guardar kits en ella o cargar kits desde
ella. Consulte Funcionamiento > Unidad
USB para aprender más.
Importante: Su unidad de memoria USB
debe utilizar un sistema de archivos FAT32
para funcionar correctamente con el módulo
de batería.
3. Botón de encendido: Pulse este botón para
encender o apagar el módulo de batería.
4. Volumen maestro: Gire esta perilla para
ajustar el nivel de volumen de las salidas del
panel trasero.
5. Volumen de auriculares: Gire esta perilla
para ajustar el nivel de volumen de la salida
para auriculares del panel trasero.
6. Pantalla: Esta pantalla muestra diversos menús y opciones para ayudarle a configurar y
utilizar el módulo de batería. Consulte Funcionamiento para aprender más.
7. Menú: Pulse este botón para acceder al menú Kit en la pantalla.
8. Abajo: Pulse este botón para desplazarse hacia abajo por las opciones en la pantalla.
9. Up: Pulse este botón para desplazarse hacia arriba por las opciones en la pantalla.
10. Intro: Pulse este botón para confirmar su selección o para entrar a un submenú.
1
3
4
5
6
7
89
10 11
12
13 14 15 16
17
18
19
20
21
2

15
11. Salir: Pulse este botón para cancelar su selección o para salir de un submenú.
12. Cuadrante: Gire este cuadrante para cambiar el ajuste del elemento actualmente
seleccionado en la pantalla (valores numéricos, kits, canciones, etc.). Como alternativa,
utilice los botones izquierda () y derecha ().
13. Clic: Pulse este botón para activar o desactivar el metrónomo (“clic”) integrado. Cuando lo
active, los ajustes de metrónomo también aparecerán en la pantalla, los cuales puede
ajustar. Consulte Funcionamiento > Metrónomo para aprender más.
14. Tema: Pulse este botón para acceder a la página de selección de canción en la pantalla.
Consulte Funcionamiento > Canciones para aprender más.
15. Kit: Pulse este botón para acceder a la página de selección de kit en la pantalla. Consulte
Funcionamiento > Kits para aprender más.
16. Guardar: Pulse este botón para guardar los ajustes del kit actual. Consulte
Funcionamiento > Kits para aprender más.
17. Tempo: Pulse este botón para visualizar el tempo actual en la pantalla. Consulte
Funcionamiento > Metrónomo para aprender más.
18. Grabar: Pulse este botón para preparar el módulo de batería para grabar. Para comenzar
a grabar, golpee un pad, pulse Enter o Start/Stop. Para finalizar la grabación, pulse Exit o
Record. Consulte Funcionamiento > Canciones para aprender más.
19. Iniciar/parar: Pulse este botón para iniciar o detener una canción. Cuando el módulo está
preparado para grabar, pulse este botón para comenzar a grabar.
20. Izquierda ():
Pulse este botón para disminuir el valor del elemento seleccionado (o
desplazarse al ajuste anterior) en la pantalla. Como alternativa, gire el cuadrante.
21. Derecha (): Pulse este botón para aumentar el valor del elemento seleccionado (o
desplazarse al siguiente ajuste) en la pantalla. Como alternativa, gire el cuadrante.
Panel trasero
1. Salida para auriculares: Conecte auriculares
estéreo de 3,5 mm (1/8 pulg.) a esta salida (se
venden por separado). Controle el volumen con
la perilla Phones Volume (volumen de
auriculares) del panel superior.
2. Entrada auxiliar: Conecte una fuente de audio
adicional (teléfono inteligente [smartphone], etc.)
a esta entrada mediante un cable estéreo/TRS
de 3,5 mm (1/8 pulg.). El sonido se mezclará con
los sonidos del módulo de batería.
3. Salidas: Conecte su interfaz de audio, mezclador, monitores alimentados, etc. a estas
salidas utilizando cables TRS estándar de 6,35 mm (1/4 pulg.).
4. Entrada de disparador Crash 2: Conecte a esta entrada el pad de platillo Crash 2
incluido utilizando un cable TRS estándar de 6,35 mm (1/4 pulg.).
5. Entrada de disparador Tom 4: Conecte un pad de tambor de zona simple o doble
opcional a esta entrada utilizando un cable TS o TRS estándar de 6,35 mm (1/4 pulg.)
según corresponda.
6. Entrada MIDI: Conecte un dispositivo MIDI externo, caja de ritmos, etc. a esta entrada
mediante un cable MIDI estándar de 5 patillas.
7. Salida MIDI: Conecte un dispositivo MIDI externo (sintetizador, módulo de sonidos, etc.) a
esta salida mediante un cable MIDI estándar de 5 patillas.
8. Puerto USB MIDI: Conecte este puerto USB a un ordenador utilizando un cable USB estándar.
El módulo de batería enviará mensajes MIDI a su ordenador a través de esta conexión.
1
2
33
45
6
7
8

16
Funcionamiento
Kits
Un kit del módulo de batería es una selección de sonidos que puede reproducir con los pads
de su batería electrónica.
Para seleccionar un kit:
1. Pulse Kit para entrar a la página de selección de kits (si aún no se encuentra en ella).
2. Utilice el cuadrante o los botones izquierda () y derecha () para seleccionar un kit.
Para alternar entre los kits preestablecidos (001–054) y los kits del usuario (055–074),
pulse Kit.
Puede utilizar cada que inmediatamente después que aparece en la pantalla.
Nota: Para aprender a seleccionar un kit en una unidad de memoria USB, consulte el capítulo
Unidad USB.
Puede modificar ciertos parámetros de cada kit, pudiendo personalizar el sonido general.
Cómo editar un kit:
1. Pulse Kit para entrar a la página de selección de kits (si aún no se encuentra en ella).
2. En esta página:
• Para seleccionar el parámetro que desea editar, utilice los botones subir y bajar: Kit
(la opción grande en el centro de la pantalla), Volume (volumen), EQ High
(ecualización alta), EQ Middle (ecualización media) y EQ Low (ecualización baja).
• Para cambiar el ajuste o valor, utilice el cuadrante o los botones izquierda () y
derecha ().
3. Cuando termine sus modificaciones, le recomendamos guardar el kit. Consulte las
instrucciones más adelante en este capítulo para aprender a hacer esto.
En un kit, cada sonido se denomina “voz”. Puede modificar cada voz y ajustar algunos de sus
parámetros, pudiendo personalizar la colección de sonidos en un kit.
Cómo editar una voz:
1. Pulse Kit para entrar a la página de selección de kits (si aún no se encuentra en ella).
2. Pulse Menu para entrar al menú Kit.
3. Utilice los botones subir y bajar para seleccionar Voice y luego pulse Enter.
4. Golpee el pad cuya voz desea editar. El nombre del pad aparecerá en la parte superior de
la pantalla. Como alternativa, utilice los botones izquierda () y derecha ().
5. La pantalla mostrará la voz actual del pad y sus parámetros. En esta página:
• Para seleccionar el parámetro que desea editar, utilice los botones subir y bajar:
o Nombre d
e la voz: La voz actual del pad.
o Volume (Volumen): El volumen actual del pad (00–16).
o Pan (Balance): La posición del pad en el campo estéreo (-08 a +08). Los valores
negativos corresponden al lado izquierdo y los valores positivos corresponden al
lado derecho. El 00 es el centro.
o Pitch: Desplazamiento del tono (o pitch) del pad en semitonos (-08 a +08).

17
o Reverb (Reverberación): La cantidad de efecto de reverberación aplicado al sonido
del pad (00–16).
o Decay (Decaimiento): La cantidad de tiempo que tarda el sonido del pad en decaer (-
05–00). El 00 es el valor por defecto y la mayor cantidad de tiempo. -05 es un tiempo
muy corto.
o Mode (Modo): El modo de reproducción del pad:
Poly (polifónico): Cada golpe disparará la muestra y permitirá que la muestra se
“superponga” sobre sí misma si lo golpea varias veces.
Mono (monofónico): Cada golpe disparar la muestra e instantáneamente
silenciará cualquier muestra anterior del pad que aún se esté reproduciendo.
Loop (Bucle): Cada golpe disparará la muestra. Cuando llegue al final de la
muestra, regresará al principio. Golpee el pad una vez más para detener el bucle.
Stop (Detener): Al golpear el pad se silenciarán todas las muestras, se detendrá la
reproducción de la canción y se desactivará el metrónomo.
Tmp (Tempo): Golpee el pad varias veces a un ritmo constante para que el tempo
coincida con ese ritmo. Cada golpe también disparará la muestra.
Clk (clic): Cada golpe activará o desactivará el metrónomo.
o Mute Group (Grupo de silenciamiento): El grupo de silenciamiento del pad (00–16).
Normalmente, cuando golpea un pad mientras se está reproduciendo otra muestra, la
nueva muestra se superpone con la que se está reproduciendo actualmente. Cuando
golpea un pad en un grupo de silenciamiento, todas las otras muestras cuyo pads
pertenecen al mismo grupo de silenciamiento dejarán de sonar inmediatamente.
o Pad Song (C
anción del pad): La canción que comienza cuando golpea el pad. La
canción se detiene cuando lo golpea nuevamente. Si Mode se ajusta a Stop (descrito
anteriormente), esta característica no funcionará.
• Para editar el ajuste o valor del parámetro, utilice el cuadrante o los botones izquierda ()
y derecha ().
6. Cuando termine sus modificaciones, le recomendamos guardar el kit. Consulte a continuación
para aprender a hacer esto.
También puede guardar los sonidos y ajustes actuales como un kit de usuario.
Cómo guardar un kit:
1. Pulse Kit para entrar a la página de selección de kits (si aún no se encuentra en ella).
2. Utilice el cuadrante o los botones izquierda () y derecha () para seleccionar el kit que desea
guardar. Para alternar entre los kits preestablecidos (001–054) y los kits del usuario (055–074),
pulse Kit.
3. Pulse Save. Aparecerá Rename Kit (renombrar kit) en la parte superior de la pantalla.
4. Opcional: En esta página:
• Para modificar el carácter seleccionado actualmente, gire el cuadrante.
• Para pasar al carácter siguiente o anterior, pulse los botones izquierda () o derecha ().
5. Tras introducir el nombre del nuevo kit, pulse abajo para selecciona
r Save (para continuar con
el guardado del kit) o Cancel (para cancelar y regresar a la página de selección de kit).
6. Aparecerá el kit de usuario deseado y Save? (¿Guardar?) en la pantalla.
7. Utilice el cuadrante o los botones izquierda () y derecha () para seleccionar un kit de usuario.
8. Para confirmar su selección, pulse Enter. Aparecerá Save OK! (¡Guardado exitosamente!)
brevemente en la pantalla.
Para cancelar la operación en cualquier punto, pulse Exit.
Nota: Para aprender a guardar un kit en una unidad de memoria USB, consulte el capítulo Unidad USB.

18
Canciones
Existen 120 canciones preestablecidas sobre las cuales puede tocar. Las canciones 001–060
incluyen un acompañamiento de banda completo sobre el cual tocar, las canciones 061–070 son
bucles de percusión y las canciones 071–120 son muestras que se disparan una sola vez. Puede
ajustar el volumen del acompañamiento y de su batería electrónica por separado.
Cómo reproducir una canción:
1. Pulse Song (canción) para entrar a la página de selección de canción (si aún no se encuentra en ella).
Para alternar entre las canciones preestablecidas y las canciones del usuario (001–120 y 121–
125) y las canciones disponibles en la unidad de memoria USB, pulse Song.
2. Utilice el cuadrante o los botones izquierda () y derecha () para seleccionar una canción.
3. Opcional: En esta página:
• Para seleccionar el parámetro que desea editar, utilice los botones subir y bajar: Song (la
opción grande en el centro de la pantalla), Accomp Vol (volumen del acompañamiento) y
Drum Vol (volumen de la batería).
• Para cambiar el ajuste o valor, utilice el cuadrante o los botones izquierda () y derecha ().
4. Pulse Start/Stop para reproducir la canción. Pulse Start/Stop nuevamente para detenerla.
Importante: A fin de reproducir archivos de audio o archivos MIDI correctamente en el módulo de
batería, asegúrese de que los archivos estén formateados de la siguiente manera:
• Los archivos MIDI deben ser archivos MIDI estándar (SMF), Tipo 0. El número de pista debe ser
inferior a 16, el PPQN debe ser 480 o menos y el tamaño del archivo debe ser 128 kb o menos.
• Los archivos WAV deben ser de 16 bits y utilizar una taza de muestreo de 48 kHz o inferior.
• Losarchivos MP3 deben utilizar una taza de bits de 320 kbps o inferior y una tasa de muestreo
de 48 kHz o inferior.
Puede grabar lo que toca y guardarlo en la memoria integrada del módulo de batería o en una
unidad de memoria USB conectada.
• Al utilizar la memoria interna del módulo, puede grabar hasta 5 canciones del usuario como
archivos MIDI.
• Al utilizar una unidad de memoria USB, puede grabar hasta 99 canciones de usuario como
archivos de audio MP3.
Cómo grabar una canción:
1. Para grabar una canción con acompañamiento, pulse Song para entrar a la página de selección
de canción.
Para grabar una canción solo con batería (sin acompañamiento), pulse Kit para entrar a la
página de selección de kit.
2. Pulse Record para preparar el módulo de batería para grabar. El botón parpadeará y aparecerá
Record to Usersong___? (¿Grabar en canción de usuario___?)en la pantalla.
3. Utilice el cuadrante o los botones izquierda () y derecha () para seleccionar una canción de
usuario disponible.
4. Para comenzar a grabar, golpee un pad o pulse Start/Stop. Aparecerá una cuenta regresiva en
la pantalla. Cuando aparece Recording
… (Grabando...) en la pantalla, la canción se está
grabando (si está grabando una canción con acompañamiento, comenzará a reproducirse). La
longitud de la grabación se mostrará en la parte superior de la pantalla.
Para cancelar la grabación, en cambio, pulse Record.
5. Cuando haya terminado de grabar, pulse Start/Stop. Aparecerá Saving… (Guardando...) en la
pantalla. La página anterior volverá una vez finalizado el guardado.

19
Metrónomo
El metrónomo incorporado (o “pista de clics”) puede ayudarle a mantener un tempo parejo al tocar.
Para activar o desactivar el metrónomo, pulse Click.
Cuando activa el metrónomo, sus ajustes también aparecerán en la pantalla, los cuales puede
ajustar. En esta página:
• Para seleccionar el parámetro que desea editar, utilice los botones subir y bajar: Time
Sig (firma de tiempo), Volume, Interval (qué tan seguido hace clic el metrónomo), Sound
(Sonido) y Output (si el metrónomo reproduce a través de todas las salidas del módulo
[All] consola la salida para auriculares [Phones]).
• Para cambiar el ajuste o valor, utilice el cuadrante o los botones izquierda () y derecha ().
• Para salir de la página, pulse Exit o pulse Clic para desactivar el metrónomo.
Para cambiar el tempo:
1. Pulse Tempo. El tempo actual aparecerá en la pantalla.
2. Utilice el cuadrante o los botones izquierda () y derecha () para definir el tempo.
3. Pulse Exit o Tempo para regresar a la página anterior.
Ajustes del disparador
El módulo de batería también le permite personalizar los ajustes de cada disparador (pad de
tambor o pad de platillo). Puede cambiar sus parámetros, permitiéndole personalizar su kit
según su forma de tocar. Estos ajustes son “globales” y por lo tanto aplican a todos los kits.
Cómo editar los ajustes de su disparador:
1. Pulse Kit para entrar a la página de selección de kits (si aún no se encuentra en ella).
2. Pulse Menu para entrar al menú Kit.
3. Utilice los botones subir y bajar para seleccionar Trigger y luego pulse Enter.
4. Golpee el pad cuya voz desea editar. El nombre del pad aparecerá en la parte superior de
la pantalla. Como alternativa, utilice los botones subir y bajar para seleccionar el nombre
del pad en la parte superior de la pantalla y luego utilice el cuadrante o los botones
izquierda () y derecha () para cambiarla.
5. La pantalla mostrará el pad actual y sus parámetros. En esta página:
• Para seleccionar el parámetro que desea editar, utilice los botones subir y bajar (no
todos los parámetros están disponibles para todos los pads):
o Sensitivity (Sensibilidad): La sensibilidad de la cabeza (centro) de un pad de
tambor. Valores mayores permiten producir sonidos más altos con menos
fuerza. Valores menores requieren más fuerza para producir sonidos más bajos.
o Rim Sens (Sensibilidad del borde): La sensibilidad del borde de un pad de
tambor. Valores mayores permiten producir sonidos más altos con menos
fuerza. Valores menores requieren más fuerza para producir sonidos más bajos.

20
o Head-Rim Adj (Ajuste cabeza-borde): El nivel de reducción de los disparos
accidentales entre la cabeza (centro) y borde de un pad de batería. Valores
mayores disminuyen la probabilidad de que se dispare un sonido de borde del
pad cuando se toca su cabeza solamente y viceversa (debido a que la fuerza se
transmite a través del pad). Sin embargo, ¡procure no usar un valor demasiado
elevado! Si el valor es demasiado alto, podría no ser capaz de disparar su
sonido si toca intencionalmente tanto la cabeza como el borde al mismo tiempo;
puede quedar silenciado porque el módulo interpreta incorrectamente el golpe
como un disparo accidental.
o Threshold (Umbral): La cantidad de fuerza requerida para disparar el sonido.
o Xtalk (Disparo accidental): El nivel de reducción de los disparos accidentales.
Valores mayores disminuyen la probabilidad de que el sonido del pad se dispare
cuando se tocan otros pads (debido a que la fuerza se transmite a través del
rack, el piso, etcétera.). Sin embargo, ¡procure no usar un valor demasiado
elevado! Si el valor es demasiado alto, podría no ser capaz de disparar su
sonido si toca otro pad al mismo tiempo; puede quedar silenciado porque el
módulo interpreta incorrectamente el golpe como un disparo accidental.
o Curve (Curva): La curva de velocidad del pad. Esto controla la relación entre la
cantidad de fuerza con la que se toca y el nivel de volumen del sonido del pad.
o Retrig Cancel (Cancelar re-disparo): Tiempo requerido entre golpes sucesivos
del pad para que se produzcan sonidos para ambos golpes. Si este ajuste es
demasiado alto, es posible que algunas notas no se disparen cuando toque
rápidamente o toque redobles. Si este ajuste es demasiado bajo, es posible que
dispare notas adicionales no deseadas cuando toque normalmente.
o MIDI Note (Nota MIDI): Cuando el puerto MIDI USB o MIDI Out del módulo de
batería se conecte a un ordenador o dispositivo MIDI externo, el pad enviará
esta nota MIDI hacia él. Si no está utilizando estas conexiones, éste ajuste no
afectará al disparador y su sonido.
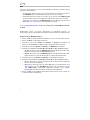
Bombo 36 Tom 3 (centro) 43 Crash 1 49
Redoblante (centro) 38 Tom 3 (borde) 75 Crash 1 (borde) 49
Borde del redoblante 40 Tom 4 (centro) 41 Crash 2 57
Tom 1 (centro) 50 Tom 4 (borde) 73 Crash 2 (borde) 57
Tom 1 (borde) 82 Lomo del ride 51 Hi-Hat abierto 8
Tom 2 (centro) 47 Borde del ride 59 Hi-Hat cerrado 8
Tom 2 (borde) 80 Campana del ride 53 Pedal de Hi-Hat 22
Splash del hi-hat 23
o Splash Sens (Sensitividad del splash): La sensibilidad del pedal del hi-hat para
crear un sonido tipo “splash” en lugar del sonido de “cerrar hi-hat” normal.
• Para editar el ajuste o valor del parámetro, utilice el cuadrante o los botones
izquierda () y derecha ().
6. Para guardar sus cambios, pulse Save. De lo contrario, sus cambios se perderán cuando
apague el módulo de batería.
7. Pulse Exit para volver a la página anterior.
Seite wird geladen ...
Seite wird geladen ...
Seite wird geladen ...
Seite wird geladen ...
Seite wird geladen ...
Seite wird geladen ...
Seite wird geladen ...
Seite wird geladen ...
Seite wird geladen ...
Seite wird geladen ...
Seite wird geladen ...
Seite wird geladen ...
Seite wird geladen ...
Seite wird geladen ...
Seite wird geladen ...
Seite wird geladen ...
Seite wird geladen ...
Seite wird geladen ...
Seite wird geladen ...
Seite wird geladen ...
Seite wird geladen ...
Seite wird geladen ...
Seite wird geladen ...
Seite wird geladen ...
Seite wird geladen ...
Seite wird geladen ...
Seite wird geladen ...
Seite wird geladen ...
Seite wird geladen ...
Seite wird geladen ...
Seite wird geladen ...
Seite wird geladen ...
Seite wird geladen ...
Seite wird geladen ...
Seite wird geladen ...
Seite wird geladen ...
Seite wird geladen ...
Seite wird geladen ...
Seite wird geladen ...
Seite wird geladen ...
-
 1
1
-
 2
2
-
 3
3
-
 4
4
-
 5
5
-
 6
6
-
 7
7
-
 8
8
-
 9
9
-
 10
10
-
 11
11
-
 12
12
-
 13
13
-
 14
14
-
 15
15
-
 16
16
-
 17
17
-
 18
18
-
 19
19
-
 20
20
-
 21
21
-
 22
22
-
 23
23
-
 24
24
-
 25
25
-
 26
26
-
 27
27
-
 28
28
-
 29
29
-
 30
30
-
 31
31
-
 32
32
-
 33
33
-
 34
34
-
 35
35
-
 36
36
-
 37
37
-
 38
38
-
 39
39
-
 40
40
-
 41
41
-
 42
42
-
 43
43
-
 44
44
-
 45
45
-
 46
46
-
 47
47
-
 48
48
-
 49
49
-
 50
50
-
 51
51
-
 52
52
-
 53
53
-
 54
54
-
 55
55
-
 56
56
-
 57
57
-
 58
58
-
 59
59
-
 60
60


Alesis Crimson II SE Mesh Kit Benutzerhandbuch
- Kategorie
- Digitale Klaviere
- Typ
- Benutzerhandbuch
in anderen Sprachen
Verwandte Artikel
-
Alesis Crimson II Mesh Kit Bedienungsanleitung
-
Alesis Command Kit Benutzerhandbuch
-
Alesis Command Mesh Kit Benutzerhandbuch
-
-
Alesis DM10 MKII Pro Kit Benutzerhandbuch
-
-
Alesis Strike Performance Drum Module Schnellstartanleitung
-
Alesis CompactKit 4 Benutzerhandbuch
-
-
Alesis CompactKit 7 Benutzerhandbuch