HQ-Power HQLP10014 Benutzerhandbuch

Kategorie
Stroboskope
Typ
Benutzerhandbuch
HQLP10014
SHOWPAR SPECIAL FX - RGBW
USER MANUAL 6
HANDLEIDING 11
MODE D'EMPLOI 16
MANUAL DEL USUARIO 21
BEDIENUNGSANLEITUNG 26
HQLP10014
V. 03 24/11/2017 2 ©Velleman nv
HQLP10014
V. 03 24/11/2017 3 ©Velleman nv
2 CH
channel
from
to
function
1
0
9
no function
10
119
DMX auto programme
120
255
DMX sound programme
2
0
255
speed DMX auto programme, F > S
9 CH
channel
from
to
function
1
0
255
red 1-4
2
0
255
green 1-4
3
0
255
blue 1-4
4
0
255
white 1-4
5
0
9
no function
10
255
strobe 1-4, S > F
6
0
9
no function
10
255
SMD 1-8
7
0
255
SMD strobe, S > F
8
0
9
no function
10
119
DMX auto programme
120
255
DMX sound programme
9
0
255
speed DMX auto programme, F > S
HQLP10014
V. 03 24/11/2017 4 ©Velleman nv
19 CH
channel
from
to
function
1
0
255
red 1-3
2
0
255
green 1-3
3
0
255
blue 1-3
4
0
255
white 1-3
5
0
9
no function
10
255
strobe 1-3, S > F
6
0
255
red 4
7
0
255
green 4
8
0
255
blue 4
9
0
255
white 4
10
0
9
no function
10
255
strobe 4, S > F
11
0
9
no function
10
255
SMD 1
12
0
9
no function
10
255
SMD 2
13
0
9
no function
10
255
SMD 3
14
0
9
no function
10
255
SMD 4
15
0
9
no function
10
255
SMD 5
16
0
9
no function
10
255
SMD 6
17
0
9
no function
10
255
SMD 7
18
0
9
no function
10
255
SMD 8
19
0
9
no function
10
255
SMD strobe, S > F
HQLP10014
V. 03 24/11/2017 5 ©Velleman nv
29 CH
channel
from
to
function
1
0
255
red 1
2
0
255
green 1
3
0
255
blue 1
4
0
255
white 1
5
0
255
red 2
6
0
255
green 2
7
0
255
blue 2
8
0
255
white 2
9
0
255
red 3
10
0
255
green 3
11
0
255
blue 3
12
0
255
white 3
13
0
9
no function
10
255
strobe 1-3, S > F
14
0
255
red 4
15
0
255
green 4
16
0
255
blue 4
17
0
255
white 4
18
0
9
no function
10
255
strobe 4, S > F
19
0
9
no function
10
255
SMD 1
20
0
9
no function
10
255
SMD 2
21
0
9
no function
10
255
SMD 3
22
0
9
no function
10
255
SMD 4
23
0
9
no function
10
255
SMD 5
24
0
9
no function
10
255
SMD 6
25
0
9
no function
10
255
SMD 7
26
0
9
no function
10
255
SMD 8
27
0
9
no function
10
255
SMD strobe, S > F
28
0
9
no function
10
119
DMX auto programme
120
255
DMX sound programme
29
0
255
speed DMX auto programme, F > S
HQLP10014
V. 03 24/11/2017 6 ©Velleman nv
USER MANUAL
1. Introduction
To all residents of the European Union
Important environmental information about this product
This symbol on the device or the package indicates that disposal of the device after its lifecycle
could harm the environment. Do not dispose of the unit (or batteries) as unsorted municipal
waste; it should be taken to a specialized company for recycling. This device should be returned
to your distributor or to a local recycling service. Respect the local environmental rules.
If in doubt, contact your local waste disposal authorities.
Thank you for choosing HQPower™! Please read the manual thoroughly before bringing this device into
service. If the device was damaged in transit, do not install or use it and contact your dealer.
2. Safety Instructions
HQLP10014
V. 03 24/11/2017 7 ©Velleman nv
3. Warranty
Refer to the Velleman® Service and Quality Warranty on the last pages of this manual.
All modifications of the device are forbidden for safety reasons. Damage caused by user
modifications to the device is not covered by the warranty.
Only use the device for its intended purpose. Using the device in an unauthorised way will void
the warranty.
Damage caused by disregard of certain guidelines in this manual is not covered by the warranty
and the dealer will not accept responsibility for any ensuing defects or problems.
Nor Velleman nv nor its dealers can be held responsible for any damage (extraordinary, incidental
or indirect) of any nature (financial, physical…) arising from the possession, use or failure of this
product.
4. Installation
4.1 General Guidelines
4.2 Overhead Installation
HQLP10014
V. 03 24/11/2017 8 ©Velleman nv
4.3 Connection
5. Operation
The device can be used in the following modes:
stand-alone mode
master/slave
with a DMX-512 controller.
5.1 Control Panel
Access the control panel functions using the four panel buttons located around the display.
Menu
scroll through the menu options
upwards through the menu list
downwards through the menu list
Enter
confirm a selection
5.2 Menu
mode
programme
description
DMX mode
29CH
d001-d484
29 channels
19CH
d001-d494
19 channels
9CH
d001-d504
9 channels
2CH
d001-d512
2 channels
static colours
C--
C01-21
static colours
auto mode
Auto
Au1-7
auto programme
sound mode
Soun
So1-7
sound programme
speed
SPEE
SP1-9
speed
mic sensitivity
SEnS
SE1-9
microphone sensitivity
edit colour
Colo
r000-255
red
g000-255
green
b000-255
blue
U000-255
white
dimming
dIMM
dl1-9
master dimming
silent scene
SILE
on/oFF
silent scene at sound programme
slave
SLAV
Slave
slave mode
IR
InFr
on/oFF
enable/disable IR remote
5.3 Stand-Alone Mode
The device starts running in stand-alone mode after connection to the mains. This mode allows you to
use the device without controller.
5.4 Master/Slave Mode
The master/slave mode allows for connecting several devices to a single master device in a daisy chain.
All slave devices will then work synchronously with the master device.
Configure all slave units before connecting the master unit to the daisy chain.
HQLP10014
V. 03 24/11/2017 9 ©Velleman nv
5.5 DMX Mode
The DMX mode allows you to control the device with any universal DMX controller.
All DMX-controlled devices need a digital start address so that the correct device responds to the
signals. This digital start address is the channel number from which the device starts to “listen” to
the DMX controller. The same starting address can be used for a whole group of devices or an
individual address can be set for every device.
When all devices have the same address, all the units will “listen” to the control signal on one
particular channel. In other words: changing the settings of one channel will affect all devices
simultaneously. If you set individual addresses, each device will “listen” to a separate channel
number. Changing the settings of one channel will only affect the device in question.
5.6 DMX Channel Values
Refer to page 3 of this manual.
6. IR Remote Controller
BLACK OUT
Press this button to black out the current active mode. Press again to return.
AUTO
Enables you to run the automatic programmes.
1. Press <AUTO>.
2. Press <+> or <-> to choose the different programmes.
SOUND
Enables you to run the sound-controlled programmes.
1. Press <SOUND>.
2. Press <+> or <-> to choose the different programmes.
STROBE
Press this button to activate the stroboscope. Press again to de-activate.
1. Press <STROBE>.
2. Press <+> or <-> to adjust the strobe speed.
SPEED
Enables you to adjust the speed of the automatic programmes.
1. Press <SPEED>.
2. Press <+> or <-> to choose the programme.
SENSITIVITY
Enables you to adjust the microphone sensitivity.
1. Press <SENSITIVITY>.
2. Press <+> or <-> to adjust the microphone sensitivity.
DMX/%
Allows you to activate/de-activate the DMX mode.
MANUAL
Press this button to activate/de-activate the manual mode.
1. Press <MANUAL>.
2. Select your colour.
3. Press <+> or <-> to adjust the colour intensity.
FADE
Press <FADE> to enable or disable the fader.
1-9
Press <1> to <9> to adjust the colour intensity.
HQLP10014
V. 03 24/11/2017 10 ©Velleman nv
7. Cleaning and Maintenance
Before starting any cleaning or maintenance activities:
1. Unplug the device's power cord from the outlet.
2. Let the device cool down.
Cleaning
Use normal glass cleaner and a soft cloth to wipe off the outside casing.
Always be sure to dry all parts completely before plugging the device back in.
Cleaning frequency depends on the environment in which the unit operates (i.e. smoke, fog residue,
dust, dew).
Do not immerse the device in any liquid.
Maintenance
All screws should be tightened and free of corrosion.
The housing, the lenses, the mounting supports and the installation location (e.g. ceiling, suspension,
trussing) should not be deformed, modified or tampered with; e.g. do not drill extra holes in
mounting supports, do not change the location of the connections…
Mechanically moving parts must not show any signs of wear and tear.
The electric power supply cables must not show any damage. Have a qualified technician maintain
the device.
There are no user-serviceable parts, apart from the fuse and the lamp.
Refer to an authorized dealer for service and/or spare parts.
Replacing the fuse
1. Unplug the device's power cord from the outlet.
2. Let the device cool down.
3. Remove the rear cover with an appropriate screwdriver.
4. Open the fuse holder.
5. Replace with an identical fuse.
6. Insert the fuse holder back in its place, replace the rear cover and reconnect power.
8. Technical Specifications
power supply ......................................................................... 100-240 V~, 50/60 Hz
power consumption ........................................................................................ 65 W
power factor ................................................................................................... 0.47
colour ........................................................................................................... black
light source
PAR .................................................................................... 9 x 4 W RGBW 4-in-1
COB ........................................................................................... 1 x 15 W RGBW
SMD ............................................................................................ 24 x 1 W white
dimensions .............................................................................. 300 x 280 x 160 mm
weight ......................................................................................................... 2.4 kg
Use this device with original accessories only. Velleman nv cannot be held responsible in the
event of damage or injury resulting from (incorrect) use of this device. For more info
concerning this product and the latest version of this manual, please visit our website
www.hqpower.eu. The information in this manual is subject to change without prior notice.
© COPYRIGHT NOTICE
The copyright to this manual is owned by Velleman nv. All worldwide rights reserved. No part
of this manual may be copied, reproduced, translated or reduced to any electronic medium or otherwise
without the prior written consent of the copyright holder.
HQLP10014
V. 03 24/11/2017 11 ©Velleman nv
HANDLEIDING
1. Inleiding
Aan alle ingezetenen van de Europese Unie
Belangrijke milieu-informatie betreffende dit product
Dit symbool op het toestel of de verpakking geeft aan dat, als het na zijn levenscyclus wordt
weggeworpen, dit toestel schade kan toebrengen aan het milieu. Gooi dit toestel (en eventuele
batterijen) niet bij het gewone huishoudelijke afval; het moet bij een gespecialiseerd bedrijf
terechtkomen voor recyclage. U moet dit toestel naar uw verdeler of naar een lokaal
recyclagepunt brengen. Respecteer de plaatselijke milieuwetgeving.
Hebt u vragen, contacteer dan de plaatselijke autoriteiten betreffende de verwijdering.
Dank u voor uw aankoop! Lees deze handleiding grondig door voor u het toestel in gebruik neemt. Werd
het toestel beschadigd tijdens het transport, installeer het dan niet en raadpleeg uw dealer.
2. Veiligheidsvoorschriften
HQLP10014
V. 03 24/11/2017 12 ©Velleman nv
3. Garantie
Raadpleeg de Velleman® service- en kwaliteitsgarantie achteraan deze handleiding.
Om veiligheidsredenen mag u geen wijzigingen aanbrengen. Schade door wijzigingen die de
gebruiker heeft aangebracht aan het toestel valt niet onder de garantie.
Gebruik het toestel enkel waarvoor het gemaakt is. De garantie vervalt automatisch bij
ongeoorloofd gebruik.
De garantie geldt niet voor schade door het negeren van bepaalde richtlijnen in deze handleiding
en uw dealer zal de verantwoordelijkheid afwijzen voor defecten of problemen die hier
rechtstreeks verband mee houden.
Noch Velleman nv noch zijn verdelers kunnen aansprakelijk gesteld worden voor schade
(buitengewoon, incidenteel of onrechtstreeks) van welke aard dan ook (financieel, fysisch…)
voortvloeiend uit het bezit, gebruik of falen van dit product.
4. Montage
4.1 Algemene richtlijnen
4.2 Het toestel ophangen
HQLP10014
V. 03 24/11/2017 13 ©Velleman nv
4.3 Aansluiting
5. Gebruik
Het toestel kan gebruikt worden als volgt:
autonome modus (standalone)
master/slave-modus
met een DMX-512-controller.
5.1 Bedieningspaneel
Bedien het controlepaneel met de vier knoppen onderaan de display.
Menu
door de opties scrollen
naar boven in het menu scrollen
naar onder in het menu scrollen
Enter
een optie bevestigen
5.2 Menu
modus
programma
omschrijving
DMX-modus
29CH
d001-d484
29 kanalen
19CH
d001-d494
19 kanalen
9CH
d001-d504
9 kanalen
2CH
d001-d512
2 kanalen
statische kleuren
C--
C01-21
statische kleuren
automatische mode
Auto
Au1-7
automatisch programma
muziekgestuurde
modus
Soun
So1-7
muziekgestuurd programma
snelheid
SPEE
SP1-9
snelheid
microfoongevoeligheid
SEnS
SE1-9
microfoongevoeligheid
kleur veranderen
Colo
r000-255
rood
g000-255
groen
b000-255
blauw
U000-255
wit
dimmer
dIMM
dl1-9
master dimmer
silent scene
SILE
on/oFF
aan/uit in muziekgestuurde modus
slave
SLAV
Slave
slave-modus
IR
InFr
on/oFF
IR-afstandsbediening in-
/uitschakelen
5.3 Autonome modus (standalone)
Het toestel start op in autonome modus, nadat u het gekoppeld hebt aan het lichtnet. In deze modus
kunt u het toestel zonder controller gebruiken.
5.4 Master/slave-modus
In master/slave-modus kunt u meerdere toestellen aansluiten op één mastertoestel in een reeks.
Alle slavetoestellen zullen vervolgens synchroon functioneren met het mastertoestel.
Configureer alle slavetoestellen vooraleer u het mastertoestel aansluit op de reeks.
HQLP10014
V. 03 24/11/2017 14 ©Velleman nv
5.5 DMX-modus
In DMX-modus kunt u het toestel aansturen via een universele DMX-controller.
Alle DMX-gestuurde toestellen hebben een digitaal startadres nodig zodat het juiste toestel reageert
op de signalen. Dit digitale startadres is het kanaalnummer van waarop het toestel luistert naar het
signaal van de DMX controller. U kunt één enkel startadres gebruiken voor een groep toestellen of u
kunt per toestel een nieuw startadres ingeven.
Wanneer u een enkel startadres instelt, zullen alle toestellen ‘luisteren’ naar hetzelfde kanaal. Met
andere woorden: Wanneer u de instellingen voor 1 kanaal verandert, zullen alle toestellen er tegelijk
op reageren. Wanneer u verschillende adressen instelt, dan luistert elk toestel naar een ander
kanaal. Wanneer u de instellingen van een kanaal verandert, zal enkel het toestel op dat kanaal
reageren.
5.6 DMX-waarden per kanaal
Zie pagina 3 van deze handleiding.
6. IR-afstandsbediening
BLACK OUT
Druk om de huidige actieve modus uit te schakelen. Druk nogmaals om terug te keren.
AUTO
Druk om de automatische programma's uit te voeren.
1. Druk op <AUTO>.
2. Druk op <+> of <-> om tussen de verschillende programma's te schakelen.
SOUND
Druk om de muziekgestuurde programma's uit te voeren.
1. Druk op <SOUND>.
2. Druk op <+> of <-> om tussen de verschillende programma's te schakelen.
STROBE
Druk om de stroboscoop in te schakelen. Druk nogmaals om uit te schakelen.
1. Druk op <STROBE>.
2. Druk op <+> of <-> om de stroboscoopsnelheid in te stellen.
SPEED
Druk om de snelheid van de automatische programma's in te stellen.
1. Druk op <SNELHEID>.
2. Druk op <+> of <-> om het programma te kiezen.
SENSITIVITY
Druk om de microfoongevoeligheid in te stellen.
1. Druk op <SENSITIVITY>.
2. Druk op <+> of <-> om de microfoongevoeligheid in te stellen.
DMX/%
Druk op de DMX-modus te activeren/deactiveren.
MANUAL
Druk om de manuele modus te activeren/deactiveren.
1. Druk op <MANUAL>.
2. Selecteer de gewenste kleur.
3. Druk op <+> of <-> om de kleurintensiteit in te stellen.
FADE
Druk op <FADE> om de fader in- of uit te schakelen.
1-9
Druk op <1> tot <9> om te kleurintensiteit in te stellen.
HQLP10014
V. 03 24/11/2017 15 ©Velleman nv
7. Reiniging en onderhoud
Voor het reinigen of onderhoud:
1. Ontkoppel het toestel van het lichtnet.
2. Laat het toestel afkoelen.
Reiniging
Gebruik een glasreiniger en een zachte doek om de behuizing te reinigen.
Zorg ervoor dat alle onderdelen volledig droog zijn voordat u het toestel opnieuw aansluit.
De frequentie van de reiniging hangt van de omgeving af (bv. rook, stof, vocht).
Dompel het toestel nooit onder in een vloeistof.
Onderhoud
Alle schroeven moeten goed zijn aangespannen en mogen geen sporen van roest vertonen.
De behuizing, de lenzen, de montagebeugels en de montageplaats (bijvoorbeeld plafond, ophanging
of gebinte) mogen niet vervormd of aangepast worden (bv. geen extra gaten in montagebeugels
boren, de aansluitingen niet verplaatsen...).
Mechanisch bewegende delen mogen geen sporen van slijtage vertonen.
De voedingskabels mogen niet beschadigd zijn. Laat het toestel onderhouden door een geschoolde
technicus.
Er zijn geen door de gebruiker vervangbare onderdelen in dit toestel, behalve de zekering en de
lamp.
Contacteer uw verdeler voor eventuele reserveonderdelen.
De zekering vervangen
1. Ontkoppel het toestel van het lichtnet.
2. Laat het toestel afkoelen.
3. Verwijder het deksel (achterkant) met een geschikte schroevendraaier.
4. Open de zekeringhouder.
5. Vervang door een geschikte zekering.
6. Plaats de zekeringhouder terug in het toestel en schakel de stroom weer in.
8. Technische specificaties
voeding ................................................................................ 100-240 V~, 50/60 Hz
verbruik ........................................................................................................ 65 W
vermogensfactor ............................................................................................. 0.47
kleur ............................................................................................................ zwart
lichtbron
PAR .................................................................................... 9 x 4 W RGBW 4-in-1
COB ........................................................................................... 1 x 15 W RGBW
SMD ................................................................................................ 24 x 1 W wit
afmetingen.............................................................................. 300 x 280 x 160 mm
gewicht ........................................................................................................ 2.4 kg
Gebruik dit toestel enkel met originele accessoires. Velleman nv is niet aansprakelijk voor
schade of kwetsuren bij (verkeerd) gebruik van dit toestel. Voor meer informatie over dit
product en de laatste versie van deze handleiding, zie www.hqpower.eu. De informatie in deze
handleiding kan te allen tijde worden gewijzigd zonder voorafgaande kennisgeving.
© AUTEURSRECHT
Velleman nv heeft het auteursrecht voor deze handleiding. Alle wereldwijde rechten
voorbehouden. Het is niet toegestaan om deze handleiding of gedeelten ervan over te nemen, te
kopiëren, te vertalen, te bewerken en op te slaan op een elektronisch medium zonder voorafgaande
schriftelijke toestemming van de rechthebbende.
HQLP10014
V. 03 24/11/2017 16 ©Velleman nv
MODE D'EMPLOI
1. Introduction
Aux résidents de l'Union européenne
Informations environnementales importantes concernant ce produit
Ce symbole sur l'appareil ou l'emballage indique que l’élimination d’un appareil en fin de vie peut
polluer l'environnement. Ne pas jeter un appareil électrique ou électronique (et des piles
éventuelles) parmi les déchets municipaux non sujets au tri sélectif ; une déchetterie traitera
l’appareil en question. Renvoyer l'appareil à votre fournisseur ou à un service de recyclage local.
Respecter la réglementation locale relative à la protection de l’environnement.
En cas de questions, contacter les autorités locales pour élimination.
Nous vous remercions de votre achat! Lire attentivement le présent mode d'emploi avant la mise en
service de l’appareil. Si l'appareil a été endommagé pendant le transport, ne pas l’installer et consulter
votre revendeur.
2. Consignes de sécurité
HQLP10014
V. 03 24/11/2017 17 ©Velleman nv
3. Garantie
Se référer à la garantie de service et de qualité Velleman® en fin de ce mode d'emploi.
Toute modification est interdite pour des raisons de sécurité. Les dommages occasionnés par des
modifications par le client ne tombent pas sous la garantie.
N’utiliser l'appareil qu’à sa fonction prévue. Un usage impropre annule d'office la garantie.
La garantie ne se s’applique pas aux dommages survenus en gligeant certaines directives de ce mode
d'emploi et votre revendeur déclinera toute responsabili pour les problèmes et les fauts qui en résultent.
Ni Velleman ni ses distributeurs ne peuvent être tenus responsables des dommages
exceptionnels, imprévus ou indirects, quelles que soient la nature (financière, corporelle, etc.),
causés par la possession, l’utilisation ou le dysfonctionnement de ce produit.
4. Installation
4.1 Directives générales
4.2 Suspendre l'appareil
HQLP10014
V. 03 24/11/2017 18 ©Velleman nv
4.3 Connexion
5. Emploi
Il y a plusieurs modes de fonctionnement :
mode autonome
maître/esclave
avec un contrôleur DMX 512.
5.1 Panneau de contrôle
Accéder aux fonctions en utilisant les quatre touches au bas de l’afficheur.
Menu
accéder au menu
naviguer vers le haut dans le menu
naviguer vers le bas dans le menu
Enter
confirmer et sauvegarder une option
5.2 Menu
mode
programme
description
mode DMX
29CH
d001-d484
29 canaux
19CH
d001-d494
19 canaux
9CH
d001-d504
9 canaux
2CH
d001-d512
2 canaux
couleurs statiques
C--
C01-21
couleurs statiques
mode
automatique
Auto
Au1-7
programme automatique
mode contrôlé
par la musique
Soun
So1-7
mode contrôlé par la musique
vitesse
SPEE
SP1-9
vitesse
sensibilité du
microphone
SEnS
SE1-9
sensibilité du microphone
changement de
couleur
Colo
r000-255
rouge
g000-255
vert
b000-255
bleu
U000-255
blanc
variateur
dIMM
dl1-9
variateur maître
silent scene
SILE
on/oFF
on/off en mode contrôlé par la
musique
esclave
SLAV
Slave
mode esclave
IR
InFr
on/oFF
allumer/éteindre la télécommande IR
5.3 Mode autonome
L'appareil se met en marche en mode autonome après la connexion au réseau. Ce mode vous permet
d'utiliser l'appareil sans contrôleur.
5.4 Mode maître/esclave
Le mode maître/esclave vous permet de connecter plusieurs appareils à un appareil maître en série.
Tous les appareils esclave fonctionneront en synchronisation avec l'appareil maître.
Configurer tous les d'appareils esclave avant de connecter l'appareil maître à la série.
HQLP10014
V. 03 24/11/2017 19 ©Velleman nv
5.5 Mode DMX
Le mode DMX vous permet de piloter l'appareil avec n'importe quel contrôleur DMX universel.
Tous les appareils pilotés par un signal DMX demandent une adresse de départ DMX pour assurer
que les appareils corrects réagissent sur les signaux de contrôle. Cette adresse de départ numérique
indique le numéro de canal sur lequel l’appareil “écoute” le contrôleur DMX. Il est possible de choisir
entre une seule adresse de départ pour toute une série d’appareils ou une adresse de départ par
appareil.
Dans le cas d’une seule adresse, tous les appareils “écouteront” les mêmes signaux, sur un seul
canal. En d'autres termes : tous les appareils seront donc influencés en changeant les réglages d’un
seul canal. Avec des adresses de départ individuelles, chaque appareil “écoutera” son propre canal.
Par conséquent, ajuster les réglages d’un seul canal n’influence que l'appareil sur ce canal.
5.6 Valeurs de DMX par canal
Se référer à la page 3 de ce mode d'emploi.
6. Télécommande IR
BLACK OUT
Appuyer pour désactiver le mode actif. Appuyer à nouveau pour retourner.
AUTO
Appuyer pour exécuter les programmes automatiques.
1. Appuyer sur <AUTO>.
2. Appuyer sur <+> ou <-> pour basculer entre les différents programmes.
SOUND
Appuyer pour exécuter les programmes pilotés par la musique.
1. Appuyer sur <SOUND>.
2. Appuyer sur <+> ou <-> pour basculer entre les différents programmes.
STROBE
Appuyer pour activer le stroboscope. Appuyer à nouveau pour désactiver.
1. Appuyer sur <STROBE>.
2. Appuyer sur <+> ou <-> pour ajuster la vitesse stroboscopique.
SPEED
Appuyer pour ajuster la vitesse des programmes automatiques.
1. Appuyer sur <SPEED>.
2. Appuyer sur <+> ou <-> pour choisir le programme.
SENSITIVITY
Appuyer pour régler la sensibilité du microphone.
1. Appuyer sur <SENSITIVITY>.
2. Appuyer sur <+> ou <-> pour ajuster la sensibilité du microphone.
DMX/%
Appuyer pour activer/désactiver le mode DMX.
MANUEL
Appuyer pour activer/désactiver le mode manuel.
1. Appuyer sur <MANUAL>.
2. Sélectionner la couleur souhaitée.
3. Appuyer sur <+> ou <-> pour ajuster l'intensité de la couleur.
FADE
Appuyer sur <FADE> pour activer ou désactiver le fader.
1-9
Appuyer sur <1> à <9> pour ajuster l'intensité des couleurs.
HQLP10014
V. 03 24/11/2017 20 ©Velleman nv
7. Nettoyage et entretien
Avant tout nettoyage ou entretien :
1. Débrancher le câble d'alimentation.
2. Laisser refroidir l'appareil.
Nettoyage
Utiliser un nettoyant à vitres normal et un chiffon doux pour nettoyer le boîtier.
S'assurer que toutes les pièces sont sèches avant de reconnecter l'appareil.
La fréquence de nettoyage dépend de l'environnement d'installation (p. ex. fumée, résidus de
brouillard, poussière, condensation).
Ne jamais immerger l’appareil dans un liquide.
Entretien
Serrer les vis et vérifier qu’elles ne rouillent pas.
Ne pas déformer, modifier ou altérer le boîtier, les lentilles, les supports de montage et
l'emplacement d'installation (par exemple des plafonds, constructions portantes) par exemple ne pas
percer des trous additionnels dans un support, ne pas modifier l'emplacement des connexions ...).
Les parties mécaniques mobiles ne peuvent pas être usées.
Les câbles d'alimentation ne peuvent pas être endommagés. L’entretien doit être effectué par un
technicien qualifié.
Il n’y a aucune pièce réparable par l’utilisateur sauf le fusible et la lampe.
Commander des pièces de rechange éventuelles chez votre revendeur.
Remplacer le fusible
1. Débrancher le câble d'alimentation.
2. Laisser refroidir l'appareil.
3. Retirer le couvercle arrière avec un tournevis approprié.
4. Ouvrir le porte-fusible.
5. Remplacer le fusible défectueux par un fusible du même type.
6. Réinsérer le porte-fusible, replacer le capuchon et rebrancher le câble d'alimentation.
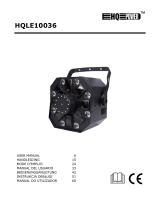
8. Spécifications techniques
alimentation .......................................................................... 100-240 V~, 50/60 Hz
consommation ............................................................................................... 65 W
facteur de puissance ....................................................................................... 0.47
couleur ........................................................................................................... noir
source lumineuse
PAR ....................................................................................9 x 4 W RGBW 4-en-1
COB ........................................................................................... 1 x 15 W RGBW
SMD ............................................................................................. 24 x 1 W blanc
dimensions .............................................................................. 300 x 280 x 160 mm
poids ........................................................................................................... 2.4 kg
N'employer cet appareil qu’avec des accessoires d’origine. Velleman SA ne peut, dans la
mesure conforme au droit applicable être tenue responsable des dommages ou lésions
(directs ou indirects) pouvant résulter de l’utilisation de cet appareil. Pour plus d’informations
concernant cet article et la dernière version de cette notice, visiter notre site web
www.hqpower.eu. Les spécifications et le continu de ce mode d'emploi peuvent être modifiés
sans notification préalable.
© DROITS D’AUTEUR
Velleman SA est l’ayant droit des droits d’auteur de ce mode d'emploi. Tous droits mondiaux
réservés. Toute reproduction, traduction, copie ou diffusion, intégrale ou partielle, du contenu de ce
mode d'emploi par quelque procédé ou sur tout support électronique que ce soit est interdite sans
l’accord préalable écrit de l’ayant droit.
  • Page 1 1
  • Page 2 2
  • Page 3 3
  • Page 4 4
  • Page 5 5
  • Page 6 6
  • Page 7 7
  • Page 8 8
  • Page 9 9
  • Page 10 10
  • Page 11 11
  • Page 12 12
  • Page 13 13
  • Page 14 14
  • Page 15 15
  • Page 16 16
  • Page 17 17
  • Page 18 18
  • Page 19 19
  • Page 20 20
  • Page 21 21
  • Page 22 22
  • Page 23 23
  • Page 24 24
  • Page 25 25
  • Page 26 26
  • Page 27 27
  • Page 28 28
  • Page 29 29
  • Page 30 30
  • Page 31 31
  • Page 32 32

HQ-Power HQLP10014 Benutzerhandbuch

Kategorie
Stroboskope
Typ
Benutzerhandbuch