Baumer O200.SP.T-GW1J.72CV/H006 Bedienungsanleitung
- Typ
- Bedienungsanleitung

3
42
1
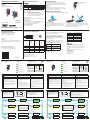
Connection Diagrams
- Disconnect power before connecting the sensor.
- Voltage supply according UL 1310, Class 2
or device shall be protected by an external R/C or listed fuse, rated max.
30 VAC/3A or 24 VDC/4A
Push-Pull &
Teach-In /
IO-Link*
PNP
Complementary
NPN
Complementary
1 - Brown BN +Vs
2 - White WH Teach-In*
PNP
Inverted
NPN
Inverted
3 - Blue BU 0 V
4 - Black BK
Push-Pull /
IO-Link*
PNP NPN
*Only for models with IO-Link and/or Teach-In by wire
See packaging label for the specifi c wiring of your product
BK (4)
output / IO-Link
O200
0 V
BU (3)
BN (1)
+V
S
WH (2)
Teach-In or output
Photoelectric sensors
O200
Baumer Electric AG - CH-8501 Frauenfeld
Phone +41 (0)52 728 1122 - Fax +41 (0)63 739 1144
www.baumer.com
qTarget
®
qTeach
®
EN
DE
FR
IT
ES
CN
14.01.2020 / Version 1.0
Xpert Mode
Transparent Object Detection
11700760
Available Commands:
Teach-In commands, light emission on/off , Find Me (locating
sensor) and more
Available Parameters:
Switching point, output function, time fi lters, operation modes,
qTeach lock time, teach-mode, LED status indicators,
Teach-In method, tracking settings and more
Available Additional Data:
Switch counter, temperature
Models with IO-Link
SSC1/4: Switching Signal Channels
MDC: Attenuation value, excess gain or switch counts
(selectable)
Quality: The quality bit signals a weak signal
Alarm: The alarm bit signals a problem with the
confi guration or the functionality of the sensor
Scale: Factor by power of ten, applicable to the value of
the Measurement Data Channel (MDC)
IO-Link Process Data Input
16 8 0
IntegerT(16) IntegerT(8) 8 bit
Measurement
Data Channel
(MDC)
Scale
Baumer specifi c
7 6 5 4 3 2 1 0
SSC4 Alarm Quality SSC1
Related Models
O200 Models with Xpert Teach:
O200.Rx.T (Retro-refl ective sensors)
O200.Sx.T* (SmartRefl ect light barriers)
More Information related to these
products can be found on our website
(CAD, Beamcharts, CoC, Drawings, IODDs …)
www.baumer.com
*Equipped with
ALINE
®
The innovative, high performance CMOS Opto-ASIC for
fast and temperature-stable sensors with high ambient light
immunity
Mounting Instructions
SmartRefl ect light barriers for transparent object detection (O200.S)
Reference Background
In case a shiny object/metal plate is used as background
reference, it is recommended to tilt the sensor slightly
(3 ... 5°) to avoid any infl uence due to direct refl ections on
the receiver.
Object
It is recommended that the object to be detected approaches the
active area of the sensor from the side, which avoids malfunctions
caused by defl ection of the light beam at edges.
Exception: Sensors with line beam
Alignment Aid
Retro-refl ective sensors and SmartRefl ect Light barriers
(O200.R, O200.S) are equipped with an alignment aid, which
is integrated in Teach Level 1 and indicates the strength of the
received signal.
Align sensor, faster fl ashing,
better reception
n
qTarget
®
The Baumer design aligns the sensor‘s light beam to the
fi xing holes (qTarget
®
) This allows a fast and easy installation
without fi ne-tuning as well as fast exchange.
General Information for Transparent Object Detection
This sensor is optimized to detect reliabily transparent
objects such as foils, bottles and more.
To be able to detect all diff erent kind of objects but
to be also robust to any variations in temperature or
changes of the background reference/refl ector (dust
as example), the sensor has a compensation/tracking
algorithm implemented.
Still it is recommended to evaluate carefully the most
robust sensitivity setting to reliable detect the objects
by avoiding a setting too sensitive respecting the
enviroment conditions.
Please check the product packaging for the pre-confi -
gured sensitivity setting.
Object Typically Sensitivity Settings
Foils 10% or 20%
Flow pack 20%
Trays 20%
Colored bottles, fi lled
or empty
30% or higher
Transparent bottles,
fi lled or empty
20%
Sensitivity 10%
Most sensitive setting
Sensitivity 20% Detection of almost any objects
Sensitivity 30%
Robust on reference against
dust, tilting
Models with IO-Link can be adjusted manually down to
detect an attenuation of 5%.
In addition a variety of parameters and additional data
are available to set up the application as reliable as
possible.
- Measured attenuation/variation (Relative value)
- Sensitivity settings
- Tracking settings
- Autoteach settings
- Delay fi lters
- Hysteresis settings
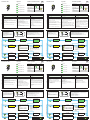
Teach-In OK
Teach-In NOK
2 sec / Level 1
4 sec / Level 2
6 sec / Level 3
8 sec / Level 4
8
8
X
11
22
2
2
BN (1)
+V
S
WH (2)
Teach-In
Idle 60 sec
4
4
4
4
Idle 4 sec
Idle 4 sec
Idle 60 sec
Idle 60 sec
or
Enter Teach Level
- Place ferromagnetic tool as shown right to
activate qTeach
® or connect Teach-In wire to +Vs
- Green and yellow LED light up if tool / Teach-In is
recognized properly
- Remove after n sec for desired level
A TAP is a short touch (>100 ms) of the tool as
shown right
General Information
- qTeach
® locks 5 min after power up*
- If locked, qTeach
® can be reactivated by re-apply-power or
by connecting the Teach-In wire for >15 sec. to +Vs
- External teach-in is always possible (no locking)
- In teach mode the output changes to 0V
- During operation the teach wire should be connected to 0V
- For external Teach-In connect Teach-In to +Vs
1-Point Teach
Alignment Aid
Sensitivity
Output Logic
TAP to change
setting
Factory Reset
Do nothing for factory reset
Teach-In Instruction
Indication Logic
Active if object present
Inactive if object present
Align the sensor to
the refl ector /
reference & TAP
TAP to change
setting
Indication Sensitivity
10%
20%
30%
10% Foil mode, only O200.R
20% Foil mode, only O200.R
30% Foil mode, only O200.R
After the defi ned idle time, the sensor returns to
operation mode (60 sec before fi rst TAP, 4 sec
after fi rst TAP).
Any changes are stored.
Place tool >2 sec : Leave Teach-In without
changes.
>12 sec: Sensor turns to operation mode without any changes
1
2
4
1
8
8
LED Indicators Green Yellow
Power on
Short circuit
Output 1 active
Output 1 signal close
to threshold
Teach-In mode see Teach-In Instruction
LED Indication Legend Operating Mode
LED on
LED fl ashing 1 Hz
LED fl ashing 2 Hz
LED fl ashing 4 Hz
Transparent object detection Foil ruptures/break detection
(Foil mode*, only O200.R)
Foil ruptures/break detection
(only O200.S)
Level 1
1-Point Teach 1-Point Teach 1-Point Teach
If teached to a reference or a refl ector, the sensor is
able to detect the smallest variations.
A tracking algorithm* compensates any variations of
the background reference or refl ector.
The sensitivity can be adjusted in Teach level 2.
The sensitivity describes how much the received
signal needs to be damped before switching on.
Higher = More robust on variations (dirt, dust, vibra-
tions) of the background reference/refl ector
Lower = More sensitive on transparent objects
By choosing a sensitivity setting described as foil
mode, the sensor can be set up to detect more
reliable clear or colored foils.
This mode is recommended if the background can be
rarely seen (only in case of an error, a.e. foil rupture
detection).
Clear and colored foils
Perform the teach on a clear part of the foil
- The foil must be stretched and smooth and clean
- It is recommended to mount the sensor 3 ...5° slan-
ted in relation to the foil to avoid any direct refl ections.
If set up in foil mode, the sensor tracks small varia-
tions of the foil including of variations of the refl ector*
In case of a foil rupture/break detection, the backg-
round can be rarely seen (only in case of error).
Clear foil
It is recommended to perform a teach with a foil
between sensor and reference to detect any variation
to the foil. Note, that the output is inverted.
- The foil must be stretched and smooth, clean and
clear
- It is recommended to mount the sensor 3 ...5° slan-
ted in relation to the foil to avoid any direct refl ections.
Colored foil
Perform the teach without the target/foil between
sensor and reference.
Teach-In Description Level 1
Englisch
EN
*This parameter is adjustable by IO-Link. Please check the IO-Link manual available on www.baumer.com
LED fl ashing 8 Hz
1
2
4
1
8
8
LED Indikatoren Grün Gelb
Betriebsanzeige
Kurzschluss
Ausgang 1 aktiv
Ausgang 1 Signal
nahe der Schwelle
Teach-In Modus siehe Teach-In Anweisung
LED Anzeige Legende Betriebsmodus
LED leuchtet
LED blinkt 1 Hz
LED blinkt 2 Hz
LED blinkt 4 Hz
Erkennung transparenter Objekte Folienriss- oder Brucherkennung
(Folienmode*, nur O200.R)
Folienriss- oder Brucherkennung
(nur O200.S)
Level 1
1-Punkt Teach 1-Punkt Teach 1-Punkt Teach
Wenn der Sensor auf eine Hintergrundreferenz oder einen
Refl ektor eingelernt wird, ist er in der Lage,
kleinste Abweichungen zu erkennen.
Ein Tracking-Algorithmus* kompensiert alle Variationen der
Hintergrundreferenz oder des Refl ektors.
Die Empfi ndlichkeit kann im Teach-Level 2 eingestellt
werden. Diese beschreibt, wie stark das empfangene
Signal gedämpft werden muss, um einen Schaltvorgang
auszlösen.
Höher = Robuster gegenüber Variationen (Schmutz, Staub,
Vibrationen) der Hintergrundreferenz/des Refl ektors.
Niedriger = Empfi ndlicher auf transparente Objekte
Durch die Wahl einer Empfi ndlichkeitseinstellung, die als
Folienmode bezeichnet wird, kann der Sensor so eingestellt
werden, dass er zuverlässiger klare oder farbige Folien
erkennt.
Dieser Modus wird empfohlen, wenn der Hintergrund
nur selten zu sehen ist (nur im Falle eines Fehlers, z.B.
Folienbruch).
Klare und farbige Folien
Führe den Teachvorgang auf einen transparenten Teil der
Folie durch
- Die Folie muss gedehnt und glatt und sauber sein
- Es wird empfohlen, den Sensor 3 ...5° schräg zur Folie zu
montieren, um direkte Refl exionen zu vermeiden.
Im Folienmodus trackt* der Sensor Veränderungen der Folie
inklusive der Variationen des Refl ektors.
Im Falle einer Folienbrucherkennung ist der Hintergrund nur
selten zu sehen (nur im Fehlerfall).
Klare Folie
Es wird empfohlen, einen Teach mit einer Folie zwischen
Sensor und Referenz durchzuführen, um jegliche Abwei-
chungen zur Folie zu erkennen.
Beachte, dass der Ausgang invertiert ist.
- Die Folie muss gedehnt und glatt, sauber und klar sein.
- Es wird empfohlen, den Sensor 3 ...5° schräg zur Folie zu
montieren, um direkte Refl exionen zu vermeiden.
Farbige Folie
Führe den Teachvorgang ohne die Folie zwischen Sensor
und Referenz durch. Das Hintergrundtracking* funktioniert in
diesem Fall nur sehr eingeschränkt.
Teach-In Beschreibung Level 1
DE
*Dieser Parameter kann per IO-Link verändert werden. Weitere Details fi nden Sie im IO-Link Manual verfügbar auf www.baumer.com
LED blinkt 8 Hz
Teach-In OK
Teach-In NOK
2 sec / Level 1
4 sec / Level 2
6 sec / Level 3
8 sec / Level 4
8
8
X
11
22
2
2
BN (1)
+V
S
WH (2)
Teach-In
Idle 60 sec
4
4
4
4
Idle 4 sec
Idle 4 sec
Idle 60 sec
Idle 60 sec
or
Allgemeine Information
- qTeach® verriegelt 5 min nach dem Einschalten*
- Falls gesperrt, kann qTeach® durch ein erneutes Einschalten oder
durch den Anschluss der Teach-In-Leitung für >15 Sek. an +Vs reaktiviert
werden
- Externes Teach-In ist immer möglich (keine Verriegelung)
- Im Teachmodus wechselt der Ausgang auf 0V
- Im Normalbetrieb muss die Teachleitung auf 0V gelegt werden
- Für externes Teach-in, Teachleitung entsprechend mit +Vs verbinden
1-Punkt Teach
Ausrichthilfe
Den Sensor zu
Refl ektor / Referenz
ausrichten & TAP
Ausgangslogik
TAP um Einstellung
zu ändern
Werkseinstellungen
Keine weiteren Eingriff e nötig
Teach Level auswählen
- Platziere das ferromagnetische Werkzeug wie
rechts dargestellt um qTeach® zu aktivieren oder
verbinde die Teachleitung mit +Vs
- Die grüne und gelbe LED leuchten auf, wenn das
Werkzeug korrekt erkannt wird
- Nach n Sek. entfernen, um das gewünschte Level
auszuwählen
Ein TAP ist eine kurze Berührung (>100 ms) des
Werkzeugs
Teach-in Anleitung
Indikation Logik
Aktiv, wenn Objekt präsent
Inaktiv, wenn Objekt präsent
TAP um Einstellung
zu ändern
Nach der defi nierten Idle-Zeit kehrt der Sensor in
den Betriebsmodus zurück (60 Sekunden vor dem
ersten TAP, 4 Sekunden nach dem ersten TAP).
Alle Änderungen werden gespeichert.
Werkzeug platzieren >2 Sek.: Verlasse Teach-In
ohne Änderungen.
Sensitivität
Indikation Sensitivität
10%
20%
30%
10% Folienmode, nur O200.R
20% Folienmode, nur O200.R
30% Folienmode, nur O200.R
>12 Sek: Sensor geht ohne Änderung in den Betriebsmodus über
Seite wird geladen ...
-
 1
1
-
 2
2


Baumer O200.SP.T-GW1J.72CV/H006 Bedienungsanleitung
- Typ
- Bedienungsanleitung
in anderen Sprachen
Verwandte Artikel
-
Baumer O200.GR-GW1J.72CV/E026 Bedienungsanleitung
-
Baumer U300.R50-GP1J.72N Assembly Instruction
-
Baumer O300.SP.T-GW1J.72N Bedienungsanleitung
-
-
-
Baumer O300H.GL-GW1J.PVCV Bedienungsanleitung
-
-
Baumer O300H.SL-GW1J.PVNV Bedienungsanleitung
-
-