Kenwood KMX50GY (OW20011029) Benutzerhandbuch
- Kategorie
- Mischer
- Typ
- Benutzerhandbuch

KMX50 series
KMX80 series

English 1 - 6
Nederlands 7 - 13
Français 14 - 20
Deutsch 21 - 27
Italiano 28 - 34
Português 35 - 41
Español 42 - 48
Dansk 49 - 55
Svenska 56 - 61
Norsk 62 - 67
Suomi 68 - 73
Türkçe 74 - 80
Ïesky 81 - 87
Magyar 88 - 94
Polski 95 - 101
Ekkgmij 102 - 109
Русский 110 - 116
´¸∂w
711 - 221

before using your Kenwood appliance
●
Read these instructions carefully and retain for future
reference.
●
Remove all packaging and any labels.
safety
●
Switch off and unplug before fitting or removing
tools/attachments, after use and before cleaning.
●
Keep your fingers away from moving parts and fitted
attachments.
●
Never leave the machine on unattended.
●
Never use a damaged machine. Get it checked or repaired:
see ‘service’, page 6.
●
Never let the cord hang down where a child could grab it.
●
Never let the power unit, cord or plug get wet.
●
Never use an unauthorised attachment or both outlets at the
same time
●
Never exceed the maximum capacities on page 4.
●
When using an attachment, read the safety instructions that
come with it.
●
Take care when lifting this appliance as it is heavy. Ensure the
head is locked and that the bowl, tools, outlet cover and cord
are secure before lifting.
●
This appliance is not intended for use by persons (including
children) with reduced physical, sensory or mental capabilities,
or lack of experience and knowledge, unless they have been
given supervision or instruction concerning use of the
appliance by a person responsible for their safety.
●
Children should be supervised to ensure that they do not play
with the appliance.
●
Only use the appliance for its intended domestic use.
Kenwood will not accept any liability if the appliance is subject
to improper use, or failure to comply with these instructions.
know your Kenwood kitchen machine
1

before plugging in
●
Make sure your electricity supply is the same as the one shown on
the underside of your machine.
●
This appliance conforms to EC directive 2004/108/EC on
Electromagnetic Compatibility and EC regulation no. 1935/2004 of
27/10/2004 on materials intended for contact with food.
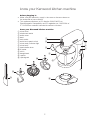
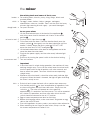
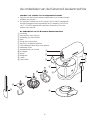
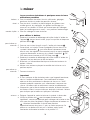
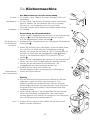
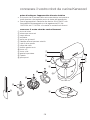
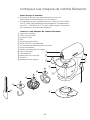
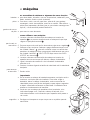
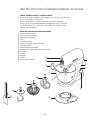
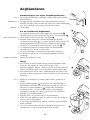
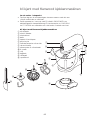
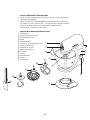
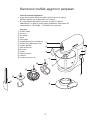
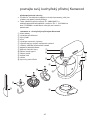
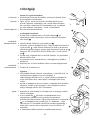
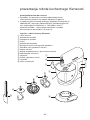
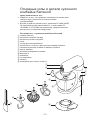
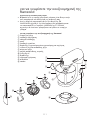
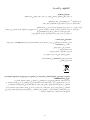
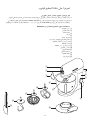
know your Kenwood kitchen machine
mixer head
attachment outlet
outlet cover
bowl
tool socket
on/off and speed switch
mixer ready indicator light
mixer body
head release lever
K beater
whisk
dough hook
spatula
splashguard
2
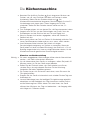
know your Kenwood kitchen machine

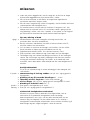
the mixing tools and some of their uses
beater
●
For making cakes, biscuits, pastry, icing, fillings, éclairs and
mashed potato.
whisk
●
For eggs, cream, batters, fatless sponges, meringues,
cheesecakes, mousses, soufflés. Don’t use the whisk for heavy
mixtures (eg creaming fat and sugar) – you could damage it.
dough hook
●
For yeast mixtures.
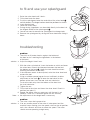
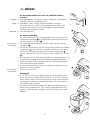
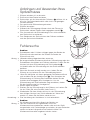
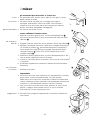
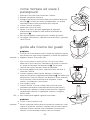
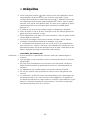
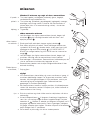
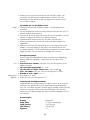
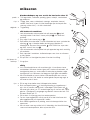
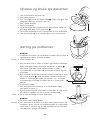
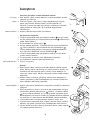
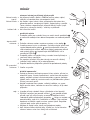
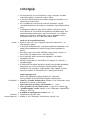
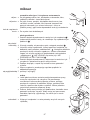
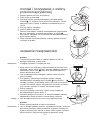
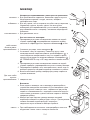
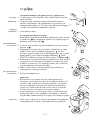
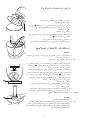
to use your mixer
1 Lift the head release lever at the back of the appliance
and at the same time lift the head until it locks in the raised
position .
to insert a tool 2 Push up until it stops then turn .
3 Fit the bowl onto the base. Place the handle directly over the
unlock symbol , then gently turn the bowl clockwise until the
handle is directly above the lock symbol . DO NOT USE
excessive force and DO NOT overtighten .
4 Lift the head release lever at the back of the appliance and at the
same time lower the mixer head .
5 Plug into the power supply and the mixer ready indicator light
will glow.
6 Switch on by turning the speed switch to the desired setting.
to remove a tool 7 Turn and remove.
important
●
If the mixer head is raised during operation, the machine will stop
working straight away. To re-start the mixer, lower the mixer head,
turn the speed switch to the off position, wait a few seconds and
then re-select the speed. The mixer should resume operating
straight away.
●
Whenever the mixer head is raised the mixer ready indicator light
will go out. When the head is lowered, the light will glow indicating
the mixer is ready to use.
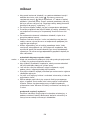
hints
●
Switch off and scrape the bowl with a spatula when necessary.
●
Use the fold position for slow incorporation of ingredients such
as when mixing flour and fruit into cake mixes. Simply turn the
switch to . The mixer will operate on slow speed for
approximately 2
1
⁄2 revolutions and then pause. This will be repeated
for a further 20 operations and then stop after which time the
switch should be returned to the off ‘O’ position.
●
Eggs at room temperature are best for whisking.
●
Before whisking egg whites, make sure there’s no grease or egg
yolk on the whisk or bowl.
●
Use cold ingredients for pastry unless your recipe states otherwise.
●
When creaming fat and sugar for cake mixes, always use the
fat at room temperature or soften it first.
3
the mixer

●
Your mixer has been fitted with a ‘soft start’ feature to minimise
spillage. However if the machine is switched on with a heavy
mixture in the bowl such as bread dough, you may notice that the
mixer takes a few seconds to reach the selected speed.
points for bread making
important
●
Never exceed the maximum capacities below - you will overload
the machine.
●
To protect the life of the machine always allow a rest of 20 minutes
between loads.
●
If you hear the machine labouring, switch off, remove half the dough
and do each half separately.
●
The ingredients mix best if you put the liquid in first.
●
At intervals stop the machine and scrape the mixture off the dough
hook.
●
Different batches of flour vary considerably in the quantities of liquid
required and the stickiness of the dough can have a marked effect
on the load imposed on the machine. You are advised to keep the
machine under observation whilst the dough is being mixed; the
operation should take no longer than 5 minutes.
speed switch
These are a guide only and will vary depending upon the quantity of
mix in the bowl and the ingredients being mixed.
beater
●
creaming fat and sugar start on ‘min’, gradually increasing
to a higher speed.
●
beating eggs into creamed mixtures 4 - ‘max’.
●
folding in flour, fruit etc ‘min - 1 or fold .
●
all in one cakes start on ‘min’, gradually increase to ‘max’.
●
rubbing fat into flour ‘min - 2.
whisk
●
Gradually increase to ‘max’.
dough hook
●
Start on ‘min’, gradually increasing to 1.
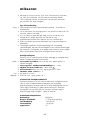
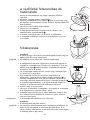
electronic speed sensor control
Your mixer is fitted with an electronic speed sensor control that is
designed to maintain the speed under different load conditions,
such as when kneading bread dough or when eggs are added to a
cake mix. You may therefore hear some variation in speed during
the operation as the mixer adjusts to the load and speed selected -
this is normal.
maximum capacities
shortcrust pastry 680g flour
fruit cake mix 2.72 Kg total mix
stiff bread dough 1.35 Kg flour
soft bread dough 1.3 Kg flour
egg whites 12
4
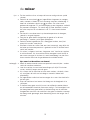
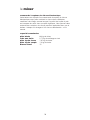
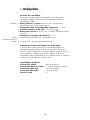
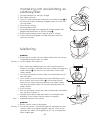
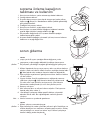
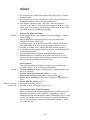
the mixer

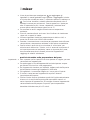
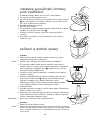
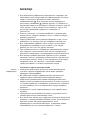
1 Raise the mixer head until it locks.
2 Fit the bowl onto the base.
3 Push the splashguard onto the underside of the mixer head
until fully located. The hinged section should be positioned as shown.
4 Insert required tool.
5 Lower the mixer head.
●
During mixing, ingredients can be added directly to the bowl via
the hinged section of the splashguard .
●
You do not need to remove the splashguard to change tools.
6 Remove the splashguard by raising the mixer head and sliding it
down.
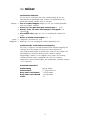
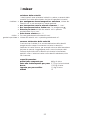
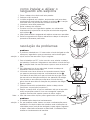
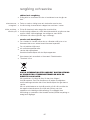
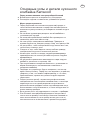
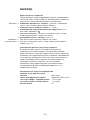
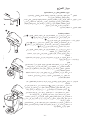
troubleshooting
problem
●
The whisk or K-beater knocks against the bottom of
the bowl or isn’t reaching the ingredients in the bottom
of the bowl.
solution
●
Adjust the height. Here’s how:
1 With the mixer switched off, insert the beater or whisk and lower
the mixer head. Check the clearance between the tool and
the bottom of the bowl . Ideally the tool should be almost
touching the bottom of the bowl.
2 If the clearance needs to be adjusted, raise the mixer head and
remove the tool.
3 Using a suitable spanner loosen the nut sufficiently to allow
adjustment of the shaft . To lower the tool closer to the
bottom of the bowl, turn the tool shaft anti-clockwise.
To raise the tool away from the bottom of the bowl turn
the shaft clockwise.
4 Tighten the nut.
5 Fit the tool to the mixer and lower the mixer head. Check its
position (see point 1).
6 Repeat the above steps as necessary until the tool is set
correctly. Once this is achieved tighten the nut securely.
Note:
●
No adjustment of the dough hook is necessary.
problem
●
The mixer stops during operation.
solution
●
If for any reason power to the mixer is interrrupted and the
machine stops working, turn the speed switch to the off position,
wait a few seconds and then re-select the speed. The mixer
should resume operating straight away.
to fit and use your splashguard
5

6
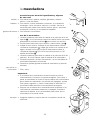
care and cleaning
●
Always switch off and unplug before cleaning.
mixer body,
●
Wipe with a damp cloth, then dry.
outlet cover
●
Never use abrasives or immerse in water.
bowl, tools,
●
Wash by hand, then dry thoroughly or wash in the dishwasher.
splashguard
●
Never use a wire brush, steel wool or bleach to clean your
stainless steel bowl. Use vinegar to remove limescale.
●
Keep away from heat (cooker tops, ovens, microwaves).
service and customer care
●
If the cord is damaged it must, for safety reasons, be replaced
by KENWOOD or an authorised KENWOOD repairer.
If you need help with:
●
using your machine
●
servicing or repairs
●
Contact the shop where you bought your appliance.
●
Designed and engineered by Kenwood in the UK.
●
Made in China.
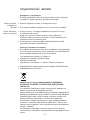
IMPORTANT INFORMATION FOR CORRECT DISPOSAL OF THE PRODUCT
IN ACCORDANCE WITH EC DIRECTIVE 2002/96/EC.
At the end of its working life, the product must not be disposed of as urban waste.
It must be taken to a special local authority differentiated waste collection centre or to a
dealer providing this service.
Disposing of a household appliance separately avoids possible negative consequences
for the environment and health deriving from inappropriate disposal and enables the
constituent materials to be recovered to obtain significant savings in energy and
resources. As a reminder of the need to dispose of household appliances separately, the
product is marked with a crossed-out wheeled dustbin.
cleaning and service

voordat u uw Kenwood-apparaat gebruikt:
●
Lees deze instructies zorgvuldig door en bewaar ze voor
toekomstig gebruik.
●
Verwijder alle verpakking en labels.
veiligheid
●
Schakel het apparaat uit en haal de stekker uit het stopcontact
voordat u instrumenten/hulpstukken aanbrengt of verwijdert, na
ieder gebruik en alvorens het apparaat te reinigen.
●
Houd uw vingers uit de buurt van bewegende onderdelen en vaste
accessoires.
●
Laat de machine nooit onbeheerd achter, wanneer deze
ingeschakeld is, en houd hem buiten het bereik van kinderen.
●
Gebruik de machine niet als hij beschadigd is. Laat hem nakijken of
repareren: zie paragraaf ‘onderhoud en klantenservice’, blz. 13.
●
Laat het snoer nooit naar beneden hangen waar een kind erbij kan.
●
De motor, het snoer of de stekker nooit nat laten worden.
●
Gebruik nooit een ongeautoriseerd hulpstuk of meer dan één
aansluitpunt tegelijkertijd.
●
Overschrijd nooit de maximumcapaciteit (blz.11).
●
Lees eerst de veiligheidsvoorschriften bij de accesoires, voordat u
ze gebruikt.
●
Wees voorzichtig wanneer u dit apparaat optilt, omdat het zwaar
is. Zorg dat de kop vergrendeld is en dat de kom, hulpstukken,
afdekking van het aansluitpunt en het snoer vastzitten voor u het
apparaat optilt.
●
Dit apparaat is niet bedoeld voor gebruik door personen (inclusief
kinderen) met verminderde lichamelijke, zintuiglijke of geestelijke
vermogens of gebrek aan ervaring en kennis, tenzij ze toezicht of
instructies over het gebruik van het apparaat hebben gekregen van
de persoon die verantwoordelijk is voor hun veiligheid.
●
Op kinderen moet toezicht gehouden worden om er zeker van te
zijn dat ze niet met het apparaat spelen.
●
Gebruik het apparaat alleen voor het huishoudelijke gebruik
waarvoor het is bedoeld. Kenwood kan niet aansprakelijk worden
gesteld in het geval dat het apparaat niet correct is gebruikt, of
waar deze instructies niet worden opgevolgd.
7
de onderdelen van de Kenwood keukenmachine
NL

voordat u de stekker in het stopcontact steekt
●
Zorg dat uw elektriciteitstoevoer overeenkomt met de aanwijzingen
onderop de machine.
●
Dit apparaat voldoet aan de EC-richtlijn 2004/108/EC betreffende
de elektromagnetische compatibiliteit en EC-bepaling 1935/2004
van 27/10/2004 betreffende materialen die bestemd zijn voor
contact met voedsel.
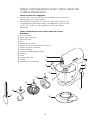
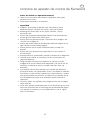
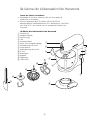
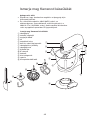
de onderdelen van de Kenwood keukenmachine
mixerkop
aansluitpunt voor hulpstuk
afdekking van aansluitpunt
kom
fitting voor hulpstukken
aan/uit en snelheidschakelaar
indicatielampje Mixer klaar voor gebruik
hoofddeel mixer
ontgrendeling van de kop
K-klopper
garde
deeghaak
spatel
spatscherm
de onderdelen van de Kenwood keukenmachine
8

de menghulpstukken en hoe ze gebruikt kunnen
worden
klopper
●
Voor het bereiden van taarten, koekjes, gebakjes, suikerglazuur,
vullingen, éclairs en aardappelpuree.
garde
●
Voor eieren, room, beslag, vetloos eiergebak, meringue,
kaastaart, mousse, soufflé. Gebruik de garde niet voor zware
mengsels (bijv. boter en suiker vermengen), omdat de garde
daardoor beschadigd kan raken.
deeghaak
●
Voor gistmengsels.
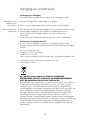
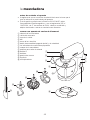
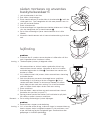
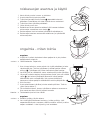
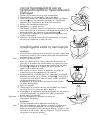
de mixer gebruiken
Zet de hendel om de kop te ontgrendelen aan de achterkant van
het apparaat omhoog en til tegelijkertijd de kop op tot deze in
de omhoog-stand vastklikt .
een hulpstuk 2 Duw het hulpstuk omhoog tot het niet verder kan en draai het
bevestigen vervolgens .
3 Zet de kom op de basis. Zet het handvat recht boven het symbool
Ontgrendeld , draai de kom vervolgens voorzichtig naar rechts
tot het handvat zich recht boven het symbool Vergrendeld
bevindt. Gebruik NIET te veel kracht en draai de kom NIET te vast
.
4 Zet de hendel om de kop te ontgrendelen aan de achterkant van
het apparaat omhoog en laat de mixerkop tegelijkertijd zakken.
5 Steek de stekker in het stopcontact en het indicatielampje Mixer
klaar voor gebruik gaat branden.
6 Schakel het apparaat aan door de snelheidsschakelaar tot in de
gewenste stand te draaien.
een hulpstuk 7 Draai en verwijder het.
verwijderen
belangrijk
●
Als de kop van de mixer opgetild wordt terwijl het apparaat aan
staat, dan stopt het apparaat onmiddellijk. Om de mixer opnieuw
op te starten, draait u de knop naar de uit-stand, wacht een paar
seconden en selecteert de snelheid opnieuw. De mixer moet nu
onmiddellijk weer aangaan.
●
Wanneer de mixerkop omhoog staat, gaat het indicatorlampje
Mixer klaar voor gebruik uit. Als de kop omlaag gebracht wordt,
gaat het lampje branden; dit geeft aan dat de mixer klaar is voor
gebruik.
9
de mixer

tips
●
Zet de machine uit en schraap de kom zo nodig met een spatel
schoon.
●
Gebruik de vouwstand om ingrediënten langzaam te mengen,
zoals wanneer u bloem en fruit vermengt voor een cakebeslag. U
hoeft de schakelaar slechts op te zetten. De mixer werkt
gedurende ongeveer 2½ omwentelingen op een langzame snelheid
en pauzeert vervolgens. Dit wordt nog 20 keer herhaald, waarna
de mixer stopt en de schakelaar in de 'O’-stand moet worden
gezet.
●
Het beste is om eieren eerst op kamertemperatuur te brengen,
voordat u ze gaat kloppen.
●
Zorg dat er geen boter of eigeel op de garde of in de kom
aanwezig is, voordat u eiwit gaat opkloppen.
●
Gebruik koude ingrediënten als u deeg gaat maken, tenzij het
recept iets anders voorschrijft.
●
Wanneer u boter en suiker voor een taart vermengt, zorg altijd dat
de boter op kamertemperatuur is gebracht of dat u de boter eerst
zacht laat worden.
●
Uw mixer is uitgerust met een ‘langzame start’ functie om spatten
te minimaliseren. Als de machine echter aangezet wordt terwijl er
een zwaar mengsel in de kom zit, zoals brooddeeg, kan het even
duren voordat de mixer de geselecteerde snelheid bereikt.
tips voor het bereiden van brood
belangrijk
●
Nooit de onderstaande maximumcapaciteit overschrijden – anders
raakt de machine overbelast.
●
Laat de machine tussen twee bewerkingscycli altijd 20 minuten
rusten, zodat hij langer mee zal gaan.
●
Als u hoort dat de machine te hard moet werken, schakelt u hem
uit, verwijdert de helft van het deeg en verwerkt iedere helft
afzonderlijk.
●
De ingrediënten zullen het beste mengen als u eerst de vloeistof in
de kom giet.
●
Stop de machine af en toe om het deeg van de deeghaak af te
schrapen.
●
Er bestaat een groot verschil tussen verschillende soorten bloem
en de hoeveelheid vloeistof die ervoor nodig is. De kleverigheid van
het deeg heeft een groot effect op de belasting van de machine.
Aangeraden wordt om de machine in de gaten te houden wanneer
het deeg wordt gemengd; deze bewerking duurt niet langer dan 5
minuten.
de mixer
10

snelheidsschakelaar
Dit zijn slechts richtlijnen; de ware snelheid hangt af van de
hoeveelheid die gemengd moet worden. De ingrediënten die
gemengd moeten worden zitten in de kom.
klopper
●
vet en suiker kloppen begin op ‘min’ en schakel geleidelijk
naar een hogere snelheid.
●
eieren in een glad mengsel vermengen: 4 - ‘max’.
●
bloem, fruit, etc door het mengsel scheppen: 1 of
vouwen .
●
één-staps cake begin op ‘min’ en verhoog de snelheid tot
‘max’.
●
boter en bloem vermengen: min - 2.
garde
●
Langzaam versnellen tot ‘max’.
deeghaak
●
Begin op ‘min’ en verhoog de snelheid geleidelijk tot 1.
elektronische snelheidssensorregeling
De mixer is uitgerust met een elektronische snelheidsregeling die
speciaal werd ontworpen om een constante snelheid bij
verschillende belastingen te handhaven, zoals bij het kneden van
brooddeeg of wanneer eieren aan een cakemix worden
toegevoegd. Daarom is het mogelijk dat u tijdens de werking
snelheidsvariaties hoort, aangezien de mixer de snelheid
automatisch aan de belasting en aan de gekozen snelheid aanpast
– dit is normaal.
maximumcapaciteit
kruimeldeeg 680 gr bloem
fruittaartmix 2,72 kg totale mix
deeg voor hard brood 1,35 kg bloem
deeg voor zacht brood 1,35 kg bloem
eiwit
●
12
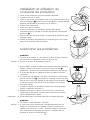
de mixer
11

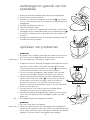
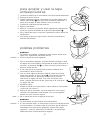
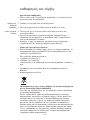
1 Breng de mixerkop omhoog totdat deze wordt vergrendeld.
2 Plaats de kom op het onderstel.
3 Monteer het spatdeksel onderaan de mixerkop , tot hij goed
vast zit. Het scharnier bevindt zich zoals op de afbeelding staat
aangegeven.
4 Monteer het gewenste hulpstuk.
5 Laat de mixerkop zakken.
●
Tijdens het mixen kunt u ingrediënten rechtstreeks aan de kom
toevoegen via het scharnierende deel van de spatbescherming .
●
U hoeft het spatdeksel niet te verwijderen om van hulpstuk te
wisselen.
6 Verwijder het spatdeksel door de mixerkop omhoog te halen en
het deksel ervanaf te trekken.
oplossen van problemen
probleem:
●
De garde of de K-klopper slaat tegen de bodem van de kom of
reikt niet tot aan de ingrediënten op de bodem van de kom.
oplossing
●
Pas de hoogte aan. Ga hierbij als volgt te werk:
1 Schakel de mixer uit, bevestig de klopper of de garde en laat de
kop van de mixer zakken. Controleer de hoeveelheid ruimte
tussen het hulpstuk en de bodem van de kom . Het hulpstuk
moet het liefst de bodem van de kom bijna aanraken.
2 Als de tussenruimte aangepast moet worden, laat u de kop
van de mixer omhoog komen en verwijdert u het hulpstuk.
3 Gebruik een geschikte sleutel om de moer voldoende los te
draaien en de steel bij te stellen . Om het hulpstuk dichter
bij de bodem van de kom te krijgen, draait u de steel van
het hulpstuk naar links. Om het hulpstuk verder van de
bodem van de kom te verwijderen, draait u de steel naar rechts.
4 Draai de moer weer vast.
5 Zet het hulpstuk in de mixer en laat de mixerkop zakken.
Controleer de positie van de klopper (zie punt 1).
6 Herhaal zo nodig de bovengenoemde stappen tot het hulpstuk
zich in de juiste positie bevindt. Vervolgens draait u de moer
goed vast.
NB:
●
De deeghaak hoeft niet bijgesteld te worden.
probleem
●
De mixer stopt tijdens het gebruik.
oplossing
●
Mocht de stroom naar de mixer om enige reden onderbroken
worden en het apparaat stopt, dan draait u de snelheidknop naar
de uit-stand, wacht een paar seconden en selecteert de snelheid
opnieuw. De mixer moet nu onmiddellijk weer aangaan.
aanbrengen en gebruik van het
spatdeksel
12

reiniging en onderhoud
verzorging en reiniging
●
De machine altijd uitzetten en de stekker uit het stopcontact halen.
hoofddeel mixer,
●
Met een vochtige doek schoonvegen en afdrogen.
afdekking van
aansluitpunt
●
Geen schuurmiddelen gebruiken en nooit in water onderdompelen.
kom, hulpstukken,
●
Met de hand wassen en goed afdrogen of in de vaatwasmachine wassen.
spatscherm
●
Gebruik geen staalborstel, schuursponsje of bleekmiddel om uw
roestvrijstalen kom te reinigen. Gebruik azijn om kalkaanslag te
verwijderen.
●
Uit de buurt van hittebronnen houden (gaspitten, ovens, magnetrons).
onderhoud en klantenservice
●
Als het snoer beschadigd is, moet het om veiligheidsredenen door
Kenwood of een door Kenwood geautoriseerd reparatiebedrijf vervangen
worden.
Als u hulp nodig hebt met:
●
het gebruik van uw apparaat of
●
onderhoud en reparatie
kunt u contact opnemen met de winkel waar u het apparaat gekocht hebt.
●
Ontworpen en ontwikkeld door Kenwood in het VK.
●
Vervaardigd in China.
BELANGRIJKE INFORMATIE VOOR DE CORRECTE
VERWERKING VAN HET PRODUCT IN OVEREENSTEMMING
MET DE EUROPESE RICHTLIJN 2002/96/EC
Aan het einde van de levensduur van het product mag het niet samen met
het gewone huishoudelijke afval worden verwerkt. Het moet naar een
speciaal centrum voor gescheiden afvalinzameling van de gemeente
worden gebracht, of naar een verkooppunt dat deze service verschaft. Het
apart verwerken van een huishoudelijk apparaat voorkomt mogelijke
gevolgen voor het milieu en de gezondheid die door een ongeschikte
verwerking ontstaan en zorgt ervoor dat de materialen waaruit het
apparaat bestaat, teruggewonnen kunnen worden om een aanmerkelijke
besparing van energie en grondstoffen te verkrijgen. Om op de verplichting
tot gescheiden verwerking van elektrische huishoudelijke apparatuur te
wijzen, is op het product het symbool van een doorgekruiste vuilnisbak
aangebracht.
13

faites connaissance avec votre robot de
cuisine Kenwood
avant d’utiliser votre appareil Kenwood
●
Lisez et conservez soigneusement ces instructions pour pouvoir
vous y référer ultérieurement.
●
Retirez tous les éléments d’emballage et les étiquettes.
sécurité
●
Éteignez et débranchez l'appareil avant d'adapter ou de retirer tout
élément/accessoire, après l'utilisation et avant le nettoyage.
●
N’approchez jamais vos doigts des éléments en mouvement ou
des accessoires fixés sur votre robot.
●
Ne laissez jamais votre appareil sans surveillance lorsqu’il
fonctionne et maintenez-le hors de portée des enfants.
●
N’utilisez jamais un appareil endommagé ou en mauvais état.
Faites-le vérifier et réparer. Pour cela reportez-vous à la rubrique
'service après-vente' en page 20.
●
Ne laissez jamais le cordon pendre de telle façon qu’un enfant
puisse s’en saisir.
●
Ne mouillez jamais le bloc moteur, le cordon d’alimentation ou la
prise.
●
N’utilisez jamais un accessoire non recommandé ou les deux
sorties en même temps.
●
Ne dépassez jamais les capacités maximales de charge de
l’appareil telles qu’elles sont précisées en page 18.
●
Lorsque vous utilisez un accessoire, lisez attentivement les
instructions sur la sécurité concernant cet accessoire.
●
Cet appareil est lourd. Prenez donc des précautions lorsque vous
le soulevez. Assurez-vous que la tête est verrouillée et que le bol,
les ustensiles, le cache de la sortie et le cordon d’alimentation sont
attachés avant de soulever l’appareil.
●
Cet appareil n’est pas destiné à être utilisé par des personnes (y
compris des enfants) dont les capacités physiques, sensorielles ou
mentales sont diminuées, ou qui ne disposent pas des
connaissances ou de l’expérience nécessaires, à moins qu’elles
n’aient été formées et encadrées pour l’utilisation de cet appareil
par une personne responsable de leur sécurité.
●
Les enfants doivent être surveillés afin qu'ils ne puissent pas jouer
avec cet appareil.
●
N’employez l’appareil qu’à la fin domestique prévue. Kenwood
décline toute responsabilité dans les cas où l’appareil est utilisé
incorrectement ou que les présentes instructions ne sont pas
respectées.
14
F

avant de brancher l’appareil
●
Assurez-vous que la tension de votre installation est la même que
celle indiquée sous votre appareil.
●
Cet appareil est conforme à la directive 2004/108/CE de la CE sur
la compatibilité électromagnétique, et au règlement 1935/2004 de
la CE du 27/10/2004 sur les matériaux destinés au contact
alimentaire.
faites connaissance avec votre robot de cuisine
Kenwood
tête du batteur
sortie pour accessoire
cache de sortie
bol
douille pour ustensile
bouton on/off (marche/arrêt) et de vitesse
témoin lumineux du batteur
corps du batteur
manette de déblocage de la tête
batteur K
fouet
crochet pétrisseur
spatule
protection anti-projections
faites connaissance avec votre robot de
cuisine Kenwood
15

le mixer
les accessoires du batteur et quelques-unes de leurs
utilisations possibles
batteur
●
Pour la confection de cakes, biscuits, pâtisseries, glaçages,
garnitures, éclairs et purées de pommes de terre.
fouet
●
Pour les œufs, la crème, la pâte à beignet, les gâteaux sans
matière grasse, les meringues, les gâteaux au fromage, les
mousses, les soufflés. N’utilisez pas le fouet pour les mélanges
épais (ex matière grasse et sucre) – vous pourriez l’endommager.
crochet à pâte
●
Pour les mélanges à base de levure.
pour utiliser le batteur
1 Soulevez la manette de déblocage de la tête située à l’arrière de
l’appareil , tout en levant la tête, jusqu’à ce qu’elle se bloque en
position relevée .
pour insérer un
ustensile 2 Poussez vers le haut jusqu’à ce qu’il s’arrête puis tournez .
3 Posez le bol sur la base. Placez la poignée juste au-dessus du
symbole "déverrouiller" , puis faire tourner doucement le bol
dans le sens des aiguilles d’une montre jusqu’à ce que la poignée
se trouve directement au-dessus du symbole "verrouiller" . NE
PAS forcer excessivement et NE PAS trop serrer .
4 Soulevez la manette de déblocage de la tête située à l’arrière de
l’appareil, tout en abaissant la tête du batteur.
5 Branchez sur l’alimentation électrique et le témoin lumineux du
batteur s’allume.
6 Mettez sous tension en plaçant le contrôle de la vitesse sur la
position requise.
pour retirer un
ustensile 7 Tournez et retirez-le.
important
●
Si vous soulevez la tête du batteur alors que l’appareil fonctionne,
celui-ci s’arrête immédiatement. Pour redémarrer le batteur,
abaissez la tête, positionnez le sélecteur de vitesse sur "Arrêt",
attendez quelques secondes, puis sélectionnez à nouveau une
vitesse. Le batteur doit se remettre en marche immédiatement.
●
Chaque fois que la tête du batteur est relevée, le témoin lumineux
du batteur s’éteint. Lorsque la tête est abaissée, le témoin s’allume
pour indiquer que le batteur est prêt pour l’utilisation.
astuces
●
Éteignez l’appareil et raclez le bol avec la spatule si nécessaire.
●
Utilisez la position fold pour incorporer lentement des
ingrédients, comme par exemple pour mélanger de la farine et des
fruits pour les pâtes de gâteaux. Réglez simplement le bouton sur
. Le batteur fonctionnera à vitesse lente pendant
approximativement deux tours ½ puis se mettra en pause. Ce
processus se répétera 20 fois puis s’arrêtera, après quoi il
conviendra de remettre le bouton sur la position ‘O’.
16

●
Il est conseillé d’utiliser des œufs à température ambiante pour
les battre.
●
Avant de monter des blancs en neige, vérifiez qu’il n’y a pas de
graisse ou de jaune d’œuf sur le fouet ou dans le bol.
●
Utilisez des ingrédients froids pour la pâte sauf indications contraires
mentionnées sur votre recette.
●
Si vous préparez des gâteaux à base de matière grasse et de sucre,
utilisez-les toujours à température ambiante ou faites-les ramollir
auparavant.
●
Votre batteur est muni d’une fonction ‘soft start’ (démarrage en
douceur) pour minimiser les déversements. Toutefois, si l’appareil est
mis sous tension alors qu’une préparation lourde se trouve dans le
bol (par exemple de la pâte à pain), quelques secondes peuvent
s’écouler avant que le batteur n’atteigne la vitesse sélectionnée.
points importants pour la fabrication du pain
important
●
Ne dépassez jamais les capacités maximales ci-dessous - vous
risqueriez de surcharger votre appareil.
●
Afin de préserver la durée de vie de votre machine, prévoyez toujours une
période de repos de 20 minutes entre les préparations.
●
Si vous entendez l’appareil forcer, éteignez-le, retirez la moitié de la
pâte et travaillez chaque moitié séparément.
●
Les ingrédients se mélangeront mieux si vous versez les liquides en
premier.
●
Arrêtez régulièrement l’appareil et raclez le mélange avec le crochet à
pâte.
●
Différents types de farine varient considérablement dans les quantités
de liquide nécessaires et la viscosité de la pâte peut avoir un effet
important sur la charge imposée à la machine. Il est conseillé
d’observer l’appareil pendant le mélange de la pâte ; l’opération ne
doit pas durer plus de 5 minutes.
bouton de réglage de la vitesse
Les informations suivantes ne sont données qu’à titre indicatif et
peuvent varier selon la quantité du mélange dans le bol et des
ingrédients mixés.
batteur
●
travailler de la matière grasse et du sucre commencez sur
la position ‘min’, passez progressivement à une vitesse plus élevée.
●
incorporer les œufs à une crème : 4 - ‘max’.
●
incorporer la farine, les fruits etc. : 1 ou incorporer .
●
gâteaux en une étape commencez sur ‘min’, augmentez
progressivement pour atteindre la position ‘max’.
●
incorporer les corps gras à la farine : min - 2.
fouet
●
Augmentez progressivement jusqu’à ‘max’.
crochet pétrisseur
●
Commencez sur ‘min’, passez progressivement à 1.
le mixer
17

le mixer
commande à capteur de vitesse électronique
Votre batteur est équipé d’une commande à capteur de vitesse
électronique conçu pour maintenir la vitesse dans différentes
conditions de charge, comme lorsque l’on pétrit de la pâte à pain
ou incorpore les œufs dans une pâte à gâteaux. Vous pouvez donc
entendre des variations de vitesse pendant l’opération alors que le
batteur s’adapte à la charge et à la vitesse sélectionnée – c’est
normal.
capacités maximales
pâte brisée 680 g de farine
cake aux fruits 2,72 kg de mélange en tout
pâte à pain ferme 1,35 kg de farine
pâte à pain souple 1,3 kg de farine
blancs d’œuf 12
18
Seite wird geladen ...
Seite wird geladen ...
Seite wird geladen ...
Seite wird geladen ...
Seite wird geladen ...
Seite wird geladen ...
Seite wird geladen ...
Seite wird geladen ...
Seite wird geladen ...
Seite wird geladen ...
Seite wird geladen ...
Seite wird geladen ...
Seite wird geladen ...
Seite wird geladen ...
Seite wird geladen ...
Seite wird geladen ...
Seite wird geladen ...
Seite wird geladen ...
Seite wird geladen ...
Seite wird geladen ...
Seite wird geladen ...
Seite wird geladen ...
Seite wird geladen ...
Seite wird geladen ...
Seite wird geladen ...
Seite wird geladen ...
Seite wird geladen ...
Seite wird geladen ...
Seite wird geladen ...
Seite wird geladen ...
Seite wird geladen ...
Seite wird geladen ...
Seite wird geladen ...
Seite wird geladen ...
Seite wird geladen ...
Seite wird geladen ...
Seite wird geladen ...
Seite wird geladen ...
Seite wird geladen ...
Seite wird geladen ...
Seite wird geladen ...
Seite wird geladen ...
Seite wird geladen ...
Seite wird geladen ...
Seite wird geladen ...
Seite wird geladen ...
Seite wird geladen ...
Seite wird geladen ...
Seite wird geladen ...
Seite wird geladen ...
Seite wird geladen ...
Seite wird geladen ...
Seite wird geladen ...
Seite wird geladen ...
Seite wird geladen ...
Seite wird geladen ...
Seite wird geladen ...
Seite wird geladen ...
Seite wird geladen ...
Seite wird geladen ...
Seite wird geladen ...
Seite wird geladen ...
Seite wird geladen ...
Seite wird geladen ...
Seite wird geladen ...
Seite wird geladen ...
Seite wird geladen ...
Seite wird geladen ...
Seite wird geladen ...
Seite wird geladen ...
Seite wird geladen ...
Seite wird geladen ...
Seite wird geladen ...
Seite wird geladen ...
Seite wird geladen ...
Seite wird geladen ...
Seite wird geladen ...
Seite wird geladen ...
Seite wird geladen ...
Seite wird geladen ...
Seite wird geladen ...
Seite wird geladen ...
Seite wird geladen ...
Seite wird geladen ...
Seite wird geladen ...
Seite wird geladen ...
Seite wird geladen ...
Seite wird geladen ...
Seite wird geladen ...
Seite wird geladen ...
Seite wird geladen ...
Seite wird geladen ...
Seite wird geladen ...
Seite wird geladen ...
Seite wird geladen ...
Seite wird geladen ...
Seite wird geladen ...
Seite wird geladen ...
Seite wird geladen ...
Seite wird geladen ...
Seite wird geladen ...
Seite wird geladen ...
Seite wird geladen ...
Seite wird geladen ...
Seite wird geladen ...
-
 1
1
-
 2
2
-
 3
3
-
 4
4
-
 5
5
-
 6
6
-
 7
7
-
 8
8
-
 9
9
-
 10
10
-
 11
11
-
 12
12
-
 13
13
-
 14
14
-
 15
15
-
 16
16
-
 17
17
-
 18
18
-
 19
19
-
 20
20
-
 21
21
-
 22
22
-
 23
23
-
 24
24
-
 25
25
-
 26
26
-
 27
27
-
 28
28
-
 29
29
-
 30
30
-
 31
31
-
 32
32
-
 33
33
-
 34
34
-
 35
35
-
 36
36
-
 37
37
-
 38
38
-
 39
39
-
 40
40
-
 41
41
-
 42
42
-
 43
43
-
 44
44
-
 45
45
-
 46
46
-
 47
47
-
 48
48
-
 49
49
-
 50
50
-
 51
51
-
 52
52
-
 53
53
-
 54
54
-
 55
55
-
 56
56
-
 57
57
-
 58
58
-
 59
59
-
 60
60
-
 61
61
-
 62
62
-
 63
63
-
 64
64
-
 65
65
-
 66
66
-
 67
67
-
 68
68
-
 69
69
-
 70
70
-
 71
71
-
 72
72
-
 73
73
-
 74
74
-
 75
75
-
 76
76
-
 77
77
-
 78
78
-
 79
79
-
 80
80
-
 81
81
-
 82
82
-
 83
83
-
 84
84
-
 85
85
-
 86
86
-
 87
87
-
 88
88
-
 89
89
-
 90
90
-
 91
91
-
 92
92
-
 93
93
-
 94
94
-
 95
95
-
 96
96
-
 97
97
-
 98
98
-
 99
99
-
 100
100
-
 101
101
-
 102
102
-
 103
103
-
 104
104
-
 105
105
-
 106
106
-
 107
107
-
 108
108
-
 109
109
-
 110
110
-
 111
111
-
 112
112
-
 113
113
-
 114
114
-
 115
115
-
 116
116
-
 117
117
-
 118
118
-
 119
119
-
 120
120
-
 121
121
-
 122
122
-
 123
123
-
 124
124
-
 125
125


Kenwood KMX50GY (OW20011029) Benutzerhandbuch
- Kategorie
- Mischer
- Typ
- Benutzerhandbuch
in anderen Sprachen
Verwandte Artikel
-
Kenwood KMX99 Bedienungsanleitung
-
Kenwood Electronics KMX80 series Bedienungsanleitung
-
Kenwood KMX50YW (OW20011035) Benutzerhandbuch
-
-
-
Kenwood KM080 Bedienungsanleitung
-
-
-