BELGACOM TWIST208 Benutzerhandbuch
- Kategorie
- Telefone
- Typ
- Benutzerhandbuch

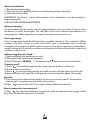
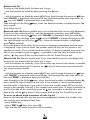
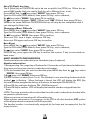
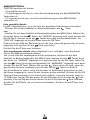
3)Close the battery
cover
3)Schliessen Sie das
Akkufach
2)Place the batteries
controlling the
polarity indicated
2) Setzen Sie die
Akkus ein. Achten
Sie auf die Polarität
Batteries installation / Installation der Akkus
TWIST208 Rev 0 UK- DE
1)Open the battery
cover
1)Öffnen Sie das
Akkufach
2
++
--
++
--
2
3
1
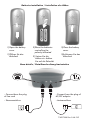
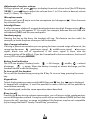
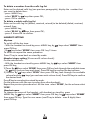
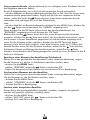
Base details / Detailbeschreibung basisstation
- Connect here the plug of
AC/DC adaptor
- Amtsanschluss
- Connect here the plug
of line cord
- Stromanschluss

Thank you for your choice of the new digital cordless phone, is a DECT (Digital
European Cordless Telephone) phone with GAP (Generic Access Profile) profile.
Together with the audio quality and to the safety offered from the digital technology,
offers manifold and useful features including, for example 30 memories for the
phonebook, the caller identification (with name if on phonebook), 10 volume levels...
All the features are easily accessible through a practical menu.
Thanks to the GAP profile, it is possible to connect 4 handsets to the same base station
giving the possibility of also do an internal conversations between handsets.
Each handset can be subscribed up to 4 bases.
Please read carefully this instructions manual before using your new HI-Tel phone.
ACCESSORIES
TWIST208
- Base unit
- Hand unit
- N. 2 rechargeable batteries AAA1.2V
- AC/AC Adaptor
- Tel-line cord and line plug
- User’s manual
- Warranty card
Precautions
1) Read this manual before to use this phone.
2) Avoid the direct exposure to solar rays and/ or fonts of heat, as like avoid the
installation in damps places and/ or dusty.
3) Don't support objects on the cables and/ or on the phone.
4) Don't use adaptor and/ or batteries diverged from that specified on this
instructions manual or however from those in endowment.
5) In case of storms, disconnect the phone from power and phone lines.
6) Clean by using a cloth slightly dampened. Don't use alcohol, solvents, abrasives, etc.
7) Don't effect reparations alone. Tampering and/ or uses not in conformity with as
described on the present book will do decay the guarantee.
8) BELGACOM declines any responsibility in case of improper uses or
manipulations not conform with the instructions as described on this manual.
9) The socket-outlet shall be close to the equipment and shall be easily accessible.
TWIST208
1
ENG

Index
Cordless Description .
Accessories .
Precautions .
Key’s & symbols description .
Installation of AC/DC adaptor .
Connection of phone line .
Battery installation .
Battery charging .
Coverage range .
Before using the unit, check.... .
To make a call .
Pre-dial .
How to answer the incoming call .
Adjustment of receiver volume .
Microphone mute .
Interdigit pause .
Handset paging .
Out of range indication .
Battery level indication .
To turn on/off the handset .
Keypad lock .
R key(recall) .
PHONE BOOK .
To store a phone number .
To modify a phone number .
To delete a number on phone book .
To delete the whole phone book .
To recall a number on phone book .
The caller identifier .
CALLS LOGS .
Dialed calls list .
Received calls list .
Missed calls list .
I
To store a number from calls log .
To delete a number on calls log .
To delete a whole calls log list .
HANDSET SETTING .
Keytone .
Handset ringer setting .
Handset name .
Set of the language .
Set of automatic answer .
Emergency call (baby call) .
BASE STATION SETTING .
Base ringer setting .
Call Barring .
PABX code .
Dial mode setting .
Set of R (flash) key time .
Changing of Base PIN code .
Base Reset .
MULTI HANDSET CONFIGURATION .
Handset subscription .
Call transfer between handset .
Intercommunication between handset .
Signaling of incoming call .
Conference call .
MULTI BASE CONFIGURATION .
Subscription of handset to other base .
Searching of base .
New message on network answering
machine (PhoneMail) .
Faq .
Technical data .
Note of the use of the product .
Declaration of conformity .
Guarantee terms .
Pag.
1
1
1
3
3
3
4
4
4
4
4
4
4
5
5
5
5
5
5
5
5
5
6
6
6
7
7
7
7
7
8
8
8
Pag.
8
9
9
9
9
9
9
10
10
10
10
10
11
11
11
12
12
12
12
12
13
13
13
13
13
13
14
14
14
14
15
16
17
WARNING: The first time that you make a call, probably you listen an higher echo of
your voice on your receiver, this echo will disappear after you dial the first number.
This is caused that the cordless will be set the audio level on relations of your
telephone line. This faster auto-set will be happen everytime that the the base is
disconnected from power.
2
ENG

Connection of phone line
Connect the plug of line cord to the jack placed on the back of base, then connect it
to the line socket.
Installation of AC/DC adaptor
Connect the plug of adaptor to the jack placed on the back of base, then connect
it to the 220V socket.
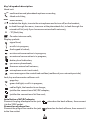
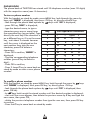
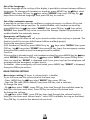
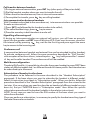
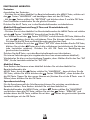
Key’s & symbols description
Hand unit:
: confirmation and phonebook options access key;
: Hook switch key;
: menu access;
:to delete the digits, to mute the microphone and to turn off/on the handset;
:to look through the menu, to access at the phonebook list, to look through the
missed call list (only if you have some missed calls not seen);
: "R" (flash) key
: To make intercom calls;
Display symbols:
: signal level;
: a calls is in progress;
: the keypad is locked;
: an internal conversation is in progress;
: an external conversation is in progress;
: battery level indication;
: you are on phonebook;
: there are missed call not seen;
: microphone mute is activated;
: new message on the centralized mailbox (mailbox of your network provider)
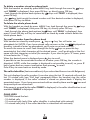
Leds, key and connectors of base unit:
: page key
: green led light, a call is in progress;
: red led light, the handset is on charge;
: jack for the connection of AC/DC adaptor;
: jack for the connection of tel line cord;
3
ENG
MENU
R
OK
C

Battery installation
1- Remove the battery door;
2- Place the 2 rechargeable batteries controlling the polarity indicated;
3- Close the battery door.
IMPORTANT: the Nickel - Metal Idrate battery, when exhausted, must be recycled or
disposed properly.
USE ONLY RECHARGEABLE BATTERIES.
Coverage range
The coverage area could be affected from manifold situations. The indication 300mt
outdoor and 50mt indoor is purely theoretical, that is obtainable only in optimal
conditions of propagation of the signal. However for a better coverage is advisable to
install the base set in a place as more central position of the building within where the
cordless must be used.
Before using the unit, check...
1) The installation was performed as well;
2) The battery has been charged properly;
3) The LCD display “BELGACOM 1” (keep pressing key to switch on the handset).
To make a call
1) Press key to take phone line (the green light on the base will be on);
2) Dial the desired number;
3) Press key or place the handset on cradle to end a call (the light will switch off).
At the end of each call, the LCD will display the duration time for about 10 seconds.
How to answer the incoming call
1) Press key when the telephone rings or lift up the handset from the charge cradle
(only if the "Automatic answer" is activated).
Pre-dial
1) Dial directly the number to be called (if an error is occurred, press C key to delete
the last digit - or hold pressed to delete full number) ;
2) Press key to send a call. The number will be called automatically.
4
ENG
Battery charging
Put the handset into the cradle, with the keypad in front view, for at least 10 hours when
the battery is totally discharged. The red light will be on to indicate that handset is in
charging state. When charging is complete, this light remain always on.
C

Adjustment of receiver volume
During a phone call, press keys to display the actual volume level (the LCD display
"EAR VOL: "), press keys to adjust the volume from 1 to 10 to select a desired volume
level (1= lower, 10= higher).
Battery level indication
The LCD can display 3 battery levels : = full charge; middle; =almost
discharge; = empty. When the battery is empty or almost discharge, put the
handset into the cradle for charging.
Handset paging
Pressing the key on the base, the handset will ring. This feature can be useful, for
example, to locate the place where you left the handset.
Microphone mute
During a call, press C key to mute the microphone (on lcd appears ). Press the same
key to restore the call.
R key (recall)
Pressing the R key during a phone conversation, you will access to the supplementary
service of Belgacom network. It may be useful also on switchboard (PABX) as Flash key
to pass the call, warning: on some switchboard this features may be not compatible
(try to change the flash R time by "Set of R key" procedure).
Interdigit Pause
It will put a pause of about 3 seconds duration between two digit. Keep pressing key
to put a pause, on lcd appears "P". It's useful, for example, between the exit code of a
switchboard (PABX) and the area code prefix.
To turn on/off the handset
To turn off the handset keep pressing the C key. To turn on keep pressing the same
key.
Keypad lock
To lock the keypad press sequencially MENU key and key, the icon is displayed.
In keypad lock condition, it won't be possible to make calls but will be possible to
receive them normally.
To unlock keypad, make the same operation above described .
5
ENG
Out of range indication
If during a phone conversation you are going far from covered range of base set, the
range icon decrease: good cover signal, middle cover signal, low cover
signal, blank icon out of signalcover, if the cover signal is lower also the
communication will be difficult. If you don’t come back to the covered area, the line will
be cut (LCD will display searching).

PHONE BOOK
The phone book of TWIST208 can stored until 30 telephone number (max. 20 digits)
with the respective name (max. 8 characters).
To store a phone number
With the handset on stand-by mode, press MENU key, look through the menu by
keys until "Phonebk" is displayed, then press OK key; or, directly press key:
- look through the phone book options by keys until "ADD" is displayed;
- press key, "Name?" is dispalyed;
OK
OK
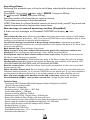
- type the desired name, to type a
characters press one or more times
the associated key (as per table). Type
directly the next key if the character is
on a different key or, if is on the same
key, wait about 2 seconds however
until the cursor is displayed on the
next position then type the new
character, press C to delete a
characters;
- Press to confirm, "Number?" is
displayed;
- Type the corresponding telephone
number (press C key to delete a
digit);
- Press to confirm;
- Press 2 times C key to come back on
stand-by mode or enter a new phone
number.
OK
OK
To modify a phone number
With the handset on stand-by press MENU key, look through the menu by keys
until "Phonebk" is displayed, then press OK key; or, directly press OK key:
- look through the phone book options by keys until "EDIT" is displayed, then
press OK key
- by keys look trough the stored number until the desired number is displayed;
- wait until the cursor appear, then delete the previous name by C key and type the
new name, then press OK ;
- delete the previous telephone number then type the new one, then press OK key
to confirm;
- Press the C key to come back on stand-by mode.
6
ENG
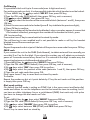
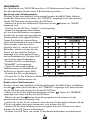
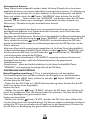
Key
Correspondent characters
1
2
3
4
5
6
7
8
9
A B C 2
D E F 3
G H I 4
J K L 5
M N O 6
P Q R S 7
T U V 8
W X Y Z 9
0
0
- ? (space) 1
To delete
C

To delete a number stored on phone book
With the handset on stand-by press MENU key, look through the menu by keys
until "Phonebk" is displayed, then press OK key; or, directly press OK key:
- look through the phone book options by keys until "Delete" is displayed, then
press OK key;
- by keys look trough the stored number until the desired number is displayed,
then press OK key to delete.
To delete the whole phone book
With the handset on stand-by press MENU key, look through the menu by keys
until "Phonebk" is displayed, then press OK key; or, directly press OK key:
- look through the phone book options by keys until "Del ALL" is displayed, then
press 2 times OK key or C key to come back on stand-by mode without delete the
whole phone book.
To recall a number from the phone book
With handset on stand-by mode press key or key. You will enter on
phonebook list (NOTE: if you have missed calls not seen so the icon displayed on
stand.by, instead of enter on phonebook, you'll enter on missed calls list).
To search the name to recall: look through the list by keys or press the key
associated at the initial characters of the desired name , you'll go directly at the first
name with that character as initial (for example: if you want to go to "S" name, press
4 times faster the "7" key).
When the desired name is displayed press key to recall.
Is possible to see the associated number of a name: press key, the numebr is
dispalyed, NOTE: while the number is displayed is not possible to recall, so, press C
key to come back on name visualization then press to recall.
Press C key to come back on stand-by mode.
OK
The caller Identifier (feature enable only if you subscribed the service with Belgacom)
This unit displays the caller number. It can also store the last 10 received calls and the
last 10 missed calls (see "Call logs" paragraph).When the handset ring the caller
number is displayed, if the caller number is stored on phone book it display the
associated name. If you have some missed calls on stand by there are the icon and
the quantity of new missed call.
If the name is covered by the called "PRIVATE" is displayed, is the caller identification is not
available "Unavaila" is dispalyed.
CALLS LOGS
TWIST208 stored the last:
- 10 dialled calls
- 10 received calls the caller identifier is
- 10 missed calls
(only if subscribed with network)
(only if the caller identifier is subscribed with network)
7
ENG

Dialed calls list
To enter on the dialled calls list there are 2 ways:
- with the handset on stand-by keep pressing the key;
or
then press key.
Look through on the list by keys, when the desired number is displayed press
key to recall.
Press C key to exit.
- with the handset on stand-by press MENU key, look through the menu by keys
until "CALLLOGS" is displayed, then pressOK key, look through the calls logs menu by
key until "Dialed" is displayed OK
Received calls list
To enter on the received call list,
then press OK
key. Look through on the list by keys, when the desired number is displayed
press key to recall.
To see the details of the calls: if the number is stored on phonebook and the name
is displayed, if you want to check the number press OK key (on this screen is not
possible to recall), if the number have more than 12 digits is possible to see the first
side of the number by press on key, is possible to see the hour and date of the
call by key, press C key to come back on the list. Press C key to exit.
(feature enable only if you subscribed the service with Belgacom)
with the handset on stand-by, press MENU key,
look through the menu by keys until "CALLLOGS" is displayed, then press OK key,
look through the calls logs menu by key until "RECEIVED" is displayed
Missed calls list
To enter on the missed calls list there are 2 ways:
- with the handset on stand-by, if you have some new missed calls stored, is possible
to access at the missed call list directly by keys (if there aren't new missed call
you enter on phone book);
or
then press key.
Look through on the list by keys, when the desired number is displayed press
key to recall.
Press C key to exit.
(feature enable only if you subscribed the service with Belgacom)
- with the handset on stand-by press MENU key, look through the menu by keys
until "CALLLOGS" is displayed, then pressOK key, look through the calls logs menu by
key until "MISSED" is displayed OK
To see the details of the calls: if the number is stored on phonebook
and the name is displayed, if you want to check the number press OK key (on this
screen is not possible to recall) if the number have more than 12 digits is possible to
see the first side of the number by press on key, is possible to see the hour and
date of the call by key, press C key to come back on the list.
8
ENG
To store on phone book a number of calls log list
Enter on the desired calls log (see previous paragraphs), display the number that
you want to save on phone book then:
- press MENU key;
- select "SAVE" by keys then press ;
- Type the desired name then press to confirm.
OK
OK

To delete a number from the calls log list
Enter on the desired calls log (see previous paragraphs), display the number that
you want to delete then:
- press MENU key;
- select "DELETE" by keys then press OK;
- press OK to confirm.
To delete a whole calls log list
Enter on the calls log list (dialed, received, missed) to be deleted (dialed, received,
missed) then:
- press MENU key;
- select "DEL all" by keys then press OK;
- press 2 ttimes OK to confirm.
HANDSET SETTING
Keytone
To switch off the key tone:
- With the handset on stand-by press key, by keys select "Handset" then
press key;
- By keys select "KEYTONE" then press key 2 times.
To switch on repeat the same procedure.
Press C key to come back on stand by mode.
MENU
OK
OK
Handset ringer setting (9 tones and 5 volume levels )
For the external calls:
- With the handset on stand-by press MENU key, by keys select "Handset" then
press OK key;
2) Tone: By keys select "EXT RING" then press OK key, look through the available tones
by keys (you can hear each tone). Press OK keys to confirm the desired tone.
3) Volume: By keys select "EXT VOL" then press OK key, look through the available
volume levels by keys (you can hear each volume level). Press OK keys to confirm
the desired tone.
Press C key to come back on stand by mode.
For the intercom calls (the one incoming from other handsets):
Repeat the previous procedure but: for the tone select "INT RING", for the ovlume select
"INT VOL".
Handset name
To change the name of the handset, with handset on stand-by, press
MENU key, by keys select "Handset" then press OK key; by keys select "SET NAME"
then press OK key. Type the new name (use C key to delete - max 8 digits) then
press OK key.
9
ENG

Emergency call (baby call)
The emergency call allow to call a pre-stored number when any key is pressed. This
feature is useful in case you left at home children or elderly people.
To store the emergency number :
With handset on stand-by, press MENU key, by keys select "BabyCALL" then press
OK key, by keys select "SET NUM?" then pressOK key, input the emergency number
then press OK to confirm (now the emergency call is enable).
To active:
If the number is already stored, with handset on stand-by, press MENU key, by keys
select "BabyCALL" then press OK key, by keys select "ENABLE" then press OK key twice.
Now, on stand-by, "BC mode" is displayed and if you press any key the telephone call
automatically the emergency number stored.
To disable: when emergency call is activated, press MENU key, "Disable?" is dispayed,
then press OK key to confirm.
Set of the language
For the language of the writing of the display is possible to choose between different
languages. To change:with handset on stand-by, press MENU key, by keys select
"Handset" then press OK key; by keys select "LANGUAGE" then press OK key, by
keys select the desired language then press OK key to confirm.
Set of the automatic answer
Is possible to set that when the cordless is ringing to answer is sufficent lift up the
handset from the charge position. To enable/disable: with handset on stand-by,
press MENU key, by keys select "Handset" then press OK key, by keys select
"AUTOTALK" then press OK key twice to confirm the change. Repeat the procedure to
enable/disable the automatic answer.
BASE STATION SETTING
Base ringer setting (9 tones, 4 volume levels + disable)
To set the tone and the volume level of the base ring:
- Press MENU key, by keys select "BASE SET" then press OK key,
- Type the PIN code (0000 default) then press OK key, wait a moment;
To change the tone:
- By keys select "B RING", press OK key, then look through the available tones by
keys (you can hear each tone). Press OK key to confirm the desired tone.
To change the volume:
- By keys select "B VOL", press OK key, then look through the volume levels by
keys (you can hear each volume levels - select OFF to disable the ring on the base).
Press OK key to confirm the desired volume level.
10
ENG

Call Barring
It is possible to lock until up to 5 area code (max. 4 digits each one).
For each area code you lock, it is also possible to decide which handset must be locked.
1) Press MENU key, by keys select "BASE SET" then press OK key,
2)Type the PIN code (0000 default) then press OK key, wait a moment;
3) By keys select "barring" , then press OK key;
4) By keys select the location of the area code to block (between 1 and 5), then press
OK key;
5) Enter the new area code to be locked (press C key to delete the previous digits);
6) Press OK key to confirm;
7) Type the numbers of the handset to be blocked, when a number appear it means that
this handset is blocked, press again the number of the handset to unlock, press
OK key to confirm;
Press more times C key to come back to the stand-by mode.
The call barring is now enabled and is not possible to make a call by the handset
blocked toward the area code you set.
To delete:
Repeat theprocedure but at point 5 delete all the previous area code then press OK key.
PABX code
If you connect the unit to the PABX (Switchboard), to obtain external line normally you
must dial 0 or 9 as for first digit. If you store this number, you will obtain an automatic
pause of 3 seconds around every times 0 or 9 is entered at first digit to make easy the
connection between switchboard and external line.
1) Press MENU key, by keys select "BASE SET" then press OK key,
2) Type the PIN code (0000 default) then press OK key, wait a moment;
3) By keys select "PABX" then press OK to confirm;
4) By keys select the position of the code (between 1 and 2), then press OK key;
5) Type the exit code code then press OK;
Press more times C key to come back on stand-by mode.
To disable:
Repeat the prodecure but at 4 point delete by C key the exit code until the position
is empty then press OK key.
Dial mode setting
On default the dial mode is setting on DTMF, that is the more recent and faster dial
mode and allows to use the telephone service that need the tone to working, but if
you have an older telephone line or a switchboard (PABX) that work only with pulse
you have to change the dial mode on Pulse.
To set:
1) Press MENU key, by keys select "BASE SET" then press OK key,
2) Type the PIN code (0000 default) then press OK key, wait a moment;
3) By keys select "DIAL MODE" then press OK to confirm;
4) By keys select between TONE (DTMF) and PULSE then press OK key.
Press C key to come back on stand by.
11
ENG

Set of R (Flash) key time
The R (flash) key on TWIST208is set to be use on public line (PSTN) on 100ms but on
some PABX maybe that you need a flash key of a different time, to set:
Press MENU key, by keys select "BASE SET" then press OK key,
Type the PIN code (0000 default) then press OK key, wait a moment;
By keys select "R RECALL" then press OK to confirm;
By keys select between "SHORT" (100ms) and "LONG" (250ms) then press OK key.
However on some PABX the TWIST208 flash key will may be not compatible also if
you change the flash time.
Changing of Base PIN code
Press MENU key, by keys select "BASE SET" then press OK key,
Type the PIN code (0000 default) then press OK key, wait a moment;
By keys select "EDIT PIN" then press OK to confirm;
Enter new PIN (max 4 digits ) and press OK key ;
Enter new PIN again and press OK key to confirm.
Base Reset
Press MENU key, by keys select "BASE SET" then press OK key,
Type the PIN code (0000 default) then press OK key, wait a moment;
By keys select "B reset" then press OK to confirm;
Press OK key, press again the OK key to confirm the reset or C key to come back on
base menu.
MULTI HANDSET CONFIGURATION
One base station can subscribe up to 4 handsets (up to 3 optional).
Handset subscription
1) Keep pressing the page key of the base for 10 seconds until you heard a doble tone.
From now you have one minute to subscribe one handset.
2) On the handset that you want to subscribe press MENU key then by keys select
"REGISTER", then press OK key;
3)By keys selct "SUB BASE" then press OK key;
3) Enter the base number (from 1 to 4). The handset is now searching the base and the
symbol is flashing. When the base is found, the LCD will display the RFPI (the
univocal number assigned on factory at the base, for example 0234H56012);
4) Press OK key and enter the base PIN (0000 factory set).
5) Press OK key to confirm. LCD will display the handset number assigned from the
base.
NOTE: The same procedure above described must be used to subscribe an handset after
an operation of base reset.
When you receive an incoming call, all handsets ring.
When a phone conversation is in progress, on the LCD of all other handsets, EXT symbol
will be displayed and no external call will be possible.
The handset number is automatically assigned by the base and correspond at the fist
empty location.
12
ENG

Call transfer between handsets
1) During an external conversation, press INT key (other party will be put on hold).
2) Dial the handset number where you want to transfer the call.
3) When the other handset answer, there is internal conversation.
4) To complete the transfer, press key on calling handset.
Intercommunication between handsets
With 2 handsets subscribed to the same base set, intercommunications are possible.
To make an internal call:
1) Press INT key followed by the handset number to be called;
2) The called handset rings, press key to answer.
3) Press the same key in both handsets to end a call.
Signalling of incoming call
If during an intercommunication an external call arrives, you will hear an acoustic
signal into the speaker and EXT icon will blink on LCD. If you want to answer, close first
the internal call by pressing key, wait for the first ring and press again the same
key to answer to the incoming call.
Multi base configuration
Thanks to GAP profile, it is possible to subscribe the proper handset to some DECT base
station of different model and / or different brand with same profile. Each handset can
be subscribed up to 4 base set.
Subscription of handset to other base
The procedure to be followed is the same described in the “Handset Subscription”
paragraph. If the base where you want to subscribe the handset is different model,
follow its instruction to put base in “Subscription mode”. When you do this, follow the
procedure described in the “Handset Subscription” paragraph from the second to the
last step. Vice versa when you need to subscribe an handset of different model on your
base set, first put TWIST208 base in “Subscription mode” then follow the specific
subscription procedure of the handset (suitable in the relative instructions).
NOTE: In any case you need to know the PIN number of the base where you want to
subscribe an handset.
Once you perform a subscription, is necessary to specify the handset searching type of
the base if manual or automatic.
13
ENG
Conference call
A conversation between handset and external line can be extended to other handset.
To activate conference call, follow the same procedure described for “Call Transfer”
with exception of last item where, instead to press key, hold pressed for 1 second
# key on the caller handset. The conference call will be enabled.

Searching of base
Following this procedure you will set to which base subscribed the handset have to be
connected.
Press MENU key, then by keys select "REGISTER", then press OK key;
By keys selct "SEL BASE" then press OK key;
Press the number of the base that you want to connect;
The handset start to search the selected base.
NOTE: if the base is not found handset remains on search mode, press C key to exit and
repeat the procedure but search a base more closer.
FAQ
I don't listen the line tone -When you press key the green led on base switch on? NO: follow
"Handset Subscription" procedure - YES: Try to use only TWIST208 on your telephone line, if alone
working, try to exchange the position of the telephone;.
Lost of audio during conversation or beep during conversation - Approach to the base
station or try to position the base on a central position or also displace the base of 20-30cm. from
the previously position.
Base doesn't ring: Check the base ring volume;
When you press a key the cordless will connect the phone line and some numbers are
displayed: Direct (emergency) call activated - Press MENU key then OK key;
On telephone near the base of the cordless I listen some noise: Displace the base away of
20-30cm. respect the previous position;
Noise during conversation: Displace the base away of 20-30cm. respect the previous position;
Handset doesn't turn on: Remove and replace the batteries, pay attention at the polarity, USE
ONLY RECHARGEABLE BATTERIES AND NOT ALKALINE BATTERIES;
Receiver volume lower: Adjust the volume level and/or pay attention to not cover or put label
on the receiver hole;
Caller identifier doesn't work: Be sure that the caller identifier service was subscribed with your
Telephone network provider, try to use only TWIST208 on your phone line. If 4 or more telephone
are connected at the same phone line it can create problems to the caller identifier service;
After dial some numbers the handset lost the link to the base: disable the call barring;
On switchboard (PABX) I can't get the external line: change the dial mode on Pulse.
14
ENG
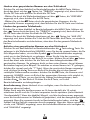
Technical data
- Technology: DECT Standard (Digital European Cordless Telephone) with GAP
(Generic Access Profile) profile
- RF Channels: 10 Channels
- Frequency range: 1.881 Ghz ~ 1.897 GHz
- Channel Bandwidth: 1.728 MHz
- Speech encoding: ADPCM / 32 Kbps
- Modulation type: GFSK, Output power: 250mW max
- Battery life: stand-by: about 5 days; talk: about 10 hours
- Communication range: about 300 mt in open field; about 50 mt in closed field
- Power supply for handset: Ni-MH Batteries (AAAx2, 2.4V, 550 mAh)
- Power supply for base set:AC/AC adaptor AC9V 300mA
- Recharging time: 12 hours
- Dialing method: DTMF/Pulse
- Max handset to the base: 4 (3 + 1 in endowment)
- Max base to the handset: 4
New message on network answering machine (PhoneMail)
If there are new messages on PhoneMail TWIST208 will display icon.

The equipment that you bought has required the extraction and use of natural
resources for its production. It may content hazardous substances for the health
and the environment.
In order to avoid the dissemination of those substances in our environment and
to diminish the pressure on the natural resources, we encourage you to use the
appropriate take-back systems. Those systems will reuse or recycle most of the
materials of your end life equipment in a sound way. The crossed-bin symbol
invites you to use those systems.
If you need more information on the collection, reuse and recycling systems,
please contact your local or regional waste administration.
You can also contact us for more information on the environmental performances
of our products.
Note on the use of the product
This product has been developed to be connected to the analogue telephone
network (PSTN). This “Class 1” radio product can be free used in EU states.
This equipment is developed in conformity of the requirements of 2002/95/EC on
the restriction of the use of certain hazardous substances in electrical and electronic
equipment.
This symbol , present also on the product, means that the electric and electronic
product have to be disposal properly and separately from normal waste as
described on Directive 2002/96/CE. So, this product and all of this components,
have to be dispose at your local collection point or recycling centre.
15
ENG

DECLARATION OF CONFORMITY
Hitel Italia Spa addressed at Via Tolara di Sotto, 51/A Ozzano dell'Emilia (Bologna)
Italia, declare that the product “DECT Cordless Telephone” model “Twist 208” is
conforms with the following standard:
- EN301489-1 (v.1.5.1) /-6 (v. 1.2.1);
- EN60950-1: 2001;
- EN301406 (2003-07);
This equipment complies with the essential requirements and provisions of
99/05/CE, Low Voltage Directive 73/23/EC and EMC directive 89/336/EC.
Hitel Italia Spa
G.Toma
R&D dept
16
ENG

Guarantee terms
The Equipment you have bought has been carefully selected by Belgacom and
is covered by a two-year warranty on spare parts and labor in the event of any
material or manufacturing defect, unless otherwise specified. The warranty shall
be valid from the date on which the equipment is collected or delivered.
If you have any problems with the equipment, you should take it to a
Teleboutique or to one of our authorized agents, in its entirety and in its original
packaging, or in packaging providing the same degree of protection, together
with the original receipt. The addresses for our Teleboutiques and authorized
agents are given in the Information Section of the White Pages.
Your equipment will be repaired or replaced free of charge, on presentation of the
receipt, in the event of any material or manufacturing defect.
Belgacom alone shall determine what repairs and/or replacements are necessary.
The warranty on the repaired or replaced equipment shall end on the date on
which the original warranty on the purchased equipment expires, but shall not
be less than 3 months.
The warranty shall not cover:
- damage of any kind that does not predate the sale;
- any damage, faults or defects attributable to the Customer or to causes unrelated
to the Equipment: lightning, power surges, humidity, accidental damage,
improper use or poor maintenance, failure to comply with the instructions in
the user manual, and force majeure;
- the repair or replacement of movable parts (cords, wires, plugs, aerials, etc.),
consumables (cells, batteries, paper, ink, etc.) needing regular replacement and
the supply of cleaning products.
The warranty shall not apply:
- to any changes or repairs to the terminal Equipment undertaken by the
Customer himself/herself or through the services of persons not designated
by Belgacom;
- if the Customer removes or tampers with the manufacturer’s serial numbers
and/or brand names on the terminal Equipment.
Belgacom shall not be liable for any indirect or immaterial loss sustained by the
Customer as a result of the malfunctioning of the terminal Equipment, such as
any loss of production, revenue or contracts.
The General Terms and Conditions for the Sale of Terminal Equipment can
be obtained on request from any Belgacom service available to the public
or at www.belgacom.be
Belgacom SA under public law,
Bd. du Roi Albert II 27, B-1030 Brussels VAT BE 0202.239.951, Brussels
Register of Legal Entities
belgacom
17
ENG

Vielen Dank, dass Sie sich für das neue digitale, schnurlose Telefon
entschieden haben, Es handelt sich hier um ein DECT (Digitales europäisches
schnurloses Telefon) Telefon mit GAP (allgemeines Zugriffsprofil) Profil.
Mit der Tonqualität und der Sicherheit der digitalen Technologie bietet dieses
Modell vielfältige und nützliche Features, zum Beispiel 30 Speicher für das
Telefonbuch, die Anrufererkennung (mit Namen, wenn im Telefonbuch
verzeichnet) 10 Lautstärkelevels und vielem mehr.
Alle Features sind durch ein praktisches Menü einfach abrufbar.
Dank dem GAP Profil ist es möglich, 4 Mobilteile an die gleiche Basisstation
anzuschließen, so dass Sie die Möglichkeit haben, auch intern mit den
Mobilteilen zu telefonieren.
Jedes Mobilteil kann an bis zu 4 Basisstationen angeschlossen werden.
Bitte lesen Sie diese Bedienungsanleitung sorgfältig, bevor Sie Ihr neues
Telefon verwenden.
ZUBEHÖR
TWIST208
- Basisstation
- Handapparat
- N. 2 wieder aufladbare Batterien AAA1.2V
- AC/AC Adapter
- Tel-line Kabel und linearem Stecker
- Bedienerhandbuch
Vorsichtsmaßnahmen
1) Lesen Sie dieses Hansbuch vor Benutzung des Telefons.
2)Vermeiden Sie direkte Einwirkung von Sonnenlicht und/oder
Wärmequellen als auch die Installation an feuchten oder staubigen
Standorten.
3)Stellen Sie keine Gegenstände auf die Kabel und/oder das Telefon.
4) Verwenden Sie nur solche Adapter und/oder Batterien, die in der
beiliegenden Bedienungsanleitung empfohlen wurden oder dem Gerät
beiliegen.
5) Ziehen Sie bei Unwettern den Netz- und Telefonstecker.
6) Reinigen Sie mit einem leicht angefeuchteten Tuch. Verwenden Sie keinen
Alkohol, Lösungen, Scheuermittel etc.
7) Führen Sie keine Reparaturen selbständig aus. Basteleien und/oder eine
von der Bedienungsanleitung abweichende Verwendung führt zum Verlust
des Gewährleistungsanspruchs.
8) BELGACOM weist im Fall unsachgemäßer Verwendung oder bei
Manipulationen, die nicht im Einklang mit den Instruktionen dieses
Handbuch stehen, zurück.
9) Die Anschlussdose sollte in der Nähe der Einrichtung und einfach
zugänglich sein.
TWIST208
1
DEU

Inhalt
Drahtlosbeschreibung .
Zubehör .
Vorsichtsmaßnahmen .
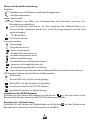
Tasten und Symbolbeschreibung .
Installation des AC/DC Adapters .
Anschluss der Telefonleitung .
Einlegen der Akkus .
Laden der Akkus .
Übertragungsbereich .
Vor Verwendung prüfen, ob.... .
Anrufen .
Vorwählen .
Einen eingehenden Anruf annehmen .
Einstellen der Empfangslautstärke .
Mikrofon Stummschaltung .
Zwischenziffernpause .
Mobilteil Funkruf .
Anzeige “außer Reichweite” .
Batteriestandsanzeige .
Ein-/Ausschalten des Mobilteils .
Tastensperre .
R Taste(Rückruf) .
.
.
.
.
.
Aufrufen einer gespeicherten Nummer
aus dem .
.
.
.
.
.
TELEFONBUCH
Speichern einer Telefonnummer
Ändern einer Telefonnummer
Löschen einer gespeicherten Nummer
aus dem Telefonbuch
Löschen des gesamten Telefonbuchs
Telefonbuch
Anruferkennung
ANRUFPROTOKOLL
Liste gewählte Anrufe
Liste empfangene Anrufe
Liste verpasste Anrufe
Speichern einer Nummer der Anrufliste
im Telefonbuch
Löschen einer Nummer aus der
Anrufliste
Löschen einer kompletten Anrufliste
EINSTELLUNG MOBILTEIL
Mobilteil Name
Spracheneinstellung
Automatische Antwort
Babyruf
EINSTELLUNG BASISSTATION
Basisstation Klingeltoneinstellung
Einstellung Wahlmodus
Einstellung R (Flash) Tastentak
Ändern des Basis PIN Code
Basis zurücksetzen
MULTI MOBILTEIL KONFIGURATION
Anzeige eingehende Anrufe
Suchen der Basisstation .
Hinweise zur Produktnutzung
Konformitätserklärung
.
.
.
.
Tastenton .
Mobilteil Klingeltoneinstellung .
.
.
.
.
.
.
Anrufsperre .
PABX Code .
.
.
.
.
.
Mobilteil Indizierung .
Rufübertragung zwischen Mobilteilen .
Wechselverkehr zwischen Mobilteilen .
.
Konferenzgespräch .
MULTI BASIS KONFIGURATION .
Anmeldung eines Mobilteil an eine
andere Basis .
Neue Nachicht auf dem Netzwerk
Anrufbeantworter (PhoneMail) .
Häufig gestellte Fragen .
Technische Daten .
.
.
Garantiebedingungen .
Seite
1
1
1
3
3
3
4
4
4
4
4
4
4
5
5
5
5
5
5
5
5
5
6
6
6
7
7
7
7
7
8
8
9
Seite
9
9
9
10
10
10
10
10
11
11
11
11
12
12
13
13
13
13
14
14
14
14
14
15
15
15
15
15
16
16
17
18
19
WARNUNG: Beim erstmaligen Telefonieren kannes möglich sein, dass Sie ein
höheres Echo Ihre Stimme im Hörer empfangen, dieses Echo wird
verschwinden, wenn Sie die erste Nummer wählen. Dies tritt auf, weil der
drahtlose Empfang den Tonlevel mit Ihren Telefonanschluss verknüpft. Diese
schnellere automatische Einstellung wird jedes mal aktiviert, wenn die Basis
von der Stromversorgung getrennt war.
2
DEU
Seite wird geladen ...
Seite wird geladen ...
Seite wird geladen ...
Seite wird geladen ...
Seite wird geladen ...
Seite wird geladen ...
Seite wird geladen ...
Seite wird geladen ...
Seite wird geladen ...
Seite wird geladen ...
Seite wird geladen ...
Seite wird geladen ...
Seite wird geladen ...
Seite wird geladen ...
Seite wird geladen ...
Seite wird geladen ...
Seite wird geladen ...
-
 1
1
-
 2
2
-
 3
3
-
 4
4
-
 5
5
-
 6
6
-
 7
7
-
 8
8
-
 9
9
-
 10
10
-
 11
11
-
 12
12
-
 13
13
-
 14
14
-
 15
15
-
 16
16
-
 17
17
-
 18
18
-
 19
19
-
 20
20
-
 21
21
-
 22
22
-
 23
23
-
 24
24
-
 25
25
-
 26
26
-
 27
27
-
 28
28
-
 29
29
-
 30
30
-
 31
31
-
 32
32
-
 33
33
-
 34
34
-
 35
35
-
 36
36
-
 37
37


BELGACOM TWIST208 Benutzerhandbuch
- Kategorie
- Telefone
- Typ
- Benutzerhandbuch
in anderen Sprachen
- English: BELGACOM TWIST208 User manual
Verwandte Artikel
Andere Dokumente
-
SENAO EP801 Benutzerhandbuch
-
Topcom Butler 2505 C Benutzerhandbuch
-
-
-
-
Unify OpenScape DECT Phone S5 Base Benutzerhandbuch
-
-
Topcom BUTLER 3501 Bedienungsanleitung
-
 Ogatech og r400 Benutzerhandbuch
-
