Wolf MGK-2-390 Installation Instructions Manual
- Typ
- Installation Instructions Manual

WOLF GMBH / POSTFACH 1380 / D-84048 MAINBURG / TEL. +49.0.875174-0 / FAX +49.0.875174-1600 / www.WOLF.eu
Art.: 3065732_201806 Änderungen vorbehalten
GB
DE
Montageanleitung
Kondensatwannentausch
MGK-2-390
MGK-2-470
MGK-2-550
MGK-2-630
MGK-2-800
MGK-2-1000

2 3065732_201806
Kondensatwannentausch MGK(-2)-390-1000
Warnhinweise:
- Kondensatwannentausch darf nur durch Fachmann durchgeführt werden
- Die Gasdichtigkeit ist nach der Montage zu überprüfen
- Bei unsachgemäßer Montage besteht durch Abgasaustritt Vergiftungsgefahr
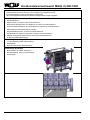
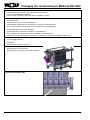
Inhalt Set für Kondensatwannentausch
•
Kondensatwanne
• Silikon „Silirub“, in Karton in der Kondensatwanne
• Dichtung Kondensatwanne zum Abgasrohr, montiert in Kondensatwanne
• 12 bzw. 8 Gewindestifte für den Wartungsdeckel, montiert in Kondensatwanne
• Wartungsdeckel Kondensatwanne, montiert
• Kondensatablaufstutzen, montiert in Kondensatwanne
• Schlauchtülle für Abgas-Druckschalter, montiert in Kondensatwanne
• Adapter für Abgas-Temperaturfühler mit O-Ring und Steckklammer,
im Beutel mit Montageanleitung
Ausrüstung/Werkzeug für Wannentausch:
•
2 x Stempelwagenheber (Höhe 500mm)
• Schleifpapier
• Bremsenreiniger oder Silikonentferner
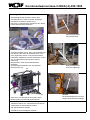
Verkleidung abnehmen
- Brennerhaube und Blech abnehmen
- Frontverkleidung, Deckel und Rückwand
abschrauben
Kondensatwanne abschrauben

3065732_201806 3
Kondensatwannentausch MGK(-2)-390-1000
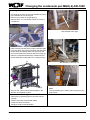
Demontage Kondensatwanne
- Stempelwagenheber ansetzen. Vorne unter
dem Rücklaufrohr. Hinten unter der Zugstange.
- Schrauben am Gasrohr entfernen (1).
- Die 2 bzw. 3 Verbindungsschrauben an den oberen
beiden Quertraversen ausbauen.
- Vorsichtig anheben (mind. 3mm), bis die Silikonnaht
der Wanne reißt. Kann der Wärmetauscher noch
nicht angehoben werden, muß beim Kessel das
Heizwasser abgelassen und alle Schrauben an den
Vor- und Rücklauf-Anschlußrohren entfernt
werden (2).
- Quertraversen unter der Kondensatwanne
ausbauen.
- Schraubenköpfebendensichinnerhalbder
Quertraversen (3).
(3)
- Dann kann man die Wanne nach unten und in
Richtung Gas-Luft-Verbund herausnehmen.
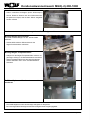
Wärmetauscher Kontaktflächen reinigen
• Restliches Silikon vom Wärmetauscher entfernen
1. Silikonreste mit Cutter Messer entfernt
2. Mit Silikonentferner reinigen
3. Oberfläche mit Schleifpapier aufrauen
Stempelwagenheber
unter der Zugstange
Stempelwagenheber
unter Rücklaufrohr
Hinweis:
Die Kondensatwanne ist an 3cm
langen Gewindestiften befestigt
(2)
(1)

4 3065732_201806
Kondensatwannentausch MGK(-2)-390-1000
Neue Kondensatwanne einbauen
• Silikon umlaufend auftragen (dicke Silikonraupe)
Grund: Zwischen Wanne und dem Wärmetauscher
ist später 3mm Spiel, das mit dem Silikon ausgefüllt
werden müssen
Kondensatwanne und Gerät in umgekehrter Reihenfolge montieren
Montage Abgas-Druckschalter
Schwarze Verschlußkappe von der Schlauchtülle
abziehen.
• Schlauchtülle mit dem Silikonschlauch des
Abgas-Druckschalters verbinden.
Montage Abgas-Temperaturfühler
• Adapter für den Abgas-Temperaturfühler mit dem zu-
gehörigen O-Ring in die Kondensatwanne montieren.
• Abgas-Temperaturfühler aus der alten Kondensat-
wanne ausbauen und in neue Kondensatwanne
einbauen.
Befüllten Siphon am Kondensatwannenstutzen
montieren
Kontrolle:
- Die Gasdichtigkeit ist nach der Montage zwingend zu überprüfen
- Bei unsachgemäßer Montage besteht durch Abgasaustritt Vergiftungsgefahr

WOLF GMBH / POSTFACH 1380 / D-84048 MAINBURG / TEL. +49.0.875174-0 / FAX +49.0.875174-1600 / www.WOLF.eu
Art.: 3065732_201806 Änderungen vorbehalten
GB
Installation instructions
Changing the condensate pan
MGK-2-390
MGK-2-470
MGK-2-550
MGK-2-630
MGK-2-800
MGK-2-1000

6 3065732_201806
Changing the condensate pan MGK(-2)-390-1000
Warnings:
- The condensate pan should only be changed by a specialist
- Check for gas leaks after installation
- There is a risk of poisoning from gas leaks if installed incorrectly
Contents set for changing the condensate pan
•
Condensate pan
• Silirub silicone in box in the condensate pan
• Seal between condensate pan and flue pipe, installed in condensate pan
• 12 or 8 grub screws for the service cover, installed in the condensate pan
• Condensate pan service cover, installed
• Condensate drain connection, installed in condensate pan
• Hose nipple for flue gas pressure switch, installed in condensate pan
• Adapter for flue gas temperature sensor with O-ring and peg in bag with installation instructions
Equipment/tools required to change the pan:
•
2 x jack (height 500mm)
• Sandpaper
• Brake cleaner or silicone remover
Remove the casing
- Removing the burner and plate
- Removing the front casing, cover and rear panel
Unscrew condensate pan

3065732_201806 7
Changing the condensate pan MGK(-2)-390-1000
Removing the condensate pan
- Put the jacks in place. At the front beneath the return
pipe. Beneath the connecting rod.
- Remove the screws on the gas pipe (1).
- Remove the 2 or 3 connecting screws on the top 2
crosspieces.
- Raise carefully (at least 3mm) until the silicone seam
of the pan tears. If the heat exchanger still cannot be
raised, drain the heating water from the boiler and
removeallscrewsfromtheowandreturnpipes(2).
- Remove crosspieces beneath the condensate pan.
- Screw heads are located within the crosspieces (3).
(3)
- The pan can now be removed downwards in the
direction of the gas/air mixture.
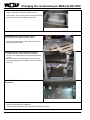
Clean the heat exchanger contact surfaces
• Remove any remaining silicone from the heat ex-
changer
1. Silicone remnants removed with blade
2. Clean with silicone remover
3. Roughen surface with sandpaper
Jack beneath connecting rod
Jack beneath return pipe
Note:
The condensate pan is fixed in place using 3cm long
grub screws
(2)
(1)

8 3065732_201806
Changing the condensate pan MGK(-2)-390-1000
Install the new condensate tray
• Apply a thick bead of silicone around the tray.
There will be 3mm of play between the pan and heat
exchangerwhichmustbelledwithsilicone.
Install the condensate pan and equipment in reverse order
Installing the flue gas pressure switch
Remove the black cap from the hose nipple.
• Connect the hose nipple to the silicone hose of the
uegaspressureswitch.
Installing the flue gas temperature sensor
• Installtheadapterfortheuegastemperature
sensor in the condensate pan using the appropriate
O-ring.
• Removetheuegastemperaturesensorfromthe
old condensate pan and install it in the new conden-
sate pan.
Fit the filled siphon to the condensate pan
connector
Check:
- Check for gas leaks after installation
- There is a risk of poisoning from gas leaks if installed incorrectly
-
 1
1
-
 2
2
-
 3
3
-
 4
4
-
 5
5
-
 6
6
-
 7
7
-
 8
8


Wolf MGK-2-390 Installation Instructions Manual
- Typ
- Installation Instructions Manual
in anderen Sprachen
- English: Wolf MGK-2-390