
Ph Sf Cpny r eac n s gurte
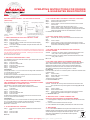
BATTERY INSTALLATION – 4 X LR03 AAA ALKALINE
(SUPPLIED)
1. FIRST OPENING ON FACTORY DEFAULT CODE
Step 1 Press ‘C’ button
Step 2 Press factory code ‘ 1 2 3 4 5 6’
Step 3 Press ‘#’ button, a melodic tone will sound and the display
conrmsOPEnd
Step 4 Turn Knob or Handle clockwise and open the door while the
tone is sounding
Caution
Ifanincorrectcodeisentered,Errorwillappearinthedisplaypanelanda
shortwarningtonewillsound.Ifanincorrectcodeisenteredvetimesthe
lockwillceasetooperateforveminutes,awarningtonewillsoundand
thedisplaywillindicatedELAY.
C > 1 > 2 > 3 > 4 > 5 > 6 > #
2. SETTING A NEW PERSONAL CODE.
Itisadvisabletosetanewcodewiththedooropenandtestthenewcode
before closing the door.
Step 1 Press ‘#’ button
Step2 EnterthePresentCode.
Step 3 Press ‘#’ button.
Step4 EnterNew4~16digitCode.
Step 5 Press ‘# button.
For Example:
If the present code is 1 2 3 4 5 6 and a new four digit code is decided as 4
2 4 2 press buttons as below.
# 1 2 3 4 5 6 # 4 2 4 2 #
EnTErdwillbeindicatedinthedisplayandashort3secondtonewill
soundtoconrmthechangeto4242
# > 1 2 3 4 5 6 > # > 4 2 4 2 > #
3. SETTING THE DUAL CONTROL FUNCTION WHERE
TWO OPERATORS WITH INDIVIDUAL PERSONAL CODES
ARE REQUIRED TO OPEN THE LOCK.
With the door in the open position set the second code.
Step 1 Press the “M” memory button recessed into the back
of the door.
Step 2 Press ‘2’ button
Step 3 Press ‘#’ button
Step4 Enter2ndPersonalcode
Step 5 Press ‘#’ button
EnTErdwillbeindicatedinthedisplayandashort3secondtonewill
sound,toconrmthe2ndcodeentry.
For Example:
If the present code is 4 2 4 2 and a second new four digit code is decided
as6789pressbuttonsasbelow.EnTErdwillappearinthedisplay
accompaniedbyashorttonetoconrmM2#6789#
M > 2 > # > 6 7 8 9 > #
4. TO ACTIVATE DUAL CONTROL
Step 1 Press the “M” memory button recessed into the back of the
door.
Step 2 Press ‘9’ button
Step 3 Press ‘#’ button
M > 9 > #
5. TO OPERATE WITH THE DUAL CONTROL FUNCTION
Step 1 Press C button dual will appear in the display.
Step2 Entertherstcode4242
Step3 Press‘#’button.ashort3secondtonewillsoundtoconrm
correct code
Step 4 Within 5 minutes enter the second code 6 7 8 9
Step5 Press‘#button.ashort3secondtonewillsoundtoconrm
correctcodeandOPEndwillappearinthedisplayandthelock
willbeopen.Eithercodecanbeenteredrstorsecond.
C > 4 2 4 2 > # > 6 7 8 9 > #
6. TO DEACTIVATE DUAL CONTROL
Step 1 Press the “M” memory button recessed into the back of the
door.
Step 2 Press ‘9’ button
Step3 Press‘#’buttonashort3secondtonewillsoundtoconrm
deactivationandSinGLEwillappearinthedisplay.Thesecond
code will be automatically erased.
M > 9 > #
7. TO HIDE CODE IN THE DISPLAY AND TURNOFF
KEYPAD SOUND.
Activate Pressthe“M”memorybuttonrecessedintothebackofthe
door,press7then#(HIdEappearsinthedisplay)
DeactivatePressthe“M”memorybuttonrecessedintothebackofthe
door, press 7 then #
M > 7 > #
8. TO HIDE CODE ENTRY IN A NUMBER SEQUENCE.
The code can be disguised by inserting random numbers either before,
after or both before and after, the personal code. This procedure is
designedtoincreasesecurityandtoconfuseapotentialobserver
attempting to memorise the code. This feature can be also be used
withhiddencodedisplayandsilentkeypadasat7above.
For Example
Personalcodeissetas4242Randomprexnumbers61Randomsux
numbers 91507
Step 1 Press C button
Step2 EnterCodeas61424291507
Step 3 Press ‘#’ button
ThedisplaywillconrmOPEnd
C > 61 4 2 4 2 91507 > #
9. ALARM SETTING
Activate Pressthe“M”memorybuttonrecessedintothebackofthe
door,press8then#(ALErTappearsinthedisplay)M > 8 > #
Deactivate
Step 1 Press ‘C button
Step2 EnterPersonalCode
Step3 Press‘#’buttonashort3secondtonewillsoundtoconrm
deactivationandOPEndwillappearinthedisplay.
C > Personal Code > #
10. BATTERY LIFE: 1 YEAR 3 TIMES A DAY.
BATTERY REPLACEMENT IS REQUIRED WHEN:
1. LObAttappearsindisplayaccompaniedbyashortonesecondwarn-
ing tone.
2. Correct code is entered but lock will not open.
3. Evenifbatteriesarecompletelyexhausted,thecodesarenotlost.
11. BATTERIES
4x1.5VAAAAlkalineBatteriesarerequiredtoactivatethelock.Used
batteries should not be disposed of with normal domestic waste. These
shouldbedisposedofatapprovedcollectionpoints.Youmay
alsoreturnusedbatteriestoyourRetailerattheirexpense
(whereapplicable).
V1/PBMAY2018
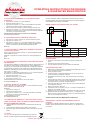
KeypadandLCDdisplaywindow
CButton
start button
#Button
Batteryposition
under keypad
2. Press the keypad opening mark, to
release the retaining arm and swing the
keypad up and left, to open.
1.Removekeypad
retaining screw
Upper
part
Lower
part
OpeningBatteryCompartment
OPERATING INSTRUCTIONS FOR DS2500E
& GUARANTEE REGISTRATION

Ph Sf Cpny r eac n s gurte
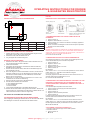
DS2500 BASE FIXING INSTRUCTIONS
MODEL A B C D
DS2501 123 143 149 131
DS2502 123 143 149 131
DS2503 180 180 220 180
CHOOSING A PLACE TO INSTALL YOUR SAFE
1. Lookforaplacethatdoesnotrestrictaccessandtheswingofthe
door.
2. Ensurethattheoorislevel.
3. Forbestresultsaconcreteoorispreferable.
DRILLING & BOLTING
1. Manoeuvrethesafeintotherequiredposition.Nowwiththepencil
marktheooraroundthesafe.
2. Openthesafedoor.
3. Usingthepencil,markthepositionsontheoorfordrillingthrough
holes in the base of the safe.
4. Nowmovethesafetooneside,givingyouaccesstothemarkingson
theoor.
5. Beforeusingthedrillbit.Withtherulermeasure60mmfromthetipof
thebitandputapieceofadhesivetapearoundthebittoensureyou
do not drill too deep.
6. Drillthe12mmholesintheooruntilyoureachyour60mmmarker.
7. Cleantheooraroundtheholes.
8. There are three parts to your bolts:
a.Acoachscrew
b.Aplasticexpandingsleeve
c.Asteelwasher
9. Inserttheplasticexpandingsleevesintothedrilledholes.
10. Place the safe back into position, insert the coach screws, including
thewashers,throughthebaseofthesafe,intotheoorandtighten
until you can not tighten them any further.
YOUR SAFE IS NOW BASE FIXED.
SECURING THE DATABOX INTO THE SAFE
Usingthe2adhesivestripsprovided,attachthesetothebackofthe
Databox.Positiontheboxintothebottomofthesafe,axingittotheback
wall.
INSÉREZ 4 PILES AAA COMME PRÉCISÉ SUR LE SCHÉMA
1. PREMIÈRE OUVERTURE AVEC LE CODE USINE
1. Appuyezsurlebouton“C”
2. Entrezlecodeusine«123456«
3. Appuyezsurlebouton#,unemélodierésonneraetl’écranconrmera
OPEnd
4. Tournezlapoignéedanslesensdesaiguillesd’unemontreetouvrez
laporteenmêmetempsquelamélodieretentit.
Attention
Siuncodeincorrectestentré,l’écranachera“Error”etunecourteto-
nalitéd’avertissementretentira.Siuncodeincorrectestentrécinqfois,la
serrures’arrêteradefonctionnerpendantcinqminutes,un’avertissement
sonoreretentiraetl’écranacheradELAY.
C > 1 > 2 > 3 > 4 > 5 > 6 > #
2. RÉGLAGE D’UN NOUVEAU CODE PERSONNEL.
Ilestconseilléderéglerunnouveaucodeaveclaporteouverteetdevéri-
erlenouveaucodeavantdefermerlaporte.
1. Appuyezsurlebouton#
2. Entrezlecodeactuel
3. Appuyezsurlebouton#
4. Entrezunnouveaucodepersonnelde4à16chires
5. Appuyezsurlebouton#
Par exemple:
Silecodeactuelest123456etquelenouveaucodedequatrechires
choisiest4242,appuyezsurlesboutonscommeci-dessous.
EnTErds’acherasurl’écranetunecourtemélodiede3secondes
retentirapourconrmerlechangementdunouveaucode4242
# > 1 2 3 4 5 6 > # > 4 2 4 2 > #
3. RÉGLAGE DE LA FONCTION CONTRÔLE DOUBLE OÙ
DEUX OPÉRATEURS AVEC DES CODES PERSONNELS
DIFFÉRENTS SONT NÉCESSAIRES POUR OUVRIR LA
SERRURE.
Aveclaporteouverteréglezledeuxièmecode
1. Appuyezsurlebouton“M”quisetrouveàl’arrièredelaporte
2. Appuyezsurlebouton«2»
3. Appuyezsurlebouton#
4. Entrezundeuxièmecodepersonnel
5. Appuyezsurlebouton#
EnTErds’acherasurl’écranetunecourtemélodiede3secondes
retentirapourconrmerlasaisiedudeuxièmecode.
Par exemple:
Silecodeactuelest4242etqueledeuxièmenouveaucodeàquatre
chireschoisiest6789,appuyezsurlesboutonscommemontré
ci-dessous.EnTErds’acherasurl’écransuivid’unecourtemélodiepour
conrmerlabonnesaisieducode
M > 2 > # > 6 7 8 9 > #
4. POUR ACTIVER LE CONTRÔLE DOUBLE
1. Appuyezsurleboutonmémoire“m”situéàl’arrièredelaporte.
2. Appuyezsurlebouton«9»
3. Appuyezsurlebouton«#»
M > 9 > #
FRENCH
ClavieretécranLED
BoutonC
Boutonde
démarrage
Bouton#
Position des piles
sousleclavier
2.Appuyezsurlerepèred’ouverturedu
clavierpourrelâcherlemécanismede
retenueetfairepivoterleclavierversle
hautetverslagauchepourouvrir.
1.Retirezlavis
retenantleclavier
Partie
supérieure
Partie
inférieure
Ouvertureducompartiment
des piles
OPERATING INSTRUCTIONS FOR DS2500E
& GUARANTEE REGISTRATION

Ph Sf Cpny r eac n s gurte
5. POUR FAIRE DÉMARRER LA FONCTION DOUBLE
CONTRÔLE
1. Appuyezsurlebouton“C”etduals’achera
2. Entrezlepremiercode4242
3. Appuyezsurlebouton«#».Unecourtemélodiede3secondes
retentirapourconrmerquelecodeestcorrect
4. Dansunelimitede5minutes,entrezledeuxièmecode6789
5. Appuyezsurlebouton«#».Unecourtemélodiede3secondes
retentirapourconrmerquelecodeestcorrectetOPEnds’achera
surl’écran.Laserrureseraouverte.
Chaque code peut être entré en premier ou en deuxième
C > 4 2 4 2 > # > 6 7 8 9 > #
6. POUR DÉSACTIVER LE DOUBLE CONTRÔLE
1. Appuyezsurleboutonmémoire“m”situéàl’arrièredelaporte.
2. Appuyezsurlebouton«9»
3. Appuyezsurlebouton«#»,unecourtemélodiede3secondes
retentirapourconrmerladésactivation,etSinGLEs’acherasur
l’écran.Ledeuxièmecodeseraautomatiquementannulé.
M > 9 > #
7. POUR CACHER LE CODE SUR L’ÉCRAN ET ANNULER
LE SON DU CLAVIER
Activé-Appuyezsurleboutonmémoire“m”situéàl’arrièredelaporte
HldEs’achesurl’écran
Désactivé-Appuyezsurleboutonmémoire“m”situéàl’arrièredela
porte.
M > 7 > #
8. POUR MASQUER LA SAISIE DU CODE PAR UNE SUITE
DE NUMÉROS.
Lecodepeutêtremasquéeninsérantdesnombresauhasard,soitavant,
soitaprèsouavantetaprès,lecodepersonnel.Cetteprocédureest
conçuepouraccroîtrelasécuritéetembrouillerunobservateurpotentiel
quitenteraitdemémoriserlecode.Cettefonctionpeutégalementêtre
utiliséeavecl’achageducodecachéetclaviersilencieuxcommeindi-
quéaupoint7ci-dessus.
Parexemple:Lecodepersonnelestxésur4242,numérosdepréxe
auhasard61,numérosdesuxeauhasard91507
1. Appuyezsurlebouton«C»
2. Entrezlecodeainsi61424291507
3. Appuyezsurlebouton«#»
Cetteprocédureseraconrméesurl’écranparOPEnd
C > 61 4 2 4 2 91507 > #
9. INSTALLATION DE L’ALARME
Activé-Appuyezsurleboutonmémoire“m”situéàl’arrièredelaporte.
ALErTs’achesurl’écranM > 8 > #
Désactivé
1. Appuyezsurlebouton“C”
1. Entrezvotrecodepersonnel
1. Appuyezsurlebouton««#»,unecourtemélodiede3secondes
retentirapourconrmerladésactivationet
OPEnds’acherasurl’écran
C > Personnel Code > #
10. DURÉE DE VIE DES PILES: 1 AN POUR UNE OUVER-
TURE 3 FOIS PAR JOUR. LE REMPLACEMENT DES PILES
EST RECOMMANDÉ LORSQUE :
1. LObAtts’achesurl’écransuivid’unavertissementsonored’une
seconde
2. Lecodecorrectaétésaisimaislecorenes’ouvrepas
3. Mêmesilespilessontcomplètementusées,lescodesnesontpas
perdus.
11. PILES
4X1.5VAAAPilesAlcalinesontnécessairespouractiverla
serrure.Lespilesusagéesnedoiventpasêtrejetésavecles
orduresménagères.Celles-cidoiventêtreemmenéesdansdespoints
decollecteagréé.Vouspouvezégalementretournerlespilesusagéesà
votredétaillantàsesfrais(lecaséchéant).
MODE D’EMPLOI DE FIXATION AU SOL DS2500
MODEL A B C D
DS2501 123 143 149 131
DS2502 123 143 149 131
DS2503 180 180 220 180
CHOISIR UN ENDROIT POUR INSTALLER VOTRE
COFFRE-FORT
1. Cherchezunendroitquinelimitepasl’accèsetl’ouverturedela
porte.
2. Assurez-vousquelesolsoitdeniveau.
3. Pourdemeilleursrésultats,unsolenbétonestpréférable.
PERÇAGE & BOULAGE
1. Manœuvrezlecore-fortdanslapositionrequise.Maintenant,avecle
crayonmarquezlesolautourducore-fort
2. Ouvrezlaporteducore.
3. Àl’aideducrayon,marquezlespositionssurlesolpourpercerau
traversdestrousdelabaseducore-fort.
4. Déplacezlecore-fortd’uncôté,vousdonnantaccèsauxmarques
sur le sol.
5. Avantd’utiliserlemèche.Aveclarèglemesurez60mmdelapointede
lamècheetmettreunmorceauderubanadhésifautourduboutpour
vousassurerdenepaspercertropprofondément.
6. Percezlestrousde12mmdanslesoljusqu’àcequevousatteigniez
votremarqueurde60mm.
7. Nettoyezlesolautourdestrous.
8. Vosboulonssonten3parties.Unevis.Unmanchond’expansionen
plastique.Unerondelleenacier.
9. Insérezlesmanchonsd’expansionenplastiquedanslestrouspercés.
10. Remettrelecore-fortenplace,insérezlesvis,ycomprislesron-
delles,àtraverslabaseducore-fort,danslesoletserrezjusqu’àce
quevousnepuissiezpluslesserrer.
VOTRE COFFRE-FORT EST MAINTENANT FIXE AU SOL.
SÉCURISER LA BOITE POUR DONNEES DANS LE
COFFRE
Enutilisantles2bandesadhésivesfournies,xez-lesàl’arrièredela
Databox.Placezlaboîtedanslefondducore-fort,enl’apposantsurle
murarrière.
OPERATING INSTRUCTIONS FOR DS2500E
& GUARANTEE REGISTRATION

Ph Sf Cpny r eac n s gurte
4 X AAA BATTERIEN GEMÄSS DIAGRAMM EINSETZEN
1. ÖFFNEN MIT WERKSCODE
Schritt 1: C-Taste drücken
Schritt 2: Werkscode 1 2 3 4 5 6 eingeben
Schritt3:#-Tastedrücken,imDisplayerscheintOPEndbegleitetvon
einer Melodie
Schritt4:drehenSiewährendderMelodiedenSafetürgriim
Uhrzeigersinn,umdieSafetürzuönen
Hinweis
Sollten Sie einen falschen Code eingegeben haben, werden Sie anstatt
dero.g.Melodieeinen3-fachenPieptonhörenundaufdemDisplay
erscheintError.SiekönnendenSafetürgrinichtdrehenbzw.denSafe
nichtönen.Nach5fehlerhaftenCodeeingabenwirddasSchlossfür5
MinutengesperrtundimDisplayerscheintdELAYbegleitetvonPieptönen
im Sekundentakt.
C > 1 > 2 > 3 > 4 > 5 > 6 > #
2. CODEÄNDERUNG.
BitteführenSiealleÄnderungenbeioenerSafetürdurchundtestenden
neuenCodemehrfach,bevorSiedieSafetürverschließen.
Schritt 1: #-Taste drücken
Schritt 2: gültigen Code eingeben
Schritt 3: #-Taste drücken
Schritt 4: neuen 4 bis 16-stelligen Code eingeben
Schritt 5: #-Taste drücken
Beispiel:
Falls der bisherige Code 1 2 3 4 5 6 ist und der neue Code 4 2 4 2 werden
soll geben Sie wie nachfolgend beschrieben ein:
# 1 2 3 4 5 6 # 4 2 4 2 #
UmdiekorrekteÄnderungzubestätigenerscheintimDisplayEnTErd
begleitetvoneinerMelodie.
# > 1 2 3 4 5 6 > # > 4 2 4 2 > #
3. FUNKTION 4-AUGEN-PRINZIP / ZWEITCODE ANLEGEN
(DER SAFE KANN NUR NOCH MIT 2 VERSCHIEDENEN
CODES GEÖFFNET WERDEN).
BitteführenSiealleÄnderungenbeioenerSafetürdurchundtestenden
neuenCodemehrfach,bevorSiedieSafetürverschließen.
Schritt 1: Drücken Sie den M-Knopf in der Tür-Innenseite
Schritt 2: 2-Taste drücken
Schritt 3: #-Taste drücken
Schritt 4: neuen Zweitcode eingeben
Schritt 5: #-Taste drücken
UmdiekorrekteProgrammierungzubestätigenerscheintimDisplay
EnTErdbegleitetvoneinerMelodie.
Beispiel:
FallsderErstcode4242istundderZweitcode6789werdensollgeben
Siewienachfolgendbeschriebenein.ImDisplayerscheintimAnschluss
EnTErdbegleitetvoneinerMelodie.
M > 2 > # > 6 7 8 9 > #
4. 4-AUGEN-PRINZIP AKTIVIEREN
Schritt 1: Drücken Sie den M-Knopf in der Tür-Innenseite
Schritt 2: 9-Taste drücken
Schritt3:#-Tastedrücken,umdieAktivierungzubestätigenerscheintim
DisplaydUALbegleitetvoneinemlangenPieptonM > 9 > #
5. ARBEITEN IM 4-AUGEN-PRINZIP
Schritt 1: C-Taste drücken, im Display erscheint dual
Schritt2:Erstcode4242eingeben
Schritt 3: #-Taste drücken, eine Melodie bestätigt die korrekte
Codeeingabe
Schritt4:innerhalbvon5MinutendenZweitcodeeingeben
Schritt5:#-Tastedrücken,imDisplayerscheintOPEndbegleitetvon
einerMelodie,SiekönnendenGrinundrehenbzw.denSafe
önen
Esistegal,obSieerstdenErstcode,oderdenZweitcodeeingeben.
C > 4 2 4 2 > # > 6 7 8 9 > #
6. 4-AUGEN-PRINZIP DEAKTIVIEREN
Schritt 1: Drücken Sie den M-Knopf in der Tür-Innenseite
Schritt 2: 9-Taste drücken
Schritt3:#-Tastedrücken,umdieDeaktivierungzubestätigenerscheint
imDisplaySinGLE,begleitetvoneinemlangenPiepton.Der
Zweitcodeistjetztautomatischgelöscht.
M > 9 > #
7. FUNKTION VERDECKTE CODEEINGABE BZW. TÖNE
AUSSCHALTEN
Aktivierung-DrückenSiedenM-KnopfinderTür-Innenseite.imDisplay
erscheintHIdE
Deaktivierung-DrückenSiedenM-KnopfinderTür-Innenseite
M > 7 > #
8. SPIONAGESICHERE CODEEINGABE.
DergültigeCodekanndurchhinzufügenzufälligerZahlenvor,odernach
demgültigenCode,jederzeit„verschleiert“werden.DieseFunktionwurde
entwickeltumdasAusspähenfürmöglicheKriminelleunmöglichzu
machen.DieseFunktionkannauchmitFunktion7(sieheoben)kombiniert
werden.
Beispiel:
Personalcodeissetas4242Randomprexnumbers61Randomsux
numbers 91507
Schritt 1: C-Taste drücken
Schritt 2: 61 4 2 4 2 91507 eingeben
Schritt 3: #-Taste drücken
ImDisplayerscheintOPEnd.
C > 61 4 2 4 2 91507 > #
9. FUNKTION ALARM
Aktivierung-DrückenSiedenM-KnopfinderTür-Innenseite.imDisplay
erscheintALErTM > 8 > #
Deaktivierung
Schritt 1: C-Taste drücken
Schritt 2: gültigen Code eingeben
Punkt3: #-Tastedrücken,umdieDeaktivierungzubestätigenerscheint
imDisplayOPEndbegleitetvoneinerMelodie
C > Personal Code > #
10. DIE LEBENSDAUER DER BATTERIEN BETRÄGT BEI
DREIMALIGER BENUTZUNG AM TAG CA. 1 JAHR.
DIE BATTERIEN SIND ZU WECHSELN WENN:
1. imDisplayLObAtterscheint,gefolgtvoneinemkurzenPiepton
2. trotzkorrekterCodeeingabesichderSafenichtönenlässt
11. BATTERIES
UmdasSchlosszuaktivierenbenötigenSie4xAAABatterien
à1,5Volt.AltbatteriengehörennichtindenHausmüll.Die
BatteriensolltenzurEntsorgungzueinergeeignetenSammel-
stellegebrachtwerden.SiekönnenIhregebrauchten
BatterienauchunentgeltlichandieVerkaufsstelle
(Versandlager)schicken.
GERMAN
Eingabeeinheit,inkl.LCDAnzeige
C-Taste
Start-Taste
# Taste
SitzderBatterie
inderEingabeeinheit
2.UmdasBatteriefachzuönen,
drückenSiedieÖnungsmarkierungan
derEingabeeinheitundschwenkendas
Oberteilnachlinks.
1.Entfernen
Sie aus der
Eingabeeinheitdie
Sicherungsschraube
Oberteil Unterteil
Batteriefachönen
OPERATING INSTRUCTIONS FOR DS2500E
& GUARANTEE REGISTRATION

Ph Sf Cpny r eac n s gurte
DS2500 ANLEITUNG ZUR BODENMONTAGE
MODEL A B C D
DS2501 123 143 149 131
DS2502 123 143 149 131
DS2503 180 180 220 180
WÄHLEN SIE EINEN AUFSTELLUNGSORT
1. WählenSieeinenPlatz,andemSieungehindertenZugriaufden
SafehabenundsichdieTürganzönenläßt.
2. StellenSiesicher,daßderBodenebenist.
3. AmgünstigstenisteinBetonuntergrund.
BOHREN UND SCHRAUBEN
1. Stellen Sie den Safe in die gewünschte Position. Markieren Sie nun
denUmrißdesSafesaufdemFußboden.
2. ÖnenSiedieSafetür.
3. ÜbertragenSiedieBohrlöcherimBodendesSafesmitHilfedes
BleistiftsaufdenFußboden.
4. RückenSiedenSafezurSeite,damitSieandieMarkierungenauf
demFußbodenkommen.
5. BevorSiebeginnenmitdemBohreinsatzzubohren,messenSiemit
HilfedesLineals60mmvonderBohrerspitzenachhintenabund
kennzeichnenSiedieStellemiteinemKlebeband,damitSieden
Bohrernichtzutiefeinführen.
6. BohrenSienunLöchermiteinemDurchmesservon12mminden
Fußbodenbisandie60mmMarkierung.
7. ReinigenSiedenUntergrundandenBohrlöchern.
8. Die Schrauben bestehen aus drei Teilen:
a.EineVierkantkopfschraube
b.EineSpreitzhülse
c.EineU-Scheibe
9. FügenSiedieSpreitzhülsenindiebeidenBohrlöcherein.
10. Rücken Sie den Safe wieder in die gewünschte Position, stecken Sie
dieSchraubeninkl.U-ScheibendurchdenSafeindieBohrlöcherund
ziehenSiedieSchraubensofestwiemöglichfest.
IHR TRESOR IST NUN AM BODEN VERANKERT.
DIE DATENBOX UNTEN IM TRESOR BEFESTIGEN
Die 2 beigefügten beidseitigen Klebestreifen an der Rückwand der Daten-
boxbefestigenunddieseanderRückwanddesSafesxieren.
INSERIRE 4 PILE AAA COME ILLUSTRATO
1. PRIMA APERTURA CON CODICE IMPOSTATO IN
FABBRICA
1. Premere il tasto ‘C’
2. Digitare il codice fabbrica ‘ 1 2 3 4 5 6’
3. Premereiltasto‘#’,sisentiràunamelodiaesuldisplayappariràla
confermaOPEnd
4. GirareilPomelloolaManigliainsensoorarioedaprirelosportello
durante il suono della melodia
Attenzione:
Nelcasovengainseritouncodiceerrato,suldisplayappariràErroresi
sentiràunavvertimentosonoro.Seuncodiceerratovieneinseritoper
cinquevolte,lachiusurasibloccheràpercinqueminuti,sisentiràunav-
vertimentosonoroesuldisplayappariràdELAY
C > 1 > 2 > 3 > 4 > 5 > 6 > #
2. IMPOSTARE UN NUOVO CODICE PERSONALE.
Siconsigliadiimpostareunnuovocodiceconsportelloapertoeveri-
carneilfunzionamentoprimadichiuderelosportello.
1. Premere il tasto ‘#’
2. Digitare il codice in uso.
3. Premere il tasto ‘#’.
4. Digitareilnuovocodice4~16cifre.
5. Premere il tasto ‘#’.
PerEsempio:
Seilcodiceinusoè123456esivuoleimpostareunnuovocodicea
quattrocifre4242,procederecomeindicatodiseguito:
# 1 2 3 4 5 6 # 4 2 4 2 #
SuldisplayappariràlascrittaEnTErdedunbrevestaccosonorodi3
secondiconfermeràilcambiamentoa4242
# > 1 2 3 4 5 6 > # > 4 2 4 2 > #
3. IMPOSTARE LA FUNZIONE DOPPIO CONTROLLO CHE
PREVEDE L’INTERVENTO DI DUE OPERATORI CON
CODICI PERSONALI INDIVIDUALI PER SBLOCCARE LA
CHIUSURA.
Con sportello aperto impostare il secondo codice.
1. Premereiltastomemoria(M)sulretrodellosportello.
2. Premere il tasto ‘2’
3. Premere il tasto ‘#’
4. Digitare il secondo Codice personale
5. Premere il tasto ‘#’
IldisplaymostreràlascrittaEnTErdedunbrevestaccosonorodi3
secondiconfermeràl’accettazionedelsecondocodice.
PerEsempio:
Seilcodiceinusoè4242evienedecisocomesecondocodicea
quattrocifre6789,premereitasticomeindicatodiseguito.Lascritta
EnTErdappariràsuldisplayconfermatadaunbrevestaccosonoro.
M > 2 > # > 6 7 8 9 > #
4. ATTIVARE IL DOPPIO CONTROLLO
1. Premereiltastomemoria(M)sulretrodellosportello.
2. Premere il tasto ‘9’
3. Premere il tasto ‘#’
M > 9 > #
ITALIAN
TastieraeDisplayLCD
Tasto C
TastodiAvvio
Tasto #
PosizionePile
sotto la Tastiera
2. Premi l’immagine di apertura della
tastieraperliberarneilssaggioefarla
roteare in alto e a sinistra.
1.Rimuoverevite
dissaggiotastiera
Parte
superiore
Parte
inferiore
AprireAlloggiamentoPile
OPERATING INSTRUCTIONS FOR DS2500E
& GUARANTEE REGISTRATION

Ph Sf Cpny r eac n s gurte
5. USO DELLA FUNZIONE DOPPIO CONTROLLO
1. PremereiltastoC.Appariràlascrittadual
2. Digitare il primo codice 4 2 4 2
3. Premereiltasto‘#’.Unbrevestaccosonorodi3secondiconfermerà
l’esatta immissione del codice
4. Entro5minutidigitareilsecondocodice6789
5. Premereiltasto‘#.Unbrevestaccosonorodi3secondiconfermerà
l’esattaimmissionedelcodiceelascrittaOPEndappariràsuldisplay
elachiusurasaràsbloccata.
I codici possono essere immessi in qualsiasi ordine.
C > 4 2 4 2 > # > 6 7 8 9 > #
6. DISATTIVARE IL DOPPIO CONTROLLO
1. Premereiltastomemoria(M)sulretrodellosportello.
2. Premere il tasto ‘9’
3. Premereiltasto‘#’.Unbrevestaccosonorodi3secondiconfermerà
ladisattivazioneelascrittaSinGLEappariràsuldisplay.Ilsecondo
codicesaràautomaticamentecancellato.
M > 9 > #
7. NASCONDERE IL CODICE DAL DISPLAY E SPEGNERE
IL SONORO DELLA TASTIERINA.
Attivare-Premereiltastomemoria(M)sulretrodellosportello.Lascritta
HIdEappariràsuldisplay
Disattivare-Premereiltastomemoria(M)sulretrodellosportello
M > 7 > #
8. COME NASCONDERE IL CODICE DI IMMISSIONE IN
UNA SEQUENZA NUMERICA.
Ilcodicepuòesserecamuatoinserendonumeriacasoprima,dopo
oppuresiaprimachedopoilcodicepersonale.Questaproceduraèstata
studiataperaumentarelasicurezzaeconfondereeventualiosservatori
neltentativodimemorizzareilcodice.Questafunzionepuòessereusata
ancheconcodicenascostoetastierinasilenziosadicuialpunto7sopra
indicato.
PerEsempio
Ilcodicepersonaleè4242Numeropressoacaso:61Numerosusso
a caso 91507
1. Premere il tasto C
2. Digitare il codice come 61 4 2 4 2 91507
3. Premere il tasto ‘#’
SuldisplayappariràlaconfermaOPEnd
C > 61 4 2 4 2 91507 > #
9. IMPOSTARE L’ALLARME
Attivare-Premereiltastomemoria(M)sulretrodellosportelloSuldisplay
appariràlascrittaALErTM > 8 > #
Disattivare
1. Premere il tasto ‘C
2. Digitare il Codice Personale
3. Premereiltasto‘#’Unbrevestaccosonorodi3secondiconfermeràla
disattivazioneelascrittaOPEndappariràsuldisplay
C > Personal Code > #
10. DURATA PILE: 1 ANNO 3 VOLTE AL GIORNO.
SOSTITUIRE LE PILE QUANDO:
1. LascrittaLObAttapparesuldisplayaccompagnatadaunbreve
avvertimentosonoro.
2. Vieneinseritoilcodicecorrettomalachiusuranonsisblocca.
3. Ancheselepilesonocompletamenteesaurite,icodicinonverranno
persi.
11. BATTERIES
4x1,5VbatteriealcalineAAAsononecessariperattivareil
blocco.Noneliminarelepileusateinsiemeairiutidomestici.
Eliminarelepileneicentridiraccoltapreposti.E’possibile
restituirelepileusatealpropriorivenditoreasuespese(dove
indicato).
DS2500 ISTRUZIONI PER FISSAGGIO ALLA BASE
MODEL A B C D
DS2501 123 143 149 131
DS2502 123 143 149 131
DS2503 180 180 220 180
SCEGLIERE DOVE INSTALLARE LA CASSAFORTE
1. Scegliereunaposizionechenonostacolil’accessoel’aperturadello
sportello.
2. Assicurarsicheilpavimentosiapiano.
3. Perunrisultatoottimale,siconsigliaunpavimentoincemento.
FORARE & IMBULLONARE
1. Posizionarelacassafortenelluogodesiderato.Conunamatita
tracciarelasagomadellacassafortesulpavimento.
2. Aprirelosportellodellacassaforte
3. Conlamatitacontrassegnareattraversoiforidellabaseipuntisul
pavimentodovepraticareiforiperilssaggio.
4. Quindispostarelacassafortedaunlato,inmododaaveraccessoai
contrassegnisulpavimento.
5. Prima di usare la punta di trapano, con un righello misurare 60mm
dall’apicedellapuntaeavvolgereunpezzodinastroadesivoattorno
allapuntainmododanontrapanaretroppoinprofondità.
6. Praticareforida12mmnelpavimentonoaraggiungimentodei
60mmcontrassegnatidalnastroadesivo.
7. Pulireilpavimentoattornoaifori.
8. I bulloni sono composti da tre parti:
a.Unbullone
b.Untasselloinplasticaadespansione
c.UnaRondellainacciaio
9. Inserire i tasselli nei fori ottenuti con il trapano.
10. Riposizionarelacassafortenelluogoselezionato,inserireibullonicon
lerondelleneiforiattraversolabasedellacassaforteeilpavimento,
stringeresaldamentenoinfondo.
LA CASSAFORTE È ORA FISSATA ALLA BASE.
FISSARE IL DATABOX DENTRO LA CASSAFORTE
ApplicaresulretrodelDataboxle2striscetteadhesiveindotazione.
AggereilDataboxsullapareteposteriore,infondoallacassaforte.
OPERATING INSTRUCTIONS FOR DS2500E
& GUARANTEE REGISTRATION

Ph Sf Cpny r eac n s gurte
INSERTAR 4 PILAS AAA SEGÚN ESQUEMA
1. PRIMERA APERTURA CON EL CÓDIGO DE FÁBRICA
1. Pulsar la tecla “C”
2. Introducir el código de fábrica “ 1 2 3 4 5 6 “
3. Pulsar la tecla #. Se escuchará un tono y en la pantalla aparecerá
OPEnd.Mientrassuenaestetono,gireeldispositivodeaperturaenel
sentidodelasagujasdelrelojparaabrirlapuerta.
Advertencia
Siseintroduceuncódigoerróneo,apareceráErrorenlapantallaysonará
untonodeaviso.Siseintroduceuncódigoerróneocincoveces,lacer-
raduraquedarábloqueadadurantecincominutosyseescucharáuntono
deavisoyenlapantallaaparecerálapalabradELAY.
C > 1 > 2 > 3 > 4 > 5 > 6 > #
2. INTRODUCCIÓN DE UN NUEVO CÓDIGO PERSONAL.
Serecomiendaintroducirelnuevocódigoconlapuertaabiertaycompro-
bar su funcionamiento antes de
cerrarla.
1. Pulsar la tecla #
2. Introducirelnuevocódigo
3. Pulsar la tecla #
4. Introducirelnuevocódigode4–16dígitos
5. Pulsar la tecla #
Ejemplo:
Sielcódigoes123456ydeseasustituirloporunodecuatrodígitos
(porej.:4242),pulsarlasteclasdelasiguientemanera:
# 1 2 3 4 5 6 # 4 2 4 2 #
EnlapantallaapareceráENTERyseescucharáunbrevetonodurante3
segundosconrmandoelcambioa4242
# > 1 2 3 4 5 6 > # > 4 2 4 2 > #
3. AJUSTE DE LA FUNCIÓN “DOBLE CONTROL”. SON
NECESARIOS DOS OPERADORES CON CÓDIGOS
PERSONALES INDIVIDUALES PARA ABRIR LA CAJA.
Con la puerta abierta, marcar el segundo código.
1. Pulseelbotóndememoria“M”localizadoenlapartetraseradela
puerta.
2. Pulsar la tecla “2”
3. Pulsar la tecla #
4. Introducir el 2º código personal
5. Pulsar la tecla “#”
EnlapantallaapareceráENTERyseescucharáunbrevetonodurante3
segundosconrmandolaentradadel2ºcódigo
Ejemplo:
Si el primer código es 4 2 4 2 y se ha introducido un 2º código de cuatro
dígitos(porej.:6789),pulsarlasteclascomoseindicaacontinuación.
M 2 # 6 7 8 9 #
ApareceráentoncesenlapantallaENTERjuntoconunbrevetonode
conrmación.
M > 2 > # > 6 7 8 9 > #
4. ACTIVACIÓN DEL “DOBLE CONTROL”
1. Pulseelbotóndememoria“M”localizadoenlapartetraseradela
puerta.
2. Pulsar la tecla ”9”
3. Pulsar la tecla “#”
M > 9 > #
5. APERTURA DE LA CAJA CON LA FUNCIÓN “DOBLE
CONTROL”
1. AlpulsarlateclaC,aparecerálapalabradual
2. Introducir el primer código 4 2 4 2
3. Alpulsarlatecla“#”,seescucharáunbrevetonodurante3segundos,
queconrmaqueelcódigoescorrecto.
4. Dentro de los 5 minutos siguientes, introducir el segundo código 6 7
8 9
5. Pulsarlatecla“#”yseescucharáunbrevetonodurante3segun-
dos,queconrmaqueelsegundocódigoescorrecto.Enlapantalla
aparecerálapalabraOPENysucajaquedaráabierta.
Cada código puede introducirse indistintamente en primer o segundo
lugar.
C > 4 2 4 2 > # > 6 7 8 9 > #
6. DESACTIVACIÓN DEL “DOBLE CONTROL”
1. Pulseelbotóndememoria“M”localizadoenlapartetraseradela
puerta.
2. Pulsar la tecla “9”
3. Alpulsarlatecla“#”seescucharáunbrevetonodurante3segundos
conrmandoladesactivación.EnlapantallaapareceráSINGLE.El
segundocódigohaquedadoborrado.
M > 9 > #
7. OCULTAR EL CÓDIGO EN PANTALLA Y SILENCIAR EL
SONIDO DEL TECLADO
Activar-Pulseelbotóndememoria“M”localizadoenlapartetraserade
lapuerta(HIdEenlapantallaaparece)
Desactivar-Pulseelbotóndememoria“M”localizadoenlapartetrasera
de la puerta
M > 7 > #
8. PARA OCULTAR EL CÓDIGO, MARCAR UNA
SECUENCIA DE NÚMEROS.
Elcódigopersonalsepuededisfrazarintroduciendonúmerosdeforma
arbitrariaantes,después,obienantesydespuésdelmismo.Este
proceso se ha concebido para añadir seguridad y confundir a un potencial
observadorquetratasedememorizarelcódigo.Estafunciónpuede
usarsetambiénconelcódigoocultoyeltecladoensilenciocomose
indica anteriormente en el punto 7
Ejemplo:
Códigopersonal:4242.Prejoarbitrario:61.Sujoarbitrario:91507
1. Pulsar la tecla C
2. Introducir el código de la siguiente manera: 61 4 2 4 2 91507
3. Pulsar la tecla “#”
EnlapantallaapareceráOPEnd
C > 61 4 2 4 2 91507 > #
9. AJUSTE DE LA ALARMA
Activar-Pulseelbotóndememoria“M”localizadoenlapartetraserade
lapuertaenlapantallaapareceALErTM > 8 > #
Desactivar
1. Pulsar la tecla “C”
2. Introducir el código personal
3. Alpulsarlatecla“#”seescucharáunbrevetonodurante3segundos
conrmandoladesactivacióndelaalarma.Enlapantallaaparecerá
OPEnd.
C > Personal Code > #
10. DURACIÓN DE LAS PILAS
Si se produce una media de tres operaciones diarias, el tiempo estimado
deduraciónserádeunaño.Lasustitución
de las pilas será necesaria cuando:
1. EnlapantallaaparezcaLObAttacompañadadeuntonodeaviso
2. Introduciendo el código correcto la cerradura no abre
3. Loscódigosnosepierdeninclusoconlaspilastotalmente
descargadas
SPANISH
TecladoypantallaLCD
Tecla C
Tecla de inicio
#Button
Colocación de las
pilasbajoelteclado
2. Presionar la marca de apertura
del teclado, para liberar el pestillo de
sujeciónygirareltecladohaciaarribay
alaizquierdaparaabrir.
1. Retirar el tornillo
quesujeta
el teclado
Parte
superior
Parte
inferior
Aperturadelcompartimento
de pilas
OPERATING INSTRUCTIONS FOR DS2500E
& GUARANTEE REGISTRATION

Ph Sf Cpny r eac n s gurte
11. PILAS
Para el funcionamiento de la cerradura son necesarias 4 pilas
1,5VAAAalcalinas.Depositesiemprelaspilasusadasen
lospuntosindicadospararecogidadelasmismas.Nuncatire
laspilasusadasalabasuraconvencional.Enalgunospaíses
existentiendasocadenasdegrandessuperciesqueaceptan
recibirlaspilasusadas,cubriendoelloslosgastosdeenvío.
GUARANTEE REGISTRATION
Pleasesubmityourguaranteeregistrationbyvisitingourwebsite
www.phoenixsafe.comandclickingonguaranteeregistration.
For further assistance or information
please contact us on 0151 944 6444.
APEXHOUSE,1ORRELLMOUNT,LIVERPOOL,L206NS,
UNITEDKINGDOM|+44(0)1519446444
MANUEL D’UTILISATION POUR SERRURE
PS600 & GARANTIE
Pourunemeilleuresécurité,nousvousrecommandonsd’enregistrer
votregarantieenligneparnotresite:www.phoenixsafe.cometen
cliquantsurenregistrementdegarantie.
19RUEDESHALLES,16510VERTEUILSURCHARENTE,
FRANCE|0033(0)545896880
BEDIENUNGSANLEITUNG PS600 & GARANTIEKARTE
AusSicherheitsgründenempfehlenwirIhnen,IhreGarantiekarte
onlineaufunsererWebsitewww.phoenixsafe.comperMausklick
aufderSchaltäche„Garantieanmeldung“auszufüllen.
DEUTSCHLANDGMBH,BAHNSTR.23,
D-2327WUPPERTAL0049-202-69519-0
MANUALE OPERATIVO PER CHIUSURA PS600
& REGISTRAZIONE DELLA GARANZIA
Perunamaggioresicurezzaviraccomandiamodiinoltrarela
vostraregistrazionedellagaranziavisitandoilnostrositoweb:
www.phoenixsafe.comecliccandosuregistrazionedellagaranzia.
VIAMONTEROSA28,20049,CONCOREZZO,
MILAN,ITALY|390395965844
MANUAL DE INSTRUCCIONES PARA
CERRADURA HS6070, HS9070 & GARANTÍA
Paramayorseguridad,lerecomendamosquecuandoaccedaa
nuestrapáginawebwww.phoenixsafe.com,hagaclicenRegistrode
garantíaeintroduzcasuregistrodegarantía.
AVDA,DELAINDUSTRIA,52POLÍGONOINDUSTRIAL,
28820COSLADA,MADRID,ESPAÑA|0034(91)6736411
OPERATING INSTRUCTIONS FOR DS2500E
& GUARANTEE REGISTRATION
-
 1
1
-
 2
2
-
 3
3
-
 4
4
-
 5
5
-
 6
6
-
 7
7
-
 8
8


Phoenix DS2500E Bedienungsanleitung
- Typ
- Bedienungsanleitung
- Dieses Handbuch ist auch geeignet für
in anderen Sprachen
- English: Phoenix DS2500E Owner's manual
- français: Phoenix DS2500E Le manuel du propriétaire
- español: Phoenix DS2500E El manual del propietario
- italiano: Phoenix DS2500E Manuale del proprietario
Verwandte Papiere
-
Phoenix FS1910K Fire Commander Benutzerhandbuch
-
-
-
-
-
-
-
-
-
Sonstige Unterlagen
-
 SecureLine Secure Doc Office III Benutzerhandbuch
-
Arregui SUPRA Bedienungsanleitung
-
Kreator KRT692012 Bedienungsanleitung
-
Dicota DATABOX ALLROUND Benutzerhandbuch
-
-
Dormakaba LA GARD 700 Series Installationsanleitung
-
